This is the best Pâte Sablée, sweet shortcrust pastry tart shells recipe you'll ever need. It's a delicious, buttery shortcrust that makes perfect French tart shells! Making French shortcrust pastry - whether it is full-sized tart cases or mini tartlets - is one of the baking basics definitely worth mastering as a home baker!
This recipe was one of the first dessert basics I shared on my blog back in 2020. Over time, I've updated it with fresh photos, a new tart shell size, additional baking tips inspired by your questions, and several fillings and ingredient substitution options.
Read what others said about this recipe
"Your recipe is excellent. I have made the recipe a number of times now, and the tart shells turn out simply perfect. Thank you for your very clear instructions and for sharing your knowledge." Miss Glitteryone
"This is the best and only tart recipe that explains everything! I am not a super experienced baker, but I nailed it; thank you so much!" Emer
Best Pâte Sablée, Sweet Shortcrust Pastry Tart Shells
This is a professional Pâte Sablée tart case recipe adapted for home bakers in their own kitchens with 100+ 5* ratings.
Tarts and tartlets are one of the most popular pastries worldwide, and this recipe is one of the most popular on my blog. Unlike traditional American flaky pie crust, pate sablee makes a crispier and more cookie-like tart shell. There's no blind baking, and the result is a super delicious, buttery shortcrust that is a sweet but not too sweet, melt-in-the-mouth pastry dough.
The sable pastry recipe contains only a few basic ingredients - like butter, sugar, and flour - yet can be the base of the fanciest, most impressive desserts you will ever make.
In this Pate sablee tartlet shell recipe you will learn
- Using the right ingredients at the right temperature, e.g., 82% fat content European style high-quality unsalted butter used chilled
- Using the right equipment, e.g., perforated tart rings that ensure even baking without blind baking
- Learning the right technique, e.g., how to roll the pastry to an even thickness
I cover all the necessary information you probably haven't read elsewhere. So, your tart cases will turn out exactly like mine. No one will believe you made these neat, professional-looking Pâte Sablée tart cases yourself!
Katalin's Key Take On How hard it is to make homemade Pâte Sablée
Making homemade tart cases using this pâte sablée recipe is actually not that hard. However, it takes practice and precision. Temperature is everything, so you must master when to chill it and when it needs to warm up slightly. The dough will break if it is too cold, but the butter will melt, and it gets sticky if it is too warm. There is also a knack for rolling it to the correct thickness; that's perfectly even for the best tart crust.
The secret behind making beautiful, neat, and delicious French tart crust is all about mastering the technique, understanding how temperature plays in role while working with the dough, and using the right equipment.
This sweet shortcrust pastry tutorial is the only recipe you will ever need to read to make tartlets at home!

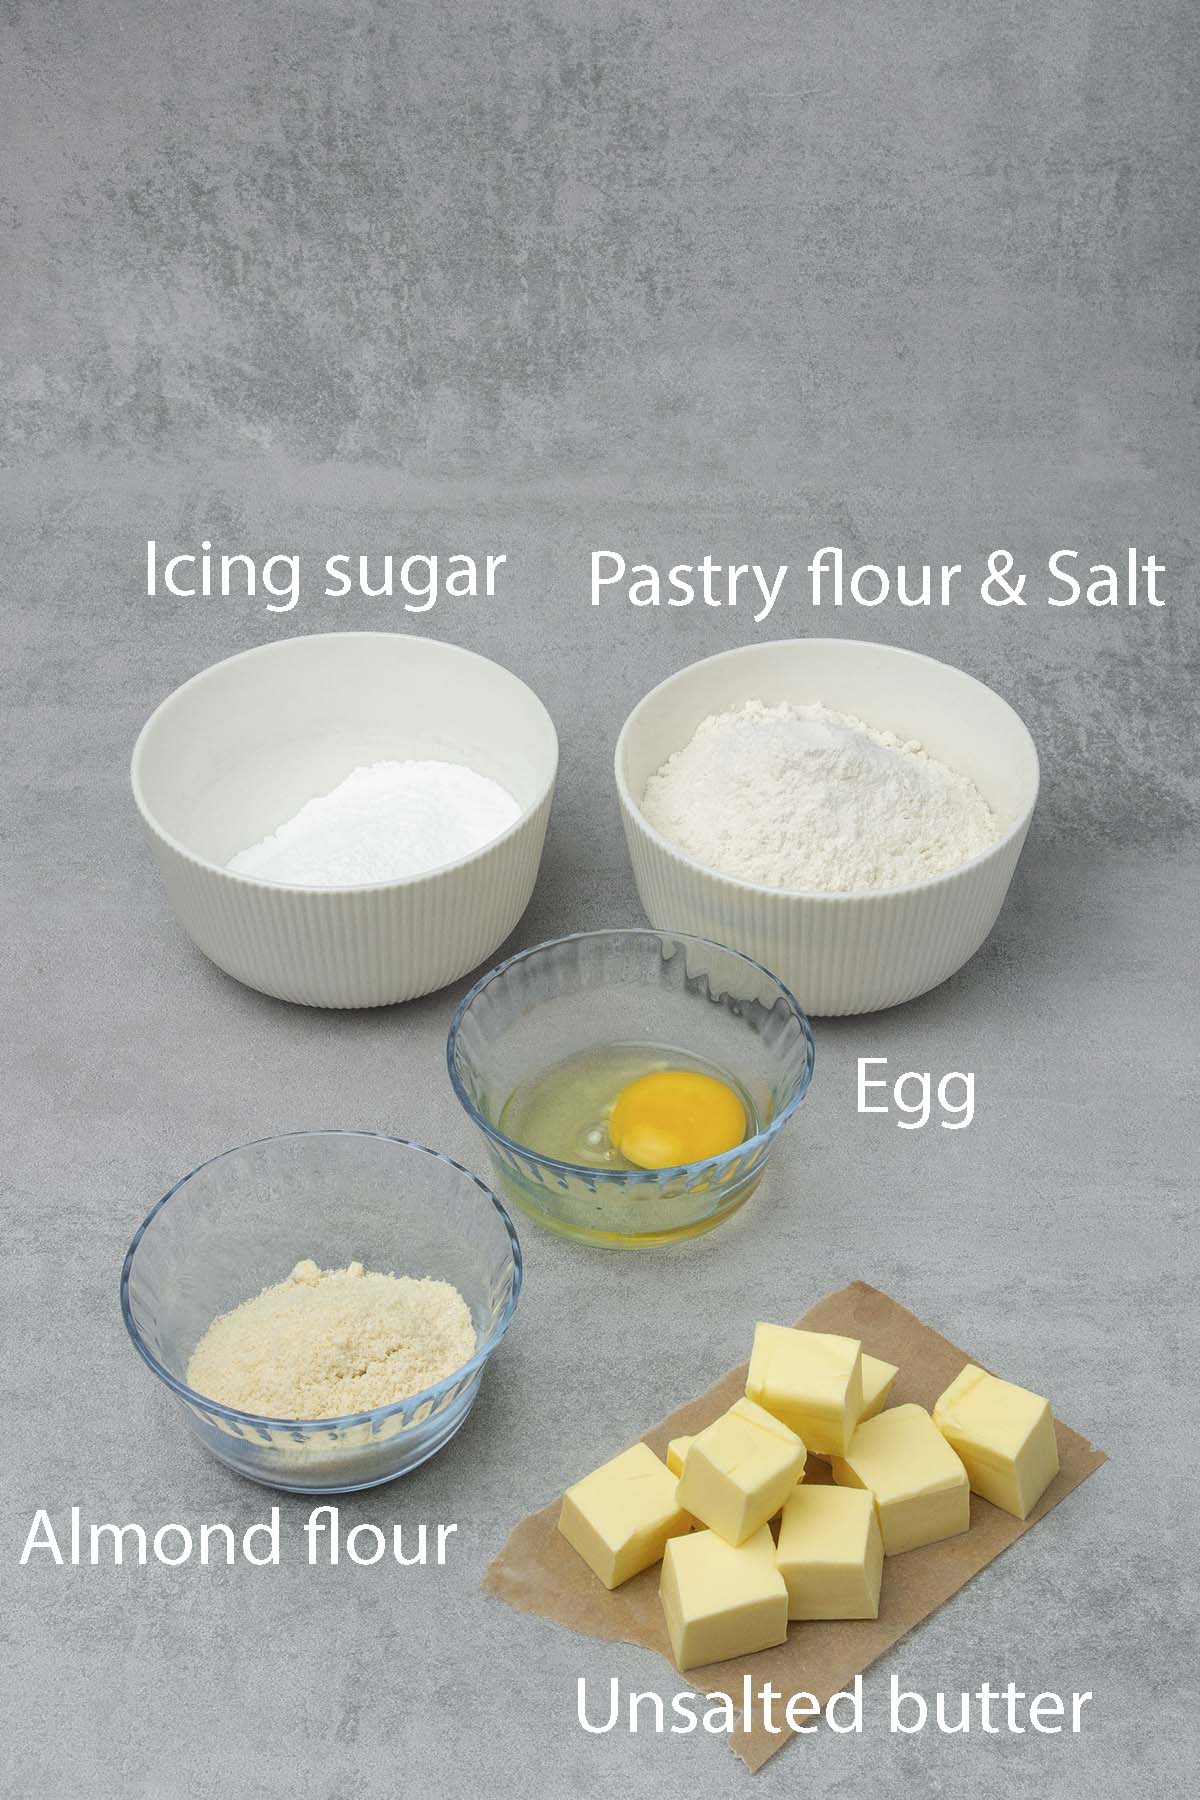
My best advice on the ingredients
You must use high-quality butter if you want the best buttery flavor in your pâte sablée. Use unsalted European-style butter with a fat content of at least 82%; it will really make a difference! The butter must be chilled. Take it out of the fridge and cut it into cubes. Then, place it into the freezer for 10-15 minutes before using it in this sweet pastry recipe.
I use pastry flour (which is lower in protein content) for this French tart shell recipe, but you can substitute it with all-purpose flour if you can't find it. Read my flour guide for more pro advice! I prefer to mix it with almond flour for a better taste and crispy texture. Buy good quality ground almonds without skin.
The recipe is also made with egg (which must be at room temperature) and a small amount of powdered sugar and salt, too. This makes the tart case sweet but not overly sweet and balanced while highlighting the delicious buttery flavor. Don't skip the salt!
My 5 minutes crumbling method to mix the shortcrust pastry dough
There are two methods in the pastry chefs' world to make sweet shortcrust pastry: the creaming method and the crumbling method. The creaming method requires the butter to be at room temperature, and it is creamed into the powdered sugar before adding everything else. I prefer the crumbling method as it keeps the butter (and the dough) chilled at all times, making it much easier to work with.
Here is how you do it:
Weigh out the butter, cut it into chunks, and place it in the freezer while you prepare the other ingredients. It is essential that the butter is really cold.
Weigh out the dry ingredients (the flour, powdered sugar, almond flour, and salt) and sift them into a bowl to avoid lumps.
To crumble the cold butter chunks into the flour mixture, add them into the bowl and rub the mixture between your hands until it reaches a sand-like texture.

Add the egg and bring the dough together with your hands. It might look crumbly, but do not add more wet or dry ingredients to the recipe. Knead the dough for one or two minutes with the palm of your hand until it becomes smooth. Work quickly to avoid melting the butter. Do not use a mixer or food processor.
Press the dough into a rectangular disk (making it easier to roll out) and wrap it in plastic food wrap. Place it in the refrigerator to chill for 10-15 minutes in case it has warmed and become sticky.
Steal my favorite rolling secret
Once the dough has cooled down, continue rolling it out.
Place it between two silicone baking mats and roll it to an even 2mm thickness. Roll it from top to bottom with an even pressure, and rotate it 90 degrees after each roll. The recipe quantity is designed so that once you roll the dough out, it will reach the silicone baking mats (41.9 x 29.5 cm, 16.5 x 11.5 inches) from edge to edge. You should not need any dusting flour.
Still between the mats, place the dough into the freezer for 10-15 minutes.

Now time to assemble the tart shells
Take the dough out of the freezer and peel off the top silicone mat. If the dough becomes too soft and warm to handle or seems sticky at any point in the following process, return it to the freezer for 5 minutes. It can tear if it is too warm, but it can break if it's too cold, so judging the correct temperature is vital.
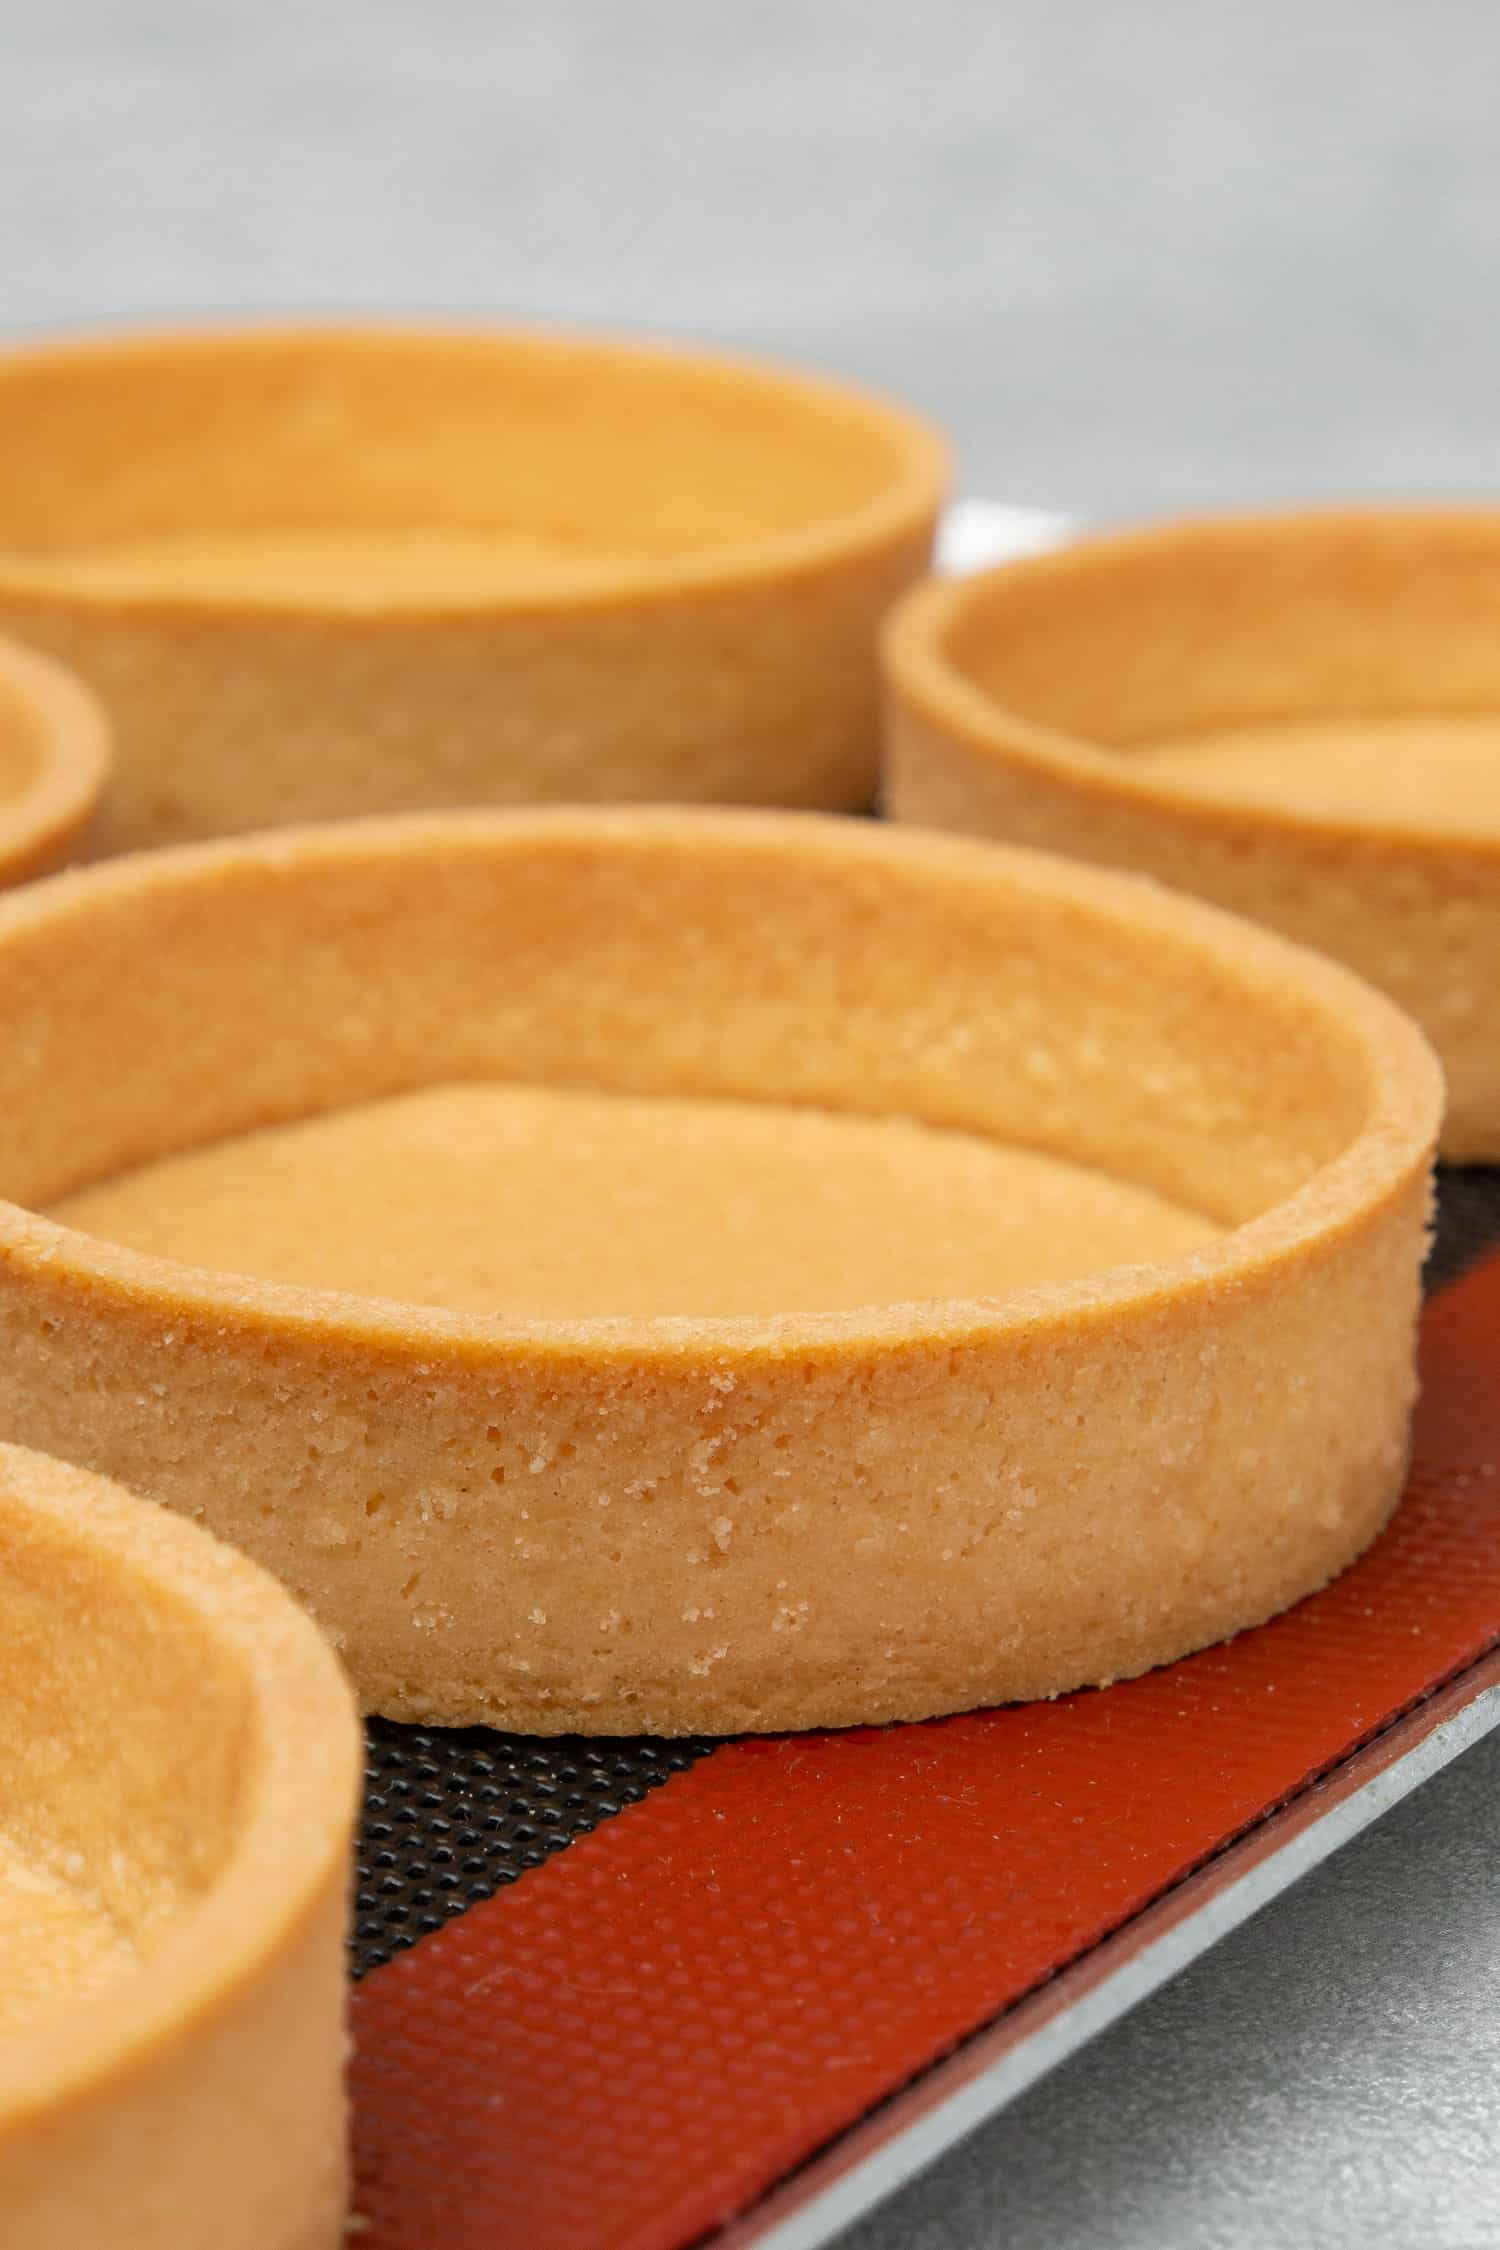
Cut eight long strips from the dough to form the sides of the tart (measure one of the rings to get the correct width, but we will trim them later, so don't worry if they are slightly too wide).
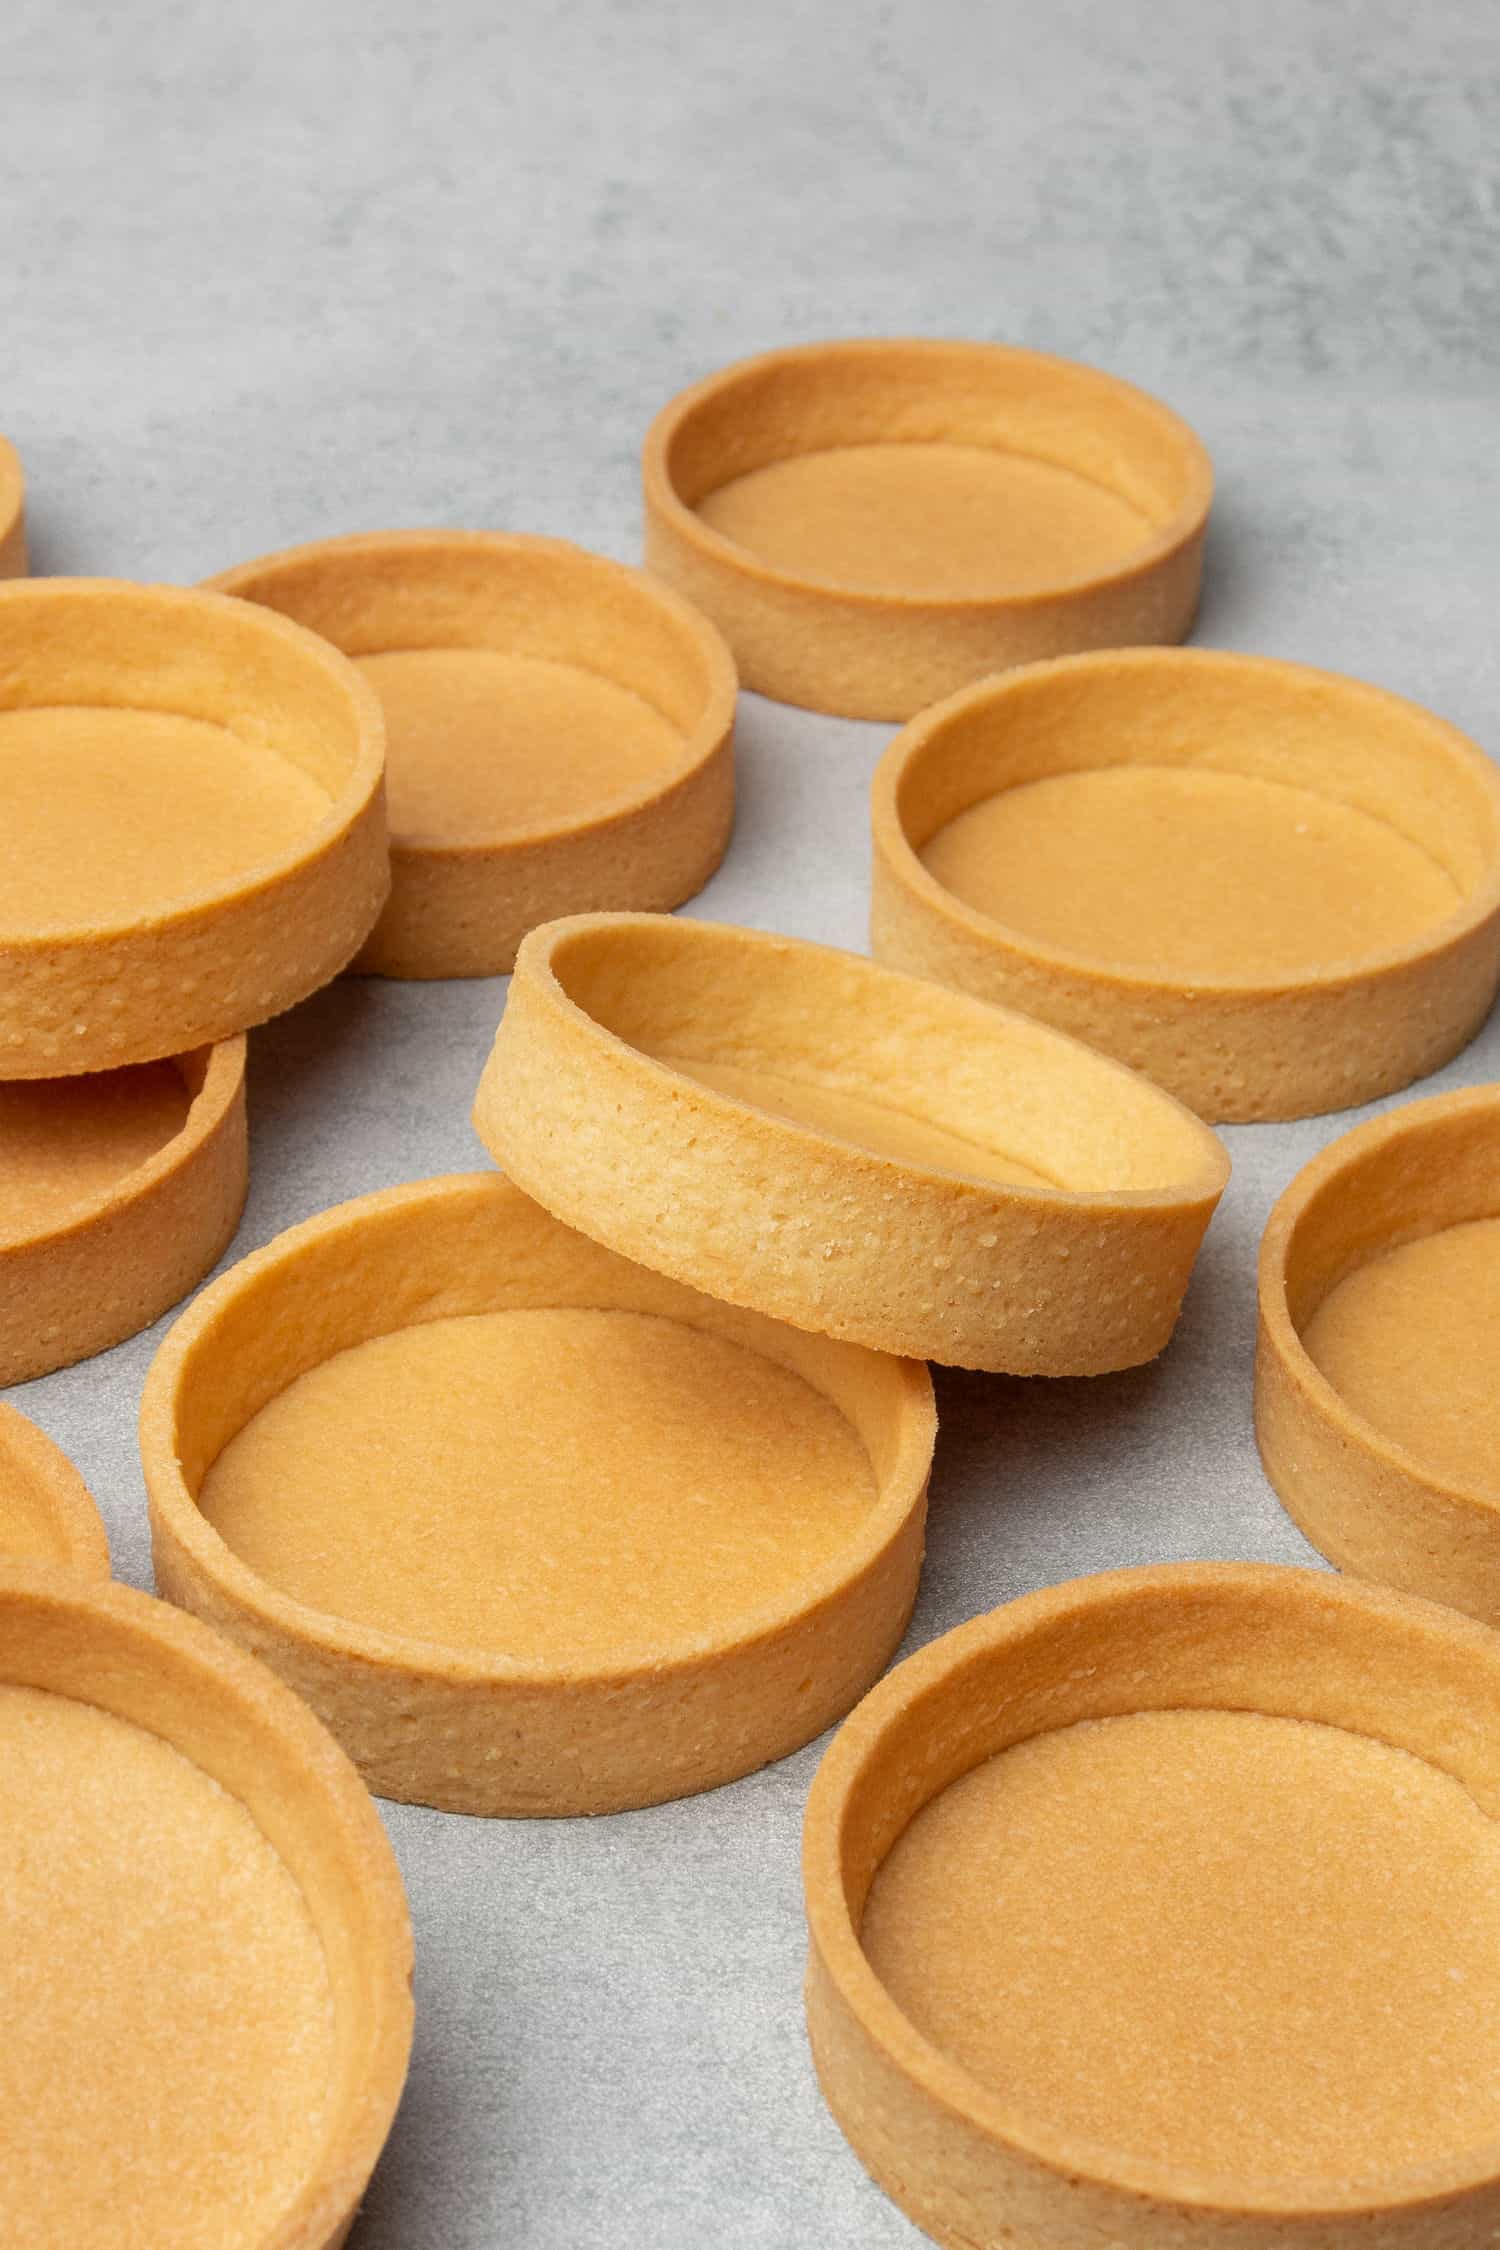
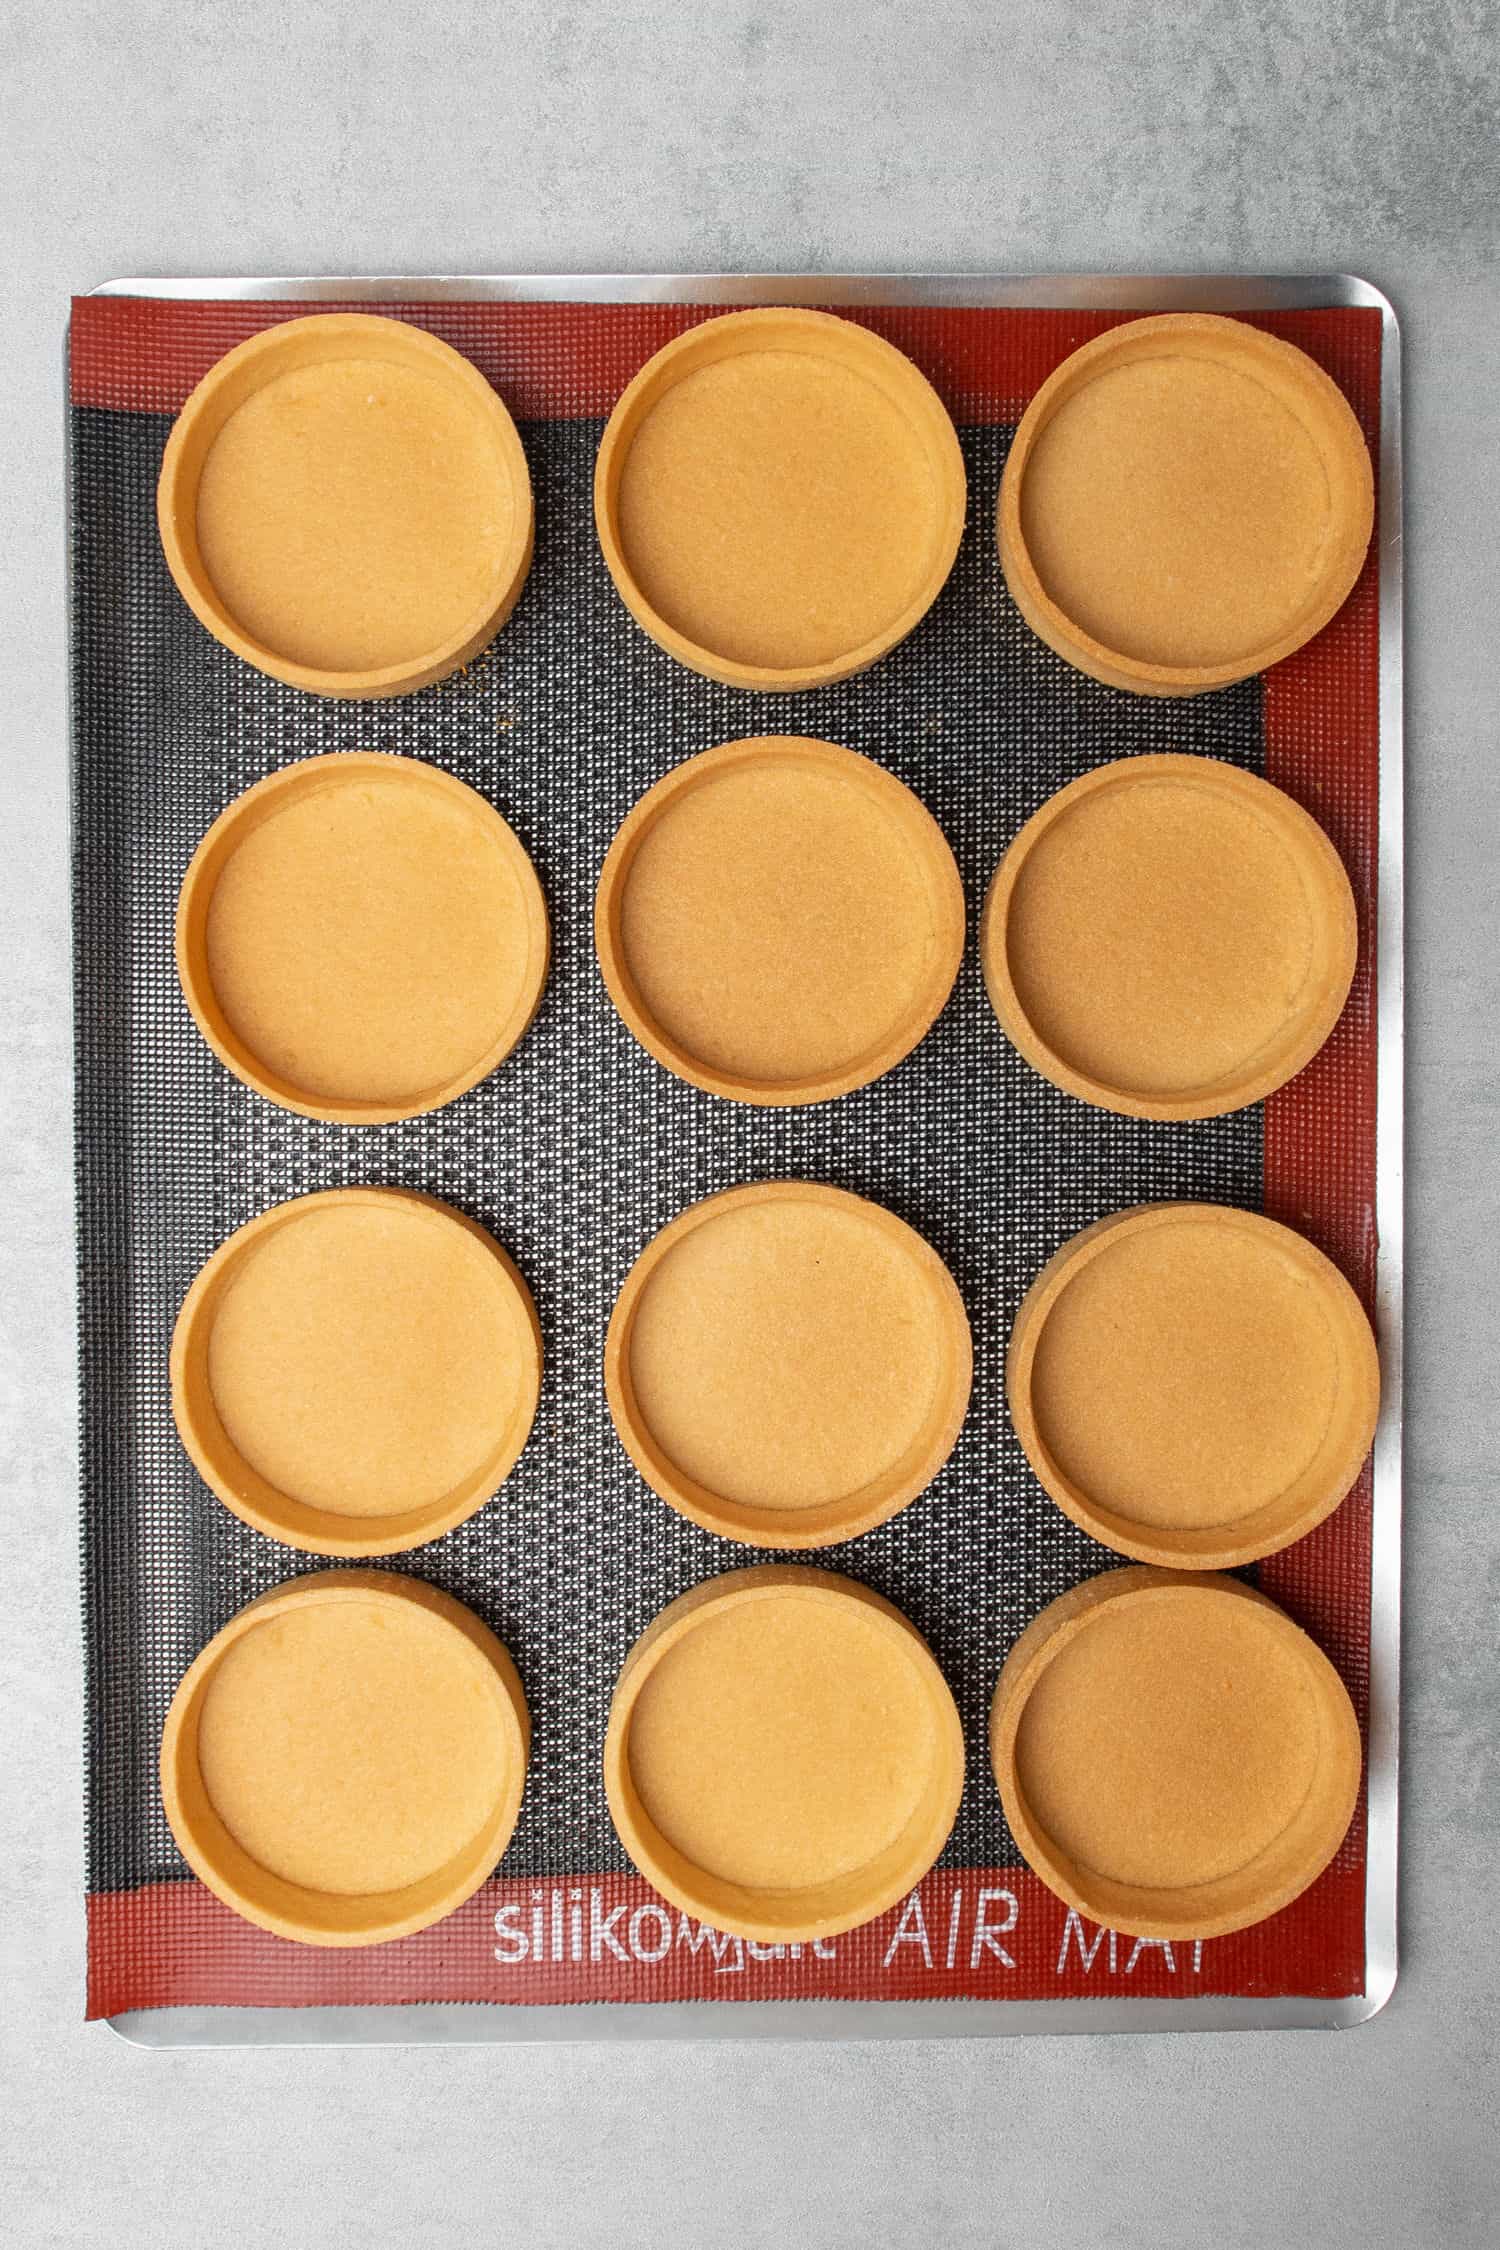
Then, use the base of a perforated tart ring to cut eight circles out of the remaining pastry dough. This will form the bottoms of your tarts. Carefully lift and place each base into the rings.

Now, take the strips and press each one into the sides of each ring and to the bottom to ensure it sticks together. It needs to be pliable enough that it doesn't break but not so warm that it is sticky to the touch.
Place the perforated tart rings with the pastry dough into the freezer for one hour. Don't skip this step!

Baking is the grand finale
Toward the end of the freezing time, preheat the oven to 160°C (320°F).
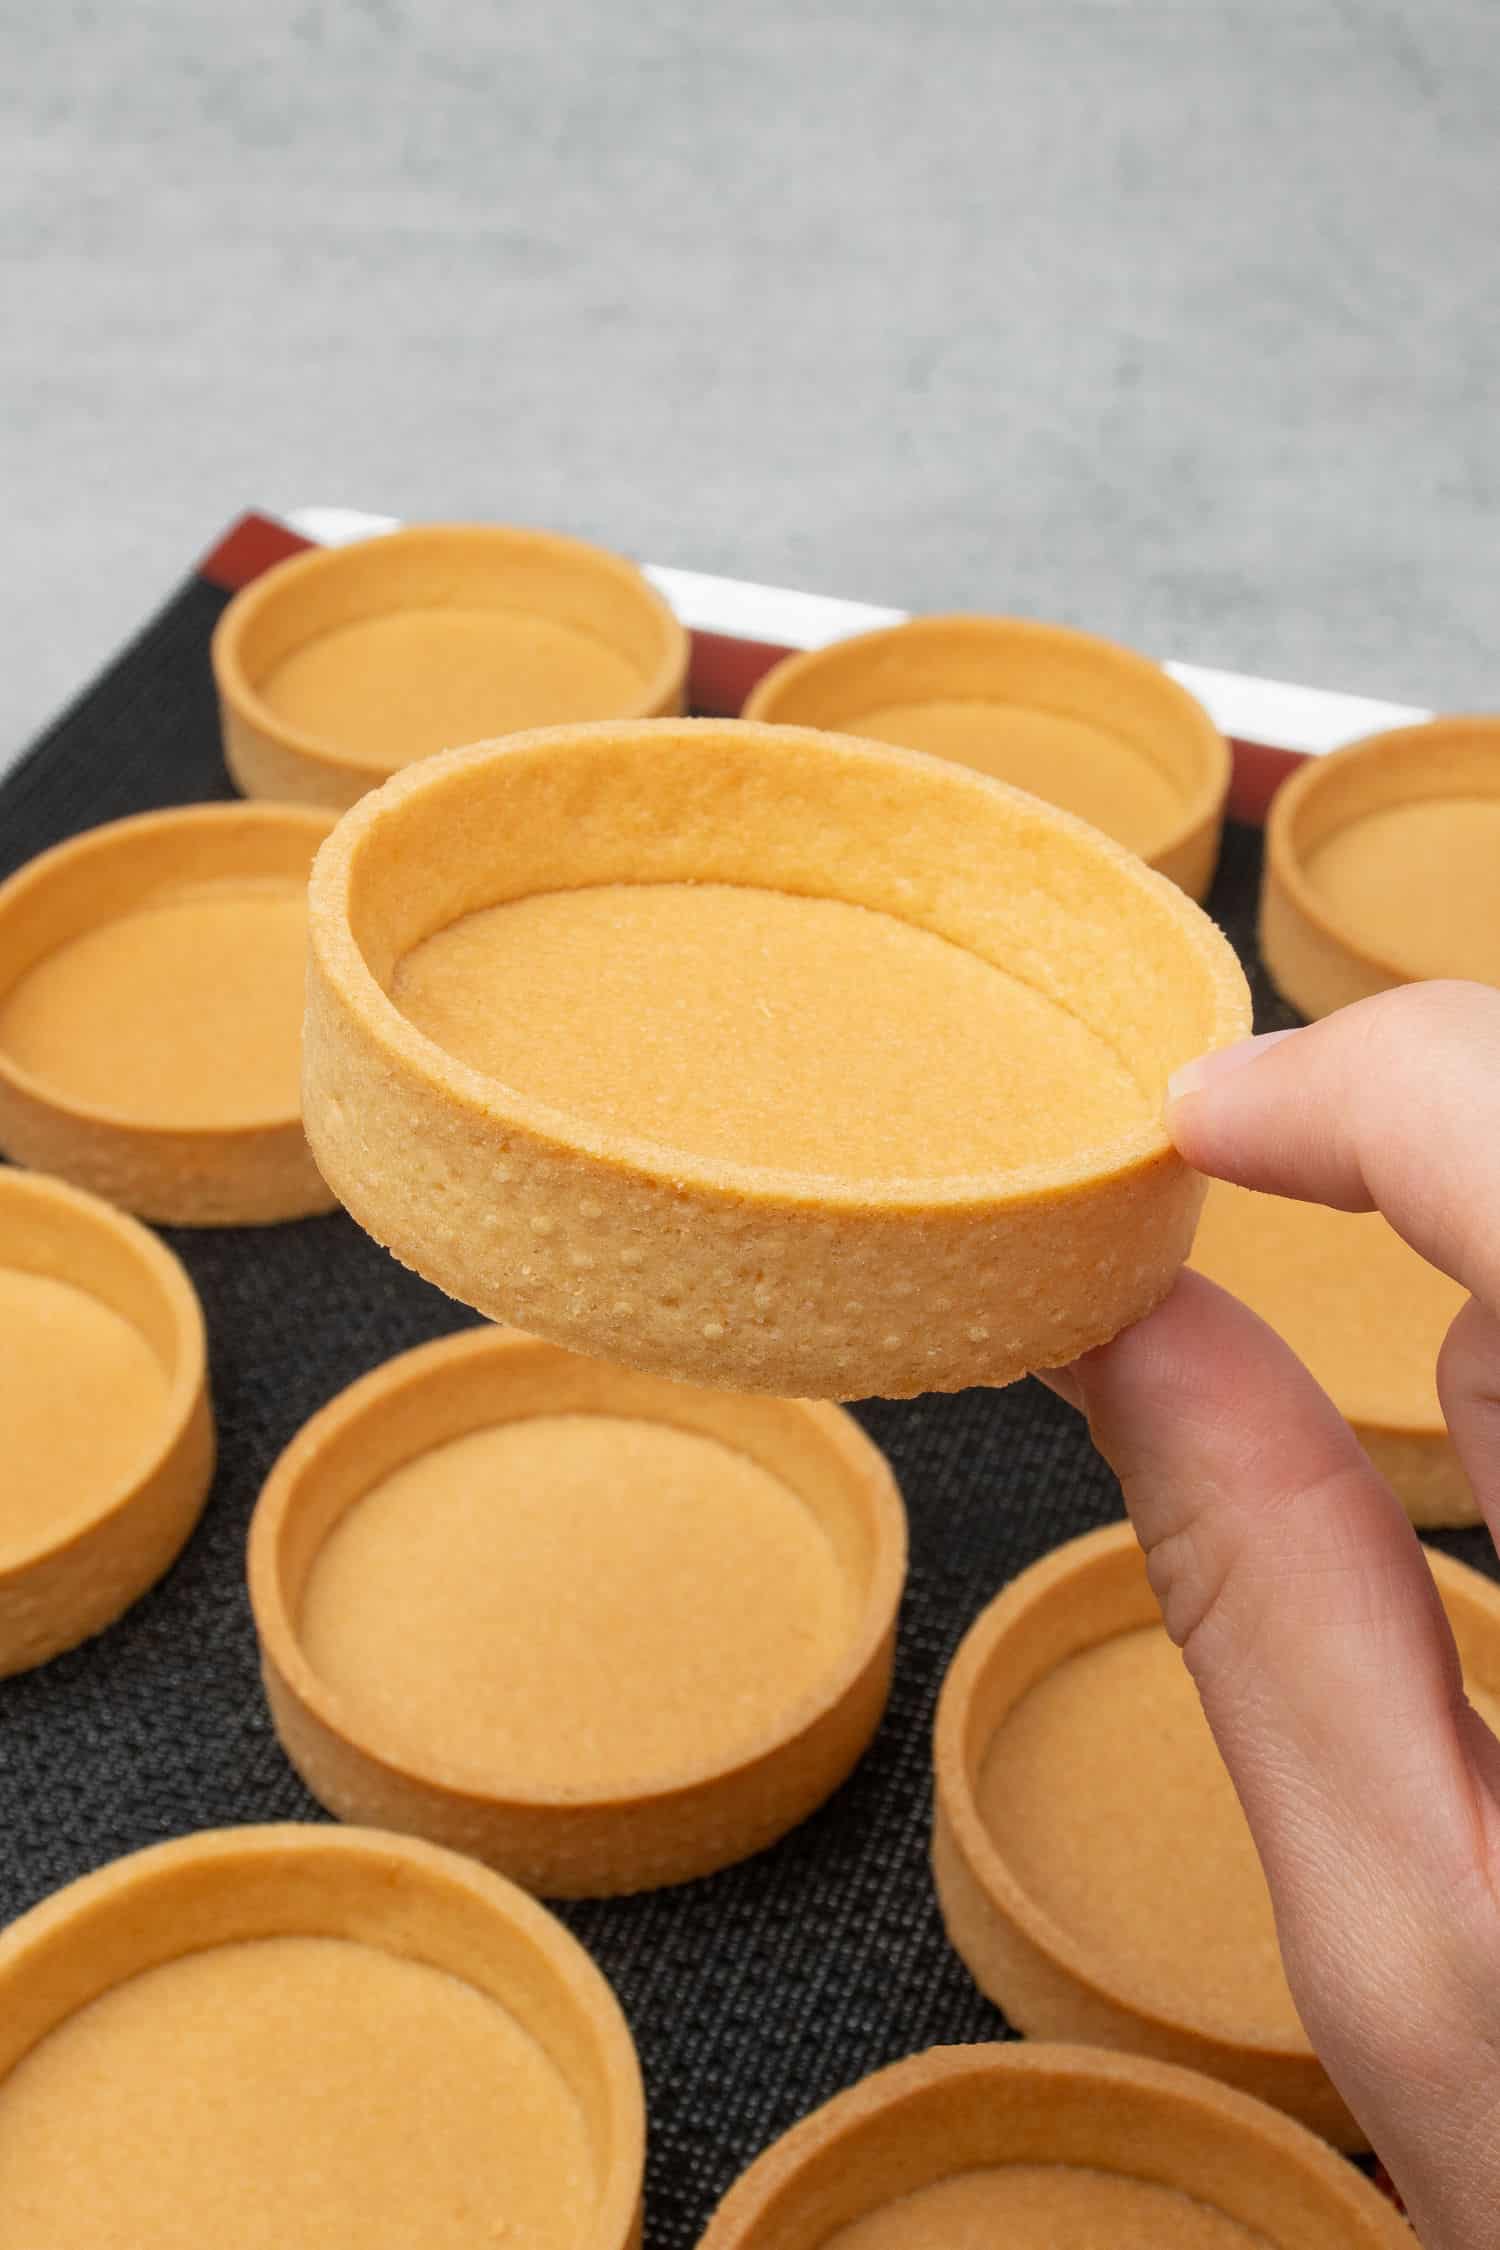
Take the tart rings from the freezer and trim the top of the dough with a sharp knife to line up with the top of each ring.
Bake the sweet pastry tart shells in the preheated oven for 20 minutes at 160°C (320°F). Then, carefully remove them from the rings. Once you take the tarts out of the oven, wait for a minute or two for the pastry to somewhat contract within the ring. Then, you will be able to remove the rings easily. If the pastry seems to be stuck onto the ring, it means you will probably need to bake it for a few more minutes. Do not force it, as you can easily break it.
After the tart rings are removed, bake the tart shells for an additional 5-10 minutes or until they turn golden brown.
Allow the French tart shells to cool completely on the perforated baking mat before filling.
Do not substitute the ingredients
When one ingredient changes, it often requires the whole recipe to be reformulated, as everything plays its part. This is one of those recipes I do not recommend swapping out the butter or using egg substitutes as it will affect the texture and flavor.
The one swap you can make is to replace the almond flour with an equal amount of pastry flour (or all-purpose flour). The pastry won't be quite as crisp, and you will lose the slight marzipan flavor, but you won't need to rework the recipe entirely.
Try some flavor variations
Once you learn the basics of preparing the pastry cases you can play around somewhat with the ingredients. Replace some almond flour with hazelnut flour to make hazelnut tart, for example, or other nut flour. Add citrus zest for a lemony kick or some black sesame seeds like this black sesame tart recipe. Love chocolate? Try adding cocoa powder (Dutch process) to make my favorite chocolate Pâte Sablée recipe.
You can also use this recipe to make simple pâte sablée cookies. Prepare the dough as explained, cut out biscuit circles using a cookie cutter, bake, and enjoy. This tastes especially good when you grate lemon zest into the dough and sprinkle over some granulated sugar after baking!
Need to bake ahead? Store and freeze like a pro
Baked tart shells can be stored in an airtight container at room temperature for several days, but make sure the container is sealed tightly. You can refrigerate them to keep them fresh for up to a week, but let them come to room temperature before filling or serving.
You can freeze the raw tart cases before baking for up to three months and bake them as explained above when needed. This is my preferred option, as while you can freeze baked tart cases, they might lose their crispiness a bit. Place the unbaked tart shells in their rings onto a baking sheet and freeze until solid. Then transfer them (still in their rings) to an airtight container or freezer bag.
To freeze the pâte sablée cases after baking, allow them to cool completely, then wrap them tightly in plastic wrap and place them in an airtight container or freezer bag. Do not freeze the tarts once they are filled.
Helpful equipment
You can achieve a neat, visually appealing, professional-looking tart crust by purchasing some basic equipment!
Always weigh ingredients by the gram using a digital scale. When it comes to French pastries, precision is everything!
I recommend rolling the pastry out with a rolling pin between two silicone baking mats, as it minimizes the need for dusting flour and keeps you from handling the dough too much. It’s also possible to use two sheets of parchment paper, but I find the silicon mats are better.
These perforated tart rings are the best investment I have ever made! They allow homogeneous baking due to the even air circulation, and there is absolutely no need to grease the tart rings. The Pâte Sablée dough will stick to its perforated side while baking and contract after baking - so the ring can be removed easily.
While baking the tart shells, use the perforated “air” baking mat straight on top of the oven rack (not in a baking pan or tray) for the air to circulate properly.
All ovens vary, and it is critical you bake at the correct temperature. Use a digital oven thermometer to check your oven is not too hot or cold.
My final expert tips
- Temperature is everything! If your kitchen is warm, you might take the dough in and out of the freezer up to 10 times in between steps to ensure the dough is always at the right temperature to work with. If you are lucky and have a cold kitchen, you might be ok with 2-5 chilling breaks.
- I really recommend using perforated equipment over the blind baking method, but read my article on how to blind bake a tart crust in case you need it.
- Always preheat your oven, and do not use the fan settings for this recipe.
- I have a special technique to get the shells out of the ring: hold the tart shell with both hands and gently press the top on two opposite sides simultaneously, then go around the edge of the tart shells. Never press the middle part, only the top side of the tart shell edges.
Troubleshooting
The pastry dough shrinks while baking - This can also be due to excess water in the dough, which evaporates, so make sure you stick to the specified amount of egg and do not add more liquid. Using butter with a high-fat content of at least 82% will also help. Pastry dough also shrinks while baking due to overworking the dough, so make sure to follow my recommendations on how long to knead the dough (just for a minute or two).
The tart shells don't keep their shape while baking - do not skip freezing the shortcrust dough before baking. This ensures it keeps its perfect, even shape! Another issue can be too low oven temperature so your pastry effectively melts instead of bakes.
The pastry falls out of the tart case while baking - This should not happen if the dough is firm enough when you press it into the ring. If this happens, very quickly open the oven door and press it back with your finger.
The dough puffs up during baking - Ensure that you roll the dough out to 2mm thickness and use perforated equipment rather than the blind baking method.
The tart shell won't come out of the ring - This happens if you assemble the tarts into the rings when the dough is too soft. If the dough temperature is just pliable at the assembling stage (not too cold, not too hot), the pastry is supposed to contract within the ring during baking, which makes it easier to remove. If the tart shells seem stuck onto the ring, bake it for a few more minutes. Do not force it, as it can break.
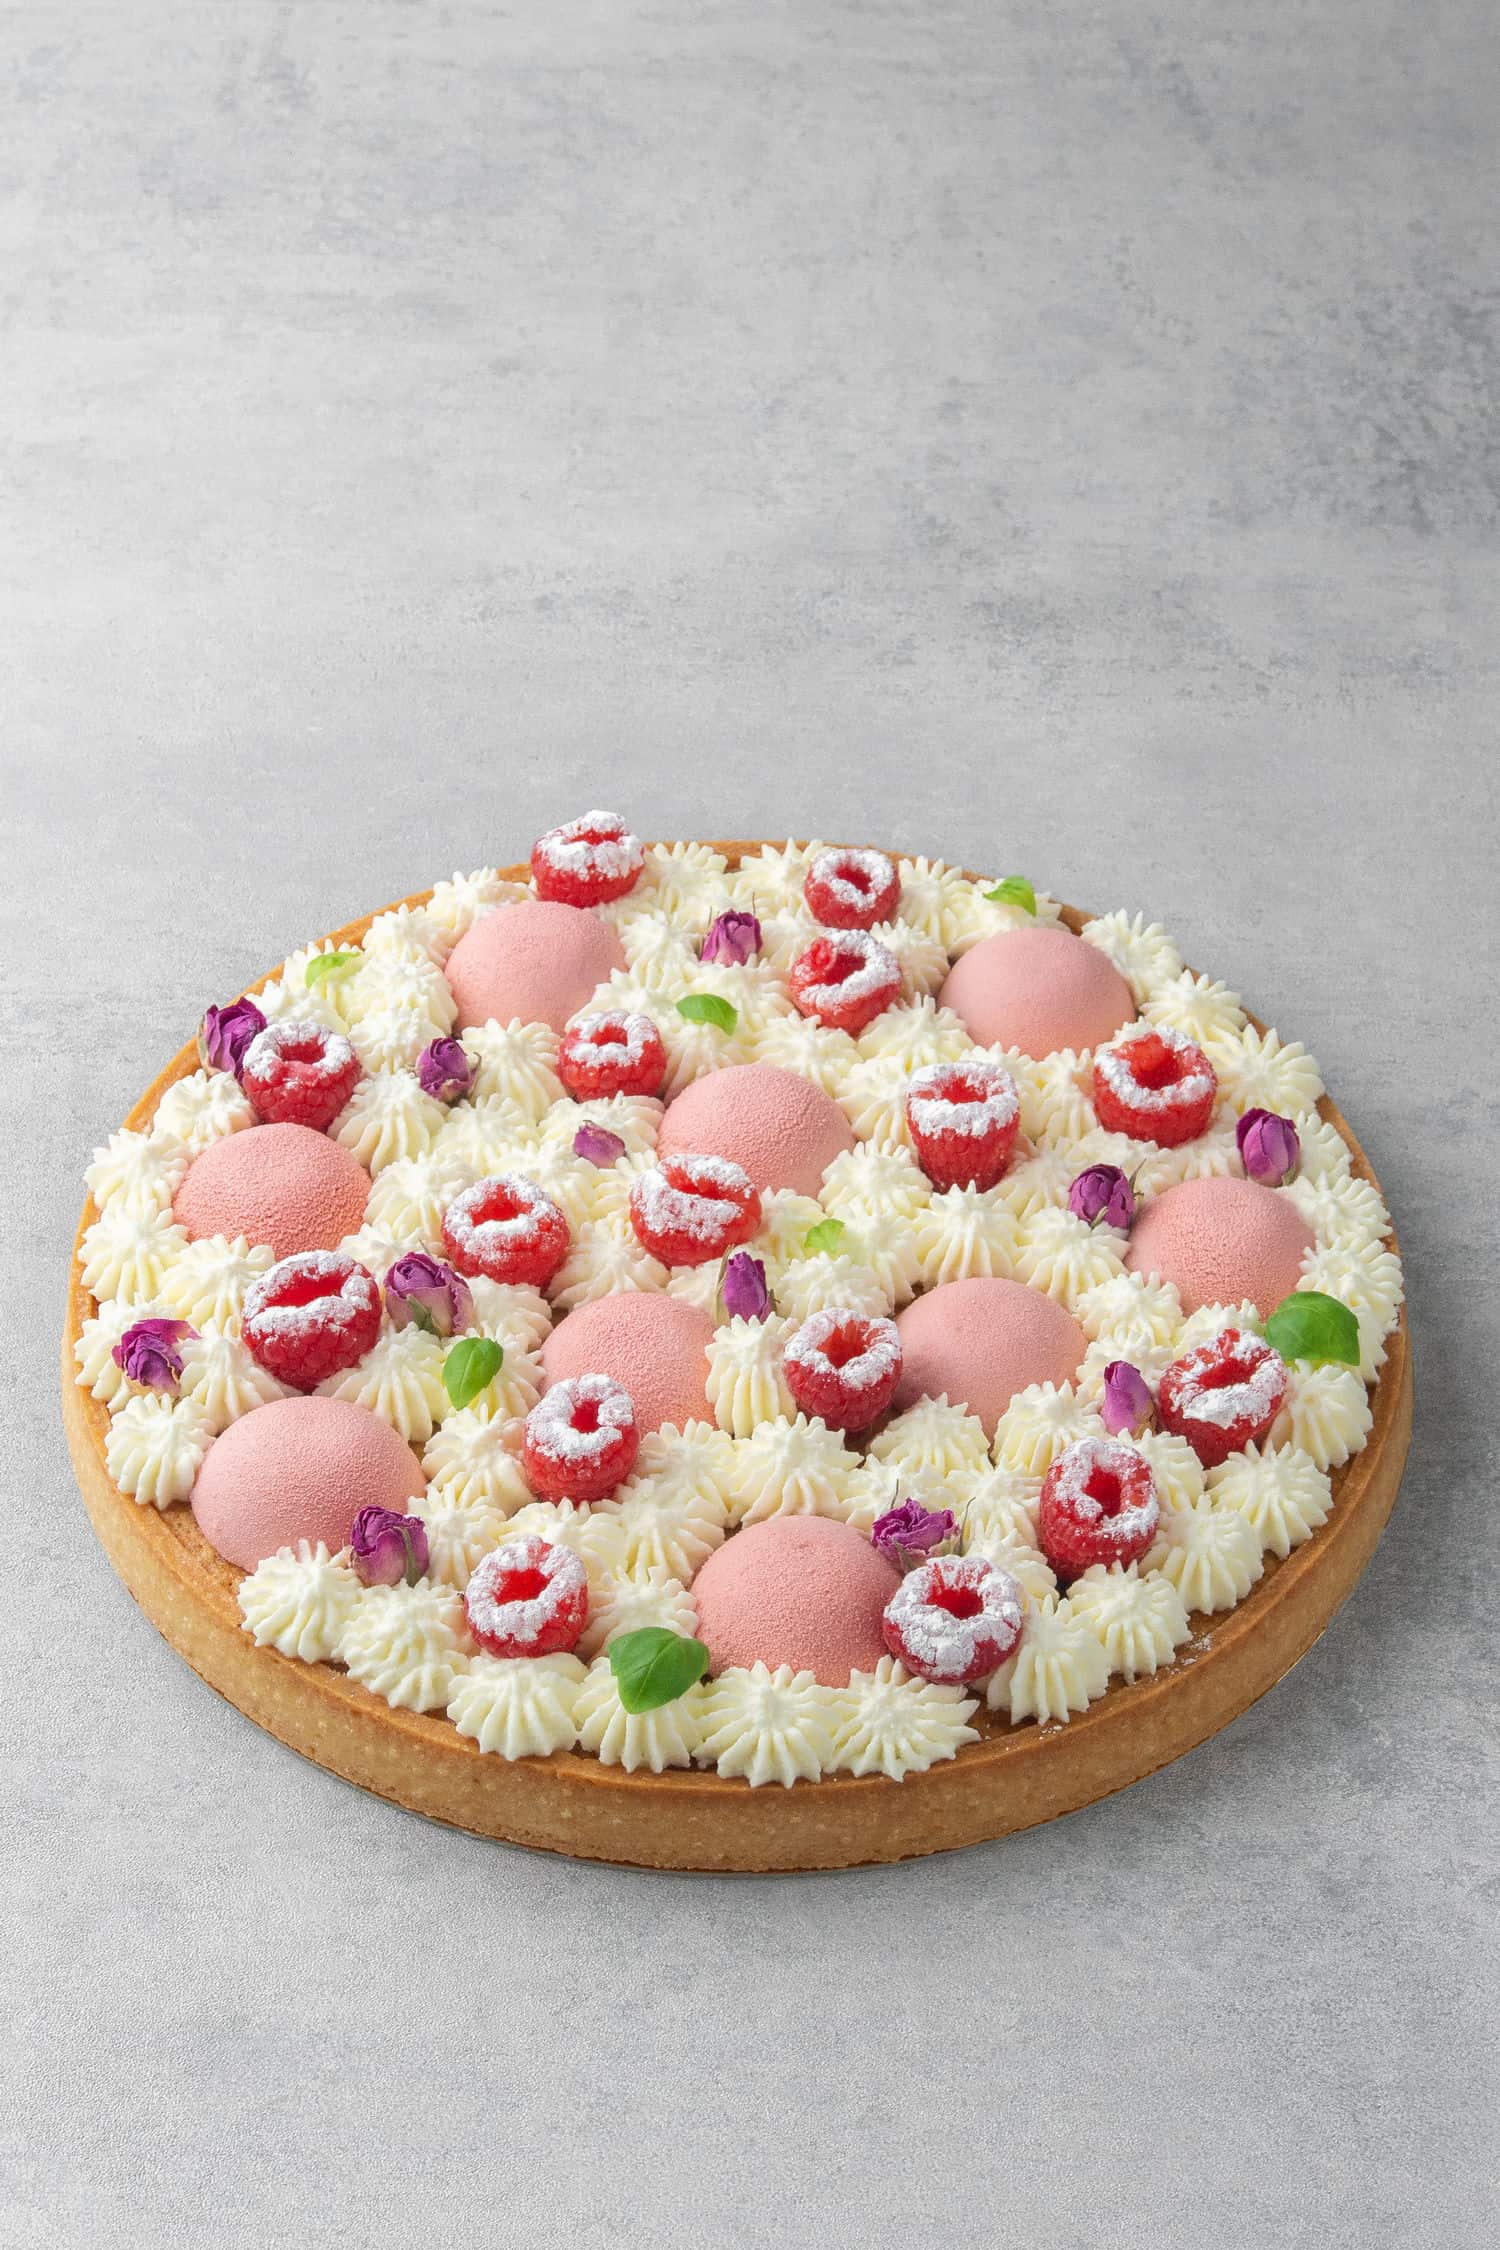
How to fill these tart shells
Try some delicious tart fillings to enjoy your homemade pâte sablée to the max!
- Strawberry tart
- White chocolate raspberry tart
- Lemon tart
- Raspberry Frangipane tart.
- Chocolate and Salted Caramel tart.
And check out my ultimate collection of tart recipes! Using this basic tart shell recipe, you can make mini tartlets or larger ones in any shape, form, or flavor.

Pâte Sablée, Sweet Shortcrust Pastry Tart Shells
Equipment
Ingredients
- 90 g (¾ cups) Powdered sugar
- 230 g (2 cups) Pastry flour can be replaced with All purpose flour
- 30 g (⅓ cups) Almond flour
- Pinch of salt
- 110 g (½ cups) Unsalted butter 82% fat content, use it very cold, cut into chunks
- 50 g Egg approx. 1 egg at room temperature
US customary cup measurement is an indicative figure only. Measure the ingredients with a digital scale by weight (gram). Baking is art but also science which requires precision and accuracy.
Instructions
Assemble the dough
- Cut the butter into chunks and place them in the freezer for a few minutes.
- Sift the dry ingredients together: flour, powdered sugar, almond, and salt.
- Add the cold butter chunks to the dry ingredients and rub the mixture between your hands until it reaches a sand-like texture.
- Add the egg to the mixture and combine with your hands until the dough comes together.
- Knead the dough with the palm of your hand for one to two minutes, just until it becomes smooth. Avoid over-kneading and do not use a mixer or food processor.
- If the dough is too warm and sticky, refrigerate it for 10-15 minutes. Otherwise, roll the dough out to a 2mm thickness between two silicone baking mats.
- Place the dough, still between the two silicone baking mats, into the freezer for 15 minutes. Do not remove the mats at this stage.
- Set up your oven rack with a perforated "air" baking mat and place the perforated tart rings on top. There is no need to grease the ring; the pastry will contract as it bakes, making it easy to remove the ring.
- Remove the dough from the freezer and peel off the top silicone mat.
Assemble the tart shells
- Cut 8 long strips from the dough to form the sides of the tart.
- Using a perforated tart ring, cut out 8 circles to form the bottoms of your tarts. Carefully lift each dough circle with an offset spatula and place them into the rings one by one.
- If the dough becomes too warm to handle at any point, return it to the freezer for 5 minutes. Depending on the temperature of your kitchen, you may need to repeat this process several times. It's crucial to work with dough that is cold enough to be manageable (not sticky), but not so cold that it becomes brittle and breaks.
- Carefully place each strip into the ring one by one, pressing each one onto the ring as well as to the bottom to ensure it sticks. Again, the dough should be at the right temperature—pliable enough that it doesn't stick (not too warm) but still flexible enough that it won't break (not too cold).
- Place the perforated tart rings with the pastry dough into the freezer for 1 hour. Toward the end of the freezing time, preheat the oven to 160°C (320°F).
- Remove the tart rings from the freezer and use a sharp knife to trim the top of the dough before baking each tart individually.
Bake
- Bake the tarts at 160°C (320°F) for 20 minutes. Then, carefully remove the rings and bake for an additional 5-10 minutes, or until golden brown. By the 20-minute mark, the pastry should be partially baked and may contract within the ring. If the pastry feels stuck to the ring, bake for an extra 1-2 minutes.
- Allow the tart shells to cool on the perforated "air" baking mat before filling.
- Tart shells can be frozen for up to 3 months. To freeze them, place the unbaked tart shells on a baking sheet and freeze until solid. Once frozen, transfer them to an airtight container or freezer bag (leave the ring on them). When the time comes, simply bake from frozen, as explained above. If freezing after baking, allow the shells to cool completely, then wrap them tightly in plastic wrap and place them in an airtight container or freezer bag.
- To store tart shells that are not frozen, place them in an airtight container at room temperature. They should stay fresh for several days. Make sure the container is sealed tightly to prevent them from becoming stale. If you need to store them for a longer period, you can refrigerate them for up to a week. Just make sure to let them come to room temperature before filling or serving.
Notes
- Measure ingredients accurately with a digital scale.
- Use high-quality 82% fat content European-style unsalted butter, very cold.
- Substitute the almonds with an equal amount of all-purpose flour for nut allergies. Or, experiment with different nut flours e.g. hazelnut or walnut.
- Do not skip the salt in the recipe.
- Use the egg at room temperature.
- Make sure you read my Expert tips section above to maximize your success. A short recipe alone is not able to cover all the necessary details, and science behind baking. Consider this recipe like an in-depth tutorial, literally the only recipe you will ever need to make Pâte Sablée, sweet shortcrust pastry.
- While assembling and kneading the dough, work as quickly as possible without 1. overworking the dough 2. making the dough too warm. Kneading literally should not take more than a minute or two.
- The temperature while working with this dough is super important. Too warm? The pastry dough will tear. Too cold? The pastry dough will break. Aim for the in-between, a cold enough dough that is comfortable to work with. Use your fridge or freezer to chill the dough if it gets too warm
- The recipe can be made with the traditional blind baking method using a tart pan, however, consider using perforated equipment for the best result. Here is my article on how to blind bake a tart crust without using perforated equipment, in case you need it.
Sarah
I tried this recipe and it was amazing 😍😍
Sor
Hello, thank you so much for your clear instructions, But I have a problem when Baling sablée tart shell in 20cm perforated tart ring the bottom always cracks during the baking , is there anything that I can do to prevent it?
admin
Hey, never had this issue, sorry to hear about your struggle! I suspect bottom is rolled either to thin or you are not using perforated mat that would allow the air to circulate. I have a large tart tutorial called "raspberry frangipane" perhaps worth to check it out. Good luck and pls keep me posted:)
Sor
Thank you for your reply, I actually use a perforated air mat, and roll the dough 3mm , but i tried it more than 10 times and every time in crack during the baking.
admin
Have you tried it with my pate sablee recipe? Sorry to hear, I have never had this issue. Perhaps you don´t wait until it cools and try to move while it is still hot? Can´t think of anything else
Mark Azul
Hi! When lining the tart rings, do you push the side dough in the bottom dough? what do you to stick the bottom and side doughs together in ring?
admin
Gently press the side with the bottom, never force the dough and pay attention to the temp. It should not be frozen neither soft, in between:) Good luck!
WY
Hi may i know if your oven is a convection oven (fan assisted) or a conventional oven? thank you 🙂
admin
no fan 🙂
Umber
Hello... there are soooo many sizes of perforated tart rings on Amazon; can you kindly tell which ones you use mostly shown in your pictures? I mean for a homebaker wanting to start making/selling tarts, which ones do you think will be most practical?
Thankyou
Regards
admin
Hey I understand that the range is overwhelming! In my Pate Sablee recipe I mention the one I use with links to Amazon (affiliate), that is a 88mm Silikomart, just click on the link I provide several times in my blog post and you will see
Claire
Can the ready to roll dough be kept in the fridge for a few days, and is it suitable for freezing?
admin
Technically you can but you need to cover it in the fridge so it won´t dry out. Re freezer, it is also possible to freezer this before rolling out. Or, you can bake them and then freezer them and unfreeze before filling.
Umber
Thankyou so much !
Michelle
Hi! Thank you for your very clear instructions. One question: How are you lifting the tart shells out of the oven quickly enough if you are not using a baking pan underneath the mat? I have a perforated baking pan and I have used that under my air mat when making pâte sucrée tart shells, but I am interested in using your method for the smaller oven on my boat that won't fit my perforated pan. Thank you!
admin
I am using perforated pan too but the oven rack can work too. Why I am calling out not to use a non perforated pan is that it would be no point to use a perforated mat as air would not circulate. Re what to use on the boat, I imagine there is an oven rack you anyway have to use?
Stephen Hamer
Hi my pastry shrunk down the sides whilst baking? Is there any main cause for this?
Kata
Hey, sorry to hear! Are you using the perforated ring? Have you gently but firmly pressed the dough into the ring (into the perforates) as shown in the video and explained in the recipe? Did you freeze the pastry before baking? Are you using a digital oven thermometer to make sure your oven has the right baking temp? Feel free to message me on my Instagram and send me pic if still struggling.
Basema Rehman
A very easy recipe and works really well!
Eva
The recipe is really simple to follow!
Be aware that it can take a long time to prepare, specialy if you're not used to roll a pastry dough. But the result is worth it! I recommend it !
Helen
Hi, just brought the tart n mould from Silikomart. Will be following your recipe cos the recipe given with the mould didn’t give the method how to really use them. Love how you give so detailed instructions. Do you have a recipe for the mirror glaze chocolate mousse cake I can put on top of your chocolate tart?
admin
Happy to hear that you find my tutorials useful! I don´t have available recipe for chocolate mousse and mirror glaze, on my list though:)
Elicia
Hi! Very detailed recipe! I would like to bake 5cm tartlets. May I know what’s the baking time like, and how many can this dough quantity make? Thanks!
admin
Hey I have never baked it that small. Temp should be the same, quantity depends on the depth of your tart tin, how thin you are able to roll out etc
Latifa
Perfect recipe. I made this with creme patisserie and fresh strawberries and my family loved it. I’ll start using it as a base for any other tarts I bake.
Tuan
Can i turn it into chocolate tart shell?
admin
Yes in fact I have a Chocolate Pate sablee on the blog just search on it 🙂
Sabi
Hello, your recipes are great 👌🏽🤩
Veronika
Using your tips and tricks my tarte shells turned out perfectly! My friends thought the desserts were from a pastry shop! 😚
Nina
hi! I´ve got a gluten-free diet and I want to ask you if I can use a version of gluten-free flour (e.g. rice or corn flour, nuts, oats...) in this tarts? ´cause I want to try this recipe so so much:)) thanks! And maybe if you can help (not necessary) I want to ask you the same thing about your recipe of eclair. But I know you don't have to know how gluten-free flour acts in a dough...
admin
Hey I am sorry I have not tested this gluten-free. I did eclair once gluten-free using rice flour but I have not shared the recipe on that yet. I have a few gluten-free recipes just use the gluten-free tag:)
Ida
Hey Nina, I made this recipe using Schar gluten free pastry flour and it worked wonderfully each time. 🙂
Paula
Love - love - love your recipes! Often make mini tartlets (4 cm) with different fillings. My favorite one is your raspberry ganache: smooth, silky, fruity and sooo yummy!
Deva amiache
This is an amazing recipe, the dough was perfect. Thank you for giving so much detail on how to make it. I would have not been able to nail it with out your detailed information
admin
so happy to hear that you appreciate by tips and giving details!
Dan Tye
Great recipe! My tarts came out beautifully ❤️
Christina
I used this recipe to bake my pistachio and raspberry tarts. I used all purpose flour because I didn’t have any pastry flour, and it still turned out great! The crust is rich, crisp, sweet but not overly sweet, and perfect for any filling. I will definitely be using this recipe for all tarts from now on.
admin
I have seen your tart, it looks incredible. You are an amazing baker, I am so happy I could help with my tart recipe!
Claire
Fantastic recipe and tutorial, thank you very much. I rolled mine a little thick 1st time, but they keep their shape perfectly with the perforated rings, great result. Thank you.
Abigail Smith
I had success making these first time round! But the last few attempts have resulted in disaster...the tart was completely solid inside the ring. Any attempt to remove it would result in damage. Do you know where I could have gone wrong here?
Thank you
admin
Once tartlets are 90% baked, they slightly contract so the ring come off easily. If it is difficult to remove the ring, probably you need to bake it a few more minutes more
Paula
Love - love - love your recipes! Often make mini tartlets (4 cm) with different fillings. My favorite one is your raspberry ganache: smooth, silky, fruity and sooo yummy!