This is, hands down, the best Pumpkin Custard Pie recipe for Thanksgiving. A flaky, buttery pie crust filled with silky, creamy, and incredibly delicious pumpkin custard. It's super rich, smooth, and full of the Fall flavors everyone loves, and it can be the perfect alternative to your usual traditional Pumpkin pie!
Read what others said about this recipe
"It was perfect! First time pumpkin pie! I followed all your directions and zero problem!" Ingrid

Why this pumpkin custard pie is the best pumpkin pie for Thanksgiving
With a flaky all-butter crust and a perfectly sweetened custard filling that reminds me of pumpkin Creme Brulee, this recipe for custard pumpkin pie will become one of your favorite ever Thanksgiving desserts.
It's so easy and quick, and you won't need any special equipment or fancy ingredients. It's also a lifesaver if you are out of condensed milk, as it does not contain any! So try this recipe if you want to make pumpkin pie without evaporated milk or condensed milk.
It's also completely beginner-proof! This is a detailed pumpkin pie tutorial that anyone can follow. I'll give you all my pro tips and you'll never have to buy pumpkin pie ever again.

Katalin's key take on what the secrets are behind the perfect pumpkin pie, including how to avoid cracked pumpkin pie
The perfect pumpkin pie comes down to a few things; the quality of the ingredients, the recipe, and the preparation. A homemade all-butter flaky pie crust is essential, and my recipe will show you exactly how to do it perfectly every time with an easy lamination technique for extra flakiness.
This pie crust is so easy to make, and keep reading for all my pro tips on making flaky pie crust for pumpkin pie. If you need more information and guidance, please check my in-depth guide to making a flaky pie crust recipe.
To avoid soggy pie, you must fully pre-bake the pie crust, as it won't bake once the filling is in. I will also show you how to precook the filling and bake it until it is just set and not overbaked to avoid cracks.

How to prepare homemade flaky pie crust
In a large bowl, mix the flour, sugar, and salt together until fully combined. Cut the cold butter into small chunks and place into a separate bowl. Measure the water and vinegar separately. Once all your ingredients are measured and ready, place everything into the freezer for 5-10 minutes.
After letting the ingredients chill down, add the butter chunks to the bowl of flour and rub the mixture between your fingers. The goal is a sand-like consistency, but leave some bigger butter chunks in the mixture, as this encourages a flaky crust.


Slowly add the water and apple cider vinegar into the butter and flour dough, a small amount at a time, while stirring with a spatula or wooden spoon.
When you have added around 75% of the liquid, take out the part of the dough from the bowl that has come together and is well-hydrated and place it on the lightly floured counter. Continue adding liquid to the rest of the dry dough.
Depending on the flour you use, you might need to use all of the water/vinegar or slightly less (or maybe slightly more). It should not be sticky or wet.

Now, start working the dough with your hands on a lightly floured surface or silicone baking mat. It will look crumbly initially, but it should come together in the next minute.

Stop as soon as the dough comes together, and don't knead, as we don't want to overdevelop gluten. It's ok if there are still some visible butter chunks.
Form a disk from the dough, cover it with plastic food wrap, and place it in the fridge to rest for a minimum of 2 hours.
Quick lamination technique (optional)
After 2 hours, take the pie dough disk out of the fridge and let it rest for a few minutes on the kitchen counter. It needs to be cold but able to be rolled out.
Roll the dough out into a rectangle roughly 11x17 inches / 28x43 cm in size. Always work quickly so the dough won´t warm up.

Fold the left half over the right half. Then, fold the bottom half up over the top half. Then, fold the bottom half over the top half again. You will end up with a 5.5x4 inches / 14x11 cm rectangle.
Re-cover the dough with plastic wrap and let it rest in the fridge for another 2 hours.

Roll out and prebake the pie crust
Let the dough rest on the counter for a few minutes so it can be rolled out, then transfer it to a lightly floured surface or silicone baking mat.
Roll out the dough evenly so that it will fit your pie dish. I use a 9 inch / 23 cm pie dish, so I roll it out to 10 inch / 26 cm in diameter.
Place the dough into the pie dish, fold the extra dough under the crust, then flute with your fingers. Do not force the dough, and make sure it stays cold.
Chill the pie dough in the dish for 30 minutes in the freezer while thoroughly pre-heating the oven to 200 C / 370 F (no fan).
Line the pie crust with parchment paper and fill it with pie weights.

Bake it for 20 minutes with the pie weight in, then remove the pie weights, and prick holes all over the crust with a fork. Bake for another 15 minutes.
Apply a thin layer of egg wash (using egg white only) on the bottom and side of the pie crust to support the crust and stop it from getting wet from the pumpkin filling. Bake until the crust is golden brown, which will take around 15 minutes more. We need to pre-bake the pie crust for approximately 50 minutes in total.
Let the crust come to room temperature before filling.
Make the pumpkin custard filling
Heat the cream in a saucepan over medium heat until simmering (but not boiling). Whisk the egg yolk with the cornstarch in a bowl, then pour the warm cream over the egg yolk mixture slowly while whisking vigorously with a hand whisk. This tempers the egg yolks, and the mixture should slightly thicken.

In a separate saucepan, heat the pumpkin puree (try my homemade pumpkin puree, or I recommend Libby's) with both kinds of sugar and cook the mixture for 2-3 minutes. Add the lemon juice and cinnamon powder or pumpkin spice mix.

Lastly, fold the warm pumpkin puree mixture with egg yolk & cream mixture. The filling is now ready to be used.
The filling part of the Pumpkin Pie is creamy custard-like, similarly to the filling of this Buttermilk Pie, which is another custard type of pie for Thanksgiving.

Assemble and bake
Preheat the oven to 175C / 350F.
Carefully pour the warm pumpkin filling into the pre-baked pie crust.
Bake the pumpkin custard pie at 175C / 350F for about 45 minutes. Cover just the edges of the pie crust with aluminum foil if it is browning too much.
It is ready when the edge of the crust is beautifully golden brown and the edges of the pumpkin custard pie filling are set, but the middle might still be a little bit wobbly. The pie will further set as it cools.
Let the pumpkin custard pie cool at room temperature for at least 3 hours before cutting and serving.

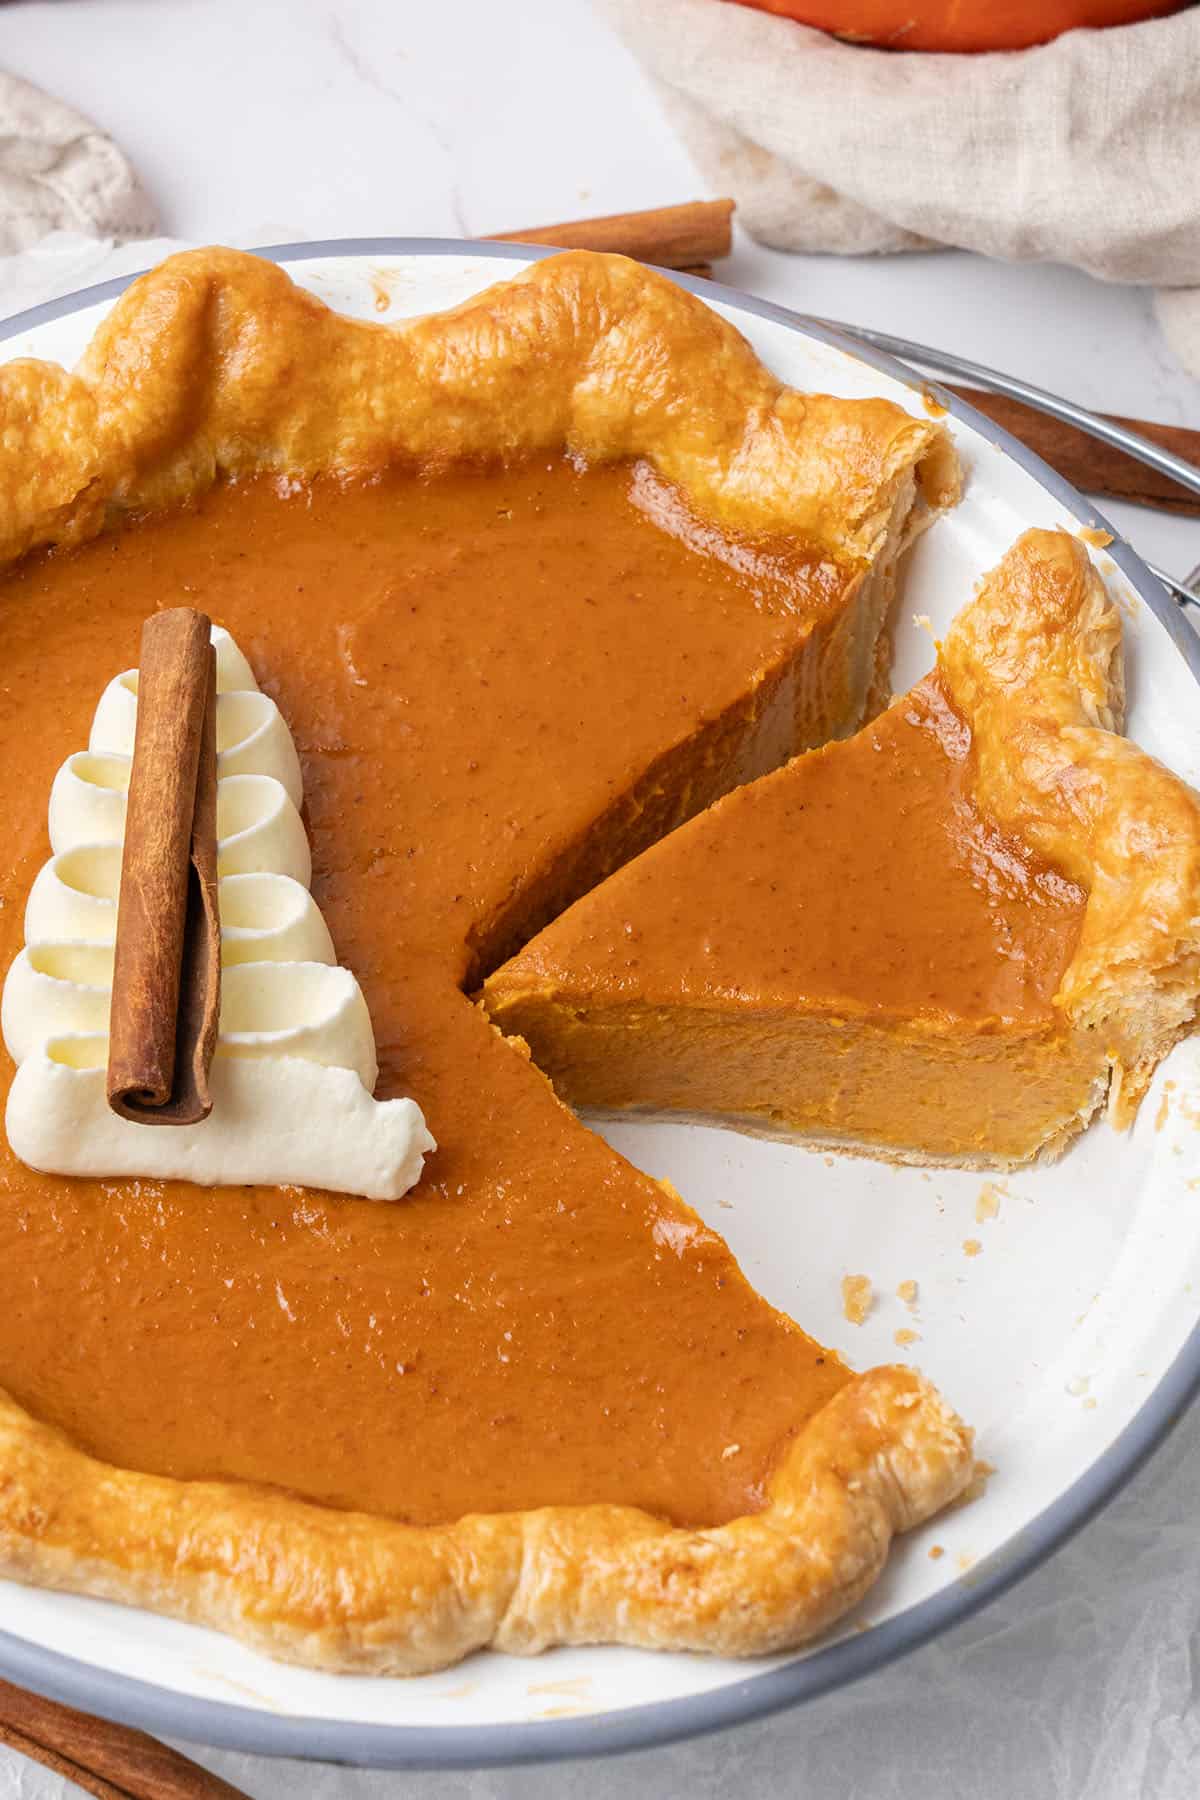
Decoration ideas
Use any leftover pie dough to make the cute Fall leaf decorations. Either cut the leaf pattern by hand using a sharp knife or Leaf Cookie Cutter.
Bake the leaf decorations on a lined baking sheet at 200 C / 370 F for 15 minutes or until golden brown. Place the leaves on the pie after both the pie and the leaves have cooled down to room temperature.
Whip cold heavy cream with sifted powdered sugar for a few minutes with an electric hand whisk until it reaches a pipeable (but not stiff) consistency.
Pipe the decoration onto the pie (I use a piping bag fitted with a 104 nozzle tip), then place one cinnamon stick on the piping.
Storage and freezing
Store leftover pumpkin custard pie covered in the refrigerator for up to 2-3 days.
I do not recommend freezing this pumpkin dessert, the custard does not freeze very well.
Flavor variations
You can use any of your favorite spices for this pumpkin filling, e.g., a teaspoon of ground ginger for some extra heat, vanilla extract, cloves, cardamom, or homemade pumpkin spice.
I like to decorate this pumpkin custard pie with pastry leaves and whipped cream, but you can also pipe cream cheese frosting on top to give it a super rich and tangy finish.
Alternatively, use an equal amount of sweet potato puree to turn this into a sweet potato custard pie.
Ingredient substitutions
Baking is a science, so changing ingredients can be difficult. Unfortunately, I cannot provide exact substitutes for all allergies and diets, but there are some swaps you can try to make this recipe suit you.
Try one of the gluten-free flours mentioned in my flour guide to swap out the all-purpose flour in the pie crust. You can also try one of the egg substitutes in this helpful guide and read about butter substitutes.
Check out my list of other baking guides to learn more about the possible ingredient substitutions and how they may affect the recipe.
Expert tips to make pumpkin custard pie
- The key to making pie crust from scratch is that the pie dough ingredients must be very cold at all times. If the dough starts to warm up too much at any time, put it in the freezer for 5-10 minutes.
- Do not use a mixer to make pie dough, and don't skip the resting periods in the fridge.
- Always apply an egg wash when blind baking pie crust to prevent a soggy bottom.
- Make sure that your pumpkin puree is not watery. I recommend using Libby's or making homemade. Squeeze out the puree in a cheesecloth and then measure it. See my detailed instructions on maximizing your pumpkin puree filling before baking.
- Cover the edge of the pie crust around with aluminum foil if it is browning too much at any point in baking.
- For an even better shine, apply a light egg wash made from a full egg and a splash of milk rather than just from egg whites.
- Try making my macaron recipe with any leftover egg whites!
What equipment to use
As always, weigh your ingredients by the gram with the help of a digital scale.
You will need a rolling pin, and I use a 9-inch/ 23cm pie dish to make this spiced pumpkin custard pie. I also like using an inexpensive and fun cookie stamp to make the leaf decorations. But many people can do it using just a sharp knife!
Avoid under-baked or burnt pumpkin custard pie by investing in an inexpensive Digital oven thermometer and always baking at the right temperature.
And finally, for the piping decoration, I use my favorite 104 nozzle tip. It is a super elegant way to decorate most desserts.
Try some of my other Thanksgiving recipes
- Pecan Brownies
- Pumpkin Spice Baked Donuts
- No Bake Apple Pie With Graham Cracker Crust
- Pumpkin Bread With Cream Cheese Frosting
- Apple Pie Cupcakes
- Pumpkin Brownies
Have you made this recipe?
Please leave a 5-star ⭐️⭐️⭐️⭐️⭐️ rating on the recipe card and consider leaving a comment as well!

Pumpkin Custard Pie
Equipment
Ingredients
Flaky pie dough
- 190 g (1½ cups) All purpose flour
- ½ tablespoon Granulated sugar
- ¼ teaspoon Salt
- 110 g (½ cups) Unsalted butter 82% fat, use it very cold
- 60 g (¼ cups) Water use it very cold
- 15 g (1 tablespoon) Apple Cider vinegar
Egg wash
- 1 Egg
- Splash of milk
Pumpkin filling
- 425 g (15 oz) Pumpkin puree 1 can Libby's pumpkin puree or make homemade pumpkin puree
- 50 g (¼ cups) Granulated sugar
- 50 g (¼ cups) Brown sugar
- 3 Egg yolk
- 1 tablespoon Corn starch
- 170 g (¾ cups) Heavy Cream 36% fat content
- 1 tablespoon Lemon juice
- 1 teaspoon Cinnamon or Pumpkin spice
Decoration
- 60 g (¼ cups) Heavy cream very cold, 36% fat content
- 1 tablespoon Powdered sugar
- Few Pie Leaves using leftover pie dough
- 1 Cinnamon stick
US customary cup measurement is an indicative figure only. Measure the ingredients with a digital scale by weight (gram). Baking is art but also science which requires precision and accuracy.
Instructions
Assemble the pie dough
- In a large bowl, mix the flour, sugar, and salt until fully combined and place it into the freezer for 5-10 minutes. Cut the cold butter into small chunks and place it into the freezer for 5-10 minutes. Measure the water and vinegar separately, and place them into the freezer as well for 5-10 minutes.
- Once all ingredients are nicely chilled, add very cold butter chunks into the bowl of flour and rub the mixture between your fingers until it becomes a sand-like consistency. Leave some bigger butter chunks in the mixture - this will encourage flaky pie texture on the pie crust - no need to fully incorporate the butter into the flour.
- Add very cold water and apple cider vinegar into the dough, a small amount at a time, and stir with a spatula or wooden spoon after each addition. Once about 75% of the liquid is used, take out the part of the dough from the bowl, that is already well hydrated, and only keep adding the water to the rest of the dry dough. You might need to use all the water, or slightly less, or very slightly more, depending on the flour you are using and how neatly you hydrate the dough.
- Now, on a lightly floured surface (or silicone baking mat), start working the dough with your hands. First, it will look crumbly but it should come together in the next minute or so. Do not knead the dough as such, stop mixing, as soon as the dough comes together. Remember, leave in some butter chunks, do not overwork the dough, and do not use a mixer.
- Form a disk, cover it with plastic wrap and let it rest in the fridge for a minimum of 2 hours.
Optional; laminating the pie dough for extra flakiness
- After 2 hours, take the pie dough disk out of the fridge and let it rest few minutes on the kitchen counter. The dough should stay cold but slightly warmed up to be able to roll it out without breaking it. Transfer the disk to a silicone baking mat or a lightly floured surface and start rolling it out, make sure you turn the dough with your hands after each rolling so it will become even. No need to add too much flour while rolling, the pie dough should be cold enough not to stick to the kitchen counter.
- The goal is to roll the dough out into a large rectangle, then, apply the following fold: Fold the left half over the right half. Then, fold this long rectangle into half by folding the bottom half over the top half. Lastly, fold again the the bottom half over the top half. After the last fold, cover the dough with plastic wrap and let it rest in the fridge for a minimum of 2 hours.
Pre-bake the pie dough
- After the 2 hours rest time, take the pie dough disk out of the fridge and let it rest few minutes on the kitchen counter. The dough should stay cold but slightly warmed up to be able to roll it out without breaking it.
- Transfer the disk to a lightly floured surface or Silicone baking mat and start rolling it out. Make sure you turn the dough with your hands after each rolling so it will become even. No need to add too much flour while rolling, the pie dough should be cold enough not to stick to the kitchen counter. If at any point the dough gets too warm, pop it back into the freezer for a minute and continue.
- If you are using a pie dish 9 inch / 23 cm, roll the dough to 10 inch / 26 cm in diameter. Carefully place the dough into a Pie dish 9 inch / 23 cm. Fold the extra dough around under the crust then flute with your fingers. Remember, do not force the dough, after rolling, it should stay smooth and cold, and easy to work with. The most common reason for pie crust shrinking is forcing and stretching it.
- Chill the pie dough in the freezer for 30 minutes while pre-heating the oven to 200 C / 370 F (no fan). After 30 minutes, line the pie crust with parchment paper and fill it with pie weights.
- The pie crust will be baked in the following way: 1. Bake it for 20 minutes with the pie weight in. 2. Remove the pie weights, and with a fork, prick holes all over the crust. Bake for another 15 minutes. 3. Apply a thin layer of egg wash (using egg white only) on the bottom and side of the pie crust, this will support the crust not getting wet from the pumpkin filling. Alternatively, for an even better shine, apply a light egg wash (full egg + splash of milk) on the edge of the pie crust. Bake until the crust is golden brown, about 15 minutes. So overall, I recommend to pre-bake the pie crust for 20+15+15=50 minutes.
- Halfway through baking, you might need to apply a pie shield, which can be as simple as placing aluminum foil around the edges to avoid over-browning.
- Let the crust come to room temperature.
Make the pumpkin filling
- Heat the cream until simmering. In the meantime, whisk the egg yolk with the corn starch, then pour the warm cream over the egg yolk mixture slowly while whisking vigorously with a hand whisk. This stage is tempering the egg yolks, and the mixture should slightly thicken.
- In a separate saucepan, heat the pumpkin puree with two different kinds of sugar and cook the mixture for 2-3 minutes. Add the lemon juice and cinnamon powder or pumpkin spice.
- Lastly, fold the warm pumpkin puree mixture with egg yolk & cream mixture. The filling is now ready to be used.
Assembling the pumpkin custard pie and baking
- Pre-heat oven to 175C / 350F
- Once the pumpkin filling is ready and still warm, and the pie crust is fully baked, carefully pour the warm pumpkin filling into the pie crust.
- Bake the pie at 175C / 350F for about 45 minutes. Cover the edge of the pie crust around with aluminum foil if it is browning too much.
- At the end of the baking time, the edge of the crust should be beautifully golden brown, the side of the filling should be set, and the middle of the filling might still be a bit wobbly.
- Let the pumpkin custard pie cool at room temperature for at least 3 hours. The pie will further set as it cools, so make sure you do not attempt to serve or cut the pie straight after baking.
Decoration
- Using the leftover pie dough make the leaf decorations. Either cut the leaf pattern by hand using a sharp knife or use Leaf Cookie Cutter.
- Bake the leaf decorations at 200 C / 370 F for 15 minutes or until golden brown. Place the leaves on the pie after both the pie and the leaves cooled.
- Whip heavy cream with powdered sugar for a few minutes until it reaches a pipeable consistency.
- Pipe the decoration (I am using 104 nozzle tip) on top then place one cinnamon stick on top of the piping.
- Store leftovers covered in the refrigerator for up to 2-3 days.
Notes
- All ingredients incl. butter, flour, and water should be very cold for the pie crust.
- Making this pie crust will take less than 5 minutes. If you are assembling the dough for more than 5 minutes, then you are overworking it.
- Resting the dough in the fridge is a must - you won't be able to roll it out without appropriate resting time (min. 2h).
- Do not begin trying to roll the pie dough until it is at the proper temperature. If it's too cold, it can crumble. If it's too warm, it can tear.
- The egg wash will seal the bottom of the crust, contributing to no soggy pie.
- The lamination is optional, however, I recommend that simple step to make the pie crust even more flaky.
- The pumpkin custard pie filling takes a few steps, however, each step is very quick. Do not try to combine them and just "dump and bake".
- Over-baking the pie is the most common reason for a cracked top, try to monitor your pie towards the end of the baking time to avoid over-baking.
Ingrid
It was perfect! First time pumpkin pie! I followed all your directions and cero problem!
admin
How lovely! Thanks for baking my pumpkin pie:)
Ingrid Vollbracht
Question: 180gr of cream is enough? In the filling?
admin
Yes 🙂 If your tin size is bigger, adjust accordingly
Penguine (rumana)
And that was a WOW 🤩
Thank you so much 😊 for the easiest recipe
admin
Thank you for baking my pie! Glad you like it!