This Jiggly Japanese Cheesecake recipe is the ultimate fluffy, souffle-like cheesecake. It is often called a Japanese cotton cheesecake due to its unique texture, and it actually only uses a few basic ingredients. The most important part of the recipe is the technique, which I will teach you!

Best Japanese cheesecake recipe
Japanese jiggly cheesecake (also known as a soufflé style cheesecake or cotton cheesecake) has a characteristically wobbly, airy texture similar to a soufflé when fresh out of the oven and a chiffon cake-like texture when chilled. We are also looking for a tall, evenly risen fluffy cake with no cracks on the top that holds its shape.
The best recipe for jiggly Japanese cheesecake will show you the secrets to getting this right and also how to avoid common mistakes. Baking is a science, and when making delicate pastries like Japanese cheesecake, eclairs, or macarons, there can be trial and error and adjustments for each baker in their home kitchen.
Keep reading for all my professional tips and tricks, plus the troubleshooting section!
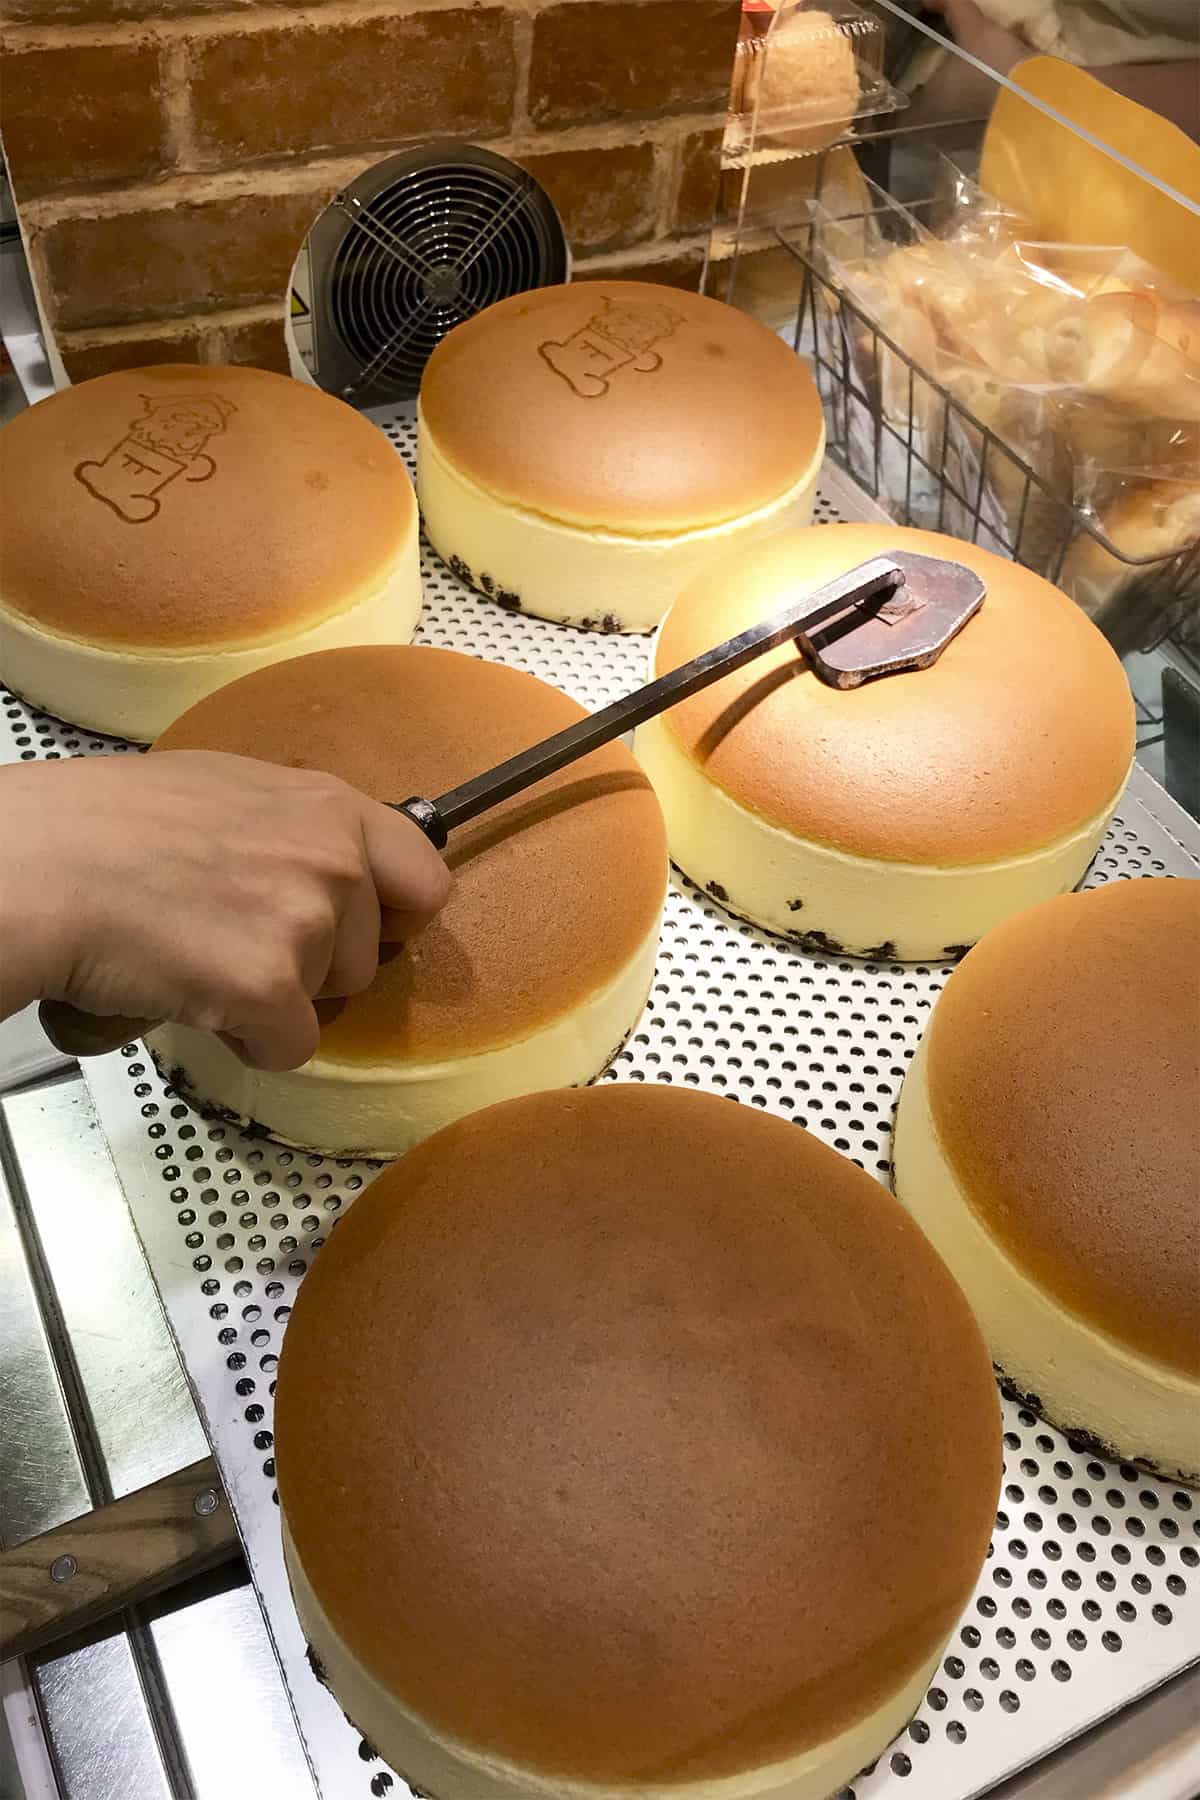
Katalin's experience trying the famous Ricuro's cheesecake in Japan
The recipe for Japanese jiggly cheesecake was first created by Japanese chef Tomotaro Kuzuno, inspired by käsekuchen cheesecake (a German variant) during a trip to Berlin in the 1960s.
When I visited Japan in 2019, I tried the famous Ricuro´s cheesecake in Osaka. I immediately decided to bring this fluffy Japanese cheesecake recipe to you so that you can make it at home no matter where you live in the world!
The original Ricuro cheesecake has raisins on the bottom, as you can see in my photo. However, it is not strictly necessary for this type of cheesecake from a baking technique point of view.
I´ve texted this recipe more times than I can count, using different ovens, different ingredient ratios, different baking times, and baking temperatures. Let´s start!

Make the cheesecake batter
First, start with making a bain marie (a water bath, which is also used to make dishes like Crème brûlée, and promotes even baking and prevents cracks). I recommend using a baking tin a few inches larger than the one you will use for the cheesecake. Fill it to ⅓ with water.
Preheat your oven to 150C / 300F with the water bath inside. Prepare your cheesecake baking pan by lining it with parchment paper. I am using a 20cm / 8-inch cake tin.
Separate your room-temperature eggs and ensure no egg yolk is in the egg white. If your granulated sugar has a larger grain, pulse blend it to grind it down further, then measure it afterward.
Heat the cream cheese with the unsalted butter and milk in a saucepan over low heat. Stir just until the mixture is smooth, then remove it from the heat.

Sift the cornstarch, salt, and flour together (it is best to use low protein content pastry flour). Mix it into the cream cheese mixture until the batter is smooth with no lumps.
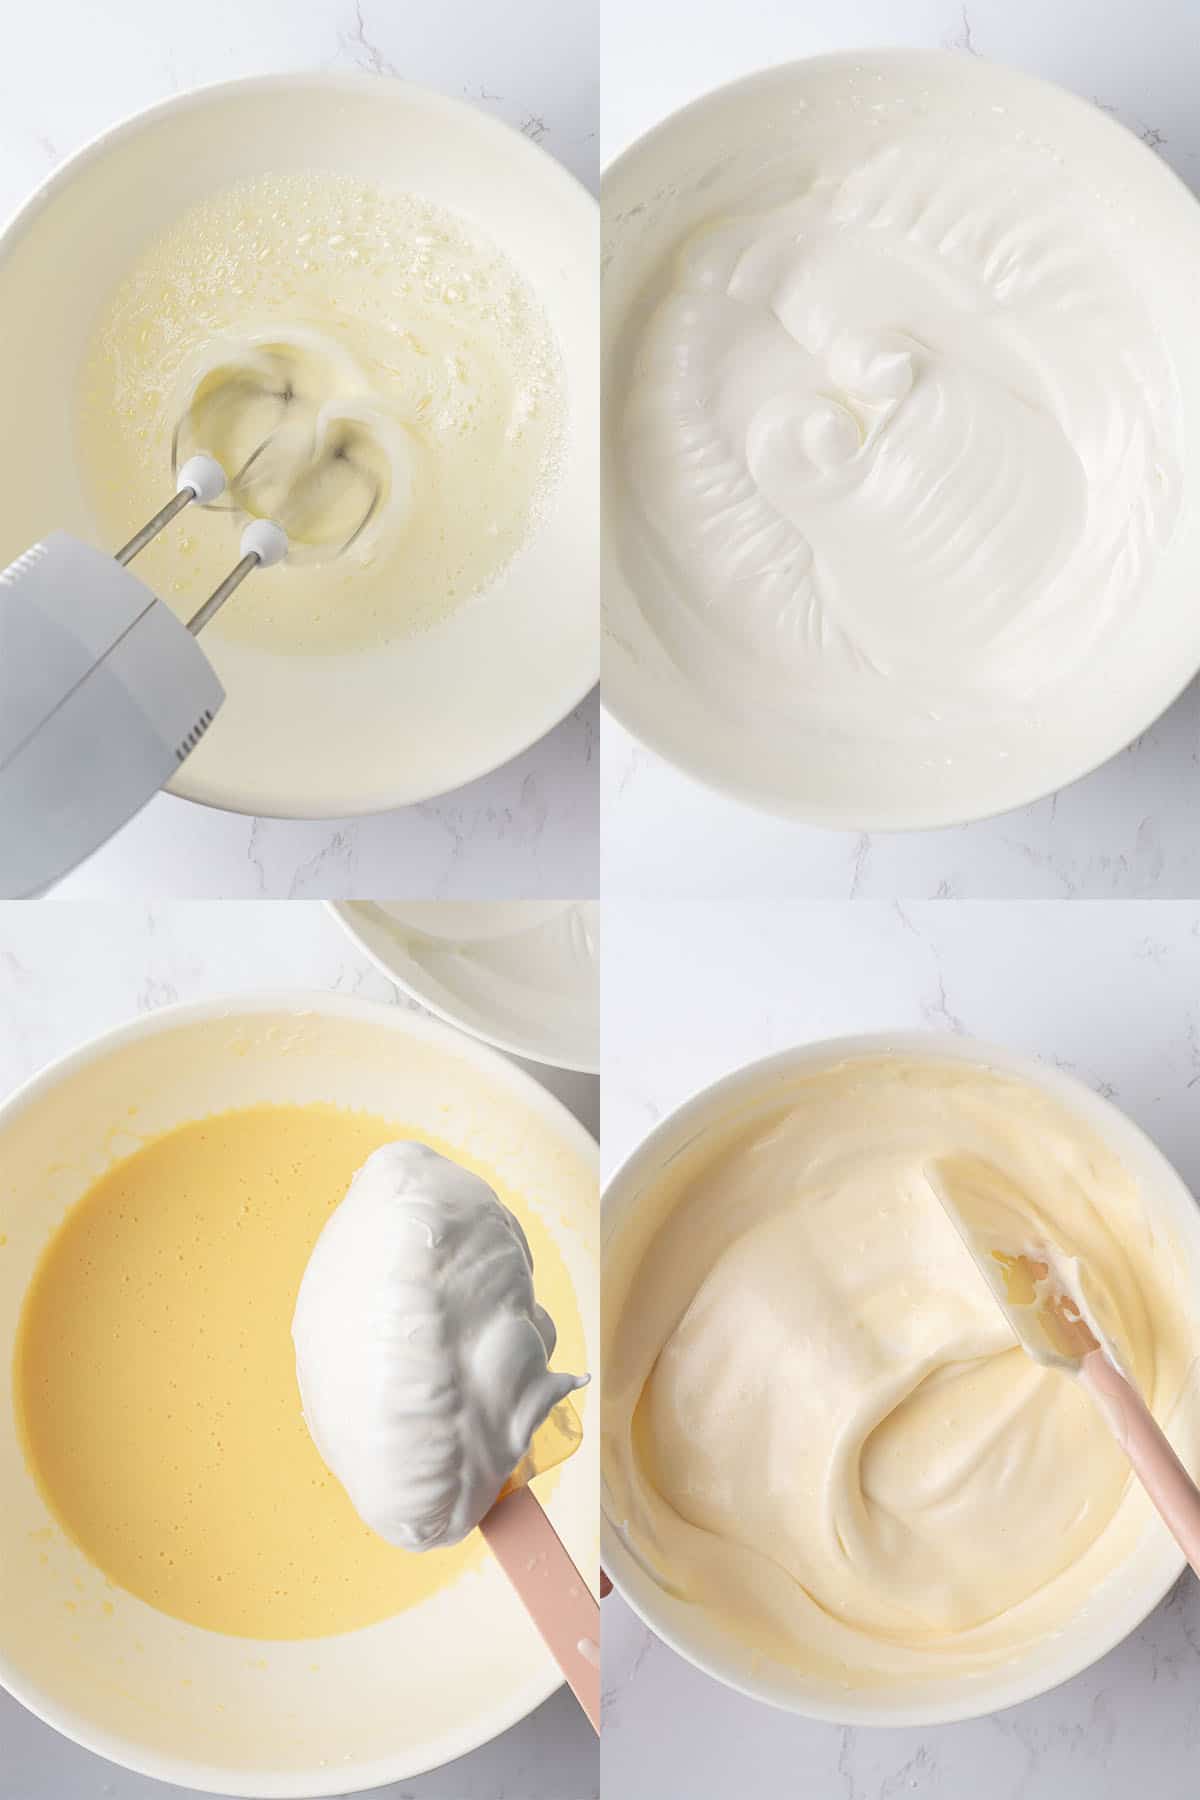
Then, one by one, add the egg yolks to the cream cheese mixture, mixing thoroughly after each addition.

Whip the egg whites on low speed in a stand mixer or using an electric hand mixer. Increase the mixer speed and gradually add the sugar one tablespoon at a time.
Continue until the mixture forms soft peaks. Do not whip to a stiff peak stage, as this can cause the cheesecake to deflate.
Gently fold the whipped meringue into the cream cheese batter with a rubber spatula, ensuring the mixture stays light and fluffy.
Bake and pray
As you can guess based on the title of this section, baking is the most difficult part of making Japanese cheesecake.
Pour the jiggly Japanese cheesecake batter into the prepared cake pan and place it in the preheated water bath in the oven to bake.
The baking will happen in 3 stages;
Bake at 150°C (300°F) for 30 minutes with the oven door closed.
Then, continue baking at the same temperature for another 20 minutes but with the oven door slightly open.
Finish the baking for another 20 minutes at 150°C (300°F) with the oven door closed. Use a digital oven thermometer, if available, to confirm accuracy.
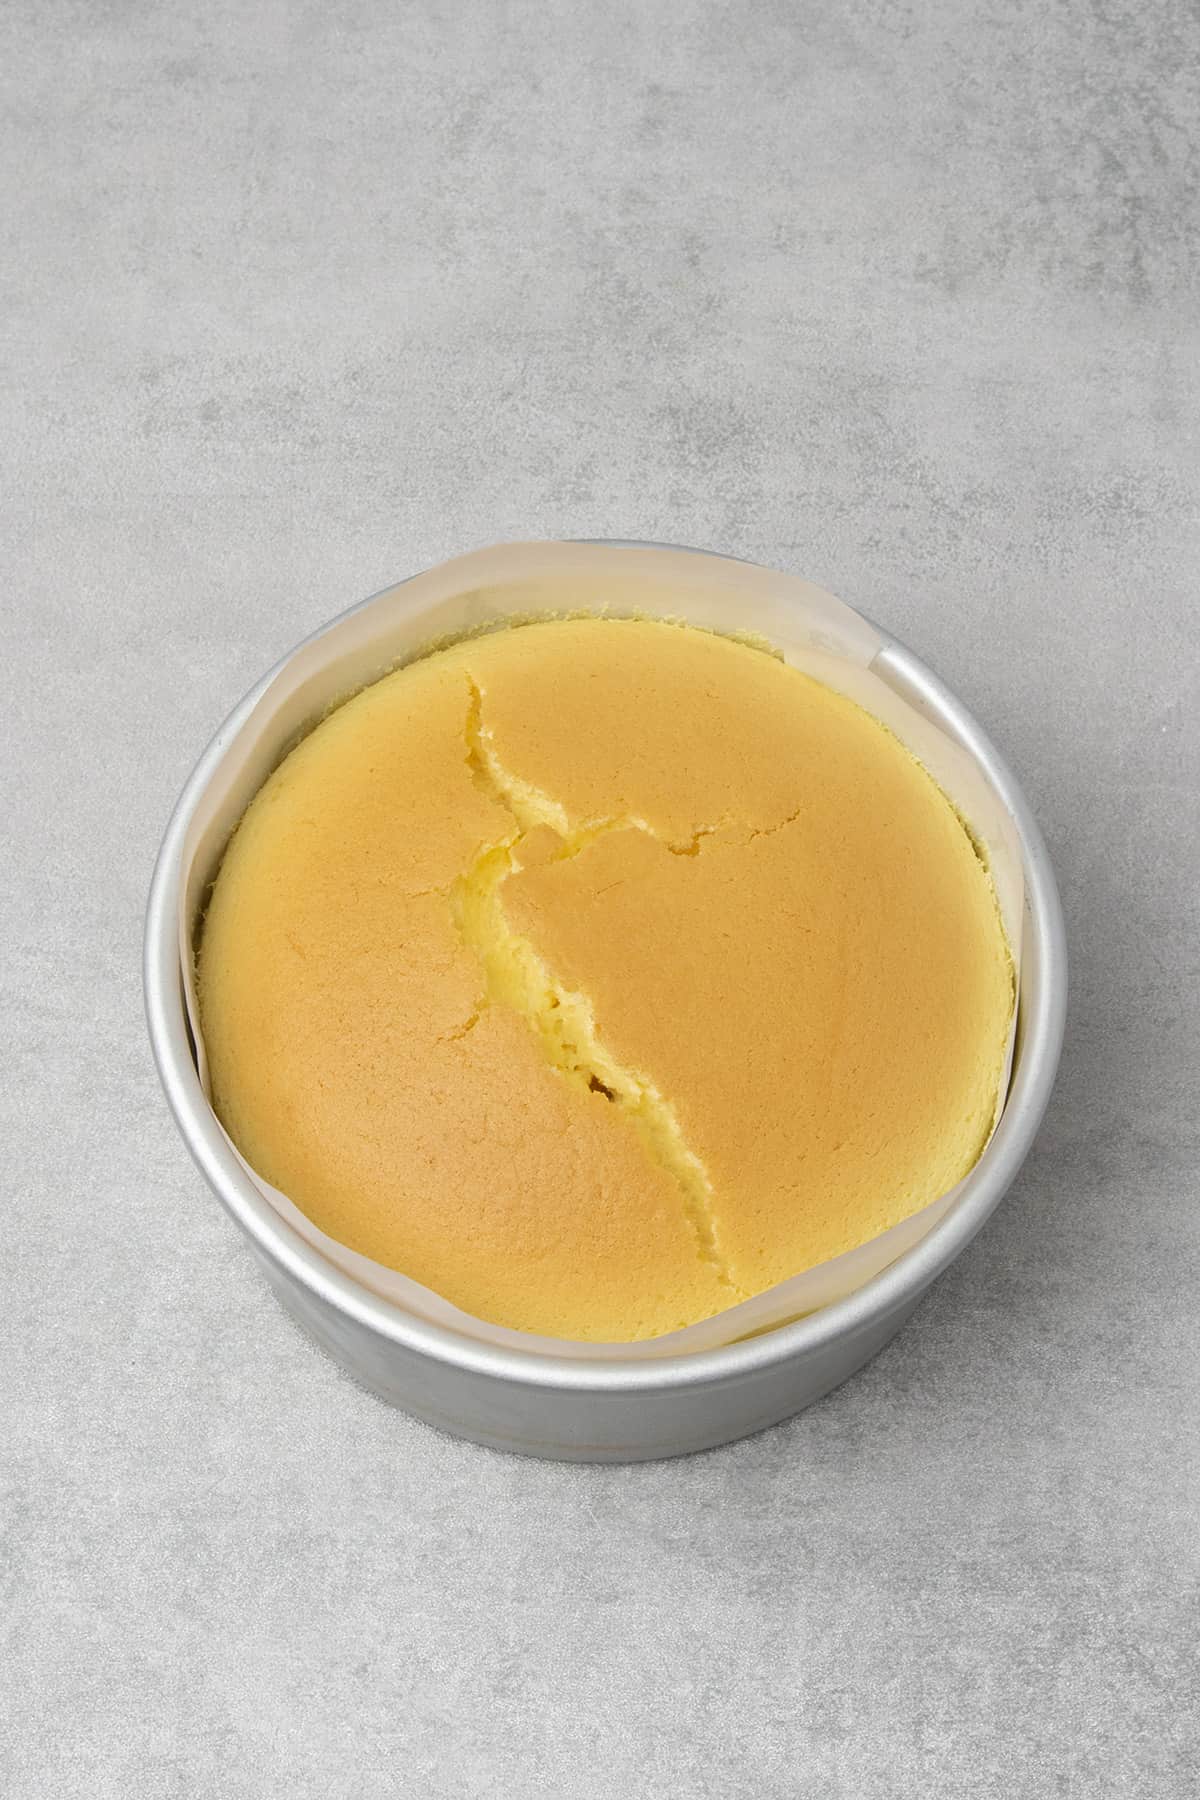
Monitor your cheesecake in the oven if you are baking it the first time. Aim for a gentle rise to avoid cracking on the surface, and look for a golden-brown top—fully colored but not burnt. Adjust the oven temperature if needed to achieve this.
The cheesecake is done when it has a golden-brown top, a slight jiggle in the center, and feels soft and springy to the touch.
Remove it from the oven once you are confident that the cheesecake is well baked. Flip it onto a plate, then flip it back onto another plate to keep its shape. Serve immediately while warm and jiggly.
Please note that with water inside the oven, you have to be super careful with the baking temperature. If it is lower than recommended, your cheesecake might stay raw even after 1,5h.

Storing and freezing
Jiggly Japanese cheesecake's airy texture is best enjoyed fresh. Any leftover cheesecake can be stored in an air-tight container in the fridge for 2-3 days. I do not recommend freezing Japanese cheesecake as this will affect the texture.

Flavor variations
The Japanese cheesecake is the perfect cheesecake on its own; I recommend you enjoy the taste and texture as it is.
However, you can perhaps dust it with powdered sugar and serve it with a bowl of fresh berries.
You can also add some vanilla extract to the batter to give this cheesecake a delicate vanilla taste. You can try making this into a chocolate Japanese cheesecake by substituting one tablespoon of flour with good quality Dutch process cocoa powder. Or, even matcha powder.
Try some of these cheesecake toppings to see how you can make this jiggly cheesecake recipe even more delicious!
Do not substitute the ingredients
This jiggly Japanese cheesecake recipe only contains a handful of ingredients, which are all essential to its taste and texture. Baking is a science, and it's all about precision!
If you want to substitute ingredients, you will be compromising on the outcome of this cheesecake recipe, and sadly, I cannot provide substitutes for allergies and diets.
Please check out my baking guides section to learn more about ingredients and their role in baking.
Expert tips to make Japanese cheesecake
- Use whole milk and ensure the cream cheese is full-fat and good quality. I recommend using Philadelphia (and try some of these other cream cheese desserts, too!)
- Use good quality, unsalted European-style butter with a high-fat content. I use 82% butter.
- Try to look for low-protein content pastry flour for the best results.
- While adding salt might seem strange, it brings out the flavor and balances the sweetness, so don't skip it!
- Work firmly but gently with a rubber spatula to fold the meringue into the cheesecake batter. Cut through the center of the mixture, then sweep along the sides of the bowl, lifting the batter gently and rotating the bowl. Avoid deflating the meringue to keep the Japanese cheesecake fluffy.
- The oven temperature is critical in this recipe. Preheat the oven with the water bath (bain-marie) inside to create a gentle and consistent heat around the cheesecake, and use an oven thermometer.
- Knowing when to take the Japanese cheesecake out of the oven is where you might need to experiment and run 1-2 tests. Practice makes perfect!
- Over time, as the cheesecake cools, it will further set into a chiffon cake-like consistency. It will lose its jiggly texture, and some wrinkles might appear on the top, which is normal and exactly how the Japanese cheesecake I tried in Osaka also behaved.

Troubleshooting
Your cheesecake cracked - The most common issue is Japanese cheesecake cracking; the main reason for cracks is the oven temperature being too high. This causes the cheesecake to rise too quickly and crack. Try baking your cheesecake at a slightly lower temperature next time.
The cheesecake is burnt on the top - This is also likely caused by the oven temperature being too high and fierce. Test your oven, and use an oven thermometer to ensure you are baking at the right temperature. Try baking your cheesecake at a slightly lower temperature next time, or move the cheesecake towards the bottom of your oven.
The cheesecake is raw in the middle - the cheesecake probably would have needed more time in the oven. Make sure you preheat the oven with the water bath inside. The cheesecake is done when the surface is golden brown, slightly jiggly in the middle, and soft and springy to the touch. Try baking your cheesecake longer next time, and make sure that your oven temperature is correct.
The cheesecake deflates - This issue is mainly caused by under-baked cheesecake, so see the points above. It can also be down to measuring the ingredients incorrectly, e.g., not adding enough flour. Make sure you weigh ingredients by the gram using a digital scale.
What equipment to use
I recommend using a lined 20 cm / 8-inch round cake pan. Avoid using a loose base spring form pan, as this can have issues with the water bath. If you do use a springform pan for the cheesecake - as I´ve done it - , wrap it thoroughly with aluminum foil to prevent water from getting into it.
Use an Electric hand mixer and a Rubber spatula to combine the ingredients.
Always weigh ingredients by the gram using a Digital scale for accuracy and consistency. I also recommend investing in a Digital oven thermometer, as the baking temperature for this jiggly Japanese cheesecake recipe is absolutely critical.
More cheesecake recipes
- Baklava cheesecake
- Burnt Basque cheesecake
- Pistachio cheesecake
- No-bake raspberry cheesecake
- Lemonade cheesecake
And for even more fun desserts that put a delicious twist on their traditional counterparts, check out my roundup of the 41 Best Unique Desserts.
Have you tried this recipe?
Please leave a 5-star ⭐️⭐️⭐️⭐️⭐️ rating on the recipe card and consider leaving a comment as well!

Jiggly Japanese Cheesecake
Equipment
- 20 cm / 8 inch cake pan
Ingredients
- 226 g (1 cups) Cream cheese full fat Philadelphia
- 55 g (¼ cups) Unsalted butter
- 120 g (½ cups) Whole milk
- 40 g (⅓ cups) All purpose flour low protein content flour e.g. pastry flour is ideal
- 15 g (2 tablespoons) Corn starch
- Pinch of salt
- 5 medium Eggs yolk and white separetely
- 75 g (⅓ cup) Granulated sugar superfine sugar is ideal
US customary cup measurement is an indicative figure only. Measure the ingredients with a digital scale by weight (gram). Baking is art but also science which requires precision and accuracy.
Instructions
- Line a 20 cm (8-inch) round cake pan with parchment paper, and preheat the oven to 150°C (300°F) with a water bath inside. Ensure the water bath reaches about halfway up the sides of the cake tin to promote even baking and prevent cracks.
- If using a loose-base pan, wrap it thoroughly with aluminum foil to keep water from getting into the cheesecake.
- In case your sugar granulates on the larger side, pulse it in a blender to make superfine sugar, then measure the amount needed. Separate the eggs into yolks and whites.
- Place the cream cheese, butter, and milk in a saucepan over low heat, stirring until completely smooth, then remove from heat.
- Sift the cornstarch, salt, and flour. Add them to the cream cheese mixture, until the batter is smooth and free of lumps.
- Then, add the egg yolks to the cream cheese mixture one at a time, mixing thoroughly after each addition.
- Using a stand mixer or hand mixer, start whipping the egg whites on low speed. Gradually add the sugar one tablespoon at a time, increasing the mixer speed as you go, and continue until the mixture forms soft peaks.
- Gently fold the whipped meringue into the cream cheese batter with a rubber spatula, ensuring the mixture stays light and fluffy.
- Then, pour the batter into the prepared cake pan, and place it in the water bath to bake. Start by baking at 150°C (300°F) for 30 minutes with the oven door closed, then continue at the same temperature for another 20 minutes with the oven door slightly open. Finish with an additional 20 minutes at 150°C (300°F) with the oven door closed, using a digital oven thermometer if available to confirm accuracy.
- Keep an eye on the cheesecake as it bakes; aim for a gentle rise to avoid cracking on the surface. Look for a golden-brown top—fully colored but not burnt—and adjust the temperature if needed to achieve this.
- The biggest question is when to take the Japanese cheesecake out of the oven and this is where you might need to experiment with your oven and run 1-2 tests. In practise, take the cheesecake out of the oven when it has a golden-brown top, a slight jiggle in the center, and feels soft and springy to the touch.
- If you are confident that the cheesecake is well baked, remove it from the oven, flip it onto a plate, then flip it back onto another plate to keep its shape.
- Serve immediately while warm and jiggly, and store any leftovers in the refrigerator for up to 2–3 days. Note that the cheesecake's airy texture is best enjoyed fresh.
Notes
- Always use unsalted butter in baking and add salt separately.
- I suggest using full-fat cream cheese and milk.
- For the flour, try to look for low protein content pastry flour.
- When separating the eggs, make sure no yolk goes into the white part, as that would make it difficult to whip up. It’s easier to separate eggs when they’re cold, as the yolks are firmer and less likely to break. However, for most baking, incl. this Japanese cheesecake, it’s best to let the separated whites and yolks reach room temperature before mixing, as they whip and incorporate better.
- Be careful not to overwhip the egg white; check the consistency regularly to avoid stiff peaks. Stiff peaks tend to form lumps and is very difficult to fold with the rest of the ingredients.
- To keep the batter airy while folding in the meringue, use a rubber spatula to cut through the center of the mixture, then sweep along the sides of the bowl, lifting the batter gently. Rotate the bowl with each fold, working firmly but gently to avoid deflating the meringue.
- The baking part is absolutely critical when making Japanese cheesecake. The most common reason for the cheesecake top to crack is a too-high oven temperature - cheesecake rising too quickly.
- A water bath, or bain-marie, is used to create a gentle and consistent heat around delicate baked goods like cheesecakes and custards. The water insulates the pan, helping the dessert bake evenly without direct high heat, which reduces the risk of cracking, drying out, or curdling. It also helps maintain a moist texture, giving cheesecakes a smooth, creamy finish.
Sam
Have you ever tried these in cupcake tins? I know it won’t have the same effect as the big jiggly cheesecake but I’m wondering if it’ll still be good overall in small cupcake form.
Katalin Nagy
It should work but you have to be careful not to overbake and I suppose it won't go jiggly.
Chris J
Gorgeous. I’ve used this recipe a few times now and it never lets me down. Follow it precisely, timer the baking times/steps and it is divine. It is now my go to for a relatively easy but impressive dessert at short notice.
Katalin Nagy
Lovely to hear, please let me know if you try any other recipe of mine!
Melissa Izquierdo
Absolutely delicious! Soft, flavorful and not too sweet. This recipe is a keeper
goo
good
Ana
Hello,
I was wondering if you have a recommendation if I wanted to add matcha or cocoa to the cheesecake so that it remains like the original recipe?
Katalin Nagy
Matcha can work (good-quality, added in a small amount); cocoa is almost sure to dry the batter out, so it needs to be tested and slightly reformulated.
Ally
Thank you for the recipe. I have a few questions.
In the instructions, it says “Start by baking at 150°C (300°F) for 30 minutes with the oven door closed, then continue at the same temperature for another 20 minutes with the oven door slightly open. Finish with an additional 20 minutes at 150°C (300°F) with the oven door closed, using a digital oven thermometer if available to confirm accuracy.”
If the oven door is slightly opened for 20 minutes after the initial 30 minute bake, how is the oven temperature maintained at 300°F when baking for next 20 minutes? Similarly, the instructions say to finish baking at 300°F for 20 minutes after the oven door was slightly opened; does this step require the cake to be removed and the oven to be preheated again to 300°F or preheat while the cake is still in the oven?
Additionally, if I only have large eggs, can I use 4 large eggs instead of 5 medium eggs? Also, my cake pans are only 1-2” tall. Can I divide the batter between two pans or bake in one pan with parchment lining the sides for additional height? Thank you.
Katalin Nagy
The temp will drop when the oven door open but it should be only slightly open for the steam to escape. The cheesecake should not be removed. Basically, you set the oven to 150°C (300°F) and halfway through baking, slightly open the oven door, then close it to finish baking the cheesecake.
If you only have large eggs, it is a good idea to use fewer.
I do not recommend making the cheesecake in any other pan than the one recommended. The main feature of this cheesecake is its tall, soufflé-like texture, which requires a tall baking pan.
zsuzsa
delicius
Anita Siu
This recipe is perfect. The shape and taste is incredible, at my first try. The middle of my cheesecake is a bit fragile, I might try again with a bit more time of baking.
Jane Brillinger Kuhlmann
I have a question…oven rack….should it be in the Center of the oven, or lower? Thanks
Katalin Nagy
Depends on your oven but center is usually the starting point.
Olivia
Just made this today and it turned out amazingly!
Bhavya
It is an amazing recipe. Just follow it blindly and you’ll get the best Japanese cheesecake ever. ❤️ was itching to try baking this for quite sometime. Finally tried it today and it came out perfect.
Lisa
It sounds as though your oven temperature was too high. When cakes rise too quickly, the top usually cracks. I'd check the oven temperature for accuracy and follow the directions precisely if you attempt to make the cake again.
Also, make sure that your oven door is open slightly (in the step provided in the recipe) to control moisture and slight temperature change in the oven during baking time.
I haven't made this cake yet, but I am an experienced baker.
Good luck!
MS TSUI TSANG
My cake was slightly under cooked whilst the top was cracked, how should I adjust the oven temperature and time? I used boiling water for the Bain Marie, is this correct? Thanks
Katalin Nagy
Your questions are all answered in the recipe instructions and tips.