
This baking guide will teach you how to blind bake pie crust like a pastry pro! Blind baking is the one technique that separates a soggy, disappointing pie from a crisp, golden, bakery-quality, sturdy crust. It takes less than an hour and works for both sweet and savory tarts and pies, from quiche to banana cream pie.
This guide walks you through the entire blind baking process step by step and gives you the tips and fixes most recipes skip, so you can say goodbye to soggy crusts for good.
What is blind baking exactly
Blind baking, or par-baking, means baking the pie crust before adding any filling. You prepare and shape your pie crust exactly as you normally would, but instead of filling and baking in one go, you weigh the empty crust down with pie weights and bake it in stages until fully or partially baked.
The name comes from the fact that the crust bakes "blind", so without the filling that would normally bake alongside it.
When to blind bake pie crust
Custard pies, such as pumpkin pie and pumpkin cream cheese pie are loaded with moisture. A raw crust under all that liquid would turn soft and pale and likely wouldn't bake through. Pre-baking is the only solution. The same logic applies to ricotta pie and rich egg-based fillings like quiche, where the wet custard would keep the bottom perpetually underbaked without blind baking it first.
No-bake fillings are the other major category. If the filling goes into the crust already cooked, you need a pre-baked crust, obviously. This includes any pies and tarts with a stovetop custard, such as vanilla cream pie or butterscotch pie.
A reliable recipe will always specify whether blind baking is needed.
When not to blind bake pie crust
You cannot blind bake any double-crust pies. Apple pie and blueberry pie are the most classic examples.
That said, skipping blind baking in a double-crust pie comes with a responsibility: the filling must have enough thickening agent to hold together and not flood the bottom crust with liquid during baking. Cornstarch does this job in most fruit pie fillings, and using the right amount isn't optional.
This is also why baking the pie long enough matters. The filling needs to bubble actively in the center before you take it out of the oven. Edge bubbling is not enough. The center must bubble too, which is when you know the cornstarch has fully activated and the filling will set as it cools.
Fully blind baked vs. partially baked pie crust
These two terms are used interchangeably online, but they describe two different outcomes.
A fully blind-baked crust is baked completely before adding anything. It comes out of the oven golden brown and ready for a filling that won't be baked again or needs only minimal heat.
A partially baked crust (also called par-baked) is taken out of the oven when it is set but not yet golden. The pie filling then goes in, and both finish baking together.
My recommendation is always to fully blind bake rather than par-bake when in doubt. A fully pre-baked crust gives you complete control. If the edges start to over-color during the second bake with the filling, a piece of foil over the rim fixes it instantly. A soggy bottom is a far harder problem to fix.
Katalin's key take on why pie crusts shrink during baking and how to avoid it
Shrinking is the most common blind baking problem, and it almost never comes from the dough recipe itself. It comes from how the dough was handled.
When you stretch the dough into the dish, you are building tension into the pastry. The moment oven heat relaxes that tension, the crust springs back and the sides slip down. The fix is to use only pushing and pressing movements when placing the dough, letting it settle into the dish naturally without any force.
Cold dough is equally critical. Fat that is still firm when the crust enters the oven holds the shape in place while the structure sets. Fat that has softened melts before the pastry can firm up, and the sides start slumping and sliding down the dish. After shaping, always place the crust in the freezer for at least 30 minutes before baking.
What are pie weights
Pie weights are small ceramic or metal balls that sit on top of the lined raw crust during the first stage of baking. They prevent the bottom from puffing up as steam builds inside the dough, and they hold the sides of the crust against the dish before the pastry has had time to set and firm up on its own.
You do not necessarily need to buy them. Dry beans, uncooked rice, lentils, and even clean pennies work just as well as purpose-made weights. Whatever you use, fill the crust generously and make sure the weights press firmly up against the sides, not just pile up on the bottom. See all the options in my pie weights substitute guide.
How to blind bake pie crust without weights
The only reliable way to blind bake without pie weights is to use a perforated tart tin paired with a perforated baking mat. The holes let direct airflow and heat reach the bottom of the crust, replacing the function of the weights. My pâte sablée recipe uses this method and does not require weights at all.
In a standard solid pie dish, weights are essential. The dish traps moisture underneath, and without the physical pressure of the weights, the crust will puff, and the sides will collapse before the pastry sets.
What is pie crust docking
Docking means pricking the bottom of the crust all over with a fork after you remove the weights. The holes give any remaining steam a place to escape, which prevents the bottom from puffing and bubbling as it finishes baking. Do this immediately after removing the weights and before the crust goes back in for the second stage.
Some sources suggest docking the crust before adding the weights and skipping the weights altogether. In practice this rarely works well. Without the weights, the sides still tend to slip during baking. Use weights for the first stage, then dock the bottom before the second.
How to roll pie dough properly and place into the pie dish
After making your pie crust, let the dough rest in the fridge for at least 2 hours before rolling. The gluten needs time to relax, and the butter needs time to firm. Dough that goes under the rolling pin too soon will resist, snap back every time you try to roll it thin, and shrink dramatically in the oven.
Then, when you take the dough out of the fridge, do not roll it immediately. Cold dough straight from the refrigerator is often too firm and will crack at the edges the moment you press the rolling pin into it. Let it sit on the counter for about 5 minutes.
If it still feels rock solid, wait another 2 to 3 minutes. If it starts to feel soft or greasy, it has already warmed too much; return it to the fridge for 10 minutes before trying again. The window you are looking for is dough that is cold to the touch but pliable enough to be rolled without cracking.
Lightly flour your work surface and your rolling pin. Place the dough disc in the center and begin rolling from the middle outward, rotating the dough a quarter turn after every few rolls. Rolling from the center rather than back and forth in one direction keeps the thickness even and prevents the edges from thinning out before the center is large enough.
How to place the dough into the pie dish
For a standard 9-inch / 23 cm pie plate (also called a pie pan or pie, you need a circle of about 10 to 11 inches / 26 to 28 cm in diameter, roughly 1 inch / 2.5 cm wider than the dish on every side. If the dough sticks to the surface at any point, lift it gently and add a little more flour underneath. If cracks form at the edges, press them back together with your fingers immediately before they widen further.
To transfer the dough into the dish, fold it loosely in half and then in half again to form a quarter-circle shape. Lift it, position the center point over the middle of the pie dish, and unfold it gently. Do not stretch or pull at any point.
Once unfolded, let the dough settle into the dish under its own weight first. Then use your fingertips to ease it into every corner and along the sides with small, downward-pushing movements.
Then crimp or flute it using your fingers or a fork. Fluting is not just decorative: it reinforces the edge and helps it hold its shape during baking instead of collapsing inward.
How to blind bake pie crust step by step
Once the dough is in the dish and finely fluted or crimped, freeze the dish with the unbaked pie crust for 30 minutes while you preheat the oven to 390°F / 200°C with no fan. Use the lower-middle rack position for the most even heat distribution.
After 30 minutes, once the oven is hot enough and the pie dough is cold enough, press a sheet of crumpled parchment paper (crumpling it first makes it easier to fit into curves) against the inside of the crust so it touches every surface.
Fill it with weights to the top and press them against the sides.
First stage: bake at 390°F / 200°C for 20 minutes. The edges of the crust will begin to look golden and the pastry will feel set, but the bottom will still look undercooked at this stage. That is expected.
Remove the parchment and weights, then immediately prick the bottom of the crust all over with a fork. If the edges look golden enough already, cover them loosely with foil before returning the dish to the oven.
Second stage: bake at 390°F / 200°C for another 15 minutes until the bottom looks dry and just starts to turn golden.
Now brush the inside of the crust, bottom and sides, with a thin layer of egg white only. The egg white sets in the oven, creating a moisture barrier that seals the pastry against liquid from the filling. My egg wash guide explains all the variations. For a glossy golden rim, also brush the edges with a mixture of egg yolk and a small splash of milk.
Third stage: return the crust to the oven for a final 15 minutes at 390°F / 200°C or until fully golden. If the side browns too much, cover it with aluminum foil.
How to tell when a pie crust is fully baked
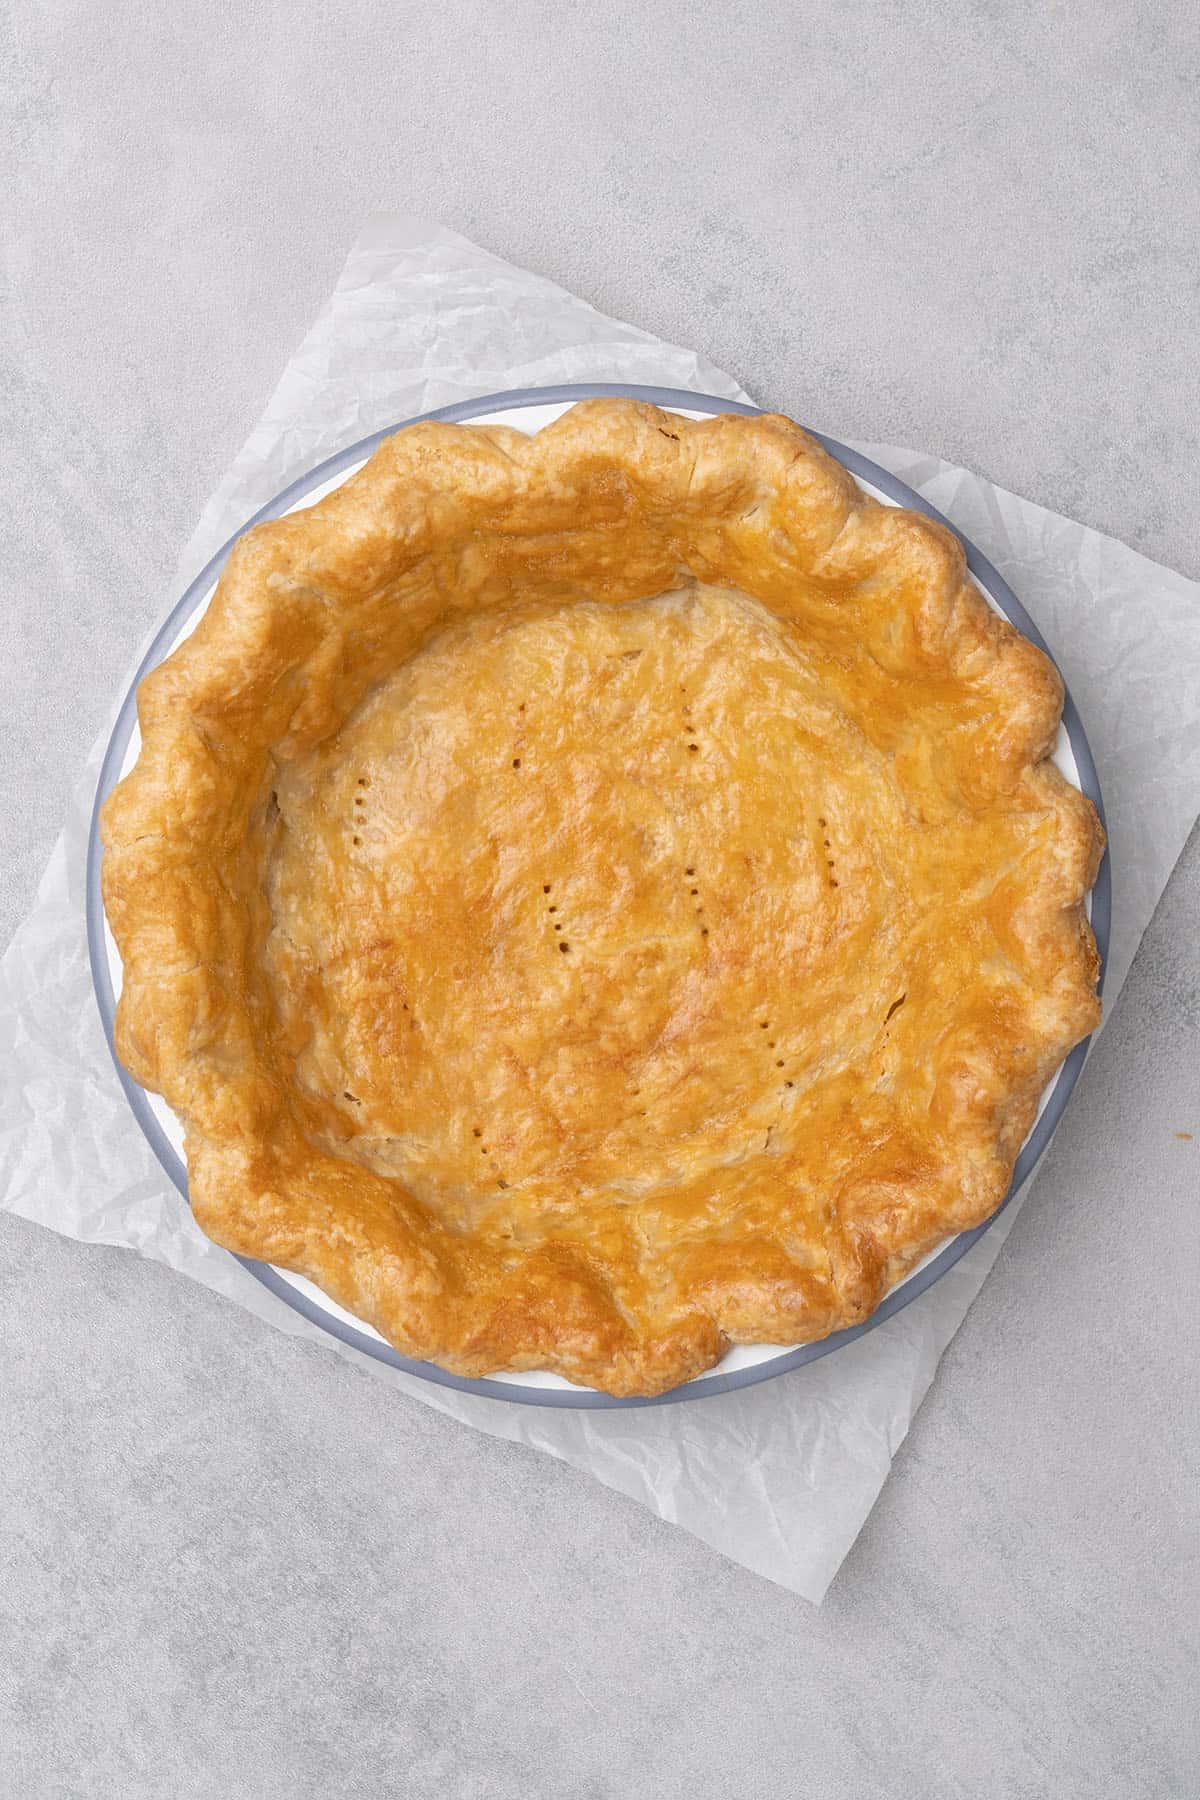
A fully blind baked crust should be an even, deep golden brown across the entire surface, including the bottom. There should be no pale or soft patches, and when you press the bottom lightly, it should feel firm and dry, not soft.
The edges will often have pulled away slightly from the sides of the dish. This is exactly what you want. If any part of the crust still looks doughy or underbaked, return it to the oven for a few more minutes.
If the crust turns golden brown before the stated baking time and the sides start to pull away from the pie dish, consider it well baked and remove it from the oven.
For no-bake fillings, let the crust cool completely before adding anything.
For pies that will be baked again with a filling, such as pumpkin pie, you can fill the warm crust and bake straight away unless the recipe says otherwise.
Pie Crust Troubleshooting
Problem: Cracks in the pie dough while rolling
Solution: Cracks when rolling usually mean the dough is too cold or too dry. Let it rest at room temperature for 3 to 5 minutes before rolling so the fat softens just enough to make it pliable without warming through. Press small cracks back together with lightly moistened fingers. To prevent this entirely, weigh your flour precisely with a digital scale. Measuring by cup consistently adds too much flour and dries out the dough.
Problem: Pie dough is too sticky
Solution: Sticky dough usually means too much water or dough that isn't cold enough. Refrigerate the dough for 30 minutes before deciding whether it needs more flour. Often, chilling alone is enough to make it workable. If it is still unmanageable, add flour in very small increments or use a generously floured surface when rolling.
Problem: Pie dough shrinks during baking
Solution: The dough was almost certainly stretched rather than pressed into the dish. Unfortunately, there is not much to recover once the crust has shrunk and baked. Push, never pull, and freeze before baking.
Problem: Pie edges over-browned
Solution: Cover the rim with foil or a pie shield as soon as it reaches the color you want. You can do this at any point in the bake. If your edges consistently brown too fast, your oven likely runs hot. A digital oven thermometer will confirm this.
Problem: Pie crust bakes unevenly
Solution: Rotate the pie dish 180 degrees halfway through each baking stage. Almost every oven has hot spots, and rotating corrects for them.
Problem: Pie has soggy bottom
Solution: Blind baking is the foundation of the fix, but the egg-white wash after the second bake truly seals the crust. Do not skip it. Also, make sure your filling has enough thickening agent. Even a perfectly baked crust will soften under a filling that is too wet and under-thickened.
Make-ahead and storage
A fully blind baked crust can be made up to 5 days in advance and stored in the fridge, wrapped tightly in plastic wrap. At room temperature it keeps for 2 days. For longer storage, freeze it for up to 2 months and thaw at room temperature for about an hour before filling.
You can also freeze the shaped, unbaked crust directly in the pie dish for up to 3 months. Bake it straight from frozen and add 3 to 5 minutes to the first stage to account for the extra cold.
A par-baked crust (only partially baked) keeps in the fridge for up to 3 days before you add the filling and finish baking. Cover it loosely and let it sit at room temperature briefly before filling.
Expert Tips
- Handle the dough as little as possible. Overworking develops gluten, which makes the crust tough and also increases the likelihood of shrinking. Stop mixing as soon as the dough comes together.
- Crumple your parchment paper into a ball before pressing it into the crust. A flat sheet fights you around the curves. A pre-crumpled one conforms to the shape with almost no effort.
- Always place the pie dish on a baking sheet. It gives you something stable to grip when rotating or removing the hot dish, and it catches any butter that drips.
- When the weights come out, the bottom of the crust will puff up slightly. This is steam escaping and it is completely normal. It deflates as baking continues.
- The egg white wash on the inside of the crust is the most underrated step in blind baking. Most published recipes do not include it. Do not skip it.
- You can freeze the shaped, unbaked crust in the dish for up to 3 months. This is a game-changer for holiday baking. Prepare several shells at once and bake them directly from frozen as needed.
Equipment notes
A digital scale is the single most important tool for making pie dough. The flour measurement has to be accurate, and the cup-and-scoop method never is. A digital oven thermometer is the second most important.
For rolling, a rolling pin and silicone baking mats make the process easier and mean you do not need to dust as much flour, which would change the texture of the dough.
The standard dish size for most pie recipes is a 9-inch / 23 cm pie dish. For the weights, two packs of ceramic pie weights is the right amount for a 9-inch dish.
Have you tried this recipe?
Please leave a 5-star ⭐️⭐️⭐️⭐️⭐️ rating on the recipe card and consider leaving a comment as well!

How To Blind Bake Pie Crust
Equipment
Ingredients
Pie dough
- 1 portion Pie dough try my all butter 3 ingredients pie crust or my extra flaky pie crust
- 1 portion Egg wash try my egg wash recipe
US customary cup measurement is an indicative figure only. Measure the ingredients with a digital scale by weight (gram). Baking is art but also science which requires precision and accuracy.
Instructions
- Make a pie dough and rest it in the fridge for at least 2 hours.
- Roll out to a 10-11 inch / 26-28 cm circle on a lightly floured surface.
- Transfer it to a 9-inch / 23 cm pie dish using only pushing movements. Trim, fold, and flute the edges. Freeze for 30 minutes.
- Meanwhile, preheat the oven to 390°F / 200°C with no fan, and place the rack in the lower-middle position.
- Crumple a sheet of parchment paper and press it firmly against the inside of the crust so it touches every surface. Fill with pie weights, pressing them up against the sides and bottom. Set the dish on a baking sheet.
- Stage 1: Bake at 390°F / 200°C for 20 minutes. The edges will start to look golden, but the bottom will still look undercooked.
- Remove parchment and weights. Prick the bottom all over with a fork. Cover the edges with foil if already golden. Stage 2: Bake for another 15 minutes at 390°F / 200°C until the bottom looks dry and just starts to color.
- Brush egg white wash over the bottom and sides of the crust. Brush the edges with egg yolk mixed with a small splash of milk for a glossy finish.
- Stage 3: Bake for a final 15 minutes at 390°F / 200°C until the crust is fully golden all over. Cover the sides with aluminum foil if browning too much.
- Use this blind-baked pie crust according to the recipe you are making.
Make ahead and storage
- A fully blind-baked crust keeps in the fridge for up to 5 days, tightly wrapped in plastic wrap, or at room temperature for 2 days. Freeze for up to 2 months and thaw at room temperature for about an hour before filling.You can also freeze the shaped, unbaked crust directly in the pie dish for up to 3 months. Bake straight from frozen and add 3 to 5 minutes to Stage 1.A par-baked crust keeps in the fridge for up to 3 days before you add the filling and finish baking.
Notes
- All ingredients must be very cold throughout. Cold butter creates flaky layers; warm butter creates grease.
- Always weigh with a digital scale. Too much flour dries out the dough and causes it to crack.
- The egg white seals the inside against moisture. The egg yolk-milk mix gives the rim its shine. These two washes are applied at the same time for different purposes.
- Stop mixing the dough the moment it just comes together in the bowl. Overworking develops gluten, which makes the crust tough and prone to shrinking.
- Never skip the chill. At least 2 hours in the fridge lets the butter firm up again and the gluten relax.
- Push the dough into the dish; never stretch or pull. Tension in the dough causes it to shrink in the oven.
- Freeze the shaped crust before baking. Firm fat holds the structure in place while the oven comes up to temperature.
- Pack the pie weights all the way up against the sides, not just across the bottom, or the sides will still slip.
- Dock (fork-prick) only after the weights come out, not before — the weights do the job during the first stage.
- The bottom will puff slightly once the weights are removed. This is normal steam escaping; it settles as baking continues.
- Do not skip the egg wash. It is the most effective step for preventing a soggy bottom.
Leave a Reply