This mini White Chocolate Raspberry Tart recipe has a buttery, melt-in-your-mouth shortcrust pastry shell filled with a super easy an delicious silky raspberry ganache.
Jump to:
🌟 Why This Is The Best White Chocolate Raspberry Tart Recipe
- It's easier than it looks - I take you through this recipe step by step, giving you all my top tips. So whilst it might seem daunting, it is actually not that hard!
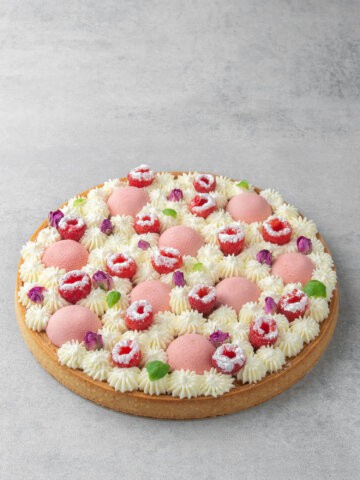
- It's so professional looking - Decorate the raspberry white chocolate tart with piped white chocolate, edible flowers, and fresh and freeze-dried raspberries. No one will believe you didn't buy it in a fancy French patisserie!
- It tastes divine - I never compromise on taste! The white chocolate and raspberry tart filling is full of real raspberry flavor and has the smoothest, silkiest texture. Coupled with the buttery crust, it is irresistible!
📝 Ingredient Notes
For the tart crust

Unlike traditional American flaky pie crust, Pate sablee makes a crispier and more biscuit-like tart shell. Here is what you need to make it.
- Flour - I use pastry flour, which is lower in protein content, for this French tart shell recipe. But all purpose flour will also work if you can't find pastry flour in grocery stores. Learn more about different types of flour in my flour guide.
- Almond flour - I bake pâte sablée with almond flour for a slightly crispier pastry with some delicious marzipan taste. You can replace it with hazelnut, walnut, or pistachio flour or an equal amount of all-purpose flour.
- Powdered Sugar - A small amount of powdered sugar (icing sugar) makes the tart case sweet but not overly sweet. Learn more by reading my sugar guide.
- Salt - This balances the sweetness and enhances all the flavors.
- Butter - Always use unsalted butter with a high-fat content of at least 82%. The butter needs to be chilled, so I recommend cutting it into cubes and placing it into the freezer for 10-15 minutes before using it.
- Egg - Eggs are baking superheroes; you might not believe all the roles eggs play in baking! Make sure they are at room temperature.
🛒 You’ll find detailed measurements for all Ingredients in the printable version of the Recipe Card at the bottom of this post
For the white chocolate raspberry ganache filling
- White chocolate - I use Valrhona Ivoire 35% white chocolate, which tastes amazing and works wonderfully in this ganache filling. To learn more about white chocolate, read my white chocolate baking guide.
- Cream - Use cream with a high-fat content between 36% and 40%.(known as whipping cream, heavy cream, or double cream).
- Raspberries - You can use fresh raspberries or frozen raspberries in the filling for this mini raspberry tart. I use frozen raspberries and hand blend them into a puree before pushing it through a sieve to remove the seeds.
🛒 You’ll find detailed measurements for all Ingredients in the printable version of the Recipe Card at the bottom of this post
👩🏼🍳 How To Make This Recipe
Make sure you check out my Ultimate Pâte Sablée Guide before you begin. It's a super detailed guide (including a video) that explains everything about how to make sweet shortcrust pastry with all my pro tips.
How to make tart crust
- Sift together the flour, icing sugar, and salt in a large mixing bowl.
- Add very cold chunks of butter to the dry ingredients and rub the mixture between your hands until it becomes a sand-like consistency.
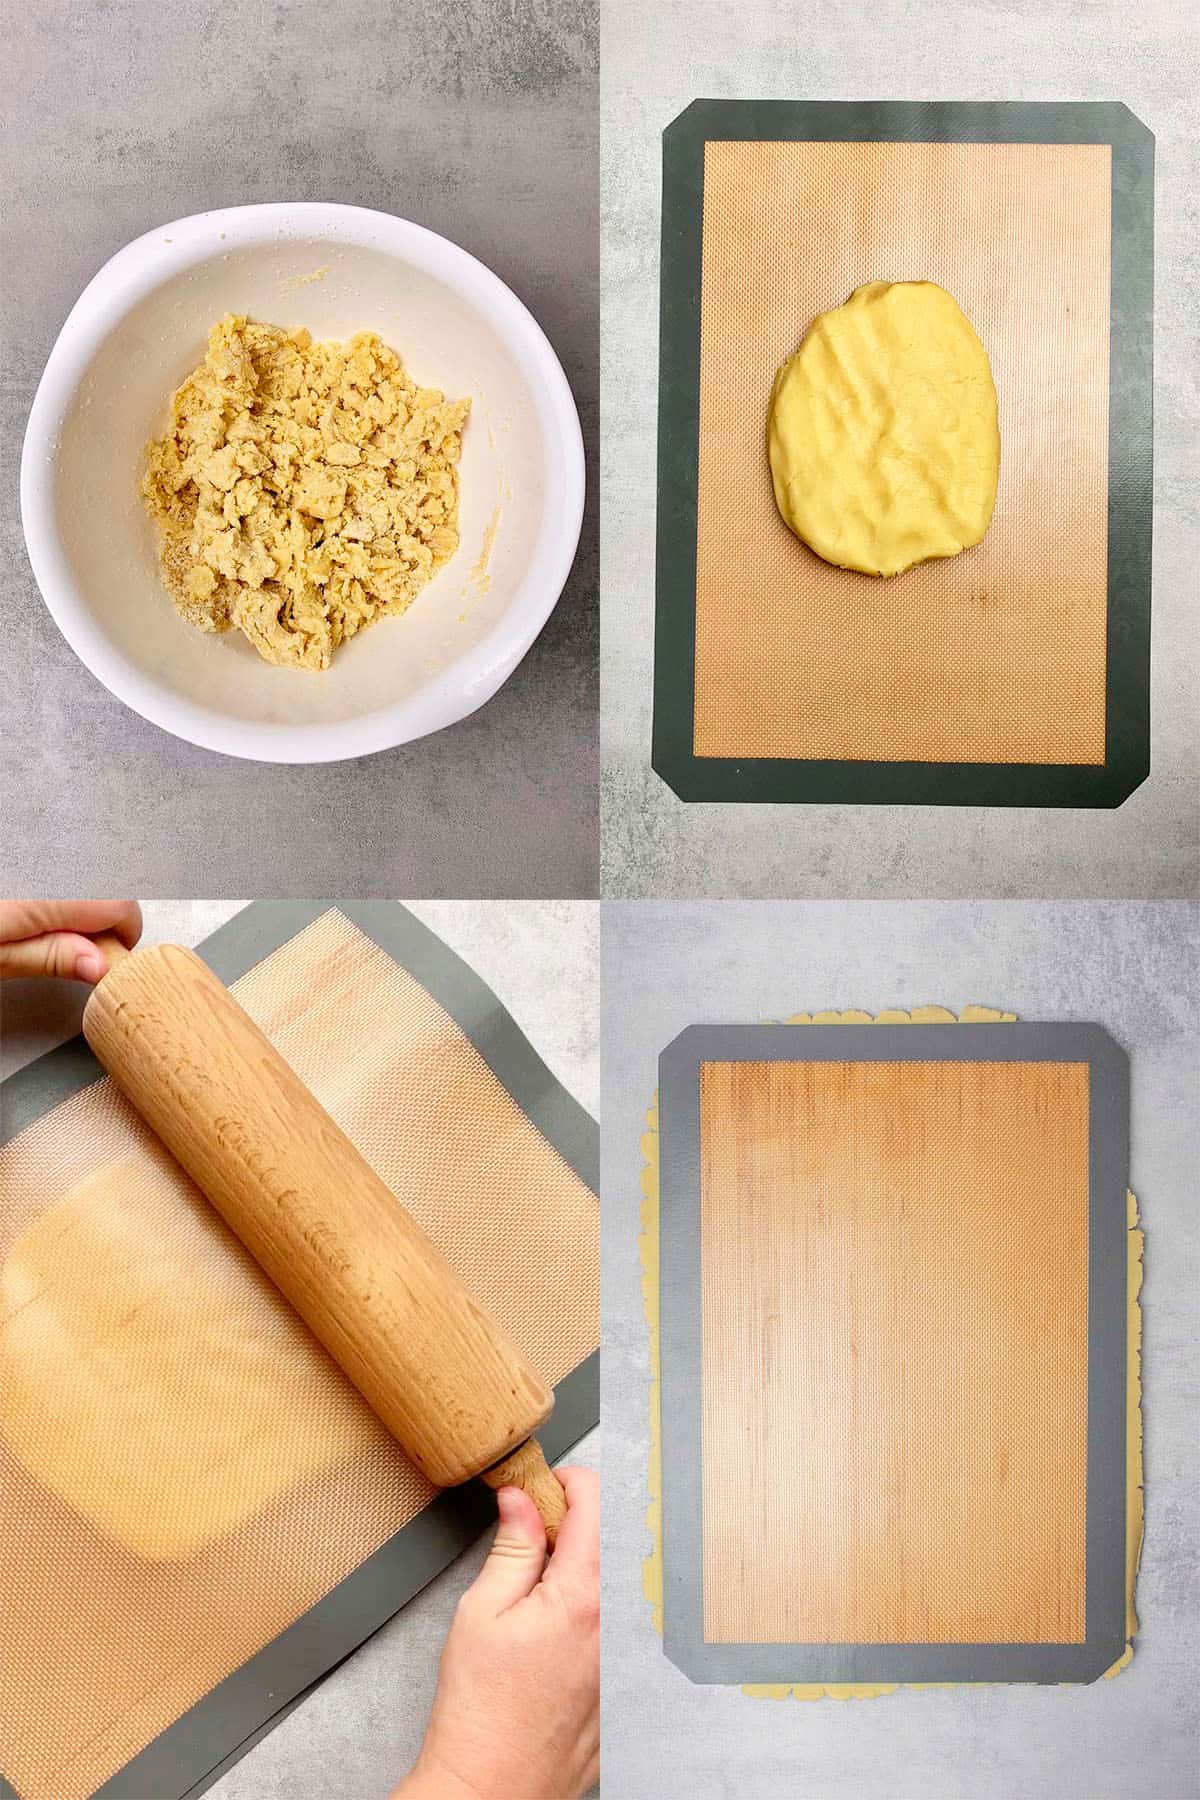
- Slowly add the egg, and mix with your hands just until the dough comes together. It might look crumbly at first but do not add anything else to the recipe. Gently knead the dough with the palm of your hand for a minute or two until the dough becomes smooth.
- If the dough is too warm and sticky, place it in the fridge for 10-15 minutes. Otherwise, roll it out to 2mm thickness between two Silicone baking mats and place the whole thing in the freezer for 10-15 minutes.
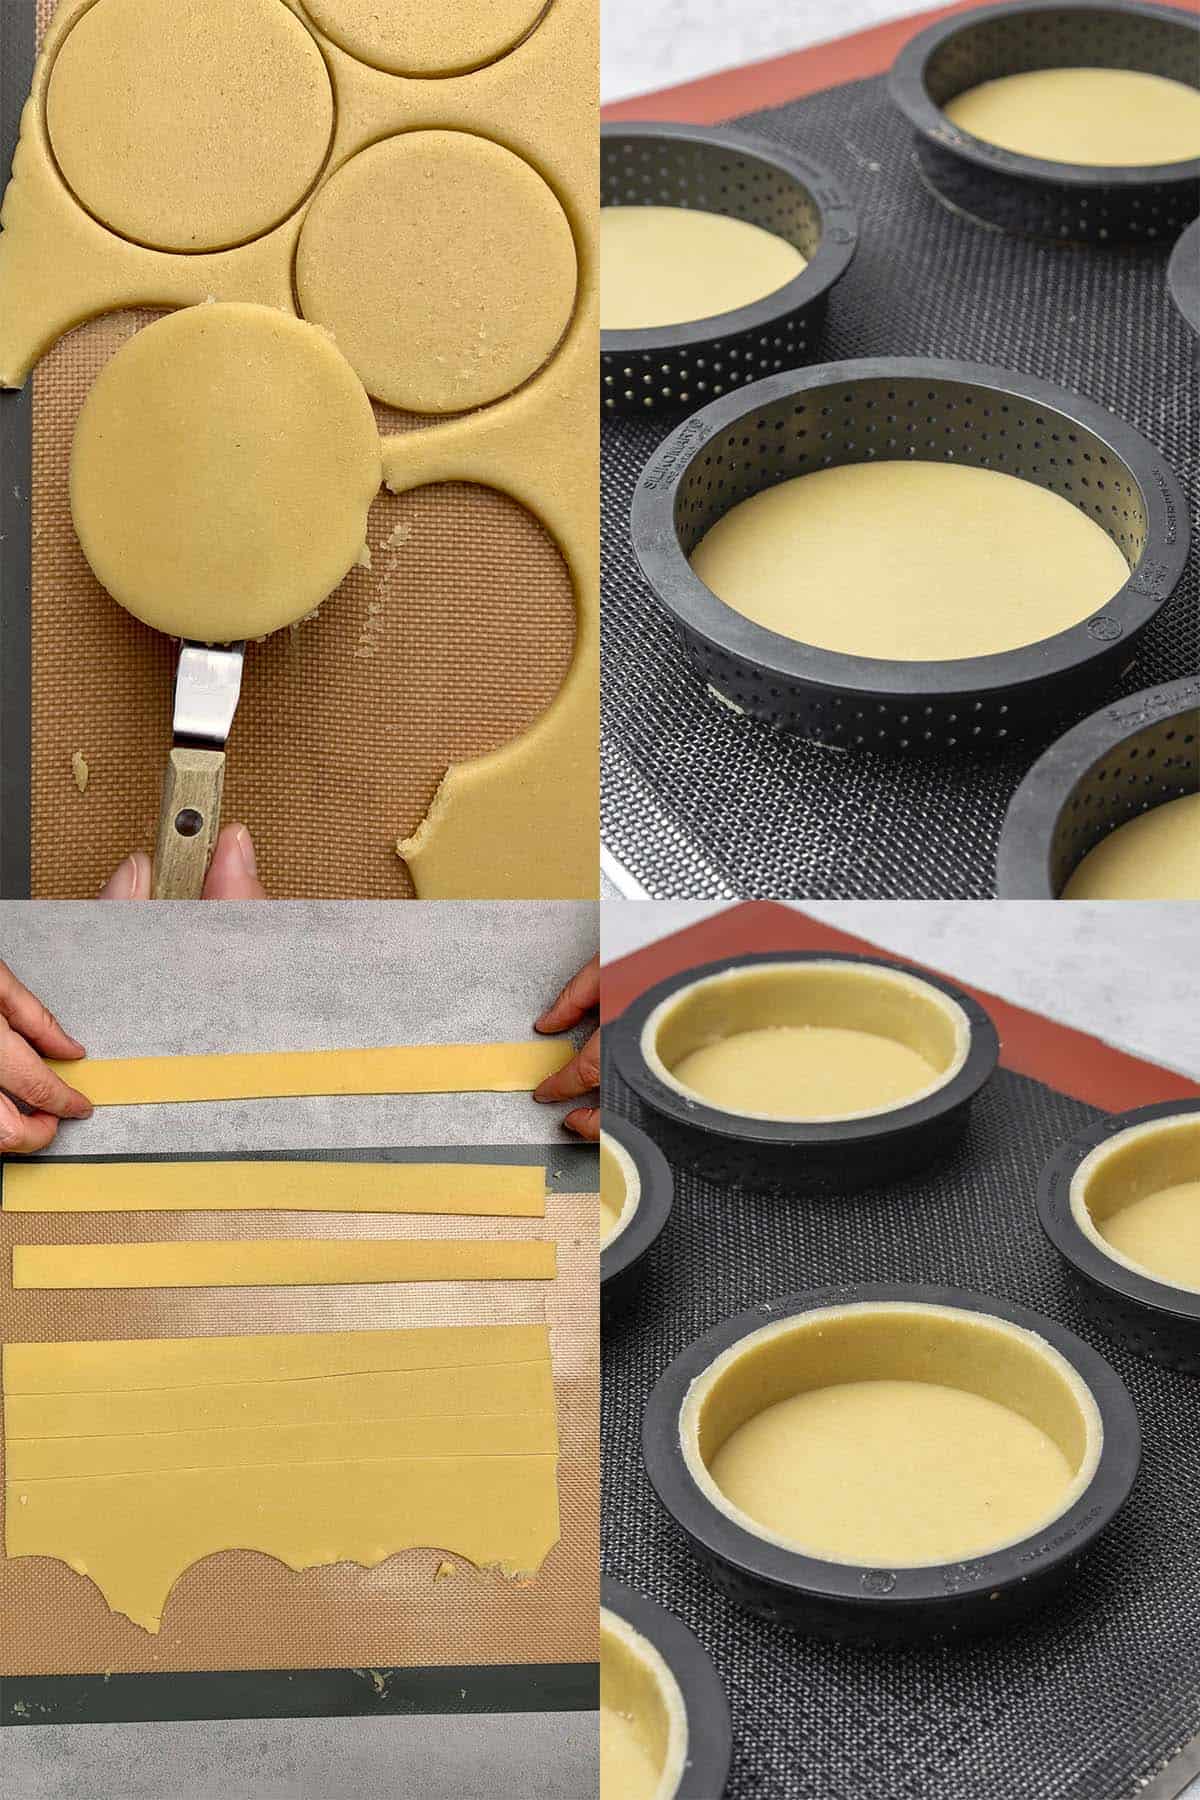
- Take the dough sheet and baking mats out and remove the top mat. Use one of the Perforated tart rings to cut out 8 circles, which will be the bottom of your tart crust. Carefully move them into the rings.
- Cut 8 long strips out of the dough and place them into the rings to form the side of the tart. Press each strip into the side of the rings so it sticks to them, and place them in the freezer for one hour.
- Preheat the oven to 160C / 320F.
- Take the pastry rings out and trim them with a sharp knife.
- Bake the tart shells for 20 minutes, then carefully remove the rings. Bake for a further 5-10 minutes until they are golden brown. Let the tart shells cool before filling.
💡 Top Tip: My sweet shortcrust pastry guide has an in-depth troubleshooting section as well as detailed information on techniques and equipment.
How to make white chocolate raspberry ganache
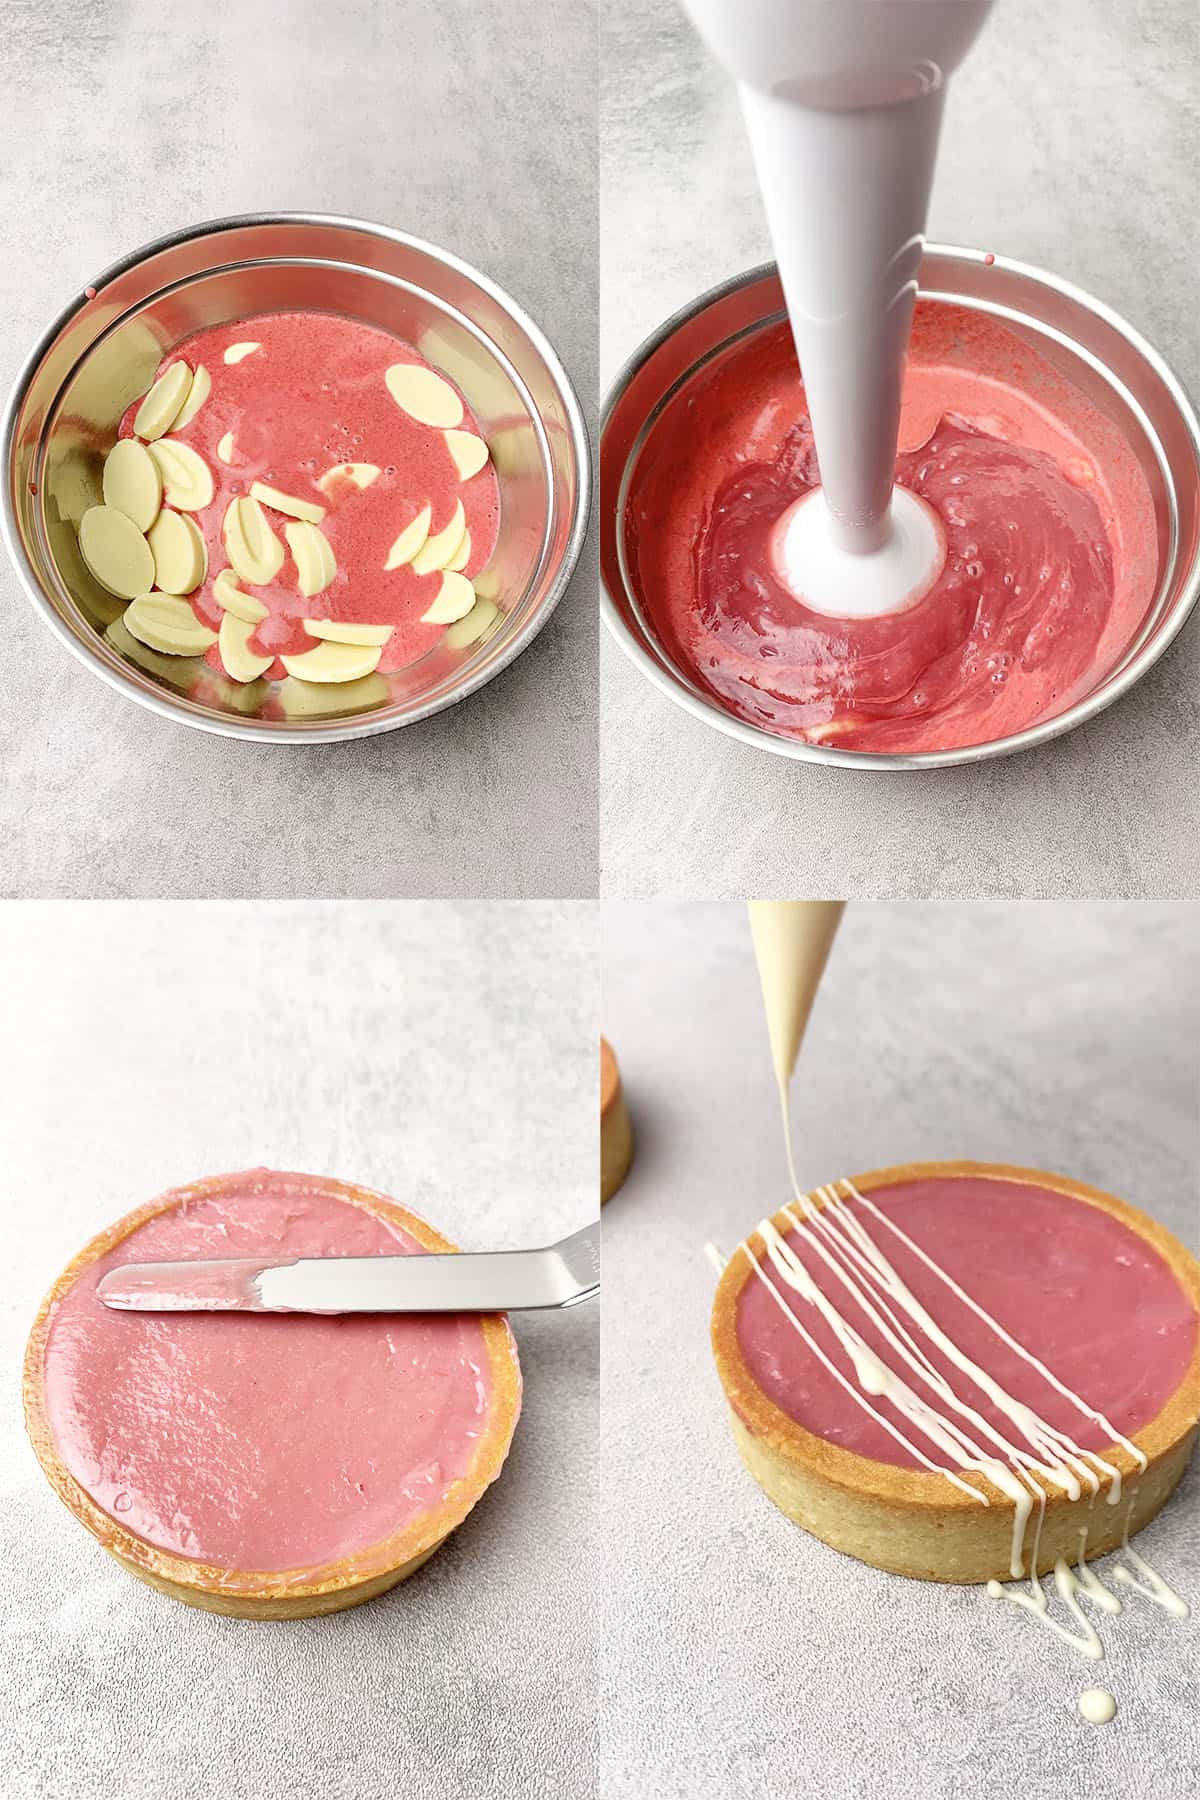
- Place the chopped white chocolate (or use white chocolate chips) into a bowl.
- Blend the raspberries into a puree and push it through a sieve to remove the seeds.
- Pour the raspberry puree and heavy cream into a saucepan, then heat the mixture over medium heat until just simmering.
- Pour the warm cream and raspberry mixture over the white chocolate and let it sit for a minute before stirring together to make a silky ganache.
- Pour or pipe the raspberry white chocolate ganache filling into the tart shells before placing them into the fridge for a few hours so the ganache can set.
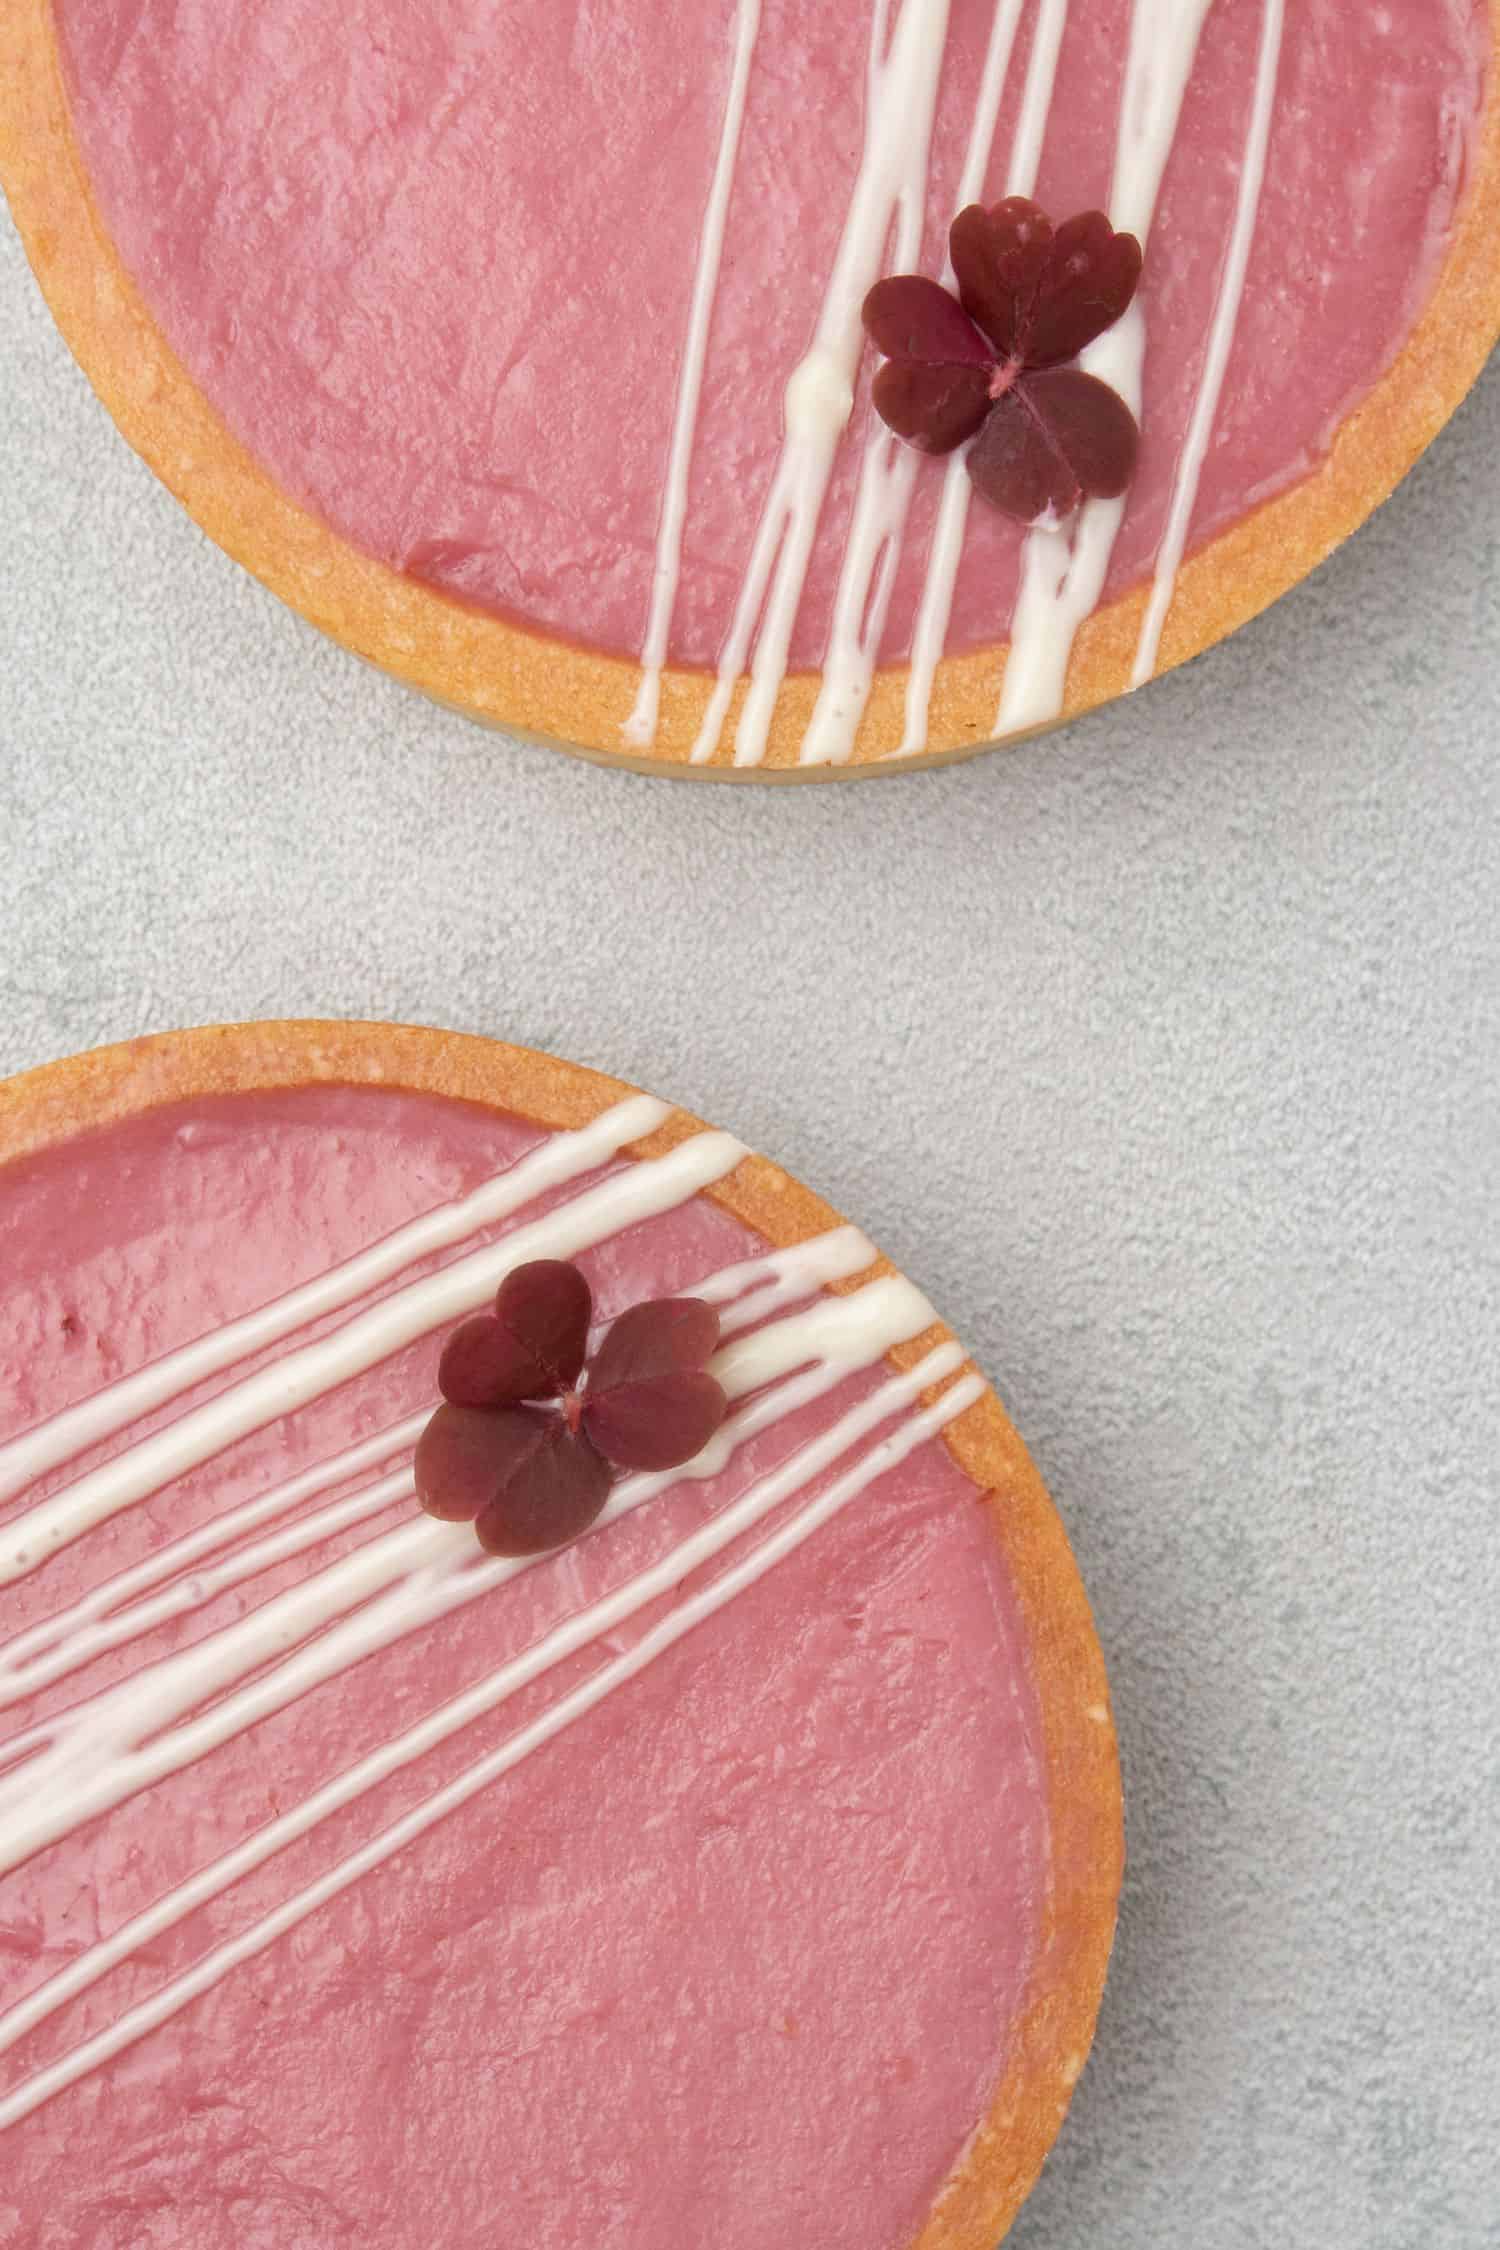
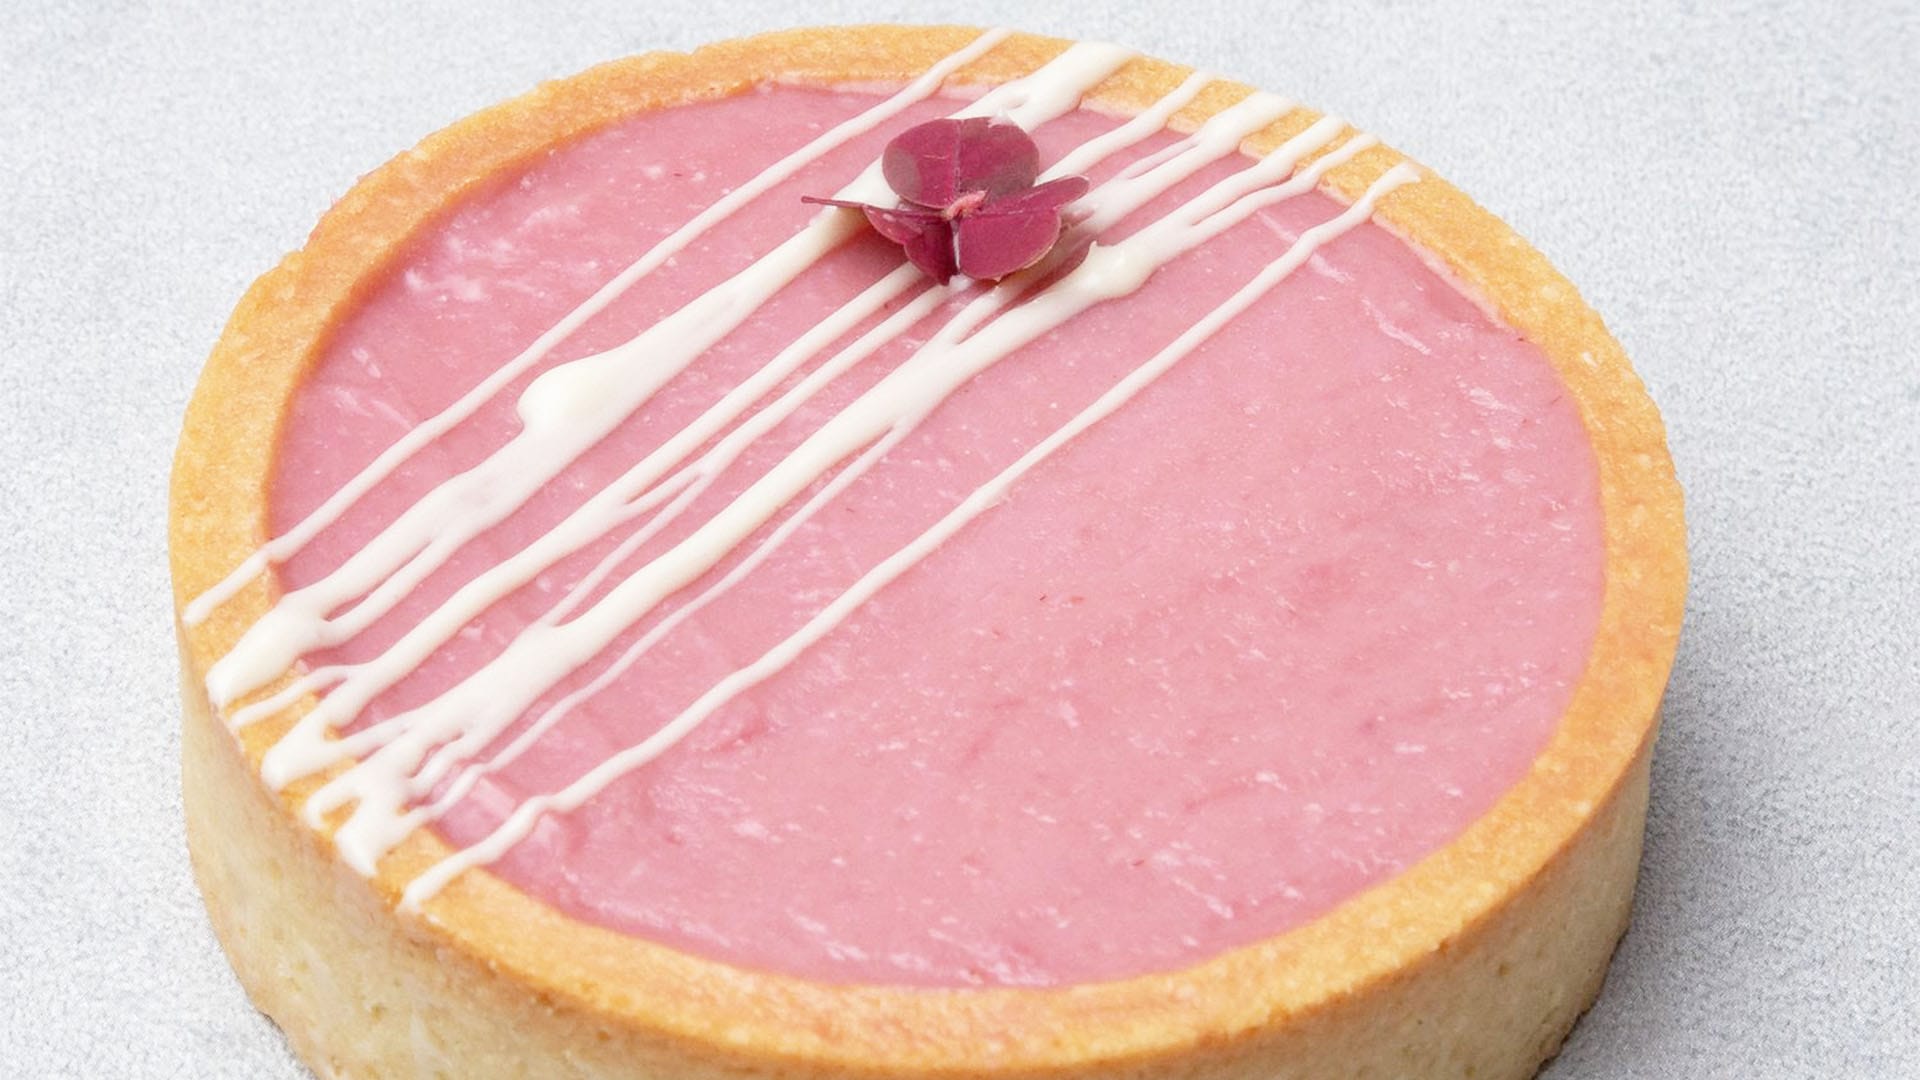
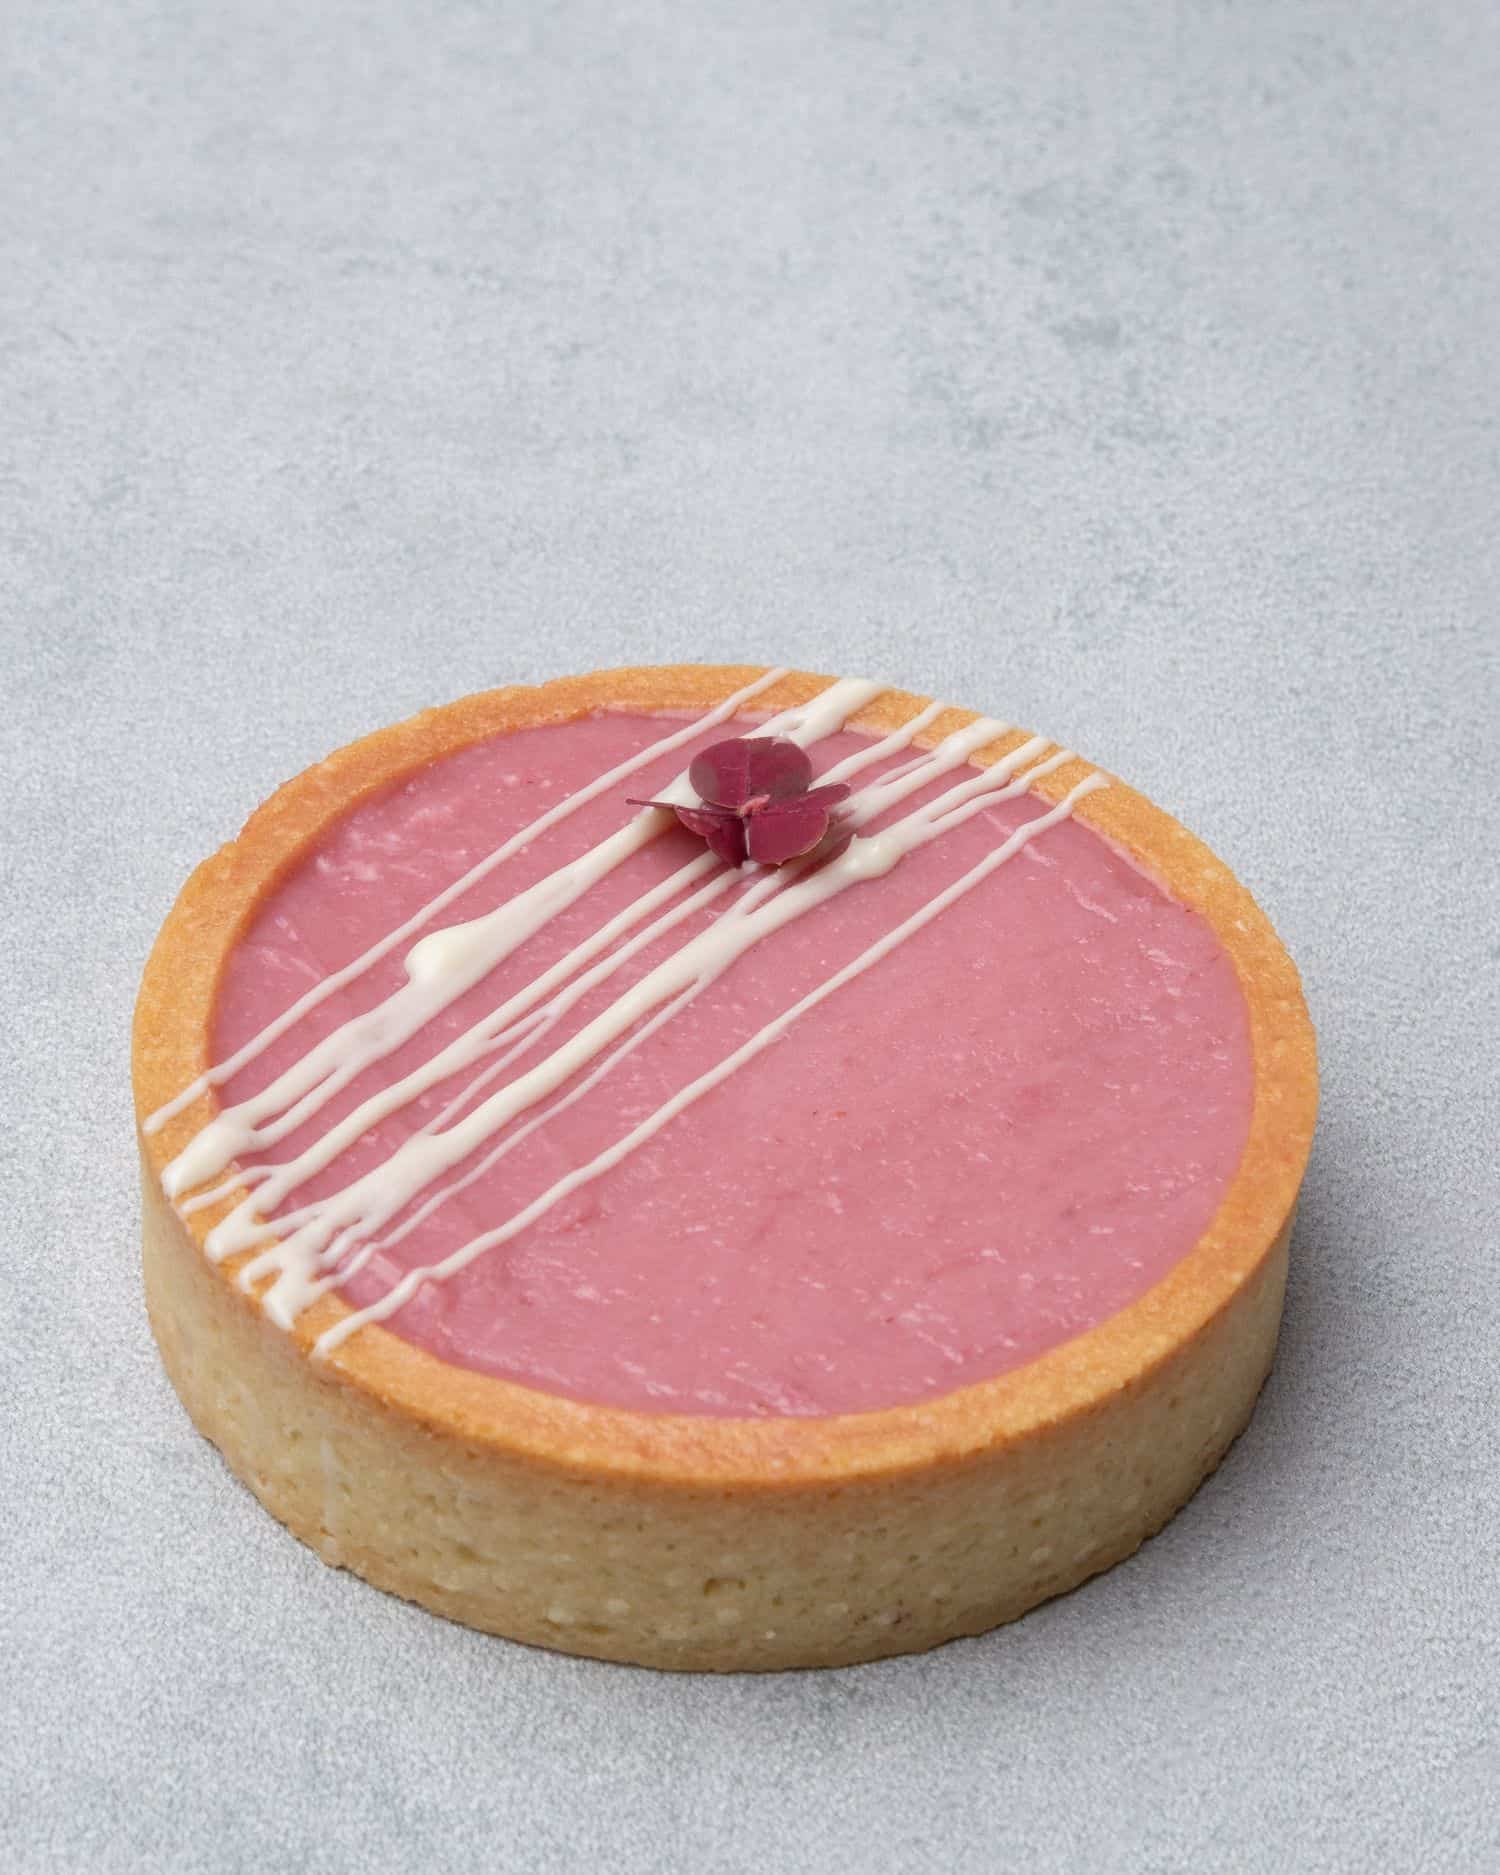
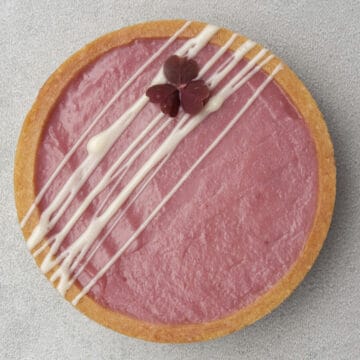
- To make the decoration, melt white chocolate and place it into a piping bag. Drizzle white chocolate over each white chocolate raspberry tart and garnish with edible flowers and fresh and freeze-dried raspberries before serving.
💡 Top Tip: Don't decorate and serve the tarts until the ganache has set in the fridge first.
📖 Flavor Variations & Substitutions
Once you have mastered this white chocolate raspberry tart recipe, you can adapt it to suit you. Try making a chocolate pastry crust instead, or swap out the fruit and add some strawberries instead of raspberries in the ganache filling. I also like to change up the nut flour and use hazelnut instead of almond.
As well as decorating this raspberry dessert with melted white chocolate, I like to pipe on some chantilly cream.
If you are baking around a dietary restriction or have run out of any ingredients, check out my substitution guides.
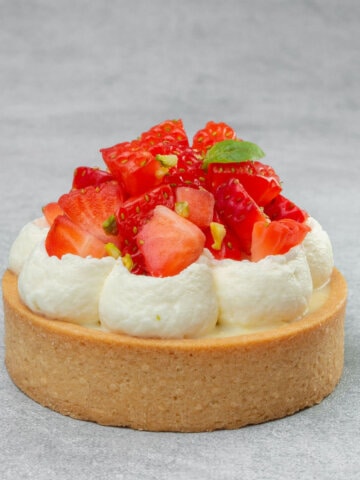
Love tarts? Try some of my other tarts and pies recipes.
❄️ Storage & Freezing
The unfilled tart cases can be stacked on top of one another in an airtight container on the worktop. Once filled, store white chocolate and raspberry tarts in an airtight container in the fridge. They are best served within 24 hours, or the pastry can go soggy.
You can easily freeze the tart cases before baking and bake them as and when needed. You can also freeze blind-baked tart shells, although they might lose their crispiness a bit after defrosting. I do not recommend freezing the white chocolate raspberry ganache tarts once filled.
✨ Expert Tips To Make White Chocolate Raspberry Tart
- While rolling out the pastry, start from the center of the disc and work your way out in all directions. The recipe quantity is designed in a way that once you roll the dough out, it will reach the silicone baking mats from edge to edge.
- If the dough is too cold, you won't be able to roll it out. If too warm, it will be difficult to handle and will even stick to the silicone baking mat. Put it back in the freezer for a few minutes if it is too warm to work with.
- When you take the tarts out of the oven to remove the rings, wait for a minute so the pastry contracts, and you can easily remove them. If the ring seems to be stuck, bake it for a few more minutes before trying again.
- If the raspberry puree and cream mixture is boiling, when you pour it over the white chocolate, it could burn it. But if it is not warm enough, it won´t melt the chocolate properly. It needs to be just at a simmering point.
- The raspberry white chocolate tart filling will set as it cools in the fridge, so don't skip this step.
🥣 Equipment Notes
Weigh all of the ingredients using a Digital scale. Baking is a science and requires precision.
I recommend rolling out the sweet pastry with a Rolling pin between two Silicone baking mats. This means you won't need any dusting flour.
Baking tart shells using a Perforated “air” baking mat and Perforated tart rings gets the best results, in my opinion. Silikomart offers rings in various shapes and sizes; I use an 8cm/3.14-inch diameter round version for this raspberry white chocolate tart recipe.
I recommend using a digital oven thermometer to always ensure you are baking at the right temperature.
❓Recipe FAQs
The intense fruity yet slightly tart flavor of raspberries goes really well with the intense taste of chocolate.
Berries, like raspberries and strawberries, pair well with white chocolate, as do slightly bitter flavors like matcha.
✨ More Tart recipes

Have you tried this recipe?
Please leave a 5-star ⭐️⭐️⭐️⭐️⭐️ rating on the recipe card and consider leaving a comment as well! I would love to hear about how your dessert turned out and your feedback also helps other Readers!
White Chocolate Raspberry Tart
Equipment
Ingredients
For the Pâte Sablée
- 90 g (¾ cups) Powdered sugar
- 230 g (2 - 2 tablespoons) Pastry flour or all purpose flour.
- 30 g (⅓ cups) Almond flour
- Pinch of salt
- 110 g (½ cup) Unsalted butter with a minimum of 82% fat content, very cold, and cut into chunks.
- 50 g (¼ cup) Egg approximately 1 egg.
For the Raspberry ganache
- 350 g (2 cups) White chocolate good quality, e.g., Valrhona
- 175 g (¾ cups) Heavy Cream
- 175 g (1½ cups) Raspberry puree blended and sieved to remove the seeds
Decoration
- 20 g (⅕ cups) White chocolate melted, good quality, e.g., Valrhona
- Edible flowers, fresh or freeze-dried raspberries
US customary cup measurement is an indicative figure only. Measure the ingredients with a digital scale by weight (gram). Baking is art but also science which requires precision and accuracy.
Instructions
How to make tart crust
- Cut the butter into chunks and place it in the freezer whilst prepping the other ingredients.
- Sift the flour, icing sugar, almond, and salt (the dry ingredients) into a bowl.
- Add the cold butter chunks to the dry ingredients, and rub the mixture between your hands until it forms a sand-like consistency.
- Add the egg to the mixture and mix it in with your hands, just until the dough comes together.
- Knead the dough with the palm of your hand for a minute or two until the dough becomes smooth.
- If the dough is too warm and sticky, place it into the fridge for 10-15 minutes first. Otherwise, continue with rolling the dough out into 2mm thickness between two Silicone baking mat.
- Place the dough into the freezer for 15 min in between the two Silicone baking mats. Prepare your oven rack with the Perforated "air" baking mat and Perforated tart rings on top.
- Take the dough out from the freezer, remove the top silicone mat, and use one of the Perforated tart rings to cut out 8 circles and form the bottom of your tarts. Carefully move the dough circles into the rings one by one with the help of an Offset spatula.
- Cut 8 long strips out of the dough to form the sides of the tarts. Carefully place the strips into the ring one by one, pressing each strip onto the ring so it sticks to it. Place them all into the freezer for 1 hour.
- Preheat the oven to 160C / 320F.
- Trim the top of the pastry from the tart shells with a sharp knife, and bake for 20 minutes. Carefully remove the rings and bake for another 5 -10 min until golden brown. Allow the shells to cool.
How to make white chocolate raspberry tart
- Chop the white chocolate into small pieces and place into a bowl.
- Blend the raspberries into puree and pass through a sieve to remove the seeds.
- Heat the heavy cream and raspberry mixture in a saucepan over medium heat just until simmering.
- Pour the warm cream raspberry mixture over the white chocolate, and allow the chocolate to start to melt into it for a minute, before stirring it together.
- Pour or pipe the warm white chocolate raspberry ganache into each room-temperature tart shell. Smooth the tops with an offset spatula.
- Place the white chocolate raspberry tarts into the fridge for 3-4 hours to set the ganache filling before decorating.
- Melt the white chocolate in the microwave and pour it into a piping bag. Decorate the tarts with the piped white chocolate, edible flowers, and fresh and freeze-dried raspberries.
Notes
- Measure your ingredients with a Digital scale for accuracy.
- Use high-quality 82% fat content European style very cold unsalted butter.
- In case of a nut allergy, the almond can be replaced with an equal amount of flour.
- Do not skip the salt in the tart shell recipe; it balances sweetness and brings out the flavors.
- Use high-quality white chocolate to make the ganache
- While assembling and kneading the dough, work as quickly as possible without overworking the dough or making it too warm. Kneading literally should not take more than a minute or two. Do not over-knead the dough, and do not use a mixer or food processor.
- If the dough is too warm, it will tear. If it is too cold, it will break. Use your fridge or freezer to quickly chill the dough if needed.
- The recipe can be made with the traditional blind baking method using a tart pan, but consider using perforated equipment for best results.
- Ensure you're baking at the right temperature by using a digital oven thermometer.
- After baking the tart shells for 20 minutes, the pastry should have contracted enough to contract within the ring and be removed. If the pastry feels stuck into the ring, bake it for a further 1-2 minutes.
- The filling (raspberry ganache) will need a couple of hours to set in the fridge before serving the tartlets.
Heather Philpot
Hi, I have a question. I'm really wanting to make a caramel macchiatto tart for my niece. I really like your ganache recipe but my question is can I replace some of the puree with strong espresso?
Thank you.
Katalin Nagy
I have a coffee tart tart that I think could work very well for you: https://www.spatuladesserts.com/delicious-coffee-tart-recipe/
Zena Simpson
Hello, would you be able to freeze these tarts?
Katalin Nagy
Yes the tarts freeze well, probably the raspberry ganache as well.
Alejandra Loves Baking
The recipe is easy to follow and the taste is great!!! we all loved it!! However, please would you advise me how to avoid the ganache cracking when the tarts are chilled in the fridge? I measured the right amounts of each ingredient but after 12 hours in the fridge the filling was separating from the sides of the tart and it got cracks across it, the lovely surface was "broken" and cracked. It didn't impact flavour, but the visual was not really great. Thanks in advance for your help!!!!
Kata
Happy to hear that you liked this recipe however unsure why your ganache has cracked. It should be firm but creamy and I never experienced it cracking per say.
Ruthio
This recipe is absolutely perfect, j cant wait try lots if different fillings! I am thinking of trying a bakewell tart, so will need to bake the frangipane for about 15 minutes or so. Do you think i should redice the bake time prior to adding this in? Was thinking of maybe baking for 15 mins then adding the frangipane.
Balint Balazzs
Thanks for your feedback. I have a frangipane recipe and also frangipane tart, check cheese where I explain how to bake that:)
Michel
How long are the tartlets good for after they are filled with the ganache?
Kata
Should be fine 1-2 days in the fridge but the tart might lose its crispiness a bit
Suraj bhandari
Good evening i make this recipe it comes very nice helps me a lot thank you for being their.
Peggy
Looks amazing! Do I need 175 grams of raspberry purée or do I take 175 grams of raspberries and then purée and strain (and end up with less than 175 grams)? Thanks.
Kata
It says 175g raspberry puree, so the puree has to be 175g:)
Deanna Lewis
It would have been helpful if you included the weight of the raspberries before and after being puréed.
Katalin Nagy
Raspberries contain different level of juice, it would be very inaccurate to provide a before weight.
Lori
Looks divine! Making your white chocolate raspberry ganache for a macaron filling. Once it sets, is it firm enough to fill for a macaron? Thx!
Katalin Nagy
I havent tried but you can check my pistachio macaron recipe that is filled with ganache to see the ratios.
Eva
For the pâte sablé :
The recipe is really simple to follow!
Be aware that it can take a long time to prepare, specialy if you’re not used to roll a pastry dough. But the result is worth it! I recommend it !
For the Raspberry ganache :
This is so simple to do! And the result is really really good and not to sweet. It was delicious!
Don't be affraid to try it!
Tsvety
it was a pleasure to try one of the recipes. it was my first time, but not my last
Catherine
I didn't have raspberries and used strawberries instead . Amazing . Will try with raspberries this weekend . Thank you for such detailed directions