This amazing simple 3 Ingredient Pie Crust recipe is a must-have for the pie season and Thanksgiving on the way! It's an easy all butter pie recipe that is super versatile and produces a deliciously rich and flaky pie crust. This is an easy pie crust recipe by hand, can be blind-baked or popped right into the oven with the filling and works well for both sweet and savory pies.
Jump to:
🌟 Why this is the best recipe
- Super easy - How to make pie crust from scratch? It, in fact, takes very little effort and skill. This pie recipe is the perfect basic introduction to pastry and a great place to start for the most novice baker
- Quick recipe - The dough comes together in 5 minutes. The rest of the time you're just letting it chill in the fridge. You can make this homemade 3 ingredient pie crust faster than you can drive to the store and buy pie dough.
- Super delicious - With no added preservatives or shortening used it's rich in flavor. Because it's made with just flour, water, and all butter with a dash of salt, the crust is super flaky and extra buttery with each yummy bite.
- Versatile crust - This easy pie dough can be blind baked to make a festive Pumpkin Pie or filled and popped right into the oven to make a divine Baileys Apple Pie. The crust also works perfectly for quiche and savory pies as well.
- It is a detailed tutorial – This is the only pie dough you need to suit all your pie recipe needs. I've shared every tip and trick I know so that your crust turns out perfect every time!
📝 Ingredient notes
What is homemade pie crust made of? Technically, this three ingredient pie crust recipe is a 4 ingredient pie crust if you count the dash of added salt. And ironically this small dash makes a big difference because it enhances the flavor of both the flour and butter. So it's important not to leave it out to achieve the tastiest pie crust.
However, the basis of this very easy pie crust relies on these three pantry staples.
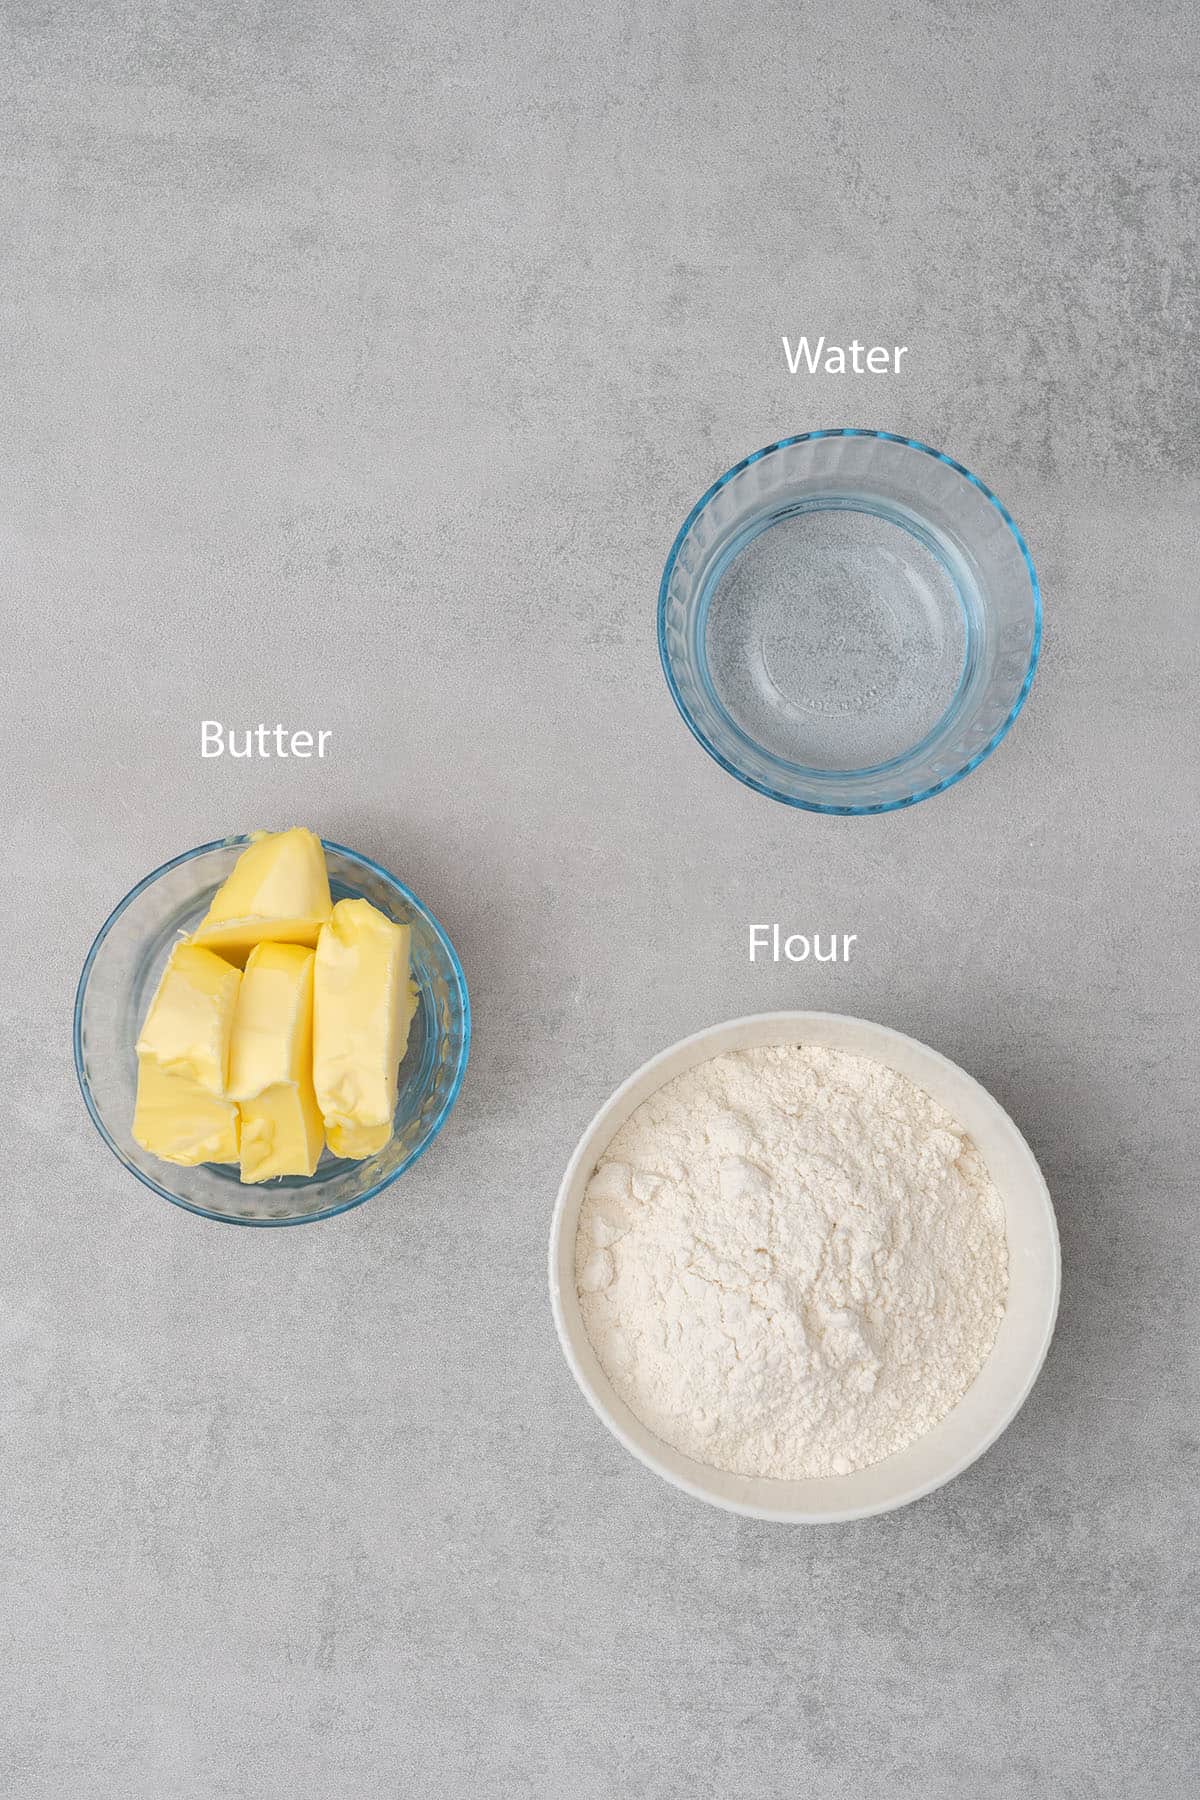
- Flour: All-purpose flour will work perfectly to make the crust. Pastry flour is another option too. To become a pro when choosing types of flour check out my flour guide to learn more.
- Butter: Always use unsalted butter in all pastry and pie crust recipes to control the amount of added salt. It's also crucial that the butter be very cold when making pie dough to reach the right consistency. I recommend cutting cold butter into cubes and then placing it in the freezer for 10-15 minutes before starting to make the dough. I use unsalted butter with 82% fat content in all my recipes and find that it produces the best results. Butter is the best choice for pie crust but check out my article if you are looking for a butter substitute.
- Water: The water works to bind the crust together. But just like the butter, it needs to be very cold. The best way to do this is to make a glass of ice water, remove the ice, and use the super cold water.
+ Plus a dash of salt! It's an essential ingredient in this easy pie pastry recipe that makes a big difference in taste. So don't skip it!
Should you add sugar to the pie crust? Yes, you can add 1-2 tablespoons of granulated sugar to this pie crust if you prefer it sweet, however, in general, pie crust does not have to be sweet, the filling that brings most of the flavor and sweetness.
🛒 You’ll find detailed measurements for all Ingredients in the printable version of the Recipe Card at the bottom of this post
👩🍳 How to make this recipe
Now that you've got your ingredients for 3 ingredient pie crust all ready to go. You're probably thinking, how do you make pie crust? It's actually a very simple process.
Just follow these few easy steps and your 3 ingredient crust is sure to come out perfect!
1. Step-by-step instructions
This is a 3 ingredient pie crust without food processor needed! Easy peasy!
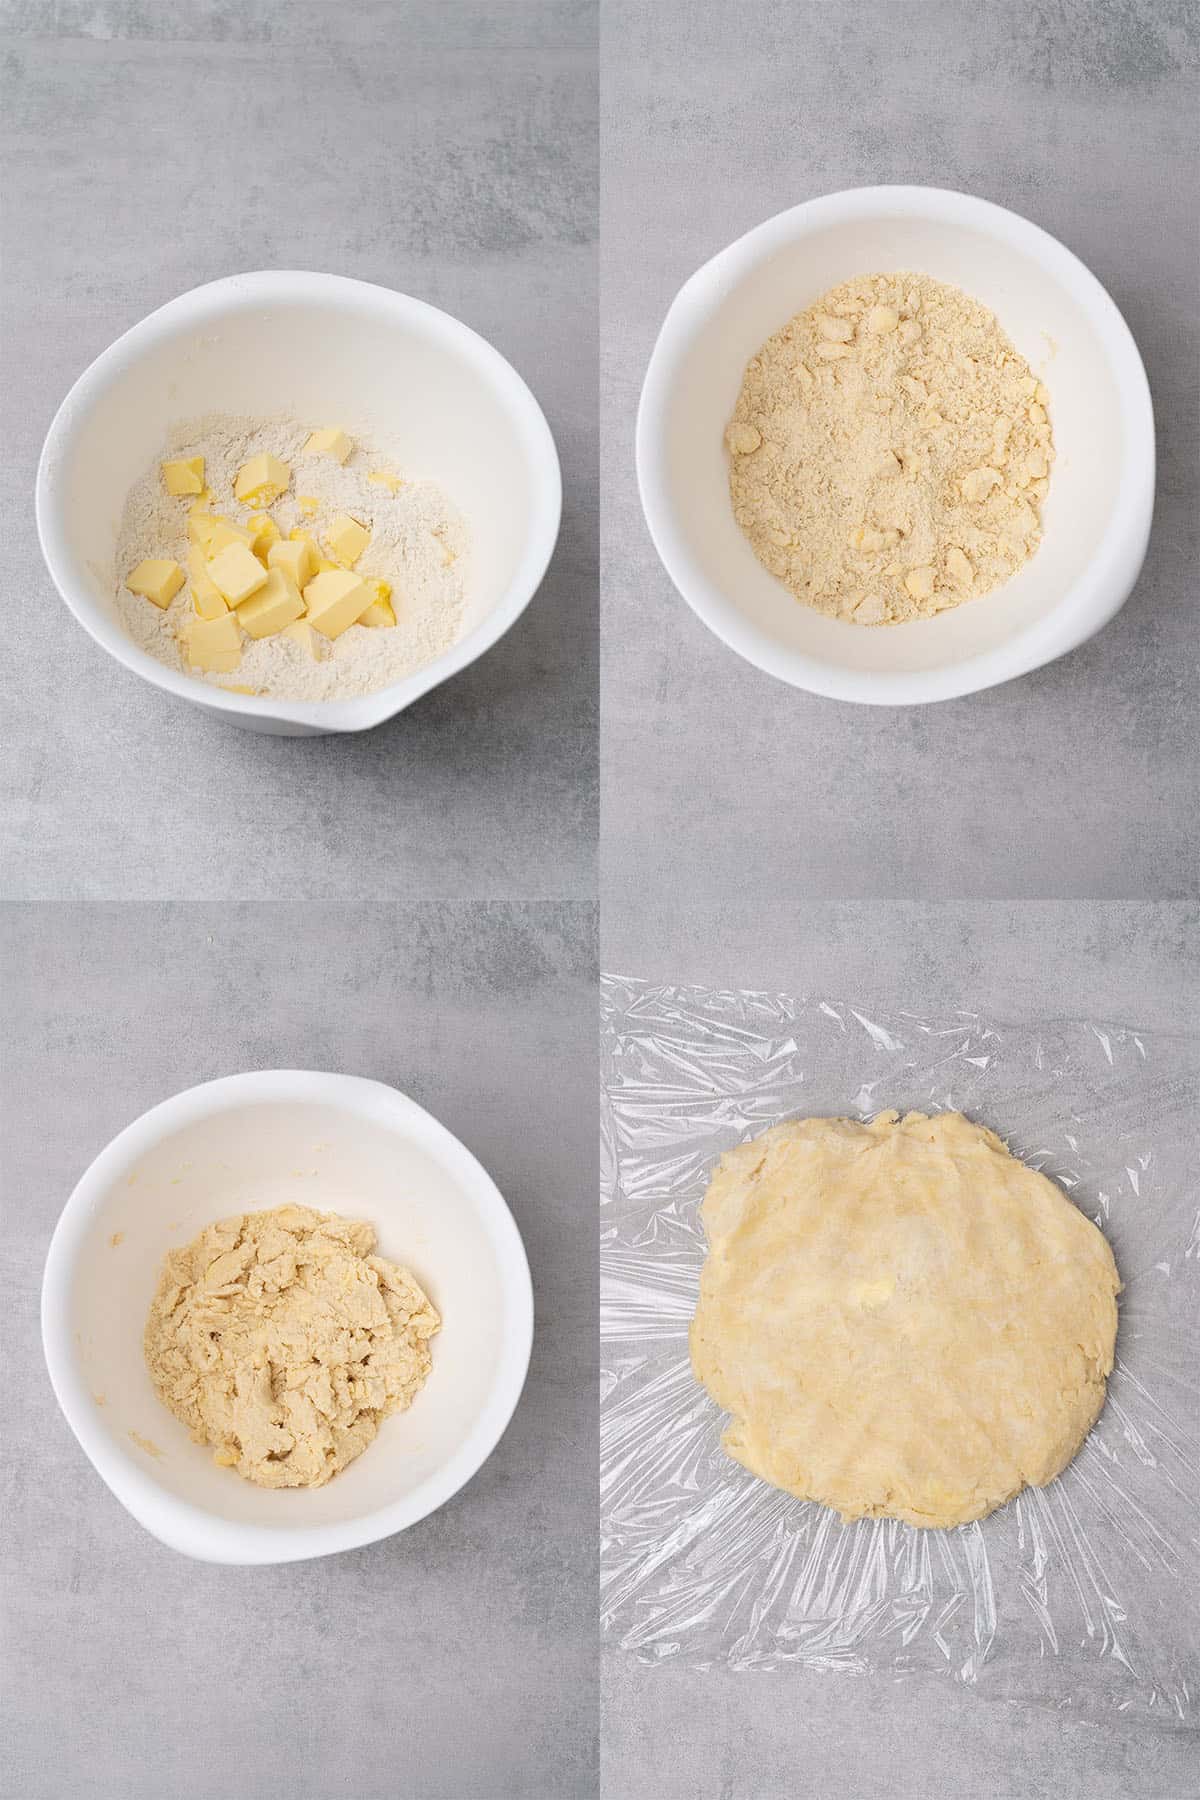
- Whisk together the flour and salt in a large bowl until well combined. Then, place the bowl in the freezer to chill for about 10 minutes or until cold.
- Cut cold butter into small cubes that are similar in size and then place them in the freezer to chill for 10 minutes along with the flour mixture.
- Add the cold cubes of butter to the chilled flour and rub the mixture between your fingers until it becomes like the texture of coarse sand. It's essential for both the flour and butter to be well chilled before you even attempt this step.
- Don't over crumble the flour and butter with your hands. It's vital that the flour mixture have some larger chunks of butter. That is what makes this perfect pie crust recipe come out extra flaky. If you like you can also use a pastry blender but I find that my hands do the best job.
- Using a spatula or wooden spoon stir in a small amount of the cold water into the flour and butter mixture a little at a time. It's very important that you not just dump in all the water at once.
- Begin carefully binding the dough together with your hands. But do not knead the dough. It will seem very crumbly at first but it will come together in just a couple of minutes.
- Form the dough into a disk. Then cover it well with plastic wrap and put it in the fridge for at least 2 hours. It's imperative that it chill for a minimum of 2 hours for the best outcome.
- Remove the dough from the fridge after 2 hours and then place it on the kitchen counter to rest for a few minutes. At this point, the pie dough needs to still be cold, yet not so cold that it begins to tear when being rolled out.
💡 Top Tip: Be careful not to overwork the flour and butter mixture. Never knead the dough. The dough must have some bigger chunks of butter in it for a flaky crust to form.
2. Why rest the pie dough before rolling
Resting pie dough is a step that requires absolutely no effort on your part. However, it is a mandatory step. So when you are planning to make any pie, it's a good idea to keep in mind that once the dough is made it needs at least 2 hours of resting time in the fridge and a few minutes out of the fridge at room temperature.
As we all know, baking is a science so these techniques make a difference. Yet, the reasons behind resting pie dough are pretty simple.
- Chilling the dough chills the butter which makes the dough hold its shape
- It allows time for the gluten in the flour to further develop which makes the dough more elastic, easier to roll, and has a much less chance of tearing.
💡 Top Tip: The resting in the fridge cannot be sped up with the freezer, however, if it is more comfortable you can rest the dough overnight and proceed the next day.
3. How to roll pie dough out
As long as you properly chilled your pie dough in the fridge and it's still cold after resting at room temperature, rolling it out should be no problem! However, if you didn't chill your dough for a full 2 hours or it's not nice and cold when you go to roll it out, you need to put it back in the fridge and wait a bit longer.
So first, check the temperature of your dough, and then proceed with these steps once you know it's good and ready.
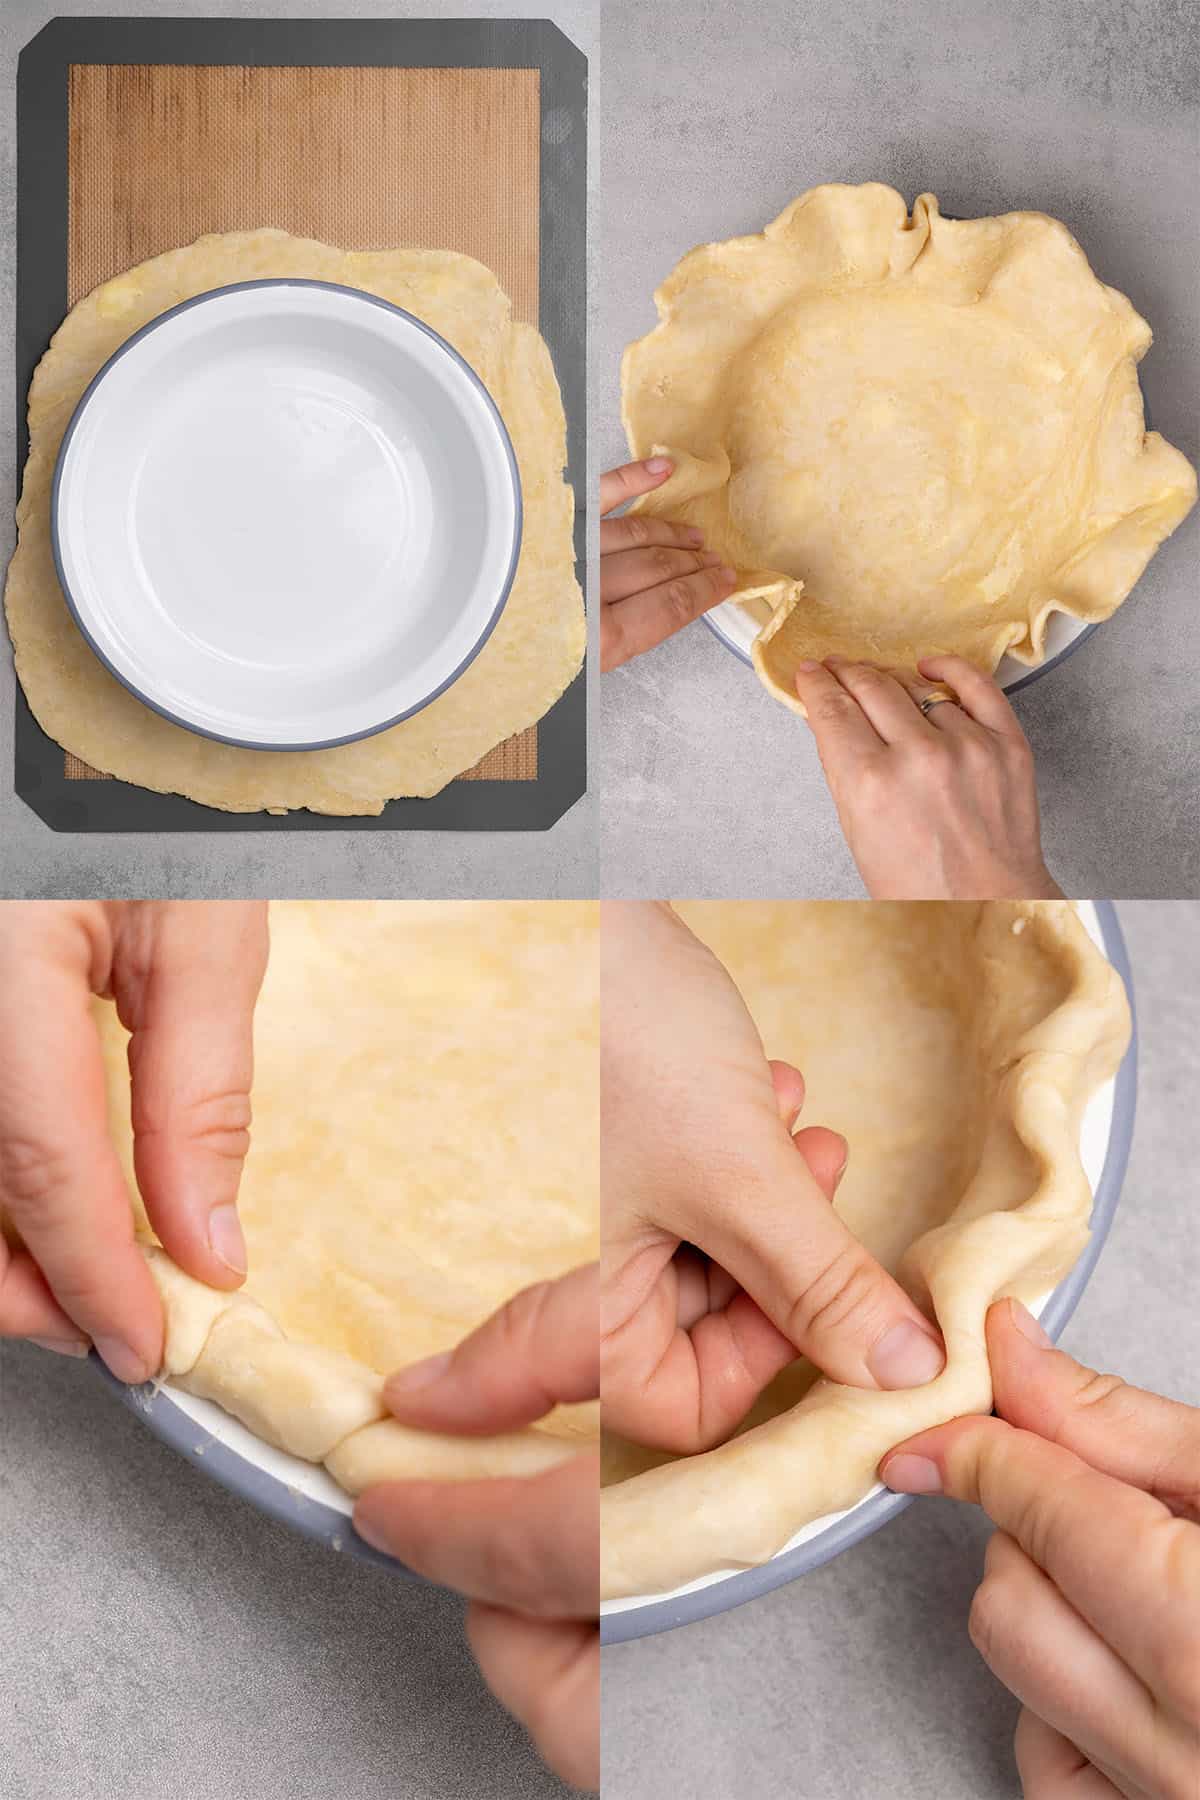
- Place the disk of dough onto a lightly floured surface or between 2 Silicone baking mats, which is my preferred method. Then begin rolling it out with a rolling pin making sure to turn the disk with each roll to make it even. When doing this, try not to add too much additional flour to the dough. The dough itself should be cold enough to prevent it from sticking to the kitchen counter. If it is sticking then your dough is likely getting too warm and you need to place it in the freezer for a minute or so to chill back up.
- For a standard Pie dish 9 inch / 23 cm you will need to roll the dough out to 10 inch / 27 cm in diameter. Also, remember that you should never force or stretch the dough after rolling. It needs to stay both cold and smooth to be easy to work with or you risk the crust shrinking.
- Carefully place the dough into the pie dish. An easy way to move the dough is to drape it over your rolling pin and then carefully lay it into the pie pan.
- Fold the excess pie dough around the edges under the crust. Then flute the dough in a uniform manner with your fingers.
- Chill the formed 3 ingredient pie crust dough once more in the freezer for 30 minutes. This step helps to prevent the crust from shrinking too much while baking in the oven.
💡 Top Tip: Do not begin trying to roll the pie dough until it is at the proper temperature. If it's too cold it can crumble and if it's too warm it can tear.
4. How to egg wash pie crust
First of all, what is egg wash? In short, egg wash is just egg (either whole egg, yolk only, or white only) that has been whisked together and thinned out with either a bit of water, milk, or cream and then brushed on top of baked goods right before they are baked.
I spent a day testing 15 different versions of egg wash along with 7 substitutes including vegan options, please check out my perfect egg wash guide!
- It helps to add golden brown color and a nice glossy shine to pastry and bread
- It can be used for structural purposes to seal and secure the edges of the pastry
- And just like in case of this 3 ingredient pie crust, it helps to seal the bottom of the pie crust so it won´t get soggy when pouring the filling in later
For this recipe in particular;
- Only use the egg white to seal the bottom of the pie crust (if blind baked). When baked, the protein in the white acts as a barrier and helps to prevent a soggy bottom.
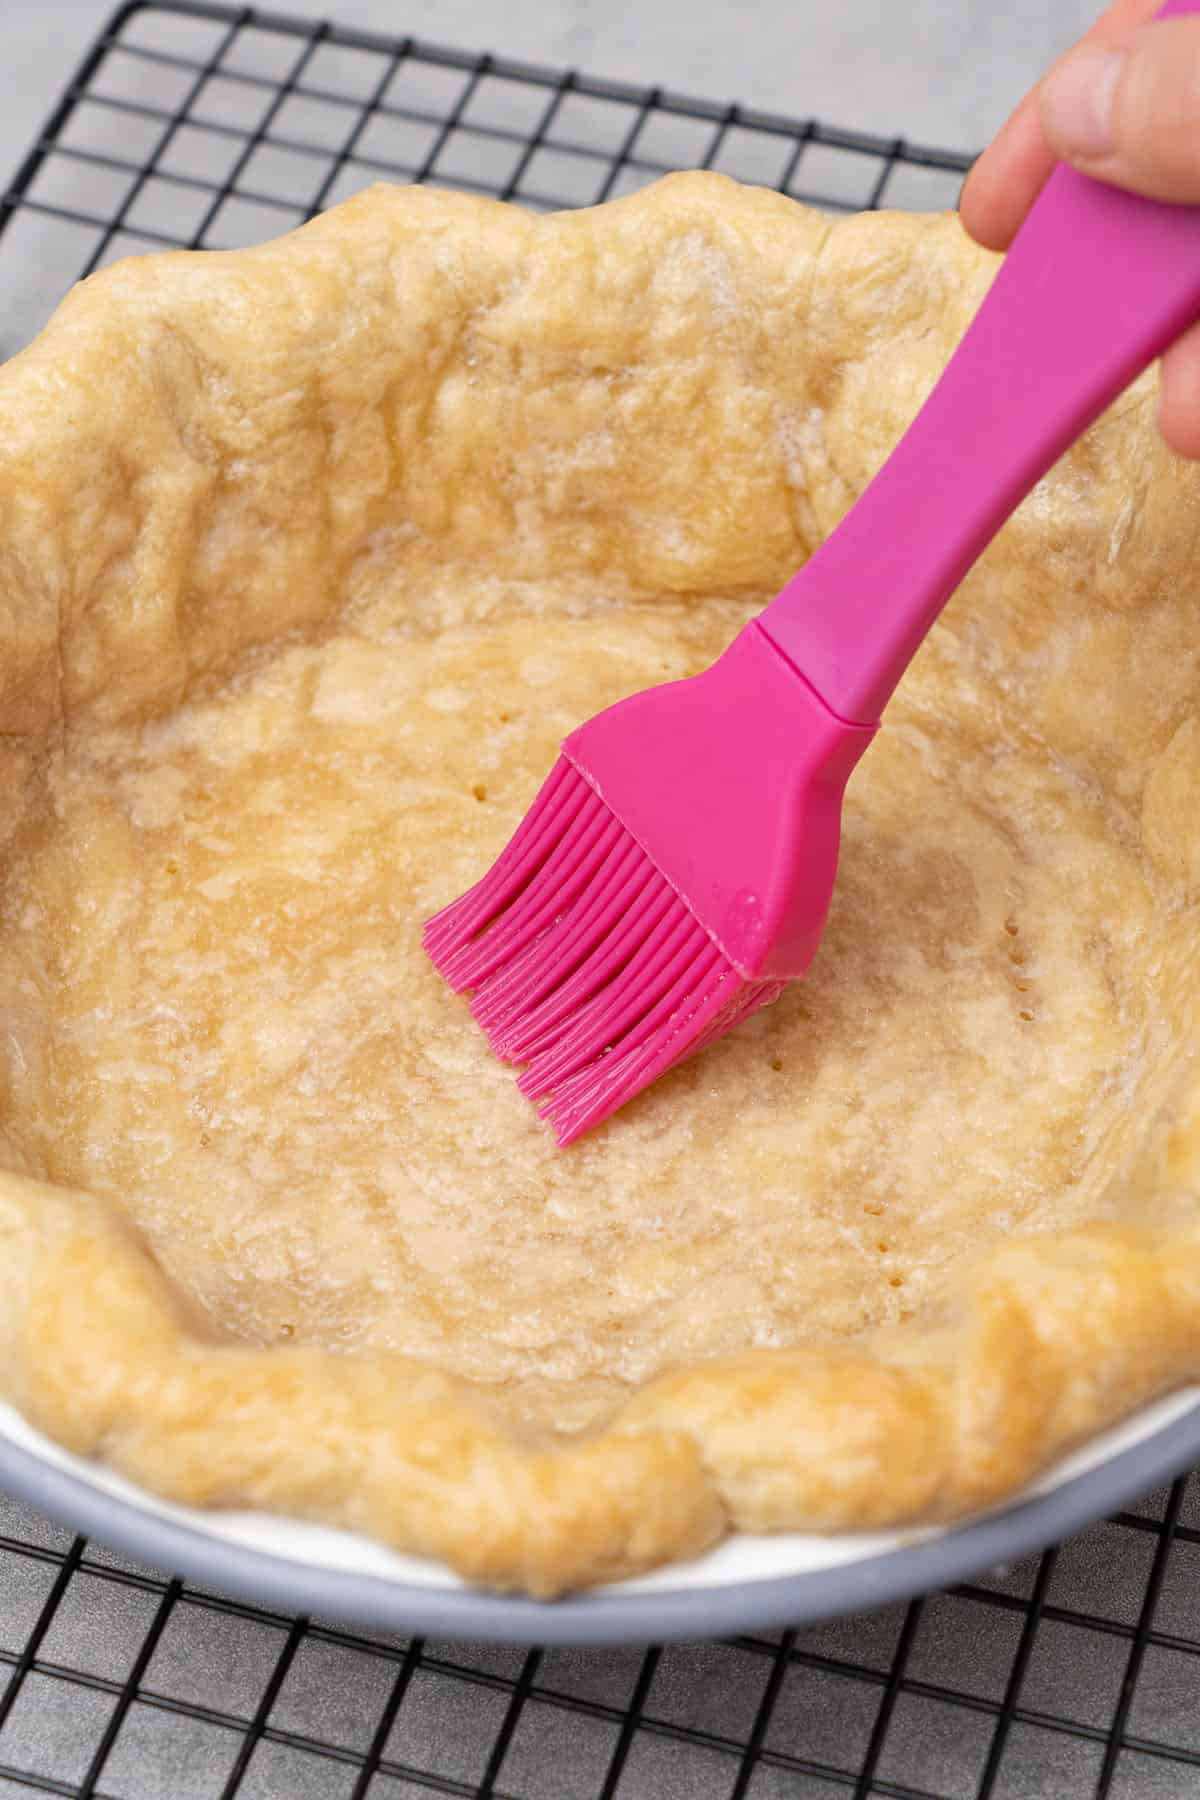
- Apply the egg wash in a thin layer using a pastry brush just right after removing the pie weight when the pastry is sort of half-baked. Use a silicone pastry brush that helps to coat all my pie crusts perfectly.
- Optionally poke the dough gently with a fork. This step is needed to avoid the dough puffing up, although it should be already half baked, so might not be necessary
💡 Top Tip: If you'd like to use the leftover egg yolk too, you can whisk it together with a dash of milk and apply it to the edges of the pie crust to add a bit of shine.
5. How to blind bake a pie crust
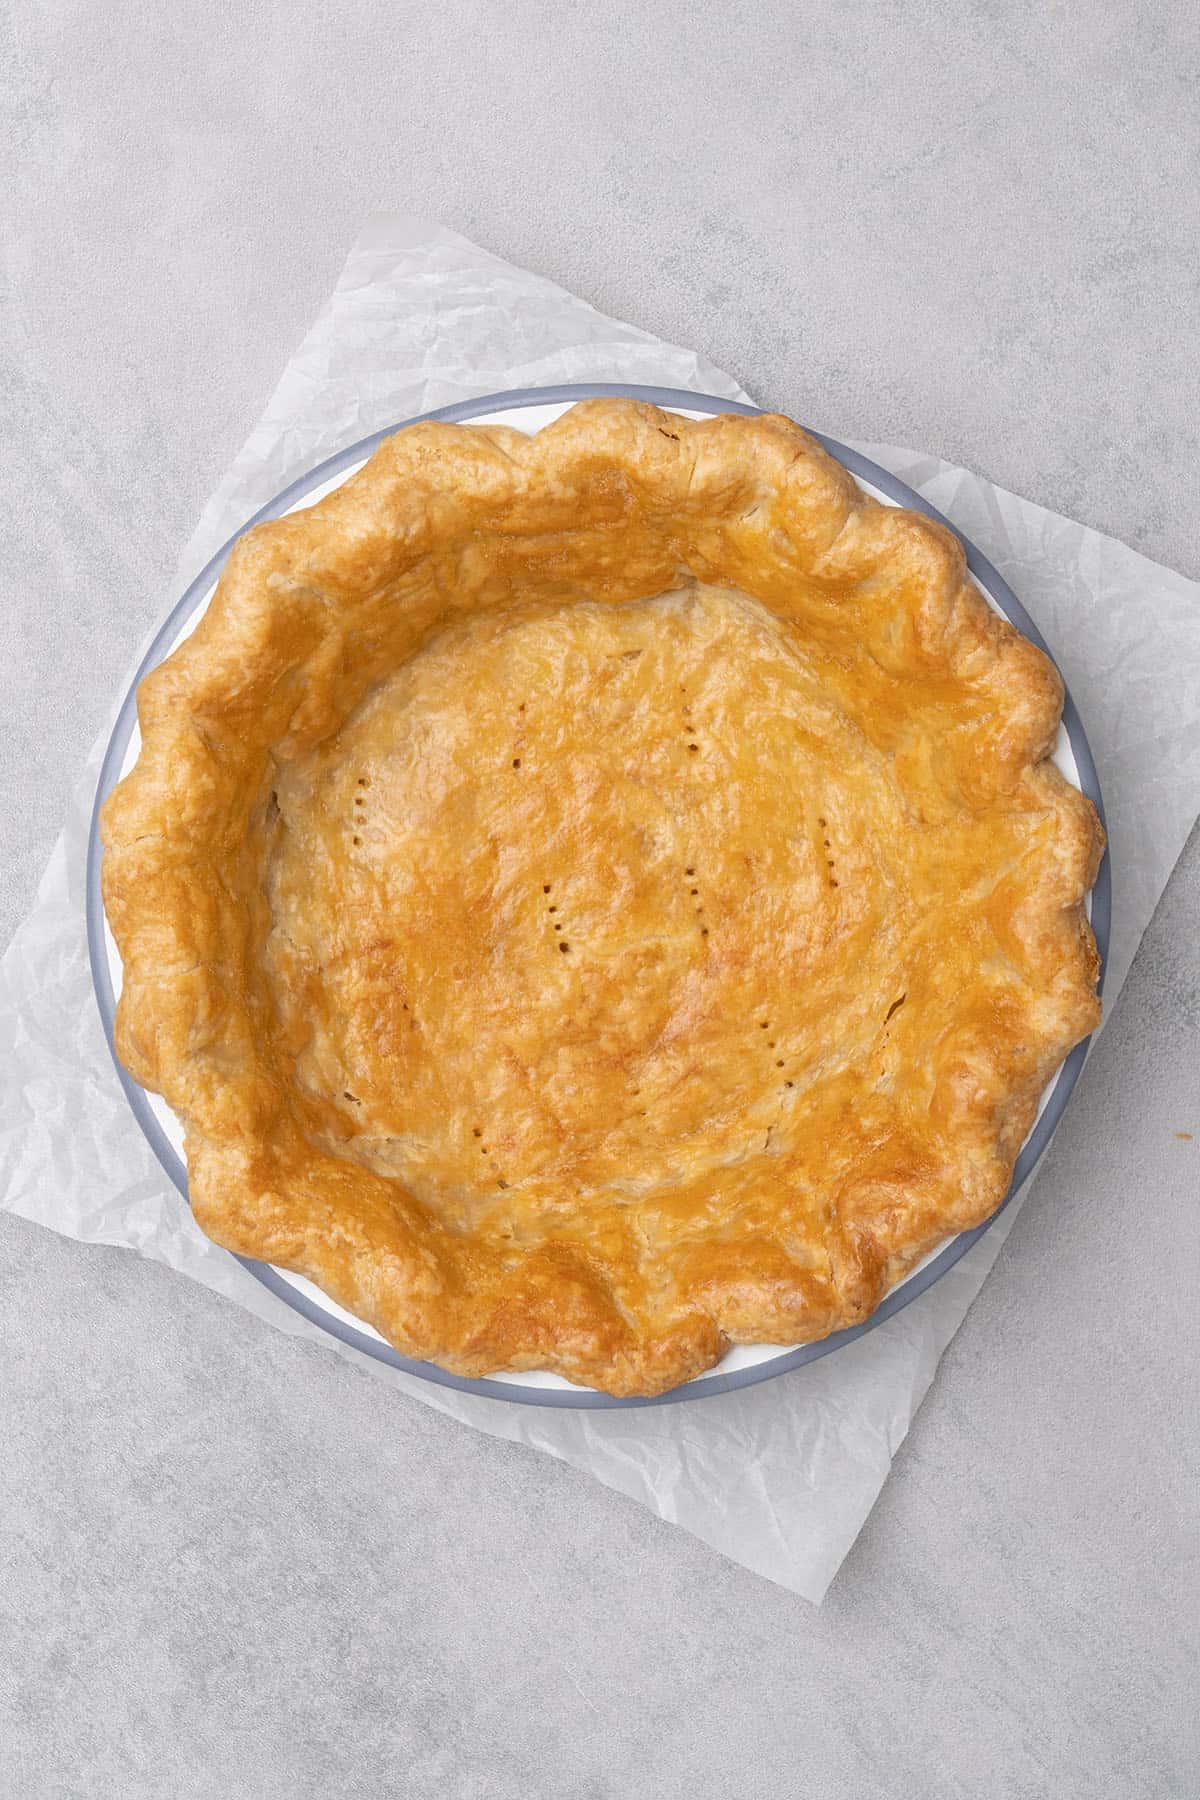
Once the 3 ingredient crust has been made and formed, it may need to be blind-baked before filling. This step is almost always necessary when making Pumpkin Pie or quiche so basically any pie that has a liquid filling.
These types of baked goods often require that the crust be fully pre-baked before filling. If not, in the best case you can end up with a soggy bottom and in the worst case a total baking disaster. Blind baking matters!
You don't have to worry about overbaking the crust. A filled blind-baked pie crust will not continue to bake in the oven. So there is absolutely no reason to skip this step.
I've outlined the simple steps here on how to blind-bake pie crust. These instructions and tips will lead you to pie baking success!
- Preheat the oven to 200 C / 372 F (no fan). The oven needs to be nice and hot before you put the crust in to bake.
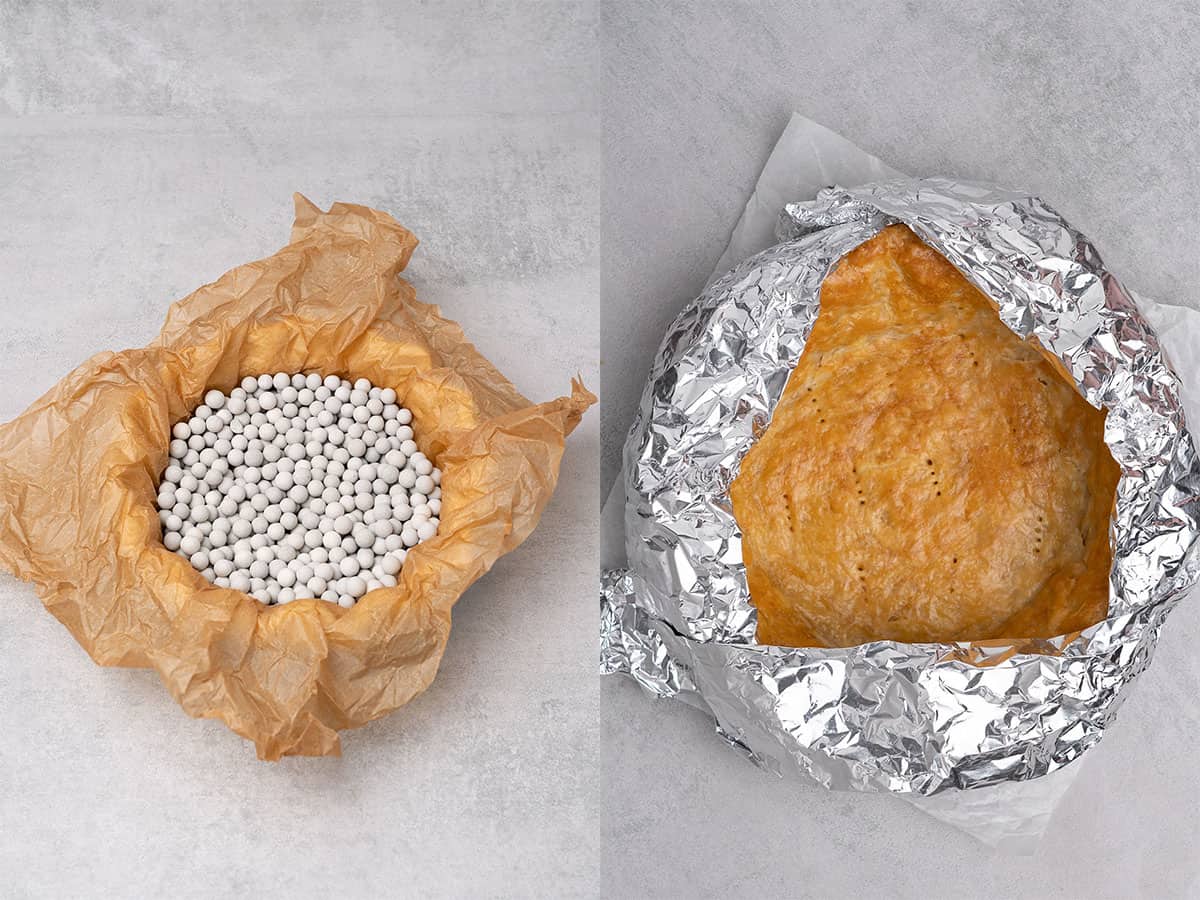
- Once the pie crust has chilled for 30 minutes, line it with parchment paper, and then fill the crust with pie weights or check how to substitute pie weights in my baking guide. Now, transfer the crust to the preheated oven and let it bake for 15 minutes.
- After baking for 15 minutes, remove the pie weights, and then brush a thin layer of egg white only egg wash onto the bottom and sides of the partially baked pie crust. Adding the egg wash works to both seal and add support to the crust, which prevents it from becoming soggy once filled.
- Put the partially blind-baked crust back into the hot oven without the pie weights and bake it for another 15 minutes.
Once the pie crust is fully baked, use it for your favorite pies. Why not try my pumpkin cream cheese pie, pumpkin pie with condensed milk, or pumpkin custard pie?
💡 Top Tip: If the edges begin to brown too much as the crust bakes you can cover them with aluminum foil. A fully baked pie crust will be golden brown in color.
🎓 Expert tips
- All the ingredients must be very cold at all times when making the dough. So if at any point the butter starts to melt or the dough begins to get too soft, you should put it back in the freezer for a few minutes to firm up again.
- For the richest buttery flavor use European-style unsalted butter with 82% fat content.
- Combine the butter and flour together using your fingers. Never knead the ingredients or use a mixer as it will quickly overwork the dough. There must be large butter chunks to create a flaky texture.
- Make a glass of ice water, remove the ice, and then use that water to make your dough.
- When adding the water to the flour and butter you only want to add a little bit at a time. Then once the dough comes together stop adding water right away. So how much water you use can vary.
- Resting the pie dough is not optional. It's a mandatory step. The dough has to rest for the butter to firm up and for the gluten to develop.
- Always apply egg wash (that is made of egg white) when blind baking pie crust to prevent a soggy bottom and to keep the pastry nice and flaky.
- You must line the unbaked crust with parchment paper and cover it with pie weights when blind baking. If you don't the crust will bubble up.
- If you need enough pie dough for a double crust all you have to do is double this recipe. Then divide the dough in half, form it into disks, and now you have 2 easy pie crusts made.
🥣 Equipment notes
You should always use a Digital Scale every time you bake. It's the only way to truly ensure that you are using the correct measurements.
For making the actual easy pie crust recipe with butter, your hands do all the work! However, when it comes time to roll it out, you will need a decent Rolling Pin to do the job! I myself like to roll pie dough between two Silicone baking mats to ensure that it never sticks to the counter. It's also a great way to create less mess and also avoid adding extra flour.
Then once the dough is rolled out, you'll need a Pie dish 9 inch / 23 cm for this recipe. I have also found that double-checking the temperature of my oven with a Digital Oven Thermometer is super helpful. Many times we don't even realize that our oven is slightly off whether it be due to its age or even due to the model such as gas versus electric. All ovens can vary by a few degrees.

❓Recipe FAQs
Probably yes, but I've not tried. To make 3 ingredient pie crust vegan just simply replace the butter with shortening or vegan butter. Yet, you may find that you need to experiment with the ratios of the flour, butter, and water to find the perfect balance.
This is an easy pastry for pies, but the crust can get tough when the dough has been overworked. That is why you should never use a mixer or knead pie dough.
You can chill both if you like. It's not necessary to chill the utensils. Yet, you must always chill all the ingredients for the best results.
It doesn't need to be thawed before baking if the crust has already been formed. Just keep in mind that the baking time is a little longer for frozen pie crust.
Yes, you can easily make dessert pie crust using this pie dough recipe. You can add 1 to 2 tablespoons of sugar to the flour mixture but it is not necessary. You can also add a dash of vanilla extract if you like.
Pie dough can be kept in the fridge for up to 2 days in a sealed bag. When ready to use just let it rest on the counter for a few minutes and then continue following the recipe instructions with rolling and so on.
You can freeze the dough in a sealed freezer bag for up to 2 months. Just be sure to remove as much air as possible from the bag before putting it in the freezer.
🥧 More Pie recipes


Have you tried this recipe?
Please leave a 5-star ⭐️⭐️⭐️⭐️⭐️ rating on the recipe card and consider leaving a comment as well! I would love to hear about how your dessert turned out and your feedback also helps other Readers!

3 Ingredient Pie crust (VIDEO)
Ingredients
Pie dough
- 250 g (2 cups) All purpose flour
- 180 g (¾ cups) Unsalted butter 82% fat, use it very cold
- 80 g (⅓ cups) Water use it very cold
- ½ teaspoon Salt
US customary cup measurement is an indicative figure only. Measure the ingredients with a digital scale by weight (gram). Baking is art but also science which requires precision and accuracy.
Instructions
- In a large bowl mix flour and salt until fully combined and place it into the freezer for 5-10 minutes
- Cut cold butter into small chunks and place it into the freezer for 5-10 minutes
- Once all ingredients are nicely chilled, add very cold butter chunks into flour and rub the mixture between your fingers until it becomes a sand like consistency.
- Leave some bigger butter chunks in the mixture - this will encourage flaky pie texture on the pie crust - no need to fully incorporate the butter into the flour
- Add very cold water into the dough, a small amount at a time, and stir with a spatula or wooden spoon after each addition
- Start working the dough with your hands. First, it will look crumbly but it should come together in the next minute or so. Do not knead the dough as such, stop mixing, as soon as the dough comes together. Remember, leave in some butter chunks, do not overwork the dough, and do not use a mixer
- Form a disk, cover it with plastic wrap and let it rest in the fridge for a minimum of 2 hours
- After 2 hours, take the pie dough disk out of the fridge and let it rest few minutes on the kitchen counter. The dough should stay cold but slightly warmed up to be able to roll it out without breaking it
- Transfer the disk to a silicone baking mat or a lightly floured surface and start rolling it out, make sure you turn the dough with your hands after each rolling so it will become even. No need to add too much flour while rolling, the pie dough should be cold enough not to stick to the kitchen counter. If at any point the dough gets too warm, pop it back into the freezer for a minute to chill then continue
- If you are using a Pie dish 9 inch / 23 cm, roll the dough to 10 inch / 27 cm in diameter. Remember, do not force the dough, after rolling, it should stay smooth and cold, and easy to work with. The most common reason for pie crust shrinking is forcing and stretching it.
- Carefully place the dough into a Pie dish 9 inch / 23 cm.
- Fold the extra dough around under the crust then flute with your fingers
- Chill pie dough again in the freezer for 30 minutes
- Pre-heat oven to 200 C / 372 F (no fan)
- After 30 minutes, line pie crust with parchment paper and fill with pie weights (rice can work completely fine too). Blind bake pie crust for 15 minutes
- After 15 minutes, remove the pie weight, and apply a thin layer of egg wash (using egg white only) on the bottom and side of the pie crust, this will support the crust not to get wet from the filling eg when making pumpkin pie.
- Alternatively, for an even better shine, apply a light egg wash (egg yolk + splash of milk) on the edge of the pie crust
- Bake the pie crust again now without pie weight for further 15 minutes
- If the pie crust was browning around the edges, cover with aluminium foil
- The pie crust is ready when it is baked even golden brown
Notes
- All ingredients incl. butter, flour, and water should be very cold
- Making this 3 ingredient pie crust will take less than 5 minutes. If you are assembling the dough for more than 5 minutes, then you are overworking it
- Resting the dough in the fridge is a must - you won't be able to roll it out without appropriate resting time (min. 2h)
- Do not begin trying to roll the pie dough until it is at the proper temperature. If it's too cold it can crumble and if it's too warm it can tear
- Egg wash will seal the bottom of the crust that contributes to no soggy pie
- You can add 1-2 tablespoons of granulated sugar to this pie crust if you prefer it sweet
ROBBIE
Is this recipe for a 9" Single Deep-Dish Pie crust or a 9" Double Pie crust?
Katalin Nagy
It is for a single layer as shown in the picture.
Pálma
Nagyon szépen köszönöm a receptet🥰
Egyszerű,jól követhető leírás😊
Szuper lett a végeredmény😊
További sikereket a munkádhoz🥰
Linda
I need ingredients in cups measurements. do not have scales. thanks
Kata
You can switch to US measurements in the recipe card. However, if you change your mind, a 10 dollar digital kitchen scale would be the best investment for your baking, that would solve 95% of the usual baking failures:)
Assia
Nice recipe thank you 🙏
Tim
What a well written delicious recipe that simply works!! Thank you so much