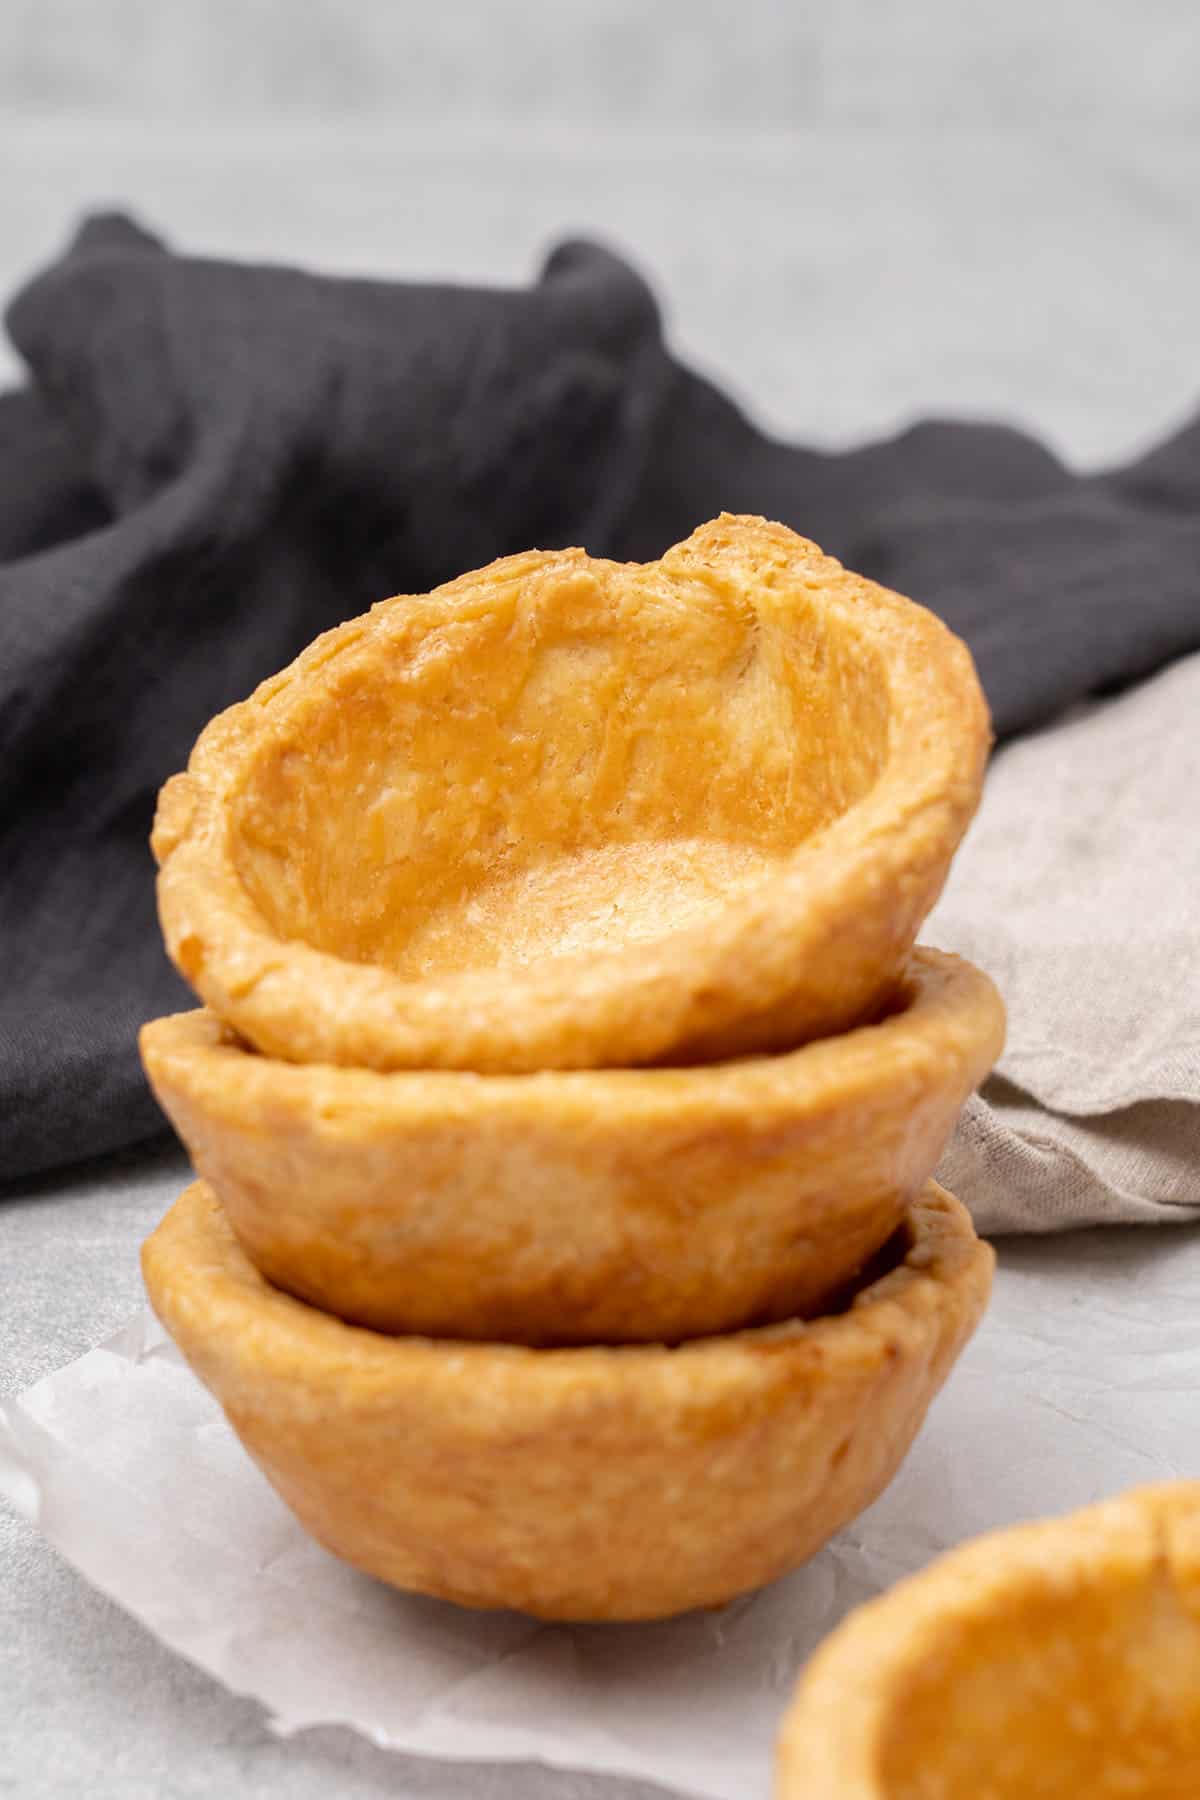
Once you try this incredibly quick, easy, and super flaky homemade Mini Pie Crust recipe, you will never want to buy those sad-looking supermarket mini pie shells ever again! This all butter individual pie shell recipe is absolutely delicious and requires no fancy tools or special pie pan. There is also no need to blind bake these mini crusts and they work perfectly for tartlets, mini pies, and mini quiche!
Jump to:
🌟 Why this is the best recipe
- Super easy - Can you buy mini pie crusts? Yes, but there is no need to with this super simple from-scratch recipe. It takes no special skill to make this recipe and is easy for even the most novice baker.
- Super delicious - This all butter recipe with a dash of salt bakes up super flaky. And because it's made without shortening it's rich and extra buttery with each and every bite.
- Versatile mini crust - These small pie shells work well for a variety of recipes from mini tarts to mini apple pies. It can also be used to make small savory pies as well as mini pie crust for quiche.
- It is a detailed tutorial – This pie dough recipe is a fantastic way to suit all your mini pie crust needs! I've shared every tip and trick I know to help YOU achieve the best results!
📝 Ingredient notes
The ingredients for this Mini Pie Crust recipe are exactly the same as my amazing 3 Ingredient Pie Crust. The only real difference is how it's made. That being said, if you need a crust for your next homemade Pumpkin Pie, you should totally check out that easy pie dough recipe too!
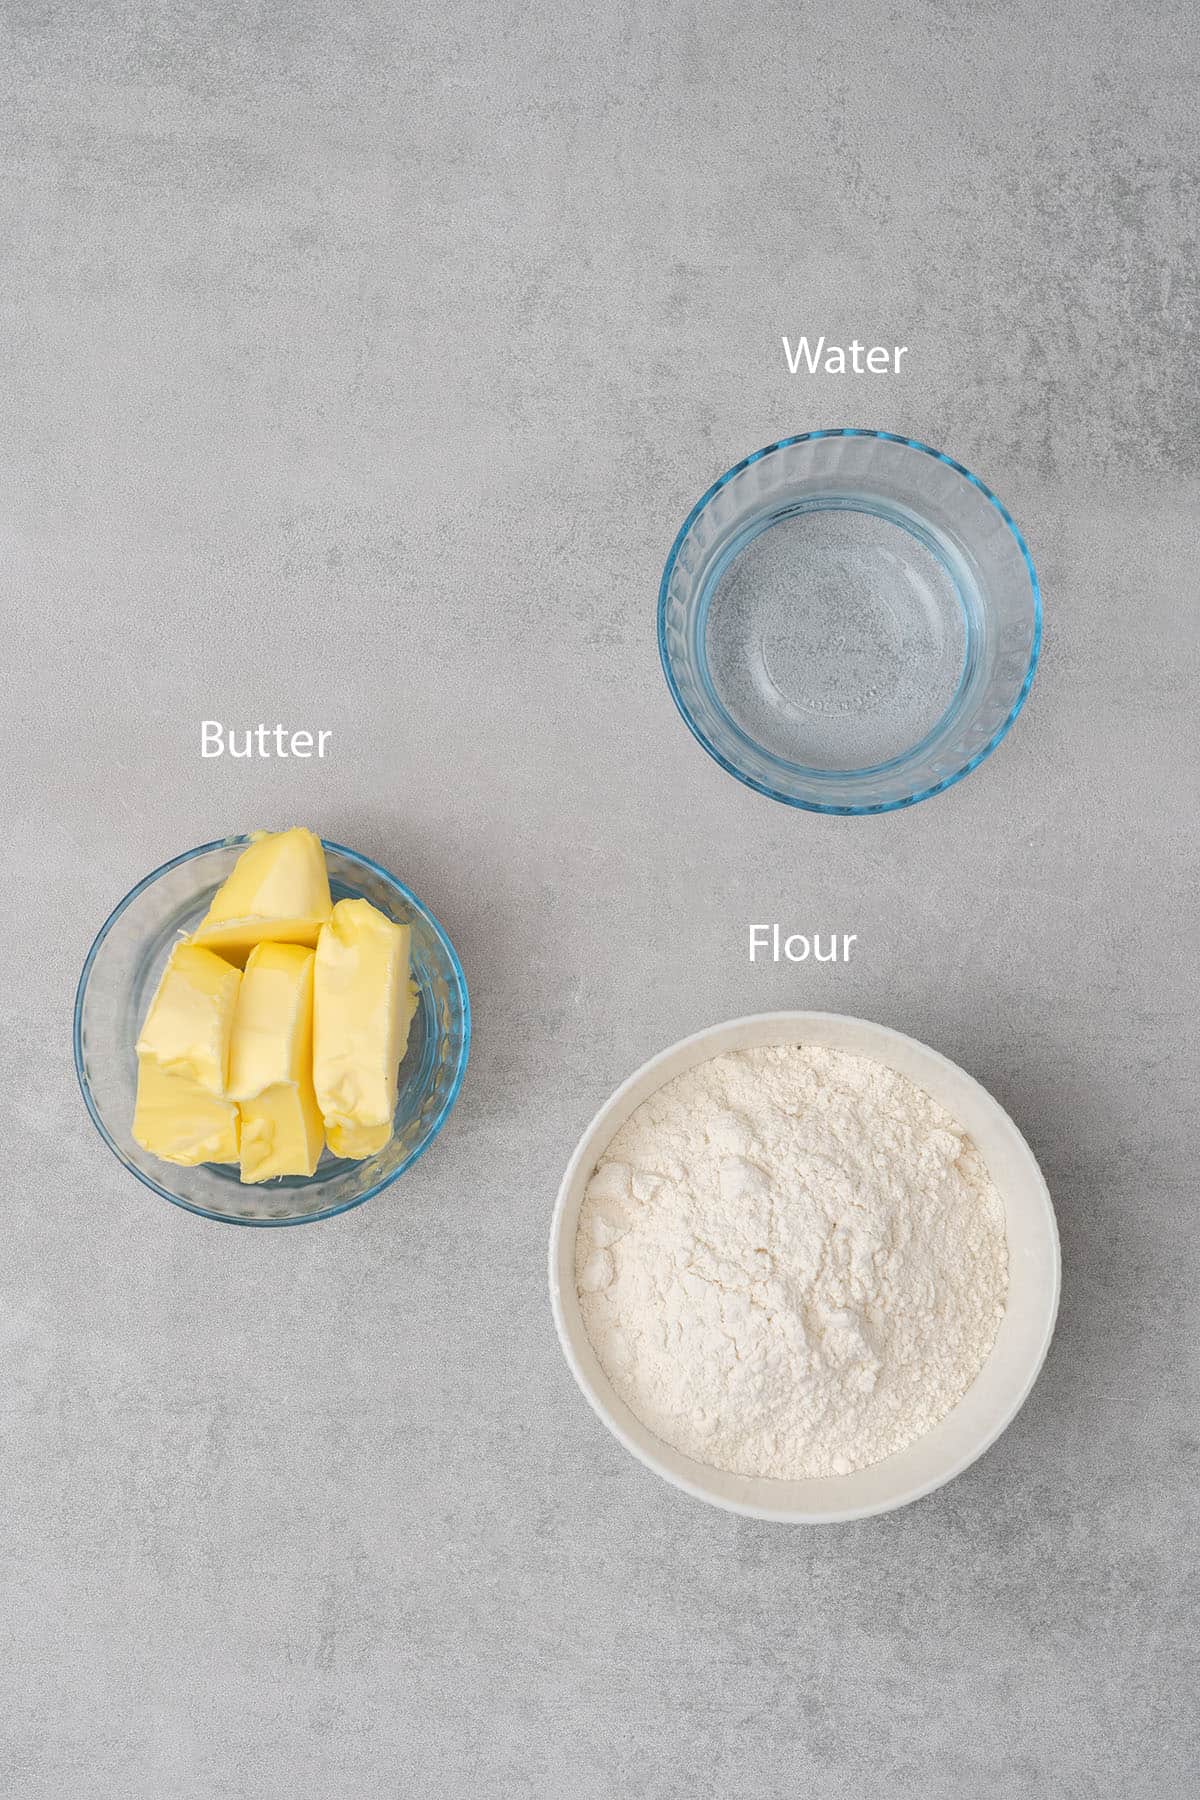
- Flour: All-purpose flour or pastry flour will work perfectly to make the mini pie crust shells. To become a pro when choosing types of flour check out my flour guide to learn more.
- Butter: Always use unsalted butter in all baking to control the amount of added salt. I use butter with 82% fat content in all my recipes. And for this particular recipe, it's also necessary that the butter be very cold when making the pie dough. So I recommend cutting cold butter into cubes and then placing it in the freezer for 10-15 minutes before starting the recipe.
- Water: The water needs to be very cold just like the butter and works to bring the crust together by creating gluten.
+ Plus a dash of salt! This is an important ingredient in all pie dough recipes. It helps to develop the flavor of the dough. So don't skip the salt!
🛒 You’ll find detailed measurements for all Ingredients in the printable version of the Recipe Card at the bottom of this post
👩🍳 How to make this recipe
How to make mini pie crust? It's a super easy process and I've outlined everything you need to do. Just follow these few simple instructions and your mini pie crust is sure to come out perfect!
1. How to make pie dough
Before you can make mini pies with mini pie crust you need to make pie dough! It's not hard to do and your hands do most of the work!
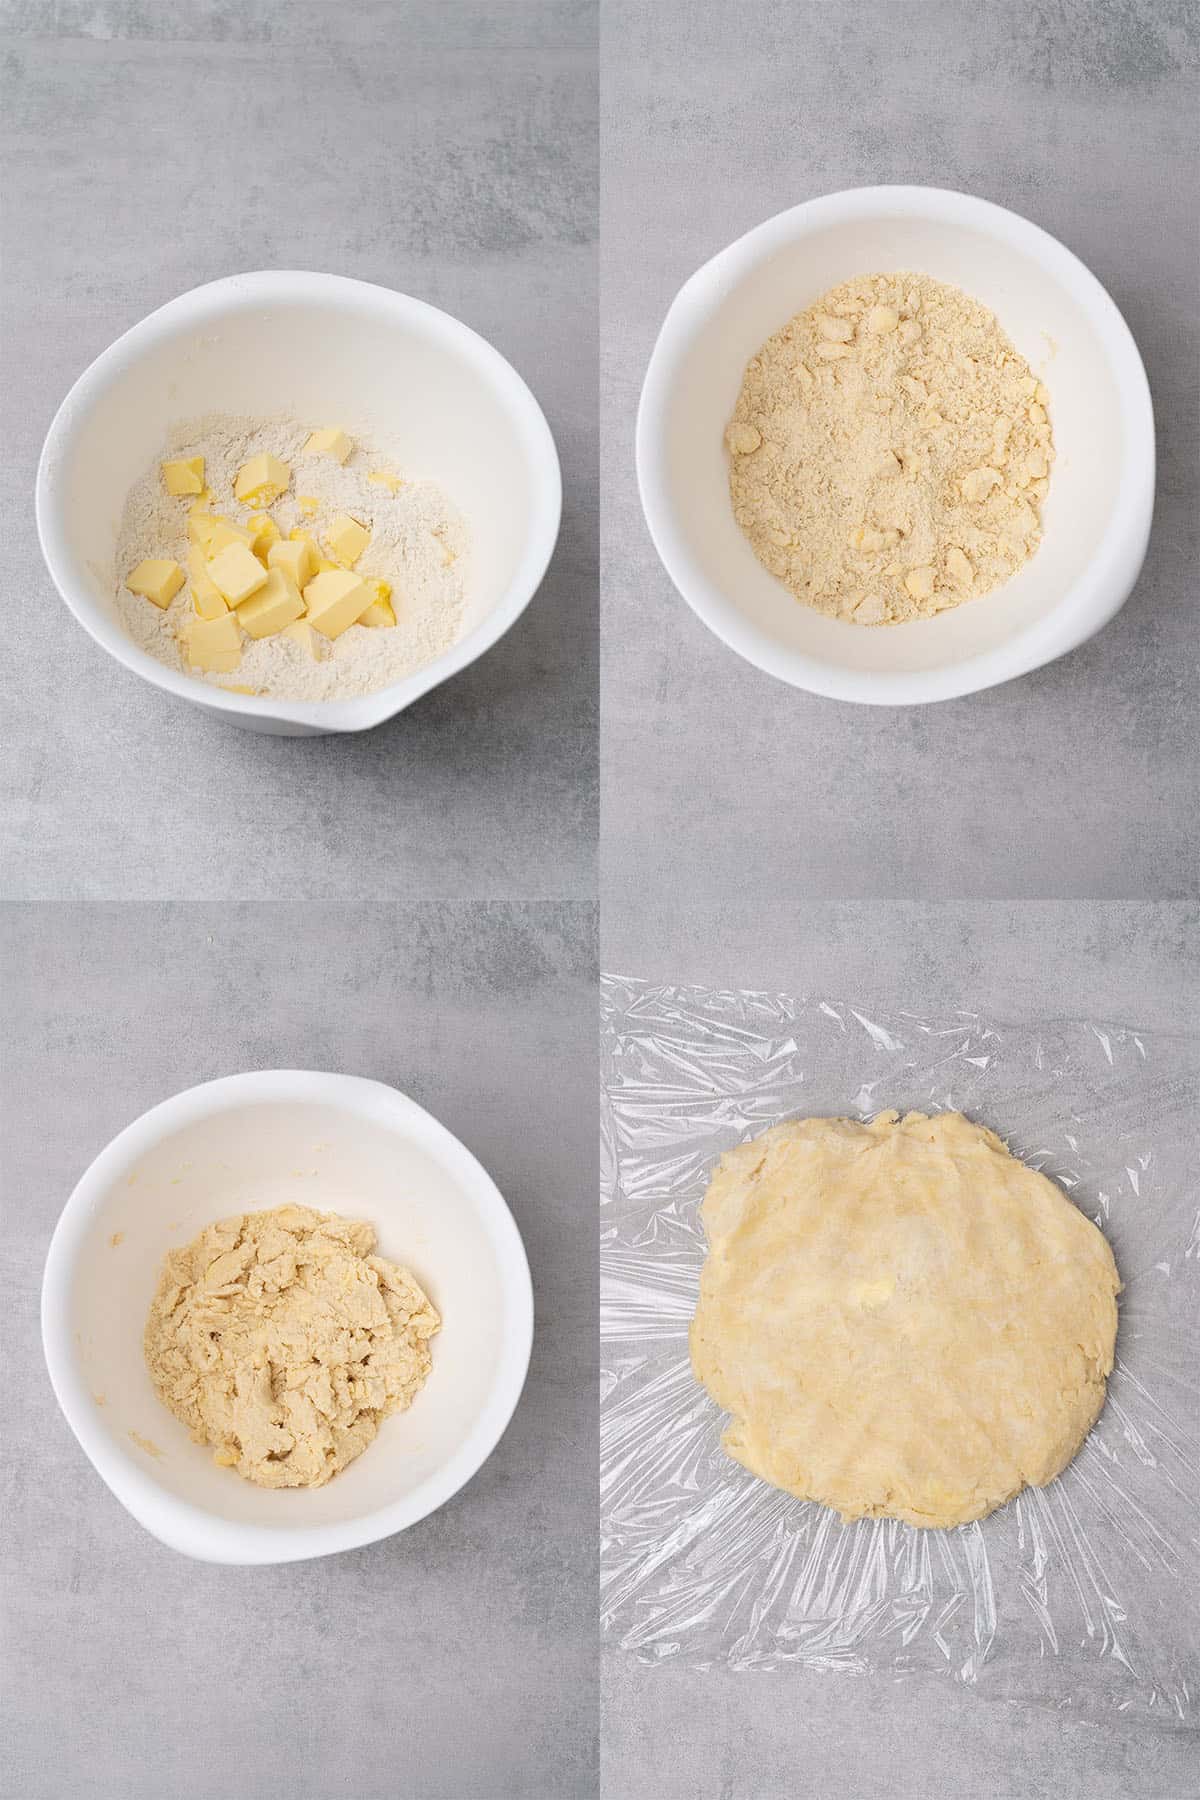
- Whisk together the flour and salt until well combined in a large bowl. Then place the mixture in the freezer to chill for about 5 to 10 minutes.
- Cut the cold butter into small chunks that are similar in size. Then place them in the freezer for 5 to 10 minutes along with the flour mixture.
- Add the chilled chunks of butter to the cold flour and then rub the mixture between your fingers until it feels and looks like coarse sand. Again, the flour and butter must be cold before you even attempt this step.
- Don't overwork the flour and butter with your hands. For a flaky crust, the flour and butter mixture must have some bigger butter chunks. So there is no need to fully incorporate them together.
- To bring the dough together, stir in a small amount of the cold water into the flour and butter mixture a little at a time. You can use a spatula or wooden spoon to do this step. It's very important that you not add all the water at once.
- Carefully start binding the dough together with your hands. It may look a little crumbly when you begin, but don't worry it will come together in just a minute or two. It's also crucial that you do not knead the dough at all and stop mixing it as soon as it comes together.
- Shape the dough to form a disk and cover it well with plastic wrap. Then place it in the fridge for at least 2 hours to rest.
- Remove the chilled dough from the fridge and put it on the kitchen counter to rest for a few minutes just long enough so it's slightly warm enough to roll. The dough should still be cold, but not so cold it is tearing when you try to work with it.
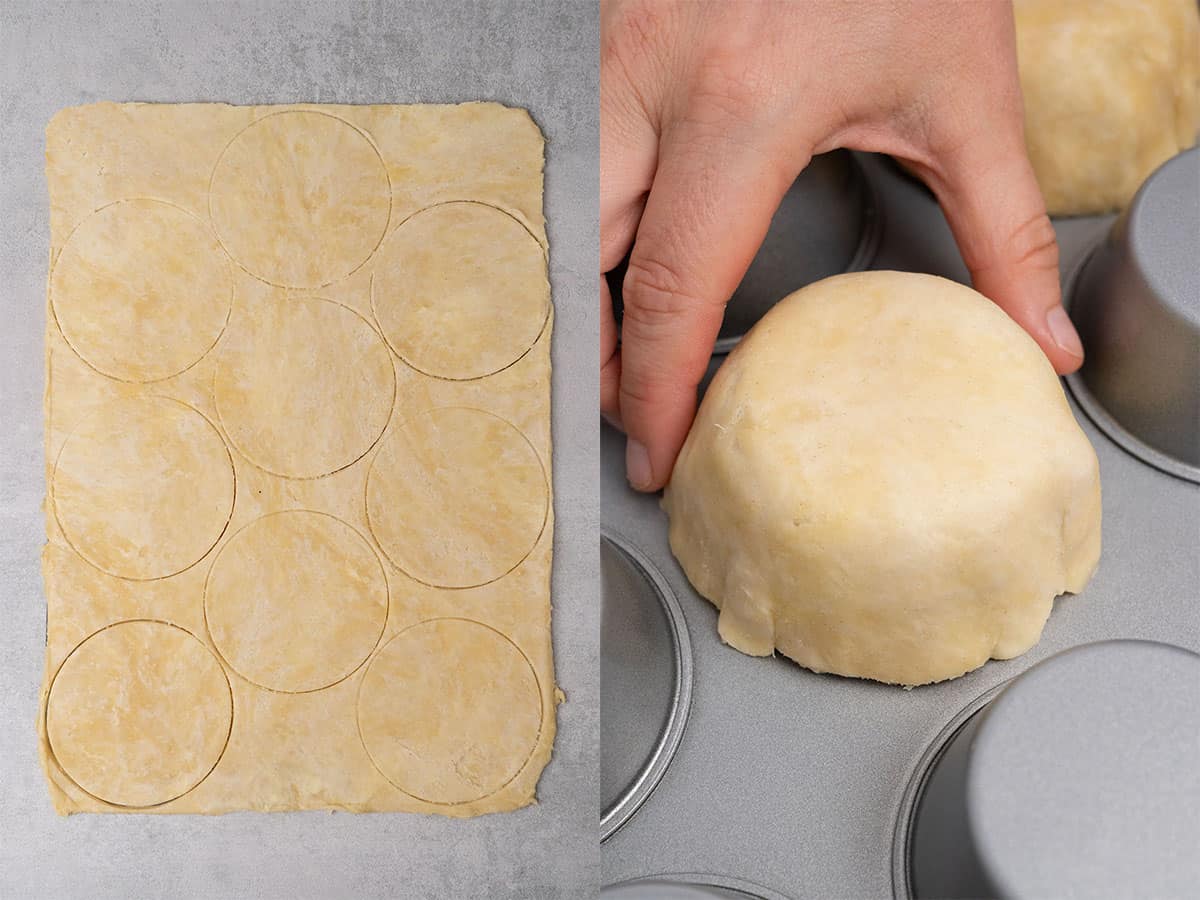
- For ease, begin rolling the dough out into a 42x30 cm / 16x12 inch rectangle on or between 2 Silicone Baking Mats with a rolling pin.
- You can also transfer the dough to a lightly floured surface and start rolling it out into a 42x30 cm / 16x12 inch rectangle. Try not to add too much additional flour to the dough. The dough itself should be cold enough to keep it from sticking to the counter. However, if it does stick you need to place it in the freezer for about a minute or so to firm back up before you try to roll it out.
- Measure the size of your muffin pan holes. This is to help you figure out what size are mini pie shells. The diameter of the circles of dough should be the same size as the muffin holes (from the back) in the following way: 2x side + 1x bottom. In my case, this was 11 cm / 4 inches.
- Using a cookie cutter, cut out circles of dough to fit your muffin pan holes.
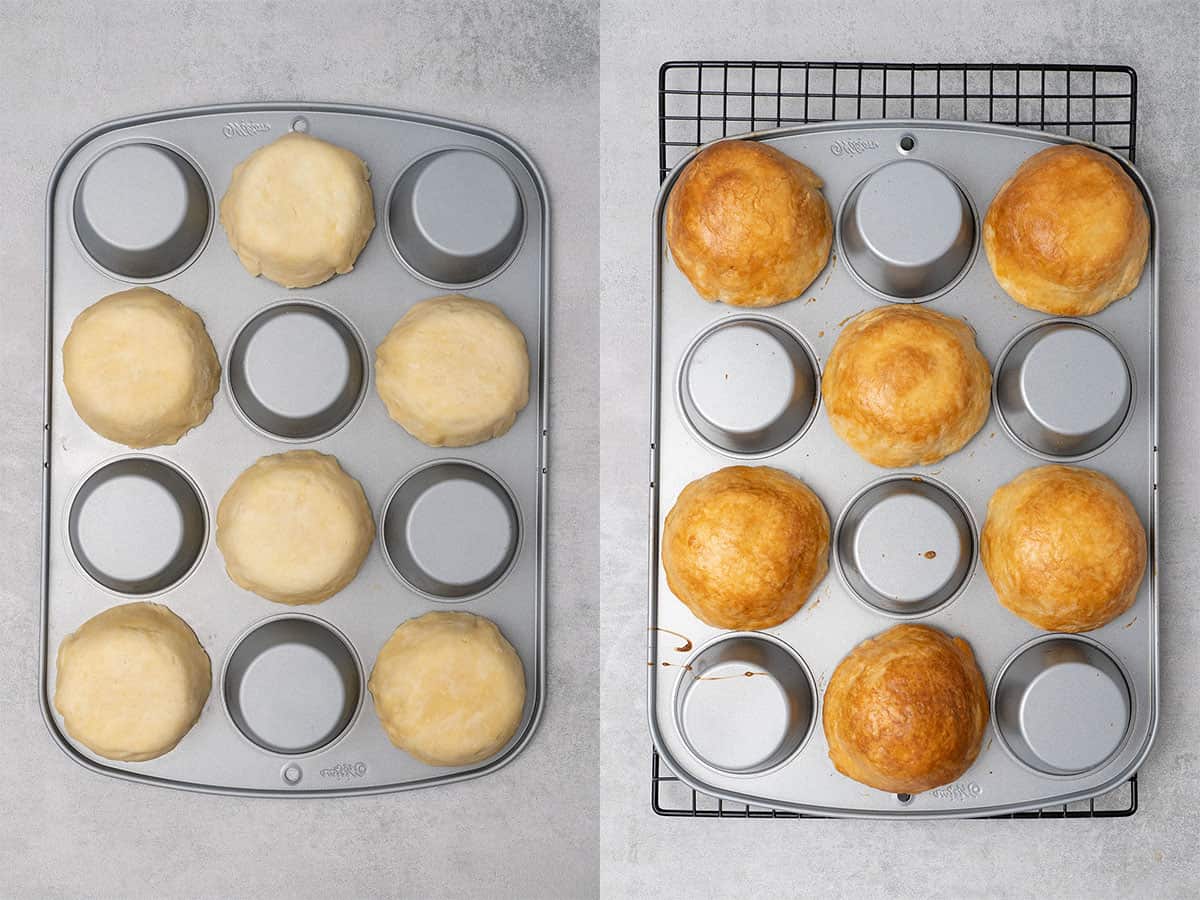
- Turn your muffin pan over and then gently start pressing the dough down over the muffin tin cavities. For the best results, you should use every other cavity to prevent the mini crusts from touching each other as they bake in the oven.
- Pop the muffin tin with the pie dough into the freezer to chill for 10 minutes.
💡 Top Tip: It's crucial that you do not force the dough or stretch it. The key is for the dough to be moldable but still cold, but not so cold that it would start to break.
2. How to bake mini pie crusts
The pie dough is ready to be baked once it has been nicely molded over the muffin pan cavities and chilled. But! How long to bake mini pie crust? The good news is that the crust does not require blind baking in this case because the gravity will hold down the dough and prevent it from puffing up as the crust bakes.
This is the easiest step of the whole recipe and the most exciting part!
- Fully preheat the oven to 200 C / 372 F (no fan) before attempting to bake the mini crusts.
- Transfer the cupcake pan from the freezer to the oven and bake the small pie crusts for 20 minutes on the pan.
- Then, very carefully remove the crusts from the pan. Brush the bottom and edges of the crusts with a light egg wash made of egg yolk + milk.
- Finally, put the mini crusts on a sheet pan lined with parchment paper and then pop them back into the oven to bake for another 5 minutes.
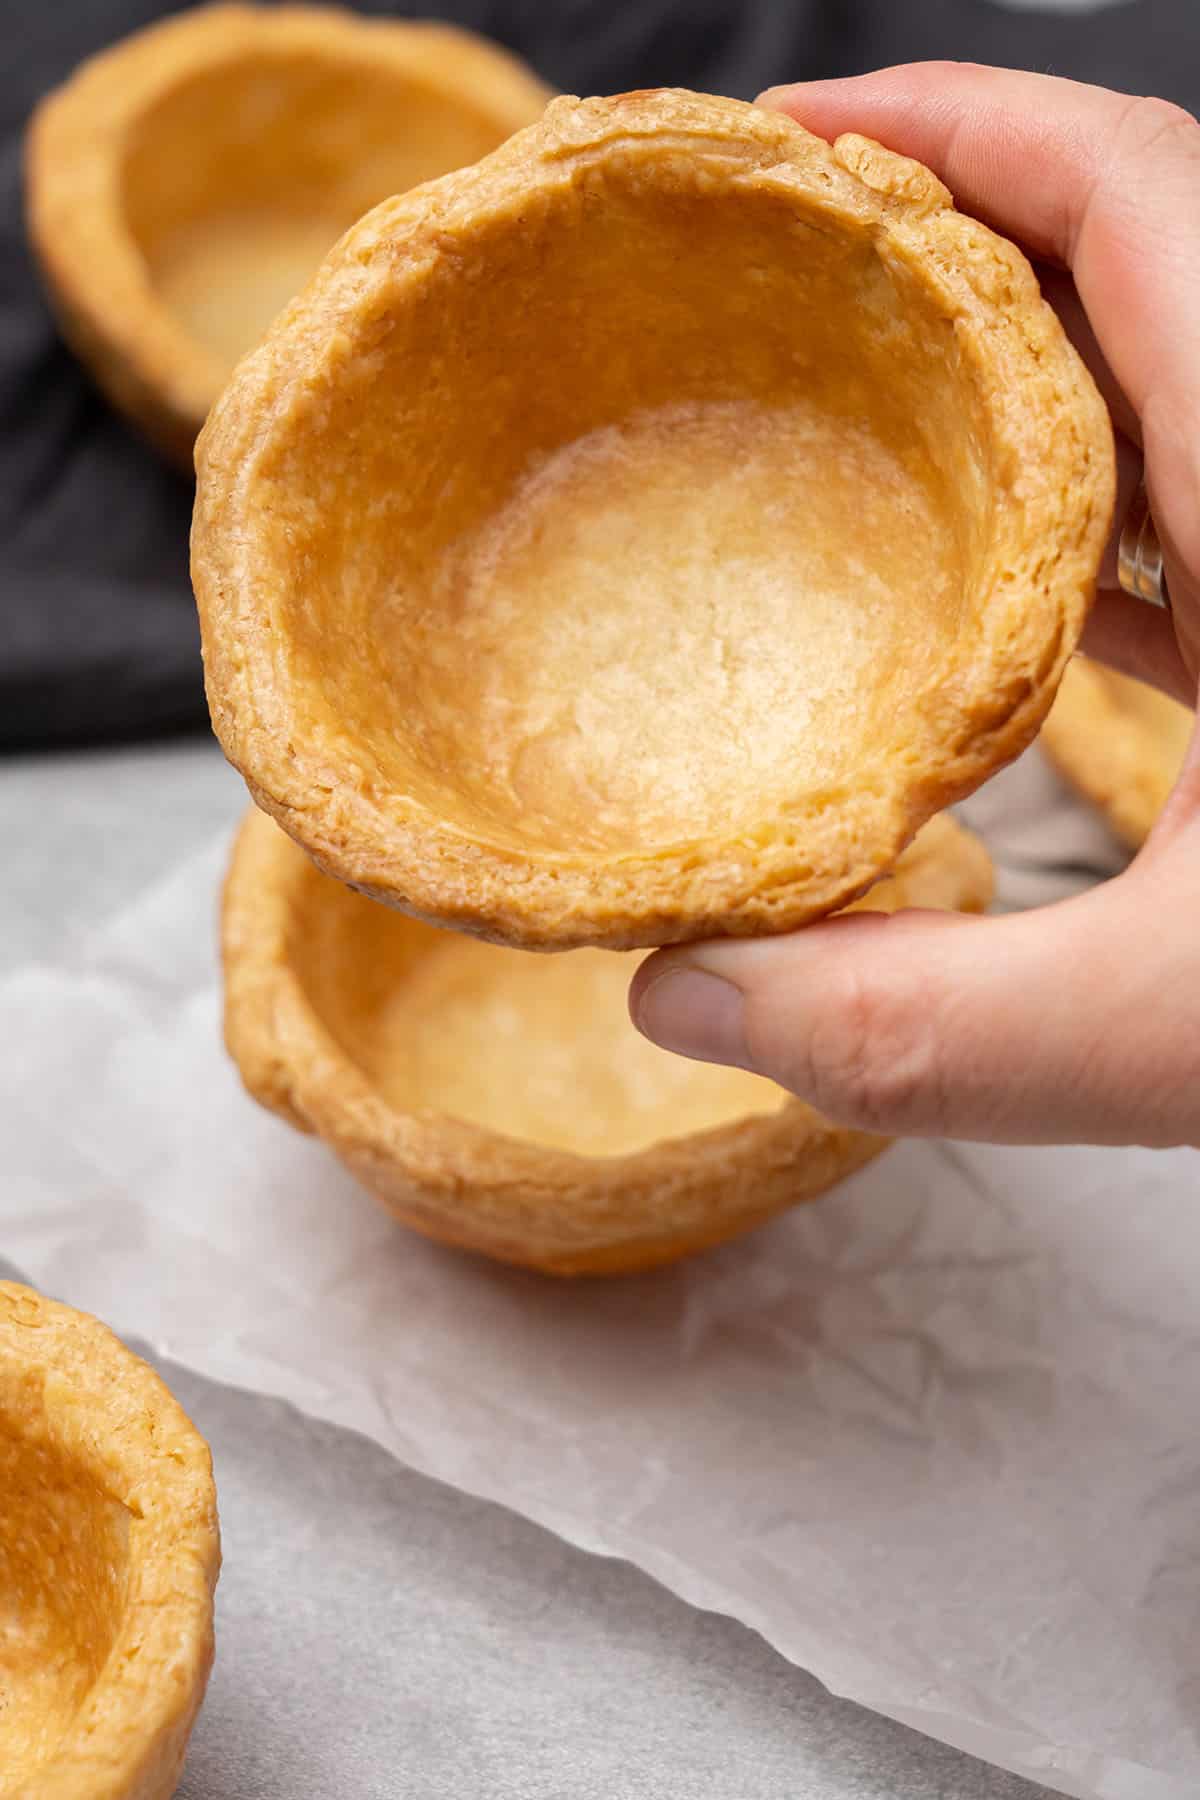
- The pie crusts should be golden brown when done. Then place them on a wire rack to cool to room temperature before using.
Also, if you'd like to learn more about egg washing, please check out my perfect egg wash guide! I spent an entire day testing 15 different versions of egg wash along with 7 substitutes including vegan options.
💡 Top Tip: Use a pastry brush to properly apply the egg wash. It helps to both fully and evenly coat the mini crusts.
3. How to use mini pie shells
This mini pie crust recipe is really versatile. It can be used to make a variety of both sweet pies and savory dishes into mini sizes. Some examples include:
- Lemon Meringue Pies
- Coconut Cream Pies
- Chocolate Silk Pies
- Pumpkin Pies
- Mini Quiches
- Fruit Filled Tarts
💡 Top Tip: You can use these mini crusts any way you like. But they must be baked before adding pie filling or any other ingredients.
🎓 Expert tips
- All the ingredients must be cold when making the pie dough. If the butter begins to melt or the dough starts to get soft, you have to put the dough into the fridge or freezer immediately so that it can firm back up.
- For the most buttery rich flavor use European-style unsalted butter with 82% fat content.
- Never knead the dough or use a mixer. Always combine the butter and flour together using your fingers to ensure there are large butter chunks to create a flaky texture.
- Make a glass of ice water, remove the ice, and then use that water to make your dough.
- How much water you will need can vary. This is why you only want to add a little bit at a time and stop adding it once the dough comes together.
- Resting the pie dough in the fridge is not optional. It's a mandatory step that gives the butter time to firm up and for gluten to develop as well.
- It's important to measure the diameter of your muffin pan holes before using a cookie cutter to cut the dough. Not doing so can result in dough circles that are either too big or too small.
🥣 Equipment notes
You'll be happy to know that this mini pie crust recipe does not require any fancy equipment! Yet, there are a few tools that can help give you the most professional results.
Rule number one is to use a Digital Scale to measure all your ingredients. This is the only way to know you're using the right amounts. Also, it's a good idea to use a Digital Oven Thermometer to make sure your oven is accurate. Ovens often vary by a few degrees, which can be due to age or even model.
And even though your hands do the majority of the work like most pie crust recipes, you'll need a good Rolling Pin to roll out your dough and some Silicone Baking Mats to help keep it from sticking to the kitchen counter. Then once your dough is rolled out, you will need at least one 12 Cup Muffin Pan.
❓Recipe FAQs
The main reason pie crust gets tough is due to overworking the dough, which is why you should never use a mixer or knead pie dough.
Yes, most likely you can. However, you can't just replace flour with gluten-free flour 1:1 without reformulating the recipe. When one ingredient changes, some other ingredients need to be changed too in order to keep the balance in the texture and flavor.
Probably yes, but I've not tried. All you have to do is replace the butter with shortening or vegan butter and omit the egg wash. However, you may need to experiment with the ratios of flour, vegan butter, and water to find the perfect balance.
Use your hands to make the dough to ensure there are large chunks of butter. Also, use all butter and properly chill the dough before both rolling it out and baking.
The crusts will keep at room temperature for up to 3 days or in the fridge for up to 5 days when covered.
You can keep mini pie crust frozen for up to 3 months in a sealed freezer bag. Just be sure to remove as much air as possible from the bag before freezing.
🥧 More Pie recipes
Mini Pie Crust (VIDEO)
Equipment
- Digital scale
Ingredients
Pie dough
- 375 g (3 cups) All purpose flour
- 270 g (1¼ cups) Unsalted butter 82% fat, use it very cold
- 120 g (½ cups) Water use it very cold
- ¾ teaspoon Salt
US customary cup measurement is an indicative figure only. Measure the ingredients with a digital scale by weight (gram). Baking is art but also science which requires precision and accuracy.
Instructions
- In a large bowl mix flour and salt until fully combined and place it into the freezer for 5-10 minutes
- Cut cold butter into small chunks and place it into the freezer for 5-10 minutes
- Once all ingredients are nicely chilled, add very cold butter chunks into flour and rub the mixture between your fingers until it becomes a sand like consistency.
- Add very cold water into the dough, a small amount at a time, and stir with a spatula or wooden spoon after each addition
- Start working the dough with your hands. First, it will look crumby but it should come together in the next minute or so. No need to knead the dough, stop mixing it as soon as it comes together. Remember, leave in some butter chunks, do not overwork the dough, and do not use a mixer
- Form a disk, cover it with plastic wrap and let it rest in the fridge for a minimum of 2 hours
- After 2 hours, take the pie dough disk out of the fridge and let it rest few minutes on the kitchen counter. The dough should stay cold but slightly warmed up to be able to roll it out without breaking it
- Alternatively, transfer the dough to a lightly floured surface and start rolling it out into a rectangle of 42x30 cm / 16x12 inches. No need to add too much flour while rolling, the pie dough should be cold enough not to stick to the kitchen counter. If at any point the dough gets too warm, pop it back into the freezer to chill for a minute then continue
- Check the size of your muffin pan holes. The diameter of the dough circle should equal the size of the muffin tin holes (from the back) in the following way: 2x side + 1x bottom, in my case is was 11 cm / 4 inches
- With the help of a cookie cutter, cut out circles of the dough that will fit your muffin pan holes
- Flip your muffin tin and slightly press down the dough on the cavities of the tin.
- Chill the pie dough again now in the freezer for 10 minutes
- Pre-heat oven to 200 C / 372 F (no fan)
- Take the cupcake tin out of the freezer and bake the mini pie crust in the following way: 20 minutes on the tin, then carefully remove them from the tin, apply a light egg wash (egg yolk + milk), and bake for further 5 minutes
- The pie crust is ready when it is baked even golden brown
Notes
- Leave some bigger butter chunks in the dough mixture - this will encourage flaky pie texture on the pie crust - no need to fully incorporate the butter into the flour
- I recommend using every other cavity on your muffin pan so that when the crust puffs up during baking, they won´t touch each other
- While rolling and working with the dough, do not force it, do not stretch it. Always work with a dough that is cold enough to be able to handle but not too cold to break it



Judy Good
I would like to use these to make mini quiches. So I would just follow the directions for making and baking - then fill them with the egg mixture and put them on a baking sheet to re-bake for the quiche filling? Won't the crusts then burn/overbake - or is there a way to prevent this
Katalin Nagy
You might need to cover the side of the crust with aluminium foil for the second bake.
Nancy
Just perfect!