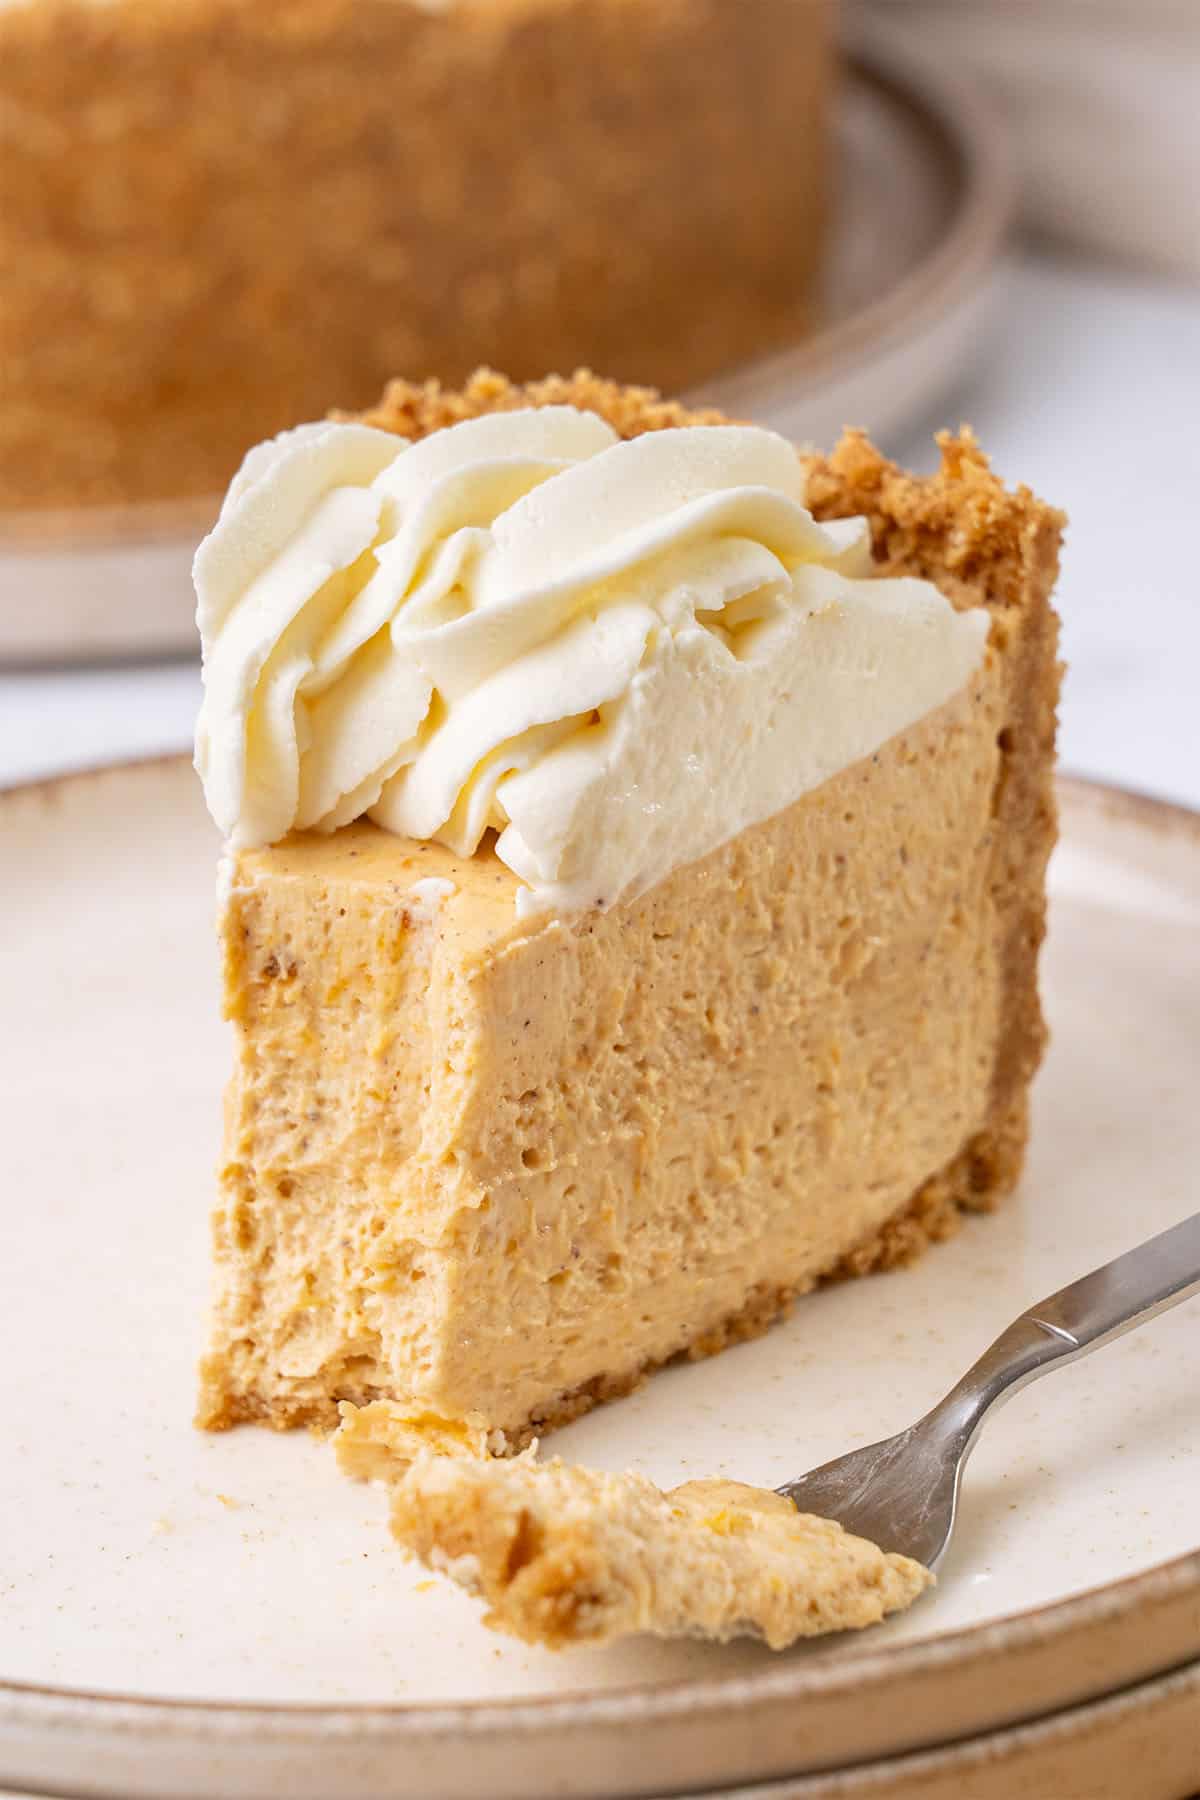
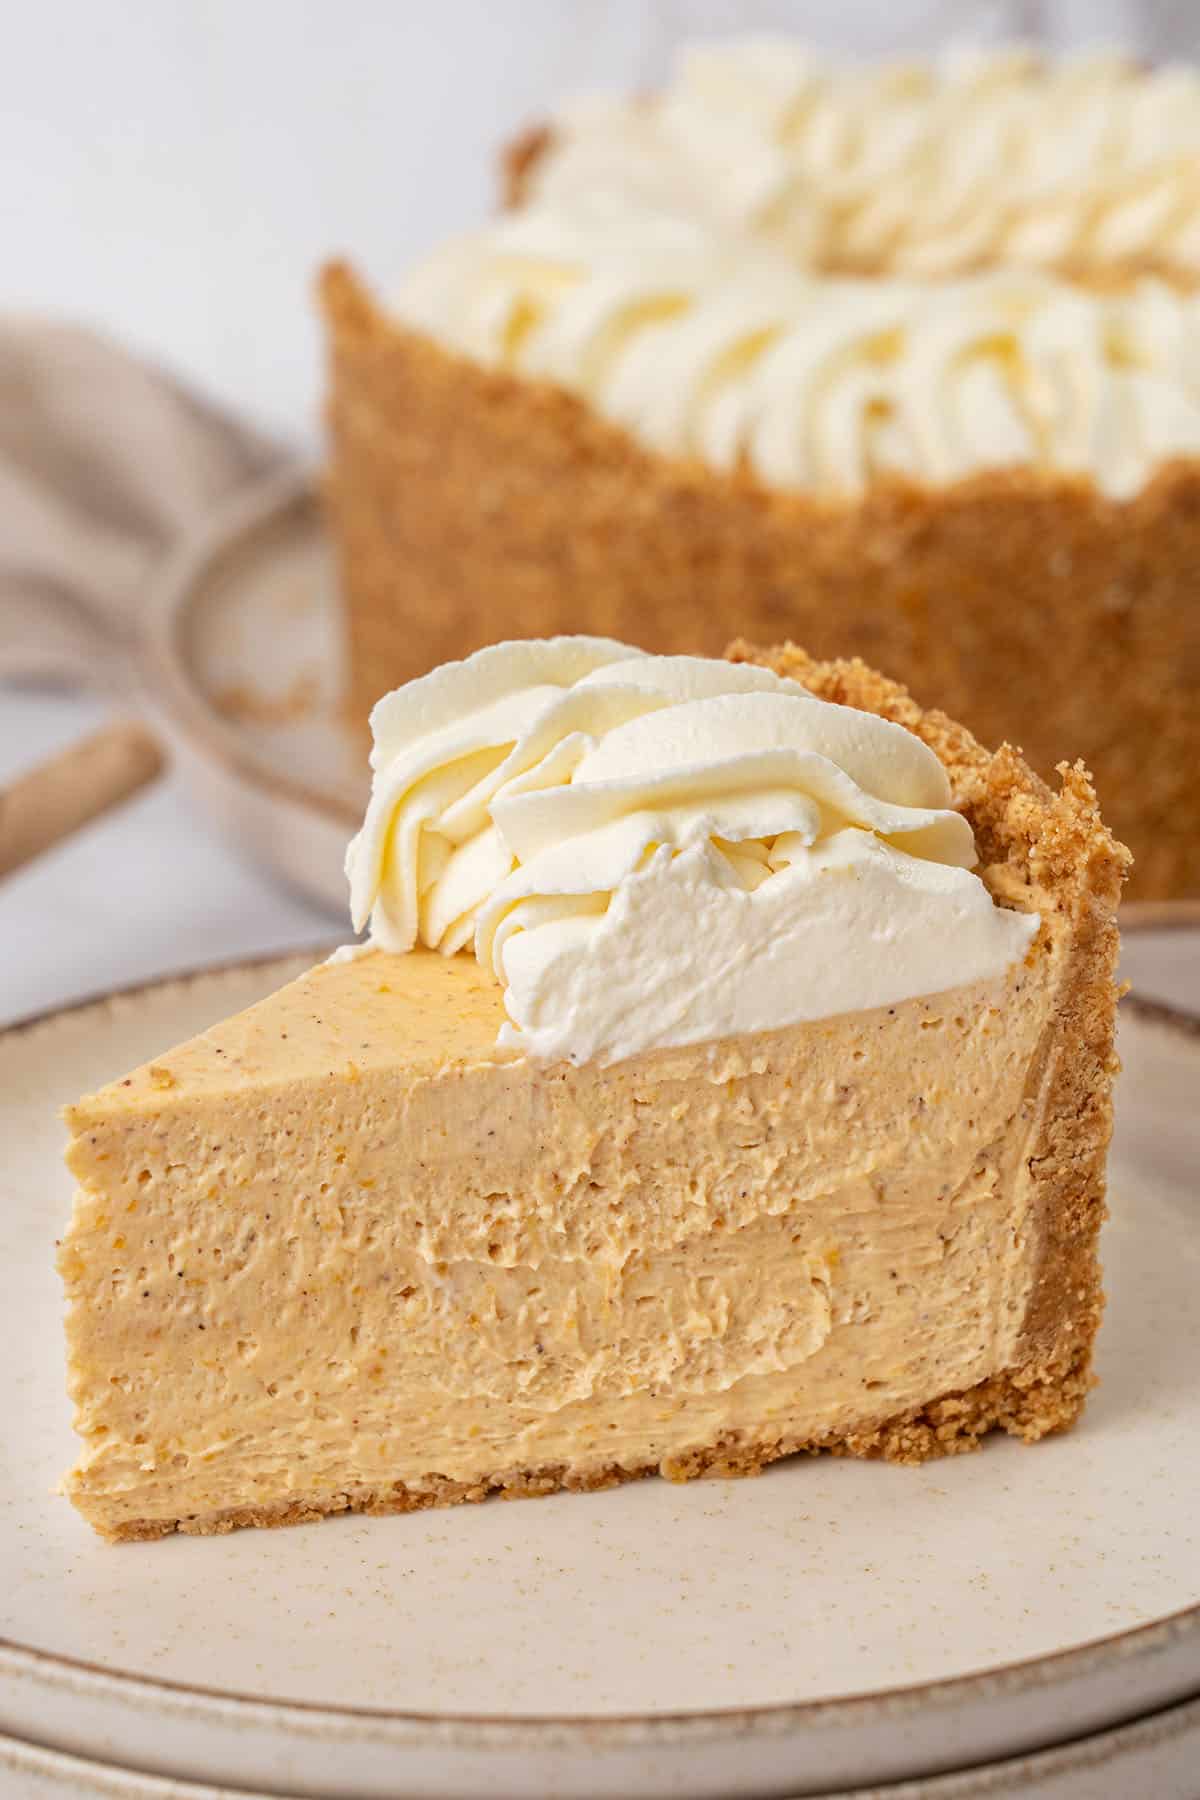
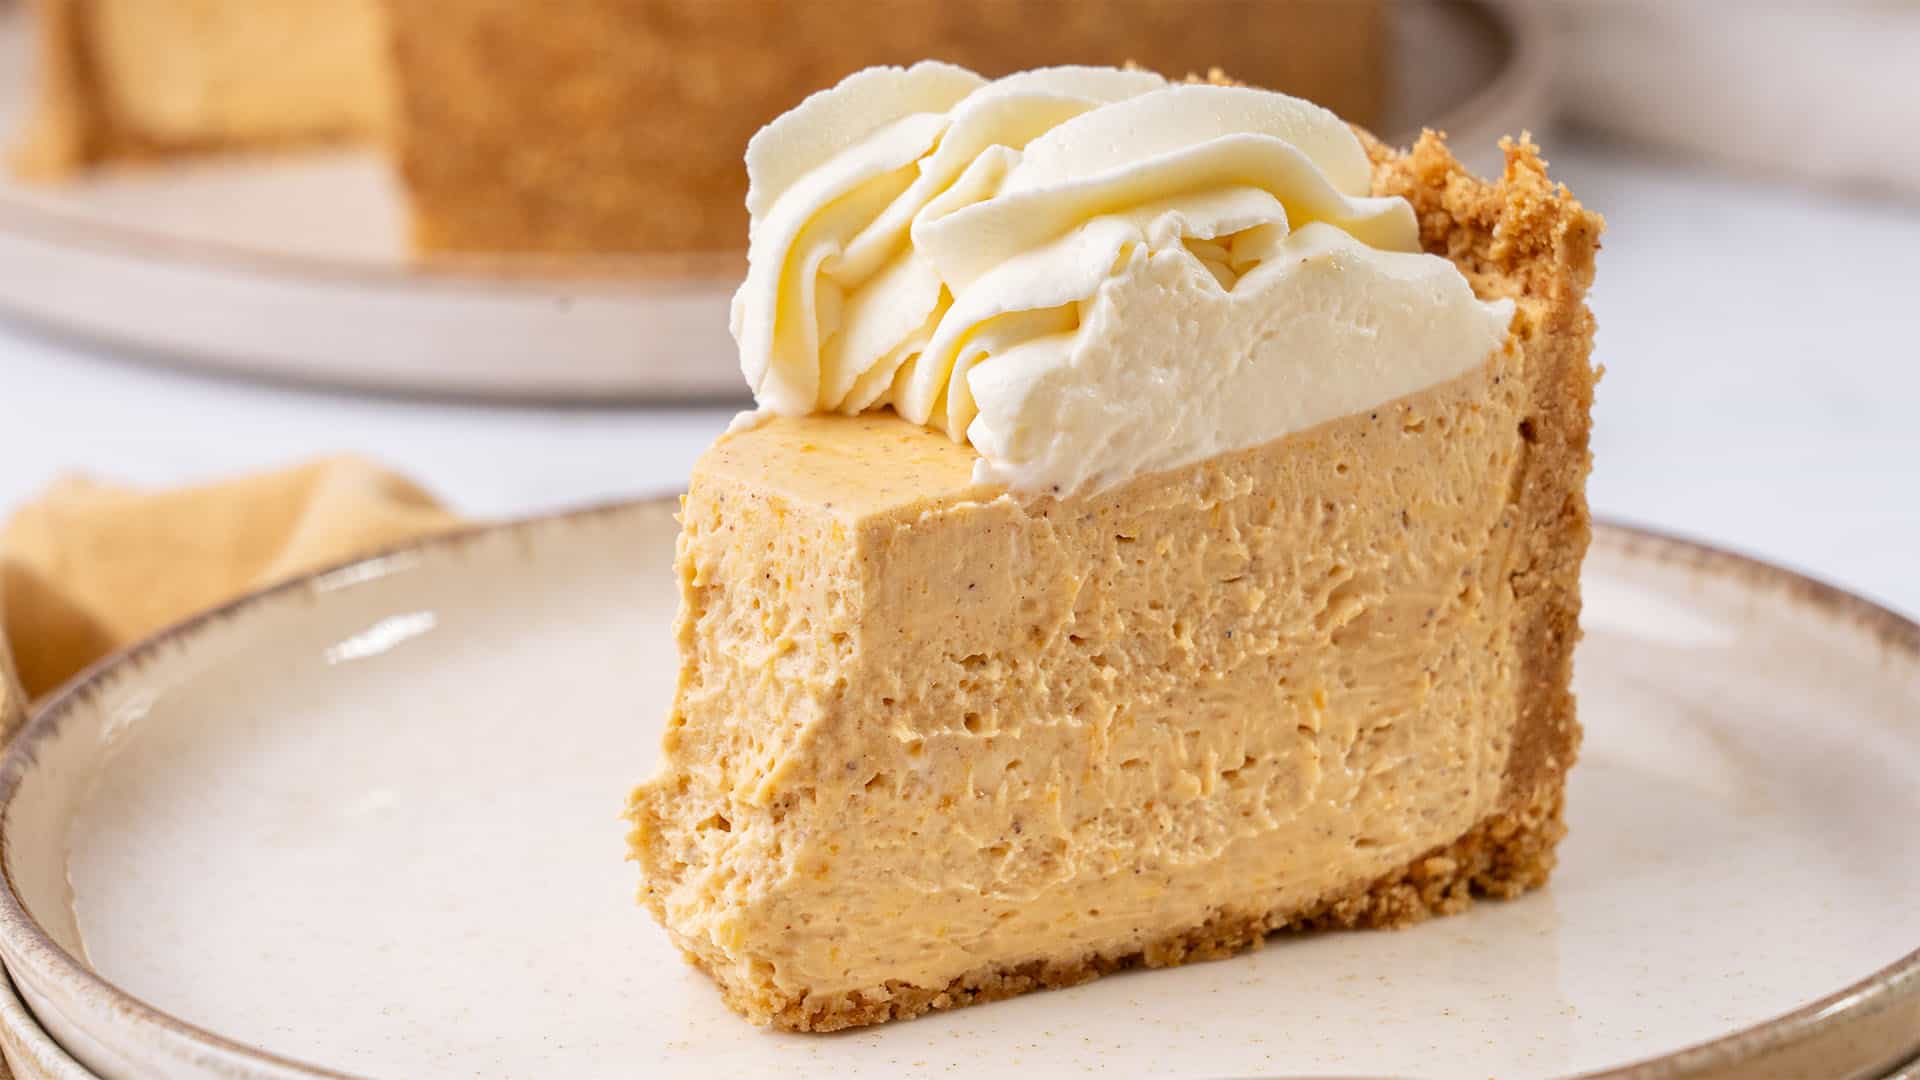
This is the creamiest no-bake pumpkin cheesecake recipe with a delicious Graham cracker crust and whipped cream cheese frosting. It's perfect for Fall and impressive enough even for Thanksgiving, but unbelievably simple!
This cake recipe was one of my first on the blog in 2020. Based on your request, I've now made it in a larger spring form pan, updated the photos, and added new expert tips based on your questions.
Read what others said about my No-bake Pumpkin Cheesecake recipe
"You made the recipe so easy to follow with the perfect explanation. I love the way you explain why I should add something or do something, helping me learn to bake instead of just following a recipe! This cake was a huge success with my family, the first time they tried pumpkin processed in something sweet." Demi
Best No-Bake Pumpkin Cheesecake Recipe
I love everything about this no-bake pumpkin cheesecake; the texture, the flavor, the design, and the fact that it comes together in literally no time with zero effort!
The ingredients are all basic, you don't need any special equipment, and you don’t even need to turn the oven on. No-bake desserts are perfect for busy times of year, such as the holidays, when you are cooking for a crowd and need all the help you can get. I'll take all the stress out for you with this super-easy yet super-delicious pumpkin cheesecake.
I have thoroughly tested this recipe and updated it to include additional tips and recommendations on how to avoid and address common issues that may arise during baking.

Katalin's Key Take On Why No-Bake Cheesecake Doesn't Set
Have you been faced with a runny no-bake cheesecake before? This is a common problem, and I will show you how to avoid it. Unlike baked cheesecakes, which rely on egg and flour for structure, no-bake cheesecakes skip both of those. But I promise you can still achieve clean, beautiful slices with the right ingredients and technique!
Patience is key! A no-bake cheesecake needs plenty of chilling time in the fridge to firm up, and cutting this short will leave you with a runny dessert. Plan for at least 4–6 hours of chilling, though overnight is best.
The heavy cream has to be very cold and whipped to the right point so that it holds its shape. Underwhipped cream won’t provide enough structure, while overwhipped cream becomes too stiff and won’t blend smoothly with the cream cheese. Aim for early stiff peaks for the perfect light and fluffy texture.
Fat content really matters. Both your cream and cream cheese should be full-fat for the cheesecake to set properly. I use heavy cream with 36% fat and full-fat Philadelphia cream cheese. Lower-fat options or cheaper cream cheeses with high water content tend to make the filling watery, resulting in a cheesecake that doesn’t hold its shape. This is especially important given that the filling contains pumpkin puree, which is a liquid.
Finally, while many no-bake cheesecake recipes skip gelatin, they are typically shallow and not nice and tall like this one. Gelatin also provides extra stability. If you want your cheesecake to be tall or if it needs to travel or sit out at an event, I really recommend using gelatin. That said, if you’d prefer to skip gelatin, don’t worry, I’ll share some tips below for making this cheesecake without it.
Start with the Graham cracker cheesecake crust
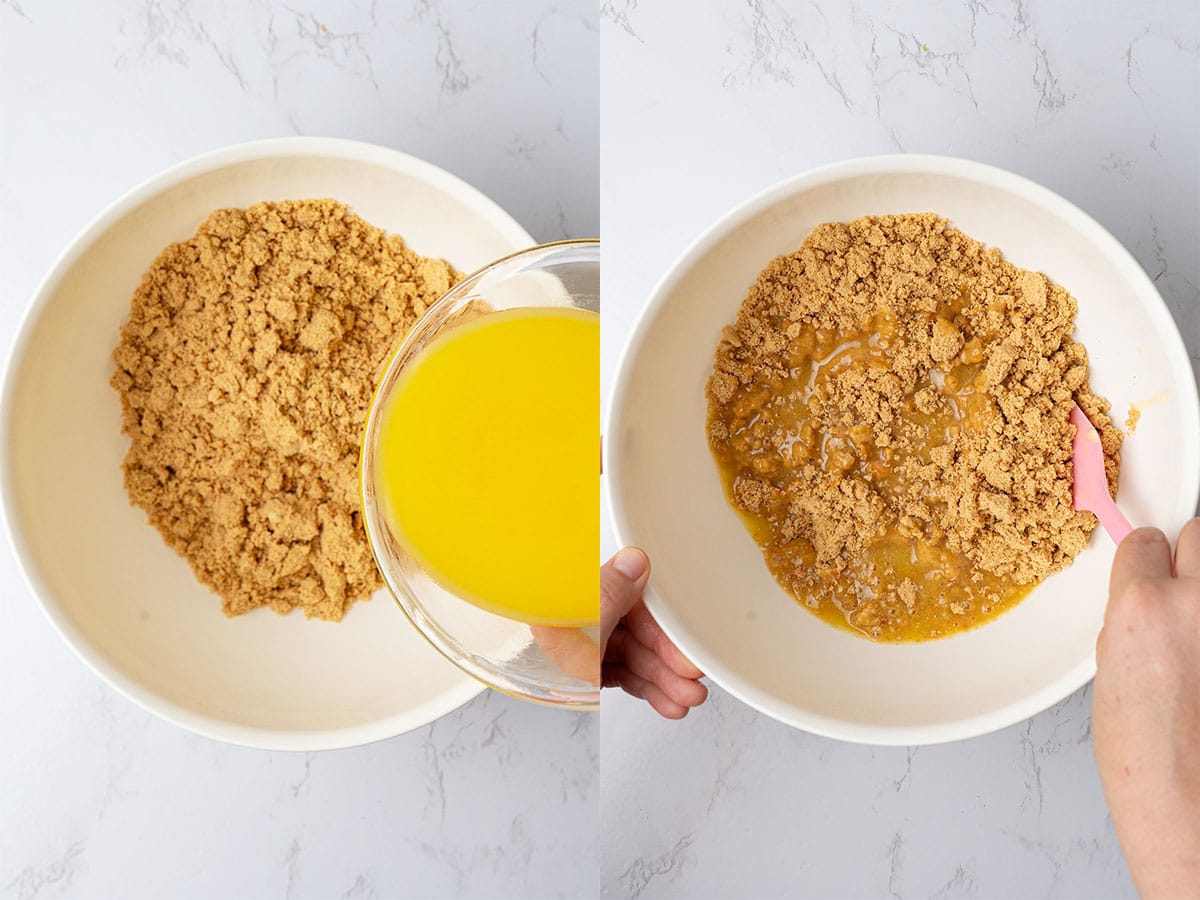
Melt the butter in the microwave on a low setting, or gently heat it in a small saucepan over low heat on the stovetop.
Crush the graham crackers into fine crumbs by pulsing in a food processor, or place them in a ziplock bag and smash with a rolling pin. We want an even, sandy crumb that is fine enough to press together, but not blended into cookie butter.
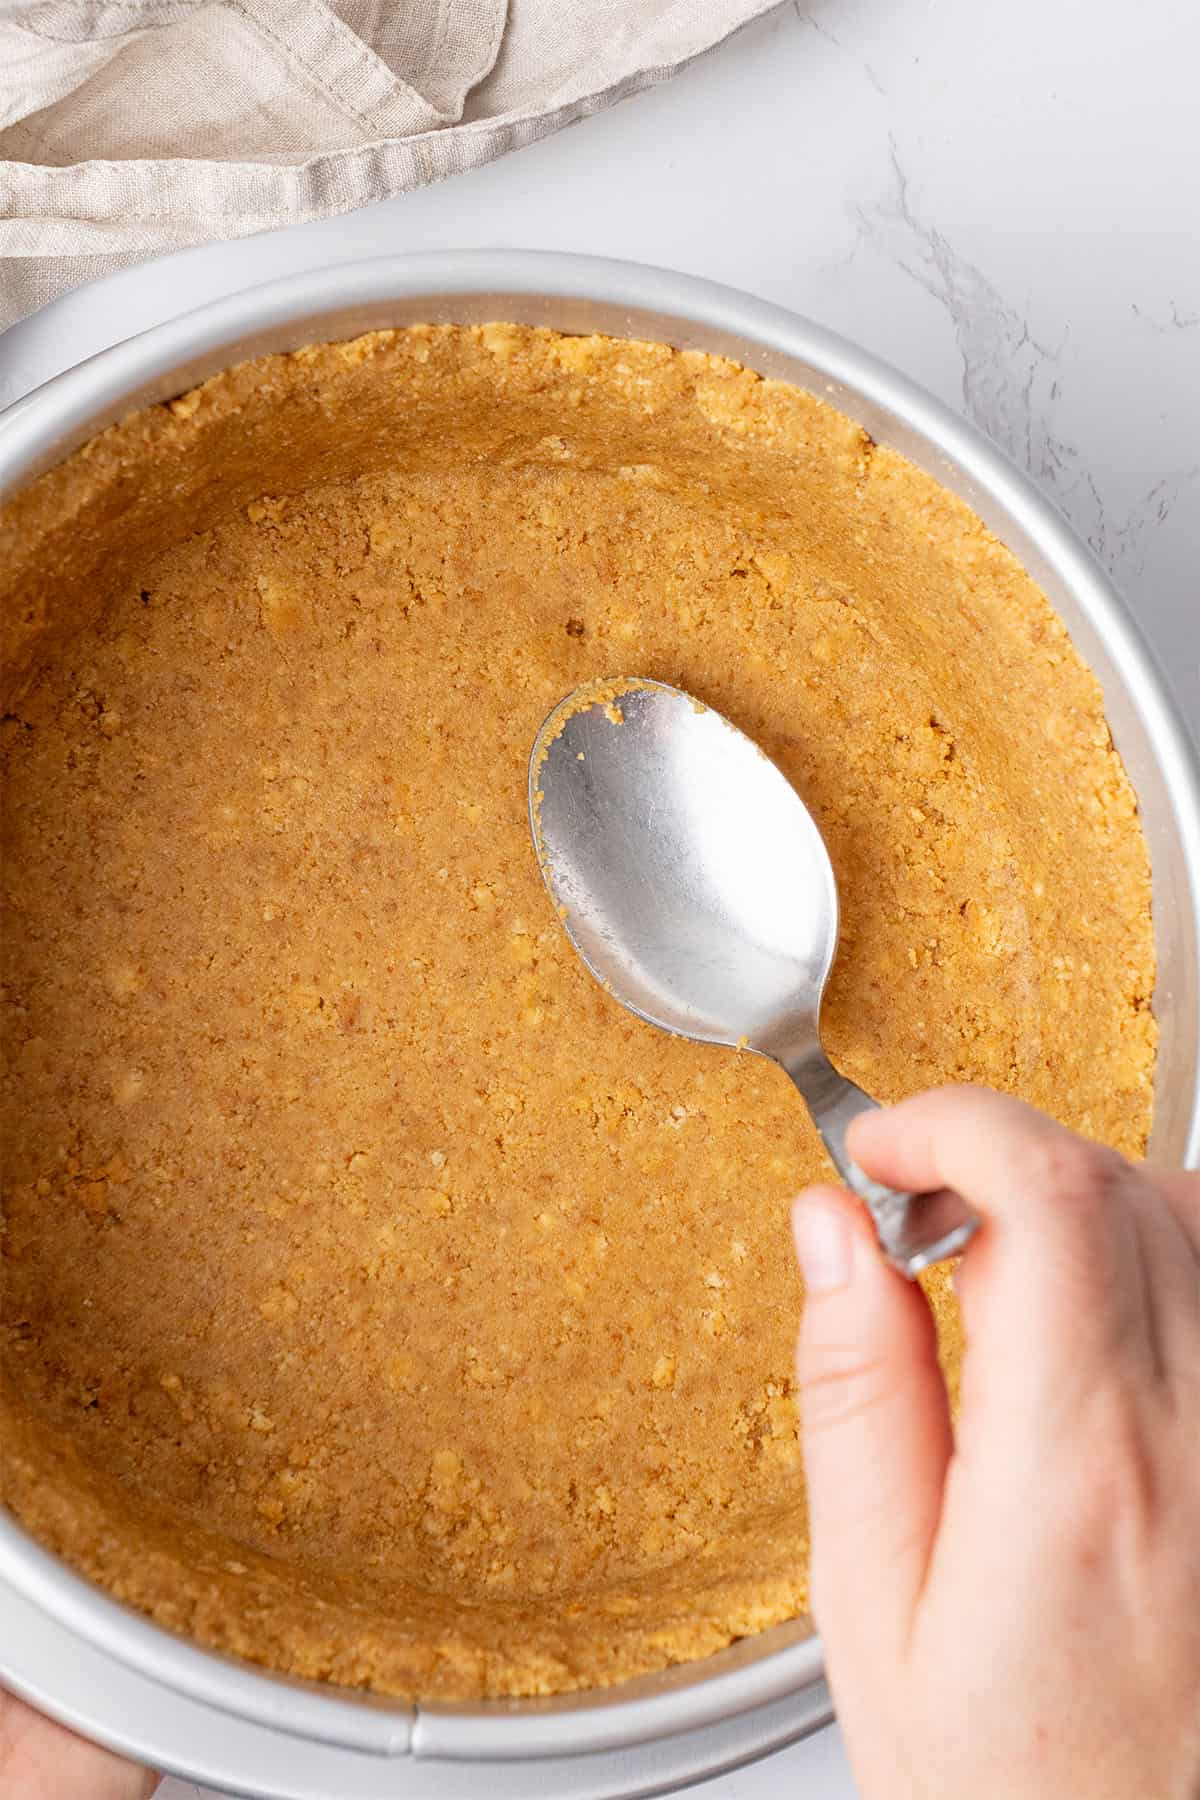
Mix the crumbs with the melted butter and a pinch of salt until everything is evenly coated. Pour the buttery graham cracker mixture into your springform pan and press it firmly into the base and sides to form your crust. You can use an 8-inch or 9-inch springform pan. I prefer an 8-inch pan so the cheesecake turns out to be taller, but if you are making this cheesecake without gelatin, use a 9-inch springform pan.
When making the crust, start with the sides and then move to the base. Be thorough and take your time. Getting into the corners and smoothing it out can take 10–15 minutes. A flat-bottomed mug, glass, or measuring cup works well; however, my personal trick is to use a spoon with a bent handle.
Place the crust in the fridge for 30 minutes to set before filling. If you're short on time, use the freezer!
If you want to be a real pro when it comes to this easy cheesecake crust, read my in-depth cheesecake crust tutorial.
Prepare the pumpkin cheesecake filling
Soak the gelatin sheets in a small bowl of cold water for 5 minutes so that they can soften.
Always use 100% pumpkin puree, not pumpkin pie filling (which already has sugar and spices added). Libby's is a reputable brand.
Cook down your pumpkin puree until some of the water evaporates by heating it in a small saucepan with sugar, pumpkin spice, and lemon juice. Bring it to a gentle boil for 5 minutes, then turn off the heat.
Now, squeeze out the gelatin sheets and whisk them into the hot pumpkin puree mixture. Make sure it all dissolves, and if you have any lumps remaining, then turn the heat back on and whisk over gentle heat until they melt. Then let this mixture cool to room temperature. Don't use it while it's still hot, and don't be tempted to chill it in the fridge, or the gelatin will set.

Whip the cream cheese using an electric hand mixer until it's smooth, light, and fluffy, then gently fold the room temperature pumpkin mixture into it until fully combined.

In a separate bowl, whip very cold, high-fat heavy cream (at least 36%) until you have early stiff peaks. Don't stop too soon, or the cream will not be stable enough to hold its shape. But if you go too far, you will have difficulty folding the mixture together as it can go lumpy.
Once you have early stiff peaks, very gently fold the whipped heavy cream into the pumpkin mixture using a rubber spatula.

Now, assemble your no-bake pumpkin cheesecake
Pour the no-bake pumpkin cheesecake filling into the prepared Graham cracker crust, and smooth off the top with an offset spatula.

Place it into the fridge to chill and set for at least 6 hours, or preferably overnight. Leave it in the springform pan until it has completely set.
Once ready to serve, run a knife around the edge to help release it, and then remove the springform. Place it onto a serving plate and prepare your decorations.
Time to decorate
Place the cold heavy cream, cold cream cheese, and sifted powdered sugar into a mixing bowl and whip together for 1–2 minutes.
Stop as soon as the mixture becomes light, fluffy, and pipeable, or it can split and go runny.
Transfer the cream cheese frosting into a piping bag fitted with a Wilton 1M piping nozzle tip and pipe frosting on top of your pumpkin cheesecake.
A note Cool Whip. While it can be used as a substitute for heavy cream, it contains so many additives, and I personally never use it!

Storing & Freezing
The cheesecake will last for up to 2-3 days in the fridge. Keep it covered in its springform pan until you need it, and then store leftover slices in an airtight container.
While it can also be frozen, you will lose some of the crunchy texture in the crust upon defrosting. To freeze the pumpkin cheesecake whole, wrap the springform in plastic wrap and then foil. To freeze individual slices, double wrap them tightly in plastic wrap and foil. Defrost overnight in the fridge.
Can I make this recipe without gelatin?
Yes, but with caution, and please follow these steps carefully. Because this cheesecake uses pumpkin puree, it’s especially important to think about how it sets. Pumpkin puree adds a lot of extra moisture, which means gelatin is highly recommended to help the cheesecake hold its shape. Gelatin is an odorless, flavorless setting agent that provides structure and stability.
If you choose not to use gelatin, you’ll still need to cook the puree down on the stove until it’s thicker and less watery.
Also, without gelatin, make this cheesecake in a 9-inch springform pan rather than an 8-inch one, and follow the recipe measurements carefully. Pay close attention to the whipping and mixing stages, as that structure becomes even more crucial without gelatin.

Flavor variations
You can swap out the Graham crackers for many different cookies, such as Oreos, Digestive biscuits, and Lotus Biscoff. I like to add some Ginger snap cookies for a bit of spice! Pretzels can also add a really good crunch.
You could add a splash of Baileys or Amaretto to the gelatin pumpkin mixture for an adult-only dessert. This twist will only work if you are using gelatin or another setting agent.
Garnish with crumbled pecans for a bit of nutty crunch, or drizzle over some caramel sauce for even more decadence!
Ingredient Substitution options
Feel free to use gluten-free versions of your crackers or cookies to make this pumpkin cheesecake gluten-free.
You can try using plant-based alternatives for the butter, cream, and cream cheese, just ensure they are high in fat content so that they set in the fridge. Plant-based creams can also be a bit sweeter than dairy, so adjust the sugar if needed.
There are plant-based gelatins you can use, like agar agar powder, which is made from seaweed. They vary in strength, so check the conversion carefully and note that the texture can be more chewy and solid.
Expert tips
- Don't be tempted to add more butter or more crackers to the crust mixture; it is perfectly formulated! If it seems too liquid to form a crust, put it in the fridge for 5 minutes.
- Mix the cracker crumbs and butter evenly. Every crumb should be coated with butter; otherwise, the crust won’t set uniformly.
- It is essential that the cream and cream cheese are full-fat and very cold to whip up properly.
- If you have a really sweet tooth, add 1-2 tablespoons of extra granulated sugar to this recipe.
- Rushing the chill time is the number one reason for a runny cheesecake. Be patient!
- Dip your knife into hot water and wipe it dry before slicing for a perfect cut.
You will need only a few pieces of equipment
Always weigh ingredients by the gram using a digital scale for precision.
Bashing the crackers with a rolling pin is a great way to relieve stress!
Combine ingredients using an electric hand mixer and then switch to a rubber spatula for folding gently. I use an 8-inch / 20 cm Springform pan for the perfect height and an easy release. Smooth the top for a perfect finish using an offset spatula
Finally, I use a Wilton 1M piping nozzle tip to decorate like a pro!
Try some of my other cheesecakes
- No-bake Oreo cheesecake
- New York cheesecake
- Japanese jiggly cheesecake
- Apple crumble cheesecake
- No-bake cheesecake bites
Have you tried this recipe?
Please leave a 5-star ⭐️⭐️⭐️⭐️⭐️ rating on the recipe card and consider leaving a comment as well!

No Bake Pumpkin Cheesecake
Equipment
Ingredients
Graham cracker crust
- 110 g (½ cups) Unsalted butter
- 300 g Graham crackers 300 g = 10.5 oz = approx. 20 sleeves
- Pinch of salt
Pumpkin cheesecake filling
- 3 Gelatine sheet 3x1.7g=5g gelatin overall
- 210 g Pumpkin puree 7.5 oz=Half a Libby's can
- 150 g (¾ cups) Granulated sugar
- 2 teaspoons Lemon juice freshly squeezed
- 1 teaspoon Pumpkin spice
- 560 g (2½ cups) Cream cheese full fat Philadelphia, cold
- 230 g (1 cups) Heavy Cream 36% fat, very cold
Decoration
- 30 g (¼ cups) Powdered sugar sifted
- 120 g (½ cups) Philadephia full fat Philadelphia, cold
- 120 g (½ cups) Heavy cream 36% fat, very cold
US customary cup measurement is an indicative figure only. Measure the ingredients with a digital scale by weight (gram). Baking is art but also science which requires precision and accuracy.
Instructions
Graham cracker crust
- Melt the butter and let it cool slightly. Crush the Graham crackers into fine crumbs using a food processor, or place them in a zip-top bag and crush with a rolling pin. Stir the crumbs with a pinch of salt, then add the melted butter and mix until evenly moistened.
- Press the mixture into the bottom and slightly up the sides of an 8-inch or 9-inch springform pan. Use the back of a spoon or a small measuring cup to press firmly and evenly without over-packing. Chill the crust in the refrigerator for at least 30 minutes (or 15 minutes in the freezer) before filling.
Pumpkin cream cheese filling
- Place the gelatin sheets in a small bowl of cold water and let them soak until softened.
- In a small saucepan, warm the pumpkin puree with the sugar, pumpkin spice, and lemon juice over medium heat. Cook it for about 5 minutes until some water evaporates and you get a thick, less watery pumpkin puree.
- Remove the saucepan from the heat. Squeeze out the excess water from the gelatin and whisk it into the hot pumpkin puree until fully melted. Let this mixture cool to room temperature.
- In a large mixing bowl, whip the cream cheese with an electric hand mixer until smooth, light, and fluffy. Using a rubber spatula, gently fold the cooled pumpkin mixture into the cream cheese until fully combined.
- In another bowl, whip the heavy cream until it reaches the stage just before stiff peaks. At this point, the cream is stable enough to hold its shape but still smooth and flexible, making it easy to fold into the cream cheese mixture without losing volume. Stopping at soft peaks won’t provide enough stability, while whipping all the way to stiff peaks can quickly turn the cream lumpy, which doesn’t blend well with the other ingredients.
- Using a rubber spatula, gently fold the whipped cream into the pumpkin mixture. Work slowly and carefully so the mixture stays airy and fluffy.
- Pour the pumpkin cream cheese filling into the prepared crust. Use an offset spatula to smooth the top evenly.
- Refrigerate for at least 6 hours, or preferably overnight, until the no bake pumpkin cheesecake sets.
- Once fully set, run a thin knife around the edge if needed, then gently release the springform ring to remove the cheesecake.
Decoration
- Whip the heavy cream, cream cheese, and powdered sugar together for 1–2 minutes until the mixture becomes light, fluffy, and pipeable. Stop as soon as it reaches the right consistency — overwhipping will cause it to turn runny. Move frosting into a piping bag fitted with Wilton 1M piping nozzle tip and pipe frosting on top.
- StorageKeep the cheesecake covered in the refrigerator for up to 2-3 days. For best results, store it in the springform pan covered with plastic wrap or foil, or transfer slices to an airtight container.FreezingYou can freeze the whole cheesecake or individual slices. Wrap tightly in plastic wrap, then foil, and freeze for up to 1 month. Thaw overnight in the refrigerator before serving. Note that while the flavor stays delicious, the texture of the Graham crackers may soften slightly after freezing.
Notes
- Measure your ingredients accurately using a digital scale.
- Use full-fat, block-style cream cheese for the best texture and flavor. Low-fat or spreadable versions contain more water, which can make the cheesecake runny.
- Choose heavy cream with at least 36% fat content. It whips up more stable and gives the filling its light, mousse-like texture.
- The crust is sweet enough, but for people with an extra sweet tooth, feel free to add 1-2 tablespoons of granulated sugar to this recipe.
- The gelatin is not required but highly recommended if you want cleaner slices, a taller cheesecake, or if the cake needs to travel.
- If you are not using gelatin, you can still cook the pumpkin puree to let some of the excess water evaporate. This helps prevent a watery puree, which would otherwise result in a cheesecake with a poor texture.
- When you make the crust, heat the butter in the microwave on low power so it does not explode. Alternatively, use a saucepan on the stovetop.
- When processing the Graham crackers in a food processor, stop as soon as you have fine, sandy crumbs. If you overprocess, the cookies can release too much fat and turn pasty, almost like cookie butter.
- While preparing the crust, make sure that you press the crumbs firmly and evenly into the sides and the bottom of your springform.
- If using gelatin, let the warm pumpkin-gelatin mixture cool to room temperature before folding it into the cream cheese. Adding it too hot can melt the cheese; adding it too cold can cause it to set in clumps. However, don't let it cool too much, e.g., don't place it into the fridge as the gelatin will set.
- The cream should be whipped to just before stiff peaks — stable enough to hold shape but still flexible. Too soft = filling won’t set; too stiff = it becomes lumpy and hard to fold in.
- When combining mixtures, always use a rubber spatula with slow folding motions. Stirring removes air and makes the filling heavier; if too much air is removed, it becomes runnier.
- The cheesecake needs time to firm up in the fridge — at least 6 hours, ideally overnight. Rushing this step is the number one reason for runny cheesecake.
Vicki Rae White
Could you please put your recipes in US measurements
Katalin Nagy
The cup measurement is available in the recipe card.
Beatriz Campo de Quiñonez
Delicious, I really loved it
admin
Thank you!
Demi
Love love love this website, the amazing baker behind this all en this recipe! You made the recipe so easy to follow with de perfect explanation. I love the way how you explain why I should add something or do something, that way I learn to bake, instead of learning how to follow a recipe! This cake was a huge succes with my family, the first time they tried pumpkin processed in something sweet. The crust is very nice hard with an amazing taste. The topping has a perfect balanced flavour, just amazing!! 🤩 The ghosts were also such a nice detail for the halloween theme. I definitely recommend this cake!!😆
admin
Thanks for your kind words, I am so happy you love and your family were happy with this cake:)