This No Bake Raspberry Cheesecake recipe has a silky cream cheese filling, tangy raspberry compote, and a crunchy crust enhanced with freeze-dried raspberries for the ultimate luxurious taste.
Jump to:
🌟Why this is the best recipe
- It's so easy – As fancy as it looks, this is a super simple raspberry cheesecake recipe, and you don't even need to turn the oven on. No bake, no water bath, and no hassle! This is one of my favorite berry desserts for a reason.
- It's super delicious – I never compromise on taste! This easy, no-bake raspberry cheesecake is well-balanced in sweetness and focuses on the natural fruit flavors of lemon and raspberry alongside rich and tangy cream cheese.
- It's super pretty - This pretty pink dessert is the perfect fit for summer evenings and weekends, and if you are looking for a popular cheesecake dessert without all the hard work, try this recipe!
- And no special equipment – There are no complex techniques, ingredients, or bits of equipment needed for this easy raspberry cheesecake.
📝 Ingredient notes
For the cheesecake crust that is flavored with raspberry
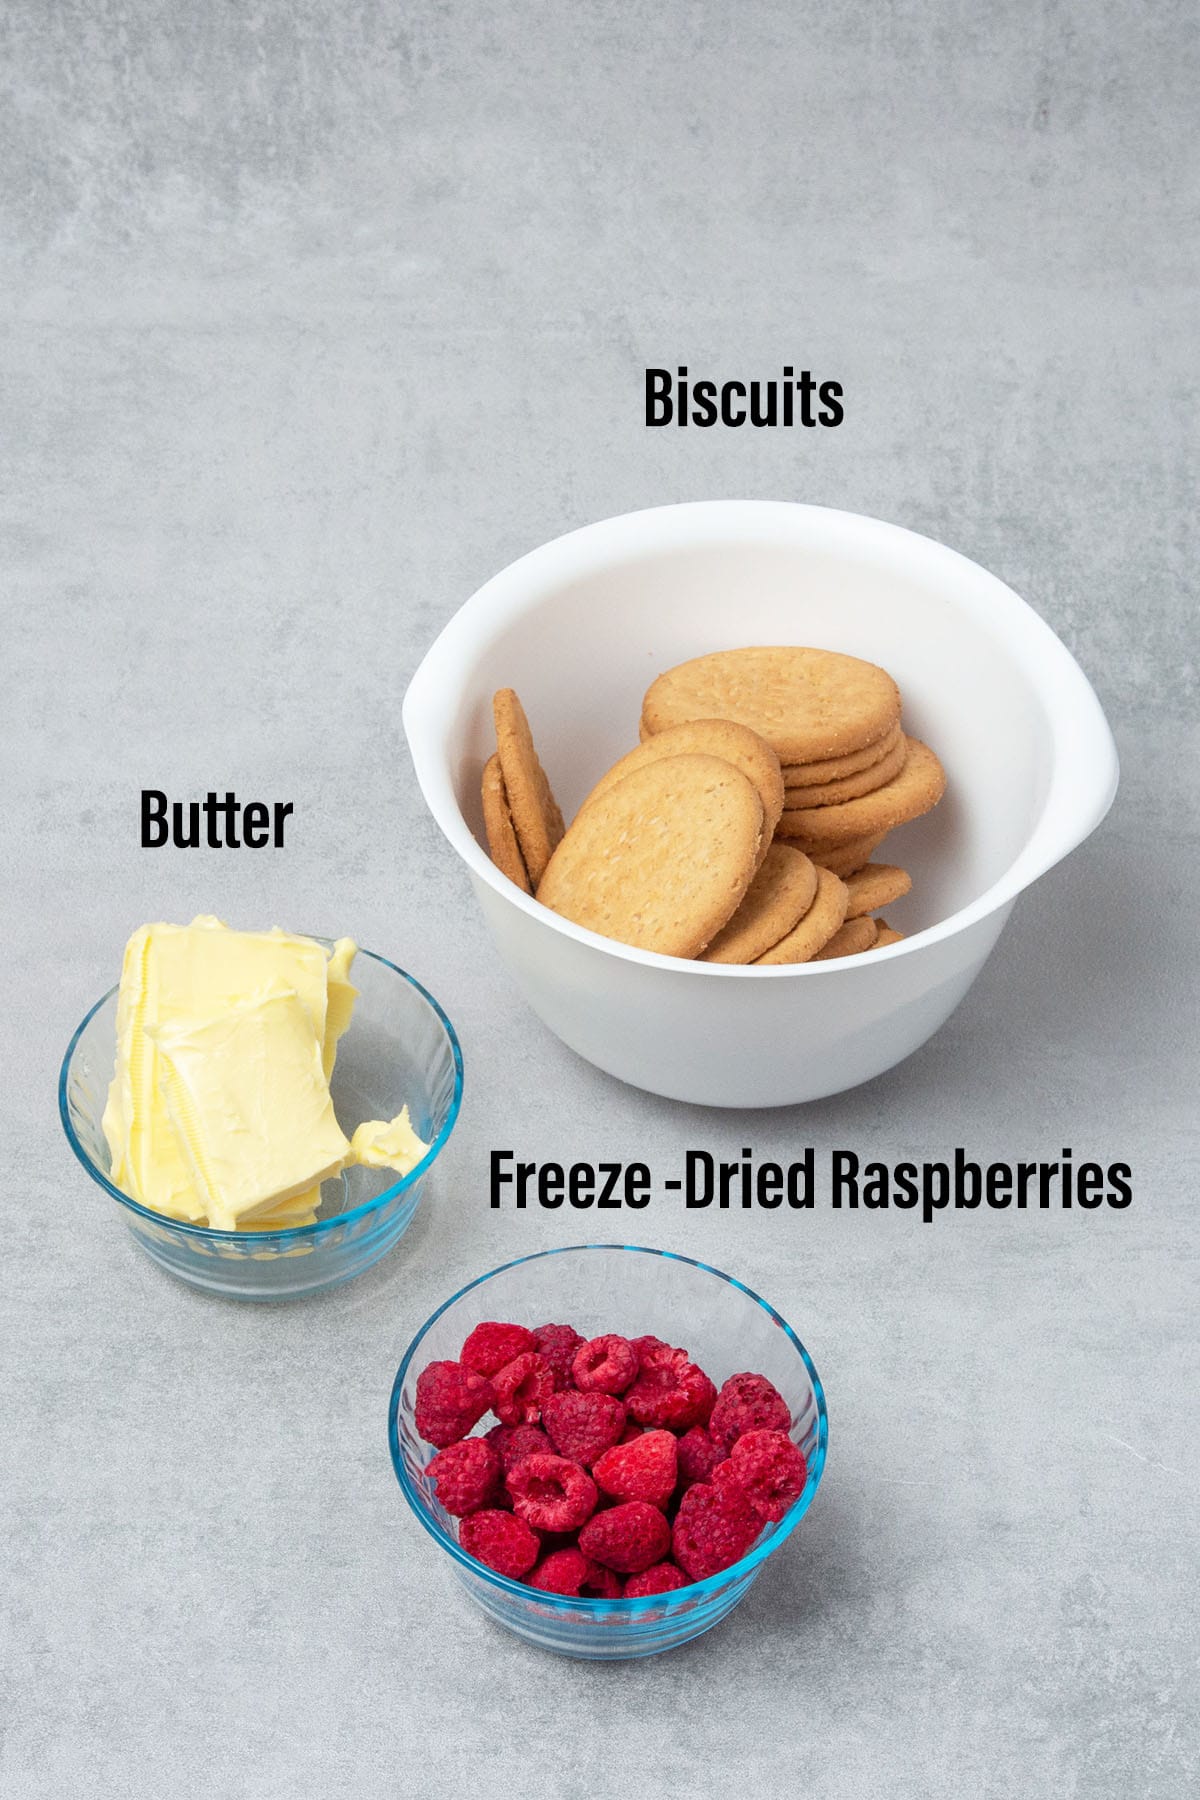
- Unsalted butter - I use European-style 82% fat-content unsalted butter in all my recipes.
- Biscuits/cookies - You will need hard biscuits, cookies, or crackers, e.g., Graham crackers or Digestive biscuits.
- Salt - This works as a flavor enhancer and balances the sweetness perfectly, so don't skip it!
- Freeze-dried raspberries - This takes a no-bake cheesecake crust to the next level in both color and flavor! But if you can´t access freeze-dried raspberries, replace them with an equal amount of the biscuit crumbs.
Please read my tutorial on making a perfect cheesecake crust before making this no bake raspberry cheesecake recipe.
🛒 You’ll find detailed measurements for all Ingredients in the printable version of the Recipe Card at the bottom of this post
For the cheesecake part
- Gelatin - I use sheet gelatin, which just needs to be soaked in water. You can also use powdered gelatin in equal weight, so instead of a 1.7g sheet of gelatin, use 1.7g of powdered gelatin. For a plant-based alternative, read my gelatin article to make a substitution.
- Heavy whipping cream - Heavy cream makes the raspberry cheesecake filling extra smooth and creamy. Use very cold heavy cream with a fat content between 36% and 40%.
- White granulated sugar - I do not use a lot of granulated sugar in this no-bake raspberry cheesecake but feel free to adjust the quantity if desired.
- Cream cheese - When I make an easy raspberry cheesecake, Philadelphia is my first choice. I find it easy to cream (from room temperature), but you can use any good quality, full-fat alternative.
- Freshly squeezed lemon juice - For a delicious raspberry lemonade cheesecake flavor.
🛒 You’ll find detailed measurements for all Ingredients in the printable version of the Recipe Card at the bottom of this post
For the raspberry topping
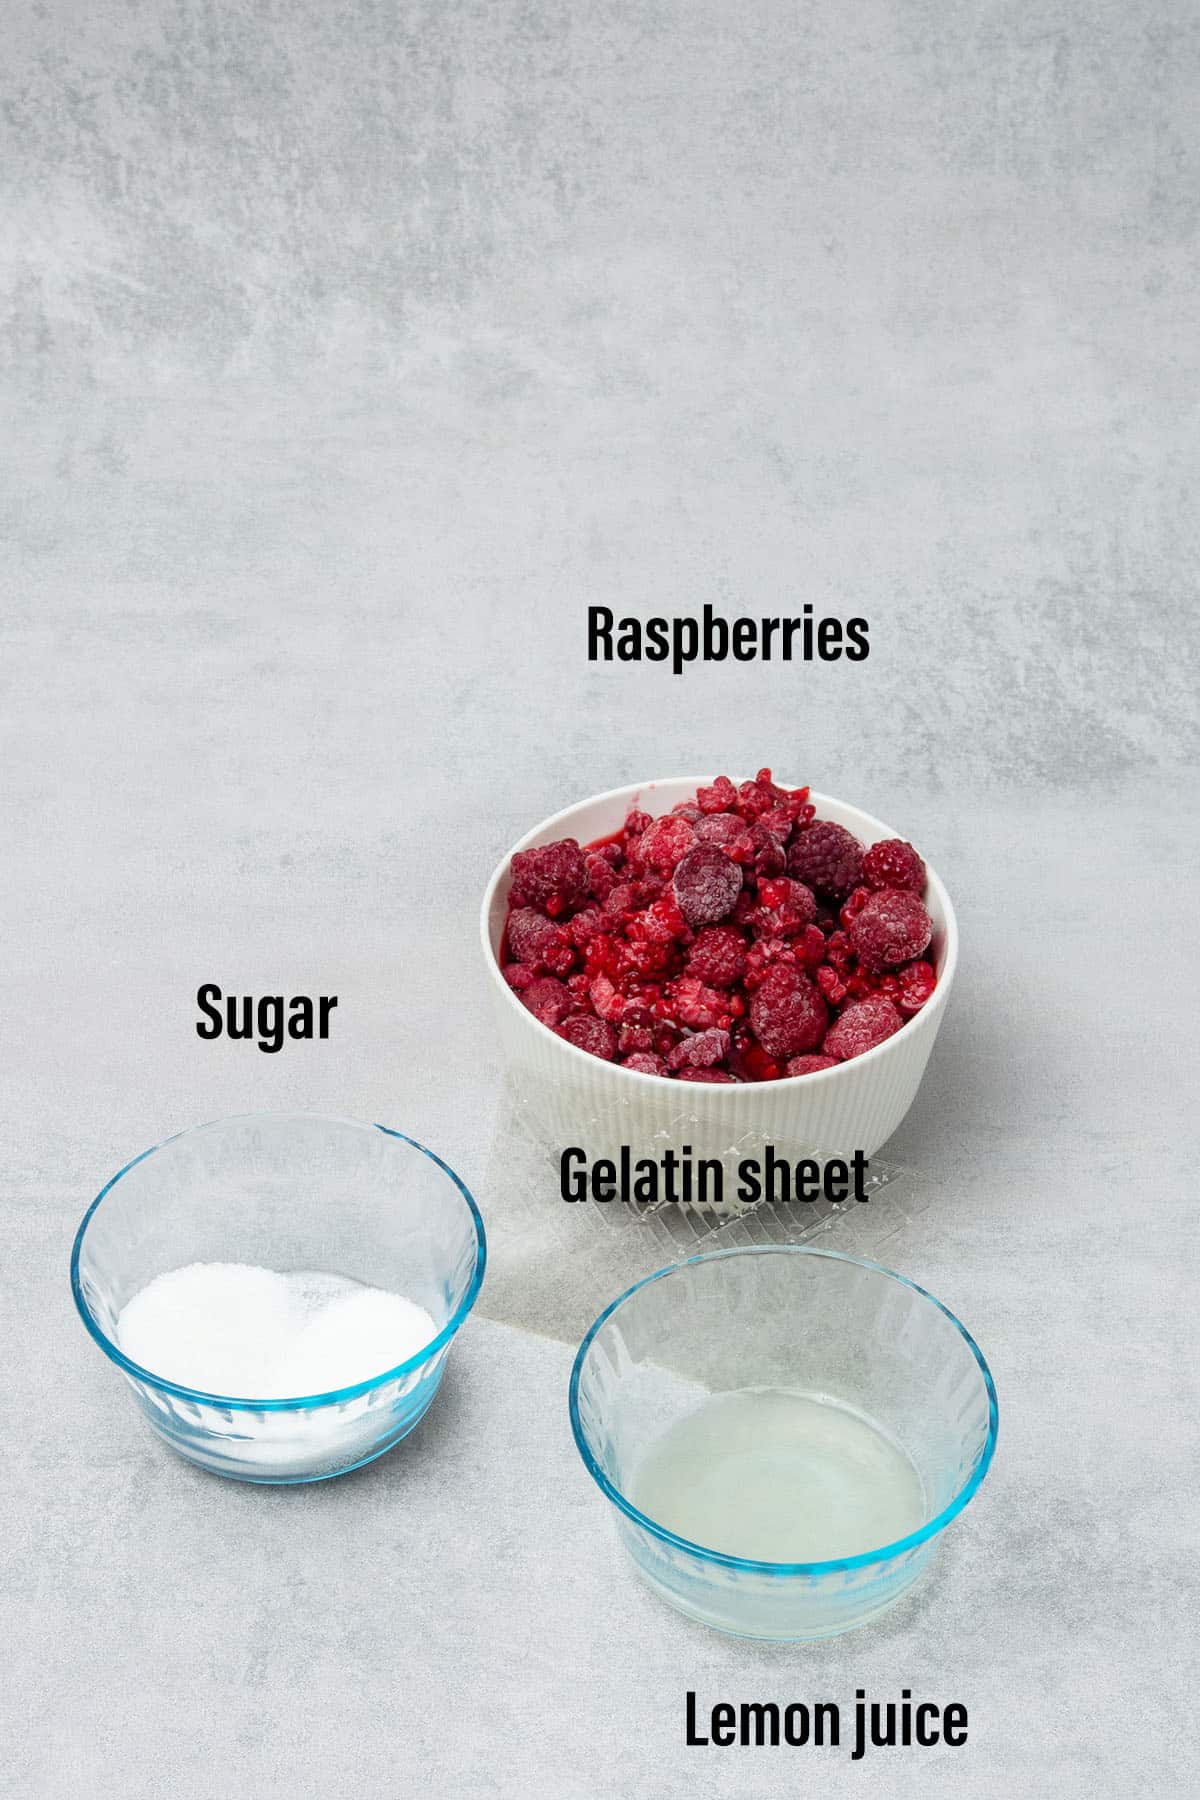
- Raspberry - Either fresh or frozen raspberries will work well.
- Sugar - Use granulated sugar in the raspberry cheesecake topping.
- Lemon juice - This perfectly balances the sweetness.
- Gelatin - See my notes above.
🛒 You’ll find detailed measurements for all Ingredients in the printable version of the Recipe Card at the bottom of this post
👩🍳How to make this recipe
1. How to make raspberry-flavored cheesecake crust
- Prepare a 16 cm/6 inches pan.
- Melt the butter and allow it to cool slightly.
- Blend the crackers/biscuits and freeze-dried raspberries in a food processor, or place both ingredients into a ziplock bag and crush with a rolling pin.
- Mix the melted butter and raspberry Graham cracker crumbs (or other) together with a pinch of salt.
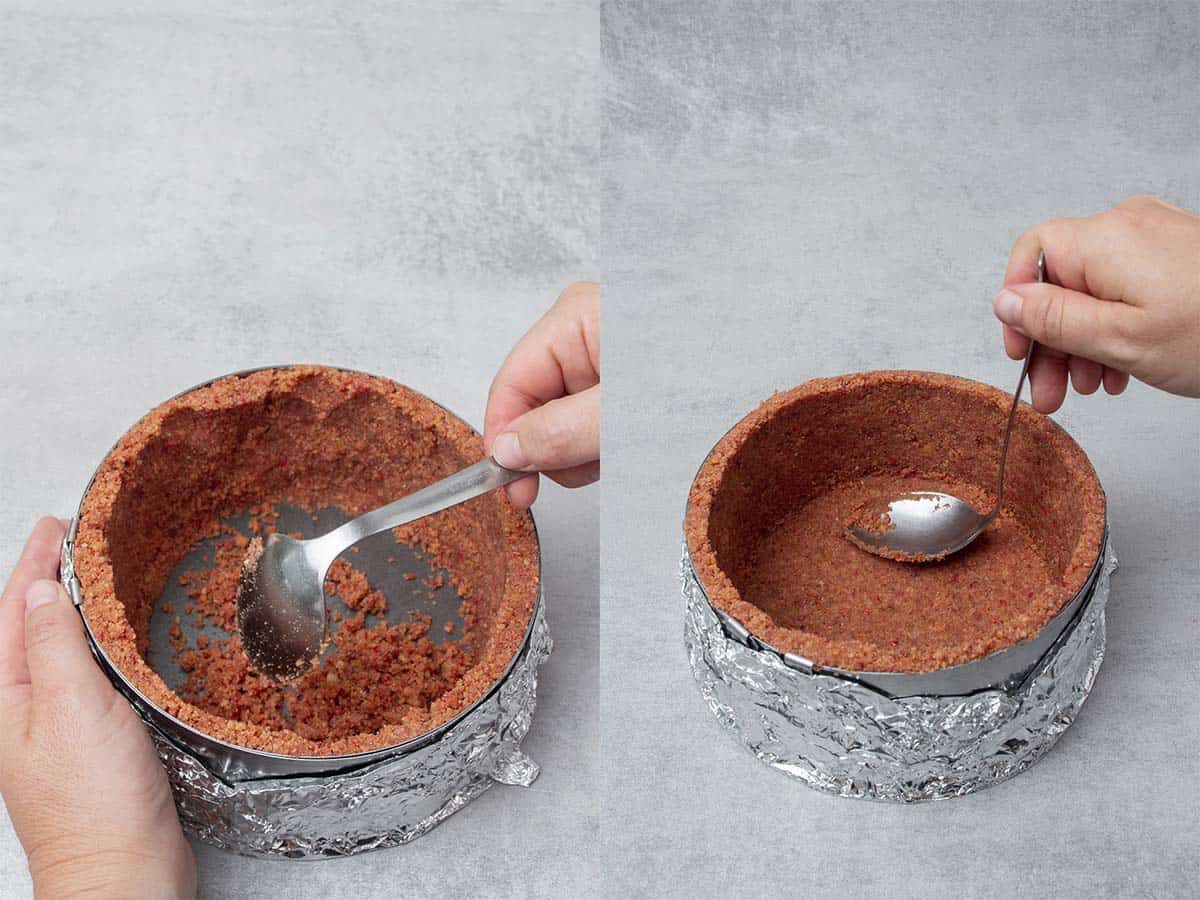
- Press the crumb mixture firmly into your pan's side and bottom.
- Place the crust in the freezer for 30 minutes whilst you prepare the cream cheese mousse filling.
💡 Top Tip: A bent spoon is the best tool to press the crust into the pan. It takes me 10-15 minutes to make sure that it is really even and neat.
2. How to assemble the no bake raspberry cheesecake
- Place the gelatin sheets for the cream cheese filling in cold water for a few minutes until they soften.
- Heat the smaller amount of heavy cream with the sugar in a saucepan over medium heat and bring to a simmering point.
- Squeeze the water from the gelatin sheets, stir them into the warm cream mixture, and then stir in the lemon juice. Remove from the heat and allow it to come back to room temperature.
- Whip the room-temperature cream cheese in a mixing bowl with an electric hand mixer, and then fold in the cream and gelatin mixture using a rubber spatula.
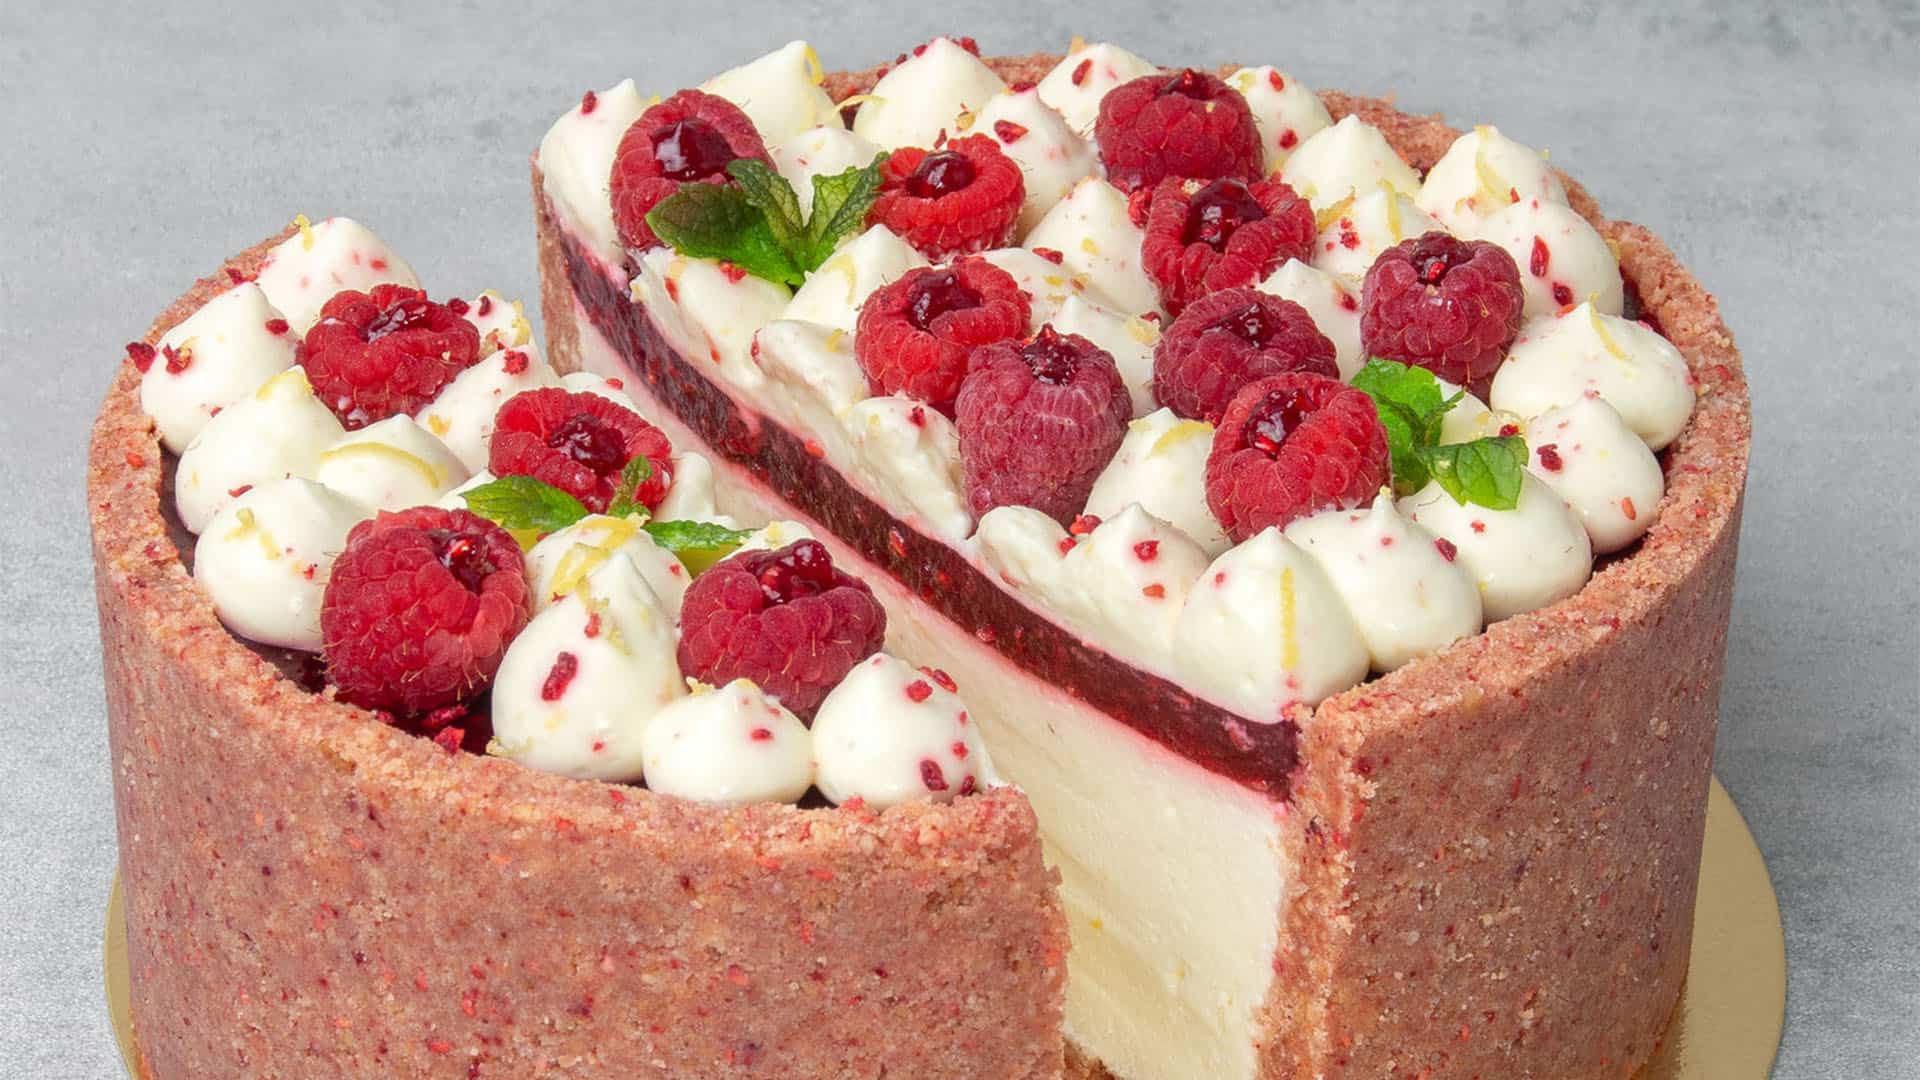
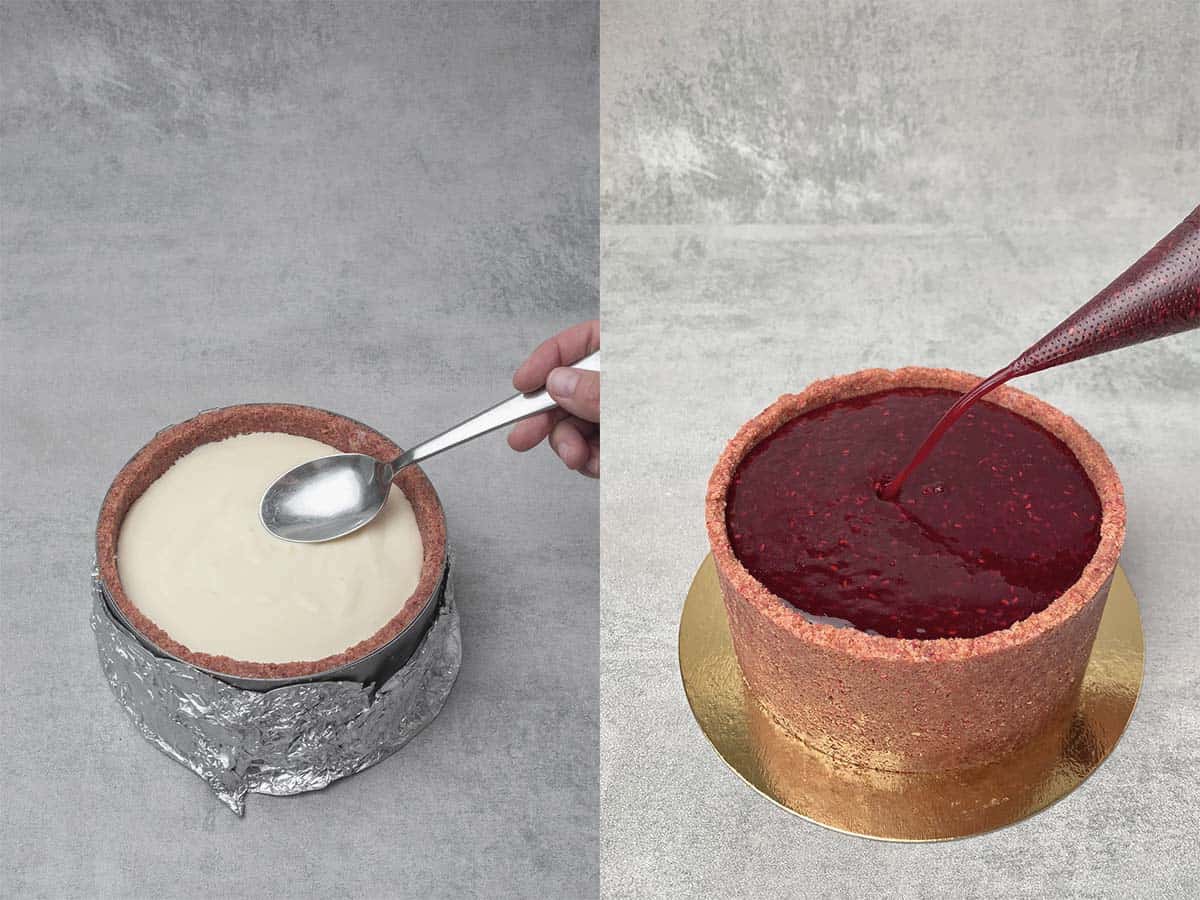
- Whisk the remaining (cold) heavy cream until it has soft peaks. Fold it into the cream cheese mixture very gently using a rubber spatula. Pour the mixture into the cheesecake crust and refrigerate for 1-2 hours. For the decoration, leave some and let it set in the fridge.
- Make the raspberry compote. Push the raspberries through a sieve to remove most of the seeds, and then cook the raspberry sauce in a saucepan for 10-15 minutes with the sugar and lemon juice until the mixture thickens slightly.
- Soak the other gelatin sheets in water, then squeeze them out and stir into the warm raspberry puree mixture. Take off the heat and allow to cool slightly. Pour the raspberry compote onto the cheesecake and place it in the fridge to set for a minimum of 4 hours before decorating and serving.
💡 Top Tip: Do not allow the raspberry compote to cool completely to room temperature or it will set. But if you pour it onto the cheesecake too hot, it will melt the cream cheese filling. Somewhere in between is the sweet spot.
👩🍳Storage and Freezing
This no-bake raspberry cheesecake is best served within 24 hours; however, it can be stored in the fridge for 2-3 days in an air-tight container.
You can freeze the cheesecake crust before filling it or freeze the finished cheesecake. However, it might lose some of its crunch & creamy consistency.
📚Flavor Variations & Substitutions
You can use this crust for making any other kind of cheesecake and add spices like cinnamon or even replace some of the biscuits with nuts. If you are baking around a dietary restriction of preference, be sure to check out my baking guides to make the right swaps and substitutions.
Other hard biscuits can be substituted in the cheesecake base, too. For example, Oreo cookies, ice cream cones, pretzels, or any homebaked hard biscuit. However, check their fat content, as you may need to reduce the amount of butter in the recipe.
If you love lemon raspberry desserts, try this Lemon Raspberry Pie from Jennifer.
🎓Expert Tips
- Measure the fresh raspberries after you have sieved the puree to remove the seeds, and not before.
- Only whip the cream cheese for around a minute until it's fluffy. It can break and go runny if you overwhip.
- Similarly, do not overwhip the cream; stop before stiff peaks form.
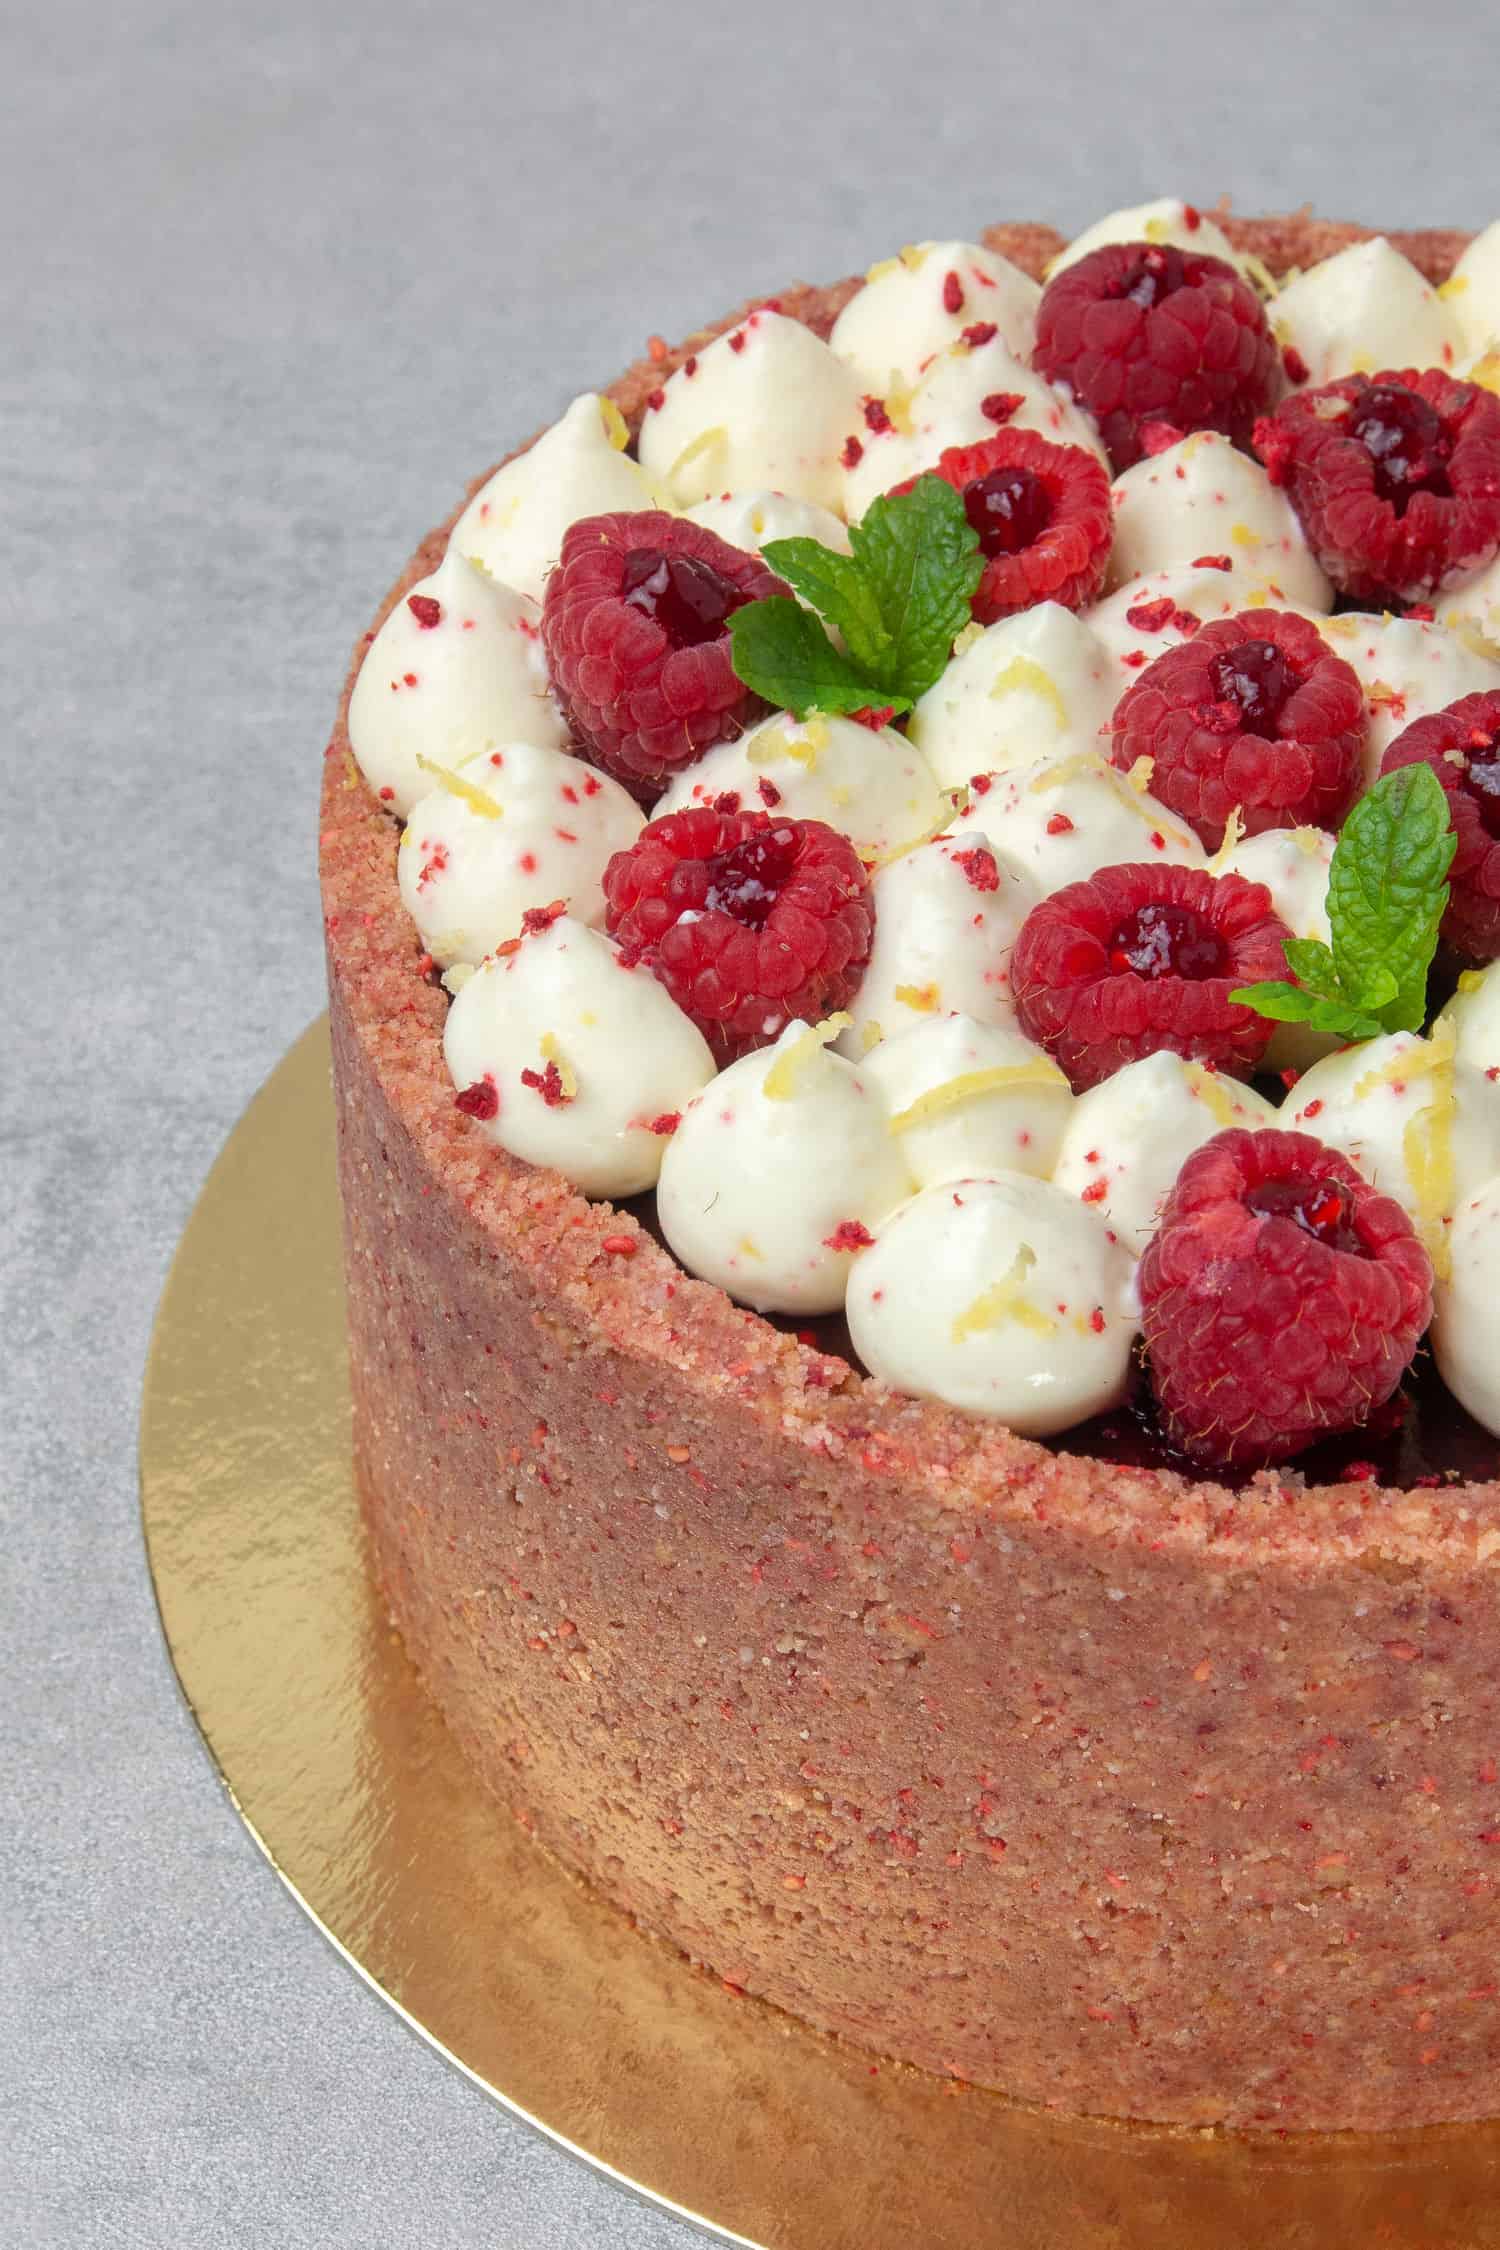
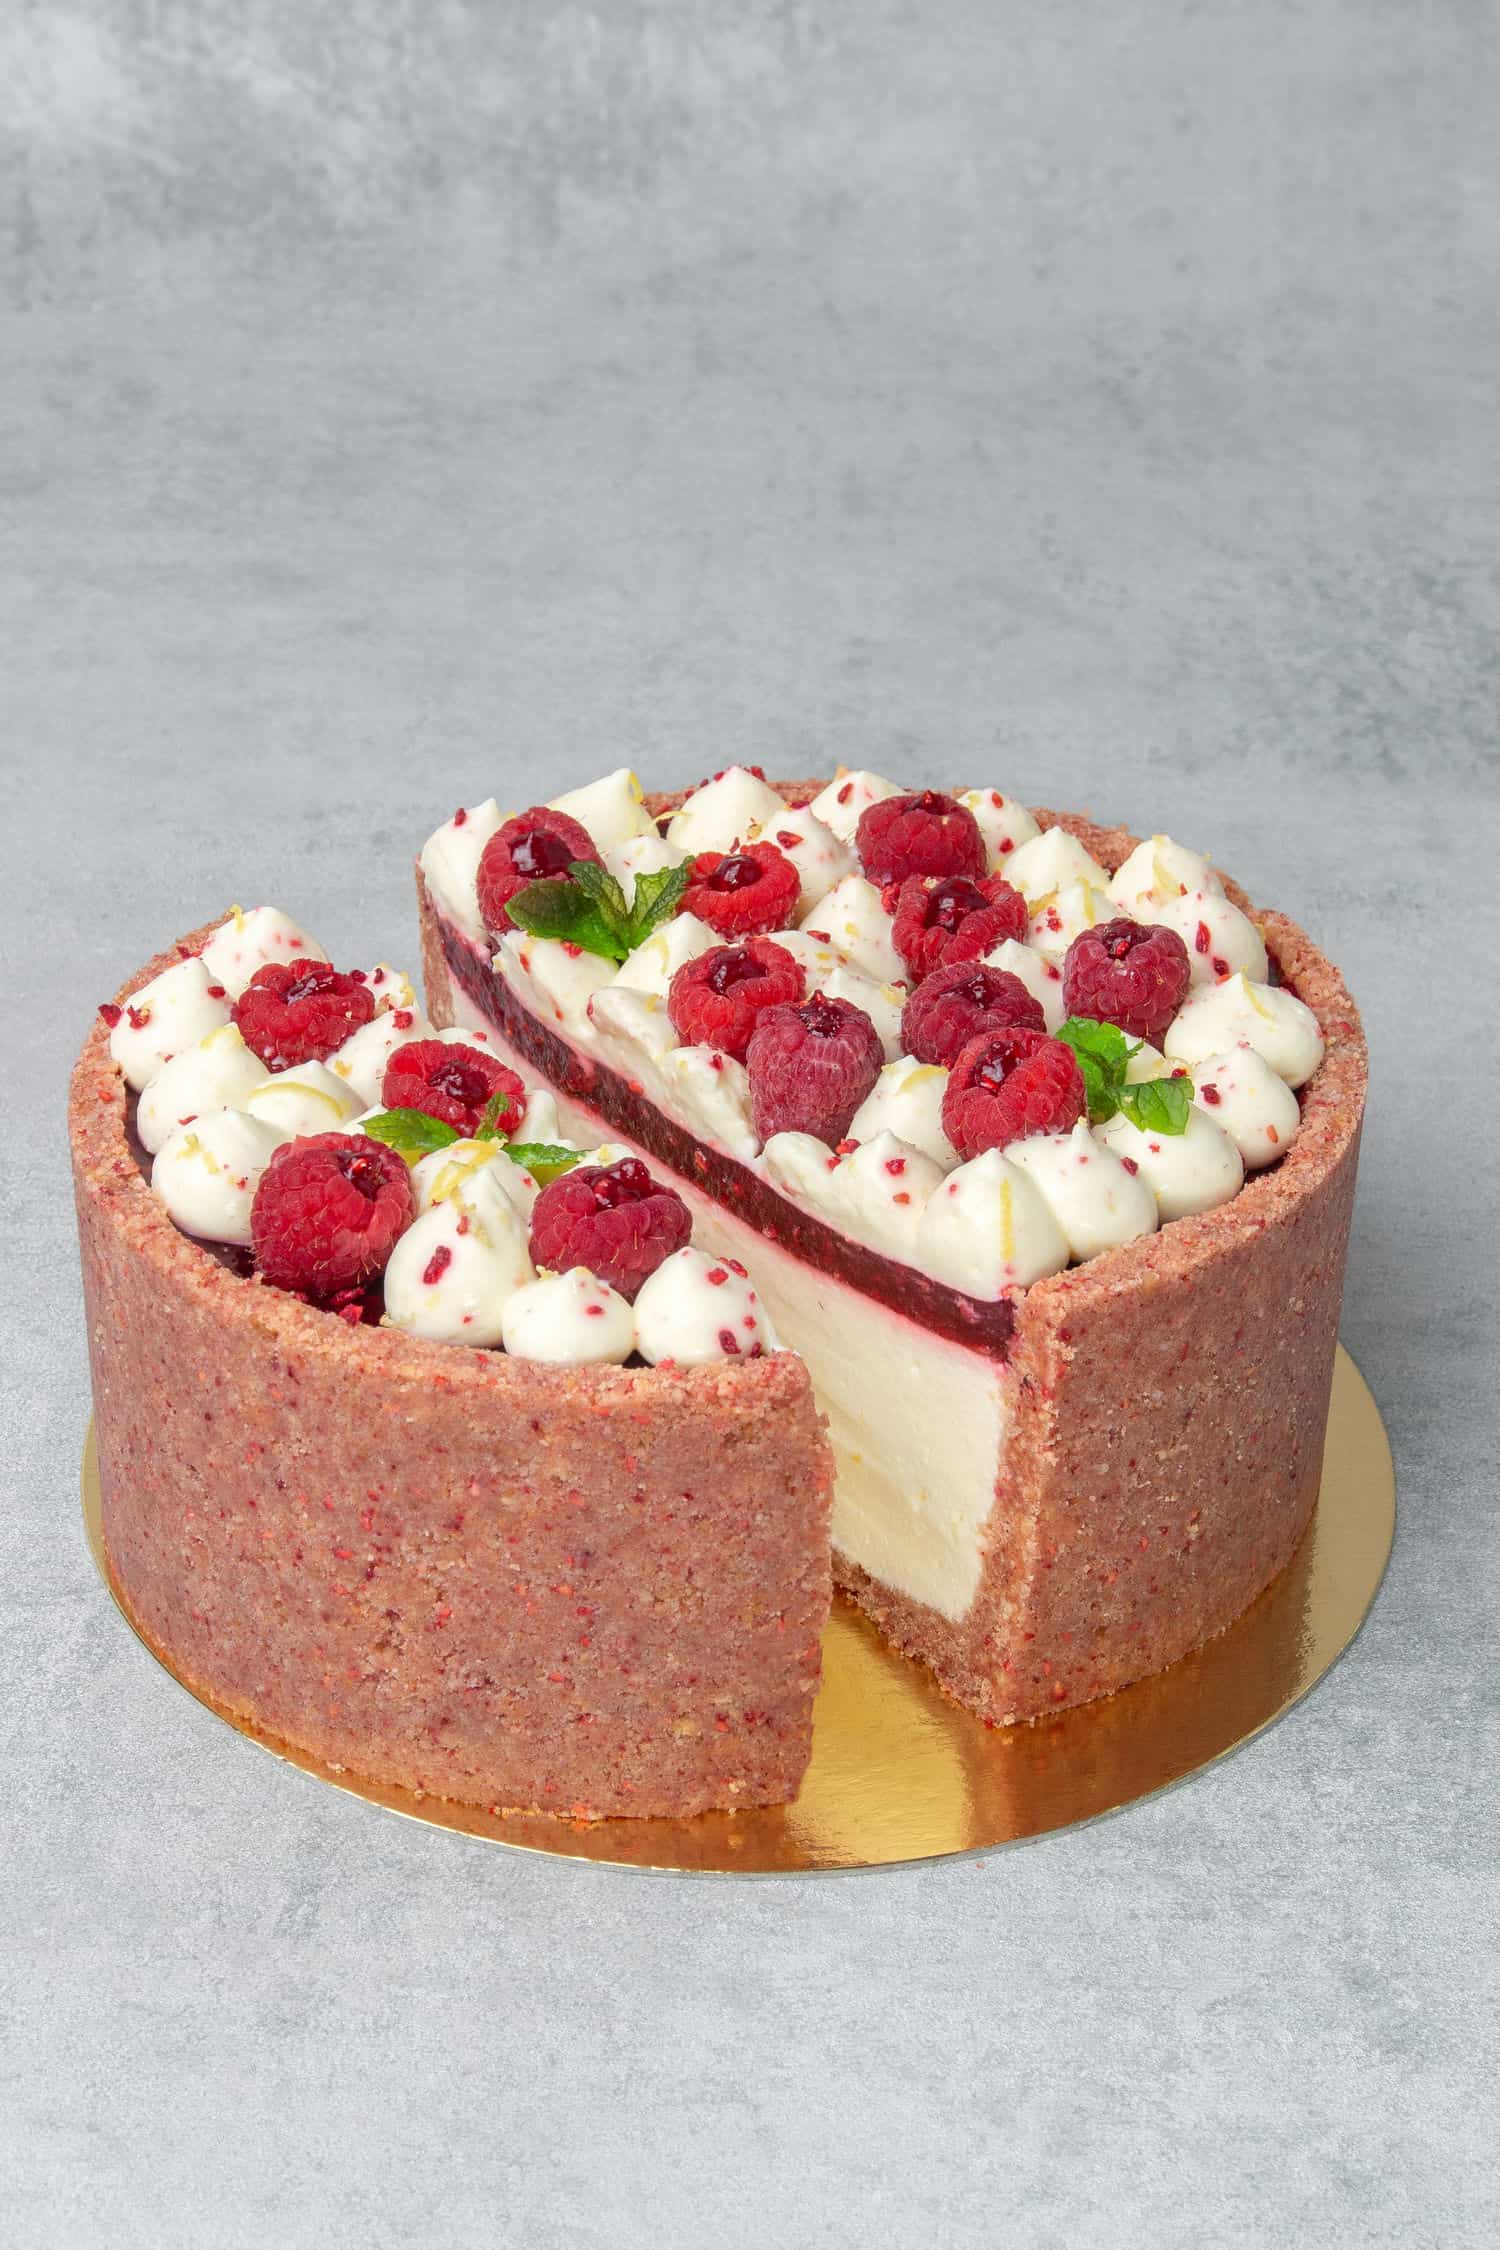
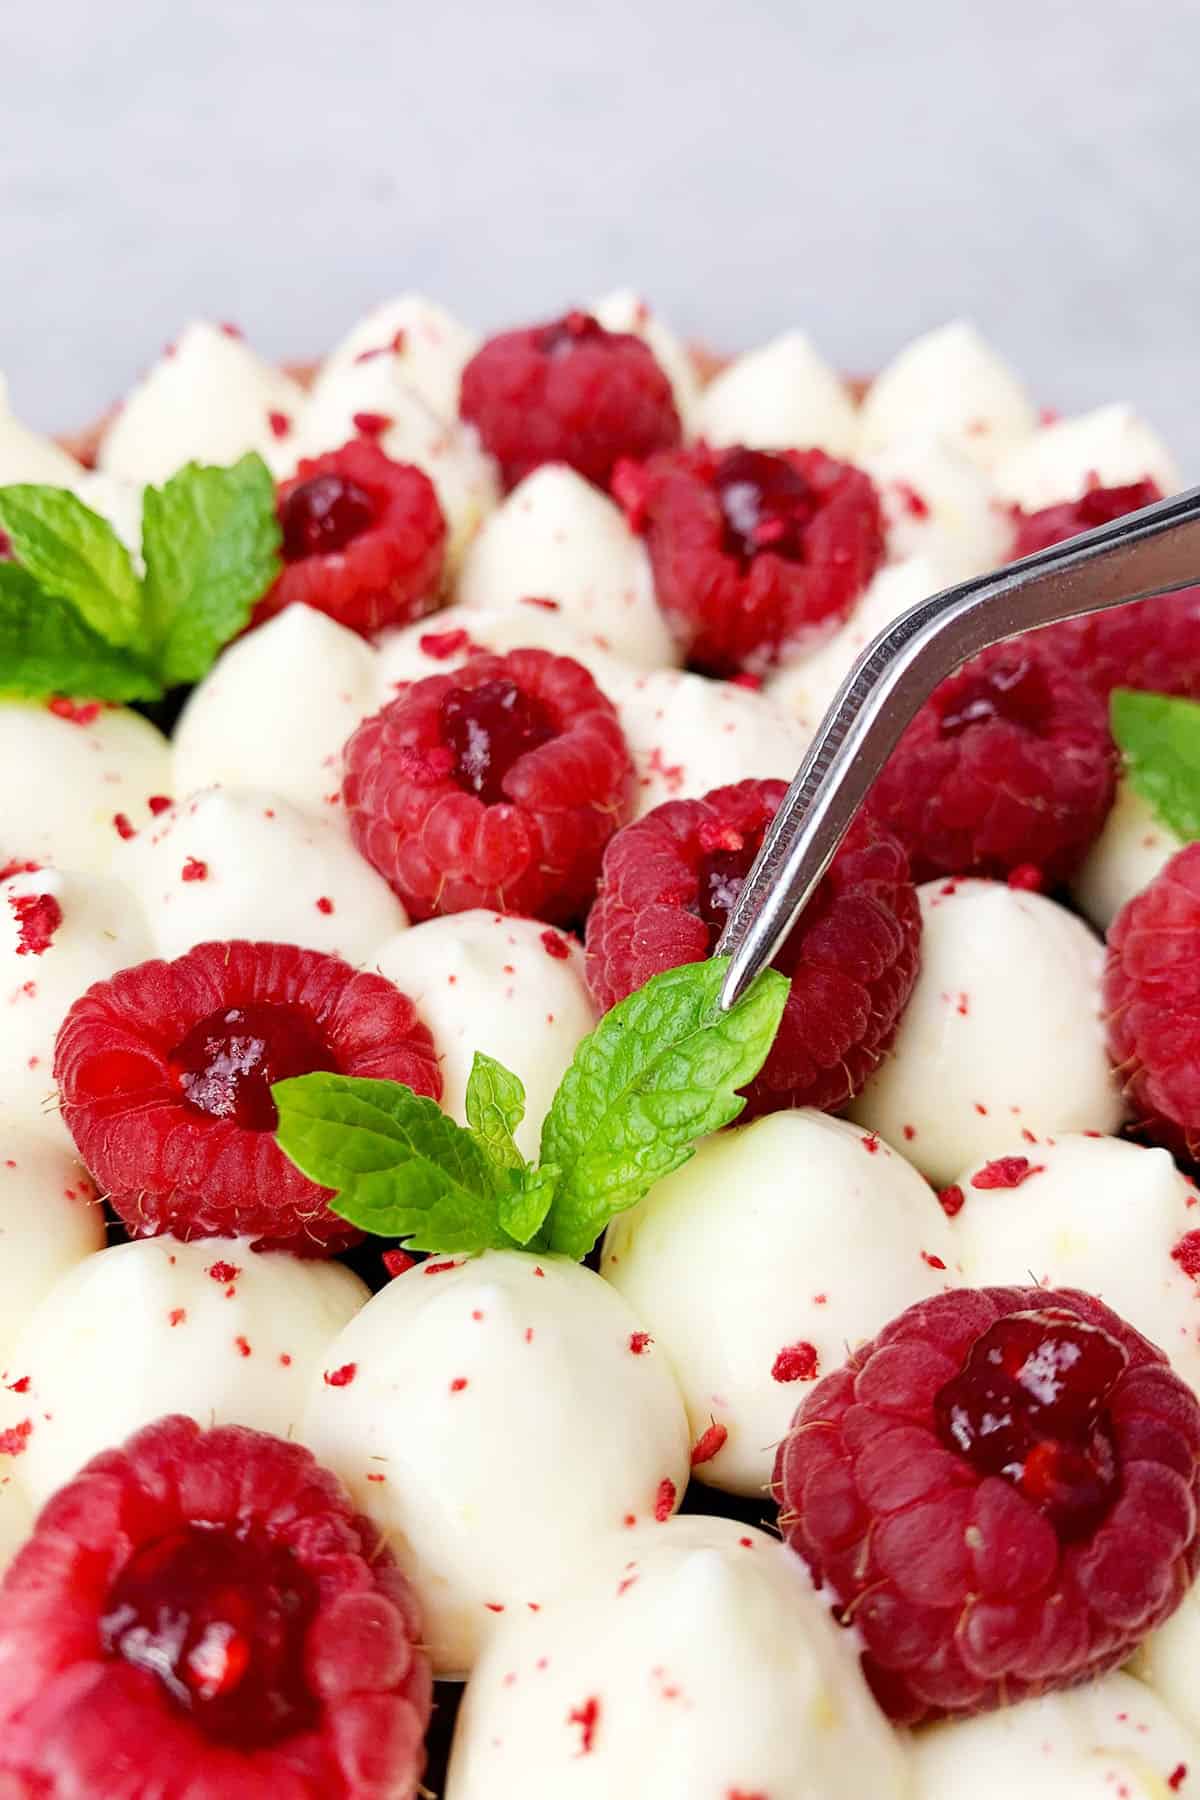
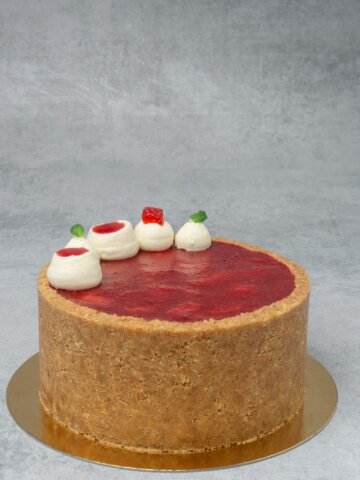
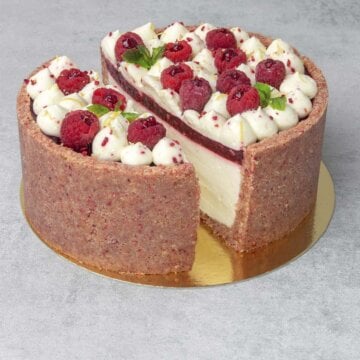
- Decorate your no-bake raspberry cheesecake with any leftover cream cheese filling using a piping bag fitted with a round nozzle tip. Pipe the filling on top of the cheesecake and place some raspberries, then garnish with fresh mint, lemon zest, crumbled freeze-dried raspberries, and dusted powdered sugar.
🥣 Equipment notes
Always measure your ingredients in grams using a digital scale. Baking is about precision. Use a rolling pin to crush the crumbs for the Graham Cracker crust (or other).
I use a mousse cake ring (adjustable in size) set to 16 cm/6 inches to make this cheesecake. I really like the neat results, and I make a base using the bottom of a springform pan and kitchen foil! Alternatively, use a springform pan.
You can make this no-bake raspberry cheesecake in a bigger or smaller pan, but adjust the quantity of the ingredients accordingly.
For pressing the crumb together, I use a tablespoon that you can bend; it´s that simple!
Use an Electric hand mixer to whip the cream cheese and heavy cream, and a Rubber spatula to fold the whipped cream in gently.
Decorate this raspberry cheesecake with a Piping bag fitted with a simple 1A Round nozzle tip.
❓Recipe FAQs
Check the amount of gelatin, as there may not have been enough. It may also be due to lower fat content in the cream or cream cheese, or it could need more time in the fridge.
If you use low-quality cream cheese or reduced-fat cream cheese, it can be quite watery, and this can contribute to a soggy cheesecake base.
Whipping cold cream cheese can result in lumps, so bring it to room temperature first.
👩🍳Other easy cheesecake recipes
If you love easy no bake raspberry cheesecake recipes, try these:


I also recommend this delicious Lemon Blueberry cheesecake from fellow blogger Louisa!

Have you tried this recipe?
Please leave a 5-star ⭐️⭐️⭐️⭐️⭐️ rating on the recipe card and consider leaving a comment as well! I would love to hear about how your dessert turned out and your feedback also helps other Readers!
No Bake Raspberry Cheesecake
Equipment
Ingredients
Cheesecake Crust flavored with freeze-dried raspberries
- 140 g (⅔ cups) Unsalted butter
- 280 g (2 cups) Biscuit crumb e.g., Graham Crackers or Digestive Biscuits.
- 20 g (⅕ cups) Freeze-dried raspberries
- Pinch of salt
Filling
- 3 Gelatine sheet 1 gelatin sheet is 1.7g, can be replaced with an equal amount of gelatin powder
- 90 g (⅓ cups + 1 tablespoon) Heavy Cream 36% fat
- 100 g (½ cups) Granulated sugar
- 65 g (⅓ cups) Lemon juice Freshly squeezed
- 300 g (1⅓ cups) Cream cheese e.g., Philadelphia full fat
- 270 ml (1⅕ cups) Heavy Cream 36% fat, use it cold
Raspberry Topping
- 400 g (3⅓ cups) Raspberry puree Measure after sieving out the majority of the seeds
- 100 g (½ cups) Granulated sugar Adjust according to the sweetness of your fruit.
- 20 g (1 tablespoon) Lemon juice Freshly squeezed
- 2.5 Gelatin sheets 1 gelatin sheet is 1.7g, can be replaced with an equal amount of gelatin powder
US customary cup measurement is an indicative figure only. Measure the ingredients with a digital scale by weight (gram). Baking is art but also science which requires precision and accuracy.
Instructions
For the cheesecake crust that is flavored with raspberry
- Melt the butter in the microwave and allow it to cool slightly while preparing the biscuit crumbs.
- Make the biscuit crumbs either by pulsing them in a food processor with the freeze-dried raspberries or by placing both ingredients into a ziplock bag and crushing them with a rolling pin.
- Mix the crumb mixture with the warm melted butter and a pinch of salt until it comes together.
- Press the crumb mixture into a springform pan or Mousse cake ring (adjustable in size) set to 16cm / 6 inches, starting with the sides before moving to the base. Place it into the freezer while preparing the filling.
For the cheesecake part
- Soak the gelatin sheets in cold water for a few minutes.
- Heat the smaller amount of heavy cream (90g) with sugar, stirring until the sugar dissolves, and bring to a simmer.
- Squeeze out the excess water from the gelatin, stir into the cream mixture, and then stir in lemon juice. Remove from the heat and allow the gelatin mixture to come down to room temperature.
- In a mixing bowl, beat cream cheese with an Electric hand mixer until light and fluffy, then fold in the heavy cream and gelatin mixture with the help of a Rubber spatula.
- In a separate bowl, whip the other heavy cream until it has soft peaks and very gently, fold it into the cream cheese mixture using a Rubber spatula.
- Pour or pipe the filling into the cheesecake crust, leaving a small gap at the top for the raspberry topping. Smooth the surface with an Offset spatula. Place it into the fridge for 1-2 hours or until the filling sets.
- Set some of the filling aside to decorate the cheesecake in a bowl covered with plastic wrap, and refrigerate.
For the raspberry topping
- Mash the raspberries with a fork and push the puree through a sieve to remove the majority of the seeds before measuring the quantity.
- Soak the gelatin sheets in cold water for a few minutes. Cook the sieved raspberry puree, sugar, and lemon juice in a saucepan on the stove for about 10 minutes until the mixture thickens slightly.
- Squeeze the excess water from the softened gelatin sheet and stir it into the warm fruit mixture. Let the raspberry cheesecake topping cool to room temperature before pouring it on top of the cheesecake.
- Leave the cheesecake with the topping to set in the fridge for a minimum of 4 hours.
Decoration
- Once the cheesecake has set, very carefully remove the ring/springform.
- Decorate according to your preference with the remaining cream cheese filling, fresh raspberries, and raspberry compote. Grate over some lemon zest and garnish with mint leaves before sering.
- Store the cheesecake in fridge.
Notes
- Always weigh ingredients by the gram using a digital scale for best results. If you have had issues in the past with crumbly cheesecake crust not holding its shape, it’s probably due to not enough butter in the recipe, so be sure to measure it out correctly.
- If the cheesecake base mixture is too runny when pressing into the mousse ring, place it in the fridge for a few minutes.
- Be very gentle when folding the whipped cream into the cream cheese mixture. It must stay light and fluffy before pouring into the crust.
- The cheesecake needs a minimum of 4 hours to set before slicing up and serving.
Maryj
Can this crust be baked as in traditional baked cheesecake?
Katalin Nagy
No, the crust will most probably melt. This is a no bake crust .
Gopi
Hi. If I were to use gelatin powder and as you said 1:1, how do I prepare the powder? Should I bloom it in water then microwave it? Or just added the bloomeed gelatin to the hot cream mixture?
Kata
Pls use the gelatin powder according to the pack instructions. Normally, you have to bloom it first, but you have to check what the package suggests.
Karen
It’s very delicious! Can I make this tart and freeze it ahead of time for a party?
Kata
Do you mean the cheesecake (this is not a tart)? This cheesecake crust can be freezed, theoretically the filling too but I would prefer to make it fresh, if you ask me...
Maria Maier
It's the first time i'm making this kind of cheesecake and i just love it. It's sweet, but not too sweet and the ratio between the crust and the filling it's perfect. I love the fact that the recipe is detailed enough to be sure of what I have to do and not have any more questions. I'll write this down as the best cheesecake recipe ever ❤
STEVANNY ZIJDERLAAN
Perfect recipe!!! Love it every time I made it❤
admin
So good to hear! Thanks for your feedback
Irina
This is a wondeful cheesecake! A refreshing taste, with the perfect amount of sweetness. It also looks great, but is rather simple to make. A keeper! Thanks for sharing it! ❤
Chizuru
This cheesecake was delicious! Brown butter gives nice flavour. Perfect size for a small family too. Your recipe is very detailed and easy to follow. I will definitely try other recipes!
admin
Thank so much, glad you liked it!