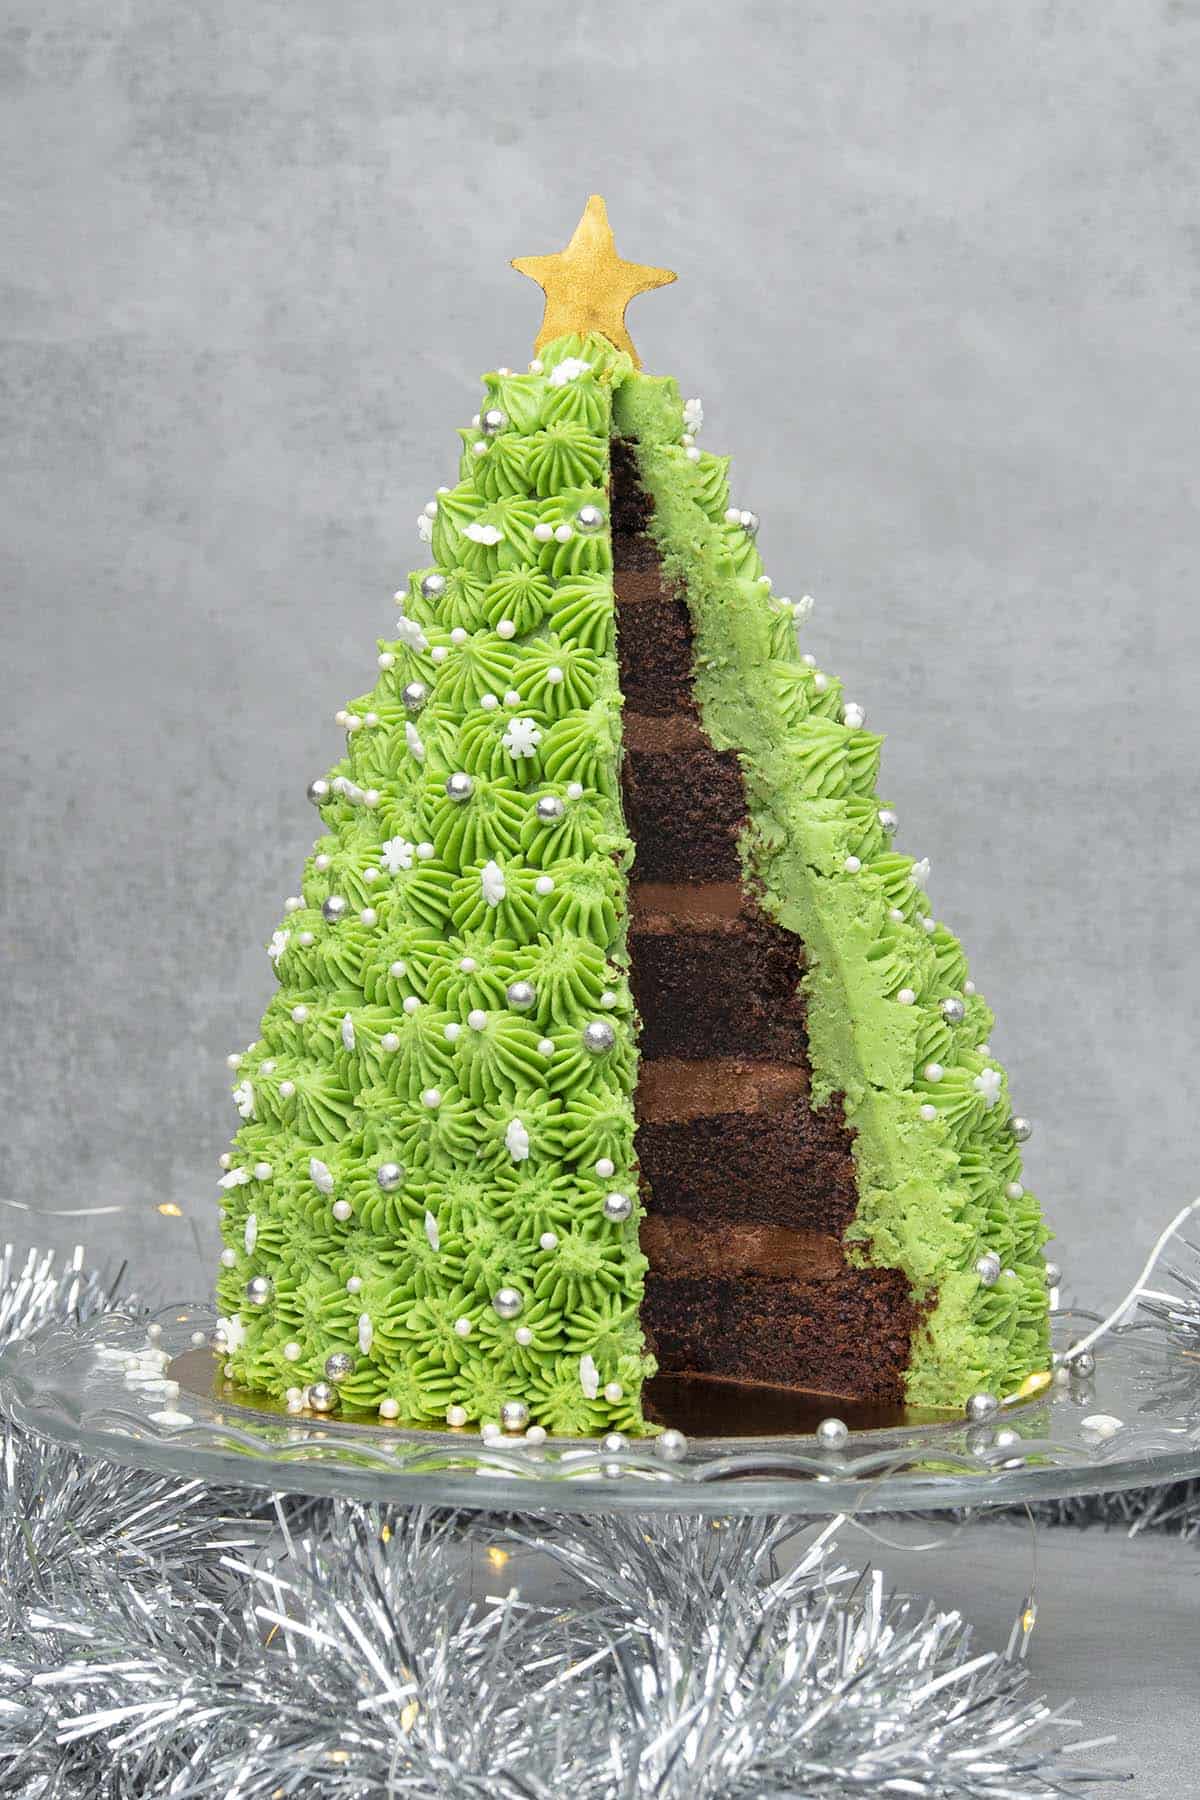
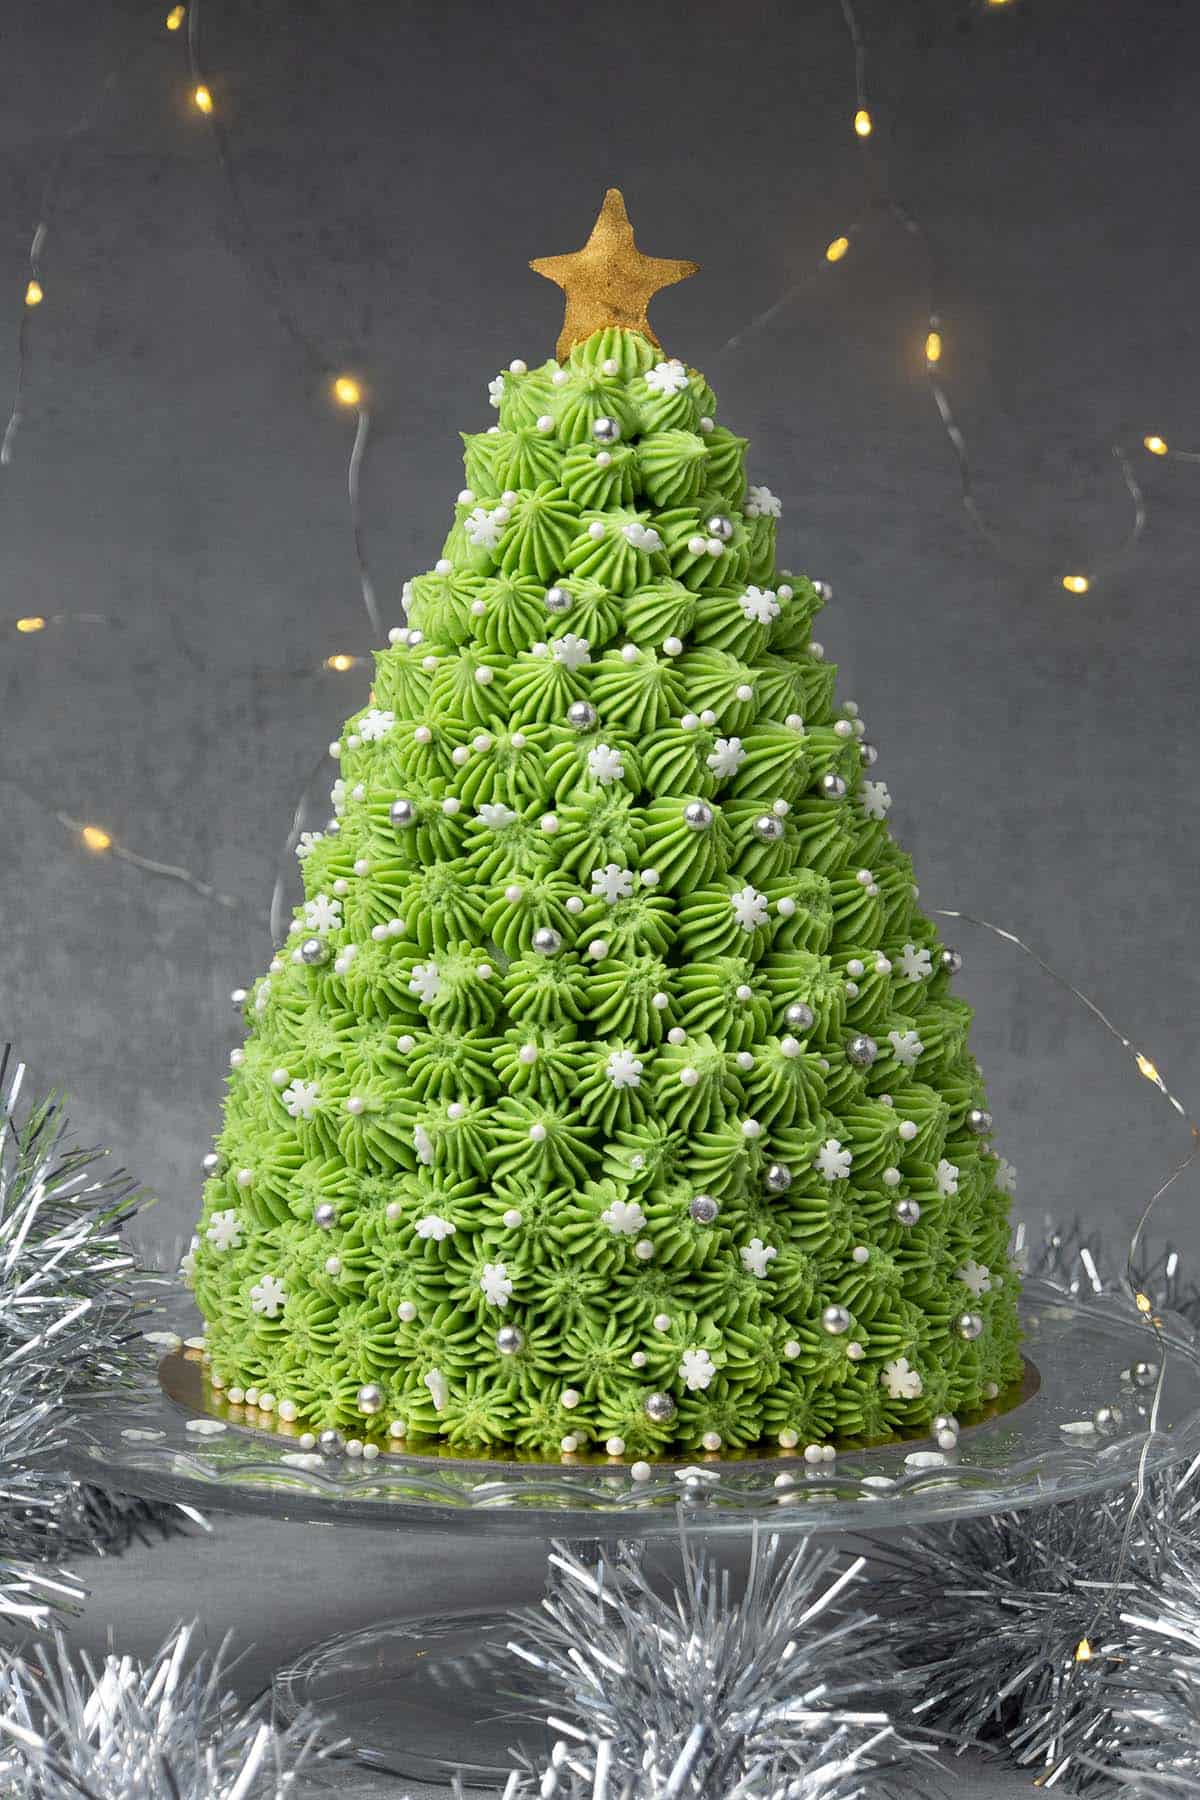
Unlike many other Christmas tree cake recipes that are made with buttercream and green food coloring, this cake consists of 6 layers of moist chocolate sponges that are filled with silky chocolate ganache and decorated with the most wonderful, fluffy pistachio whipped ganache that brings natural color and flavor to the cake!
Jump to:
🎄 How to make 3D Christmas tree cake
Please don´t get intimated by the look of this Christmas decoration cake, it is basically a layered cake with 6 tiers, and a surprisingly easy piping decoration that makes the Christmas tree design.
- You will need to bake 4 chocolate sponge cakes. This sponge cake recipe is super moist and easy, you might already know it from my German chocolate cake. You will need one sponge for the bottom of the cake, then trim layers 2 and 3, then use the 4th sponge cake to cut out layers 4, 5, 6. I will give further instructions down with the exact measurement
- The cake filling is made with an easy 3 ingredients, super silky chocolate ganache. It is literally the easiest most delicious filling for a festive cake like this. Once you learn how to make the chocolate ganache, you can use it for various other recipes eg. to fill tartlets like this Chocolate Raspberry tart, frost a cake like this Chocolate cake, or even fill your cupcakes like these Christmas tree cupcakes
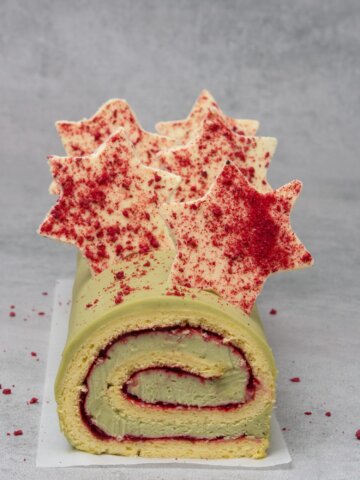
- For the frosting, I am using the most amazing fluffy pistachio whipped ganache. Unlike many other recipes that are using colored buttercream, pistachio will give flavor as well as color to your frosting, you will love it! Some other recipes where I use this frosting: Pistachio Raspberry Yule log and Christmas tart
- The Christmas tree cake design is made with a very simple piping technique using French star nozzle tip

🌟 Why this is the best Christmas tree cake recipe
- It is rather easy – As fancy as it looks, honestly, this Christmas tree cake recipe is "just" a layered cake. The chocolate cake recipe is totally doable from scratch, no need to use cake mix. The chocolate ganache is literally a 3 ingredients cream filling (mixing chocolate, cream, and a small amount of butter). The pistachio ganache is also very easy using white chocolate, cream, and pistachio paste.
- It is super delicious – I never compromise on taste! Christmas tree cakes are often more about the look than taste but this cake is super luxurious, absolutely incomparable with buttercream cakes that are made with food colorings only. Crazy moist chocolate sponges, silky chocolate ganache filling that works super well with pistachio. It´s Christmas! Treat yourself and your family to something special
- No special equipment is needed – All you need is a couple of round cake tins and a French star nozzle tip to make the piping pattern. You won´t need a fancy 3D Christmas tree cake pan as we will be making this cake 3D but layering the sponges
- It is super festive – Do I need to explain how fancy and festive this cake is?
📝 Ingredient notes
For the Chocolate cake

- Egg: Use room temperature eggs, as always. Please do not underestimate this recommendation as cold eggs can´t properly emulsify with the rest of the ingredients
- Oil: This chocolate cake is an oil based cake (no butter) that keeps the cake super moist. Butter-based cakes tend to harden a lot in the fridge, with oil we won’t have this issue. Use no flavor vegetable oil
- Milk: Whole milk at room temperature is what I recommend, again room temperature is key
- Coffee: If you are not using coffee in your chocolate desserts, you are missing out and I think you should seriously consider trying it. Believe me, the cake won’t taste like coffee at all however it enhances the taste of chocolate. I recommend brewing a strong espresso type of coffee and using it straight away fresh (at room temperature of course). It does not impact the taste whatsoever! If you don´t have coffee at home, use lukewarm water instead
- Sugar: Use a mix of brown and white sugar in this chocolate cake recipe. If you want to learn about the different types of sugar and how to use them in baking, please read my sugar guide
- Flour: All purpose flour or pastry flour makes the best cakes and would be the best to use in this Christmas tree cake recipe. They are so-called “soft flour” which are low on protein resulting in a delicate, tender texture. Make sure you sift flour before using it in the recipe to avoid lumps. If you want to be a Pro when it comes to deciding what type of flour to use in your baking, please read my flour guide
- Baking powder and baking soda: Have two functions: increase the volume and lighten the texture, use both, they have slightly different function
- Unsweetened Cocoa Powder: Generally always use unsweetened, 100% cocoa powder in baking. I use dutch-processed cocoa powder, it has a lovely dark color, and it is lower in acidity. Make sure to sift the cocoa powder to avoid lumps
- Salt: An essential ingredient in most dessert recipes. It balances flavor and enhances other ingredients, especially in chocolate cakes, it is an absolute must
🛒 You’ll find detailed measurements for all Ingredients in the printable version of the Recipe Card at the bottom of this post
For the pistachio whipped ganache frosting

- White chocolate: The pistachio whipped ganache is a white chocolate-based ganache. It is worth remembering that not all chocolates are created equal. In this recipe I am using Callebaut White chocolate (callets), this is a high-quality chocolate brand (yet affordable) that contains a higher percentage of cocoa butter than the average supermarket chocolate. Couverture chocolate is not a must in this recipe, but try to buy the best one you can access so that it will have the right texture as well as a pleasant creamy taste that won´t overpower the pistachio paste
- Cream: Also known as whipping cream or double cream, has a fat content between 36% and 40%, in my recipes, I always use 36%. Avoid substitutes like vegetable based “whipping cream”
- Gelatin: It´s an odorless, tasteless, and colorless thickening agent, very often used by pastry chefs, particularly in mousse cakes. Powder or sheet versions are available, in my recipes I always use sheet (1,7 g / sheet), which I found easier to handle. Simple soak the gelatin sheets into cold water for a few minutes before you need them and use them according to the recipe. Please note that gelatin is not suitable for vegetarians. Agar agar can be a good substitution for vegetarians however replacing gelatin with agar agar is not 1:1, and can only be done by reformulating the recipe slightly
- Pistachio paste: What makes this Christmas tree cake recipe special is the pistachio flavor! Make sure that you use 100% pistachio paste (that has one single ingredient: pistachio) as many spreads claim to be pistachio paste with less than 50% pistachio in it. I bought mine online from Amazon, it has a super deep and delicious pistachio taste without any additives, oil, milk powder or sugar
- Green food coloring (optional): depending on the pistachio paste you are using you might or might not achieve the desired green color in your cream. A very small amount of green food coloring (gel or powder) can be always handy to fine-tune the color. Avoid cheap supermarket liquid food coloring in baking as that is less concentrated and too much liquid usually can cause issues in your baked good.
🛒 You’ll find detailed measurements for all Ingredients in the printable version of the Recipe Card at the bottom of this post
For the chocolate ganache filling
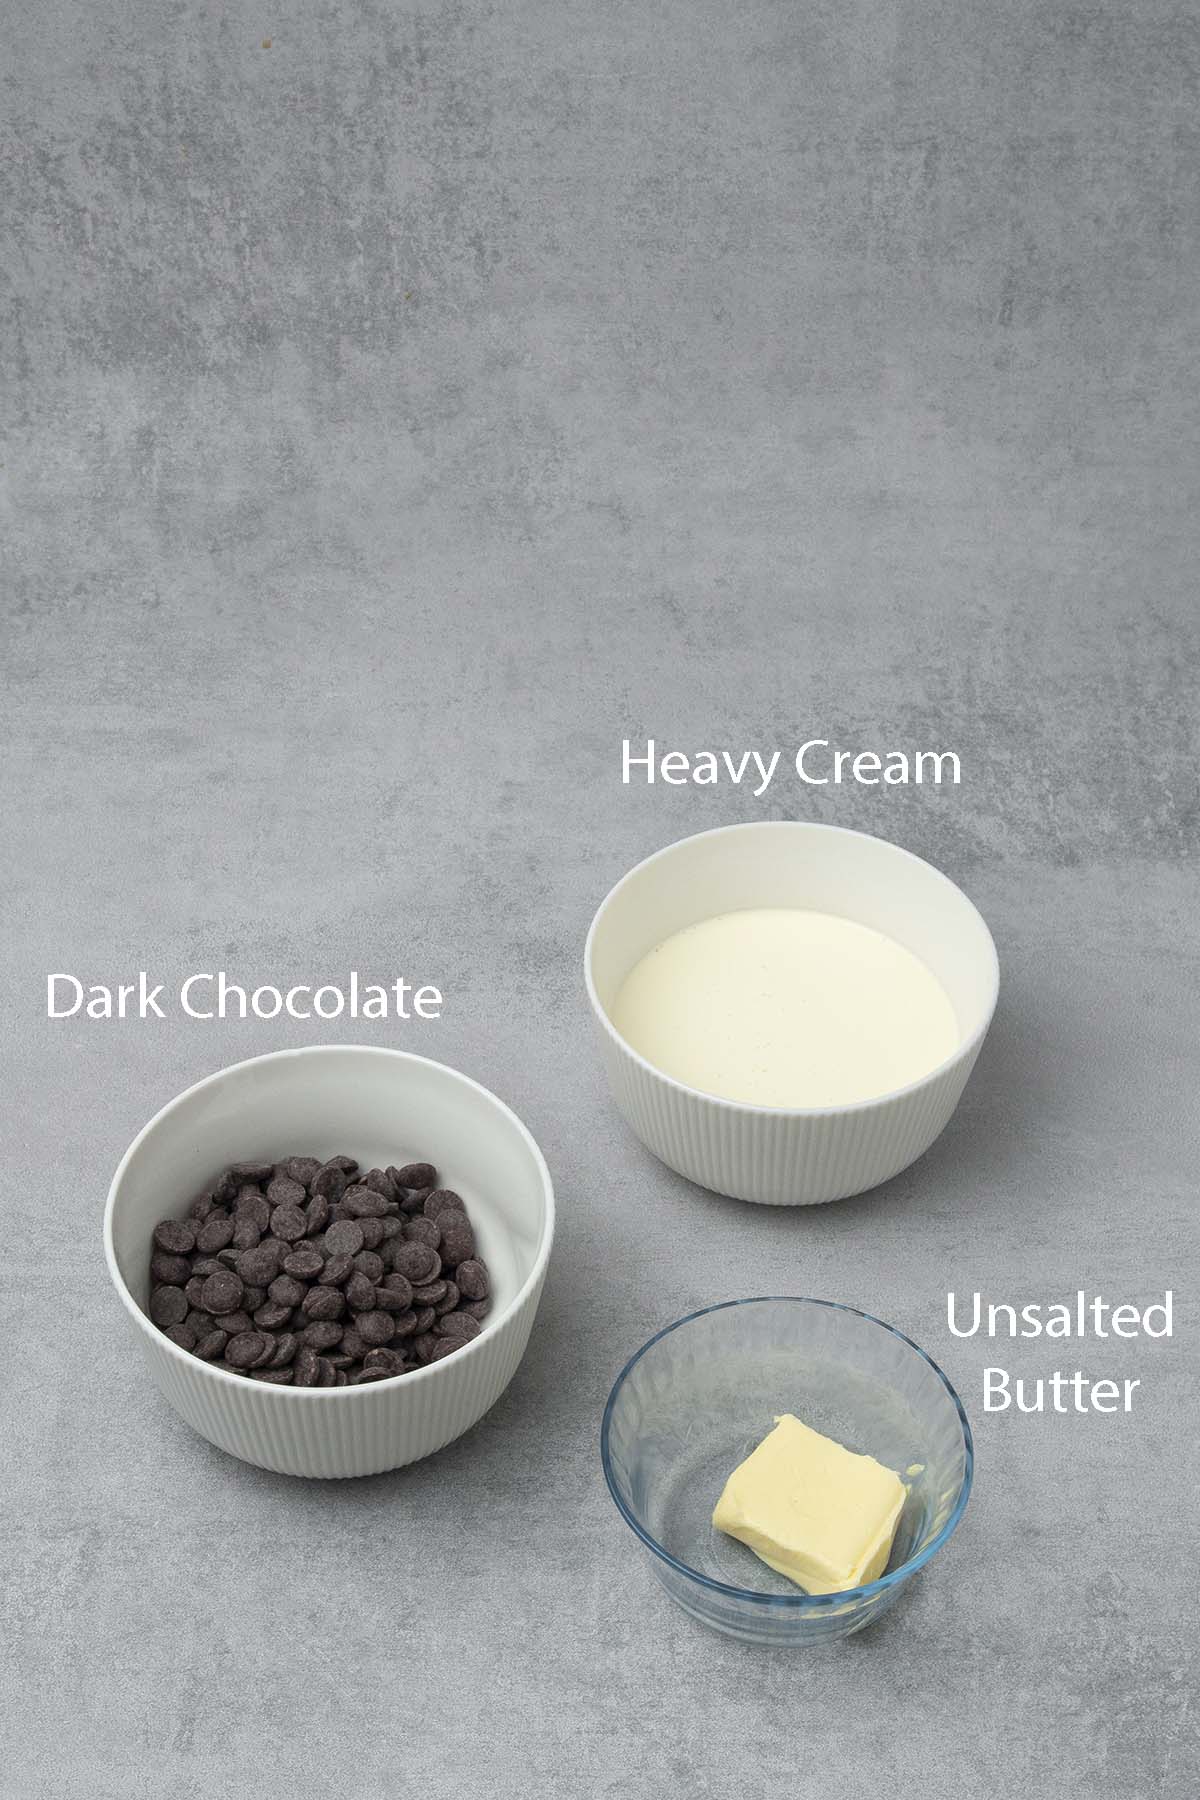
- Chocolate: Same as above. Use the best high.quality chocolate you can access. I am using Callebaut Dark Chocolate (callets)
- Heavy cream: Heavy cream also known as whipping cream has a fat content between 36% and 40%, use 36%
- Unsalted Butter: We will add a tiny bit amount of butter into this ganache, it keeps the ganache glossy plus it also adds a bit of creaminess. Use it on room temp
- +1 Salt: Don´t forget to add salt into your chocolate ganache to balance the sweetness
🛒 You’ll find detailed measurements for all Ingredients in the printable version of the Recipe Card at the bottom of this post
For the decoration
- Sprinkles: I went with white and silver sprinkles but you can use any color or decoration style of your preference
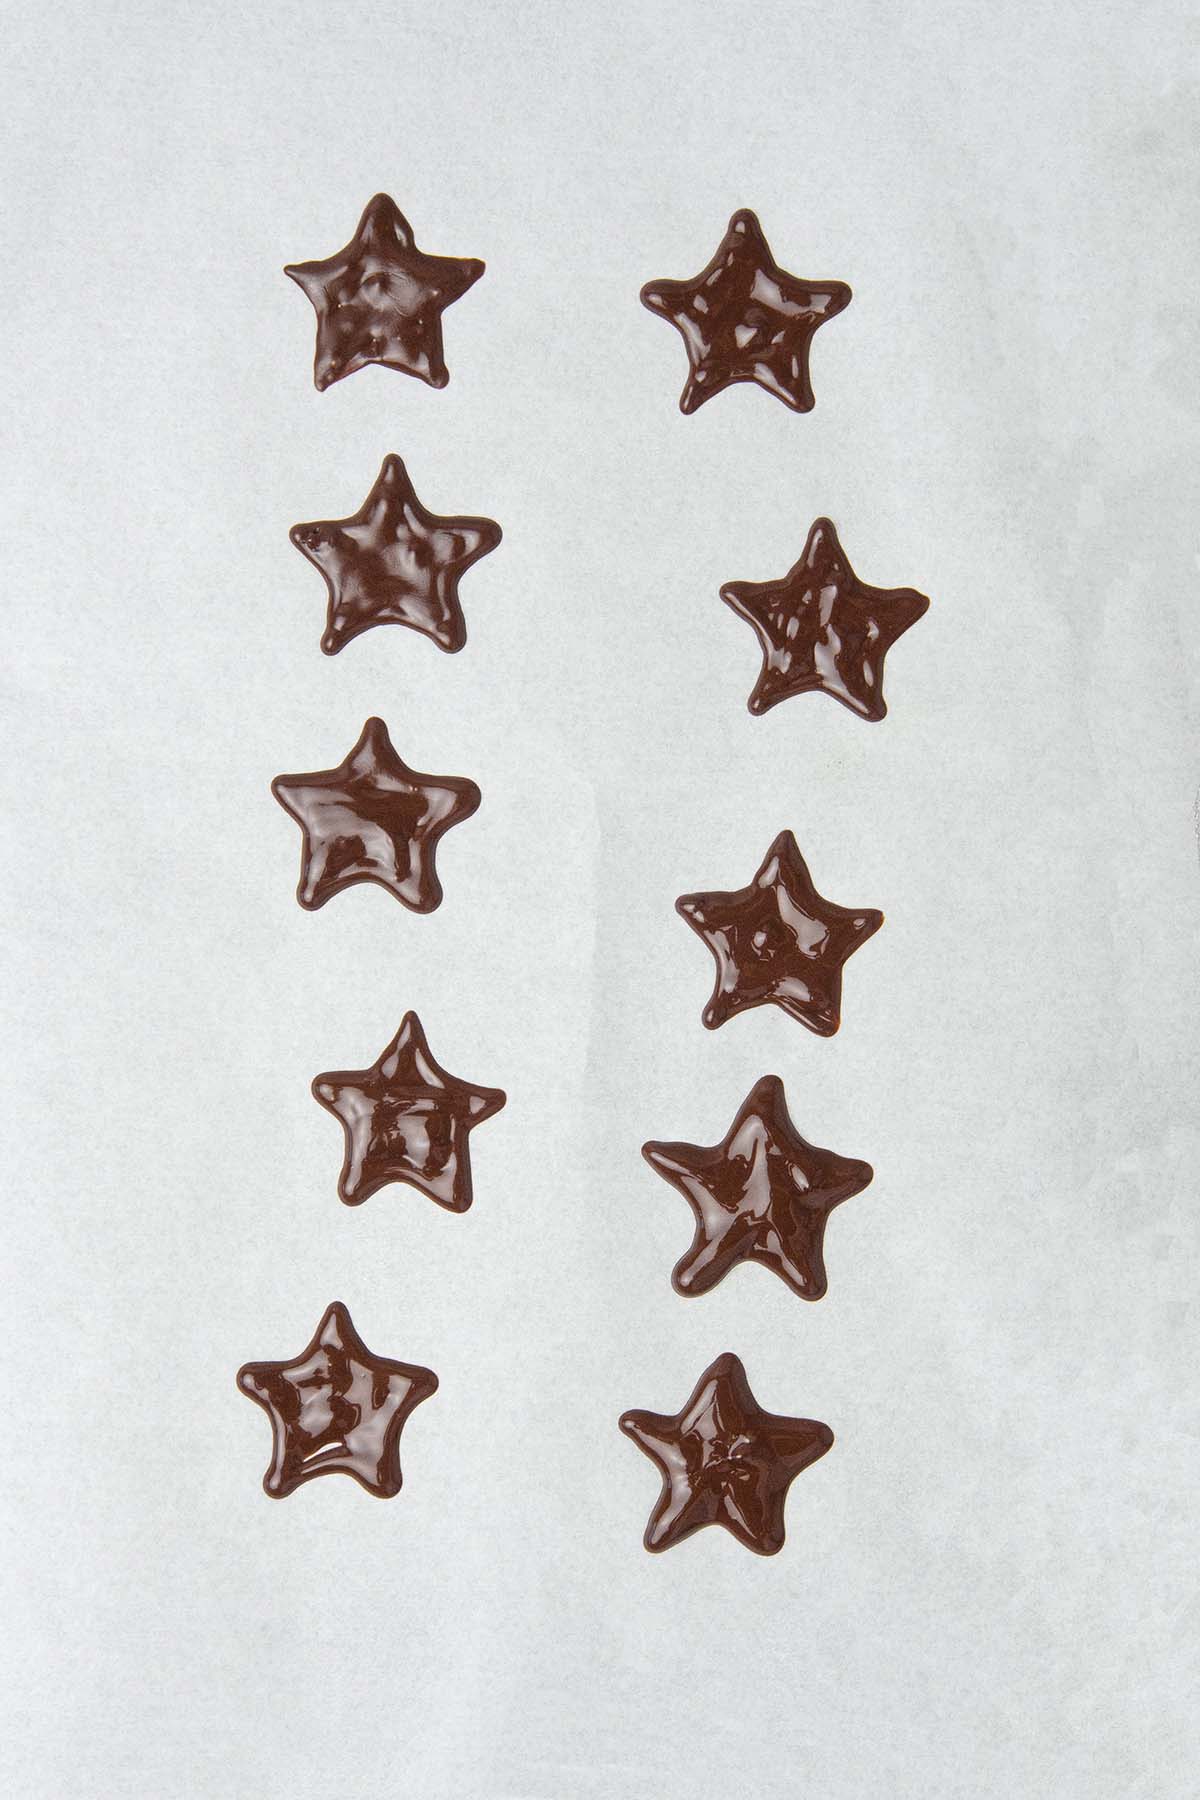
- Star: Now for the star on the top I assume you can purchase it just as "sprinkles" however if not, you can try making your own as I did, using chocolate and edible gold powder. I tempered a very small amount of chocolate and made the star shape with it then colored the chocolate decoration with gold dust. You can read more about how to temper chocolate and make chocolate decorations in this Yule log recipe I made earlier
👩🍳 How to make this recipe
1. How to make crazy moist Chocolate sponge cake
This is a super easy chocolate cake recipe, once you learn it you will be able to use it with any frosting of your choice. It is very moist with velvety crumbs and crazy delicious. The best thing about it is that it comes together in less than 5 minutes!
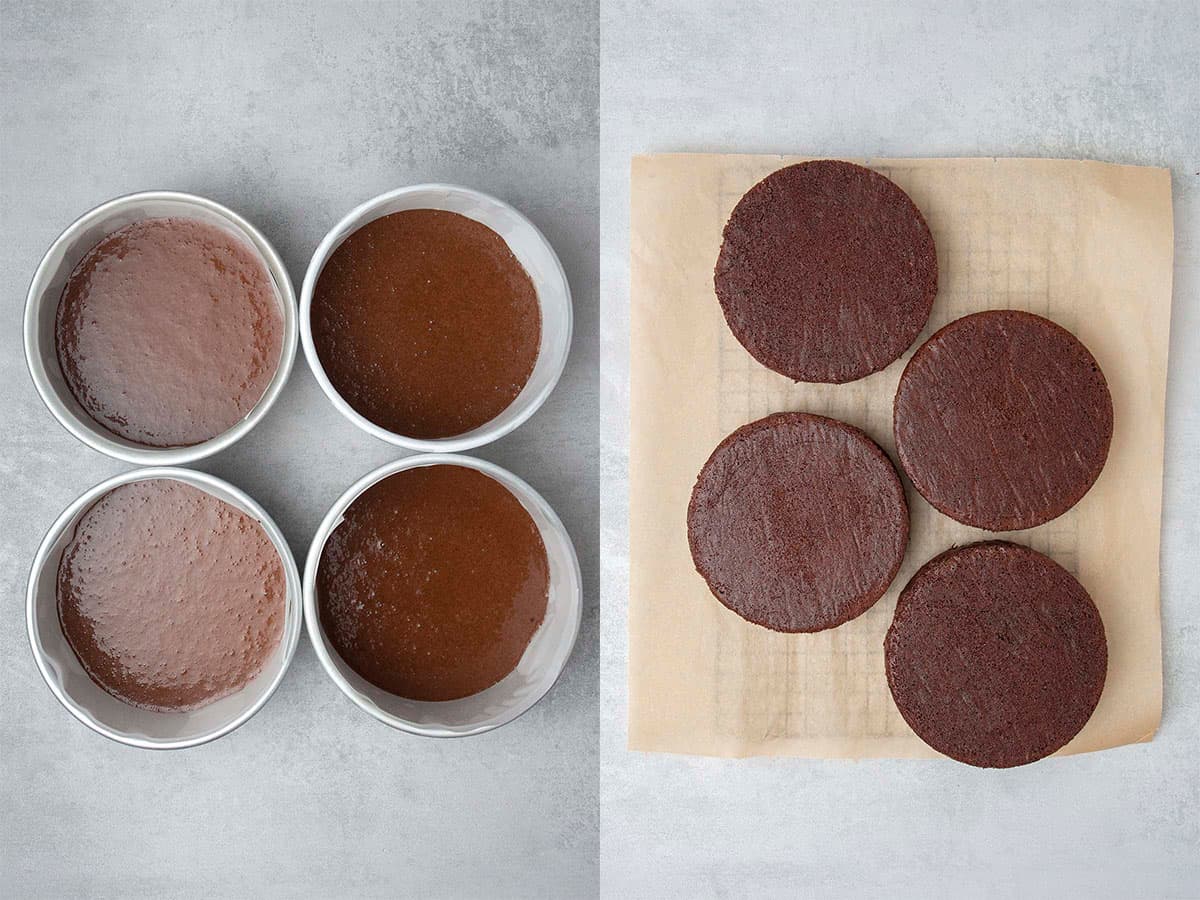
- Prepare your baking pans: 4x 15 cm (6 inch) round cake pan) as per instructions later. If you do not own 4 baking pans, divide the recipe into 4 or 2 depending on the number of cake pans you have
- The baking temperature will be 180 C / 356 F (no fan) but preheat oven +20C / 68F as the oven temp will drop when you open the door and place the baking tins in
- Consider using a Digital oven thermometer to understand your real oven temp
- Ingredients must be all measured with a Digital scale
- Eggs, milk, and coffee must be at room temperature
- Beat the wet ingredients (oil, sugar, milk, coffee, and eggs) with an Electric hand mixer for a minute or two until combined. Alternatively, this step can be made with a hand whisk too
- Sift dry ingredients together (flour, baking soda, baking powder, salt, cocoa powder) then pour wet ingredients into the dry ingredients
- Dry ingredients must be folded in by hand (using Rubber spatula). Do not use a mixer at this point
- Pour cake batter into the prepared baking pans (15 cm (6 inch) round cake pan), divide the batter equally into the 4 pans using a Digital scale
- Do not open the oven door during baking. After 25-30 minutes check the middle of the cake with a toothpick. Bake until toothpick inserted comes out clean.
💡 Top Tip: Let the chocolate sponges cool completely on a cooling rack, then the best if chill them before trimming and turning them into wonderful Christmas decoration cake. Please note that they are very fragile while hot, do not break them
2. How to make chocolate ganache
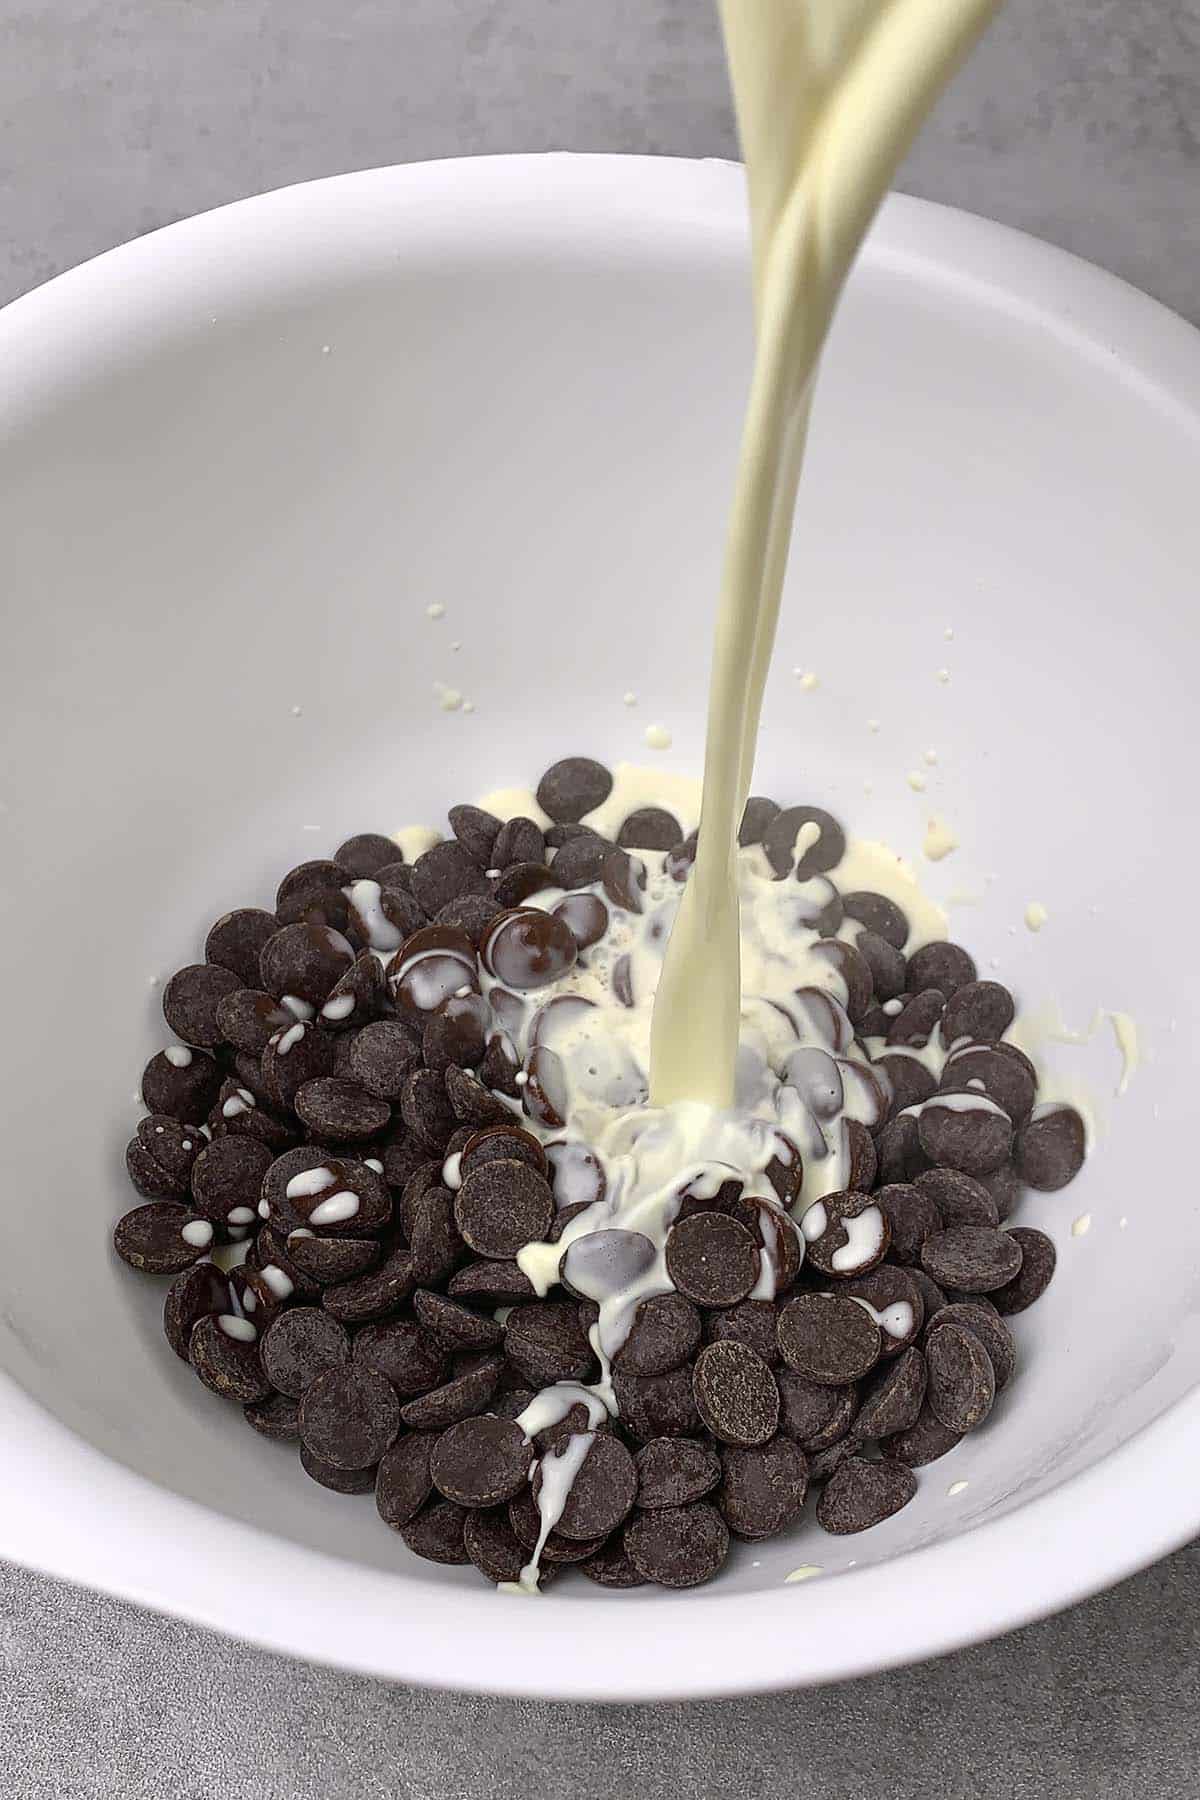
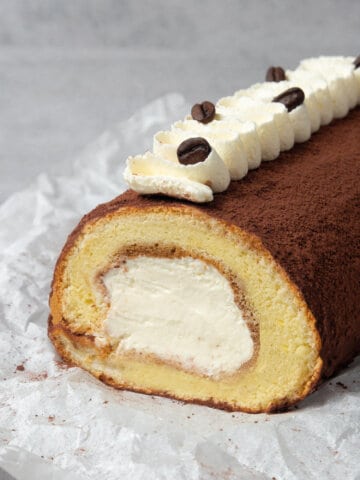
Chocolate ganache is literally chocolate and cream mixture with endless uses; cakes, cupcakes, tarts, etc. As usual, the quality of the ingredients will highly impact the end result. While taste is obviously very important, in the case of chocolate the quality goes way beyond taste, good vs poor quality chocolate can make or break any recipe. I recommend to chose a high-quality brand with high cocoa content chocolate to avoid disappointment, I am using Callebaut Dark Chocolate (callets) that has high cocoa butter %, tastes amazing, and works wonderfully silky while making ganache.
Regarding the cream, I am using heavy cream that has 36% fat content. Do not make ganache using low-fat creams or vegetable creams.
Chocolate ganache, in general, is a 1:1 mixture of chocolate and warm cream however since I am using dark chocolate and butter too, in this recipe, there is more cream than chocolate.
- Place finely chopped high-quality chocolate into a bowl or use Callebaut Dark Chocolate (callets)
- Heat cream until just simmering. If it’s boiling, the cream is too hot and could burn the chocolate. If the cream is not warm enough, it won´t melt the chocolate properly and won’t emulsify
- Pour warm cream over the chocolate
- Let the mixture sit for a minute then stir together or use a blender for a few seconds. Try not to incorporate too many bubbles into the mixture
- Mix in room temp unsalted butter. Make sure, that butter is fully incorporated, for that it is very important that the butter is soft enough but not microwaved (not runny)
- Place the ganache into a shallow container eg. a brownie tin, cover the surface with plastic wrap let it cool (=set) in the fridge for 1-2 hours
💡 Top Tip: If the chocolate ganache is too runny, probably you need to keep it longer in the fridge. On the other hand, if the ganache sets too hard, you might want to bring it back to room temperature before filling the cake's layers
3. How to make pistachio whipped ganache
This Christmas tree cake will be decorated with a super light and fluffy pistachio whipped ganache.
First, why make whipped ganache? Whipped ganache is a kind of ganache that contains gelatine, and the cream ratio is higher, so when it is whipped, the consistency will be super creamy and fluffy. You might never make buttercream (that is only butter and powdered sugar) ever again once you taste whipped ganache. It has the perfect consistency and the perfect taste without adding any powder sugar or butter.
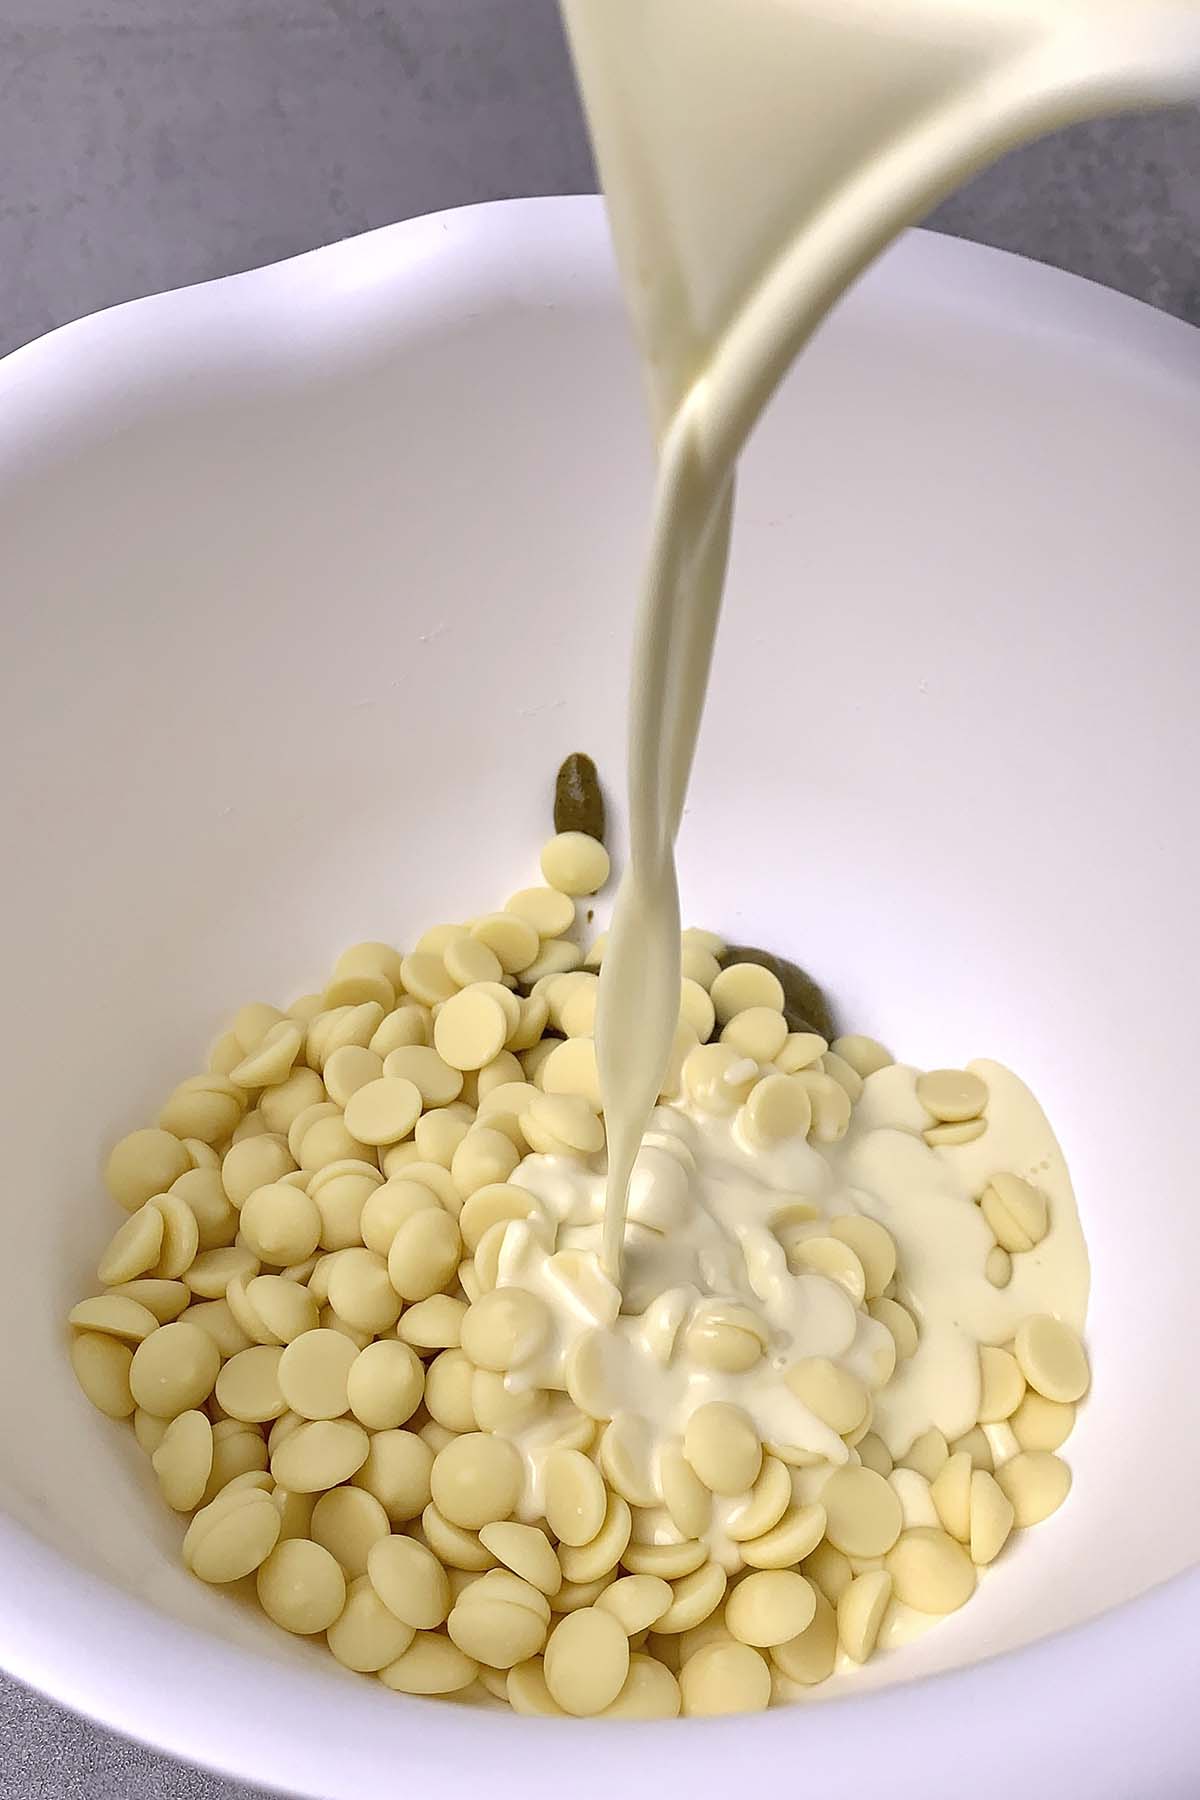
I recommend to chose a high-quality brand when it comes to chocolate with high cocoa content to avoid disappointment. I am using Callebaut White chocolate (callets), which is creamy and has a natural taste so when I add flavor to the ganache, in this case, pistachio paste, it will come through really strongly.
Regarding the cream, I am using heavy cream that has 36% fat content. Do not make ganache using low-fat creams or vegetable creams.
Regarding the gelatin, I am using sheet gelatin that is super easy to work with, please see my notes about gelatin above in the Ingredients section.
How does the process look like to make pistachio whipped ganache
- Place finely chopped white chocolate into a bowl or use Callebaut white chocolate callets
- Pour 100% pistachio paste on top of the chocolate
- Soak gelatin sheets in cold water
- Heat some part of the cream (as per recipe instructions) until simmering. If it’s boiling, the cream is too hot and could burn the chocolate. If the cream is not warm enough, it won´t melt the chocolate properly and won’t emulsify
- Mix gelatin sheets into the warm cream
- Pour warm cream over the chopped chocolate & pistachio paste
- Let the two sit for a minute then stir them together or use a blender to emulsify
- Once slightly cooled, pour the rest of the cold cream into the mixture, mix throughout
- You might want to use a very small amount of gel or powder green food coloring at this point to fine tune the colors - depending on the quality of your pistachio paste
- Pour ganache into a clean and large shallow tin eg. a brownie tin, and cover the surface of the ganache with plastic wrap and refrigerate for min. 4 hours for the ganache to set
- Take the ganache out of the fridge and gently whip it in a stand mixer using the whisk attachment, or use an electric hand mixer. It will reach a fluffy, pipeable consistency very quickly, in a minute or two. Make sure, you do not overbeat the mixture after this point as the cream might break and become runny if over-beaten
💡 Top Tip: If the ganache is more on the soft side after whipping, place it into the fridge for an hour, it will further set and will be perfectly pipeable (unless you over-beaten it)
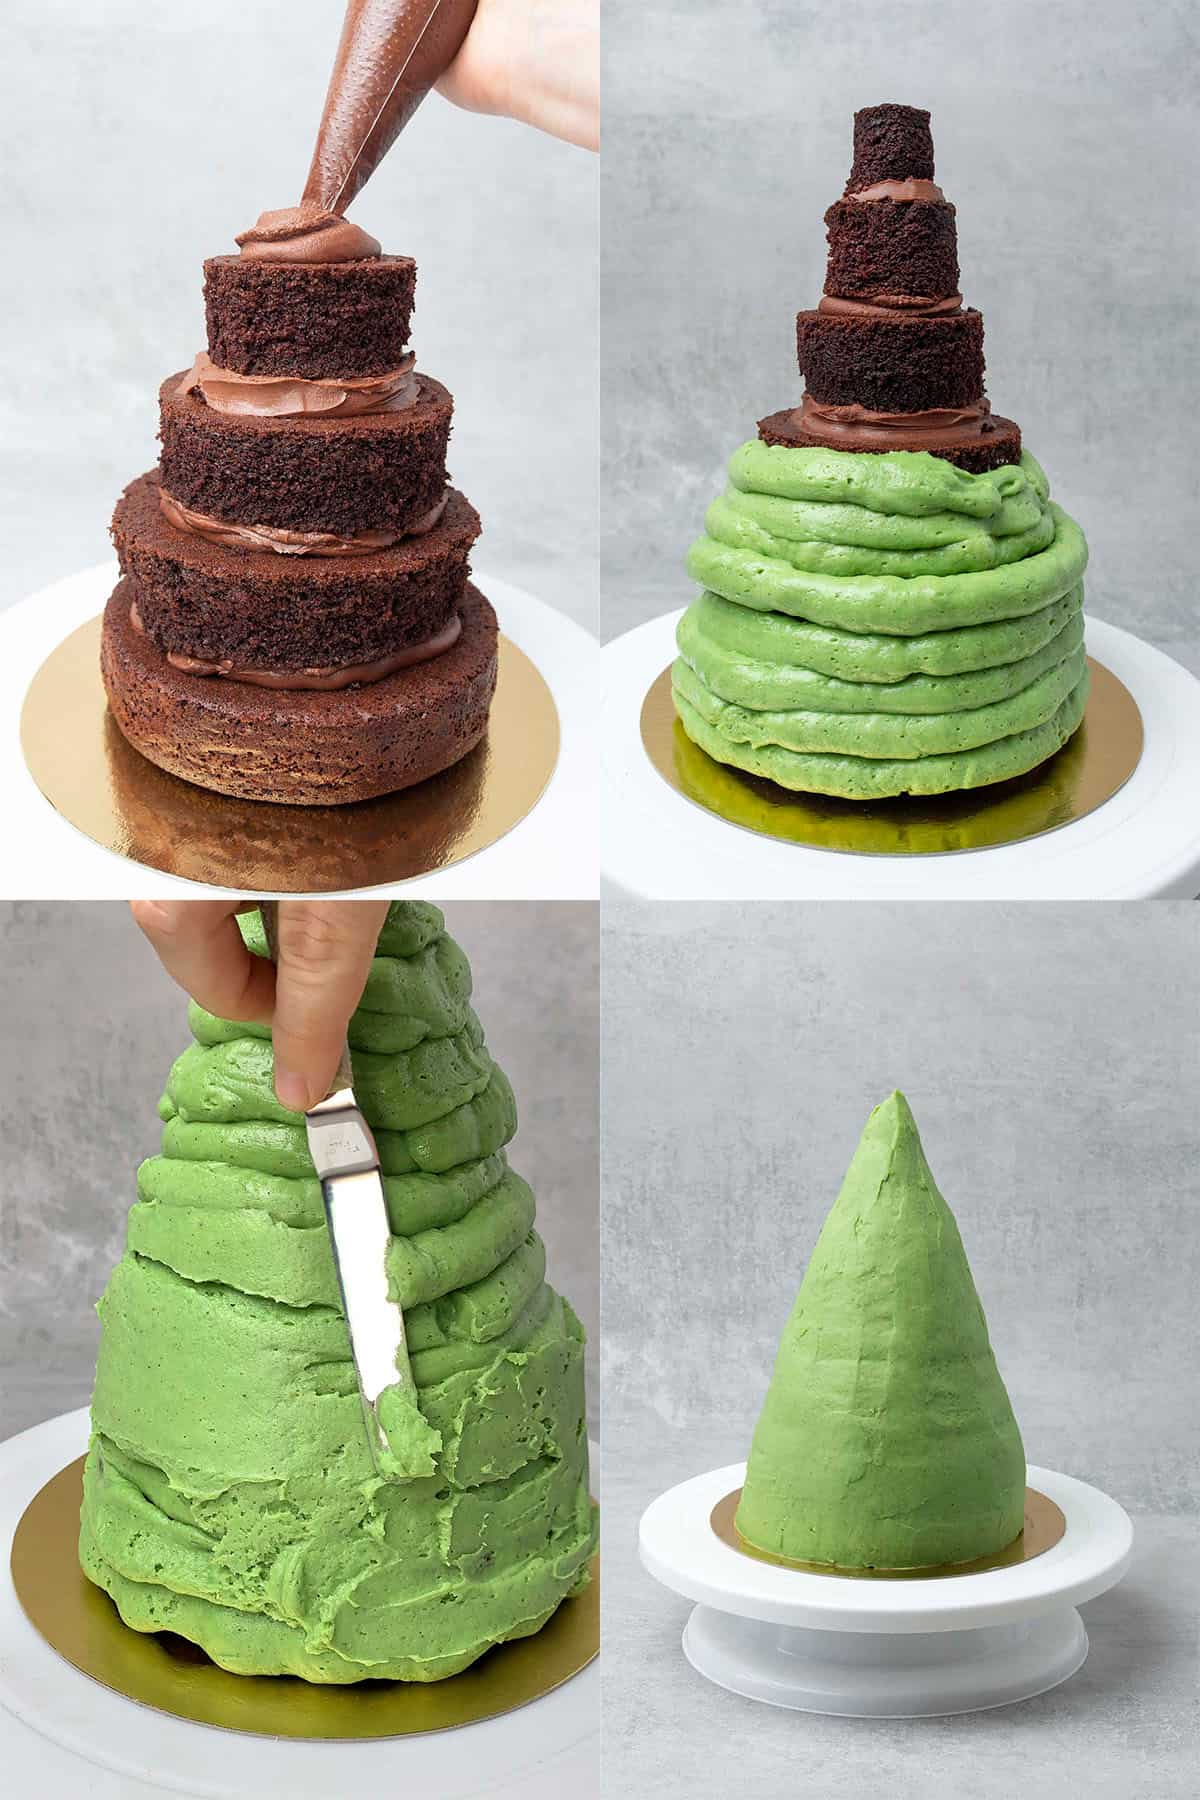
4. How to assemble this 3D Christmas tree cake
Once you have all elements of the cake ready, it is time to finally assemble our Christmas tree cake! Make sure that 1. the chocolate sponges are chilled 2. the chocolate ganache filling is set (not runny) 3. the pistachio whipped ganache is set
The assembling process might look long, but it is rather simple and straightforward, see below step-by-step.
Trim the sponges, make sure that they are chilled to room temperature, or warm cake can be very crumbly. You will need 6 layers overall
- For the 1st layer take one of the sponges as it is, 6inches / 15cm
- For the 2nd layer trim one of the remaining sponges to 5 inches / 12.5cm
- For the 3rd layer trim another sponge to 4 inches / 10cm. Make sure not to eat the leftover but set it aside for the last layer:)
- Now you have 1 sponge left and you will need to cut 2 layers out of this. The 4th layer is 3inches / 7.5cm. The 5th layer 2inches / 5cm. Use a cookie cutter
- The last, 6th layer will be a very small 1 inch / 2.5cm that you can cut out from the one that you have left from point 5
- Move the largest cake layer onto a serving plate, as later, once the cake is decorated, you won´t be able to move the cake
Start layering the cake from bottom to top and fill each layer with chocolate ganache. At each layer please check how even the layers are and make sure they are symmetrical with even layers
- After the last layer is on top, you might want to consider inserting a long food safe skewer from top to bottom that helps to stabilize the cake, but it is not strictly necessary
- Chill the cake for either 1h in the fridge or 15min in the freezer before proceeding with frosting
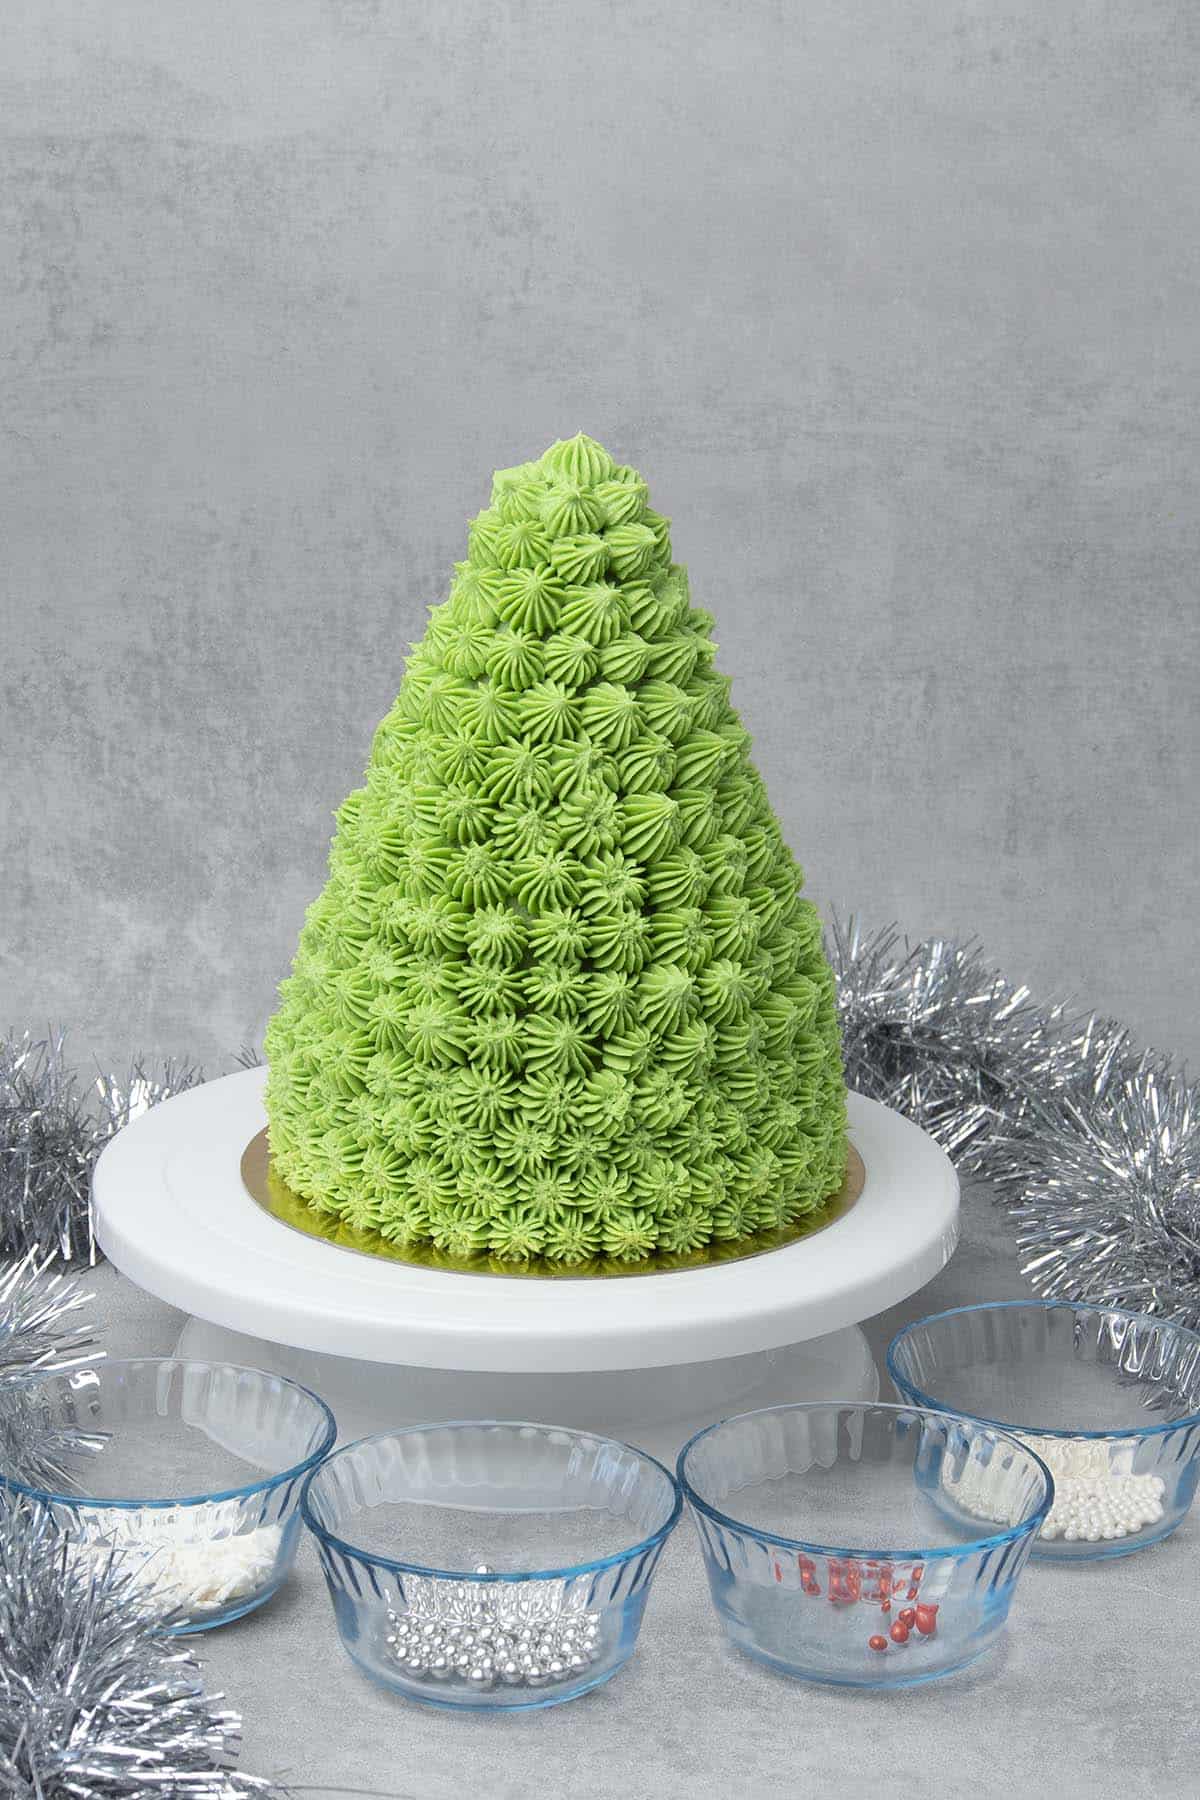
- Once the cake is nicely chilled, whip the pistachio ganache as per instructions and divide the frosting into 2 - about 60%-40% so one of the batches should be a bit more than the other. The smaller batch will be used to frost around the cake as a first layer, and the larger batch will then be piped on top to make the Christmas tree design
- Frost the cake with the smaller batch of cream. You can pipe the cream around the cake first, then smooth it with an offset spatula. Try to work as neat as possible, however, it will be covered with another layer of piping, so no need to worry if it is not perfect. What is important is that your cake is somewhat symmetrical at this point
- Chill the cake again for either 1h in the fridge or 15min in the freezer before proceeding with frosting. Do not attempt to proceed with piping without the first layer being completely set and stable. Store the remaining whipped ganache in the fridge while your cake is resting
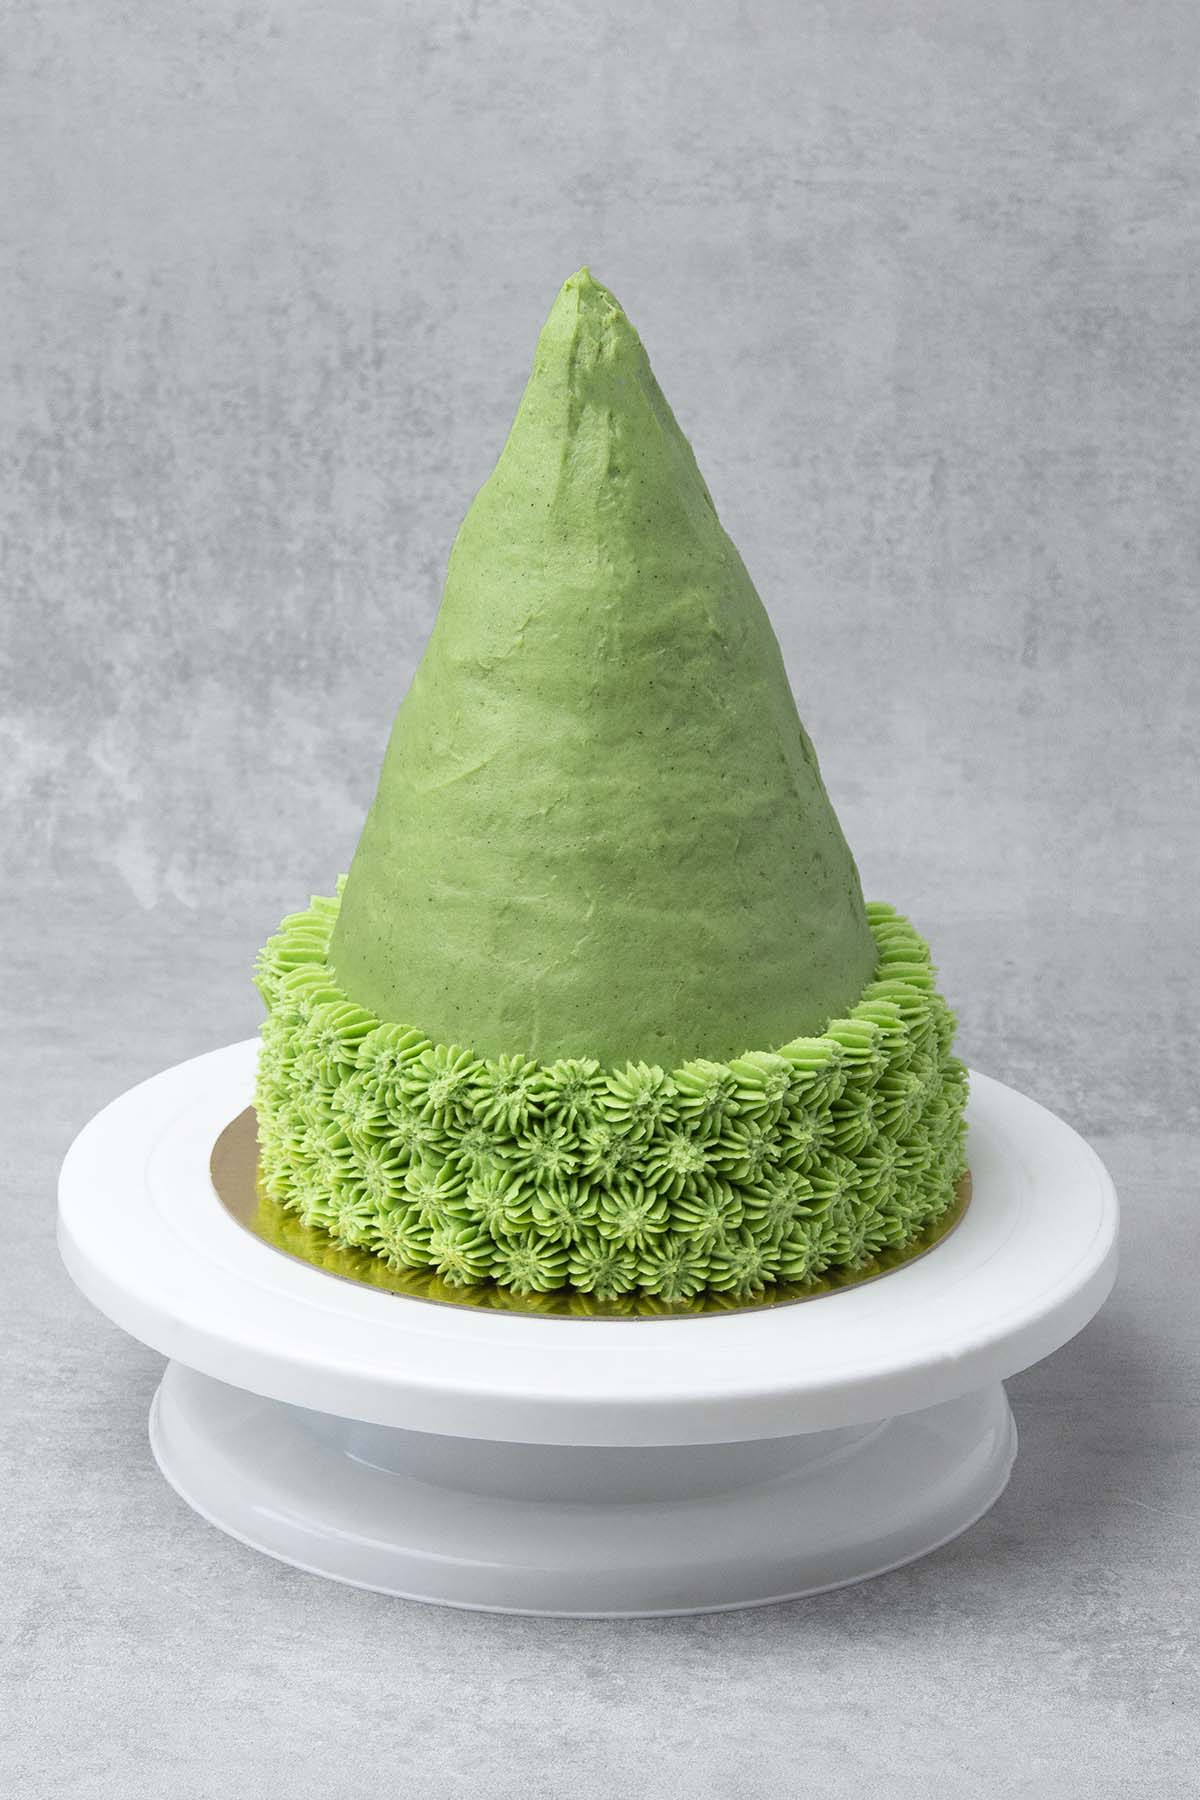
- Now comes the fun part, piping the Christmas tree design on top! Move the remaining (larger batch) pistachio whipped ganache into a piping bag fitter with a star nozzle tip, and start piping around the cake starting from the bottom all around moving towards the top. While piping, hold your hand steady at the same angle at each layer, and try to make sure that you pipe with even pressure more or less evenly, so your Christmas tree design cake will turn out neat.
💡 Top Tip: The amount of cream will be enough to frost and pipe around the cake, but you must pay attention not to pipe too much at the bottom, so you will have cream left for the top

5. How to decorate
If you have got this far, decoration is really super easy! I suggest using some sprinkles, and deciding on the color upfront eg. you might want to go with silver and white, like mine, or something different, use your imagination.
For the star on the top, you might be able to purchase one in the usual "Christmas sprinkles" aisle, however, if not, you can try making your own as I did. I tempered a very small amount of chocolate, made some stars with it by hand (using a piping bag), then colored the chocolate decoration with gold dust. You can read more about how to temper chocolate and make chocolate decorations in this Yule log recipe.

🥣 Equipment notes
Considering how showstopper this 3D Christmas tree cake is, you really won´t need too much equipment to make it.
First and foremost, make sure you measure the ingredients with the help of a Digital scale. Cup measurement is highly inaccurate and can cause all sorts of baking disappointments.
For mixing use an Electric hand mixer, while for folding every Baker needs a Rubber spatula.
For baking the sponges, you will need round cake pans, I suggest a 15 cm (6 inch) round cake pan, while an Offset spatula is super handy to smooth the frosting.
For piping the Christmas tree pattern on this cake you will need a French star nozzle tip. Finally, for any layered cake, a Cake turntable is super handy.
🎓 Expert tips
- To avoid cake sticking to the pan, brush the inside of the cake pan with a tiny bit of oil then use parchment paper on the bottom and side as well. The oil is only needed for the parchment to stick to the pan
- Don´t worry if the cake batter is too runny, it is how it´s supposed to be before baking (so that it will be super moist after baking)
- 100% pistachio paste and good quality white chocolate are critical to achieve the best flavor and texture on the frosting
- You will need to trim the cakes, please remember that the sponges should be chilled when trimming, otherwise they might be too crumbly
- While assembling the cake, stop and chill the cake and frosting whenever it feels too soft
- This is a tall (6 tier cake), please take this into consideration when assembling and transporting the cake. Eg. you should assemble the cake on the serving tray you are planning to serve as at later stage you won´t be able to move the cake
❓Recipe FAQs
Yes, you can, however, you will need to adjust the ingredient quantities and baking time accordingly. Having said that, the larger the cake the riskier that it won´t bake throughout, so you have to pay extra attention to the correct oven temperature and apply the toothpick check
Most probably yes, you can, however, you can´t just leave out / change an ingredient without reformulating the entire recipe. When one ingredient changes, some other ingredients need to be changed too in order to keep the balance in the texture and flavor. Sadly, I am not able to provide substitutes for all sorts of allergies and diets.
Yes, you can, however, you will need to use another thickening agent eg. agar agar. Gelatine is broadly used by pastry chefs and in fact a very reliable and popular baking ingredient for mousse-like consistency creams
Not all white chocolate is created equal, I suggest you try this recipe with a high-quality white chocolate brand like Callebaut. White chocolate is often used by pastry chefs as a base for fruity, nutty ganache eg. raspberry ganache or this pistachio whipped ganache, and totally does not taste like white chocolate. The white chocolate brings silkiness, creaminess, and texture to your frosting
This is a super moist cake due to the oil and high ratio of wet ingredients. A few reasons can cause dry, crumbly texture on your cake: 1. ingredients not measured correctly eg. too much flour added to the mixture 2. inappropriate mixing technique eg. over mixed cake batter 3. over baked, meaning it dried out too much. Consider investing in an inexpensive Digital oven thermometer to be able to measure the correct oven temperature and please make sure to use a Digital scale during baking, cups are not an accurate way of measuring for consistent results.
Probably the cake would have needed more baking time. Either, it was taken out of the oven too soon, or perhaps your oven is under heat. Consider investing in an inexpensive Digital oven thermometer if you tend to struggle with the baking part of your desserts.
Another issue that can cause raw texture is measuring the ingredients inappropriately eg. adding less flour to the recipe. Consider using a Digital scale
The ganache needs time to set in the fridge, over this time basically the chocolate will solidify back again along with the butter. If your ganache is runny, you either have to let it completely cool or perhaps you measured the ingredients incorrect or used low-fat cream (use 36% fat)
Similar to the chocolate ganache, the pistachio whipped ganache also needs time to set. Over this time the gelatine, along with the chocolate will stabilize the mixture. Once ganache sets into a "jelly" like texture you will have to gently whip it up. Make sure that you stop whipping as soon as the mixture is fluffy and pipeable as a minute later it will break and become runny
Once the cake is baked, let it completely cool before assembling. Any leftover cake can be stored in an air-tight container either at room temperature or in the fridge for 3-4 days. I suggest you cover the dessert so it does not absorb any smell from the fridge, or from the kitchen.
You can freeze the sponges after baking however I obviously do not recommend freezing the whole Christmas tree cake after assembling
🍰 Other Christmas dessert recipes


Have you tried this recipe?
Please leave a 5-star ⭐️⭐️⭐️⭐️⭐️ rating on the recipe card and consider leaving a comment as well! I would love to hear about how your dessert turned out and your feedback also helps other Readers!

ULTIMATE Christmas tree cake (VIDEO)
Equipment
Ingredients
Chocolate Sponge for 4 x 15 cm ( 6 inches)
- 255 g (2 cups) All purpose flour any low protein content flour eg. pastry flour can work too.
- 70 g (⅘ cups) Cocoa powder unsweetened, dutch processed
- 180 g (1 cups) Granulated sugar
- 180 g (1 cups) Brown sugar
- 1½ teaspoon Baking soda
- 1½ teaspoon Baking powder
- ½ teaspoon Salt
- 135 g (⅔ cups) Vegetable oil
- 3 Eggs room temperature
- 250 g (1 cups) Milk room temperature
- 180 g (¾ cups) Coffee freshly brewed strong coffee, room temperature
Chocolate ganache filling
- 150 g (⅘ cups) Callebaut Dark Chocolate (callets) high quality semi-sweet chocolate
- 230 g (1 cups) Heavy Cream 36% fat
- 25 g (1¾ tablespoon) Unsalted butter soft, room temperature
- Large pinch of salt
Pistachio whipped ganache
- 450 g (2 cups) Callebaut WhiteChocolate (callets) high quality white chocolate
- 1100 g (4½ cups) Heavy Cream 36% fat
- 120 g (1 cups) Pistachio paste 100% pistachio only!
- 8 Gelatine sheet 1.7g / gelatin sheet
US customary cup measurement is an indicative figure only. Measure the ingredients with a digital scale by weight (gram). Baking is art but also science which requires precision and accuracy.
Instructions
Start with pistachio whipped ganache
- Place Callebaut WhiteChocolate (callets) into a bowl or alternatively chop your chosen high quality white chocolate into small pieces and place them into a bowl
- Pour 100% pistachio paste on top
- Soak gelatin sheets into cold water.
- Heat 500g cream (2cups) until simmering, mix gelatin sheets in, and pour it over the chocolate & pistachio paste mixture
- Let the chocolate cream mixture set for a minute until chocolate gently melts then stir together or hand blend.
- Once mixture slightly cools to room temperature, stir in the rest of the cream, pour the mixture into a shallow container and cover the top of the ganache with plastic wrap. Refrigerate it for minimum 4 hours.
- The mixture should thicken after 4 hours and can be whipped into a pipeable, fluffy consistency in a Stand mixer , or use your electric hand mixer. The key is that once it is reached a fluffy consistency (1-2min), make sure you do not over whip the ganache as it can break. Whipped ganache should be stored in the fridge before using it or best if you use it immediately
Chocolate sponge
- Heat oven to 180 C / 356°F
- Prepare 4 15 cm (6 inch) round cake pan with parchment paper
- With an Electric hand mixer beat together the wet ingredients for 1-2 minutes: room temperature egg, oil, sugar, coffee and milk
- Sift dry ingredients; flour, baking powder, baking soda, cocoa powder, salt
- Pour dry ingredients into wet ingredients then fold just until combined
- Divide batter equally into 4 cake pans with the help of a Digital scale
- Bake for 25-30 min or until skewer inserted in the middle of the cakes comes out clean
- Cool the chocolate sponges on Cooling rack. Chill them in the fridge before trimming them
Chocolate ganache
- Pour the cream into a small pan and place it over medium heat. As soon as it start simmering (before boiling) remove from heat
- Pour warm cream over chocolate, stir until combined, then add butter and salt, and continue stirring until smooth, for a few more seconds
- Pour the ganache into a shallow container and cover the top of the ganache with plastic wrap. Refrigerate it for a minimum of 1 hour, or until sets.
Assemble
- Start with trimming your chilled chocolate cakes: you will need 6 layers: 1st layer: 6inches / 15cm - this will be one of the sponges as it is 2nd layer: 5 inches / 12.5cm -this will be trimmed3rd layer: 4 inches / 10cm - this will be trimmed, keep the leftover for the 6th layerNow you have 1 sponge left and you will need to cut 2 layers out of this. The 4th layer is 3inches / 7.5cm. The 5th layer 2inches / 5cm. Use a cookie cutterThe 6th layer will be a very small 1 inch / 2.5cm that you can cut out from the one that you have left from the 3rd layer
- Start layering the cake from bottom to top and fill each layer with chocolate ganache.
- After the last layer is on top, you might want to consider inserting a long food safe skewer top to bottom that helps to stabilize the cake but it is not strictly necessary
- Chill the cake either 1h in the fridge or 15min in the freezer
- Divide the pistachio whipped ganache frosting into 2 - about 60%-40% so one of the batches should be a bit more than the other. The smaller batch will be used to frost around the cake as a first layer, and the larger batch will then be piped on top to make the Christmas tree design
- Frost the cake with the smaller batch of cream. You can pipe the cream around the cake first, then smooth it with an offset spatula.
- Chill the cake again either 1h in the fridge or 15min in the freezer before proceeding with piping
- Move the remaining (larger batch) pistachio whipped ganache into a piping bag fitter with a star nozzle tip, and start piping around the cake starting from the bottom all around moving towards the top.
- Chill the cake again before proceeding with decoration
Decoration
- Use sprinkles of you choice and finally, place either a homemade or store bough edible star on top
Notes
- Measure your ingredients with a Digital scale for accuracy
- All ingredients for the chocolate cake must be at room temperature to properly emulsify: eggs, milk, etc.
- Try using the best quality ingredients; 82% butter, high-quality chocolate, unsweetened dark cocoa powder, 100% pistachio taste, 36% fat content heavy cream, etc. Do not skip salt that will balance the sweetness of this cake
- Make sure you read my Expert tips section above to maximize your success. A short recipe alone is not able to cover all the necessary details, and science behind baking. Consider this recipe more like an in-depth tutorial, literally the only recipe you will ever need to make Christmas tree cake
- Chill the chocolate sponges before trimming. Room temperature or warm sponge cake can very crumble during trimming
- Assemble the cake on the serving tray you are planning to serve as at later stage you won´t be able to move the cake
- Let the chocolate ganache set before filling the cake. Straight when you make it, it is runny, but it will set over time in the fridge (the chocolate and butter will solidify)
- Let the pistachio ganache properly set before whipping it up. While whipping, pay very close attention to the consistency and stop whipping immediately after it gets fluffy. Overbeating would result in breaking the cream and instead of becoming stiffer, in fact, it will get runnier
- Make sure you chill the cake in between applying the different layers and frostings just as stated in the recipe. That is a standard procedure for making any layered cake, and skipping it would result in best in class baking disasters
- If you have never used a piping bag and piping nozzle before, it is worth making a cheaper buttercream and practice before
Leave a Reply