This homemade Graham Cracker Cheesecake Crust with just two ingredients is so simple, but it will revolutionize your baking! This no-bake cheesecake crust (can be baked too) is stable, neat, crunchy, sweet (but not too sweet), and it holds its shape perfectly every time.
Best Graham Cracker Cheesecake Crust Recipe
This Graham Cracker cheesecake crust is made from just two ingredients: butter and Graham crackers. And you probably already have both at home in your pantry and fridge! It's unbelievably easy and versatile, with the loveliest biscuit flavor, a perfect crunchy texture, and a hint of sea salt that balances the sweetness.
This is the only Graham Cracker cheesecake crust tutorial that you will ever need. It is a thick crust that is very stable and holds its shape. You can adapt it in many ways to suit your needs, and I'll give you some ideas below for how you can add your own twist.
Katalin’s key take on how to keep Graham cracker crust from falling apart
The key to a perfect Graham cracker crust is the ratio of ingredients. You do not need additional sugar to bind it together, only good quality European-style butter with a high fat content (mine has 82%), which will fuse the Graham cracker crumbs together as it hardens. If there's too much crumb, the crust won't hold together; if there's too little, it will be runny because the ratio of fat is not in balance.
I have tested this recipe with Graham crackers and a few different alternatives (such as Digestive biscuits or Nilla wafers), and other cookies like Oreos and Speculoos. I also tested it for both baked and no-bake cheesecakes. And as long as you weigh your ingredients to get the right ratio and follow my simple instructions on the best crust, it will not fall apart.

What Graham crackers are best for cheesecake crust?
The quantity of Graham crackers is far more important than the type of cracker. I always talk about the importance of weighing ingredients, and it is really important in this recipe too! Let's look at an example using a standard box of Graham crackers, such as Honey Maid. At the time of writing, one box is 14.4 oz, which is roughly 400g. It contains 3 sleeves with nine 9 sheets in each, for a total of 27 full sheets.
I use 300 grams of Graham crackers for this crust, which is equivalent to 20 sheets. However, different brands might vary, and manufacturers can also change the weight of the sheets at any time. Therefore, it is best to stick to the quantity in ounces or grams, rather than always using 20 sheets.
Measuring cookie crumbs in cups is also very inaccurate, as everyone blitzes the cookies to different levels and packs the cup differently. I always provide cup measurements (and in this recipe, I list 2 ½ cups of Graham crackers), but I strongly recommend you weigh out 300 grams instead.
How to make biscuit crumb, 2 ways
There are generally two ways of making biscuit crumb, either the old-fashioned way or using a food processor.
To make cookie crumbs in a food processor, weigh the Graham crackers and pulse them for a few seconds until no larger pieces remain and the crumbs are all the same size.
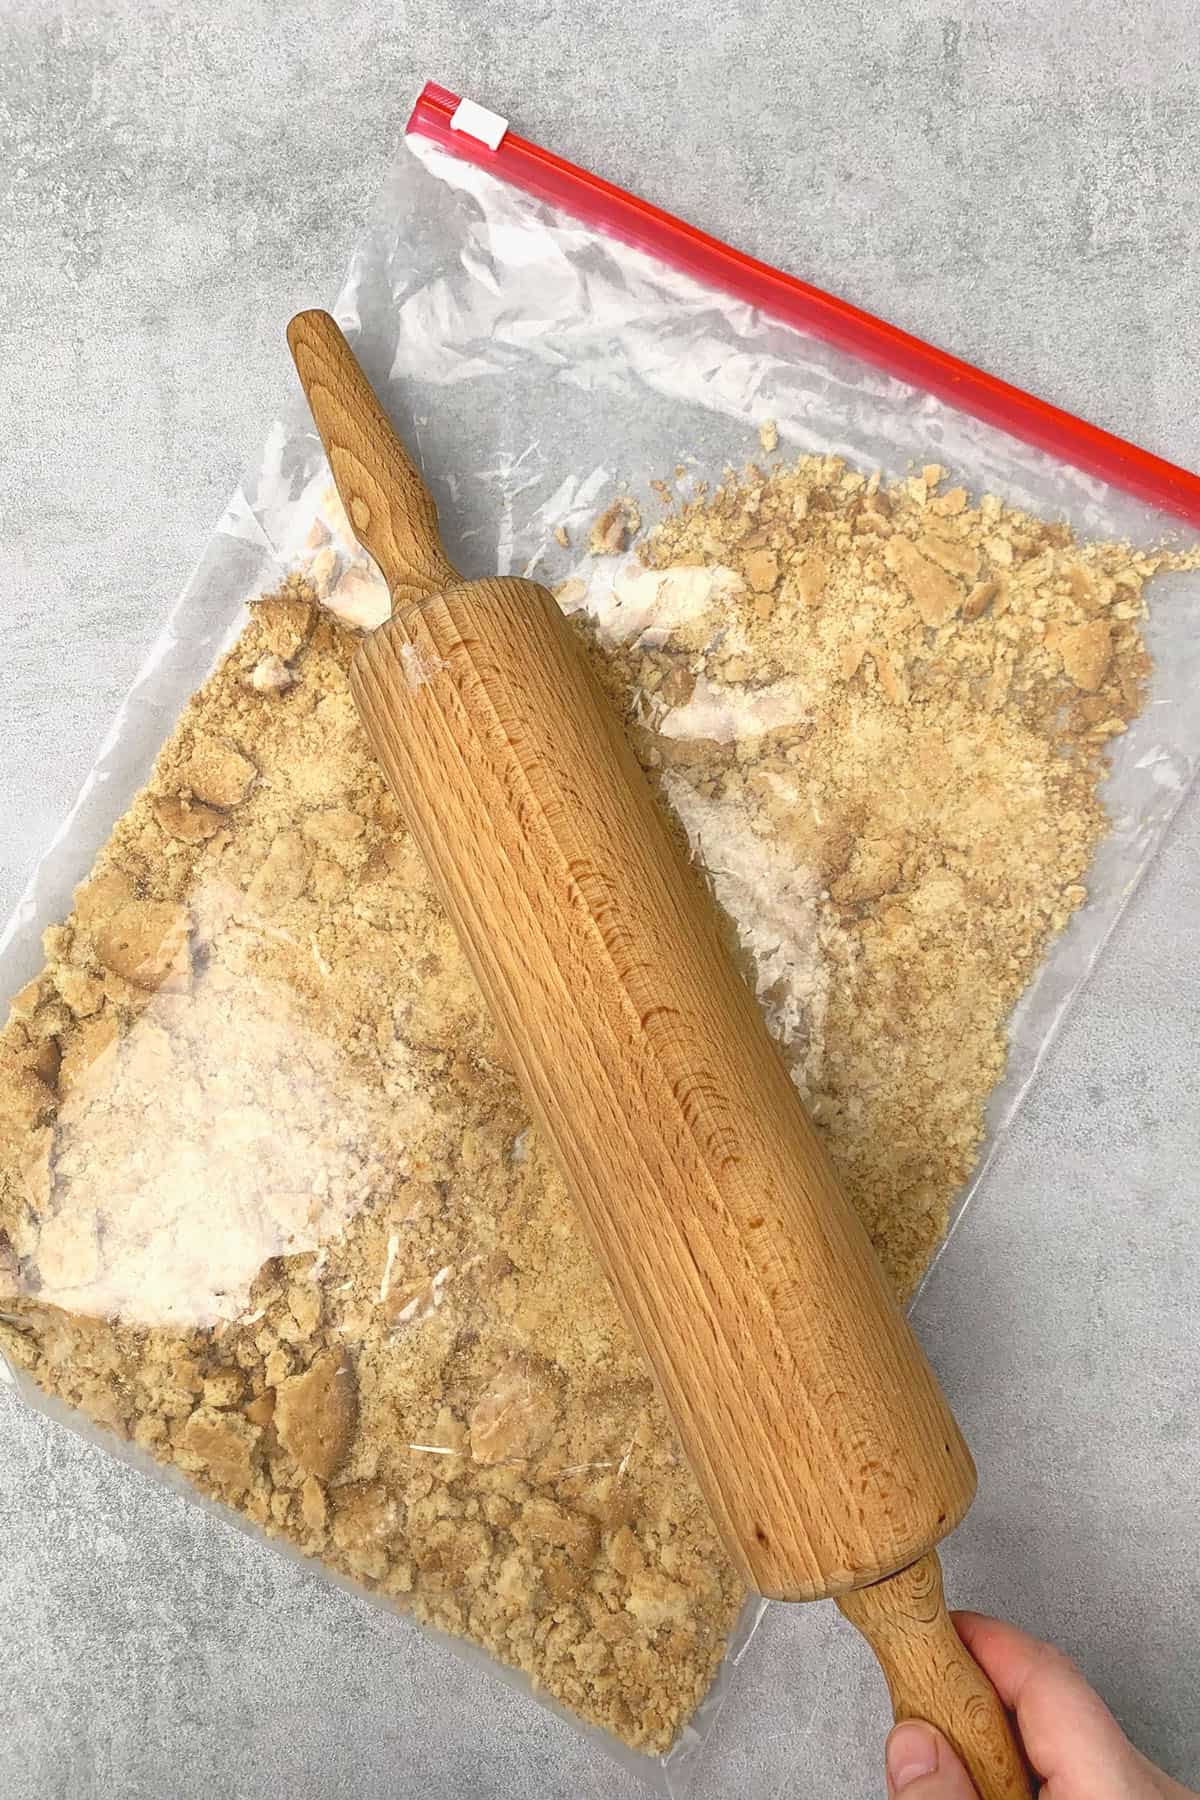
The old-fashioned way is to place the weighed Graham crackers into a plastic freezer bag/ziplock bag on the counter, zip it shut, and then hit it with a rolling pin until you have a fine biscuit crumb.
I actually prefer the rolling pin method, as it can be easier to over-process the cookies in a food processor, which can leave you with a mixture more akin to cookie batter. If you are using a zip bag, ensure it is large and strong enough to withstand the process without tearing. This is my favorite method:
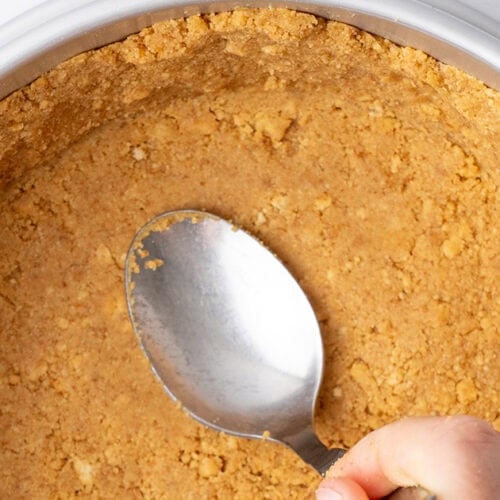
What tools are the best to assemble the Graham cracker crust nicely and tightly?
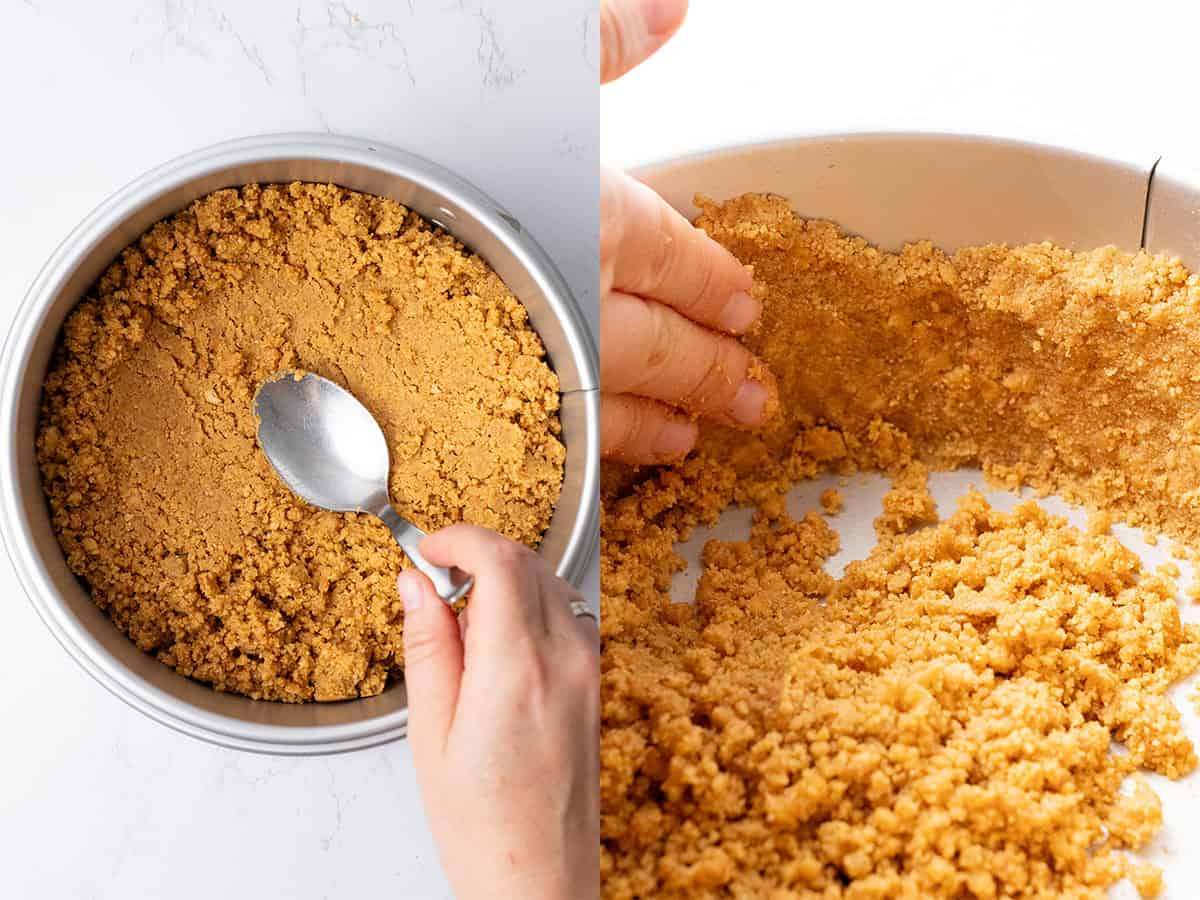
To achieve the best Graham cracker crust, pack the crushed crackers and butter mixture tightly into the pan to ensure they fuse together. You can do this one of three ways.
Use your hand and fingers, although it can get a bit sticky!
You can use a flat-bottom mug, measuring cup, or even a drinking glass.
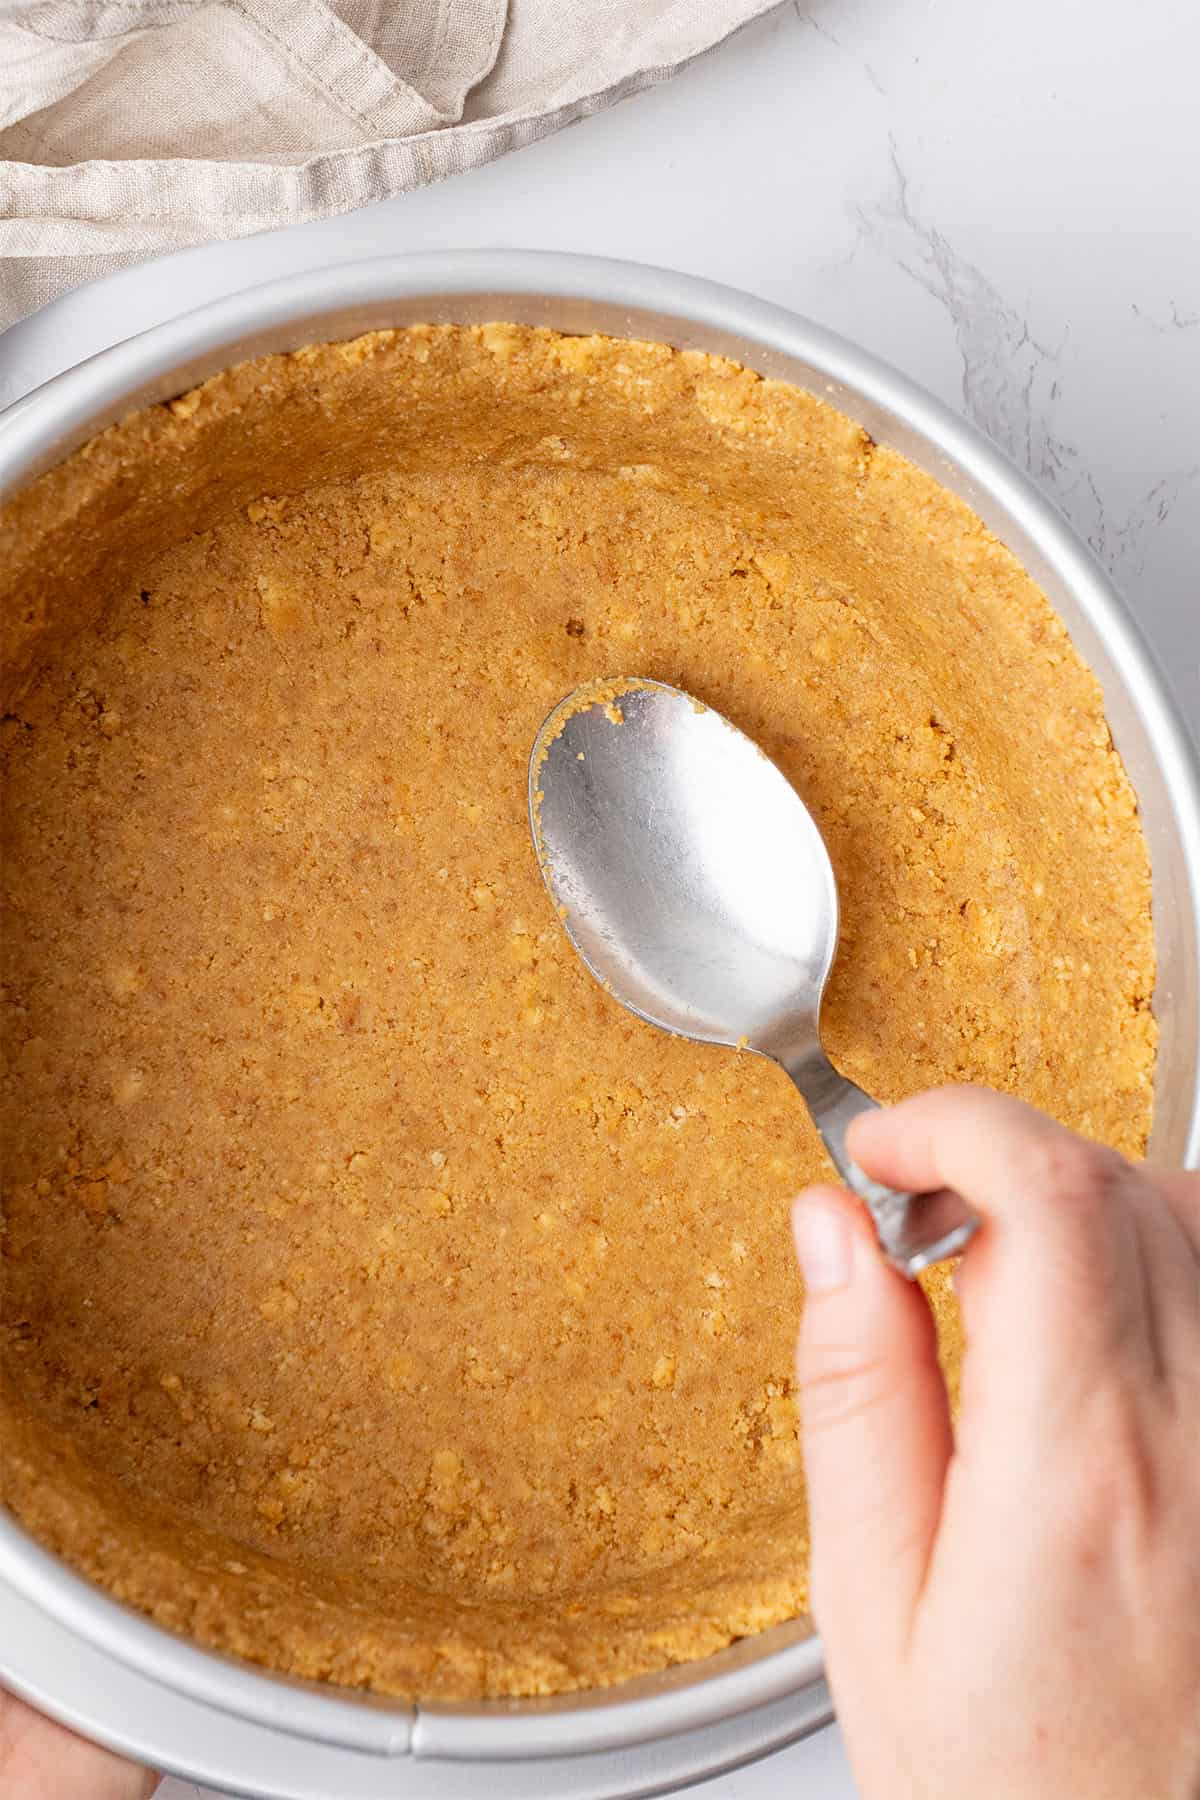
But my preferred method is to use a metal spoon with a bent handle. It allows you more control and to exert even pressure on the crumbs to press them together.
Ok, now let’s assemble the crust
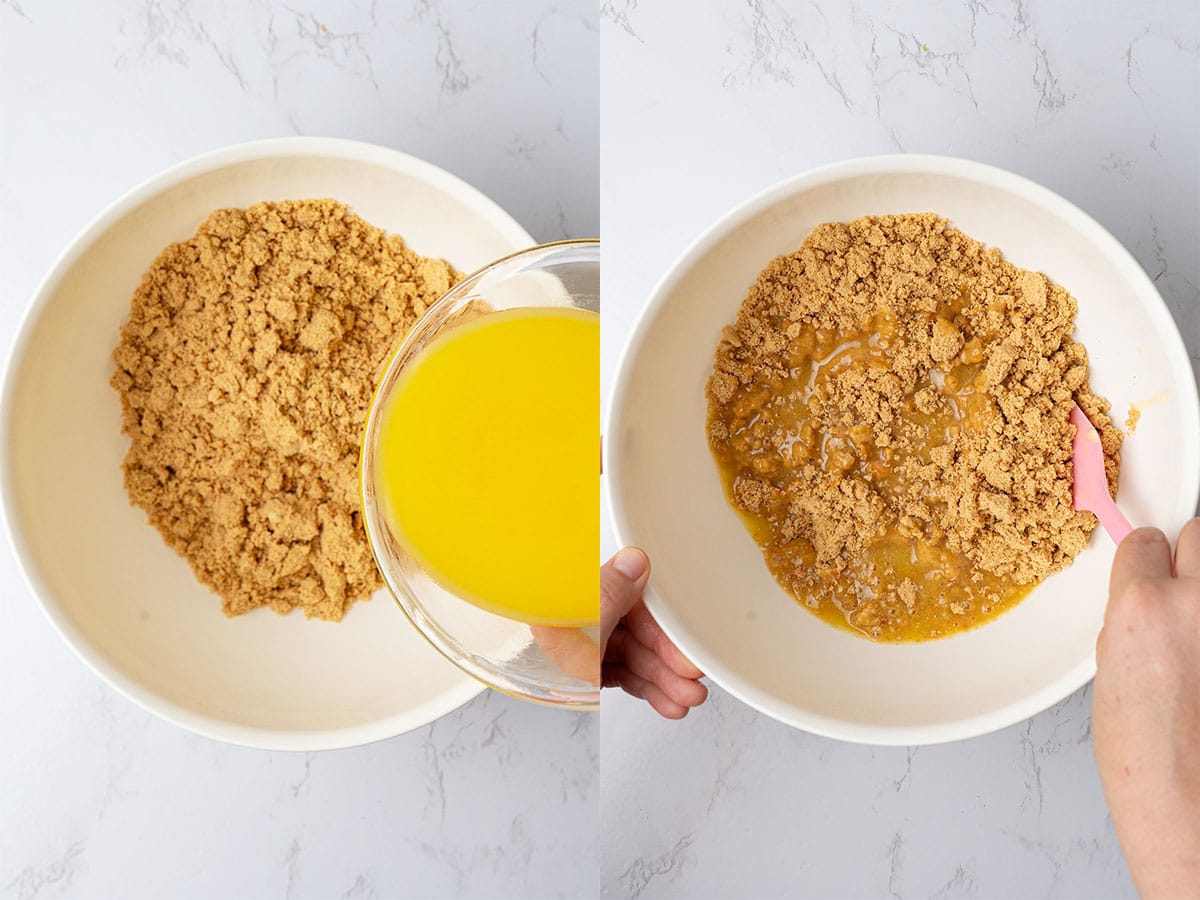
Weigh and melt the butter. You can do this in the microwave on medium strength in 20-30 second increments, or in a pan on the stove.
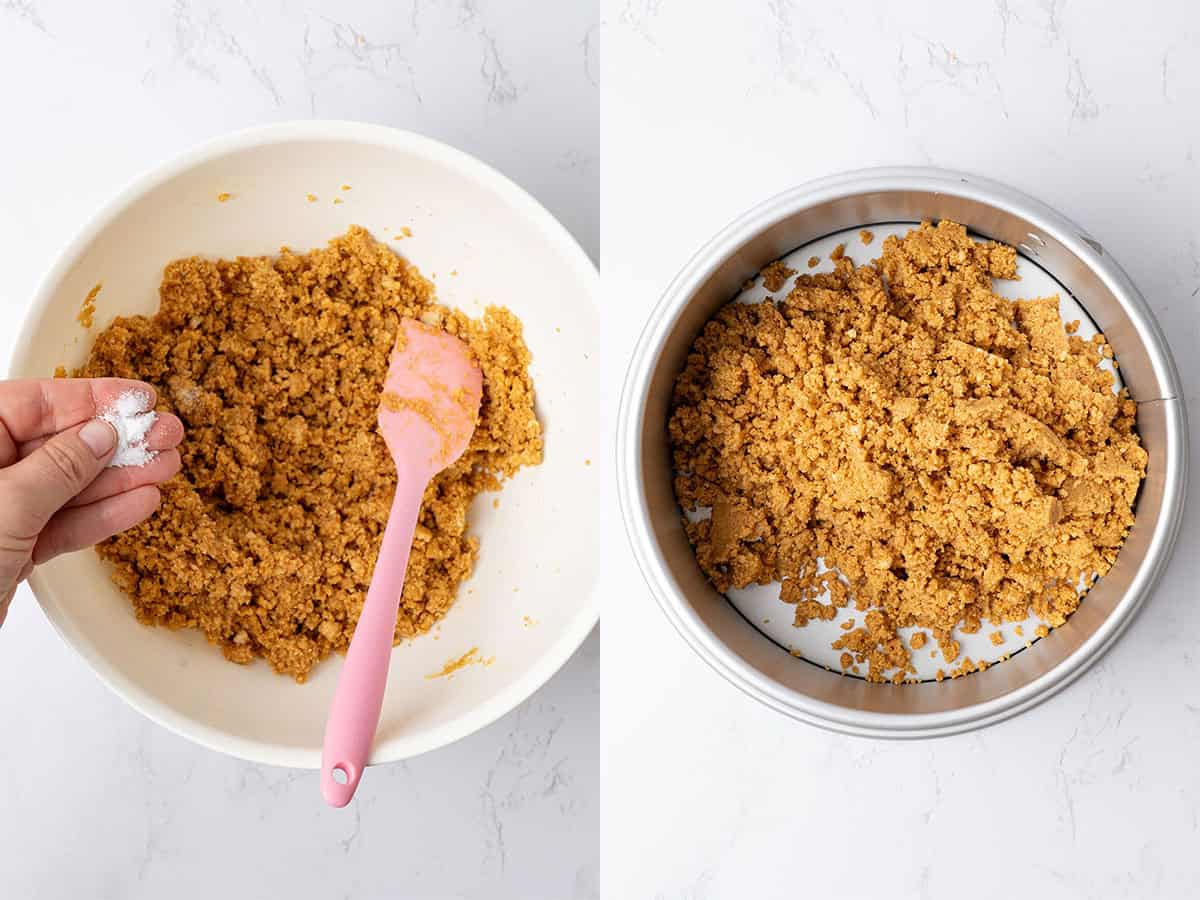
Let it cool slightly while preparing the Graham Crackers using one of the methods above and placing them into a mixing bowl with the salt. The butter needs to be liquid, but not hot, or it will be greasy.
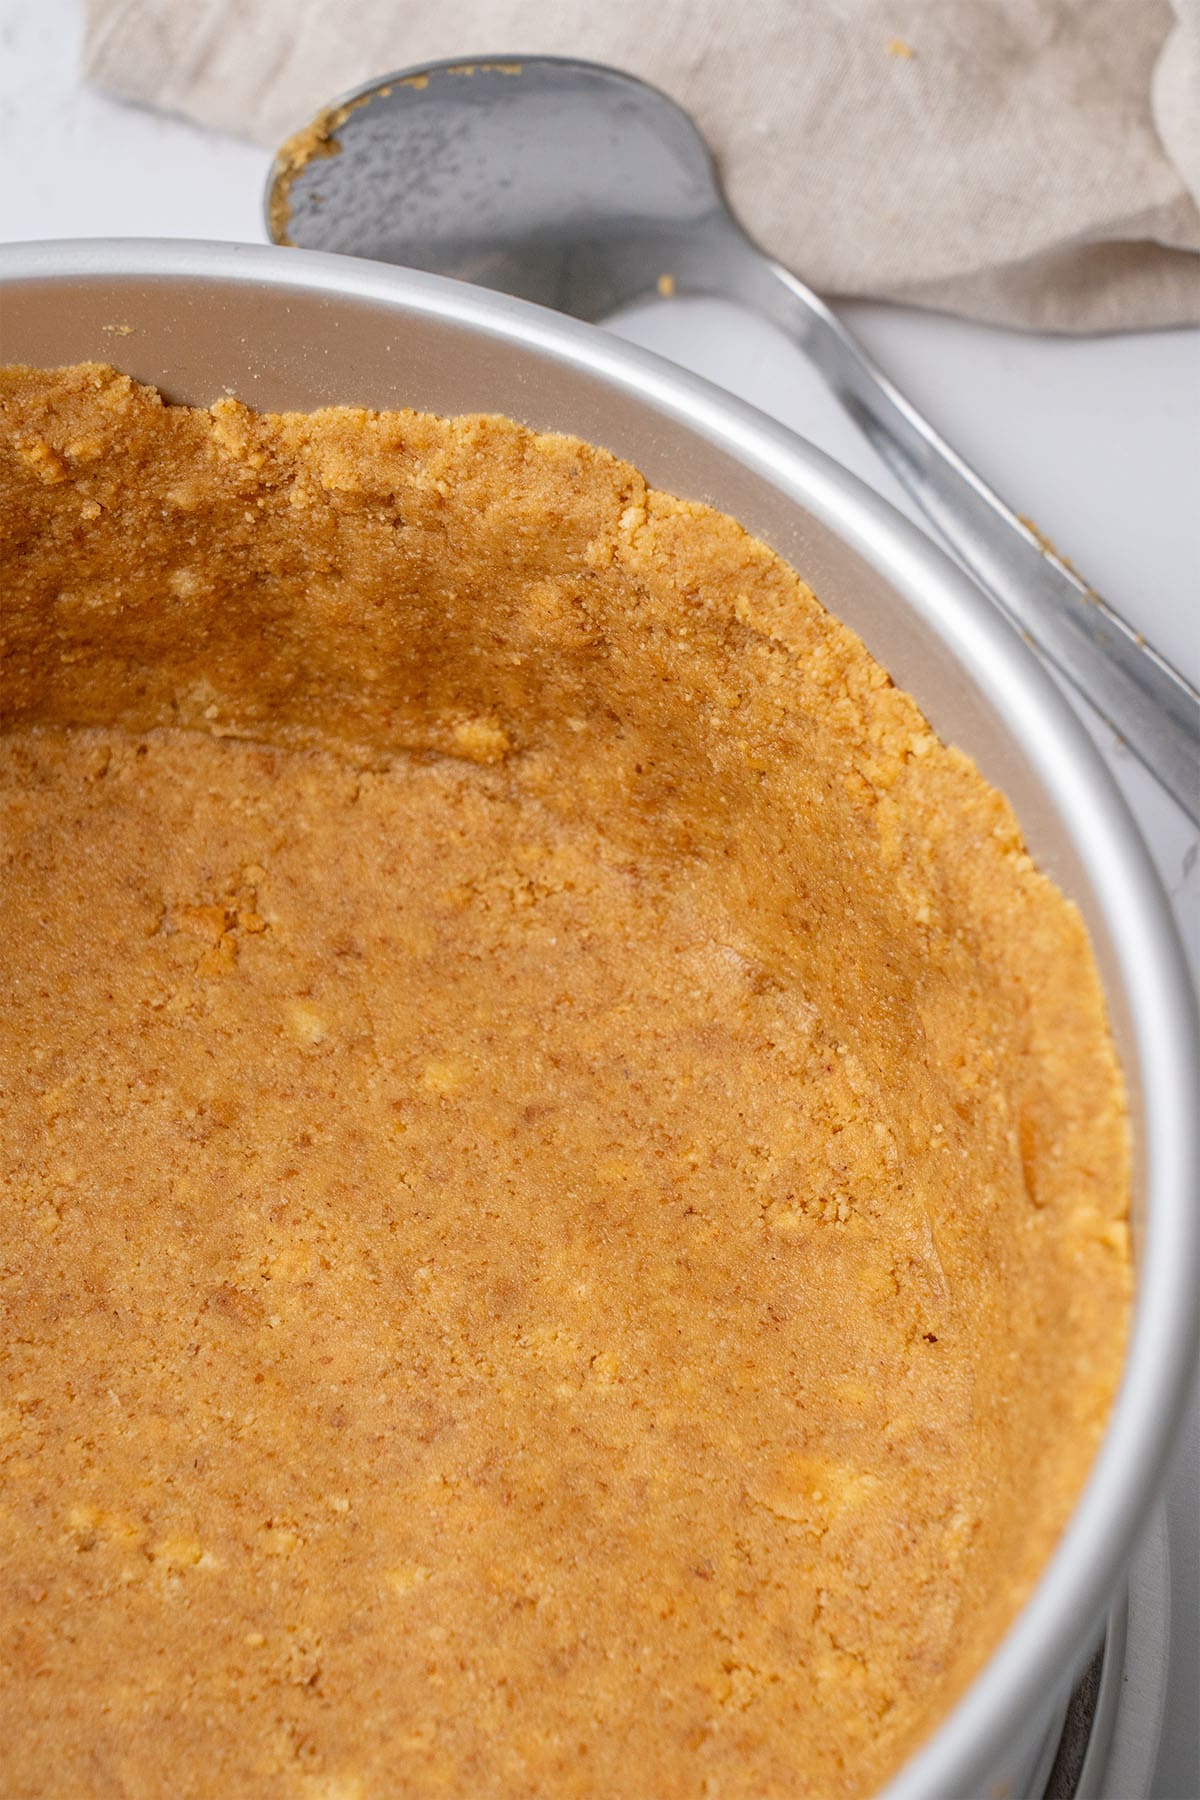
Pour the melted butter over the cracker crumbs while the butter is still runny. The mixture should have the consistency of wet sand, but if it feels too runny once the ingredients are combined, do not be tempted to add more Graham Cracker crumbs. Put it into the fridge for 5 minutes, and it will begin to set very quickly into a consistency that's more workable.
Now press the butter crumb mixture firmly and evenly into the pan in an even layer. Start with the sides and work your way around to make sure they are even, and then continue with the bottom/base of the cheesecake crust.
Let this easy Graham Cracker cheesecake crust cool down fast in the freezer so that the butter can harden and set before filling it as per your chosen recipe.
Do I need to bake Graham cracker cheesecake crust?
It isn't strictly necessary. You do not need to bake the crust if you are making a no-bake cheesecake, but it does need time in the fridge (or freezer) to set before you add the filling.
To use this crust for a baked cheesecake, I recommend chilling it while preheating the oven to 350 °F (175 °C) and then baking it for 8-10 minutes. Chill it again before pouring in the cheesecake filling and baking the whole thing.
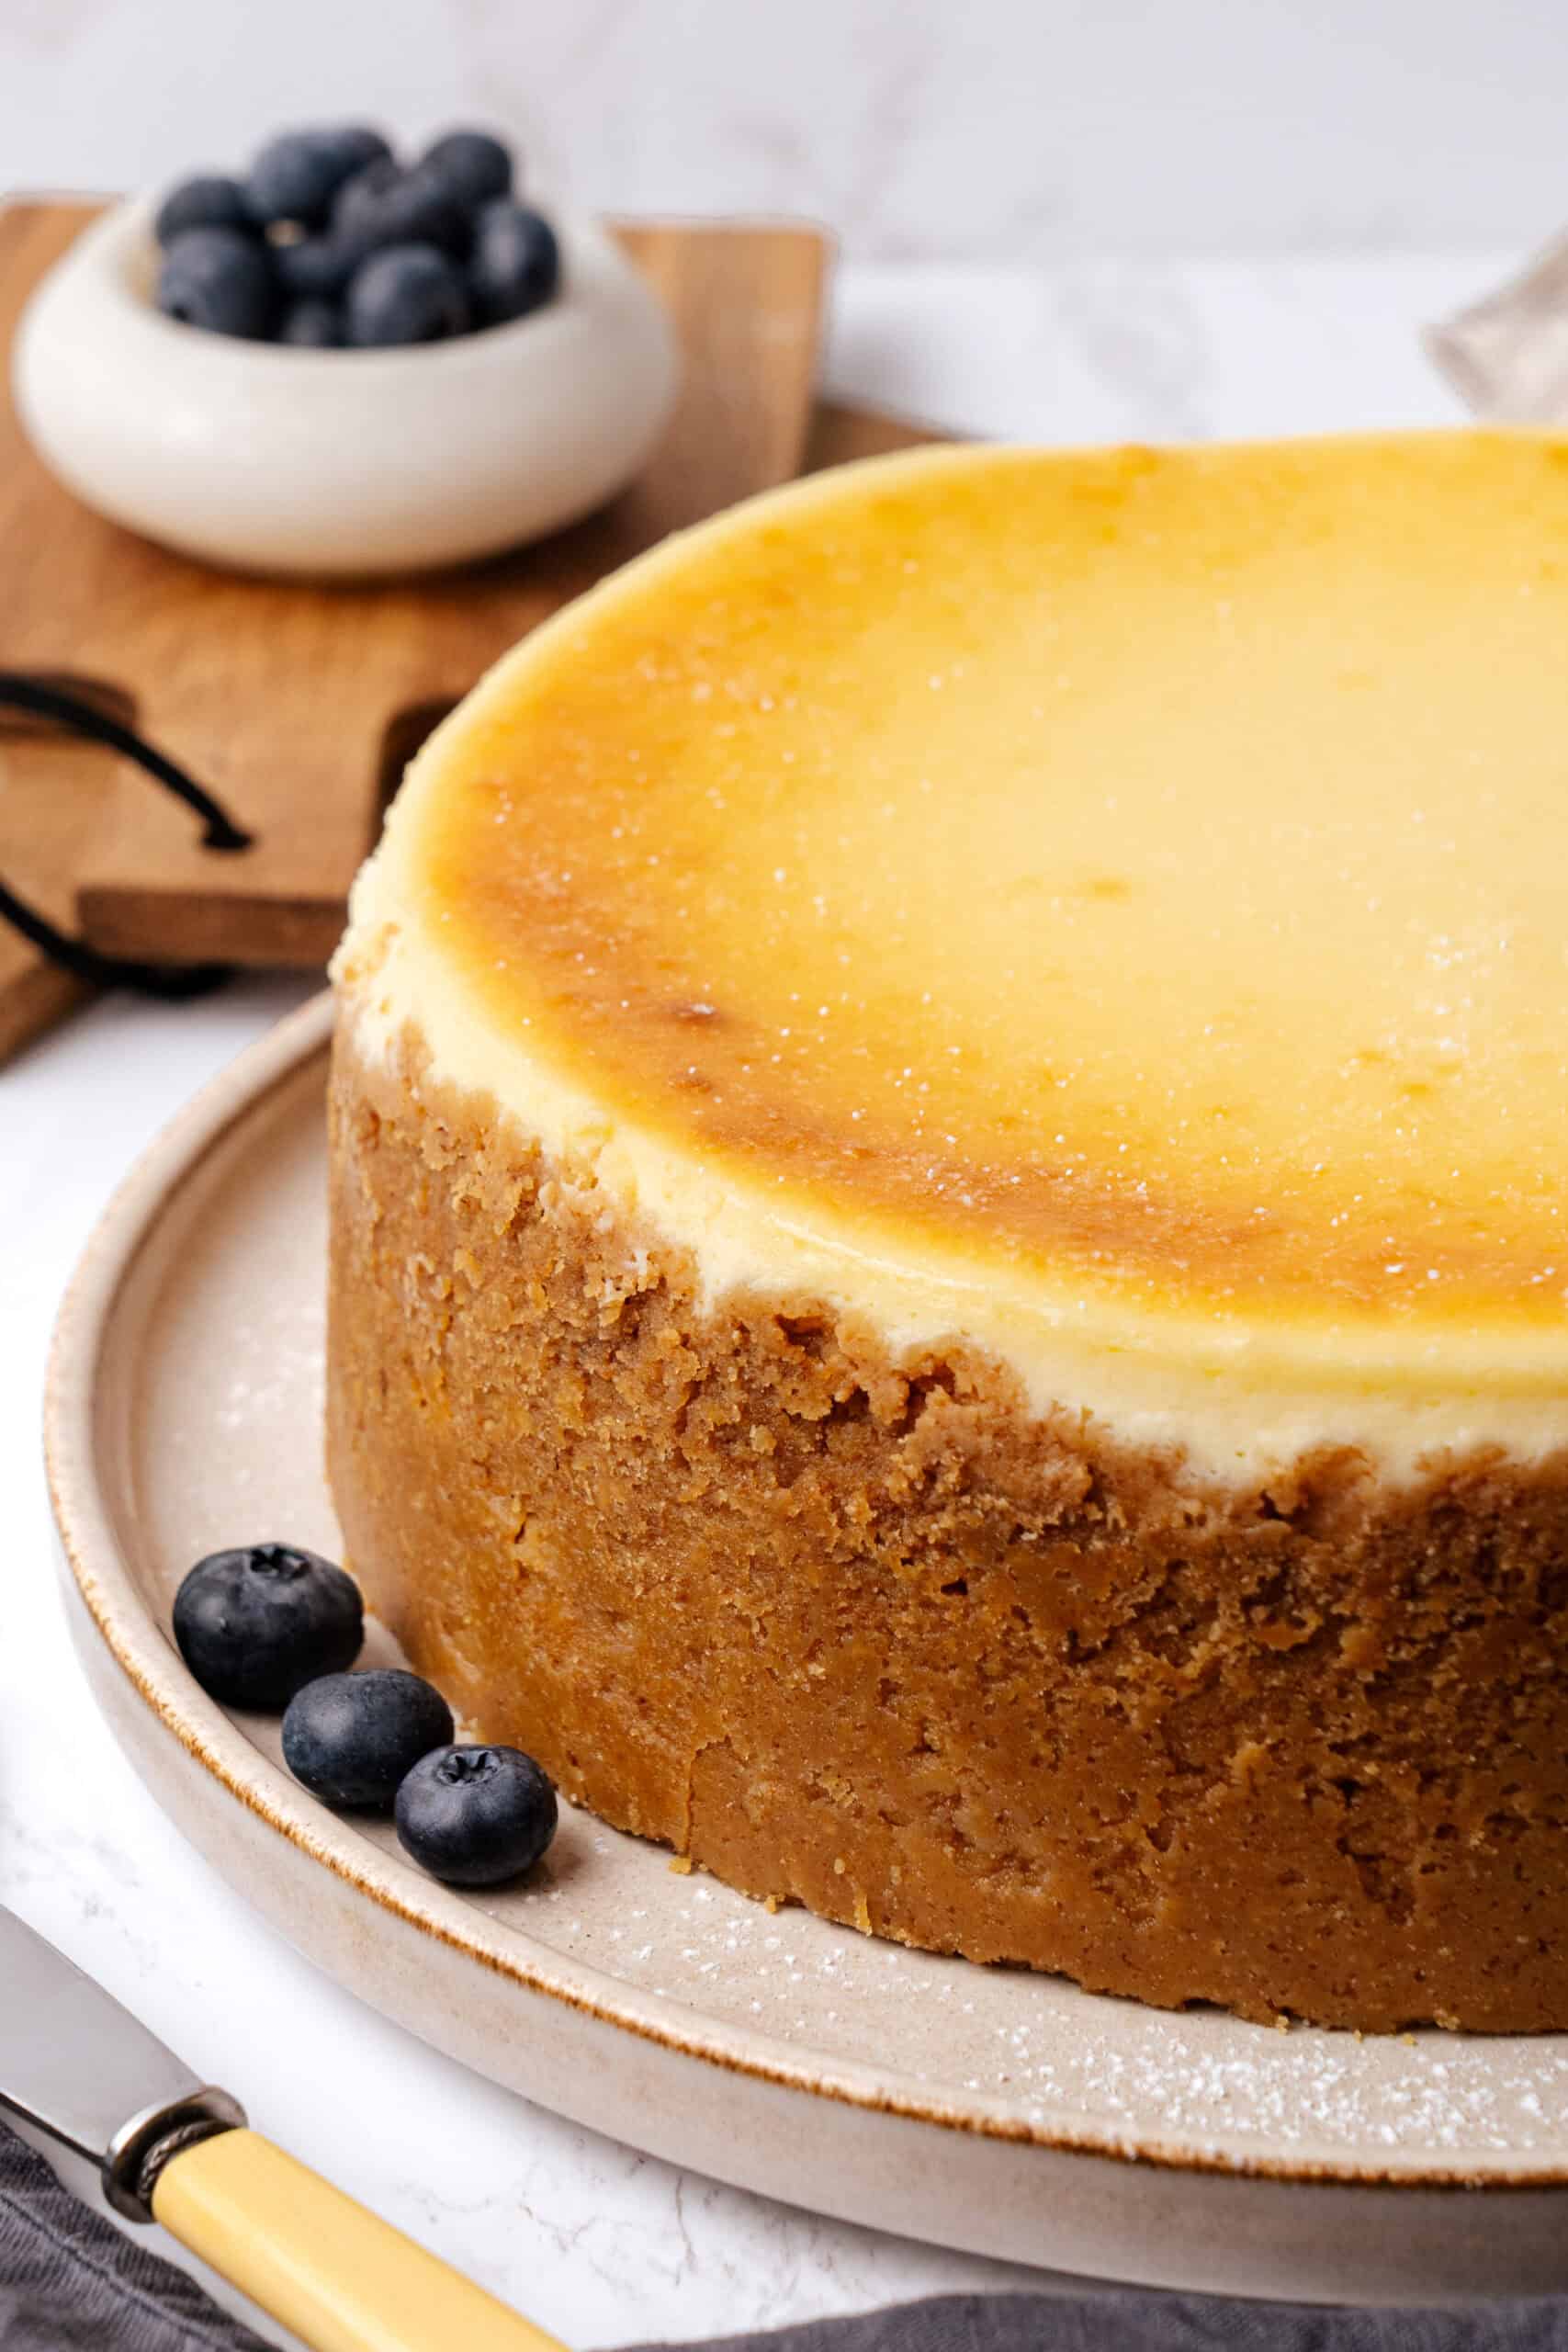
Here is one of my no-bake cheesecakes using the Graham cracker cheesecake crust:
Troubleshooting
Here are some common cheesecake crust problems I have seen, and how to fix them!
The crust was too crumbly and didn't hold together: This sounds as though you didn't have enough butter or you used too many crackers. Check the weight of your ingredients (don't just go by the number of boxes) and also ensure you are using a fat that hardens in the fridge, such as butter. It may also be that the crumbs weren’t finely ground enough.
The crust was too hard and difficult to cut: This should not happen with my recipe, as we do not add extra sugar, which can crystallize with the butter and become hard. It's possible that you blitzed the crumbs too much and compacted them too much in the pan.
The crust burns while baking: Ensure the crust is an even thickness, especially at the top edges. If it is too thin at the top, it will burn more easily in the oven.
The crust gets soggy: This is more likely to be due to your filling being too watery. It's crucial to use high-quality, full-fat cream cheese. I use Philadelphia in all my cheesecake recipes.
Can I use the same recipe to make Graham cracker pie crust?
Yes, of course! However, the quantities for a standard pie crust with Graham crackers will differ. You will need around half the amount of butter and crackers listed in this recipe. Or, make two pie crusts.
Storage & Freezing
Store Graham cracker cheesecake crust covered tightly or in an airtight container in the fridge for up to three days before filling.
Alternatively, you can easily make ahead and freeze the cheesecake crust. Double wrap it in plastic wrap and then aluminum foil to prevent freezer burn and use within one month.

Flavor variations
Now that you have mastered the best Graham cracker cheesecake crust recipe, you can experiment with it to suit your taste.
Why not add spices like ground cinnamon, cardamom, and vanilla bean paste? In the Fall, try adding some pumpkin spice.
You can mix in some pretzels or any home-baked hard biscuit to give more texture as well as flavor. Why not try adding chopped nuts or even sesame seeds?
My raspberry cheesecake crust is made with the addition of freeze-dried raspberries that add both color and flavor. The possibilities are endless! You could add dried cranberries during the holidays to give a really festive twist.
Give the crust some amazing nutty depth by using brown butter. To do this, melt a slightly larger quantity of butter in a pan on the stovetop and continue cooking until the butter solids turn a golden brown color. Since some of the water will evaporate, you will need to weigh it after browning to ensure the correct quantity. You can then use it as directed in the recipe. Add a large pinch of salt to really bring out that flavor and contrast with the caramel undertones.
Ingredient substitution options
There are only two ingredients in this Graham cracker cheesecake crust recipe, but you still have options! It definitely works with vegan butter; however, the ratio might need to be changed.
It is essential to select a fat that solidifies when refrigerated. Most oils won't work, but coconut oil is an exception because it hardens and remains solid at room temperature. It is worth noting that this will actually harden more than butter in the fridge, due to its lack of water content. This can make the crust a bit dry and crumbly, so you'll need slightly less coconut oil vs. butter.
When it comes to substituting Graham crackers, either Digestive biscuits or Nilla wafers are similar options. You can also swap the crackers for other cookies. Check out my no-bake Biscoff cheesecake and my no-bake Oreo cheesecake for more inspiration!
However, the fat content of the cookie needs to be taken into consideration, so I do recommend making it with Graham crackers first to see how it feels before making swaps.
You will only need a few bits of useful equipment
Always weigh ingredients by the gram using a digital scale for best results. Use a rolling pin or food processor to crush the Graham Crackers.
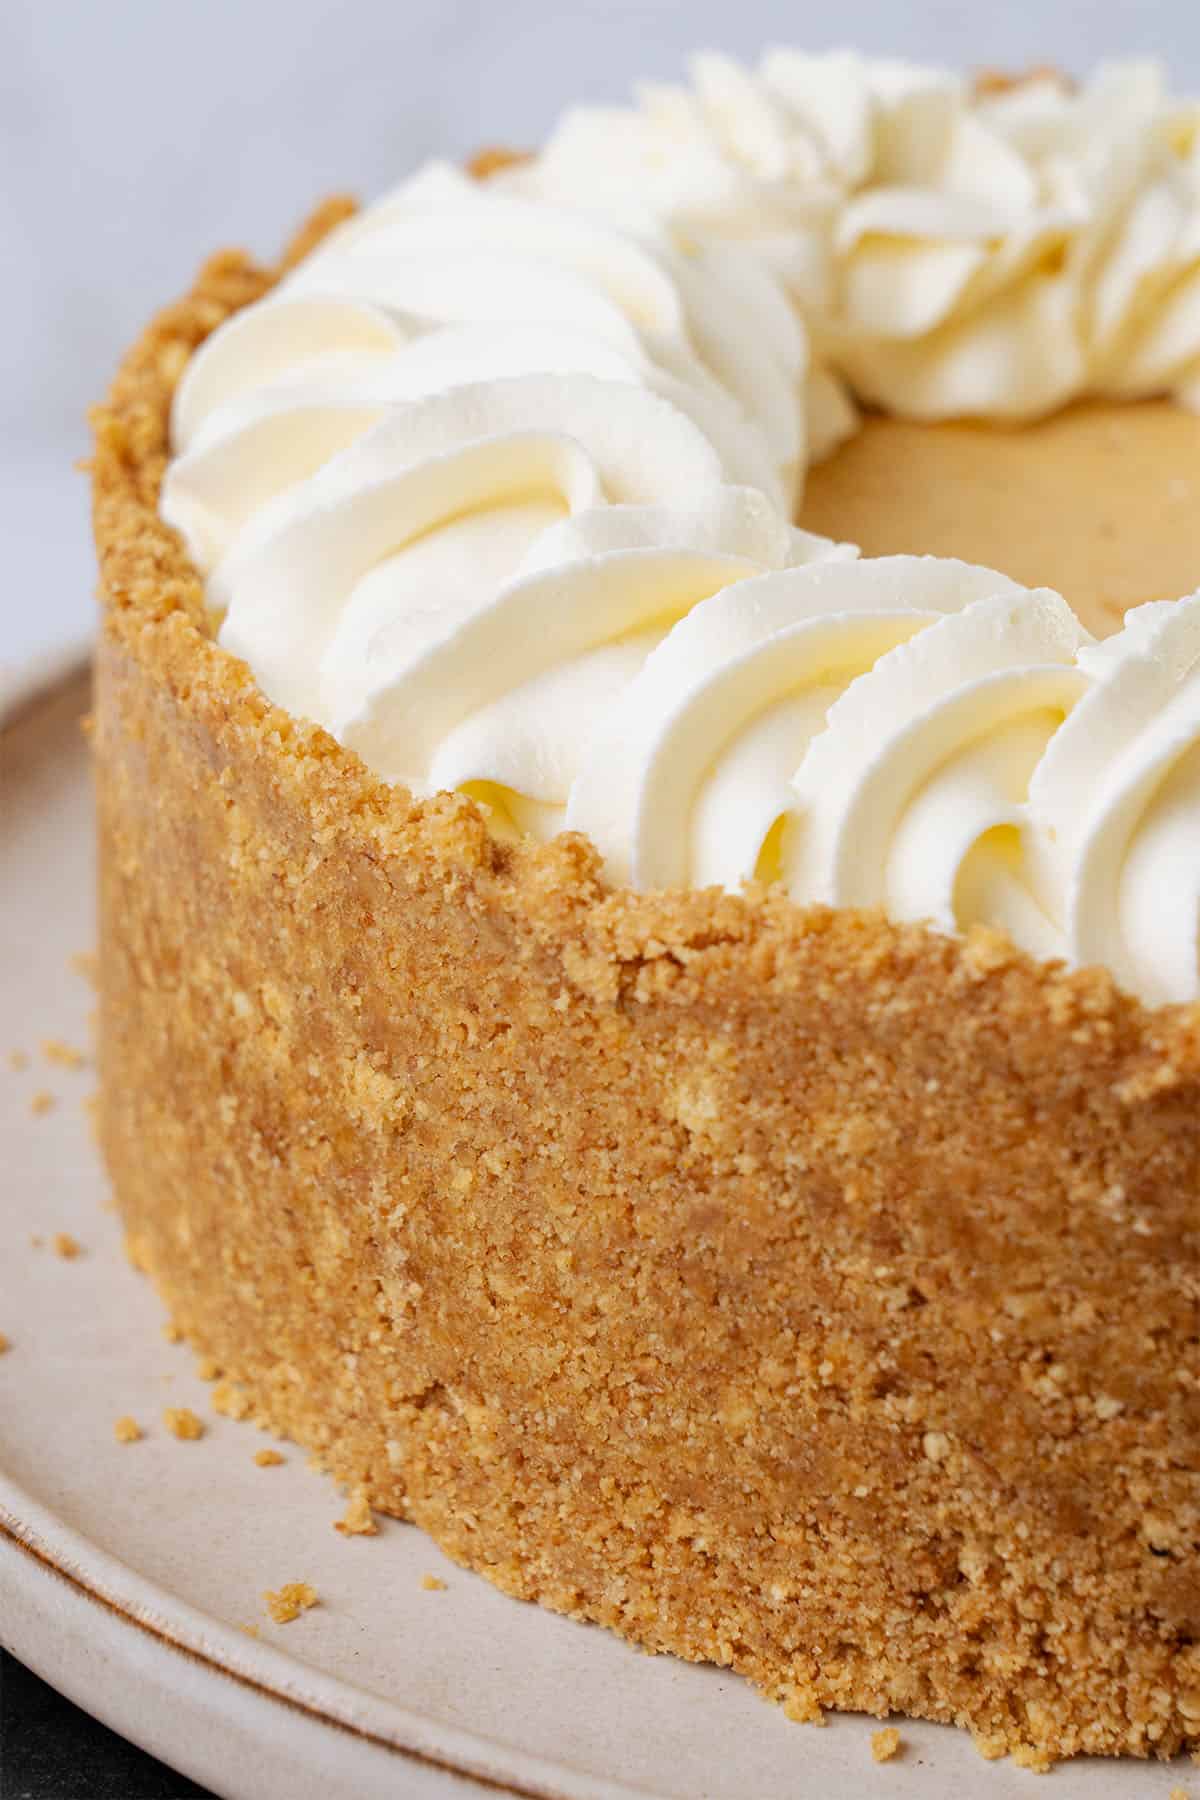
I make all my cheesecakes in an 8-inch pan, and it is important to use the right pan. It will work in a 9-inch pan, too, but I prefer the 8-inch pan because the cheesecakes look taller and slightly more elegant, in my view. Nevertheless, it has to be spring form, otherwise you can't get the cheesecake out!
I also use this pan for its straight sides, as it gives you a nice, clean, and strong corner with the base of the pan. This structure will better support a delicious, thick filling!
Expert tips
- Take your time pressing the mixture into the pan, ensuring it's evenly and compactly packed. It can take 10 minutes, but it's well worth it!
- Press, don't pound the crumb mixture into the pan!
- This is a two-ingredient recipe, but a nice pinch of salt is actually recommended. It balances the sweetness of the crust.
- Chilling time is necessary for the butter in the crust to set, resulting in a crunchy yet firm crust that holds the filling. Use the freezer if you are in a hurry!
- You can create a delicious barrier for especially wet fillings by brushing melted chocolate over the crust, freezing for 10 minutes, and then filling.
- Cut cheesecakes like a pro by running a sharp knife under the hot tap briefly before drying and using it to cut nice, clean slices.
How to use this Graham cracker cheesecake crust
You've made the crust; now it's time to make a Graham Cracker crust cheesecake or Graham Cracker crust pie! Use your delicious crust with one of these recipes:
- No-bake raspberry cheesecake
- No-bake peanut butter pie
- No-bake Oreo cheesecake
- No-bake apple pie
- Pistachio cheesecake
- No-bake Biscoff cheesecake
- No-bake chocolate pie
- No-bake strawberry cheesecake
- No-bake pumpkin pie
- No-bake pumpkin cheesecake
Have you tried this recipe?
Please consider leaving a 5-star ⭐️⭐️⭐️⭐️⭐️ rating on the recipe card and consider leaving a comment as well!
Graham Cracker Cheesecake Crust
Ingredients
Graham Cracker Cheesecake Crust
- 300 g (2½ cups) Graham Cracker Crumbs 300 g = 10.5 oz = approx. 20 sleves
- 120 g (½ cups) Unsalted butter
- Pinch of salt
US customary cup measurement is an indicative figure only. Measure the ingredients with a digital scale by weight (gram). Baking is art but also science which requires precision and accuracy.
Instructions
- Melt the butter gently in the microwave or on the stove until fully liquid, then set it aside to cool slightly.
- Biscuit/cookie crumbs can be made in a food processor or by placing the crackers into a zip bag and using a rolling pin to crush them. Crush the graham crackers into fine crumbs using one of these two methods.
- Mix a pinch of salt into the biscuit crumbs, then pour the melted butter over the crumbs and stir until the mixture looks evenly moistened and resembles wet sand.
- Pour the mixture into an ungreased 8-inch or 9-inch pringform pan. Begin pressing it into place starting from the sides, working the crumbs up gently with the back of a bent spoon or the bottom of a straight-sided small measuring cup. Once the sides are even, press the rest across the bottom of the pan. Apply firm, even pressure without over-packing, so the crust holds together but doesn’t become too hard. Once the crust is evenly distributed, place it into the freezer or fridge to chill while preparing your filling of choice.
- For baked cheesecake: Bake the crust in a preheated 350°F (175°C) oven for 8–10 minutes, until lightly golden and set. Remove it from the oven and let the crust cool completely in the pan before pouring in the cheesecake batter.
- For no bake cheesecake: Chill the crust in the refrigerator for at least 30 minutes, or in the freezer for 15 minutes, until firm before adding the cheesecake filling.
- Storage in the fridge: Cover the pan tightly with plastic wrap or aluminum foil and keep the crust in the refrigerator for up to 3 days before filling. This keeps it fresh and prevents it from drying out.Freezing: Once the crust is pressed into the pan, wrap the entire pan well in plastic wrap, then add a layer of aluminum foil to protect it from freezer burn and odors. Freeze the unfilled crust for up to 3 months. When ready to use, transfer it to the refrigerator and let it thaw overnight before adding the cheesecake filling.
Notes
- Measure your ingredients with a digital scale for accuracy.
- Do not skip the salt; it will balance the flavors.
- Use good quality 82% unsalted butter (European style).
- Feel fee to substitute Graham cracker with Digestive biscuits.
- The crust is sweet enough but for people with extra sweet tooth, feel free to add 1-2 tablespoons of granulated sugar to this recipe.
- Make sure you read my step-by-step instructions in the post above with all the details of how to make this cheesecake crust. A short recipe alone is not able to cover all the necessary details and science behind baking.
- Heat butter in the microwave on low power so it does not explode. Alternatively, use a saucepan on the stovetop.
- The butter should be fully runny so it mixes well with the crumbs, but not hot, otherwise it can make the mixture greasy.
- When processing graham crackers in a food processor, stop as soon as you have fine, sandy crumbs. If you overprocess, the crackers can release too much fat and turn pasty, almost like cookie butter.
- While preparing the crust, make sure that you press the crumbs firmly and evenly into the side and the bottom of your spring form.
- To avoid a crust that’s too hard, don’t over-pack the crumbs. Firm pressure is enough — pressing too tightly can make it difficult to cut clean slices later.
- Respect the chilling time. Chilling time is needed for the crust (butter) to set.
- Once you are a pro at making this cheesecake crust, feel free to experiment with flavorings e.g., adding cinnamon, roasted chopped hazelnuts, freeze-dried berries, or making it with browned butter etc.
Parichat Ch
This recipe is super helpful, you clearly explained of everything readers needed to know.Definitely will try this recipe and thank you so much for such a great blogs.
Kat
Hello! When adding nuts, how much do you recommend? I want to make this with macadamia nuts for a pineapple & roasted cherry cheesecake.
Thank you!
Katalin Nagy
Not more than 10%-20% of the biscuit, it should give enough taste but depends on the nut eg. nuts usually have better and stronger taste if roasted upfront. Also you might need to adjust the butter depending on the fat content of the nut.
Holly George
I would like to use your recipe as an apple crumble base. How would I do that? Do I put the crust in the fridge to set and then put my apples in and bake? Or do I put my apples on top right after I pat the crust into shape (ie. without setting the crust in the fridge). Your crust looks beautiful so I really hope it can work with my crumble!!
Kata
Hey , this is a no bake crust, I do not recommend to bake it.
Lynda
Hello Holly, better late than never. As this is succh an easy no-bake crumb, I would advise cooking your aples first (I also add pears). Once cooled and drained, they would make a wonderful filling.
What about the crumble, surely that need to be cooked?
There's an easy way round that too. Make a batch of all-butter shortbread. Cook, cool and then crush it as you did the crumb base but no need to add any firther butter. This can simply be sprinkled over your apples and served with whatever accompaniment you choose (cream, ice cream yoghurt etc)
Larisa Albulescu
Just love the final result!