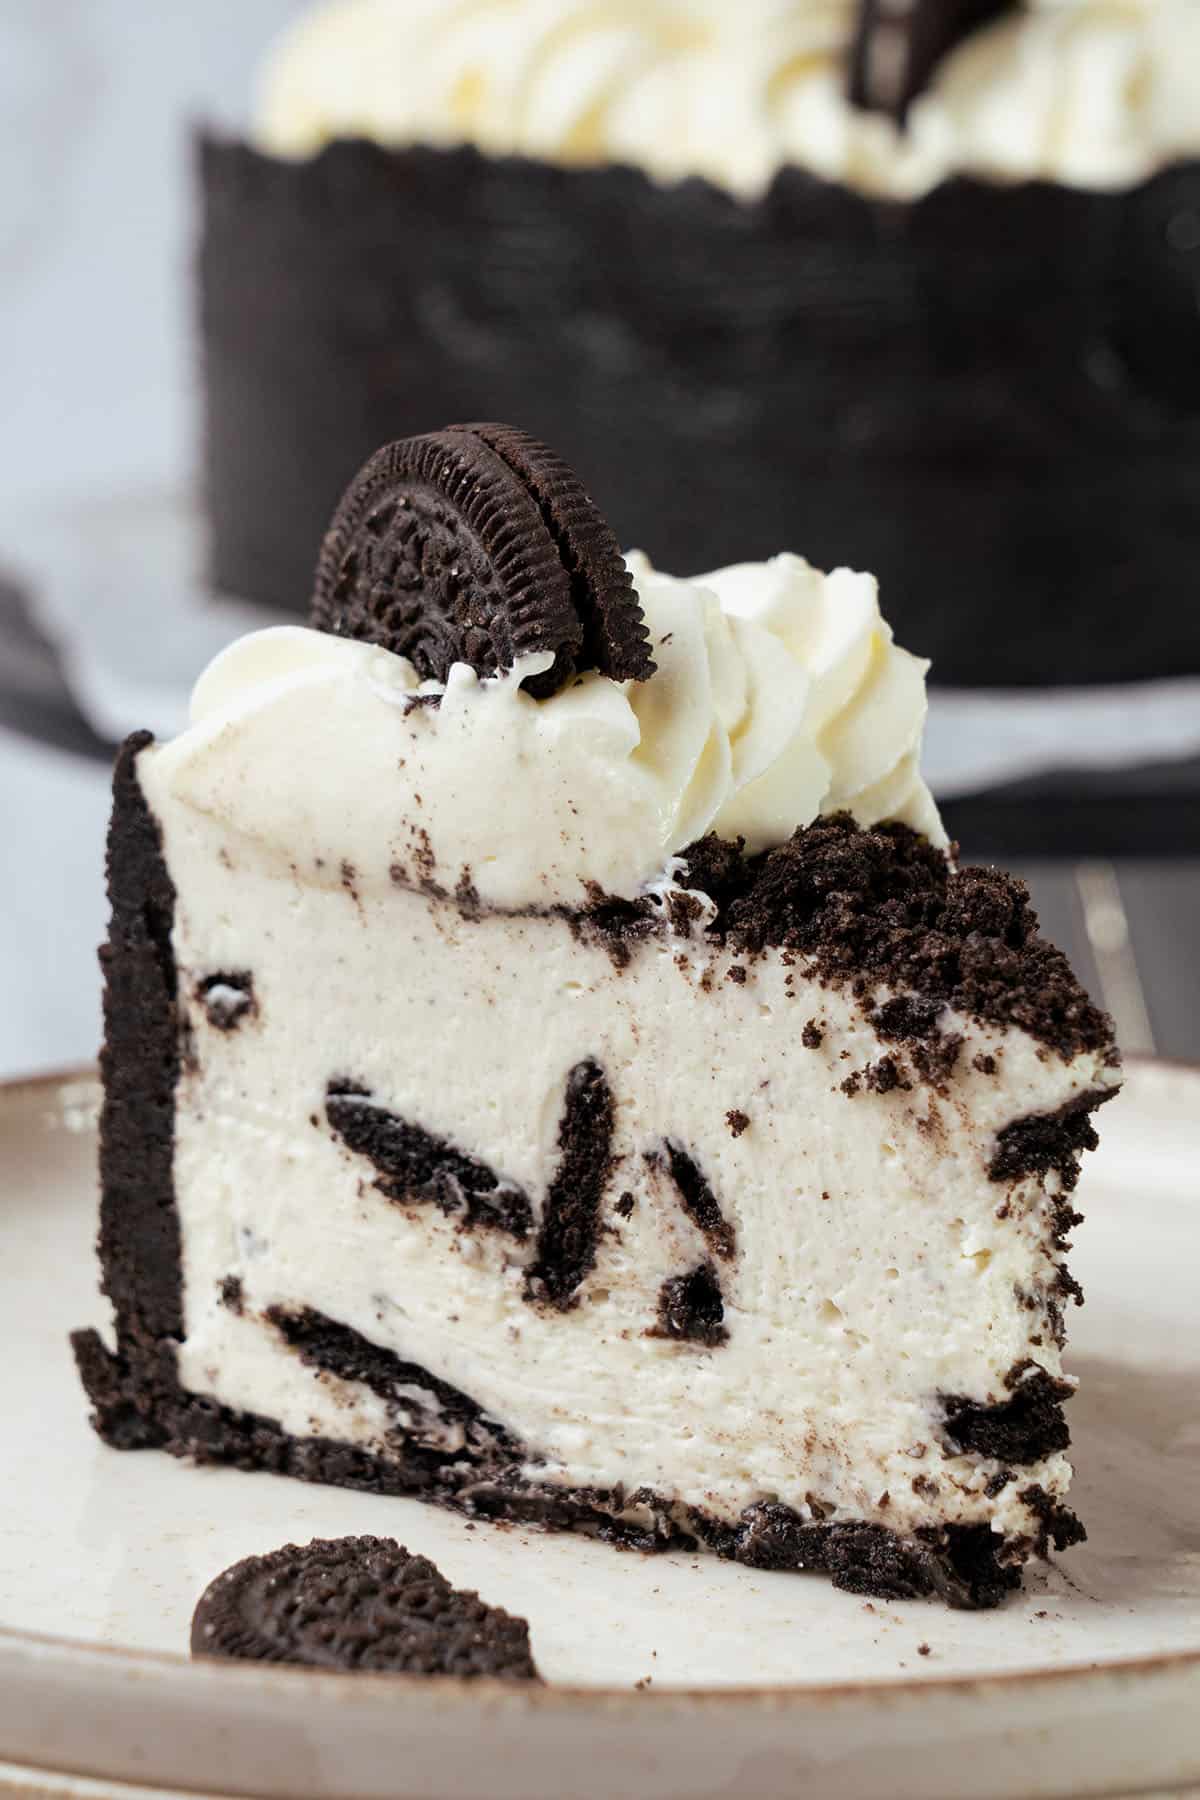
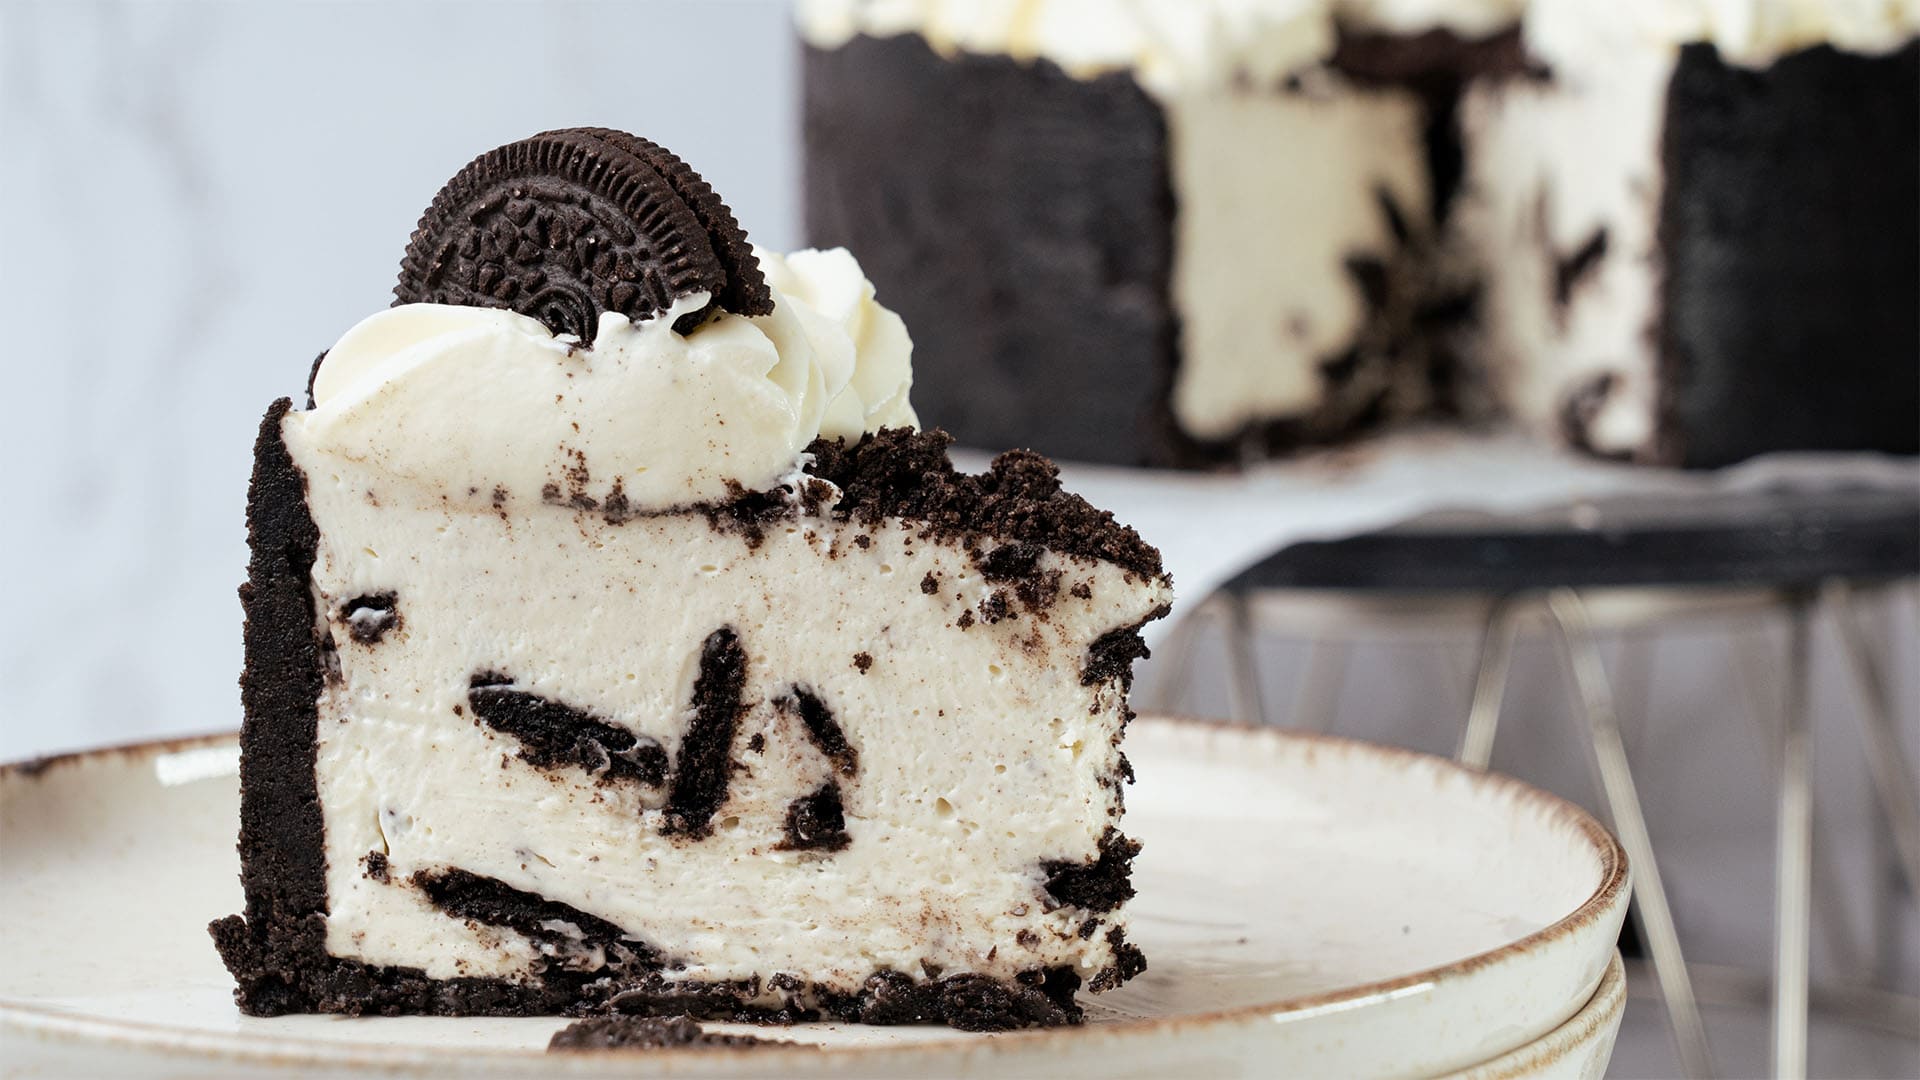
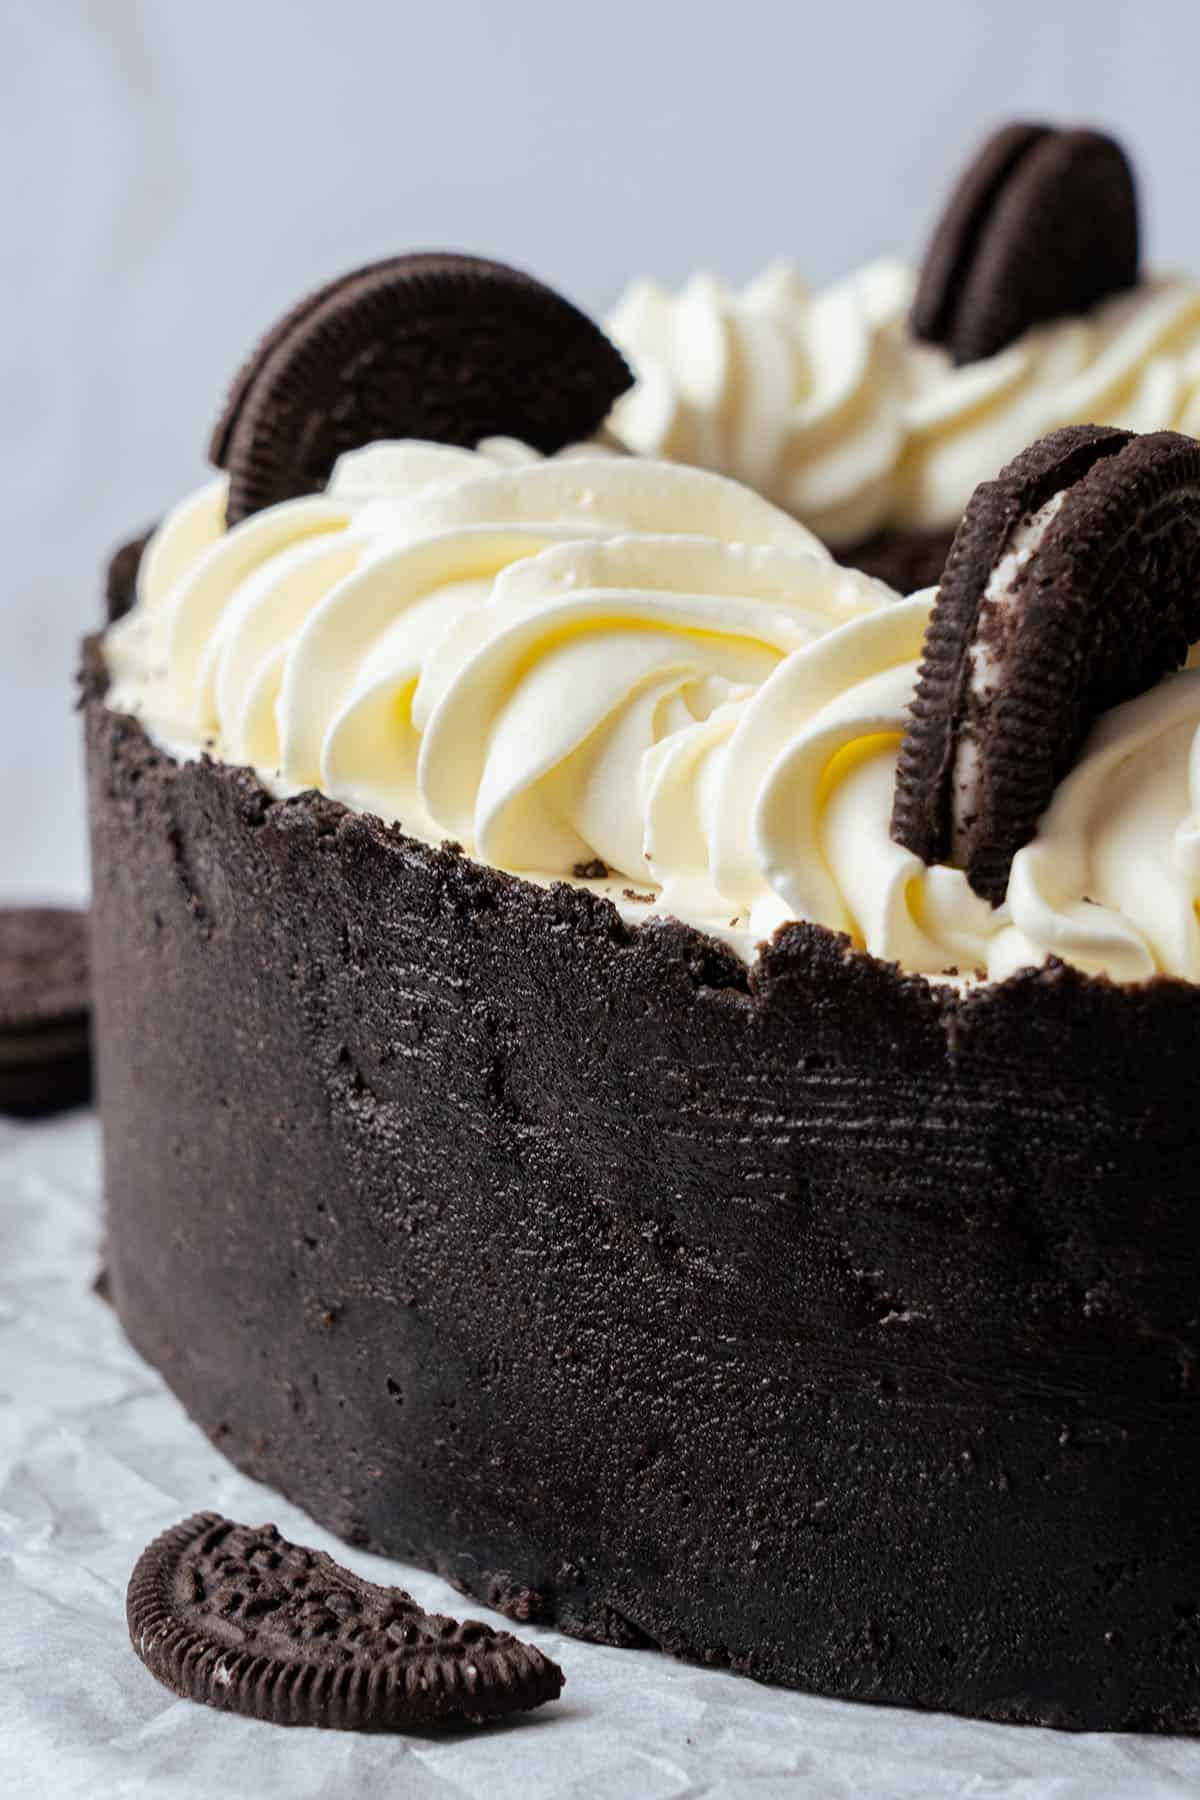
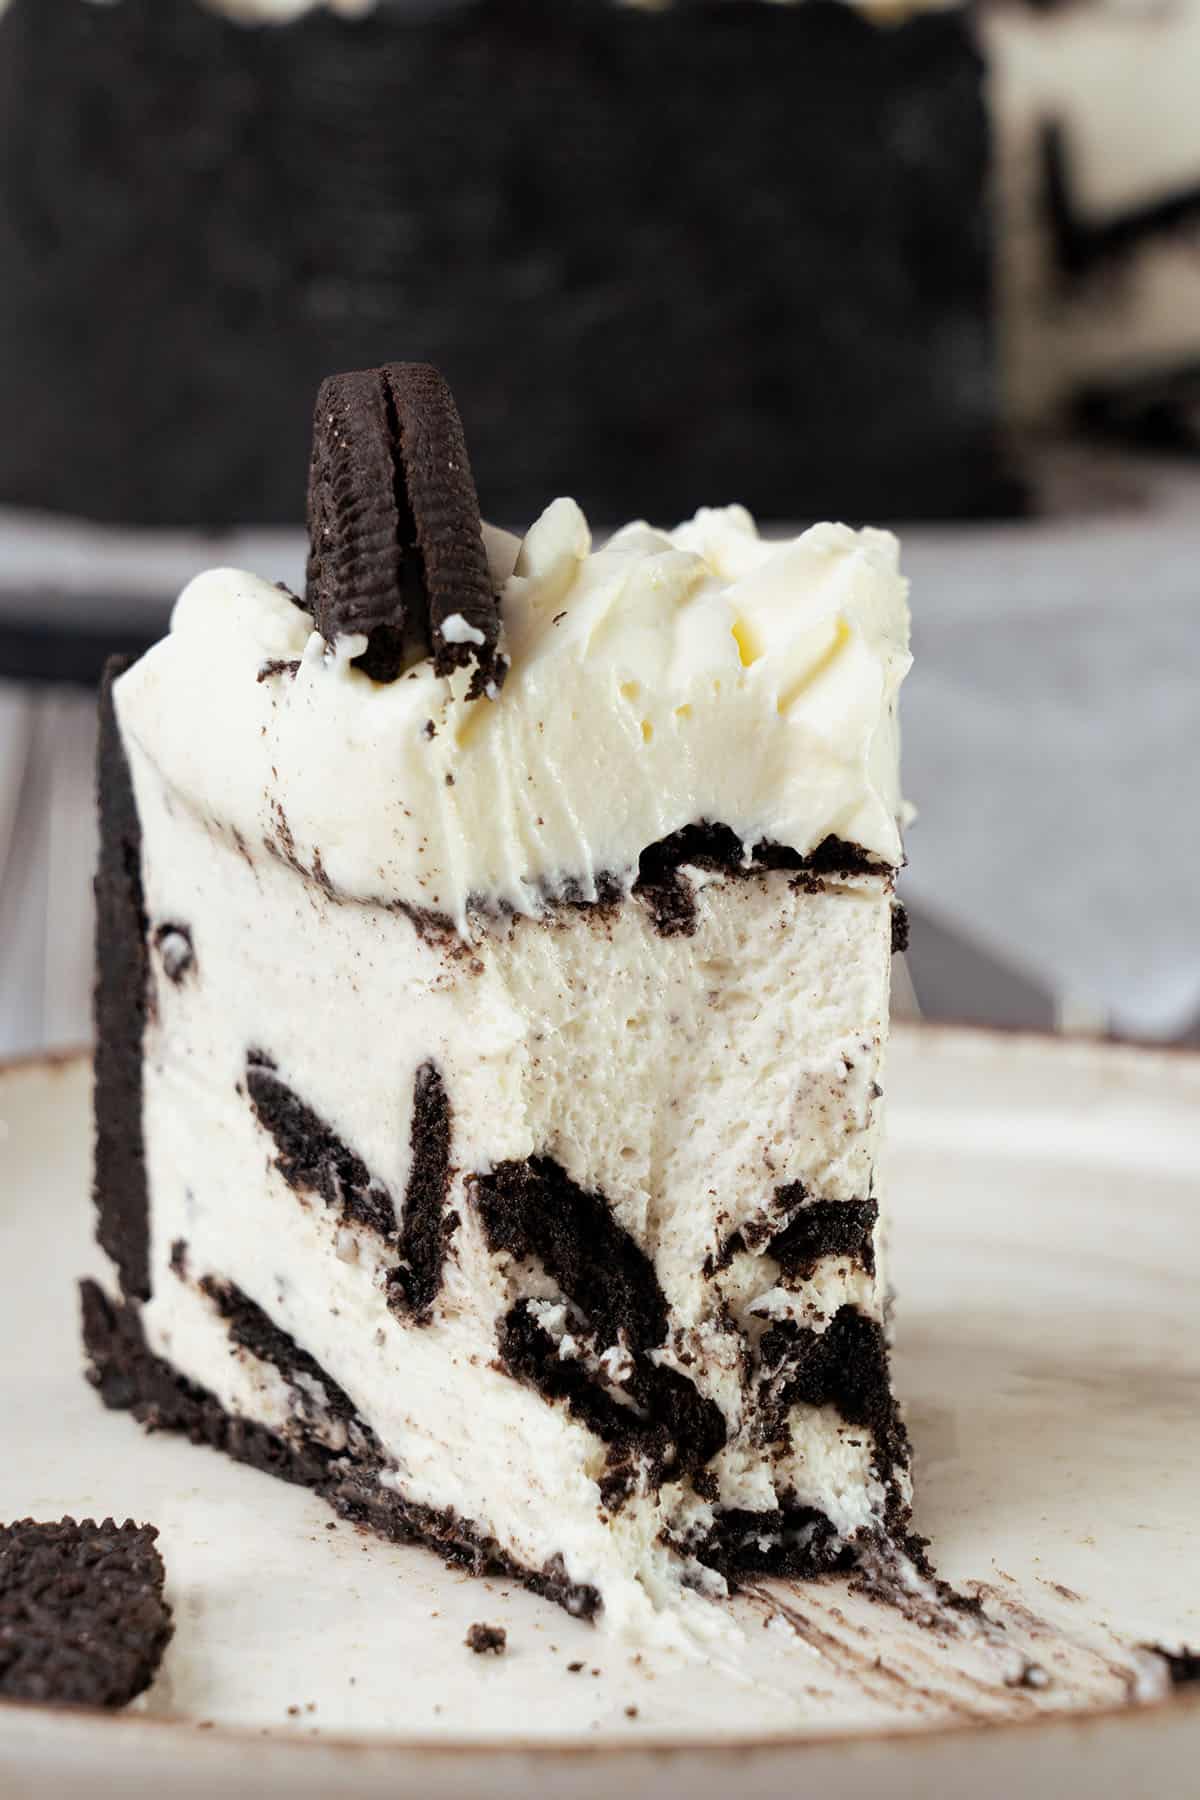
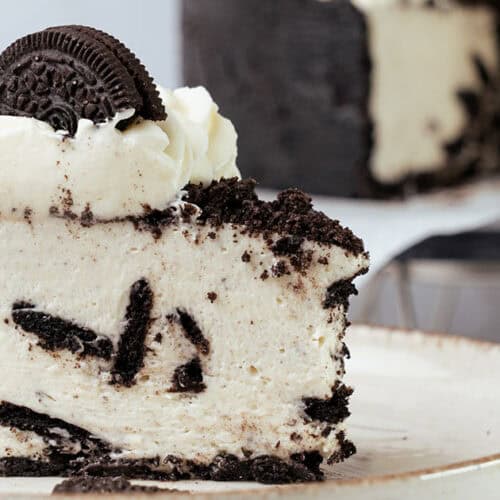
This easy no-bake Oreo cheesecake recipe is a must for Oreo and cheesecake lovers! A crunchy Oreo cookie crust filled with a silky, smooth, and rich cream cheese mousse loaded with Oreo pieces. It's super light and smooth with just the right amount of tang and sweetness.
This cake recipe was one of my first on the blog in 2020. Based on your request, I've now made it in a larger spring form pan, updated the photos, and added new expert tips based on your questions.
Read what others said about my No Bake Oreo Cheesecake recipe
"Great inspiration! I did exactly as she explained, and I made a delicious cake that my family loves." Maria
"Very easy to make if you follow the recipe and choose good ingredients. I made it to commemorate my son's birthday, and it was delicious! Thanks!" Gabriella
Best No-Bake Oreo Cheesecake Recipe
I love everything about this cheesecake. The texture, the flavor, how it looks, and most importantly, that it comes together in literally no time with zero effort!
You don't need any special equipment, and you don’t even have to turn the oven on, which is handy during warm summer months or at other times when your kitchen is busy (e.g., Thanksgiving!).
It's honestly the perfect dessert for so many occasions. Some recipes out there are far too sweet, but I add just the right amount of sugar to keep the flavors balanced. Kids and grown-ups adore it, it looks fancy but is actually very easy, and I've tested it multiple ways to give you all the best tips for perfect results every time.
Fun fact! I spent 8 years working for Mondelez, who produce the world's most famous cookie brand, Oreo, and the world's most famous cream cheese brand, Philadelphia! These two brands will always hold a special place in my heart, and I am proud to share my seriously epic No-bake Oreo cheesecake recipe.
Katalin’s key take on a no-bake cheesecake that's runny and not setting?
The most common problem home bakers encounter with no-bake cheesecakes is that they don't set properly. Baked cheesecakes, like New York cheesecake, contain egg and flour for structure and stability, but we use neither. Yet you can still achieve a perfectly formed slice! Here's how to avoid the common issues:
Firstly, your cream and your cream cheese both need to be high in fat. A high fat content is what allows it to set into a more solid consistency, so don't use low-fat versions. I use heavy cream with 36% fat, and full-fat Philadelphia. Low-quality cream cheeses often contain a high amount of water, which we want to avoid, as a watery consistency results in a runny cheesecake.
Secondly, the heavy cream needs to be very cold and whipped to the right consistency so that it retains its air and structure. If it's underwhipped, it's too slack, and if it's overwhipped, it will be too stiff and won't fold together properly with the cream cheese. We are aiming for early stiff peaks.
And finally, a no-bake cheesecake requires a significant amount of chilling time in the fridge to set. If you rush this step, your cheesecake will be runny. They really need 4–6 hours, or ideally overnight.
In addition to these points, many no-bake cheesecake recipes don’t use gelatin. However, if you prefer a taller cheesecake with clean slices (like this recipe, which is made in an 8-inch pan), I recommend adding gelatin. It also gives you extra insurance if you need to travel with the cheesecake (e.g., for a potluck), or it might be out of the fridge at an event. However, I'll provide you with some tips below if you'd like to make this no-bake Oreo cheesecake without gelatin.
Start with the Oreo cheesecake crust
What Oreos to use?
I use original Oreos in this recipe. You can experiment with different Oreo flavors if you like, but avoid the ones with double layers of cream filling.
Do I need to remove the cream filling?
No, do not remove the filling from Oreos to make a cheesecake crust. This recipe is formulated to include it, with the correct quantity of butter and salt to create the perfect flavor and texture.
How to make an Oreo cheesecake crust?
Melt the butter in the microwave on the low setting until runny, or use a saucepan on the stove.
Blend whole Oreos into a cookie crumb in a food processor or by placing them in a ziplock bag and hitting with a rolling pin. They need to be fine, even crumb, but not blended into a paste.
Stir the melted but not hot butter and a pinch of salt into the Oreo crumbs until you have an even consistency.
Now make your Oreo cheesecake crust by pouring the buttery Oreo crumbs into your springform cake pan and pressing them into the base and sides. I find it helps to start with the sides and then work on the base. Press firmly, and pay special attention to the corners. This can take up to 10-15 minutes to get a really smooth and even crust, and you can use a flat-bottomed mug or glass to help you. But I actually use a spoon with a bent handle!
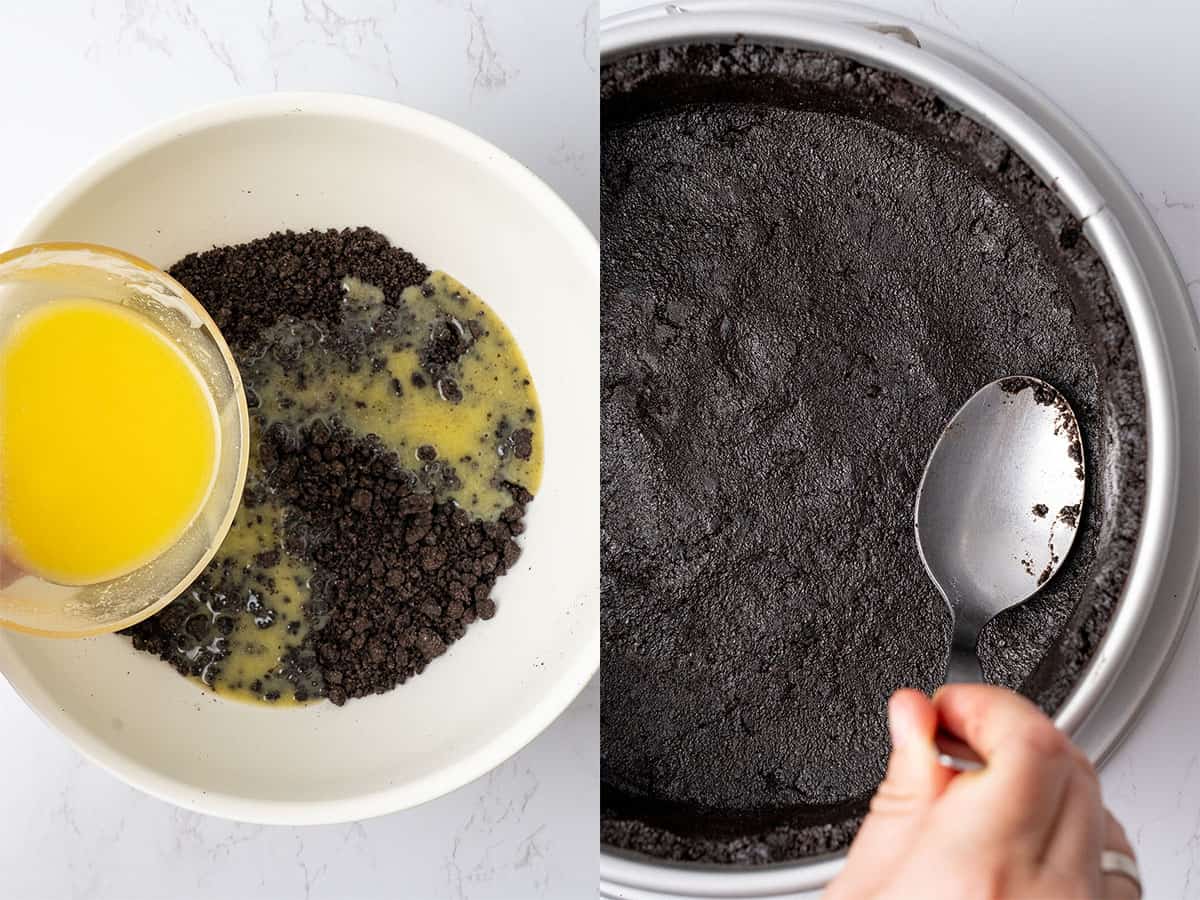
Place your Oreo cheesecake crust in the freezer and let it set while you prepare the filling. Don't skip this part, as it needs to set before you fill it.
Make sure you read my in-depth tutorial on making the best cheesecake crust for even more tips and tricks, and I have another guide on making Oreo crust in particular.
Prepare the cheesecake filling
Soak the gelatin sheets in a bowl of cold water until they become soft (this takes approximately 5 minutes). Read my guide on gelatin to learn more about how to swap gelatin sheets with powder.
Place the smaller amount of cream into a saucepan with the sugar and lemon juice and warm over medium heat until it just starts to simmer. Stir to make sure the sugar dissolves, and then turn off the heat.
Squeeze the gelatin to remove excess water and then whisk it into the hot cream until it is fully dissolved and no lumpy or gloopy bits remain. If some of it doesn't melt, place the saucepan back over gentle heat briefly while whisking until it does, but do not boil it. Now, let the mixture cool to room temperature while you prepare the rest of the ingredients.
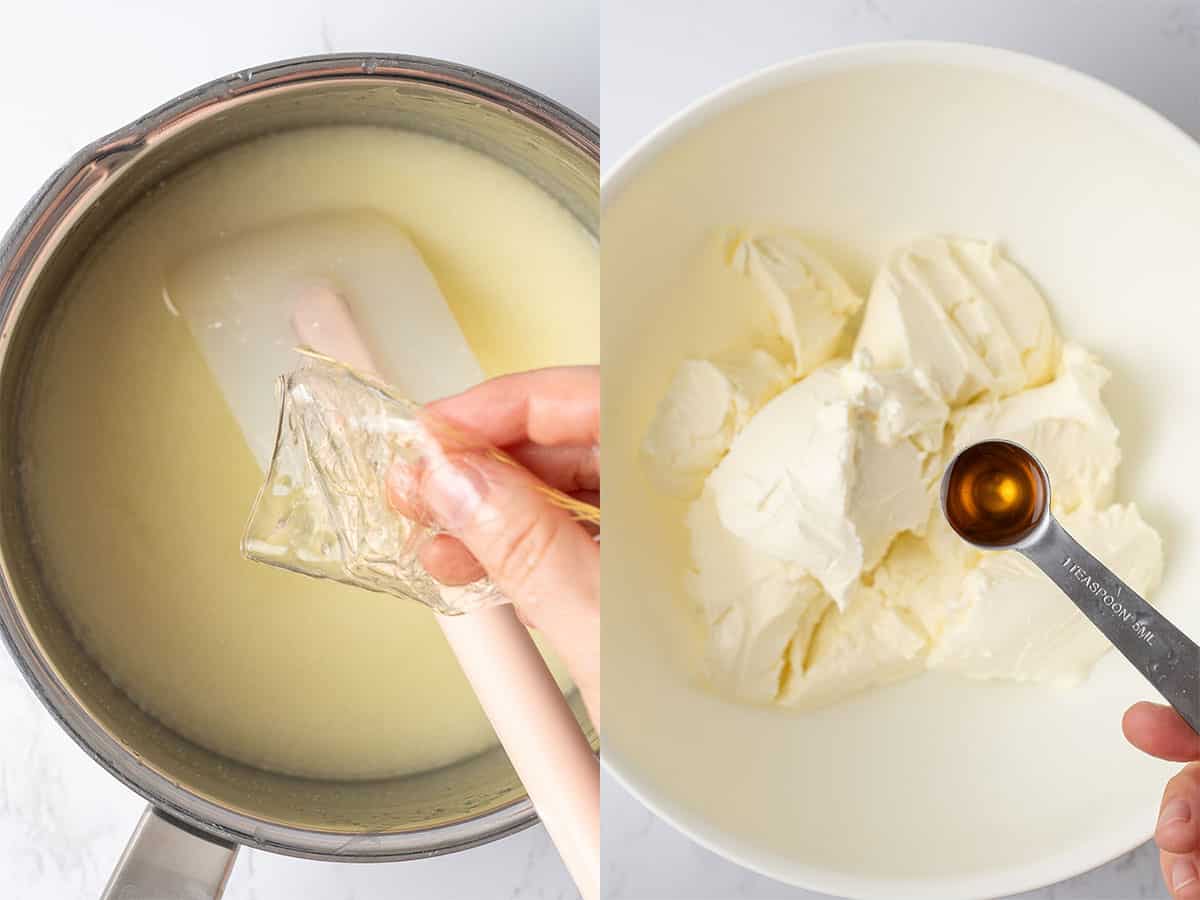
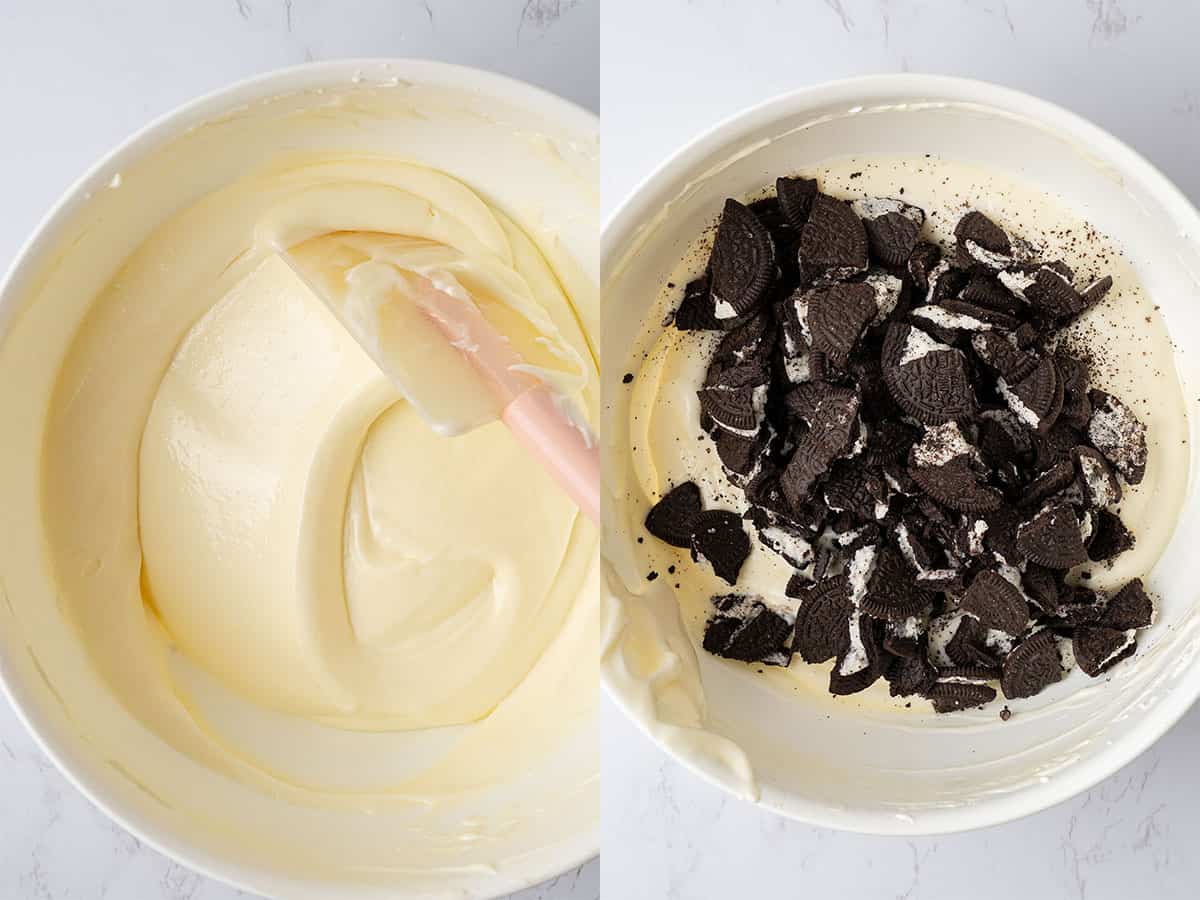
Whip the cream cheese just until smooth and fluffy in a large mixing bowl. Gently fold the cooled gelatin mixture into the whipped cream cheese, and then fold in chopped Oreo pieces. You don't want them in huge chunks, I find breaking each Oreo into at least 4-6 pieces best.
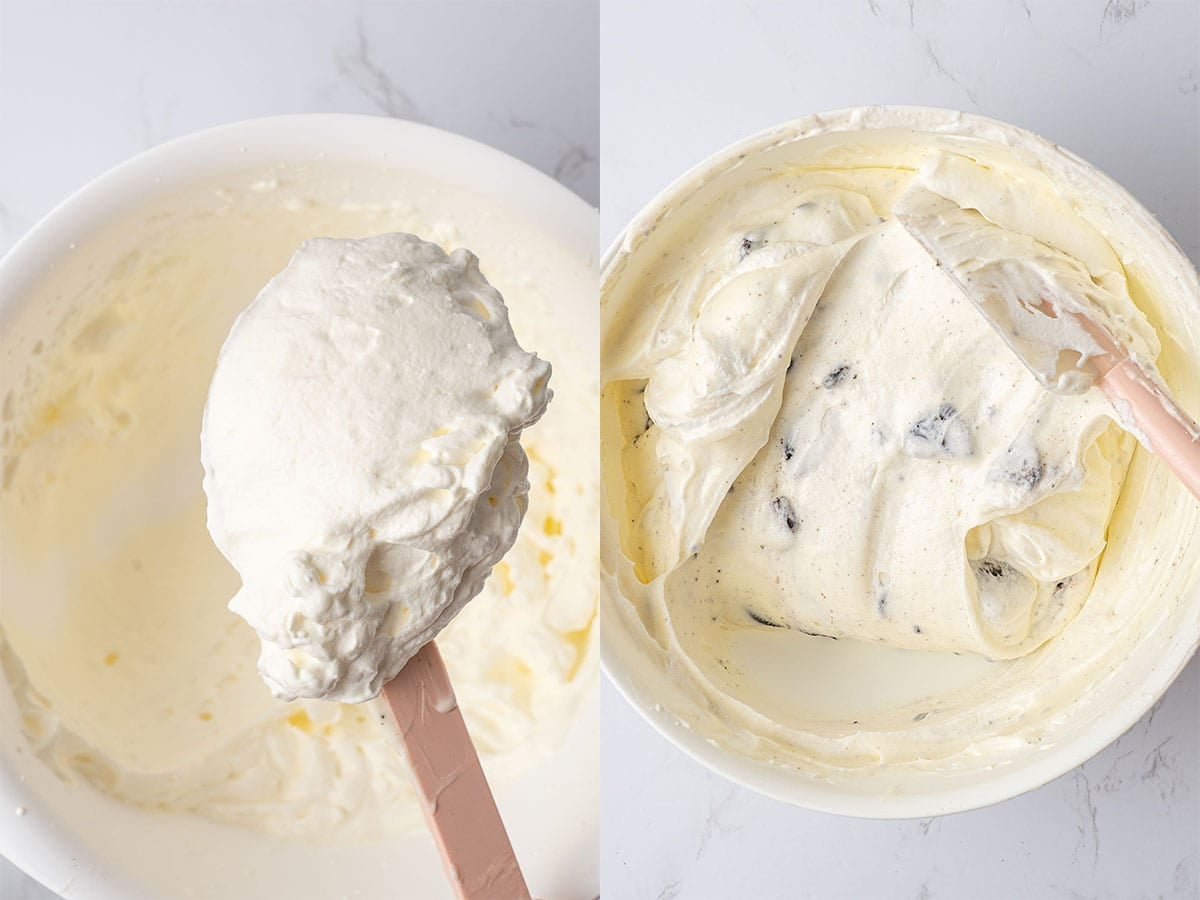
In a separate bowl, whip the remaining heavy cream (ensure it is very cold) with the vanilla extract until it just begins to form stiff peaks. Cream goes through the following stages when whipped: runny, soft peak, stiff peak, and then it will break. We don't want to go that far! You need to stop when you have early stiff peaks so it is stable enough to hold shape without losing volume.
Fold the whipped heavy cream into the cream cheese and Oreo mixture. Do this gently and slowly, using big scooping motions to maintain the airiness and avoid deflating it.
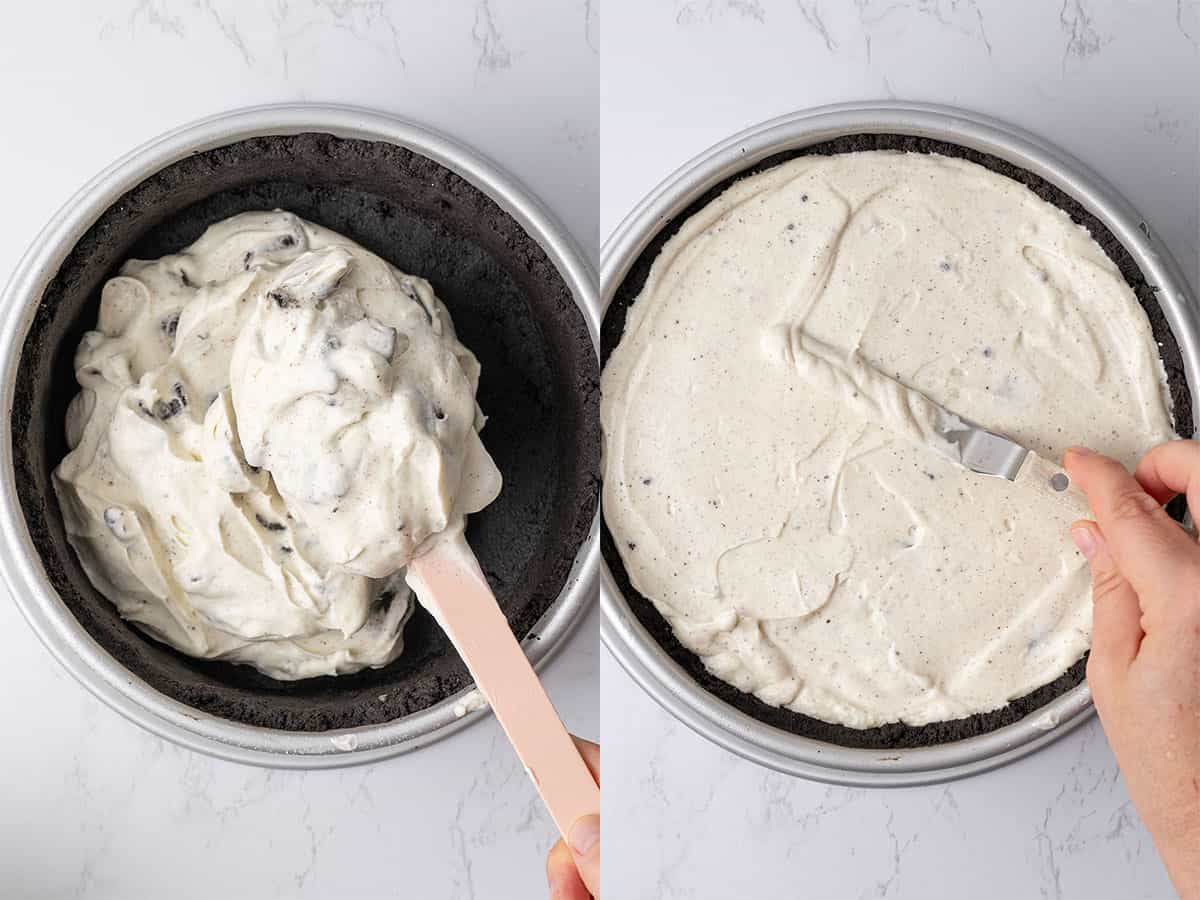
Pour the mixture into the chilled crust and smooth the top with an offset spatula. Refrigerate for at least 6 hours, or preferably overnight.
Now, decorate your no-bake Oreo cheesecake
I love adding easy decorations on top of the no-bake Oreo cheesecake to make it look even better.
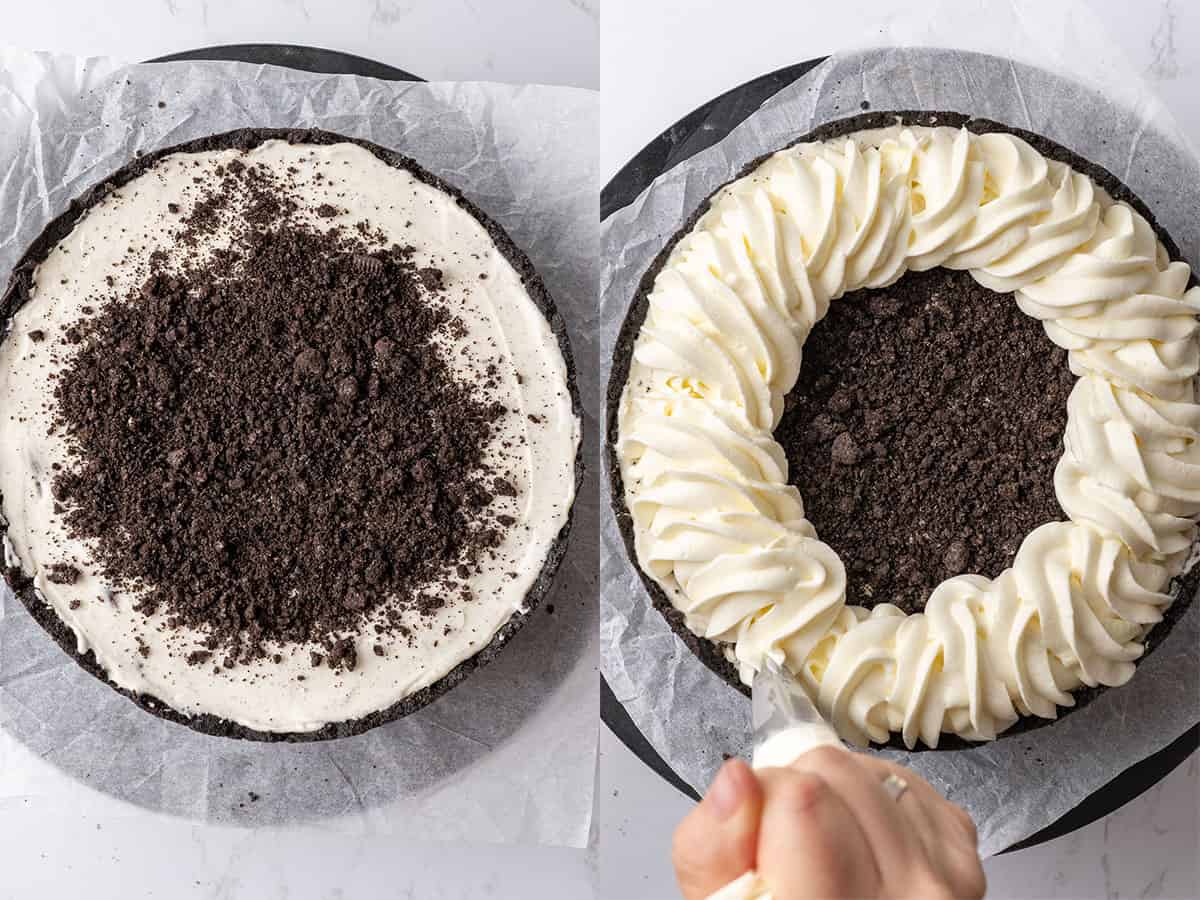
Here is my easy cream cheese frosting recipe without butter: sift the powdered sugar to avoid lumps, and whip it with cold heavy cream and cream cheese. The mixture will become light, fluffy, and pipeable in just 1-2 minutes. Stop once it reaches the right consistency.
Move the cream cheese frosting into a piping bag fitted with a Wilton 1M piping nozzle tip and prepare a few extra Oreos and Oreo crumbs.
Release the cheesecake from the springform (run a thin knife around the edge if needed) and place on a serving plate.
Pipe frosting on top of the set cheesecake, and add a few Oreo pieces and crumbs scattered on top before serving.
Storing and freezing
Store the Oreo no-bake cheesecake covered and in the refrigerator for up to 2-3 days. I prefer to store it in the springform pan covered with plastic wrap or foil and only release it when needed to serve. Store leftover slices in an airtight container. Fat will absorb flavor, so be mindful of other items you have in the fridge with strong smells (e.g., onions) that might leak into your delicous creamy cheesecake.
You can also make it ahead and freeze the whole cheesecake or individual slices, although the Oreo texture does not stay as crisp. Double wrap tightly in plastic wrap, and then foil, and freeze for up to 1 month. Thaw overnight in the refrigerator before serving.
Can I make this recipe without gelatin?
Gelatin is an odorless, flavorless setting agent, but some people prefer not to use it. You can make this recipe without it, but 1. you'll need to use a 9-inch springform instead, and 2. you'll have to nail the technique perfectly so it will set. Pay special attention to the quantities and whipping/mixing instructions so it sets in a light and airy but stable texture.
To alter this recipe in that respect, skip the stage where you heat the heavy cream, and just include this portion of cream with the rest. You will also need to compensate for the sugar in this part of the recipe. So add an equal amount of extra powdered sugar and whip it into the cream cheese, along with the lemon juice.
Read my guide on gelatin to learn more about it, as well as common substitutes.
Flavor variations
Try adding a few twists to this easy recipe to change it up! Use mint Oreos for a bit of added freshness, brownie Oreos for a bigger chocolate hit, or peanut butter Oreos for a nuttier kick.
You could add a splash of Baileys, Kahlúa, or Amaretto to the gelatin cream mixture for a grown-up twist. This variation will only work if you are using gelatin or another setting agent.
Add other candy toppings, such as Reese’s cups, M&M’s, for more color and flavor. Or a really decadent twist would be to add a whipped chocolate ganache frosting. Or some fresh berries!
Ingredient substitution options
You can swap Oreos for other cookies like Graham crackers, digestive biscuits, or Biscoff. They all taste just as delicious! You can even use pretzels for some more crunch. Feel free to use gluten-free versions of these cookies.
You can try using vegan alternatives for the butter, cream, and cream cheese, but they must all be high in fat to set in the fridge. Plant-based creams can sometimes be sweeter than dairy, so adjust the sugar if needed. Regarding sugar, this recipe is perfectly balanced in sweetness. But if you are making it for someone with a particularly sweet tooth, I recommend adding 1-2 tablespoons extra.
You can substitute gelatin for agar agar powder, which is a plant-based setting agent. However, it is much stronger than gelatin, so you will need a lot less of it. It also tends to have a more solid set, so I find it less suitable for desserts like cheesecake.
Expert tips
- Use unsalted butter in the crust to maintain control over the quantity and quality of the salt. However, don't skip the salt specified in the recipe! It is essential to enhance the flavor and balance the sweetness.
- If the crust mixture seems too loose to form into the springpan, place it in the fridge for 5 minutes. It will harden slightly, making it easier for you. Do not be tempted to add more cookie crumbs.
- Use block cream cheese, and not spreadable versions, which contain too much water.
- Don't add the cream and gelatin mixture to the other ingredients until it has cooled to room temperature, as this can cause the cream cheese to melt and form lumps.
- It can help to place the heavy cream into the freezer for 10 minutes before whipping, so that it is very cold.
You will need only a few pieces of equipment
Precision is key when you want a fully set no-bake cheesecake! So weigh all of your ingredients using a digital scale for accuracy.
I make the cheesecake in an 8-inch / 20 cm Springform. You can use a 9-inch, but the cheesecake won't be as tall.
Whip ingredients using an electric hand mixer rather than a stand mixer, as that makes it easier to overwhip. Switch to a rubber spatula to gently fold mixtures together without knocking the air out. Smooth the top of your cheesecake with an offset spatula.
I decorate the cheesecake with a piping bag and a Wilton 1M piping nozzle tip.
Try some of my other cheesecakes
- Pistachio cheesecake
- Strawberry cheesecake
- Apple crumble cheesecake
- Baklava cheesecake
- Lotus Biscoff cheesecake
And if you still can't get enough, check out my round-up of all the best cheesecake recipes!
Have you tried this recipe?
Please leave a 5-star ⭐️⭐️⭐️⭐️⭐️ rating on the recipe card and consider leaving a comment as well!
No Bake Oreo Cheesecake
Equipment
Ingredients
Oreo crust
- 110 g (½ cups) Unsalted butter
- 300 g Oreo Approx. 22 pieces with cream filling.
- Pinch of salt
Oreo cheesecake filling
- 3 Gelatine sheet 3x1.7g=5g gelatin overall
- 115 g (½ cups) Heavy Cream 36% fat
- 150 g (¾ cups) Granulated sugar
- 2 teaspoons Lemon juice freshly squeezed
- 560 g (2½ cups) Cream cheese full fat Philadelphia, cold
- 230 g (1 cups) Heavy Cream 36% fat, very cold
- 175 g (1 cups) Oreo Approx. 17 pieces with cream filling. Chop them into smaller pieces.
- 2 teaspoon Vanilla extract
Decoration
- 30 g (¼ cups) Powdered sugar sifted
- 120 g (½ cups) Cream cheese full fat Philadelphia, cold
- 120 g (½ cups) Heavy Cream 36% fat, very cold
- Few Oreos
US customary cup measurement is an indicative figure only. Measure the ingredients with a digital scale by weight (gram). Baking is art but also science which requires precision and accuracy.
Instructions
Oreo crust
- Melt the butter and let it cool slightly. Crush whole Oreos (cream included) into fine crumbs using a food processor, or place them in a zip-top bag and crush with a rolling pin. Stir the crumbs with a pinch of salt, then add the melted butter and mix until evenly moistened.
- Press the mixture into the bottom and slightly up the sides of an 8-inch or 9-inch springform pan. Use the back of a spoon or a small measuring cup to press firmly and evenly without over-packing. Chill the crust in the refrigerator for at least 30 minutes (or 15 minutes in the freezer) before filling.
Oreo cream cheese filling
- Place the gelatin sheets in a small bowl of cold water and let them soak until softened.
- In a small saucepan, warm the smaller amount of cream with the sugar and lemon juice over medium heat. Stir until the sugar dissolves completely and the cream comes just to a simmer.
- Remove the saucepan from the heat. Squeeze out the excess water from the gelatin and whisk it into the hot cream until fully melted. Let this mixture cool to room temperature.
- In a large mixing bowl, whip the cream cheese with an electric hand mixer until smooth, light, and fluffy. Using a rubber spatula, gently fold the cooled gelatin mixture into the cream cheese until fully combined. At this stage, fold in the chopped Oreo pieces.
- In another bowl, whip the larger amount of heavy cream with the vanilla extract until it reaches the stage just before stiff peaks. At this point, the cream is stable enough to hold its shape but still smooth and flexible, making it easy to fold into the cream cheese mixture without losing volume. Stopping at soft peaks won’t provide enough stability, while whipping all the way to stiff peaks can quickly turn the cream lumpy, which doesn’t blend well with the other ingredients.
- Using a rubber spatula, gently fold the whipped cream into the cream cheese mixture. Work slowly and carefully so the mixture stays airy and fluffy.
- Pour the Oreo cream cheese filling into the prepared crust. Use an offset spatula to smooth the top evenly.
- Refrigerate for at least 6 hours, or preferably overnight, until the cheesecake sets.
- Once fully set, run a thin knife around the edge if needed, then gently release the springform ring to remove the cheesecake.
Decoration
- Whip the heavy cream, cream cheese, and powdered sugar together for 1–2 minutes until the mixture becomes light, fluffy, and pipeable. Stop as soon as it reaches the right consistency — overwhipping will cause it to turn runny.
- Move frosting into a piping bag fitted with Wilton 1M piping nozzle tip and pipe frosting on top. Decorate the cheesecake with a few Oreo pieces and crumb.
- StorageKeep the cheesecake covered in the refrigerator for up to 2-3 days. For best results, store it in the springform pan covered with plastic wrap or foil, or transfer slices to an airtight container.FreezingYou can freeze the whole cheesecake or individual slices. Wrap tightly in plastic wrap, then foil, and freeze for up to 1 month. Thaw overnight in the refrigerator before serving. Note that while the flavor stays delicious, the texture of the Oreos may soften slightly after freezing.
Notes
- Measure your ingredients accurately using a digital scale.
- Do not skip the salt; it will balance the flavors.
- Ue full-fat, block-style cream cheese for the best texture and flavor. Low-fat or spreadable versions contain more water, which can make the cheesecake runny.
- Choose heavy cream with at least 36% fat content. It whips up more stable and gives the filling its light, mousse-like texture.
- The crust is sweet enough but for people with extra sweet tooth, feel free to add 1-2 tablespoons of granulated sugar to this recipe.
- The gelatin is not required but highly recommended if you want cleaner slices, a taller cheesecake, or if the cake needs to travel.
-
- When you make the crust, heat the butter in the microwave on low power so it does not explode. Alternatively, use a saucepan on the stovetop.
- When processing Oreos in a food processor, stop as soon as you have fine, sandy crumbs. If you overprocess, the cookies can release too much fat and turn pasty, almost like cookie butter.
- While preparing the Oreo crust, make sure that you press the crumbs firmly and evenly into the side and the bottom of your spring form.
- If using gelatin, let the warm cream-gelatin mixture cool to room temperature before folding it into the cream cheese. Adding it too hot can melt the cheese; adding it too cold can cause it to set in clumps. However, don't let it cool too much, e.g. don't place it into the fridge as the gelatin will set.
- The cream should be whipped to just before stiff peaks — stable enough to hold shape but still flexible. Too soft = filling won’t set; too stiff = it becomes lumpy and hard to fold in.
- When combining mixtures, always use a rubber spatula with slow folding motions. Stirring removes air and makes the filling heavier; if too much air is removed, it becomes runnier.
- The cheesecake needs time to firm up in the fridge — at least 6 hours, ideally overnight. Rushing this step is the number one reason for runny cheesecake.
Mary Posey
I love all the detail you provide for this recipe. I made it last night and followed everything to a T. However, the amount of filling came up almost a 1/2" short of the top. I do not have my scale at the moment, and used measuring cups. What do you think caused it to be so much lower? I am planning to make another one for my son's birthday. One other thing, I used GF oreos as I have an allergy. We can;t wait to try it.
Katalin Nagy
I imagine either your tin was different size or the measuring was off. Glad you liked it!:)
Margit
An absolutely wonderful treat! I made it a bit larger (18 cm in diameter) and a little lower (my tart ring is 8 cm high, I made it 6 cm high) (quantities in the recipe still hold) and decorated with whole Oreos (kids loved it). As I had a smaller box of Oreos than required for the recipe, I added some regular chocolate biscuits to the base and filling. Worked very well. The most tricky part was to get the cake out of the tart ring without fragmenting its "walls". Very patiently and very-very slowly with a fillet knife it came loose. Thank you! Very thorough and good guidance!
Karla Andrino
😍
Maria
Great inspiration! I did exactly like she explained and I made a delicious cake my family loves. Keep up with your great work😊😘🤗!
admin
Lovely to hear that your family loved the Oreo cheesecake. Thanks a lot for your kind feedback
Gabriella Maculan Forattini Pelizer
Very easy to make If you follow the recipe and choose good ingredients. I made It to comemorate my son's birthday, and It was delicious! Thanks!
admin
Great to hear your feedback, hope you will try some of my other recipes too!
Kwasa
Tried the recipe. The cheesecake was delicious and easy to make 👌👌most definitely trying it again
admin
Thanks for your feedback! Glad you liked my Oreo cheesecake recipe! I have two more cheesecakes btw, a baklava and a raspberry ones, I think you would love them too 🙂
Kanwal
I love oreos. Tasted absolutely amazing!
admin
Thanks!!:)
Ann McGreer
Can I use gelatin powder?
Katalin Nagy
Yes you may replace the gelatin sheets with equal amount (in weight) gelatin powder.
Dah
Very nice...