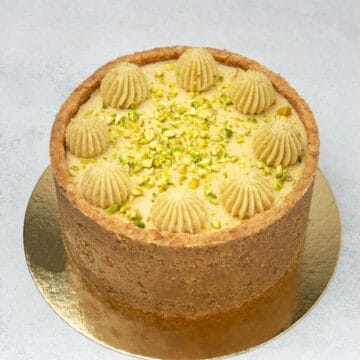
A delicious no-bake Pistachio Cheesecake with a crunchy 2 ingredients crust and creamy, airy pistachio cream cheese mousse filling. It's full of natural pistachio flavor, and there's no baking involved. It's the easiest pistachio cheesecake recipe ever!
Jump to:
🌟 Why this is the best pistachio cheesecake recipe
- It is so easy – No bake, no water bath, no hassle! The cheesecake crust has just 2 ingredients, and the pistachio cream cheese filling is also very easy to make.
- It is super delicious – I never compromise on taste! This easy pistachio cheesecake is super luxurious, creamy, and silky, with deep natural pistachio notes with no artificial flavorings or coloring.
- No special equipment is needed – You will likely already have all of the equipment in your kitchen. This is one of those beginner-friendly pistachio cheesecake recipes that anyone can make!
📝 Ingredient notes
For the cheesecake crust

- Butter - I recommend using unsalted butter to control the quantity of salt in your recipes. European-style 82% fat-content butter will give the best results. We need the unsalted butter melted.
- Biscuits - A hard biscuit or cookie, like Graham crackers or Digestive biscuits, is best for this pistachio cheesecake crust.
- Salt - This balances the sweetness and enhances the flavor of this creamy pistachio cheesecake, so don't skip it!
Read my tutorial on making the perfect cheesecake crust before you begin!
🛒 You’ll find detailed measurements for all Ingredients in the printable version of the Recipe Card at the bottom of this post
For the pistachio cheesecake filling
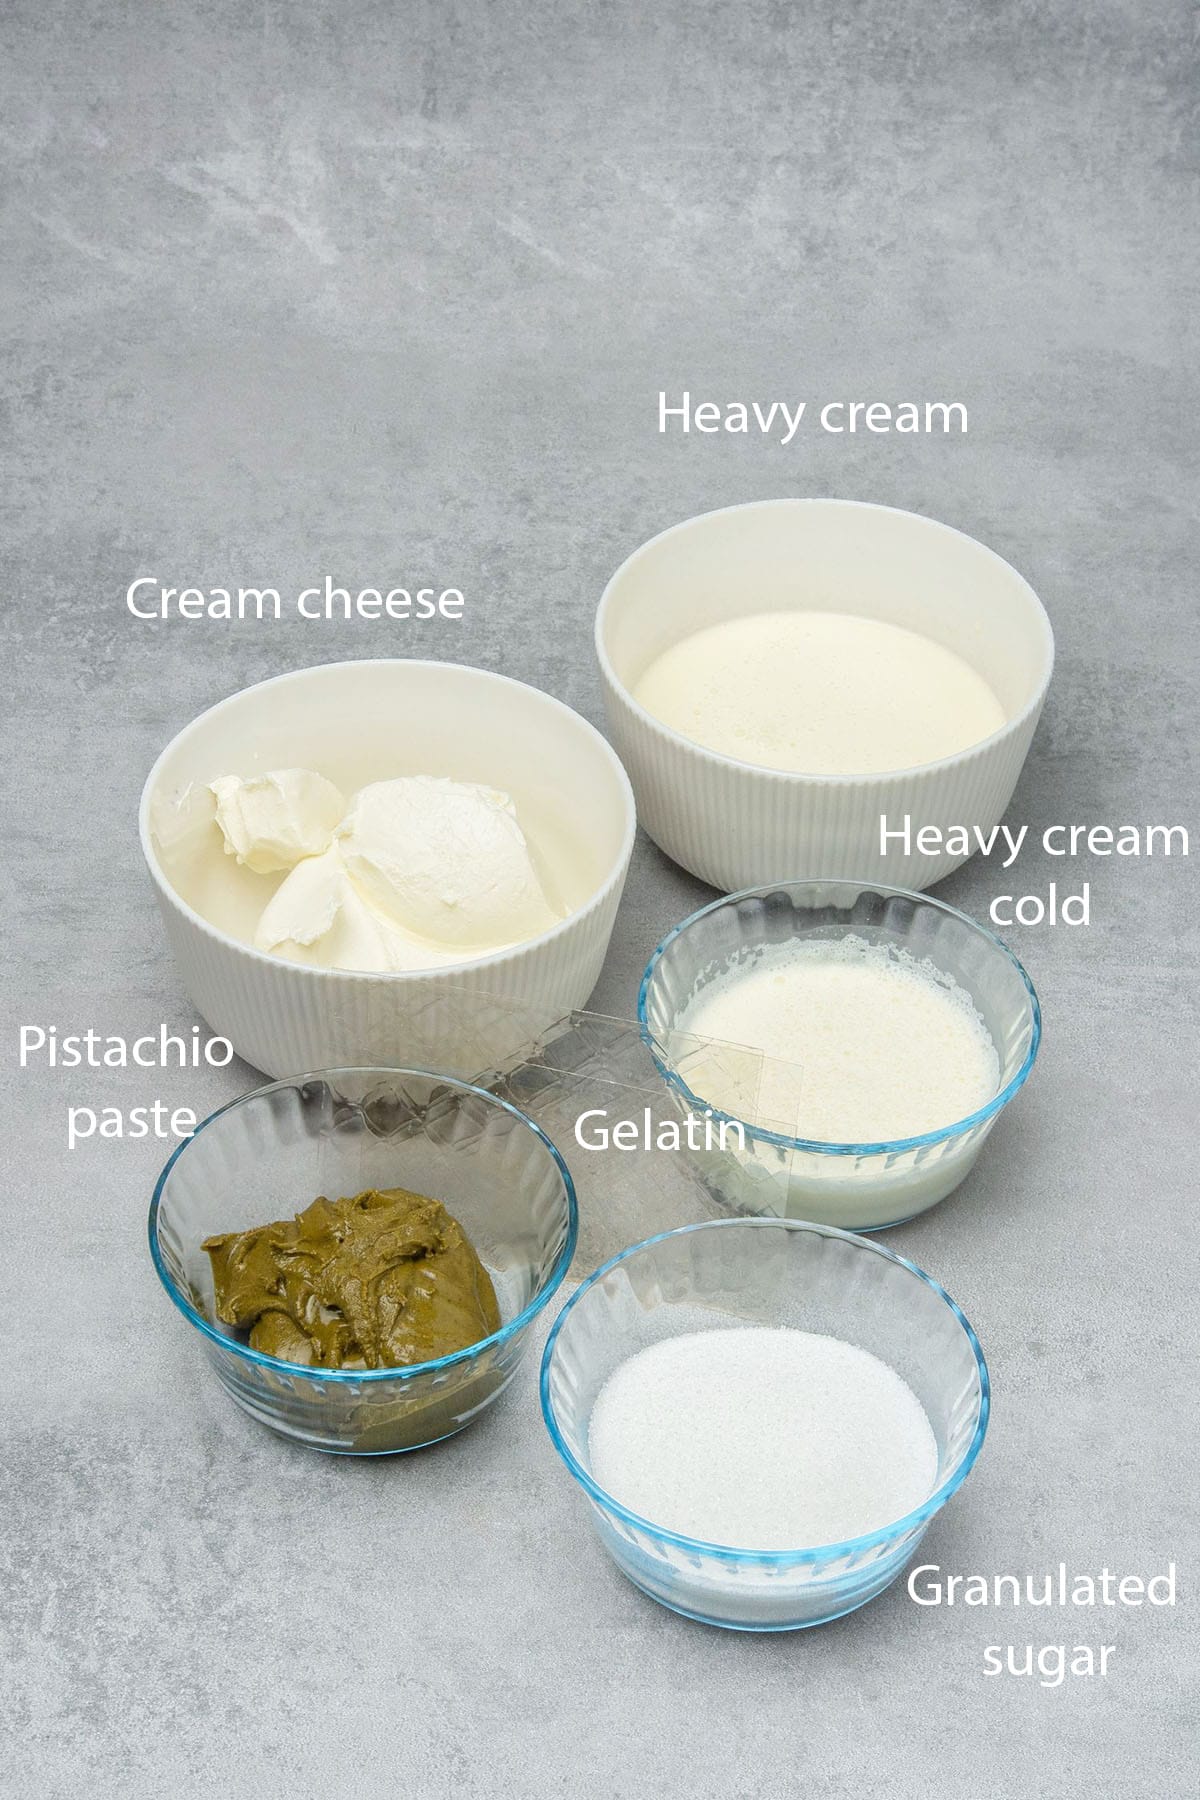
- Gelatin - I use sheet gelatin (1.7 g / sheet), which I find easier to handle. Simply soak the gelatin sheet in cold water for a few minutes before you need it, and use it according to the recipe. Powdered gelatin can be used in a 1:1 swap, so when I state 1 gelatin sheet, that means 1.7 g gelatin powder. If you prefer to use agar agar, check my agar agar guide for further details.
- Heavy whipping cream - Also known as heavy cream, you will need cream with a fat content of between 36% and 40%. It needs to be very cold.
- Granulated sugar - I do not use much sugar in this recipe but feel free to adjust the quantity if desired. If you want to learn about the different types of sugar and how to use them in baking, please read my sugar guide.
- Full Fat Cream cheese - I always use full-fat Philadelphia cream cheese in my recipes. Take it out of the fridge before use so that it is at room temperature. Check out some of my other cream cheese desserts as well!
- Pistachio paste - Make my homemade pistachio paste recipe or purchase high-quality 100% pistachio butter to achieve the best taste and color.
If you love pistachios as much as I do, don´t forget to check out my pistachio desserts collection.
🛒 You’ll find detailed measurements for all Ingredients in the printable version of the Recipe Card at the bottom of this post
👩🍳 How to make this recipe
1. How to make cheesecake crust
- Prepare a 16cm / 6 inches cake pan, mousse ring, or springform.
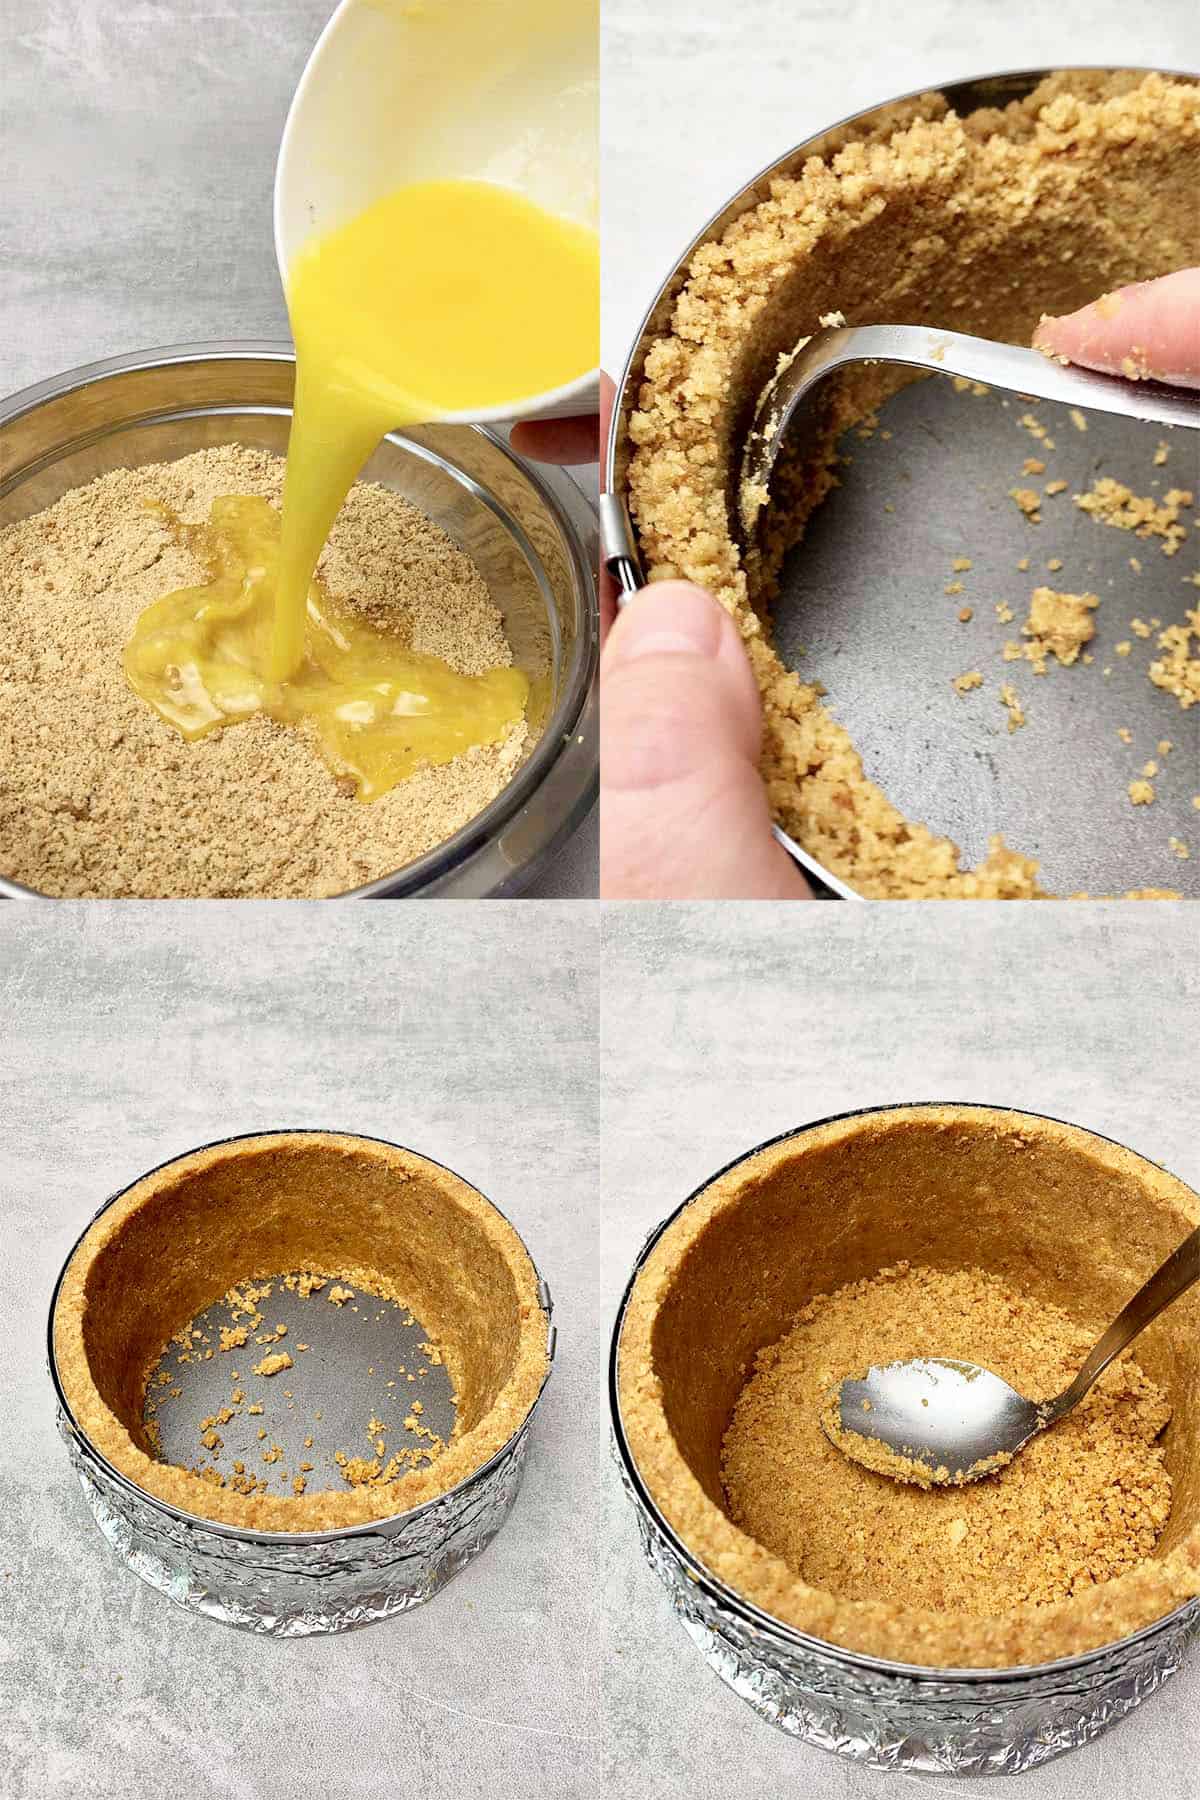
- Pulse the biscuits in a food processor or place them into a ziplock bag and crush them with a rolling pin.
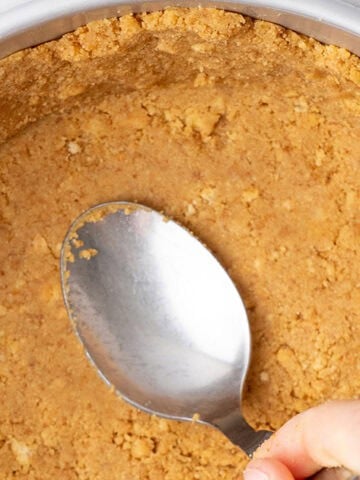
- Melt the butter and then mix the melted butter with the crumbs and a pinch of salt.
- Press crumbs firmly and evenly into the side and the bottom of your cake ring. Start with the sides and work your way up before continuing with the bottom.
- Freeze the crust for 30 minutes whilst preparing the cream cheese mousse filling.
💡 Top Tip: I use a bent spoon to press the crust into the pan and it takes me 10-15 minutes to make sure that it is neat and even on the sides and base.
2. How to assemble the no-bake pistachio cheesecake
- Soak the gelatin sheets in water for a few minutes until softened.
- Heat the smaller amount of cream and the sugar together in a saucepan over medium heat (stir to allow the sugar to dissolve). Bring to a simmering point, then squeeze out the gelatin sheets and stir them in.
- Pour the gelatin mixture over the pistachio paste in a mixing bowl, stir to combine and allow to cool slightly, but not completely to room temperature (so it does not melt the cream cheese).
- Whip room-temperature cream cheese with an Electric hand mixer for a minute until fluffy. Gently fold the whipped cream cheese into the cream and gelatin mixture.
- Whip cold heavy cream until soft peaks form. Gently fold whipped cream into the other mixture gently with a rubber spatula.
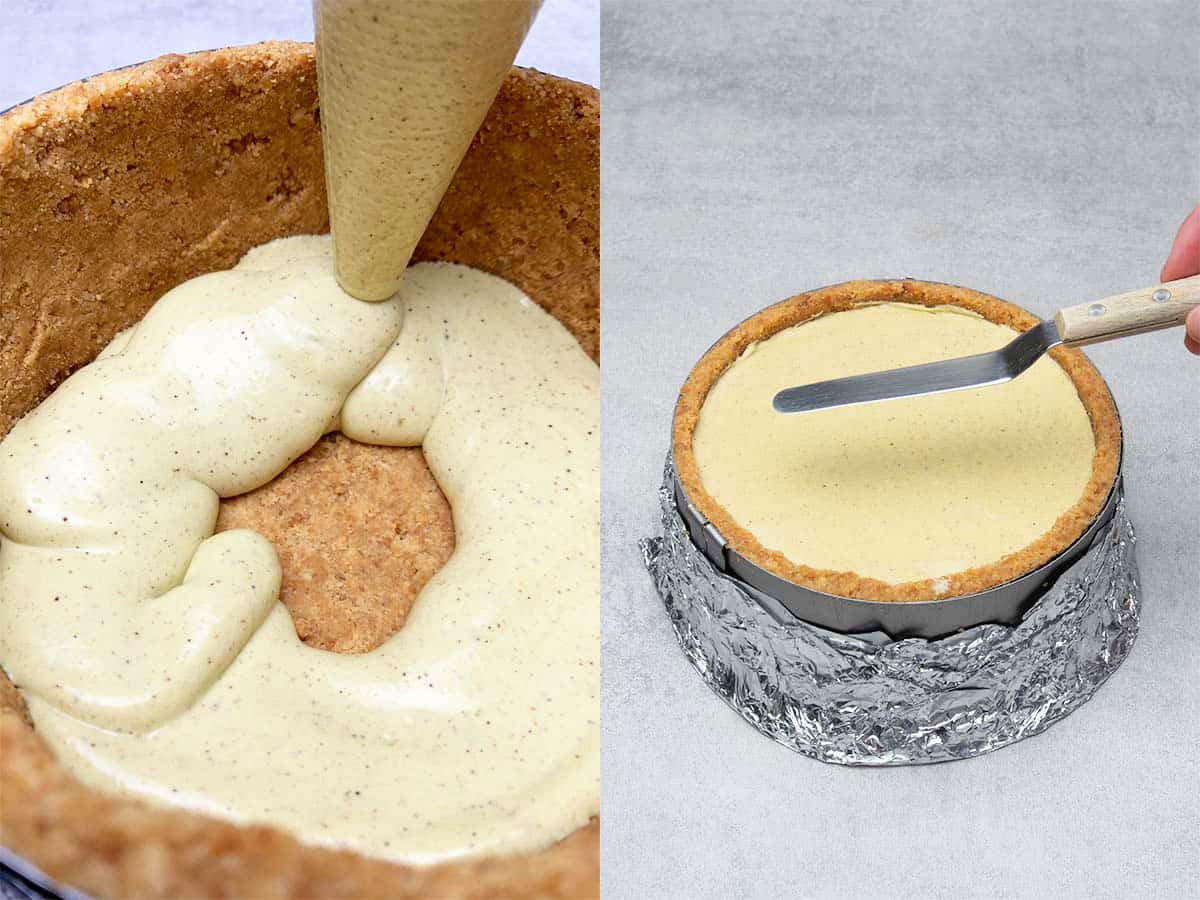
- Pour or pipe the cheesecake filling into the crust and smooth the top with an Offset spatula.
- Place the pistachio cheesecake into the fridge and set it for a minimum of 6 hours. Move the remaining cream filling into a piping bag fitted with a French star nozzle and refrigerate.
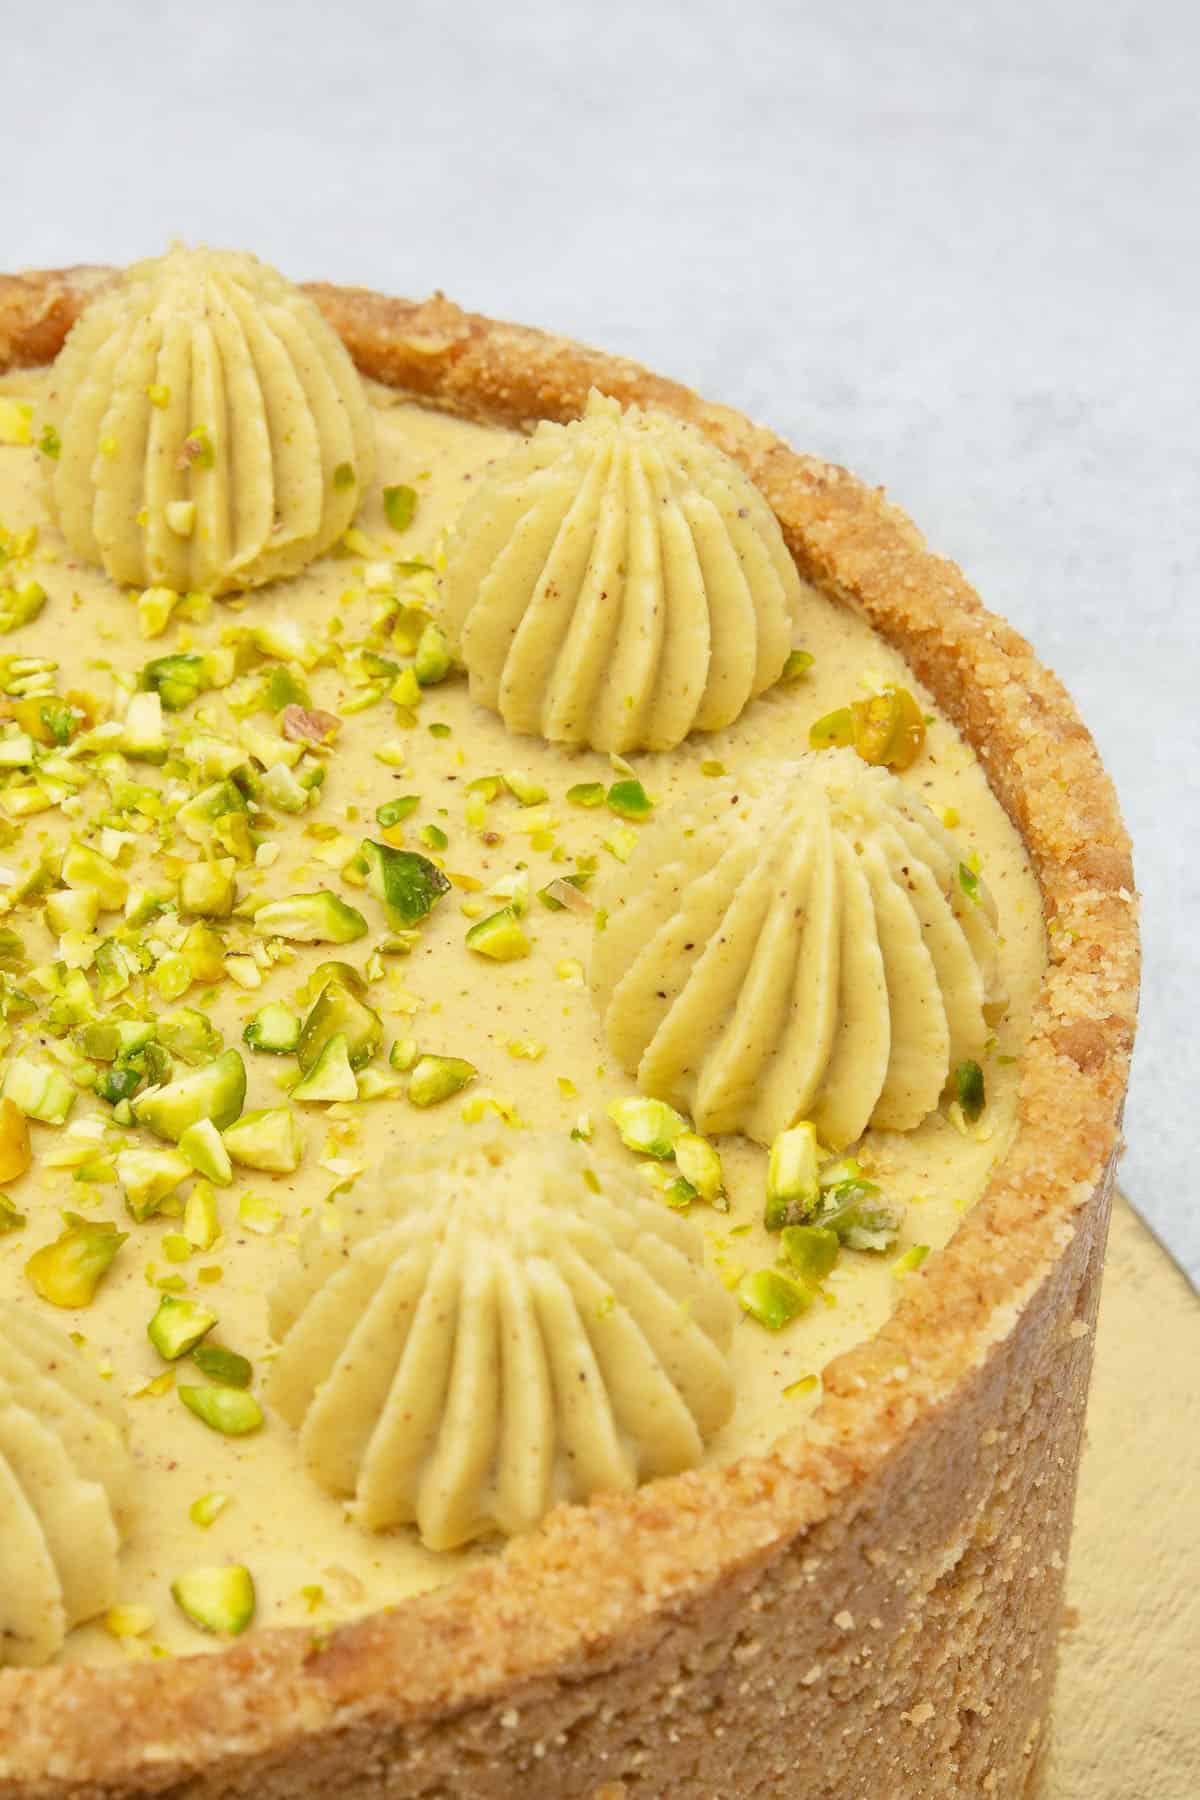
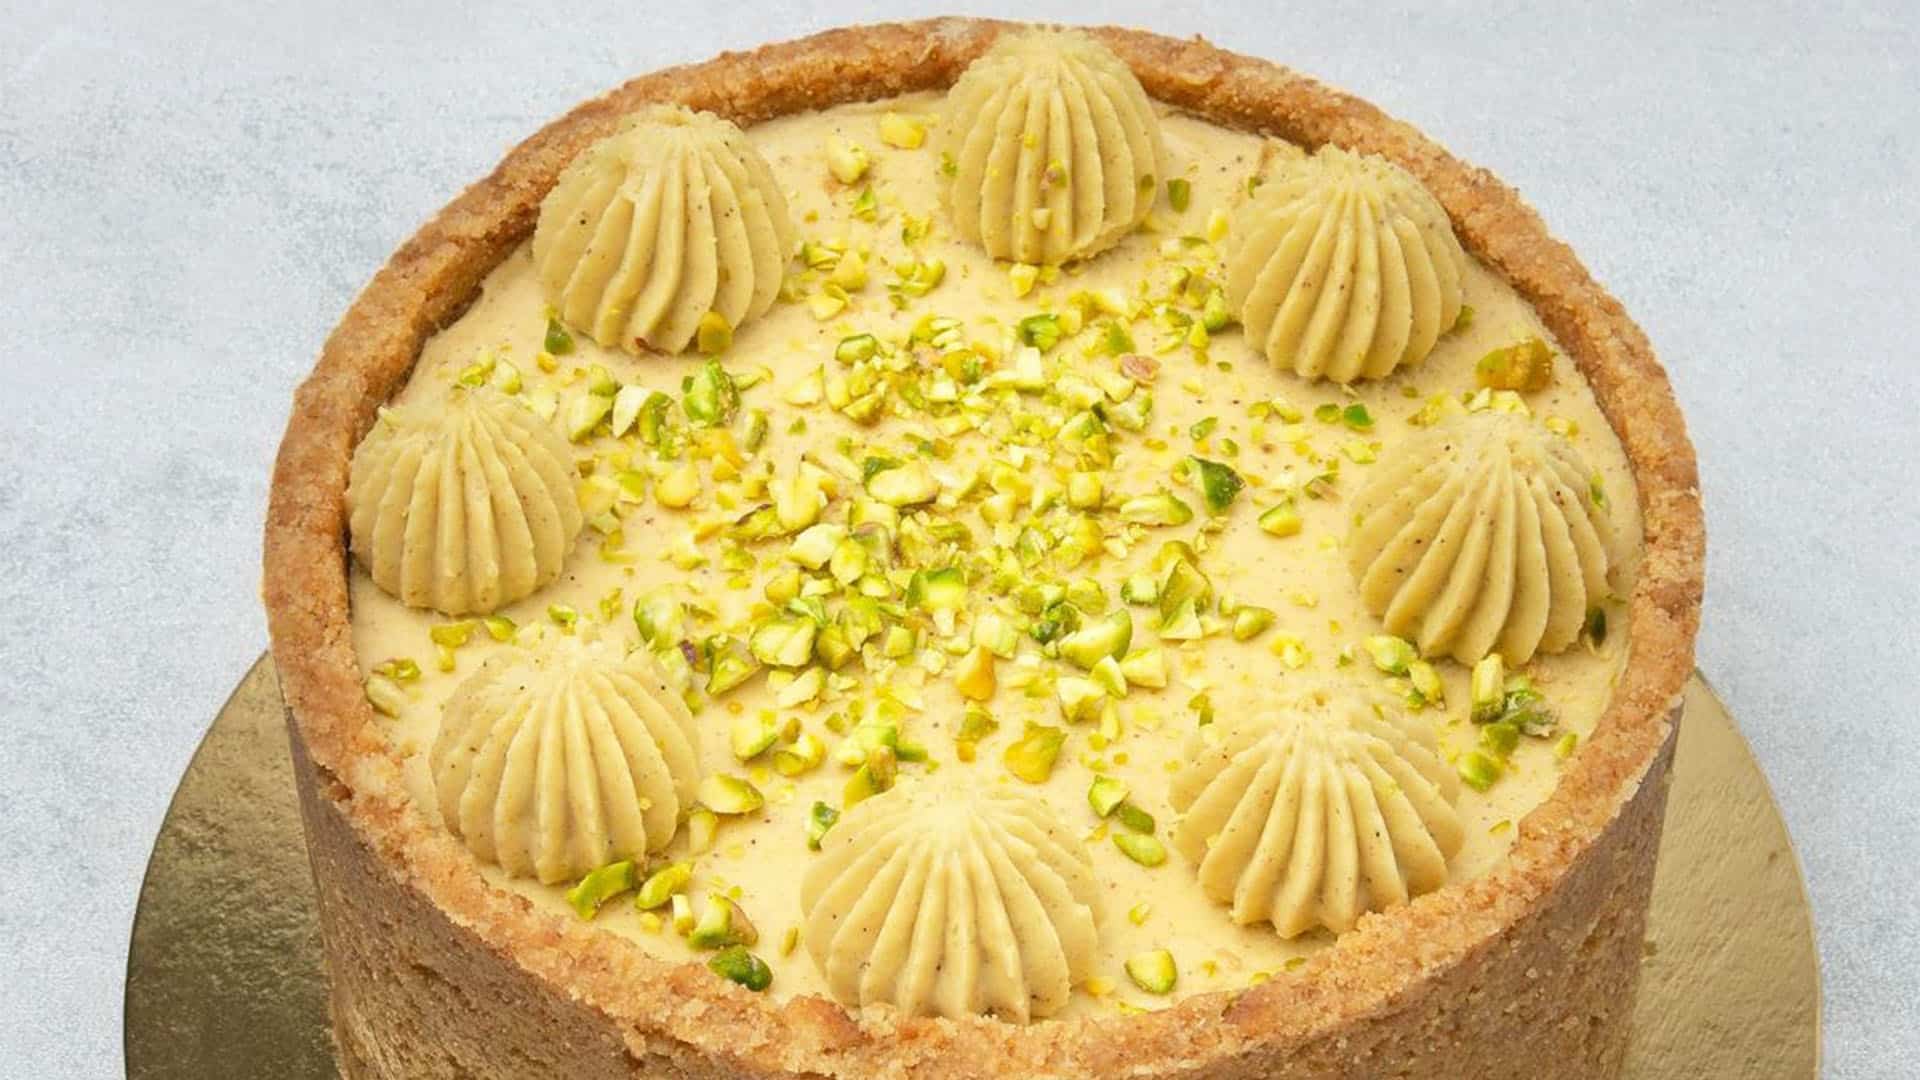
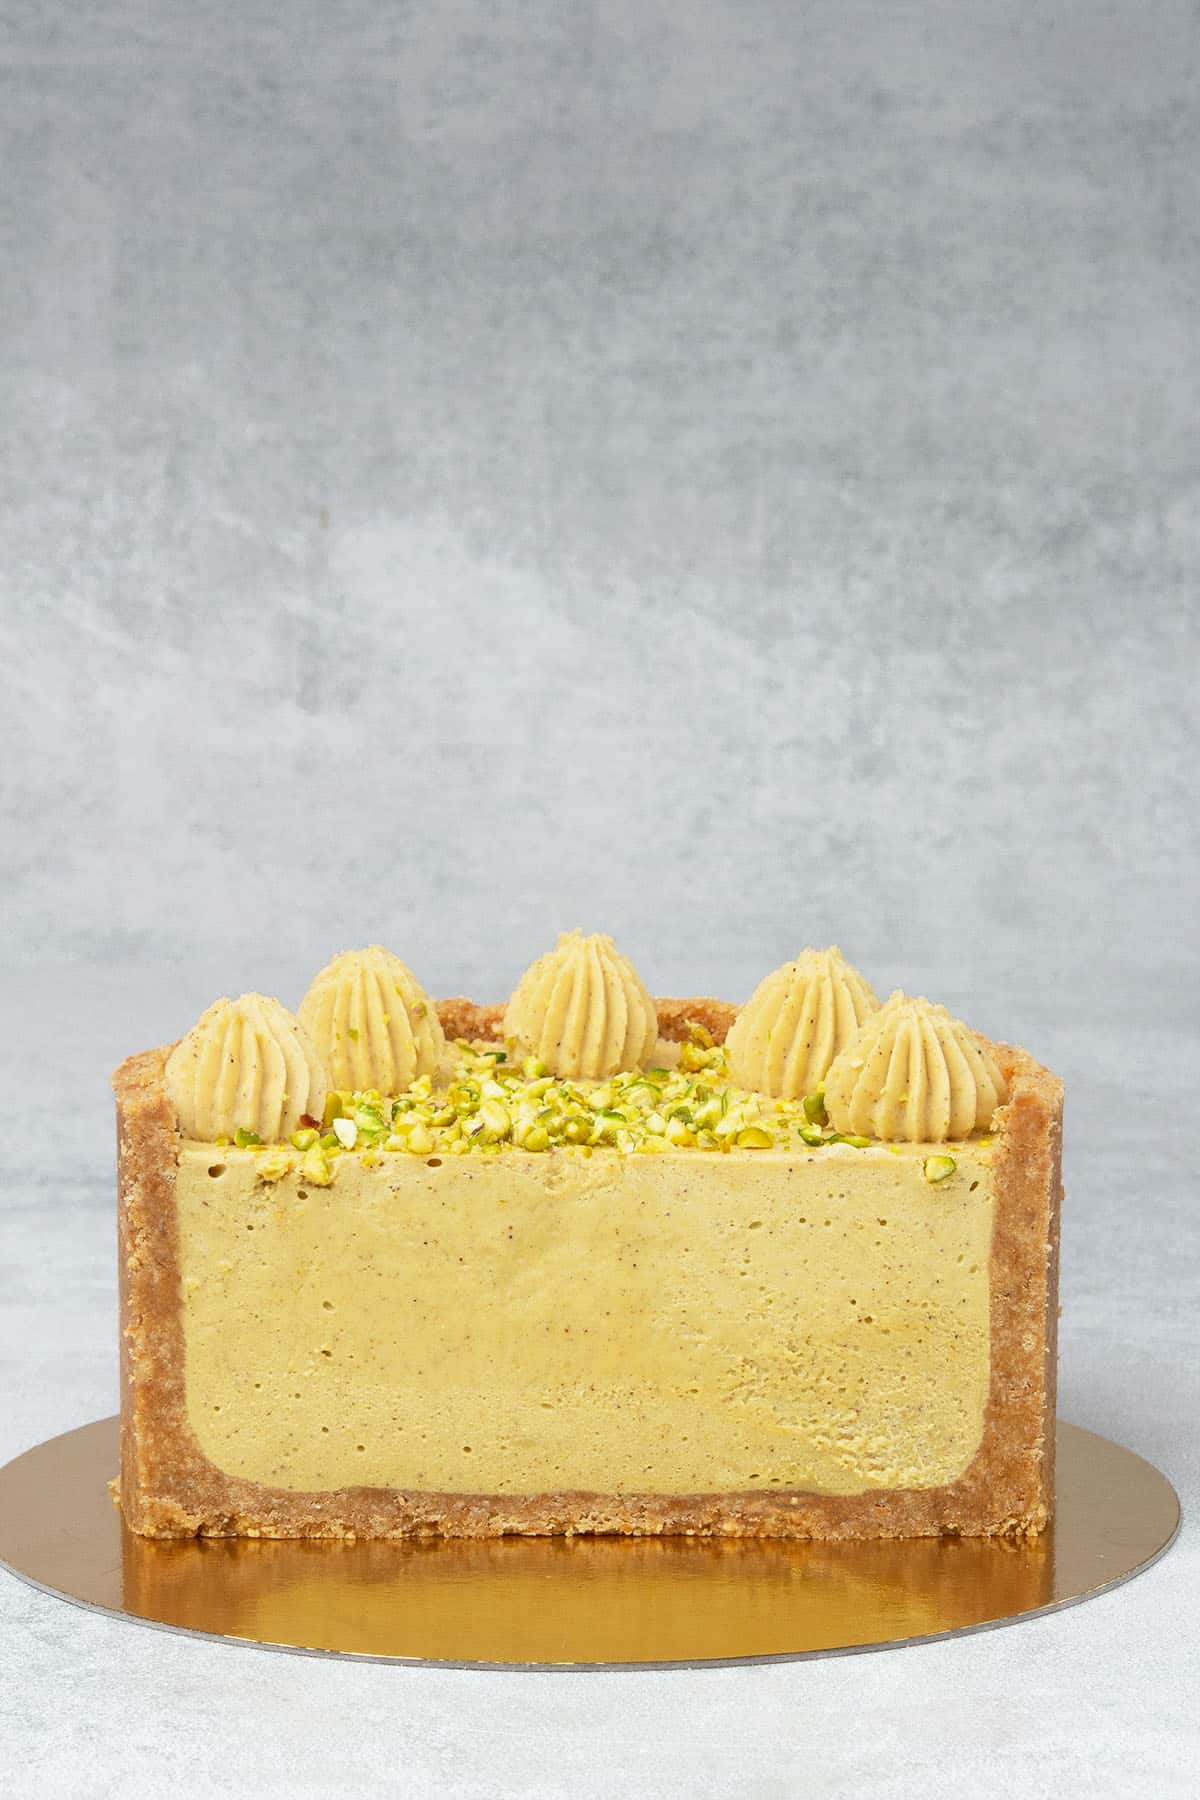
- Decorate your easy no-bake pistachio cheesecake with pistachio piped filling and garnish with some chopped pistachios.
💡 Top Tip: Be patient and do not fill the cheesecake crust before it sets, and do not open the cake ring before the cheesecake has set. Release it very gently from the pan.
👩🍳Storage and Freezing
For best results, serve pistachio cheesecake within 24 hours. However, it can be stored in the fridge in an air-tight container for 2-3 days.
You can freeze the cheesecake crust before filling it easily to defrost as and when you need it. You can also freeze pistachio cheesecake whole after the filling is in. However, it might lose some of its crunchy & creamy consistency. So it is best enjoyed fresh.
📚Flavor Variations & Substitutions
Once you have mastered this easy recipe for pistachio cheesecake, feel free to experiment with different flavors to make different types of cheesecake. For example, you could replace the pistachio paste with hazelnut butter or peanut butter, or enhance the crust further with crushed nuts or even freeze-dried raspberries.
If you are baking around a dietary restriction and need to make substitutions, be sure to check out my baking guides first.
🎓 Expert tips
- While preparing the crust, make sure that you press the crumbs firmly and evenly into the side and the bottom of your cake ring. If you feel that the mixture is too runny, pop it into the fridge for 5 minutes before continuing.
- Respect the chilling time. Chilling time is needed both for the buttery cheesecake crust to set and also for the gelatin to set the cheesecake filling.
- Don't be tempted to skip or combine steps; there is a reason why we whip the ingredients separately and combine them in a particular order. And make a note of any room temperature ingredients so you can get them out of the fridge ahead of time.
- Do not over-mix the cream cheese filling or overwhip the heavy cream, as they can go runny or even split. Make sure to use a flexible rubber spatula to be able to fold the mixtures together correctly.
- Use the cream cheese filling immediately. The pistachio cream filling will be fluffy and airy, but it will be set in a few hours due to the gelatin, so use it straight away.

🥣 Equipment notes
Weigh your ingredients rather than measuring by volume using a digital scale.
I use a Mousse cake ring (adjustable in size) set to 16cm / 6 inches to make this easy pistachio cheesecake recipe and make a base from kitchen foil. Alternatively, you can use a springform pan, but note that it does not have such a neat side.
For pressing the Graham cracker crust together, I use a spoon with a bent handle to get into the corners.
Use an Electric hand mixer to whip the cream cheese and heavy cream and a Rubber spatula to fold the whipped cream in without breaking it or knocking out air.
Use a Piping bag with a simple French star nozzle tip to decorate your no-bake pistachio cheesecake.
❓ Recipe FAQs
You may have overwhipped the ingredients, or it might need more gelatin. Always weigh ingredients by the gram using a digital scale to ensure correct quantities. It may also need more setting time.
This is down to personal preference, but both are delicious! What makes this pistachio cheesecake recipe easy is that it does not require an oven yet still has an amazing taste and airy, mousse-like consistency. If you've only ever had pistachio cheesecake baked, I recommend trying no-bake!
You can replace gelatin with another setting agent like agar agar, but you cannot leave it out altogether, or the cheesecake will not set.
🧀 More Cheesecake recipes


Have you tried this recipe?
Please leave a 5-star ⭐️⭐️⭐️⭐️⭐️ rating on the recipe card and consider leaving a comment as well! I would love to hear about how your dessert turned out and your feedback also helps other Readers!
Pistachio Cheesecake
Equipment
- Mousse cake ring (adjustable in size) Set to 16cm /6 inches
Ingredients
Crust
- 140 grams (⅔ cups) Unsalted butter
- 300 grams (2 cups) Biscuits/cookies e.g., Digestive biscuits or Graham crackers
- Pinch of salt
Pistachio Filling & Decor
- 3 Gelatin sheet 1 gelatin sheet = 1.7g of powdered gelatin
- 110 grams (½ cups) Heavy Cream 36% fat
- 120 grams (⅔ cups) Granulated sugar
- 260 grams (1⅕ cups) Cream cheese e.g., full-fat Philadelphia and at room temperature.
- 230 grams (1 cups) Heavy Cream 36% fat, very cold
- 180 grams (1 cups) Pistachio paste 100% pistachio
- Crushed pistachio nuts
US customary cup measurement is an indicative figure only. Measure the ingredients with a digital scale by weight (gram). Baking is art but also science which requires precision and accuracy.
Instructions
How to make cheesecake crust
- Melt the butter, allow to cool slightly, and prepare a cake ring set to 16cm /6 inches.
- Make the crumbs for the crust either by pulsing in a food processor or by placing them in a zip bag and crushing them with a rolling pin. Mix the crumbs with the warm melted butter and a pinch of salt until it comes together.
- Press the mixture evenly into the sided and base of the Mousse cake ring (adjustable in size). If the mixture is too runny, place it into the fridge for a few minutes before continuing. Place the crust into the freezer whilst preparing the filling.
How to assemble the no bake pistachio cheesecake
- Soak gelatin sheets into cold water.
- Heat the smaller amount of heavy cream with sugar and stir as it dissolves. Bring to a simmer, then squeeze out the gelatin and stir it in.
- Pour the mixture over the pistachio paste, in a mixing bowl and stir to combine. Let the mixture come down to almost room temperature.
- In another bowl, beat cream cheese with an electric hand mixer until light and fluffy, and then fold in the lukewarm gelatin mixture with the help of a Rubber spatula
- In a separate bowl, whip heavy cream until soft peaks form and very gently fold into the pistachio cream cheese mixture using a Rubber spatula.
- Pour or pipe filling into the chilled cheesecake crust and smooth the top with an Offset spatula. Place it into the fridge for 6 hours to allow it to set. Move the remaining filling into a piping bag fitted with a French star nozzle/tip and refrigerate.
- Carefully remove the cake ring and decorate the pistachio cheesecake with the piped pistachio cream cheese filling and garnish with crushed pistachios.
- Store the cheesecake covered in the fridge and consume it within 2-3 days.
Notes
- Weigh ingredients using a digital scale for precision. Baking is a science.
- Press the crumbs for the crust firmly and evenly into the side and the bottom of your cake ring for the best crust.
- Respect the chilling time; it is needed for the butter to set the crust and for the gelatin to set in the filling.
- Do not over-mix the cream cheese filling, as it can go runny. Make sure it is at room temperature first, or it can go lumpy.
- Make sure to use a flexible rubber spatula to be able to fold the mixtures together correctly.
- Use the cream cheese filling immediately, as it will set in a few hours due to the gelatin.
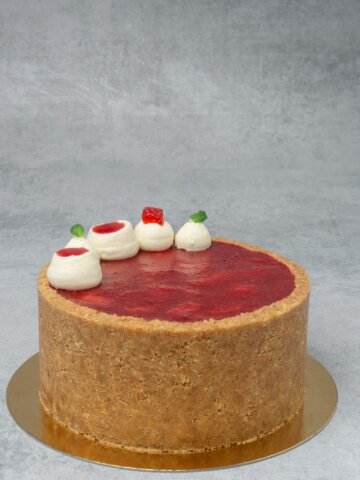
- Try this cheesecake with different flavors e.g., replacing the pistachio paste with hazelnut butter or peanut butter or enhancing the crust with crushed nuts or freeze-dried berries.
Ladonna Garrard
Is there a recipe for the pistachio paste?
Katalin Nagy
Yes:) https://www.spatuladesserts.com/how-to-make-pistachio-butter/
Vardán
Thanks a lot!!!!
Natasha
loved the flavor and came out beautifully. wasn't sure if I was supposed to add water to the powdered gelatin when using that option? guessed and added a little.
truly a unique dessert for a special dinner
Amy
Made this and follow the instructions to the T except the use of gelatine powder instead of sheet. It was full of sinful deliciousness. Thank you for sharing this recipe.
Kata
So happy that you loved this cheesecake, pls try some of my other recipes as well and let me know how they go 🙂
Louise
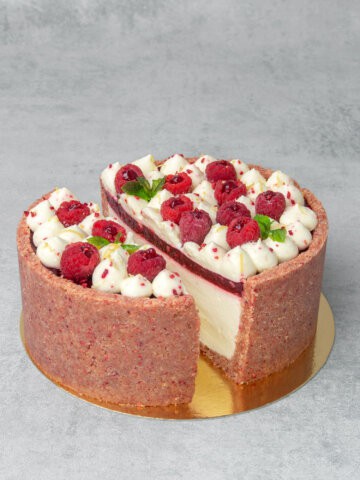
I made this recipe for my daughter's 45th birthday, she loves pistachio and raspberry, So I added natural raspberry powder in cookie crumbs crust, so good and in the middle of the cheesecake I had a layer of fresh raspberry.
Decorate the top with cheesecake fillling rosettes, fresh raspberry and pistachios. It was very good, thank you so much for your recipe ! Merci beaucoup!
Sharmaine
Hi, may I know which brand gelatin you are using? i'm quite confused as to how much gelatin i should be using. You said 3 1,7 gram so is it 5.1g of gelatin or 21g of gelatin?? Thank you!
Kata
3x 1.7g is 5.1g
Valérie
This cheesecake is just amazing
José-Miguel Calatrava
He loved it and he invited me and my wife over to his mansion for a game of lacrosse.
Kata
So happy for you:) I have a pistachio strawberry tart as well for the occasion if you feel like it haha
Best wishes
José-Miguel Calatrava
My boss is coming to visit tomorrow and everyone at work knows about his weakness for pistachios. You would know too if you could see the shells piling up in the office. I have prepared this pistachio cheesecake to impress him. My fate is in your hands.
Denise
Don't understand the ingredient as described: "3 Gelatin sheet 1 gelatin sheet: 1,7g"
Do you mean 3 sheets of gelatin each weighing 1.7 grams or a total of 1.7g regardless of the weight of each gelatin sheet?
You also said, "...soak the gelatin SHEET into cold water for a few minutes before you need THEM..."
Thank you,
Kata
Hey re gelatin sheet, you will need 3 as explained in the recipe however some people want to use powder. In case of powder you would need 3x1,7g powder.
Not sure what is your 2nd question. You will need to soak the gelatin sheets into cold water before using them, that is how they work. English is not my first language, but hope this explanation helps 🙂
Angel
Can we make combine the baklava cheese cake of its filo base and no baked cheesecake of this recipe instead of a baked cheesecake
admin
Hey, haven’t tried combining these two. You would then need to “blind bake” the filo - not sure that it would be a good idea to be fair. I suggest you make the baklava cheesecake as it is; is super delicious 🙂
Alena
Can you recommend what Pistachio paste you use and where do you buy it?
Larisa Albulescu
❤️
Esther
So good! Thank you for sharing this recipe 🙂
Katharina
This is a really delicious and airy cheesecake. Would definitely recommend!