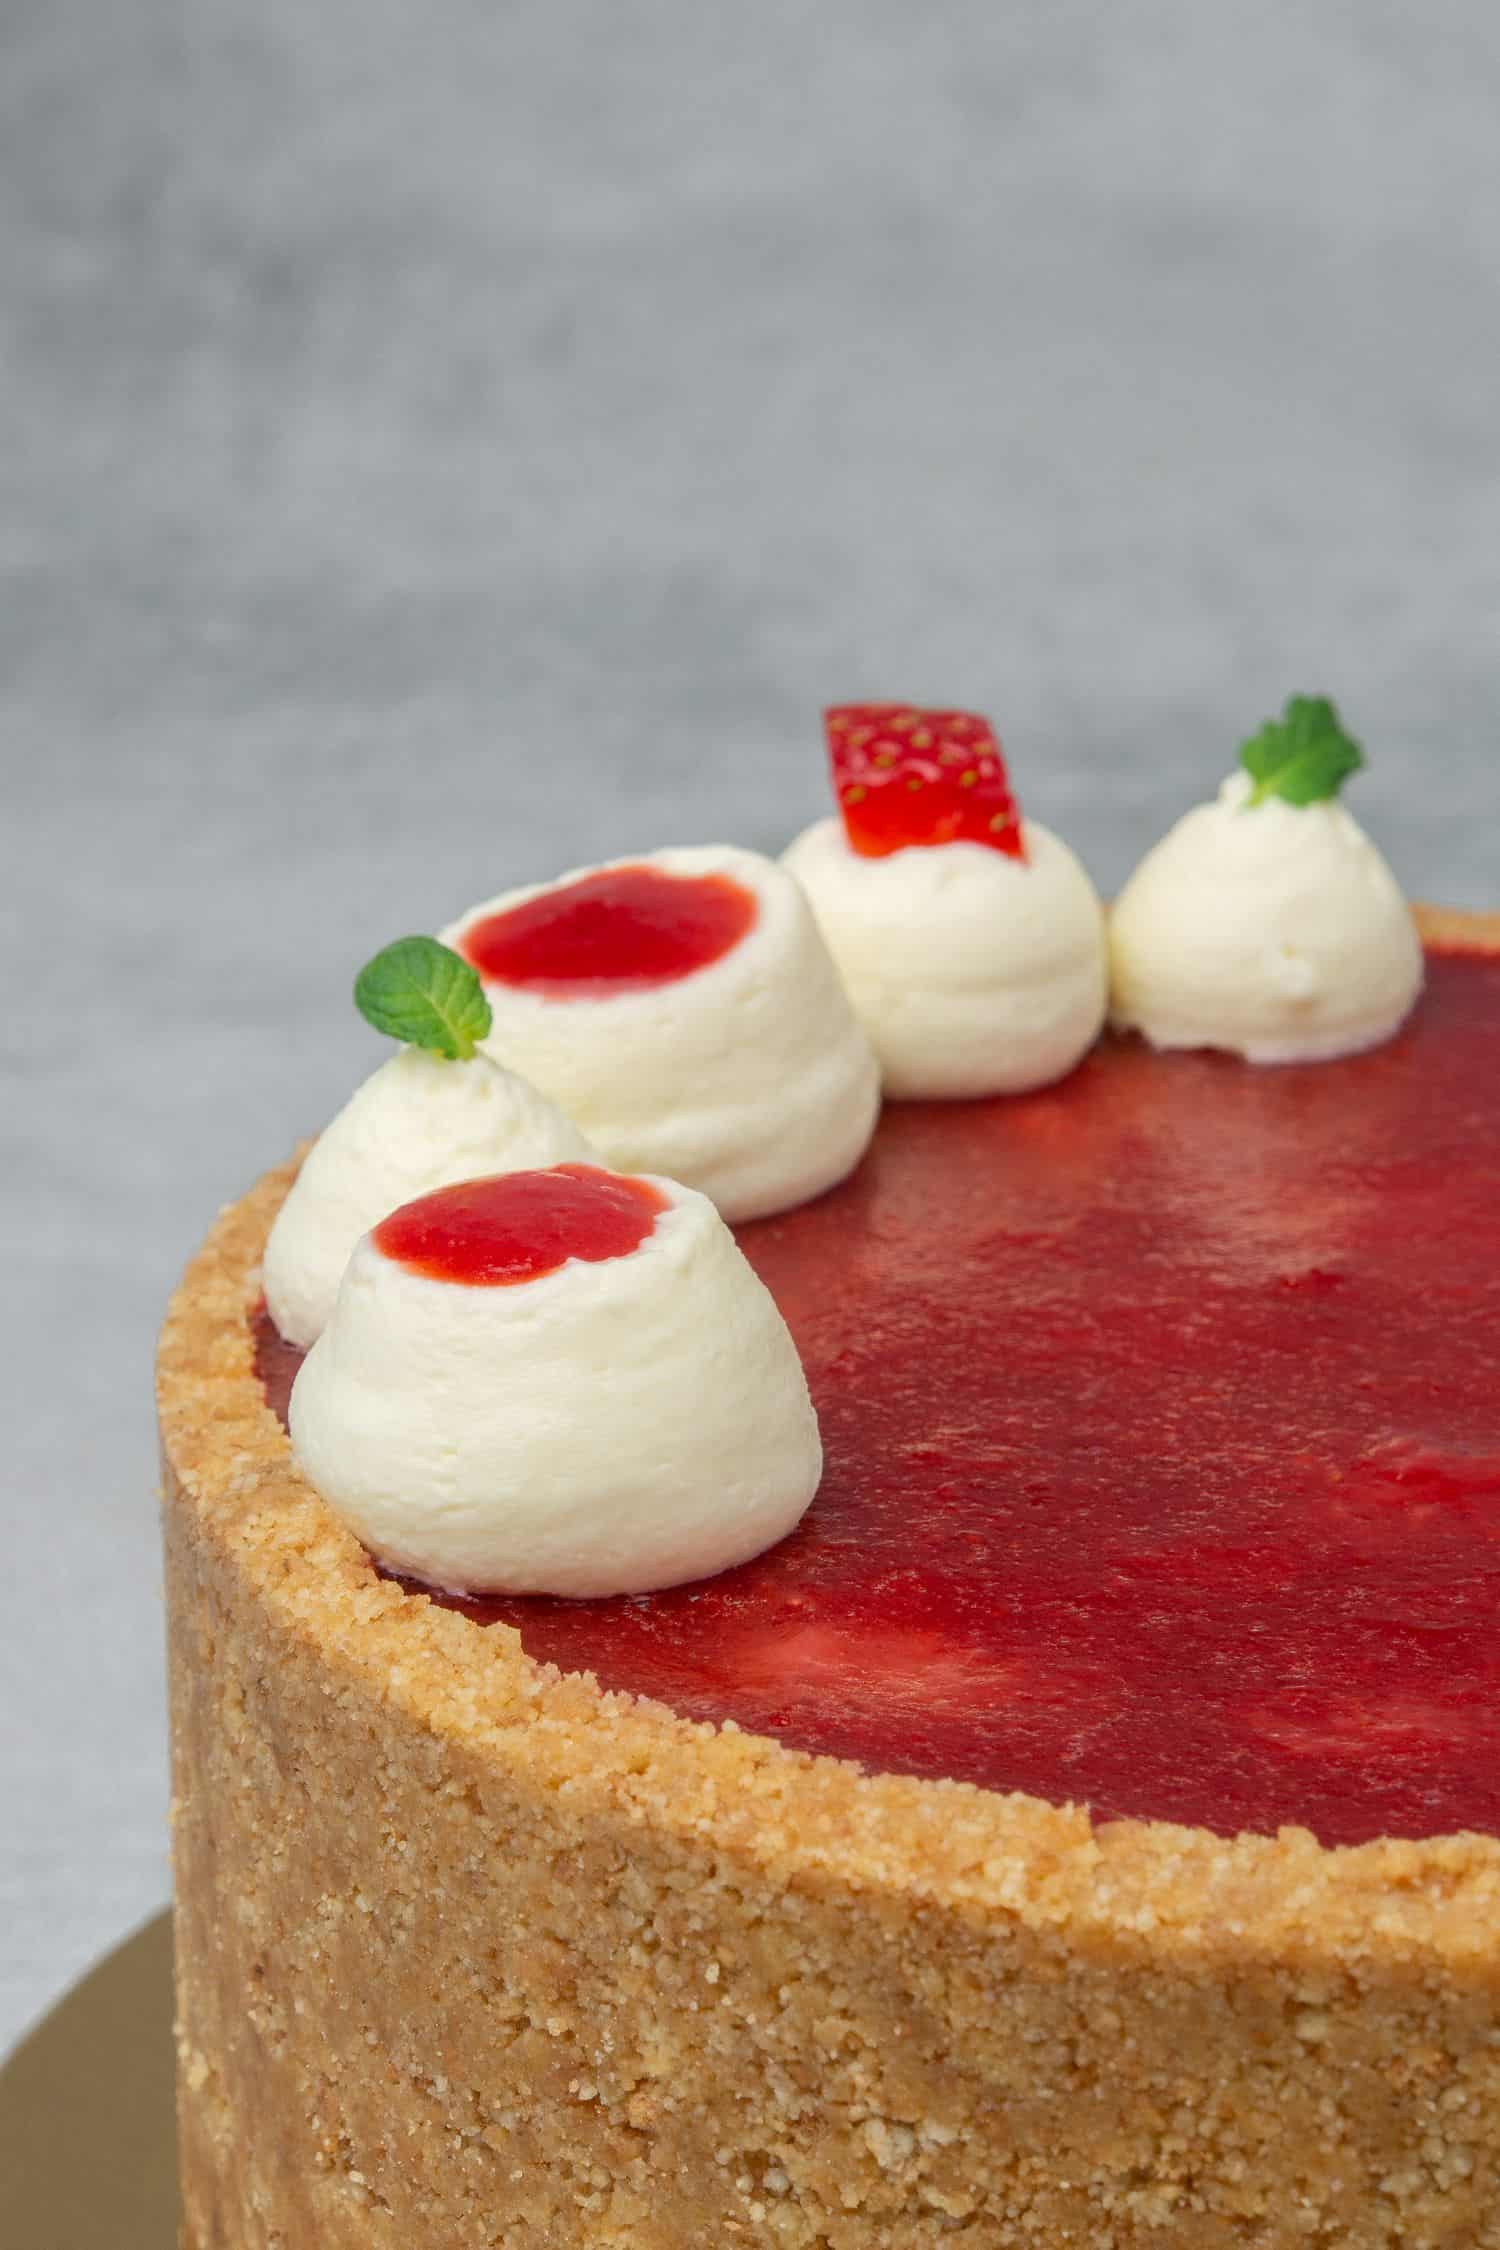
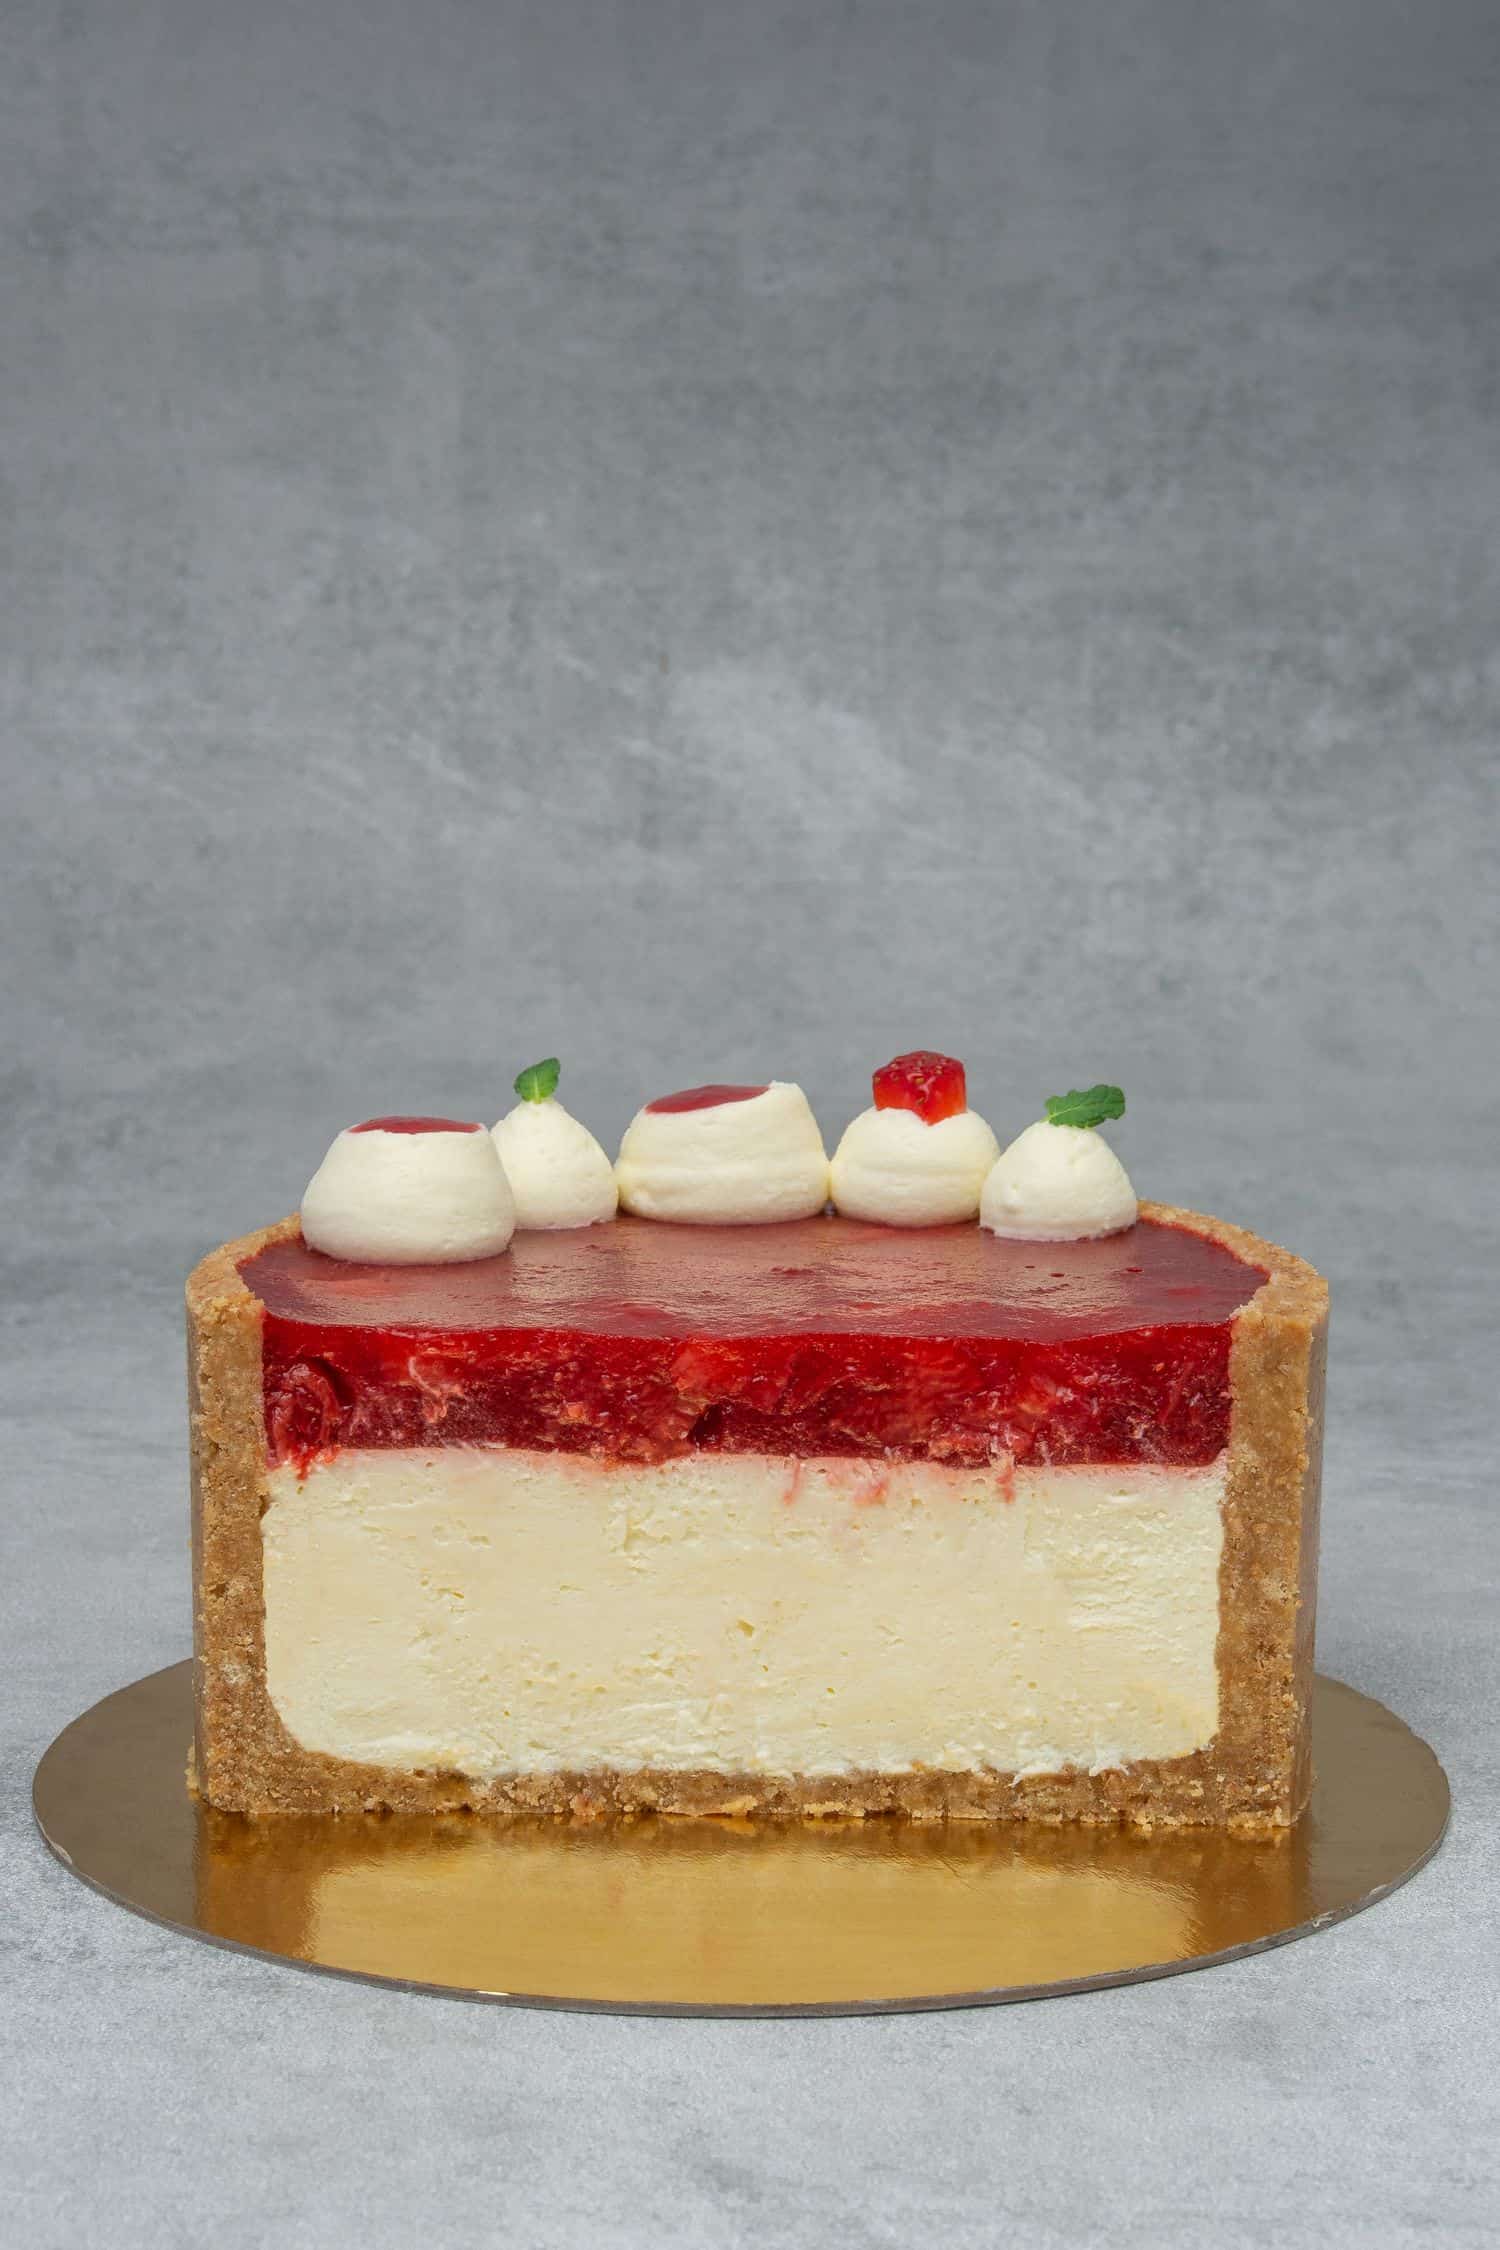
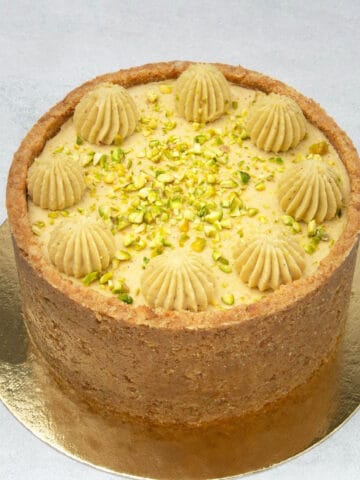
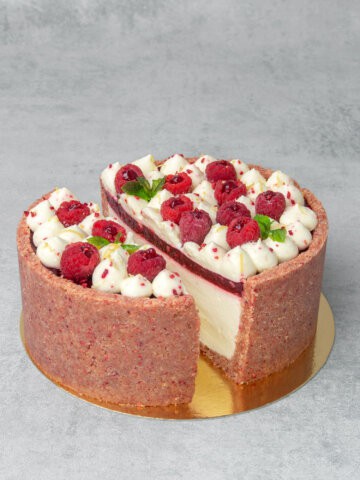
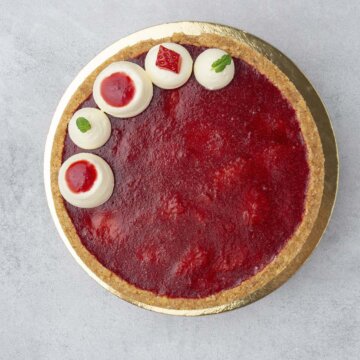
No bake Strawberry Cheesecake with Graham cracker crust is one of the most popular desserts all around the world and no wonder why! It is phenomenal as the silky ultra-creamy cheese filling meets the fruity strawberry compote in the crunchy, sweet Graham cracker crust. This is an absolutely no-fuss Strawberry cheesecake recipe, no baking involved, no issue around the water bath, you do not even have to turn the oven on. Equally delicious as its baked counterpart without all the hassle!
Jump to:
🌟 Why this is the best No-bake Strawberry Cheesecake recipe
- It is rather easy – As fancy as it looks, making this No-bake Strawberry cheesecake is extremely easy, and quick, and no special equipment is needed
- It is super delicious – I never compromise on taste! Creamy delicious cheesecake with fresh strawberry flavors in the most perfect crunchy crust will impress everyone
- It is an honest, detailed tutorial – This is the only Strawberry cheesecake tutorial that you will ever need. While this recipe might look long, all the information I have written here, every tip and trick will help you achieve the perfect results without any issues on the way. Remember, baking is science, and every little detail written here is to help YOU!
📝 Ingredient notes
For the Graham cracker crust (or Digestive crust)

- Butter: Use always unsalted butter as you want to be in control of the quantity of the salt. I am using European-style 82% fat-content butter in all my recipes. The butter needs to be melted. See my notes about the “technique” below
- Biscuit: All you need is biscuit crumbs eg. Graham cracker or Digestive, you can even bake your own biscuit if you fancy making it totally from scratch
- Sugar: No need for extra sugar for the crust given the biscuit already contains enough sugar and it will be crunchy anyway
- Salt: An essential ingredient in most dessert recipes. Balances flavor and enhances other ingredients. This is a lovely sweet crust and I just love that extra very mild salty kick at the end
Please make sure you read my tutorial about the perfect cheesecake crust!
🛒 You’ll find detailed measurements for all Ingredients in the printable version of the Recipe Card at the bottom of this post
For the cream cheese filling
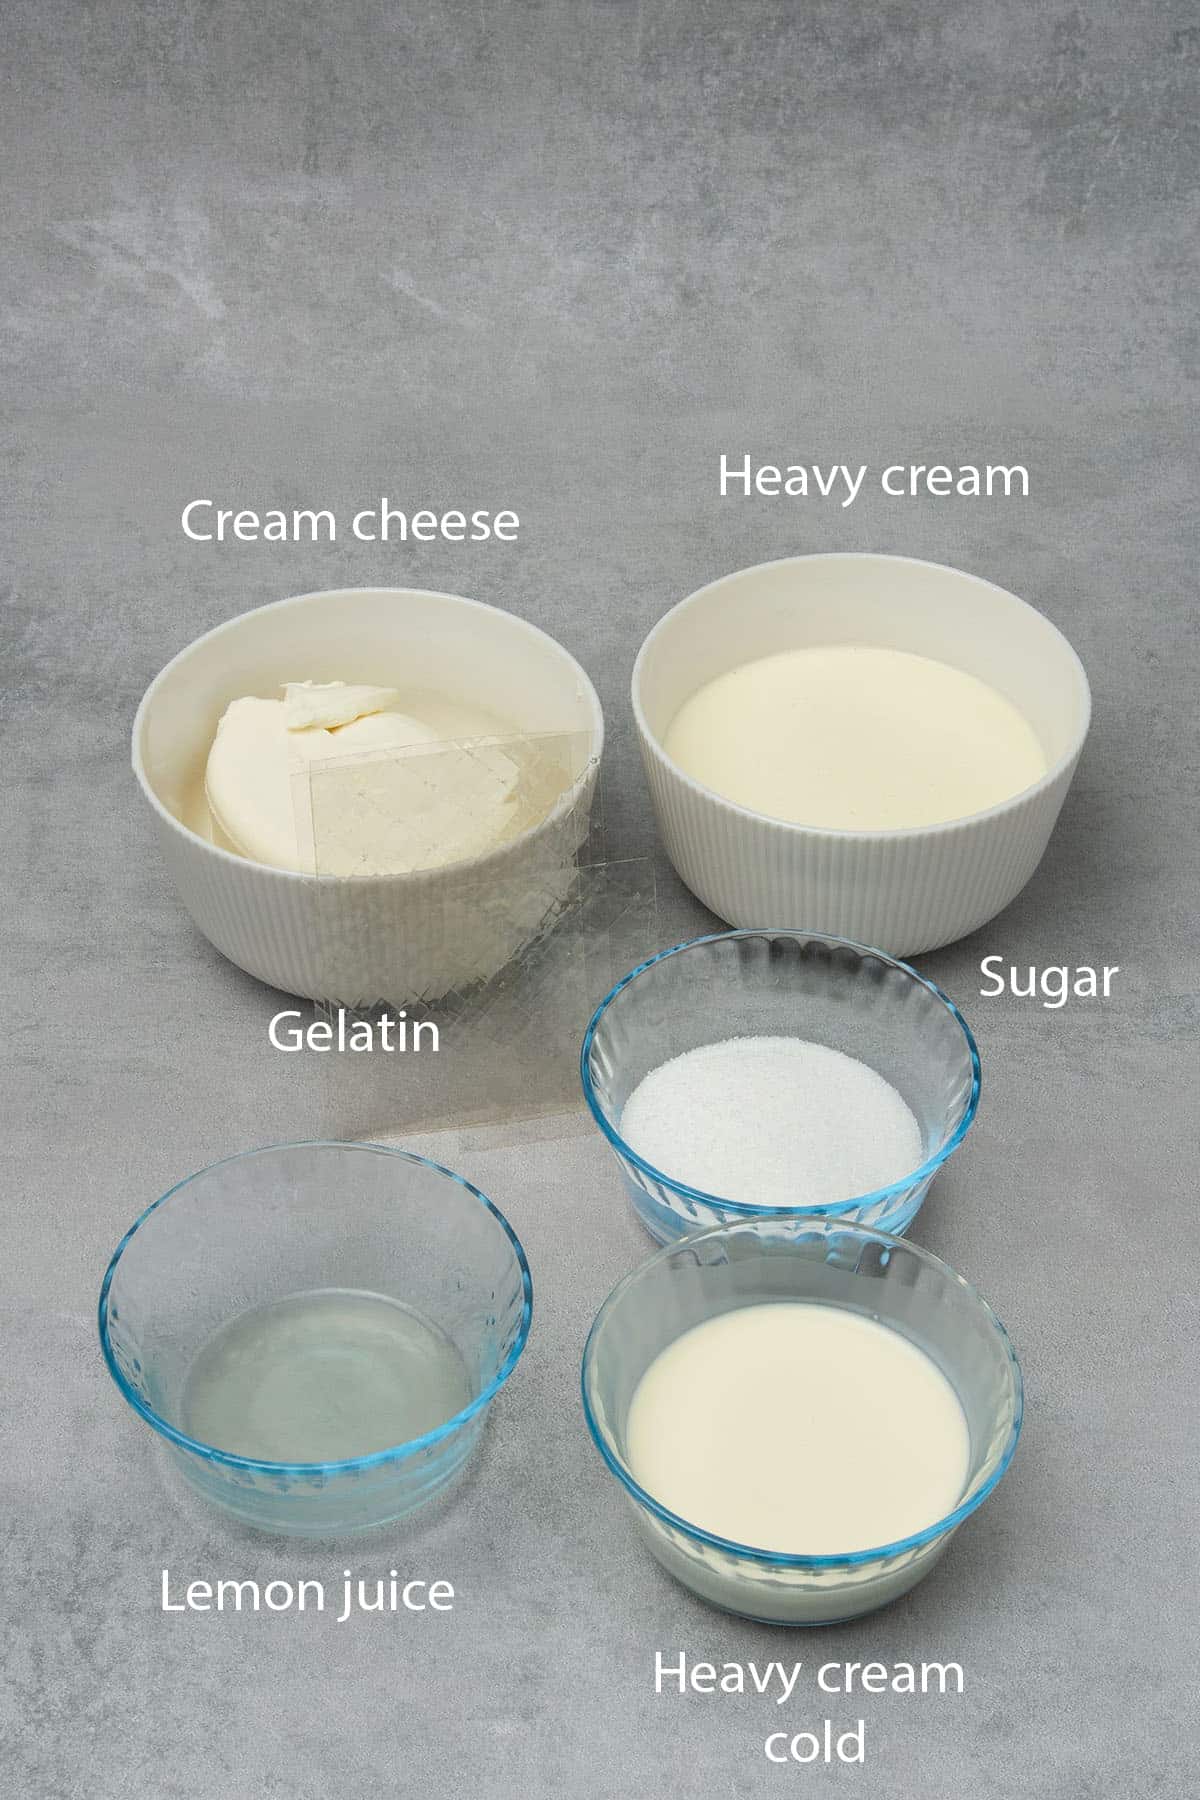
- Gelatin: It´s an odorless, tasteless, and colorless thickening agent, very often used in pastries, particularly in mousse types of cakes. Powder or sheet versions are available, in my recipes I always use sheet (1,7 g / sheet), which I found easier to handle. Simply soak the gelatin sheet in cold water for a few minutes before you need them and use it according to the recipe. Powder gelatin can be used 1:1 so when I state 1 gelatin sheet that means 1,7 g gelatin powder. Please note that gelatin is not suitable for vegetarians. Agar-agar can be a good substitution for vegetarians however replacing gelatin with agar-agar is not 1:1. If you prefer to use agar agar, check my agar agar article for further details.
- Heavy whipping cream: Also known as heavy cream, has a fat content of between 36% and 40%, I usually use double cream that contains 36% fat. Use it very cold and do not substitute it with vegetable-based “whipping cream”. Heavy cream will make the No-bake Strawberry cheesecake filling extra smooth and creamy, effectively a mousse-like consistency
- Granulated sugar: I use simple, white granulated sugar, nothing fancy. I do not use a lot of sugar in this cheesecake so feel free to adjust the quantity if desired. While heating it up with cream make sure the sugar granulates fully dissolve. If you want to learn about the different types of sugar and how to use them in baking, please read my sugar guide.
- Cream cheese: I always use a full-fat Philadelphia tub when I state cream cheese in my recipes. This Philadelphia No bake Strawberry Cheesecake is very pleasant in taste, not too sweet, just enough creamy. I usually whip it with a hand mixer for less than a minute, just until it becomes fluffy and increases a bit in volume to avoid over whipping
- Vanilla extract/paste: Please avoid using artificial vanilla. There are several great brands for fine, pure vanilla, I use Nielsen massey which I love and really recommend. I use vanilla bean paste instead of vanilla extract which has lovely vanilla bits in there too
🛒 You’ll find detailed measurements for all Ingredients in the printable version of the Recipe Card at the bottom of this post
For the strawberry topping
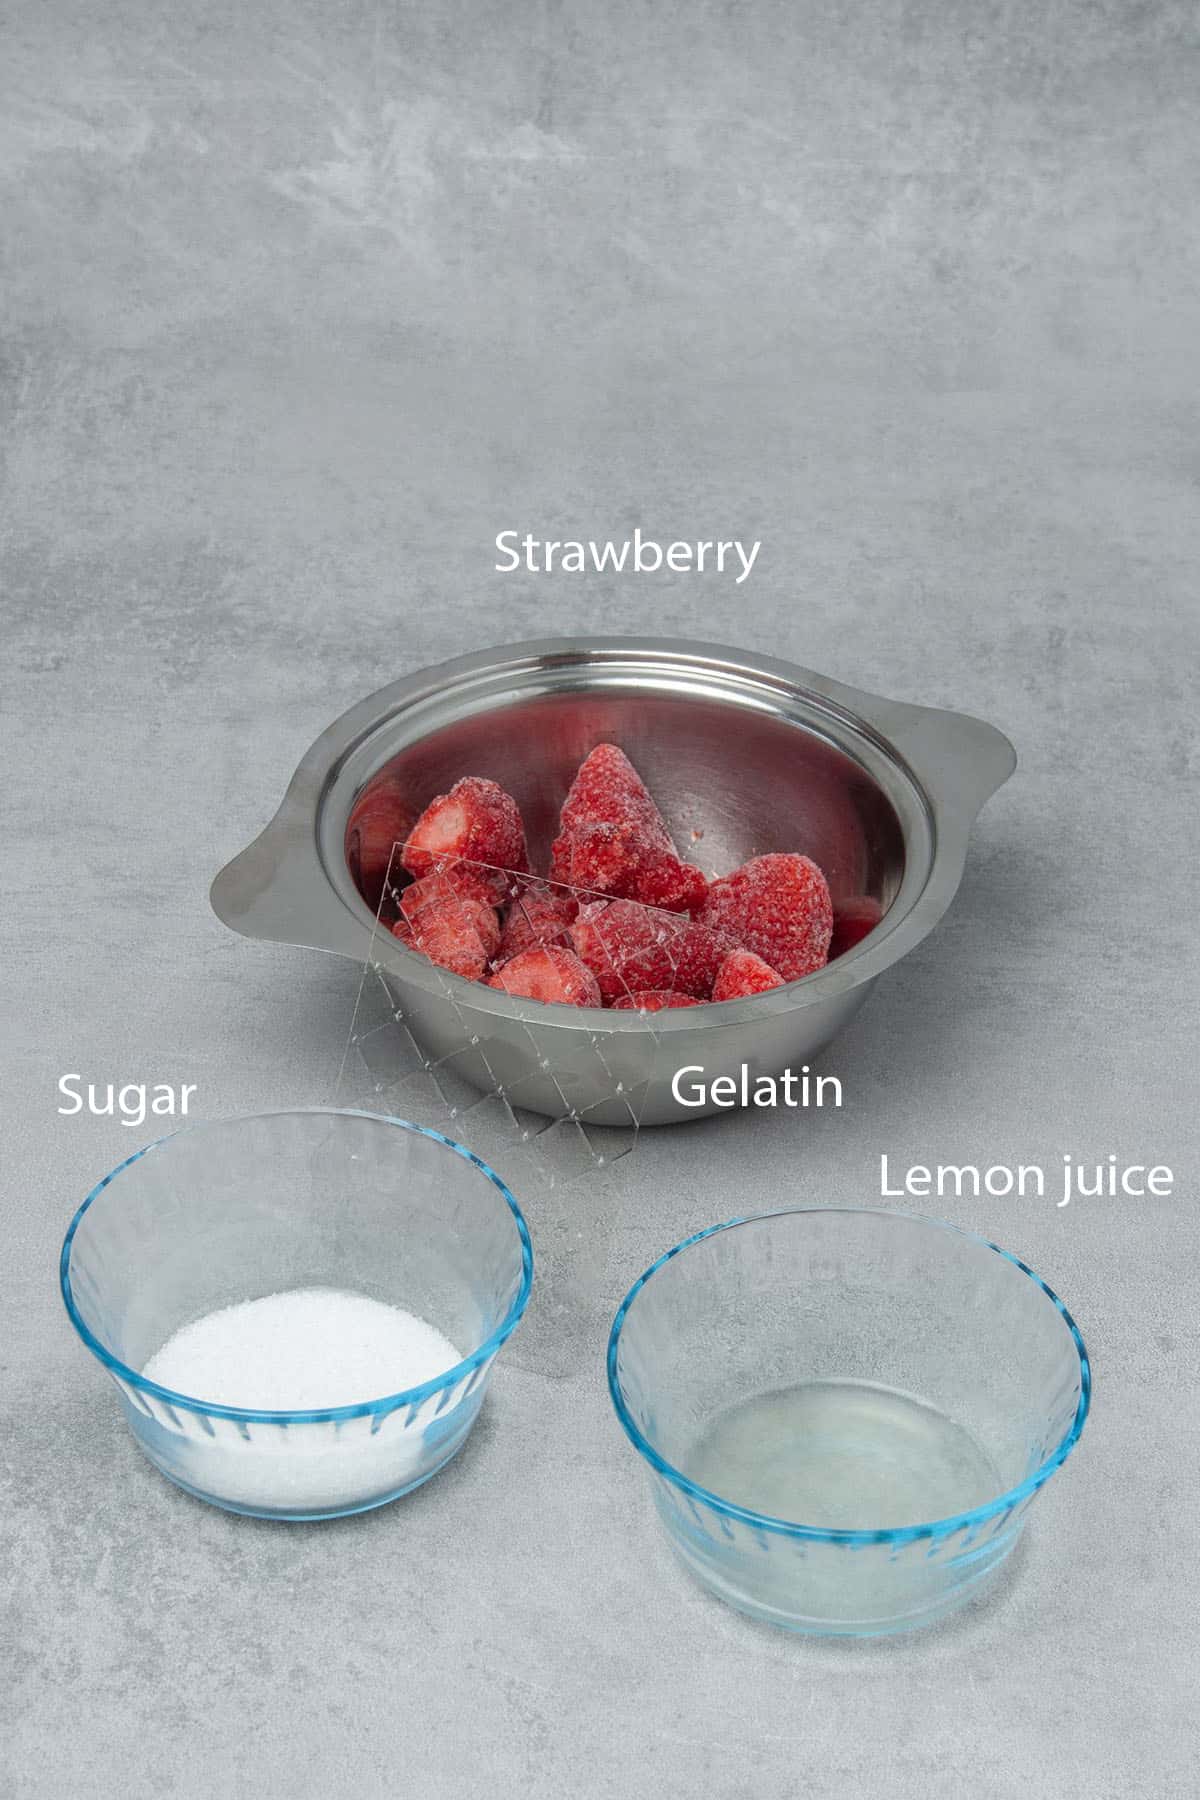
- Strawberry puree: Fresh or frozen strawberries both work well here. I just love how the natural strawberry flavor without using tons of sugar meets the silky cream cheese in this No-bake Strawberry cheesecake. It is so simple yet so delicious!
- Sugar: Granulated sugar is fine to make the topping
- Lemon juice: Use a small amount of freshly squeezed. Lemon juice is needed to balance the sweetness, it won´t taste lemony
- Gelatin: See notes above
🛒 You’ll find detailed measurements for all Ingredients in the printable version of the Recipe Card at the bottom of this post
👩🍳 How to make this recipe
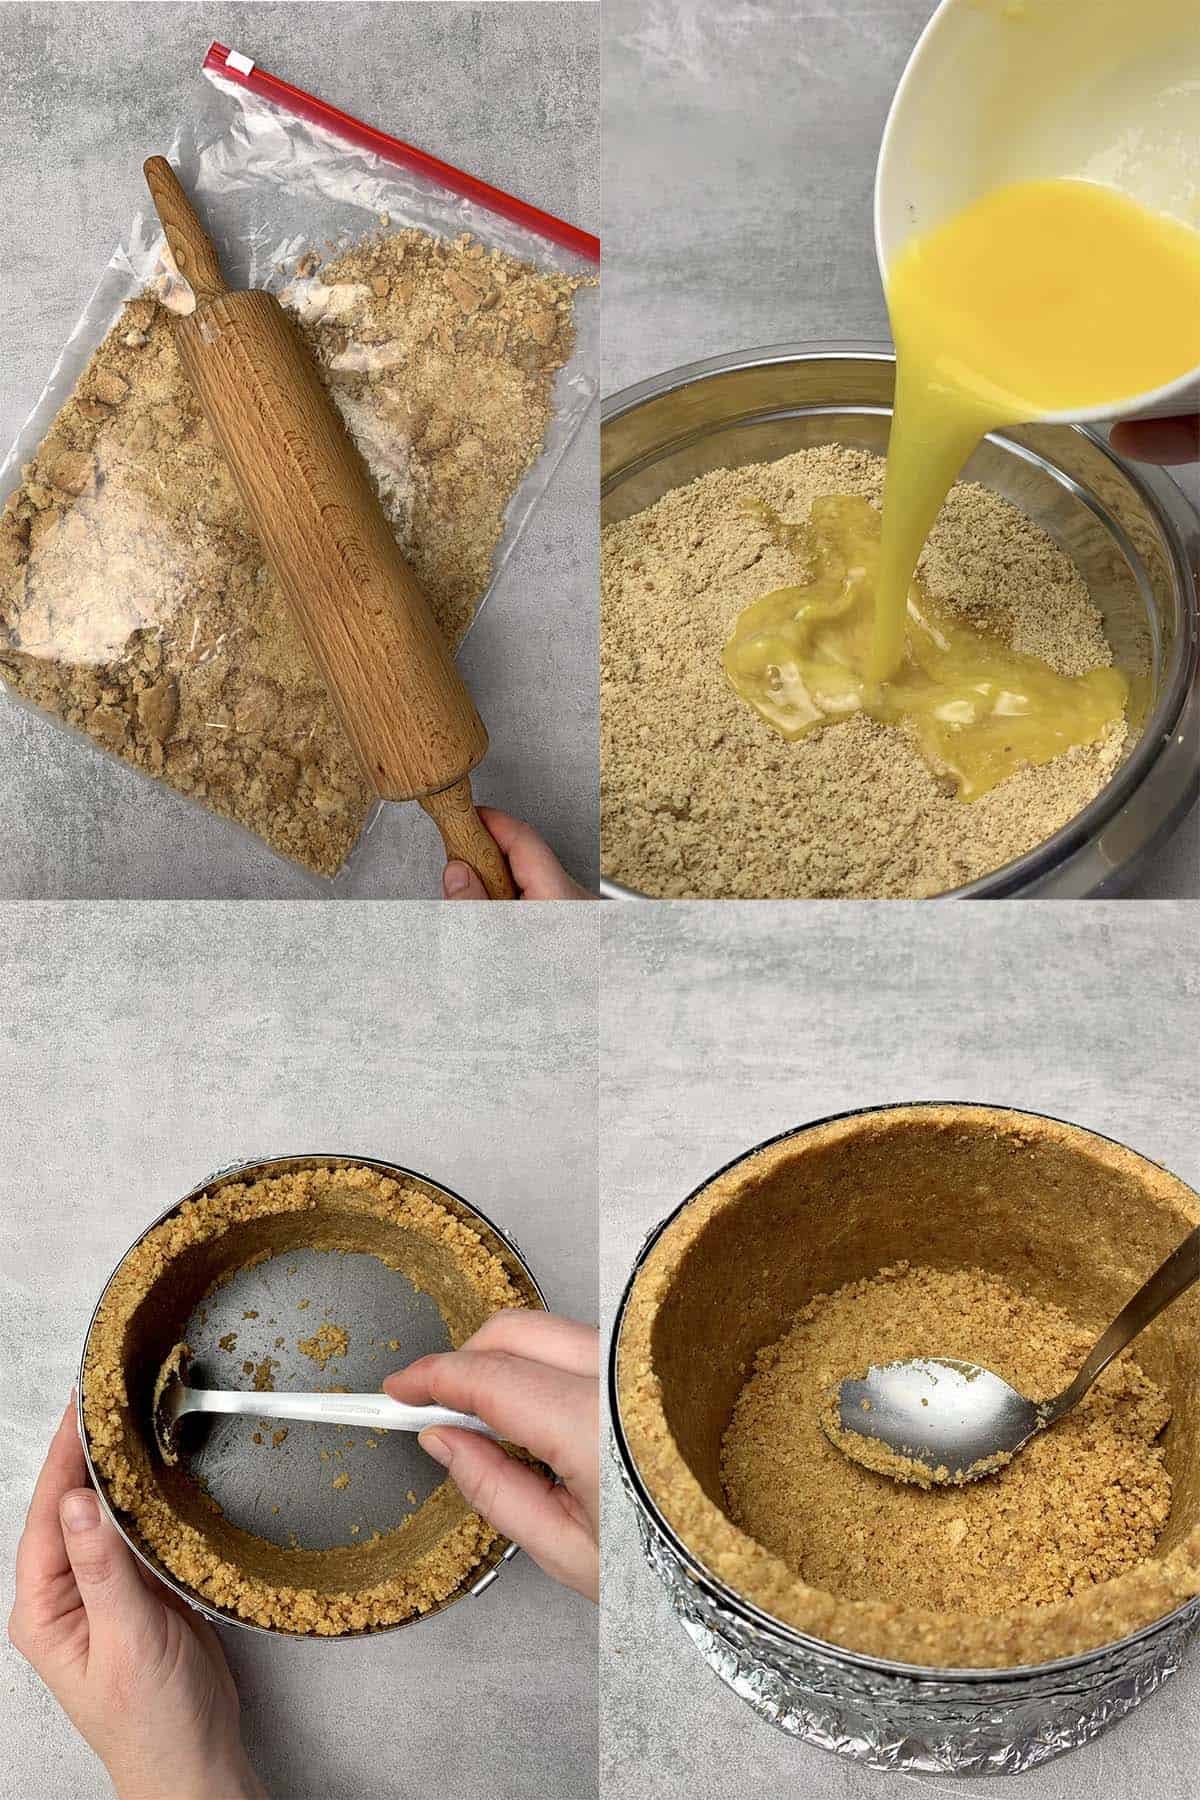
1. Step-by-step process of making the cheesecake crust
Please make sure you read my tutorial about the perfect cheesecake crust which includes more information.
Making no-bake cheesecake crust is literally mixing butter and biscuit crumb, however, there are a couple of important tips and recommendations I would like to share with you:
- Mix melted butter and biscuit crumb while the butter is runny. Butter will act as a binding agent in the recipe. Once it is cooled in the fridge, it will set creating a crunchy, but firm crust to hold the filling. You might have a bad experience from the past with cheesecake crust being too crumbly and not holding its shape, it’s probably due to not enough butter in the recipe
- When butter is melted the mixture might be runny depending on the temperature of the butter but do not add more cracker crumbs. If you feel that the mixture is too runny, pop it into the fridge for 5 minutes, it will set very quickly into a consistency you can use to make the crust with
- The one and only secret to making a firm, neat crust are to press crumbs firmly and evenly into the side and the bottom of your cake ring. Start with the side and work your way up then when it looks neat and even, continue with the bottom.
- Once you are happy with your crust, place it into the freezer and let it set while you are preparing the filling
Since the recipe only uses biscuit crumb and butter, no need to bake it, in fact, this is particularly a No-bake cheesecake crust. The structure is supported by the butter acting like the glue that will set in the fridge holding the biscuit crumbs together.
💡 Top Tip: For pressing the crumbs together, find some equipment in your kitchen eg. a bent spoon. I spent probably a good 10-15 minutes on the crust making sure that it is even on the side and really neat.
2. How to prepare the cream cheese filling
Do not attempt to cut corners and reduce the number of steps, there is a reason why we whip the ingredients separately, then fold them together in a particular order.
- Prepare the gelatin mixture; heat together cream and sugar just until simmering, then mix gelatin sheets in. Once everything is mixed, the key here is to bring the mixture down to a lukewarm temperature before step 2. Too warm? It will melt cream cheese in Step 2. Too cold? Gelatin will set and will be impossible to mix with the rest of the ingredients. Do not place the mixture into the fridge to speed up the chilling process as gelatin can start to form lumps
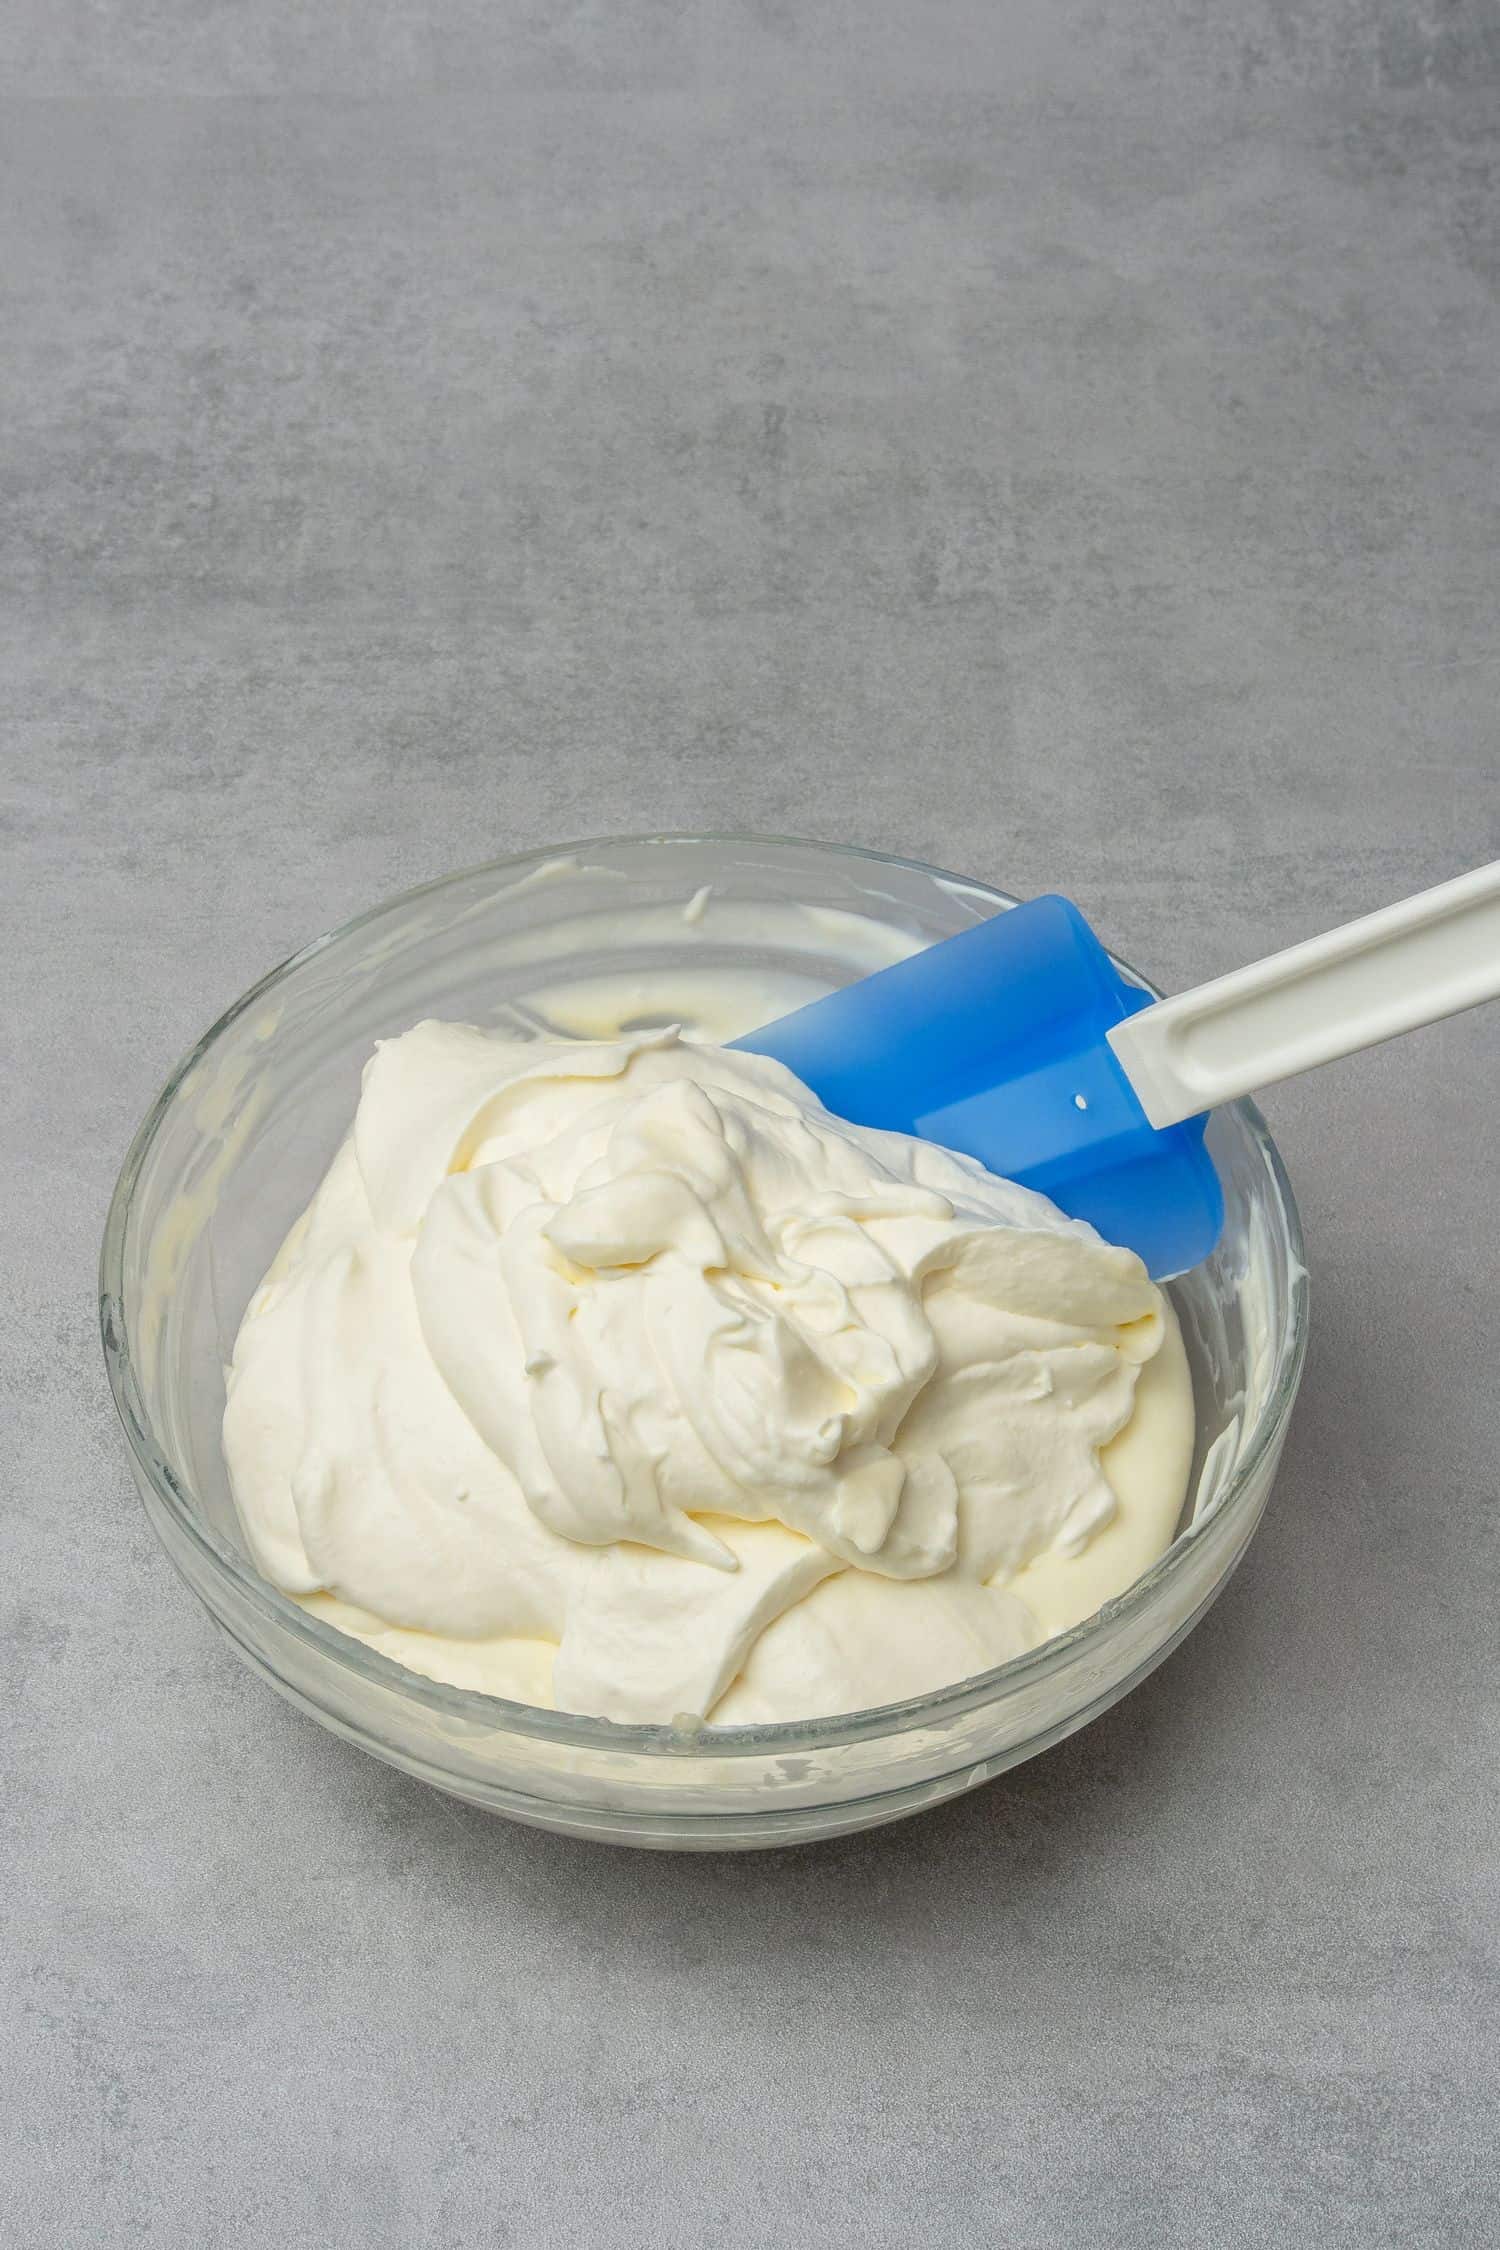
- Whip cream cheese until fluffy, for about a minute. Cream cheese is an interesting ingredient, it won´t get fluffy or harder if you beat it longer, in fact, it will break and become runny. I suggest using an Electric hand mixer to avoid overbeating. Gently fold the whipped cream cheese mixture into the gelatin mixture
- Whip heavy cream until soft peaks. Make sure heavy cream is very cold or it might be difficult to whip up. While whipping heavy cream, remember that it will go through the following stages: runny, soft peak, stiff peak then it will break and a few minutes later buttermilk separates and you can make butter. For this recipe, make sure you stop at a soft peak so it will be easy to fold the mixture together and keep the mixture fluffy without breaking it. Gently fold whipped cream into the rest of the ingredients
Use cream cheese filling immediately. The filling must be fluffy, and airy although it won´t be stiff at this point. Don´t worry, it will set in a few hours due to the gelatin added at step 1
💡 Top Tip: Preparing the filling could not be simpler, one thing that can go wrong is over-mixing instead of gently folding which would result in runny consistency. Make sure to use a flexible rubber spatula to be able to fold the mixture correctly
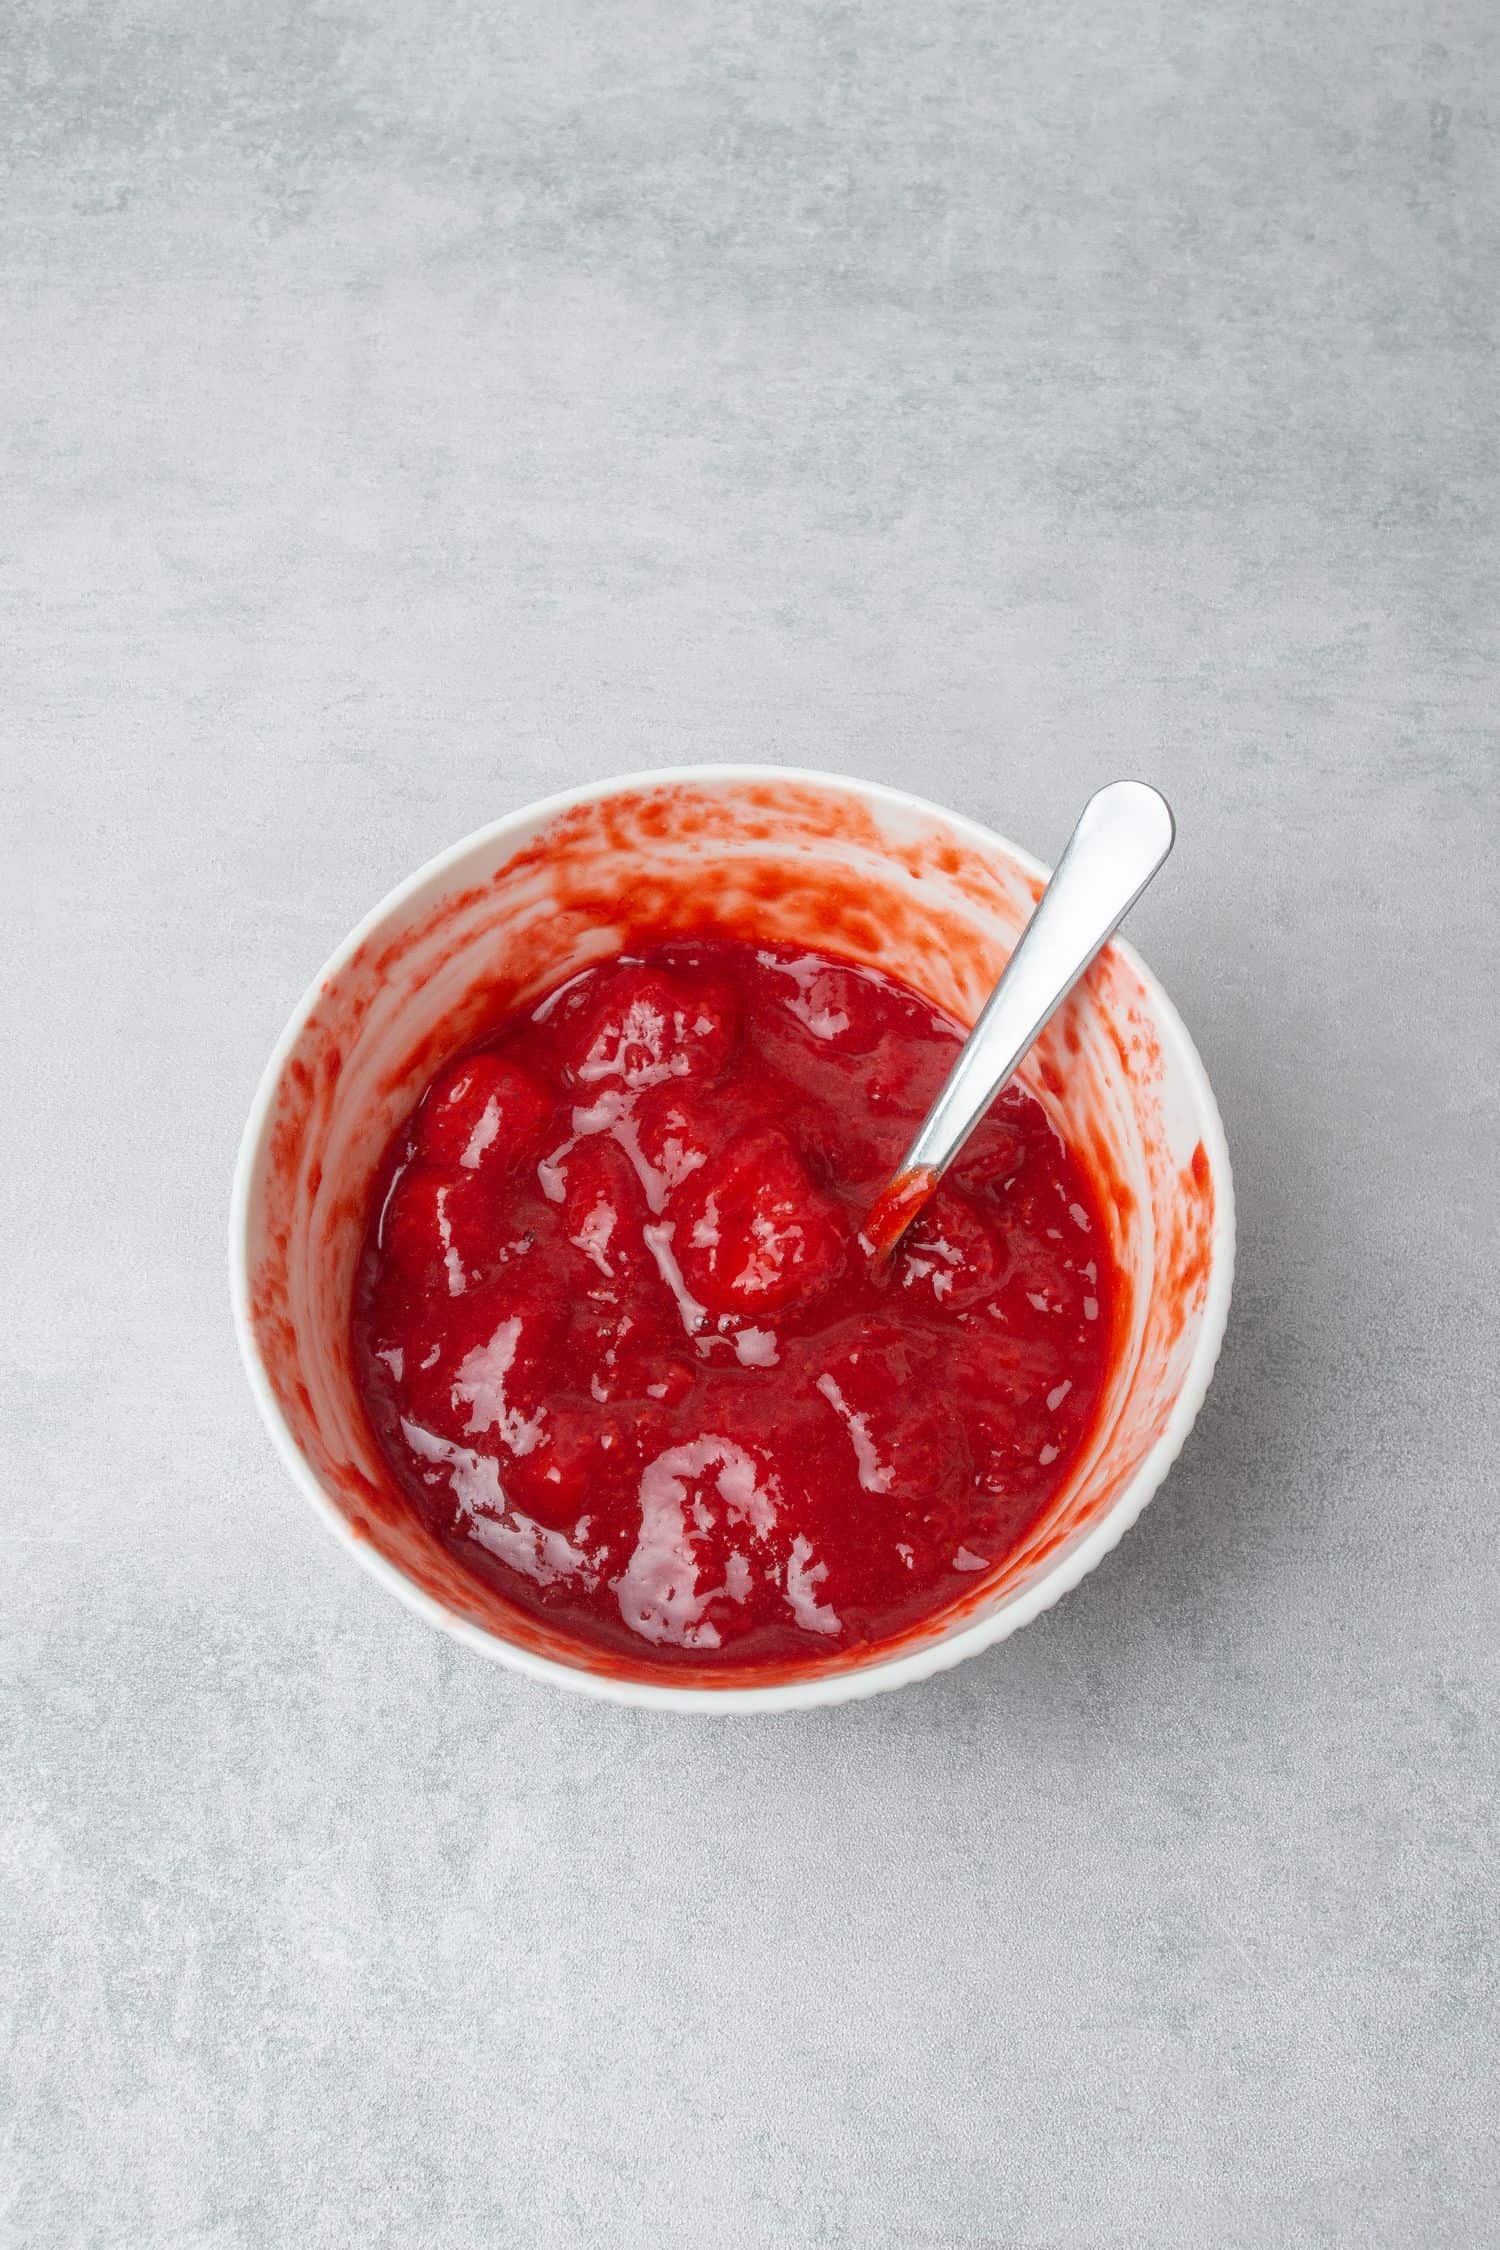
3. How to make the strawberry topping
You can make cheesecake with almost any topping, this one is made with a few ingredients super easy and quick strawberry compote. I like to have a thick layer of fruit on top of the creamy cream cheese filling but feel free to adjust the quantity according to your preference.
- Cook strawberries, sugar, and lemon juice until the mixture slightly thickens about 10-15 minutes. Monitor the consistency as the cooking time can vary depending on the saucepan, stove, and whether you are using frozen or fresh strawberries. The mixture should not fully thicken, we are not aiming to make jam, but the majority of the water should evaporate
- Soak gelatin sheets in cold water
- Squeeze excess water from the gelatin sheets and stir into the strawberry mixture
- Then wait. You will have to find the perfect moment to pour the strawberry mixture onto the cheesecake. If too hot, it will melt the cheese cream. If too cold, the gelatin will already be set and you won´t be able to pour the mixture. Aim to pour the compote over when it is neither hot nor cold, somewhere in between at room temperature
💡 Top Tip: The quantity of the gelatin sheet will depend on how thick you cook the mixture so you might need slightly more or less.
4. How to assemble the cheesecake
It is a super simple recipe, but you have to respect time, concretely leaving enough time in between the steps until each phase sets.
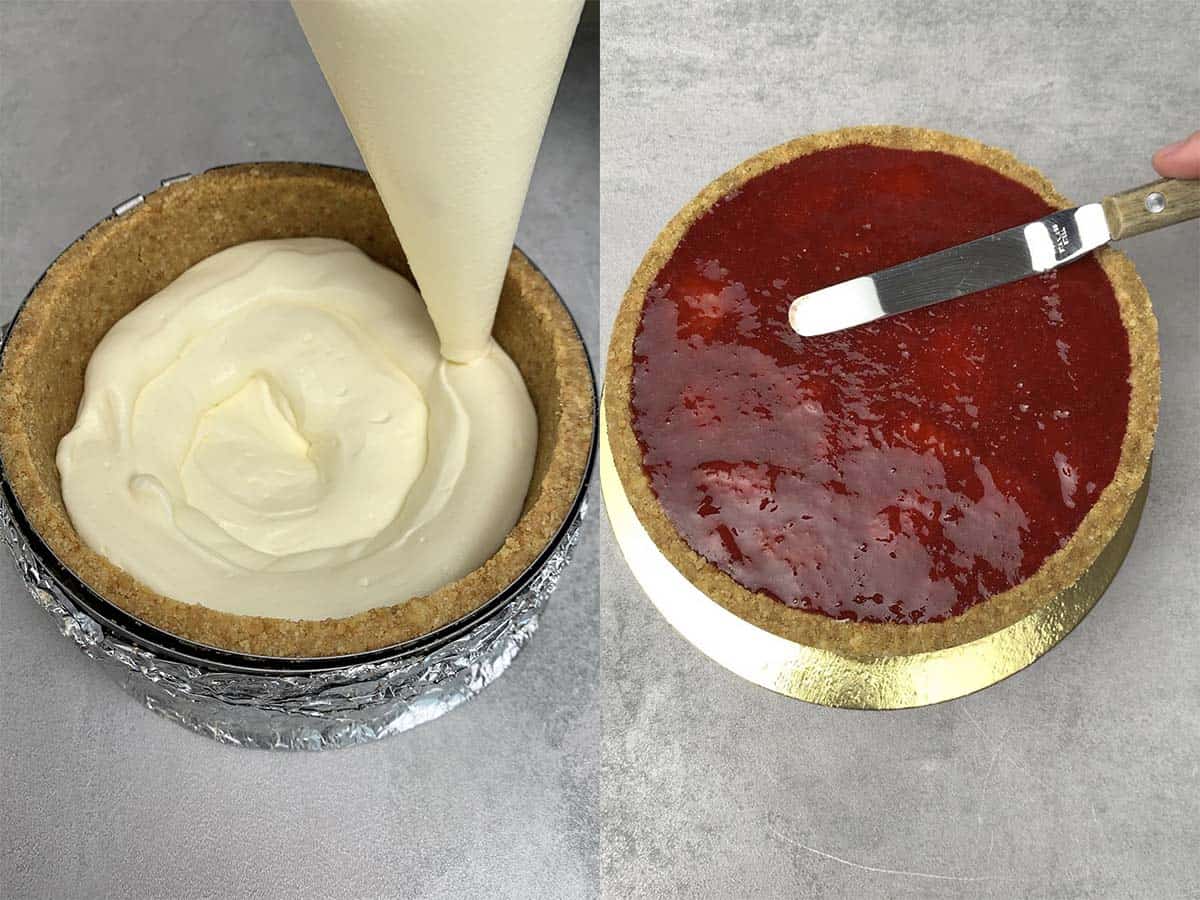
- Freeze the crust for 30 minutes while preparing the cream cheese mousse filling
- Make the cream cheese filling and pipe or pour it into the cold crust
- Move the cheesecake into the fridge and let it set for a minimum of 1-2 hours. Do not attempt to proceed with the strawberry topping before the cheesecake top is properly set or they will melt together
- Make the strawberry topping and let it cool to about room temp. You want it to be warm enough to be able to pour before it sets but not hot that would melt the cheesecake
- Once strawberry compote is on top of the cheesecake again put it back to the fridge for min 4 hours to set. Do not attempt to open the cake ring before that.
- Don´t forget to leave some cream and compote for later to decorate the cake, cover it with plastic wrap and refrigerate
- After 4 hours carefully remove the cake ring, move the remaining cream and topping into a piping bag and decorate your No-bake Strawberry cheesecake
💡 Top Tip: Patience is key when making mousse-type cakes, like this No-bake Strawberry cheesecake. You just can’t rush certain steps or it will make a mess
🥣 Equipment notes
You will be pleased to hear that making this No-bake Strawberry cheesecake does not require too much equipment!
For assembling the cheesecake I am using a Mousse cake ring (adjustable in size) set to 16cm / 6 inches. I really like the neat tall design of it, however, it does not have a bottom so I make one using kitchen foil. Alternatively, use a springform pan but please note that it does not have such a neat side.
For pressing the crumb together I suggest using a spoon that you can bend, it´s that simple!
Use an Electric hand mixer to whip the cream cheese and heavy cream, and a Rubber spatula is absolutely crucial to fold the cream without breaking it.
Last but least, for decoration use a Piping bag with a simple 1A Round nozzle tip.

🎓 Expert tips
- While preparing the crust, make sure that you press the crumbs firmly and evenly into the side and the bottom of your cake ring
- Respect the chilling time. Chilling time is needed for the crust (butter) to set, and also for the gelatin to set in the filling
- Once you are a pro at making this cheesecake crust, feel free to experiment with flavorings eg. adding cinnamon, roasted chopped hazelnuts, freezed dried strawberries, etc.
- Do not over-mix the cream cheese filling. Make sure to use a flexible rubber spatula to be able to fold the mixture correctly
❓ Recipe FAQs
Absolutely, however, please adjust the quantity of the ingredients accordingly
You can totally make cheesecake crust without Graham crackers, eg. by using Digestive biscuits or other hard biscuits depending on what you can access from your supermarket. You can also use Oreos, ice cream cones, pretzels (for a salty kick!), or any homebaked hard biscuit. One thing worth bearing in mind is the fat content of the biscuit, if it is too fatty, it is worth reducing the butter content in the recipe.
Absolutely! Use gluten-free hard biscuits when making the crumbs
Gelatin is very often used by pastry chefs whenever they make a mousse-like airy dessert. If you do not prefer using gelatin, you will have to slightly reformulate the recipe using another thickening ingredient eg. agar-agar, otherwise, the cream won´t set
Yes, but you need to use another cream cheese then that has a similar consistency and fat content. Philadelphia is brilliant when it comes to texture and flavor but feel free to use any other full-fat cream cheese you have available.
It is creamy, airy, and has the perfect consistency for a no-bake cheesecake. Taste-wise, it is not too sweet with a mild vanilla flavor. Since the recipe is using a fair amount of cream, expect the taste very creamy as opposed to very cheesy, if that makes sense?
You can freeze the cheesecake crust before filling, and also the full cheesecake, after the filling is in, however, it might lose somewhat its crunchy & creamy consistency.
The cheesecake is best served within 24 hours, however, can be stored in the fridge for a few days in an air-tight container
🧀 More Cheesecake recipes


Make sure to also check out my Spring Desserts recipe collection!

Have you tried this recipe?
Please leave a 5-star ⭐️⭐️⭐️⭐️⭐️ rating on the recipe card and consider leaving a comment as well! I would love to hear about how your dessert turned out and your feedback also helps other Readers!
No bake Strawberry cheesecake
Equipment
Ingredients
Crust
- 140 g (⅔ cups) Unsalted butter
- 300 g (1⅓ cups) Biscuit crumb eg. Digestive or Graham cracker crumb
- Pinch of salt
Cream cheese filling
- 3 Gelatine sheet 1 gelatin sheet: 1,7g
- 90 g (⅓ cups) Heavy Cream 36% fat
- 100 g (½ cups) Granulated sugar
- 15 g (1 tablespoon) Lemon juice freshly squeezed
- 300 g (1⅓ cups) Cream cheese full fat Philadelphia cream cheese
- 270 g (1 cups) Heavy Cream 36% fat, use it cold
- 2 teaspoon Vanilla bean paste
Strawberry topping
- 400 g (2¾ cups) Strawberry puree fresh or frozen
- 40 g (⅕ cups) Granulated sugar
- 20 g (1⅓ tablespoon) Lemon juice freshly squeezed
- 2.5 Gelatin sheet 1 gelatin sheet: 1,7g
US customary cup measurement is an indicative figure only. Measure the ingredients with a digital scale by weight (gram). Baking is art but also science which requires precision and accuracy.
Instructions
Crust
- Start with melting butter in the microwave then let it cool slightly while preparing the biscuit crumbs
- Biscuit crumbs can be made in a food processor or by using a zip bag and rolling pin. Mix crumbs with the warm but not hot butter and pinch of salt until it comes together
- Line a spring form or Mousse cake ring (adjustable in size) (set it to 16cm / 6 inches) with the mixture and press it flat evenly and tightly starting with the side, then moving onto the bottom. If the mixture is too runny, place it in the fridge for a few minutes. Once the crust is evenly distributed, place it into the freezer while preparing the filling
Cream cheese filling
- Soak gelatin sheets into cold water
- Heat the smaller amount of heavy cream (90g) with sugar until sugar dissolves and the mixture is simmering
- Squeeze excess water from gelatin and stir into the mixture then stir in lemon juice. Let gelatin mixture come to room temp
- In another bowl whip cream cheese and vanilla bean paste with an electric hand mixer until light and fluffy then fold in the lukewarm (not hot) gelatin mixture with the help of a Rubber spatula
- In a separate bowl whip heavy cream until soft peaks and very gently, using a Rubber spatula fold into the cream cheese mixture. It must stay light and fluffy before pouring into the crust
- Pour or pipe filling into the crust and smooth the top with an Offset spatula. Place it into the fridge for 1-2 hours until filling top properly set
- Set some filling aside for the decor and refrigerate
Topping
- Soak gelatin sheet in cold water. Cook strawberries, sugar, and lemon juice for about 10 minutes until mixture slightly thickens and some water evaporates
- Squeeze excess water from the gelatin and stir into the strawberry mixture. Let topping slightly cool to about room temp before pouring it onto the cheesecake.
- Leave cheesecake now with the topping on it to set in the fridge for min 4 hours
Decoration
- Once cheesecake sets, very carefully remove the ring / spring form
- Decorate with the remaining cream cheese filling, strawberry compote and / or fresh strawberries
- Store in fridge
Notes
- While preparing the crust, make sure that you press the crumbs firmly and evenly into the side and the bottom of your cake ring
- Respect the chilling time. Chilling time is needed for the crust (butter) to set, also for the gelatin to set in the filling
- Once you are a pro making this cheesecake crust, feel free to experiment with flavorings eg. adding cinnamon, roasted chopped hazelnuts, freezed dried strawberries, etc.
- Do not over-mix the cream cheese filling. Make sure to use a flexible rubber spatula to be able to fold the mixture correctly
Devina
Hi Kata,
Love this recipe. I am trying to make it again but I noticed the notes on gelatin are no longer there. Do you use silver or gold gelatin? Also, can you please confirm the weight per sheet is 1.7grams.
Thank you!
Katalin Nagy
Hey, I haven´t touched this recipe since 2021 and all the gelatin information is in the recipe card, as well as above where I write information about the ingredients.
Morgan Wilkins
Hi ! Is it ok to use marscarpone or does it have to be cream cheese? Thankyou🙂🙂
Kata
Hey, it won´t really taste like cheesecake without cream cheese but texture wise mascarpone can be a good substitution.
Flora
The best cheesecake we ever had. Better than the ones served in good restaurants. Recipe may seem difficult but it is very easy and quick and totally worth it.
Nathalie van loo
Very good! 🙂
Renee
This looks great! Do you think this would freeze well?
admin
I have not tried freezing it but since this is effectively a mousse, it should work
Devina
Great recipe! Really appreciate your detailed instructions
Firdaus Khan
Absolutely loved it thanks for detailed recipe!!! ☺️🤩
Larisa Albulescu
Love it❤️
Via
I love it 💗
Rianka
Awesome to see and awesome to eat! You think it’s difficult but it turns out to be easier than you think. Love this one too!