If you're looking for the ultimate Oreo brownies, you're in the right place! This simple yet indulgent recipe infuses rich, fudgy brownies with crunchy chocolate Oreo cookies for a decadent combination that will easily become a favorite for all ages! Serve them alongside a bowl of vanilla ice cream for the ultimate party dessert or after-dinner treat.
If You Are Unsure... Reason Why This Is Truly The Best Oreo Brownies Recipe
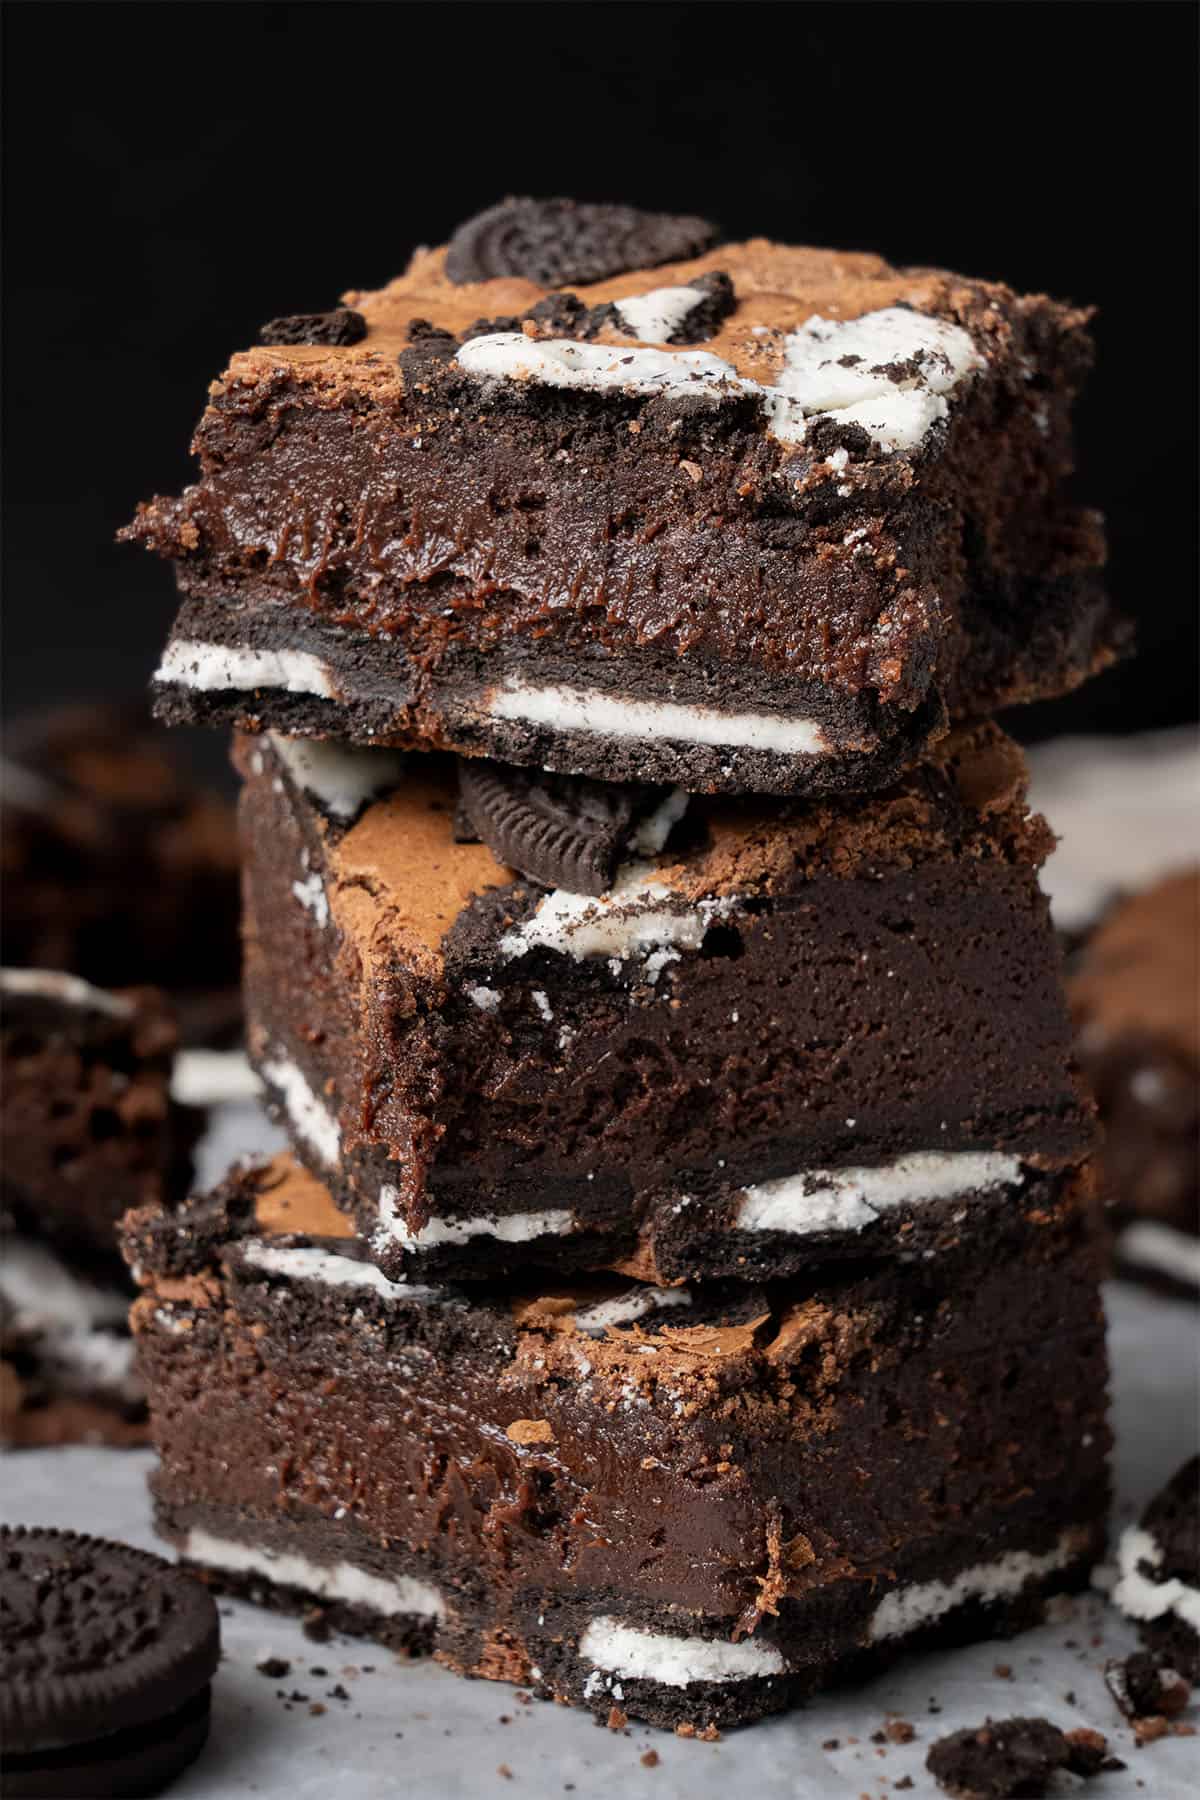
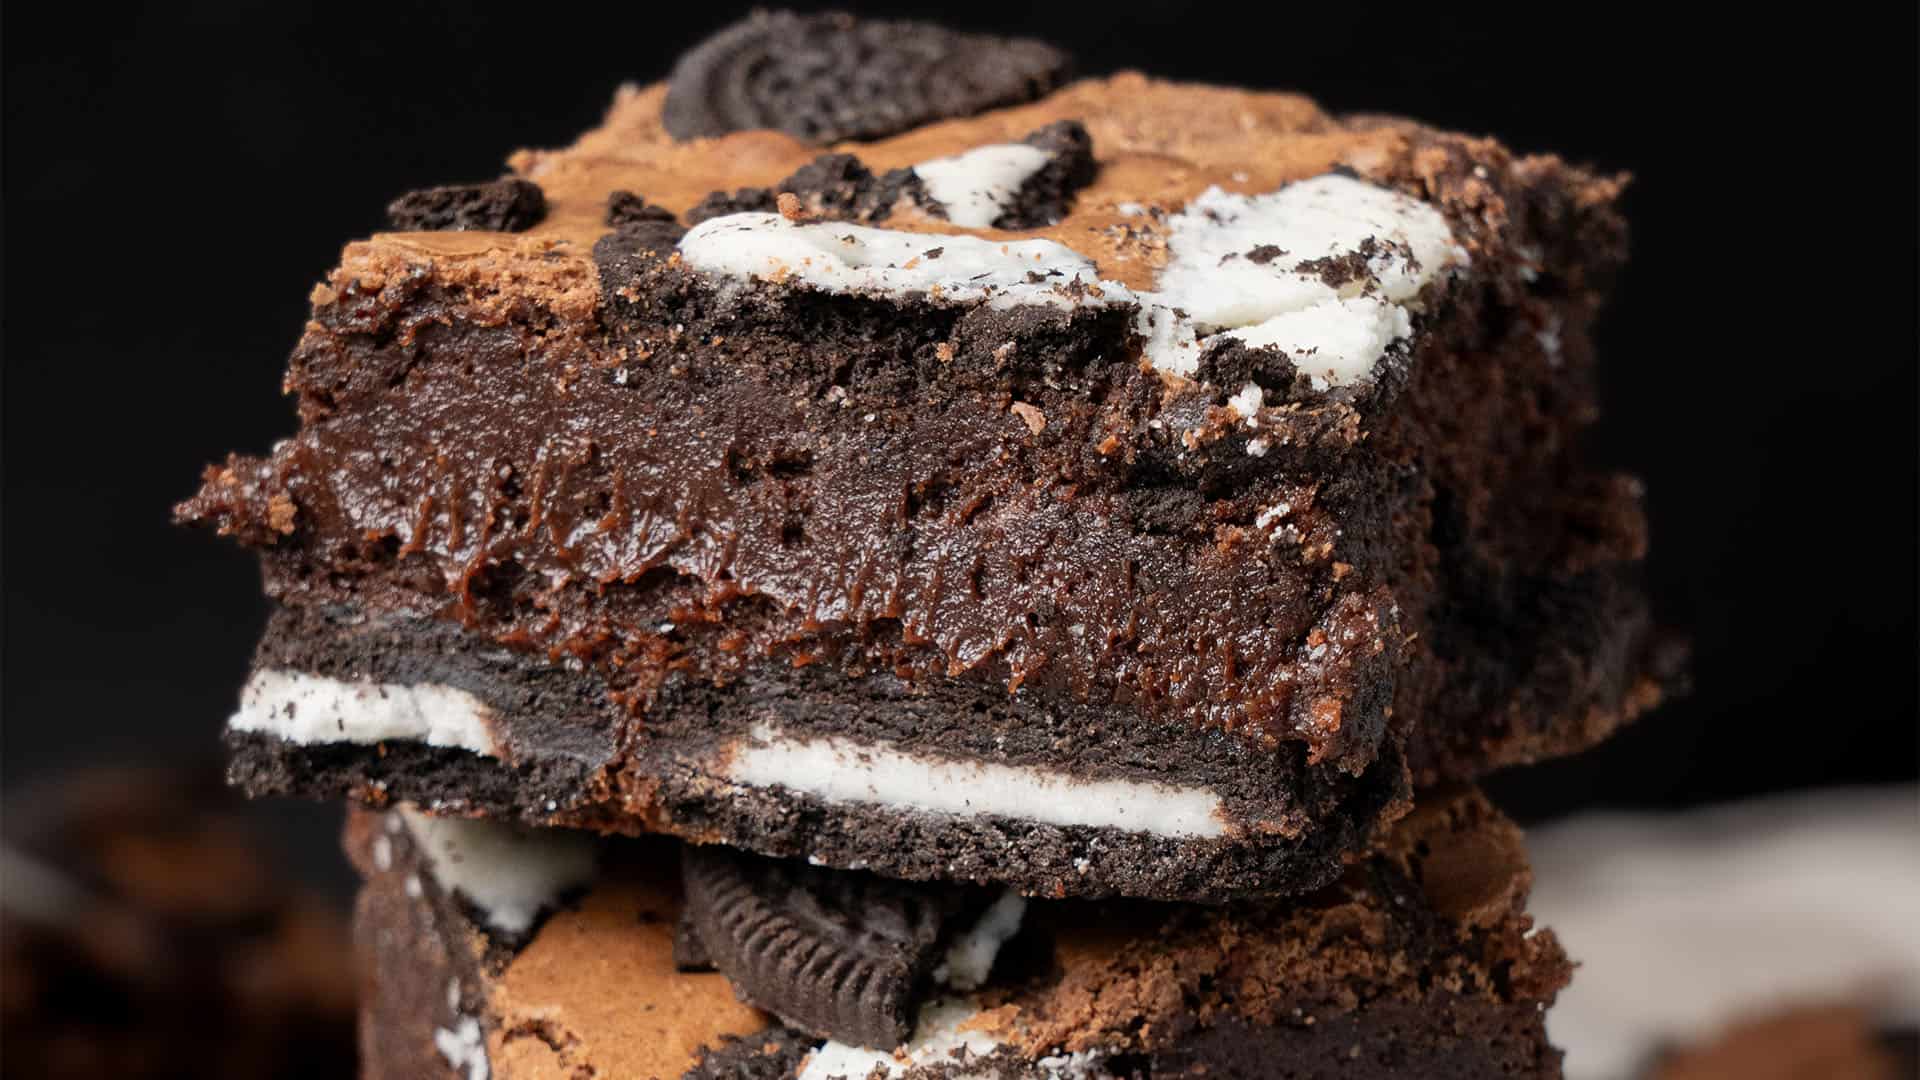
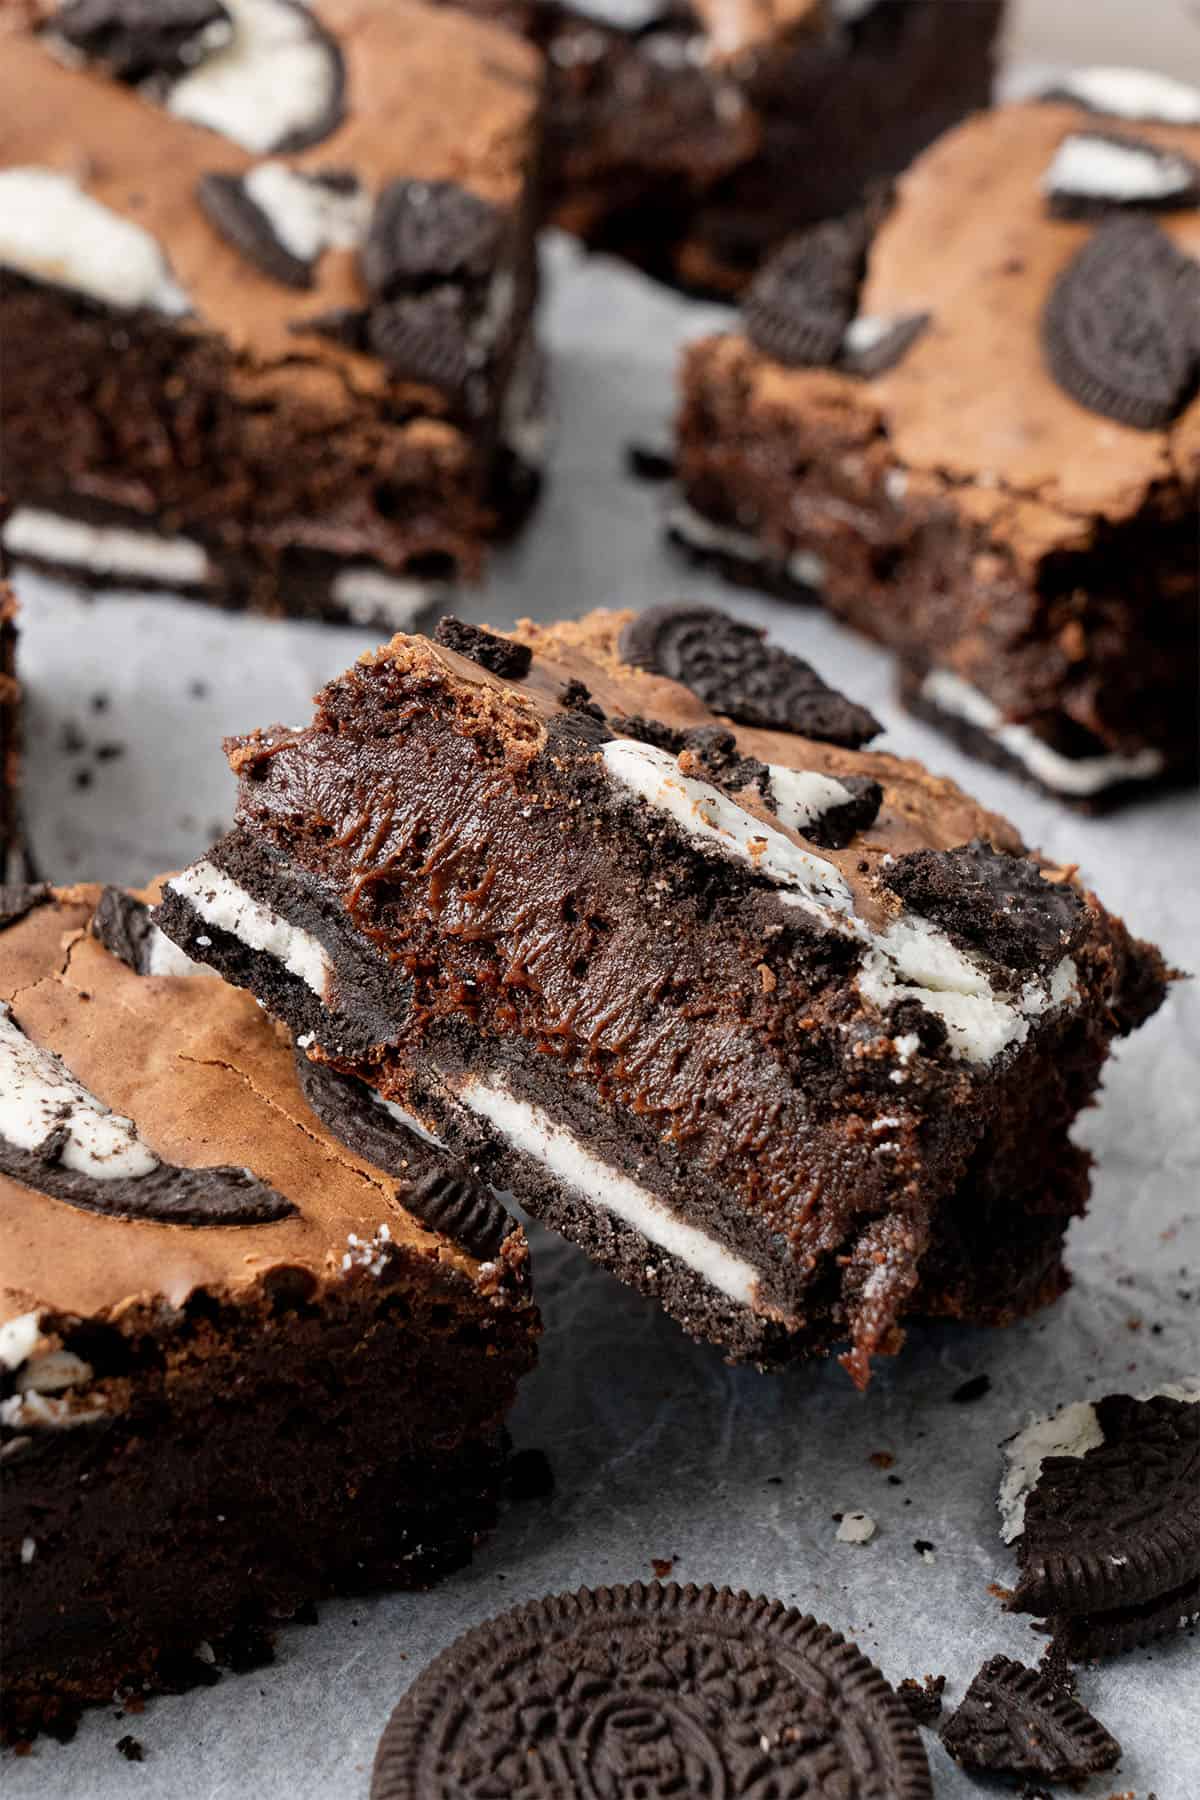
This easy Oreo brownies recipe combines two classic dessert favorites into one convenient handheld treat. By taking my tried-and-true gooey fudge brownies and layering them with Oreos on both the bottom and top, you get a dessert that's as aesthetically pleasing as they are delicious!
No special ingredients or equipment are needed to make these brownies, making them as convenient as indulgent. They require fewer than 10 ingredients, most likely already in your pantry. Whether you're an experienced baker or a beginner, the straightforward yet detailed instructions ensure that anyone can achieve chocolatey perfection.
But what sets these fudgy Oreo brownies apart the most from other recipes is the perfect blend of high-quality ingredients and foolproof technique to make them. Each bite is a flavor and texture experience that comes from using only the best ingredients and techniques: premium chocolate, high-fat butter, and the ideal ratio of pantry staples.
Whether making these for a casual snack or a dessert to impress your guests, these brownies certainly will not disappoint!
Katalin's Take On How To Make Brownies Gooey & Fudge
Creating gooey and fudgy brownies requires the perfect blend of ingredients and technique to achieve that luscious texture and rich flavor that will have you running back for seconds (and maybe even thirds)!
To keep your brownies irresistibly moist and fudgy, it is critical to have a high fat-to-flour ratio. By using a generous amount of butter, you help create that dense, melt-in-your-mouth consistency, while folding in crushed Oreos adds bits of chocolatey crunch without drying out the batter.
In all of my brownie recipes, I avoid adding baking powder or baking soda. These leaveners make the brownies rise and become too cake-like, taking away from their dense, fudgy texture that makes brownies sink between teeth. Additionally, it's important to be mindful when mixing.
Once you've added the dry ingredients, switch to a rubber spatula and gently fold the batter until just combined. This keeps gluten development to a minimum and ensures a tender texture while allowing the Oreo chunks to remain intact.
Timing is also super crucial when baking. The edges should be set, but the center should appear slightly underdone when you pull the brownies from the oven. They'll continue to firm up as they cool, locking in that gooey center while maintaining their rich chocolate flavor.

This Brownie Batter Requires No More Than 10 Minutes of Your Life
Before starting, your eggs must be at room temperature to emulsify correctly. To do so quickly, stick them in a bowl of warm water for 5-10 minutes.
Preheat your oven to 175°C / 350°F (no fan). Lightly grease a 9-inch (23 cm) brownie pan with a touch of oil, then line it with parchment paper. Make sure the paper covers both the bottom and sides for easy removal later.
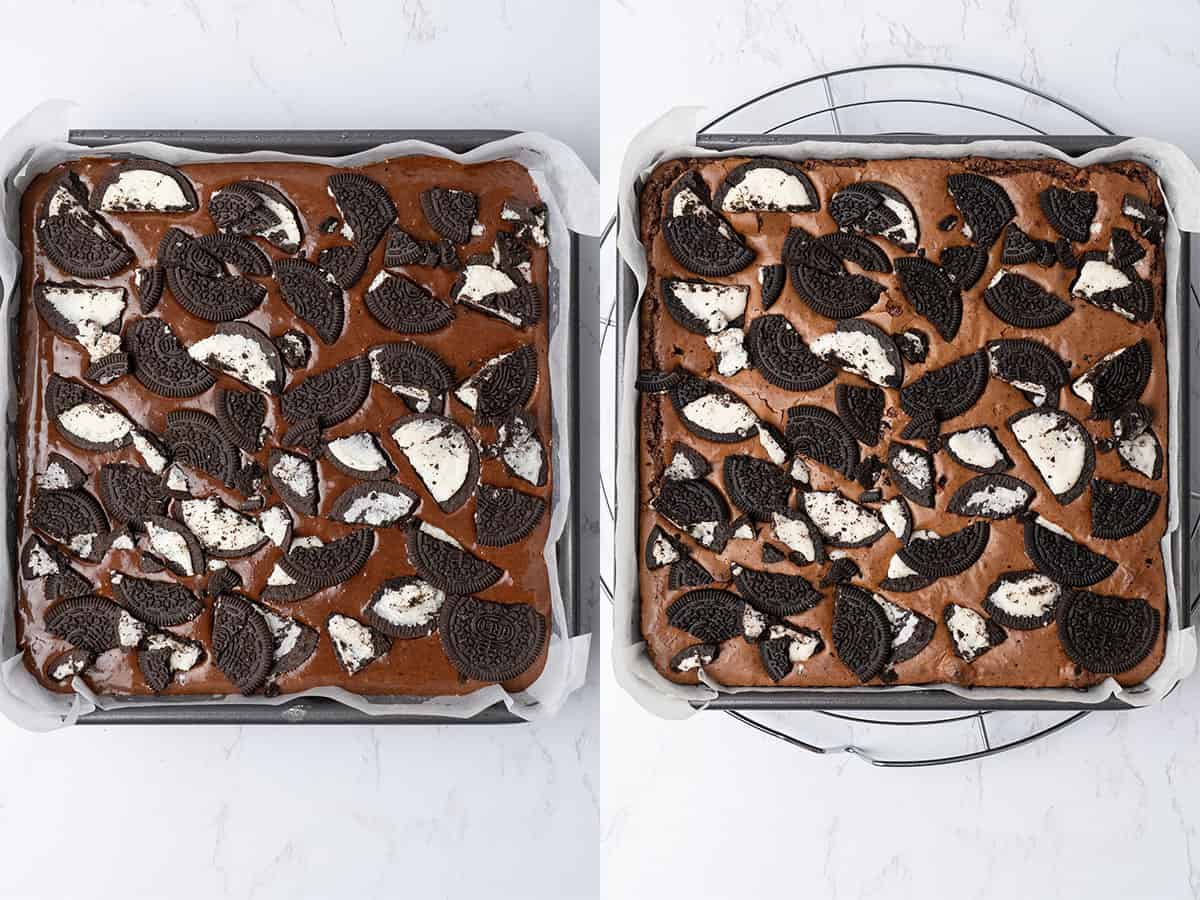
Arrange the Oreo cookies in the base of the prepared pan (16 Oreos fit perfectly in mine), then set the pan aside.
Next, gently melt the chocolate and butter (unsalted butter only to prevent salty brownies) together using a heatproof bowl placed over a pot of simmering water on low-medium heat. Occasionally, stir it using a rubber spatula and scrape any chocolate from the sides to keep it from burning. If you prefer the microwave, heat in short intervals, stirring between each interval.

In a separate bowl, whip the eggs and both the granulated and brown sugar using an electric hand mixer or stand mixer for 5-7 minutes until the mixture becomes pale.

While the mixer is on low speed, gradually add the melted butter and chocolate to the egg-sugar mixture.

Sift the dry ingredients—all purpose flour, cocoa powder, and salt—into the wet ingredients. Do not skip the salt, as it plays a key part in balancing the sweetness!

Use a rubber spatula to gently fold everything together, being careful not to overmix (which can affect the texture).
Pour the batter evenly over the Oreo layer in the baking pan, using an offset spatula to ensure the cookies are completely and evenly covered. For even more crunchy Oreo flavor, sprinkle crushed Oreo cookies over the top!

Never Overbake Your Brownies
Bake the Oreo brownies at 175°C / 350°F for approximately 35-40 minutes. They're ready when the edges appear fully baked while the center remains slightly gooey but not undercooked. Avoid overbaking, as the brownies will continue to firm up as they cool.
Allow the brownies to cool completely in the pan before slicing and serving.
Doubt There Will Be Leftovers, But If So..
If you should have leftovers of your Oreo brownies (although it is hard to imagine you will), keep them fresh by storing them in an airtight container at room temperature for 2-3 days.
To freeze individual slices, first let the brownies cool completely to room temperature. Wrap each slice tightly in parchment paper, then in aluminum foil. Place the wrapped brownies in a freezer-safe plastic bag and freeze for up to three months. When ready to enjoy, thaw them at room temperature.
For additional storage tips, check out my guide on storing brownies.
Play With the Flavors
Instead of regular Oreos, switch up the taste with different flavor varieties. Imagine how delicious they taste with mint, vanilla, birthday cake, or red velvet Oreos!
For extra chocolatey Oreo brownies, you can mix dark or milk chocolate chips into the batter, which is similar to how I do in my triple chocolate brownies. You can also try them with butterscotch, toffee, or peanut butter chips (or a combination of the above).
Enhance the chocolate flavor of the brownies with freshly brewed coffee, as in my coffee brownies and espresso brownie recipes.
Give your Oreo brownies a nutty flavor and more crunch by folding crushed almonds, pecans, or macadamia nuts into batter. See my pecan brownies recipe for inspiration!
For an extra fun treat, add a layer of chocolate chip cookies as I do in my slutty brownie recipe, or combine this recipe with my cheesecake brownies recipe to make Oreo cheesecake brownies!
You can also add a delicious finishing touch by sprinkling on sea salt or dusting powdered sugar over the top.
Substitute The Ingredients Wisely
When making substitutions, remember that even small changes may require adjustments to the other ingredient quantities and will alter the flavor and texture.
To make these brownies dairy-free, swap butter for margarine and use vegan chocolate instead of regular chocolate. Or, you can use my dairy-free brownies as a base. For a butter-free version, check out my butter substitution guide for options that preserve flavor and texture.
For an egg-free alternative, you can try one of the options in my egg substitution guide. If you need a gluten-free version, refer to my flour guide for suitable substitutes.
Boxed brownie mix can be a convenient substitute if you're short on time (although not nearly as delicious).
Expert Tips For Making Oreo Brownies
- For the best flavor and texture, always opt for full-fat options like European-style butter with 82% fat content, premium dark semisweet chocolate (such as Callebaut or Lindt), and 100% unsweetened cocoa powder. Use Dutch-processed cocoa for the best results.
- If you prefer a softer, fudgier brownie, consider taking them out of the oven slightly earlier than stated in the recipe.
- Run your knife under hot water before cutting to achieve clean, picture-perfect slices. It will prevent sticking and give the brownies a neat finish.
- Resist the urge to reduce the sugar, as it's essential for creating the ideal texture and forming that signature crackly top.
- A reflective metal pan is the best choice for evenly baked brownies. If using a glass or ceramic pan, you will want to increase the bake time by about 10 minutes, as they typically take longer to heat up and bake through.
Useful Equipments
Accuracy and precision are key in baking, so it's best to weigh your ingredients with a digital scale instead of relying on measuring cups. Additionally, using a digital oven thermometer will ensure your oven reaches the correct temperature for perfect results.
An electric hand mixer is essential for whipping together the eggs and sugar. However, you will need to switch to a rubber spatula to fold the dry ingredients into the batter gently without overmixing.
For this recipe, you'll need a 9-inch (23 cm) square pan for baking and an offset spatula to evenly spread the batter once it's in the pan.
Try Some Of My Other Brownie Recipes
If you loved these irresistibly delicious Oreo brownies, you will love these other brownie treats that put a twist on your favorite desserts:
- Slutty Brownies
- Nutella Brownies
- Cheesecake Brownies
- Tiramisu Brownies
- Biscoff Brownies
- Red Velvet Brownies
For even more fun and eye-catching desserts that will easily steal the show at your next gathering, check out this roundup of the 50+ Best Unique Desserts.
Have You Tried This Recipe?
Please leave a 5-star ⭐️⭐️⭐️⭐️⭐️ rating on the recipe card and consider leaving a comment as well!

Oreo Brownies
Equipment
- 9 inch / 23 cm brownie pan
Ingredients
Oreo Brownies
- 130 g (¾ cups) Dark Chocolate use high quality semi-sweet chocolate eg. Callebaut or Lindt
- 120 g (½ cups) Unsalted butter
- 3 Eggs at room temperature
- 150 g (¾ cups) Granulated sugar
- 100 g (½ cups) Brown sugar
- 33 g (⅓ cups) Cocoa powder unsweetened Dutch processed
- 90 g (¾ cups) All purpose flour
- ¼ teaspoon Salt
- 23 pieces Oreos
US customary cup measurement is an indicative figure only. Measure the ingredients with a digital scale by weight (gram). Baking is art but also science which requires precision and accuracy.
Instructions
- Preheat the oven to 175 C / 350 F (no fan) and prepare a 9-inch / 23 cm brownie tin. Brush the inside of the pan with a tiny bit of oil, and then line the bottom and sides with parchment paper.
- Arrange the Oreo cookies on the bottom of the brownie pan. I could fit 16 Oreos into my pan. Set the pan aside.
- Gently melt the butter and the chocolate in a bowl over simmering water over low-medium heat. Alternatively, use your microwave; however, ensure that you don't burn the chocolate.
- In another bowl, whip together the eggs with sugar with the help of an electric hand mixer or stand mixer until pale, for about 5-7 minutes.
- Slowly pour the melted butter and chocolate mixture into the egg-sugar mixture while the mixer is on low speed.
- Lastly, sift the dry ingredients (flour, salt, and cocoa powder) into the wet ingredients, and fold the mixture together with a rubber spatula. Do not overmix.
Bake
- Bake the Oreo brownies at 175 C / 350 F for about 35-40 minutes. The brownie is ready when the edge looks baked and the middle looks slightly gooey but not raw. Do not overbake! The brownie will set further as it cools.
- Let your brownie completely cool in the pan before slicing and serving.
- Any leftovers can be stored in an airtight container for 2-3 days at room temperature.
Notes
- Always use unsalted butter to make the brownies, however, add the salt separately. This way, you are in control of the quantity of the salt.
- The egg should be used at room temperature for proper emulsification.
- The quality of the chocolate and the cocoa powder will define the taste of your brownies, so try to use high-quality ingredients, e.g., semi-sweet chocolate from Lindt or Callebaut and Dutch-processed cocoa powder.
- A digital scale is required for a consistent, happy baking experience.
- If your preferred chocolate melting method is a microwave, not the double boiler, use a plastic container to melt it. The glass can very quickly heat up and might burn your chocolate.
- Always preheat your oven and consider using a digital oven thermometer for the best results.
- Each oven is different, so you might need to adjust the baking time +/- 5- 10 minutes.
- For the best fudge brownie experience, consider slightly underbaking your dessert.
- You have to wait until the brownie cooled to room temperature; otherwise, it´s impossible to make a nice, clean cut.
Tracie
This was really good, and definitely kid-approved. I added 1 teaspoon of espresso powder and in my haste overlooked adding the crumbled Oreos on top, but was delicious still. I definitely recommend eating with vanilla ice cream.