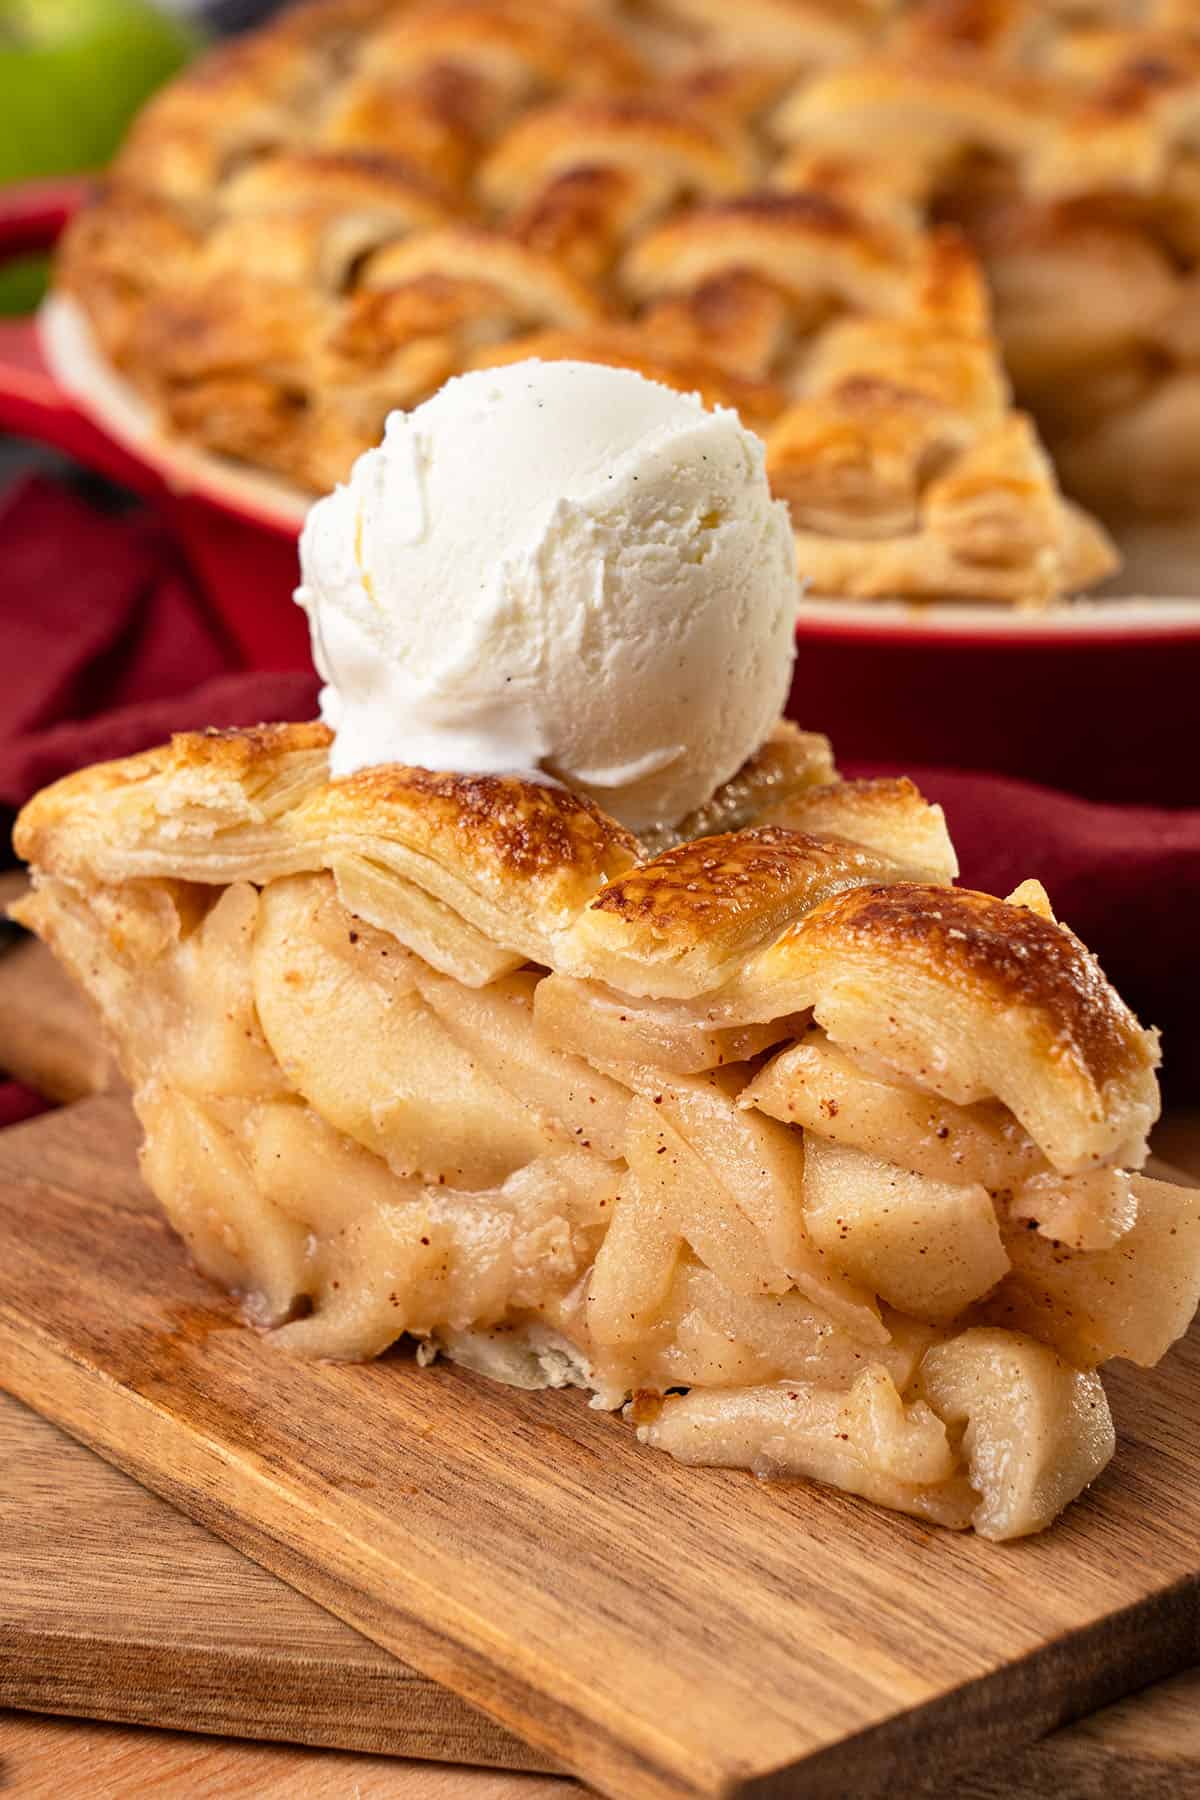
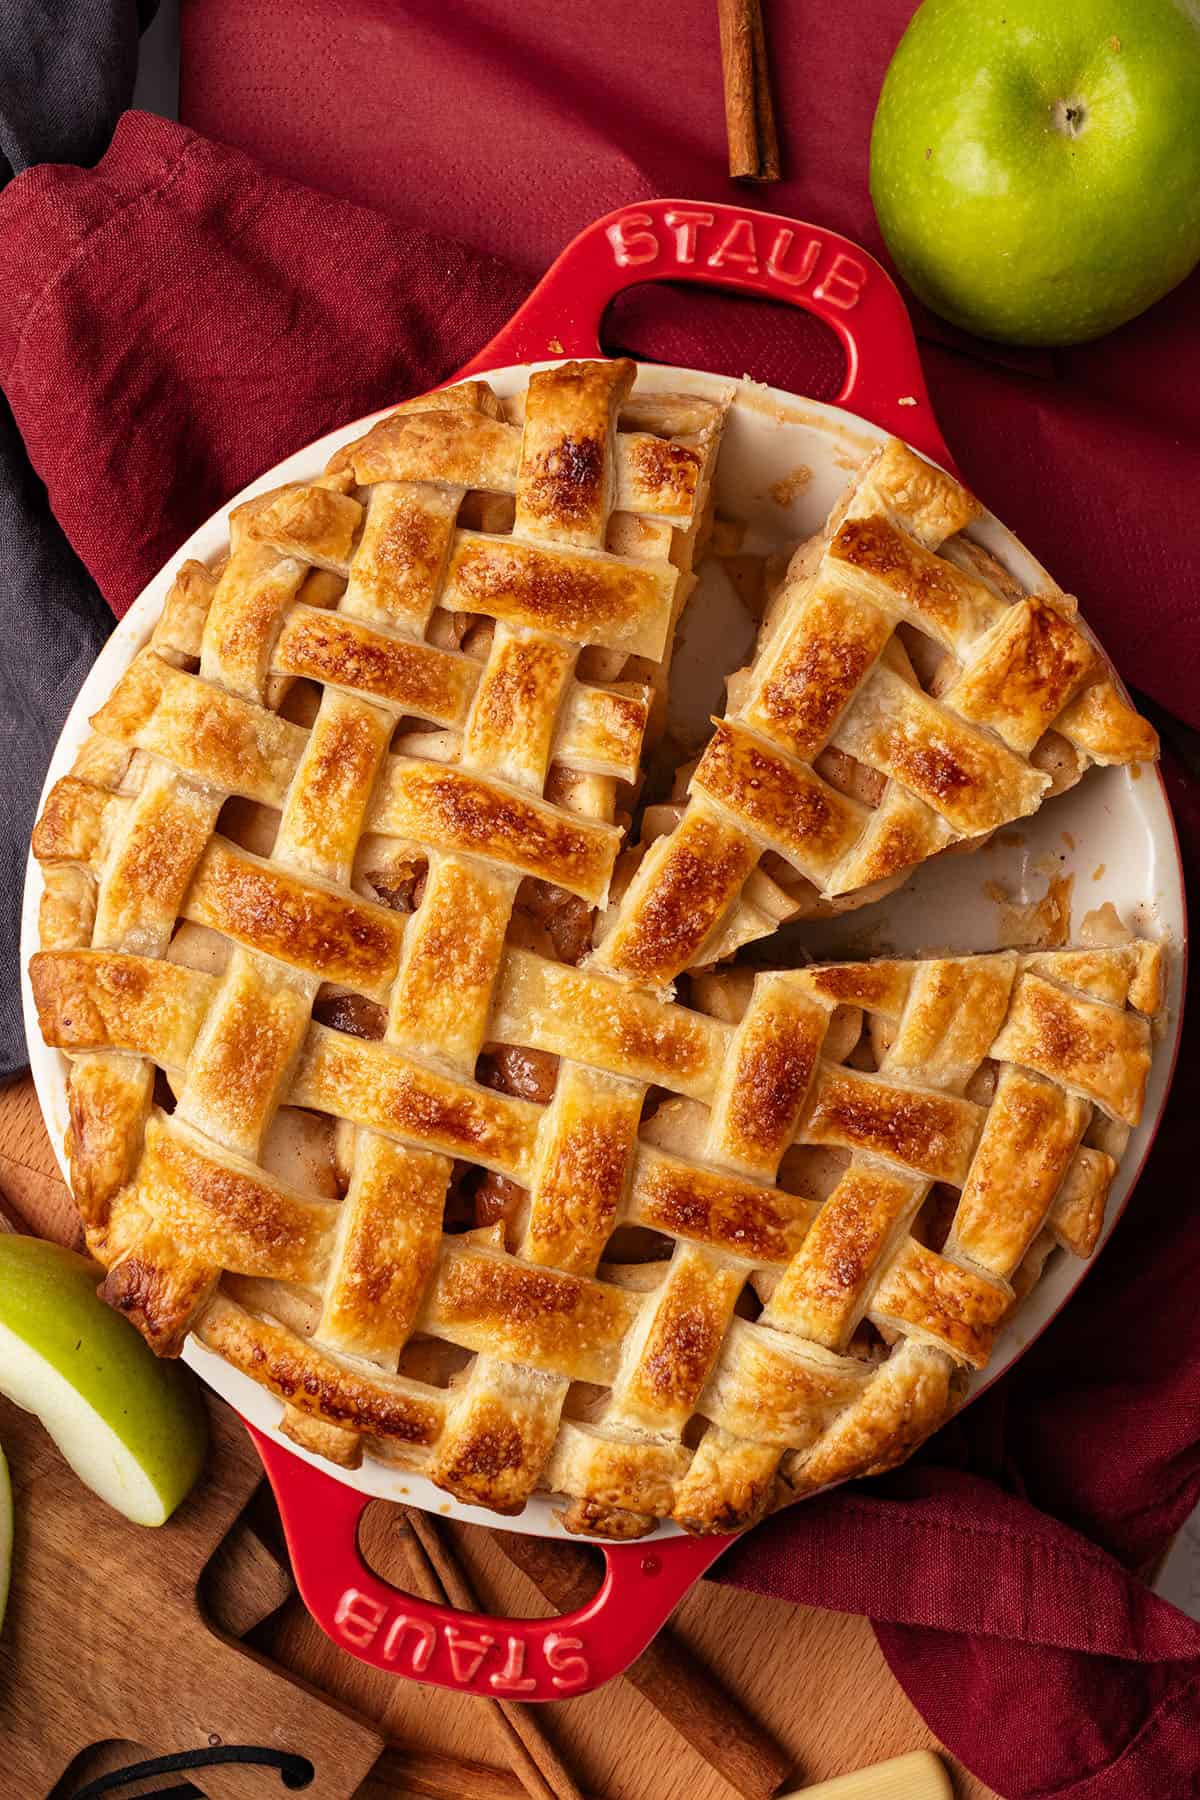
A classic Apple Pie is a cozy Fall staple, designed to be enjoyed with family and friends throughout Fall and Thanksgiving. My apple pie recipe features a crisp and buttery pie crust, filled to the brim with a juicy homemade apple filling. Every bite is filled with nostalgia!
Best Apple Pie Recipe
Apple pie is one of the most beloved traditional apple desserts, and everyone has a childhood memory of eating it at home with their family. So it's important to get it right! I tested this recipe multiple times to achieve the perfect texture and flavor, using various methods, and I'm pleased with the result.
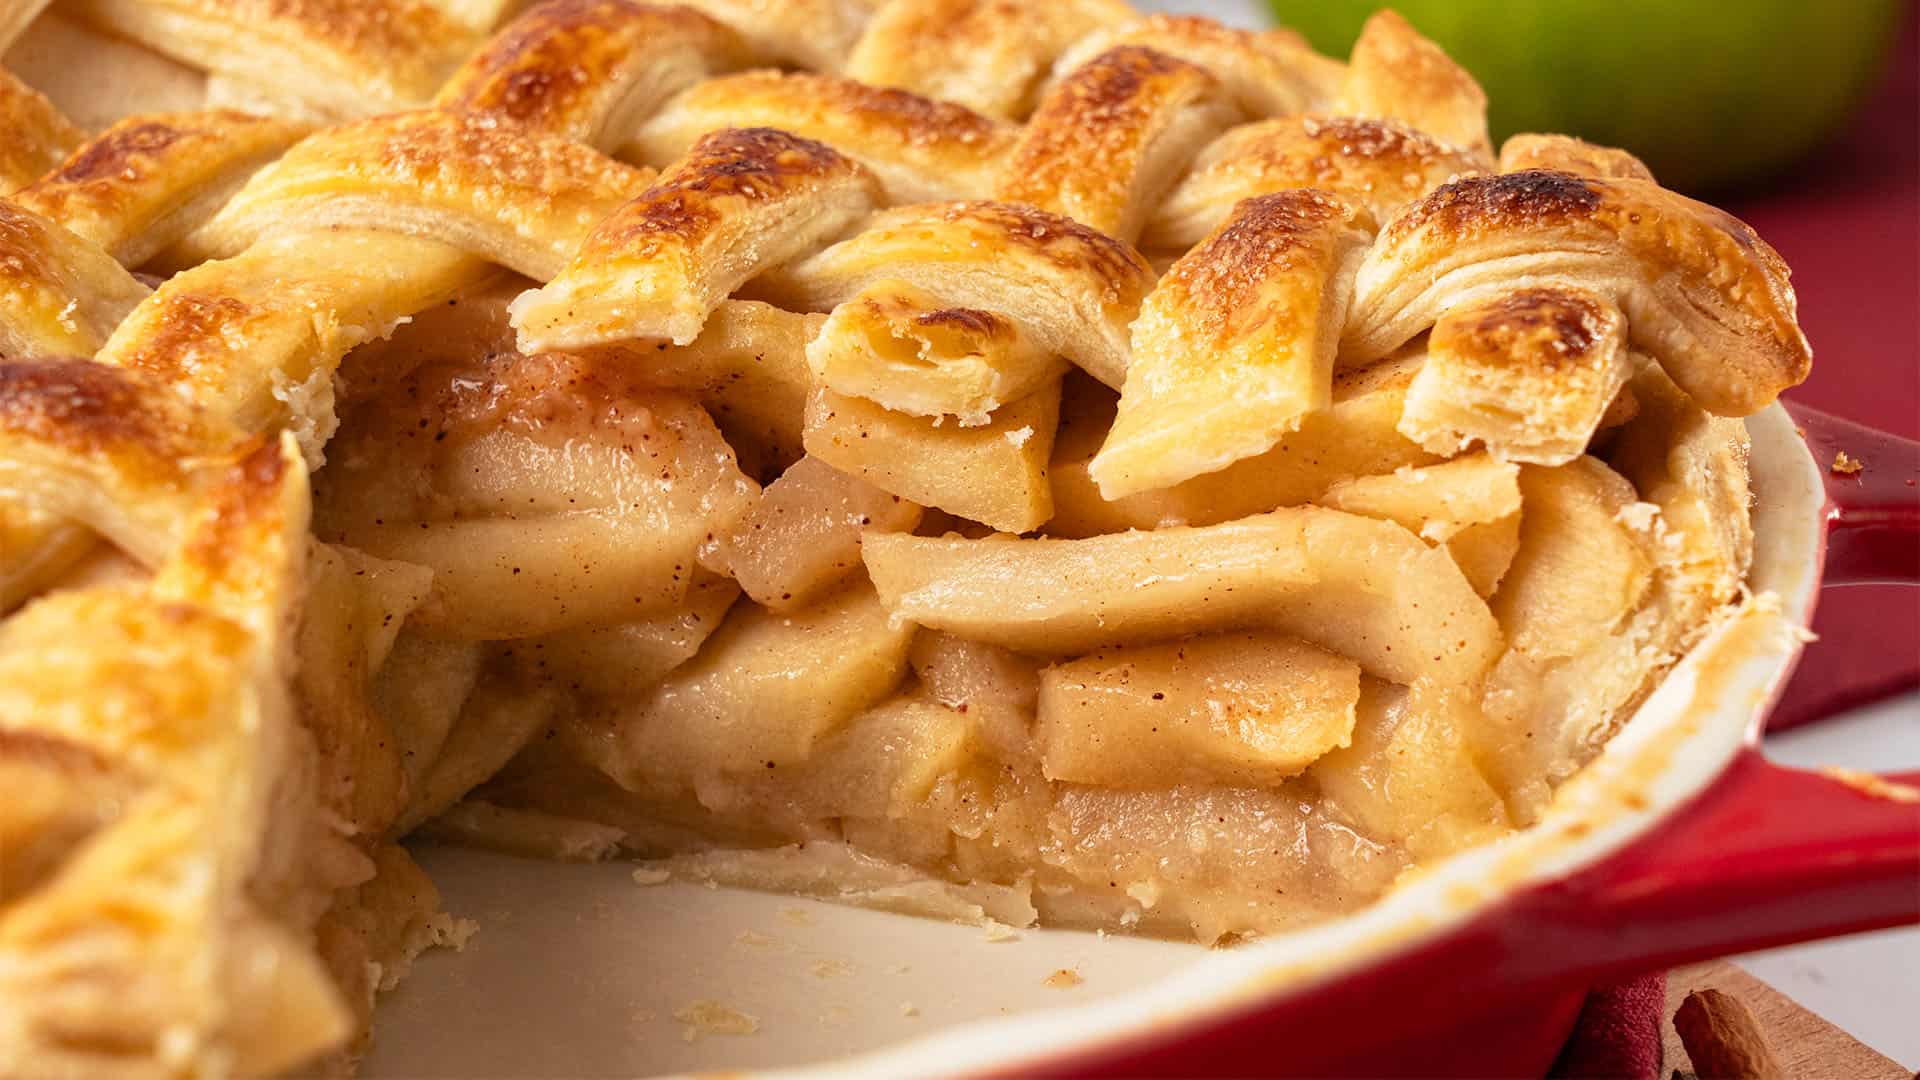
The best apple pie has a crisp, flaky, buttery crust that completely encases the filling. The filling requires whole chunks of buttery-soft apples in a thick and glossy sauce that is perfectly balanced in sweetness and features a hint of cinnamon spice.
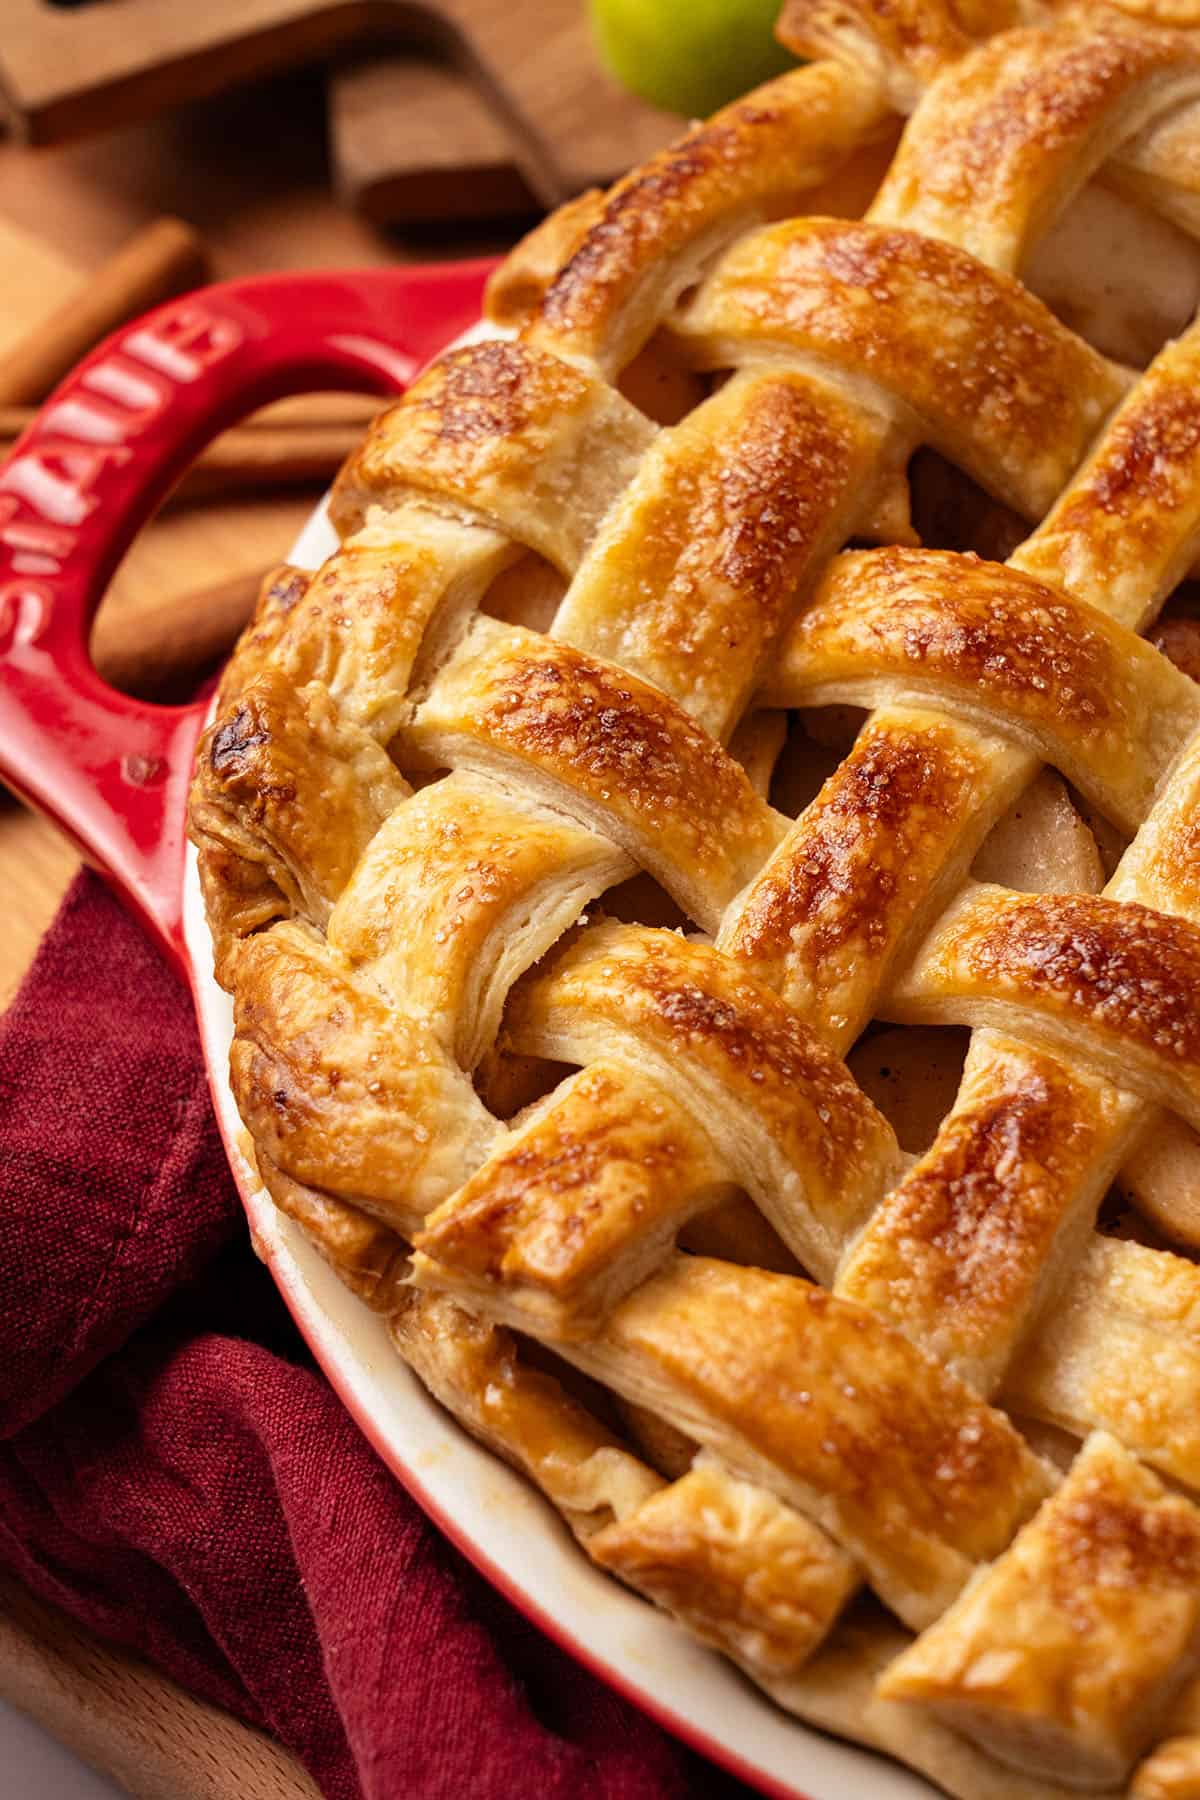
Finally, the iconic lattice topping looks picture-perfect, offering a glimpse of what's inside. Everyone gets daunted by the idea of making a lattice top for a pie, but it is simpler than you think! I'll give you detailed instructions on how it's done, with photos.
I use my popular flaky pie crust in this apple pie recipe, which is semi-laminated to give it extra buttery, flaky layers. It is well worth the little bit of extra time! My simple 3-ingredient pie crust will help you out if you're in more of a rush. Either way, this apple pie is delicious. It's one of the best Thanksgiving desserts for a reason!
Katalin's Key Take On The Most Common Apple Pie Mistakes & How to Avoid Them
First and foremost, this is a homemade apple pie, so we need to use the right apples! Often, the filling will go mushy, or it will still be crispy, when we want that buttery soft bite. I provide detailed information below on which apples to choose, so you can enjoy the best taste and texture.
The next common problem with any fruit pie is the dreaded soggy bottom from a raw apple filling that has too much water content. The obvious solution to a soggy bottom is blind baking the base part of the pie crust, which some other recipes will suggest. However, then we encounter issues because the top crust will not properly attach to the bottom, which is not acceptable!
Precooking the filling will solve both of these issues, as well as the case of a giant empty cavity under the top crust. Apples shrink in size when cooked. So if we pre-cook the filling, you can then fill it right to the brim without any shrinkage. And it means the water does not evaporate straight into the pastry, making it wet. Win-win!
A latticed pie crust also helps steam to escape, rather than trapping it inside, helping you further (as well as looking pretty).
Finally, most people take pies out of the oven too early (because the top is perhaps already golden brown), when they're still underbaked. It takes longer than you think, and I have done the testing for you. To avoid an underbaked or overbaked pie, it's best to lower the oven temperature halfway through baking to ensure the crust cooks thoroughly.
There is one other common issue, which is impatience! You need to let the pie sit for 2-3 hours after baking before slicing it, or the filling will run all over the plate.
What Apples to Use for Apple Pie
Firmer varieties of apples, like Granny Smith and Braeburn, work well as they retain their shape, and the more tart flavor profile contrasts nicely with the sweet filling. You can also use other varieties of apples, such as Honeycrisp or Golden Delicious, which are sweeter and slightly more tender.
Alternatively, you can use a combination of two varieties (e.g., Granny Smith and Honeycrisp) to achieve a balanced blend in both flavor and texture.
Start with My Quick & Easy Pie Dough
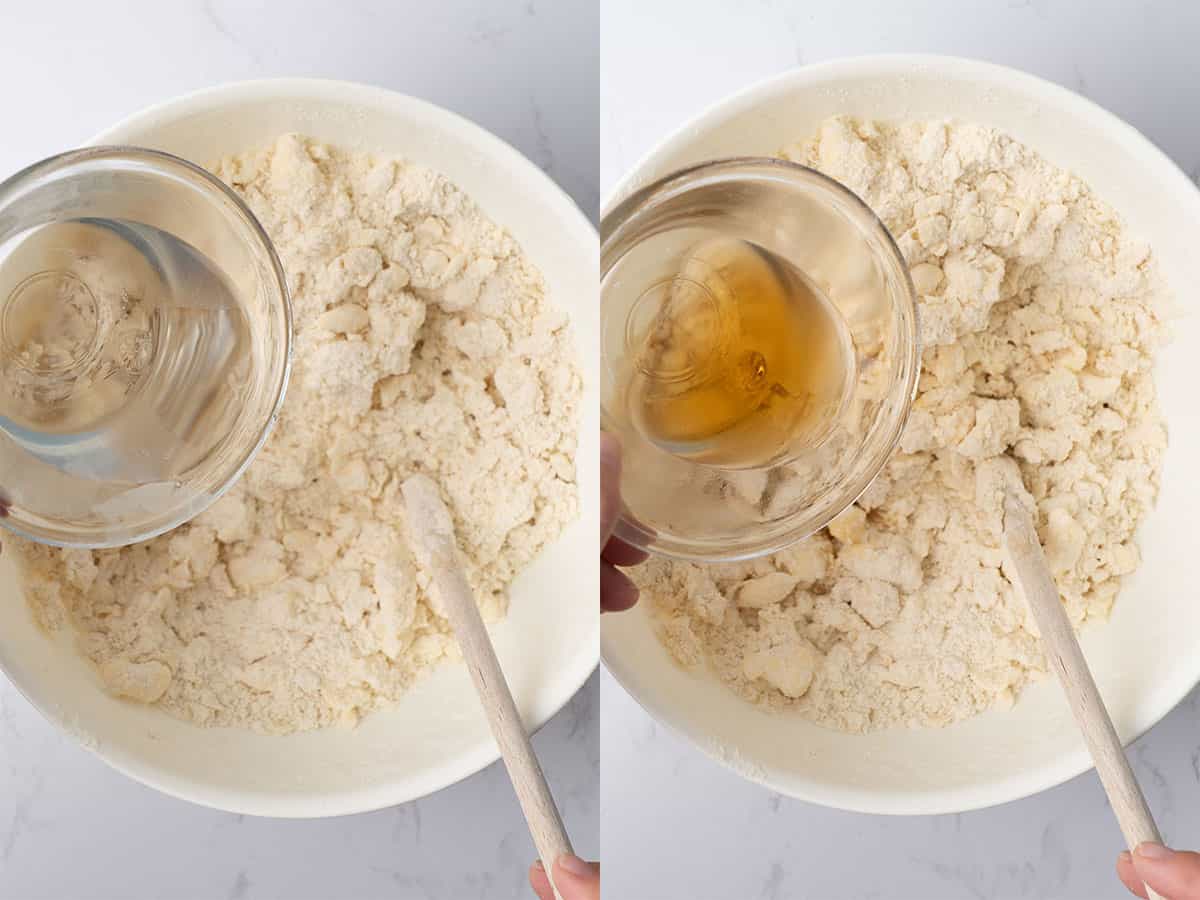
To make the pie crust, measure your all-purpose flour, granulated sugar, and salt into a bowl and put it in the freezer. Weigh your butter, cut it into one-inch cubes, and put it in the freezer. Measure out the water and apple cider vinegar (ACV), and place them in the freezer as well. Chill all of these for 5-10 minutes.
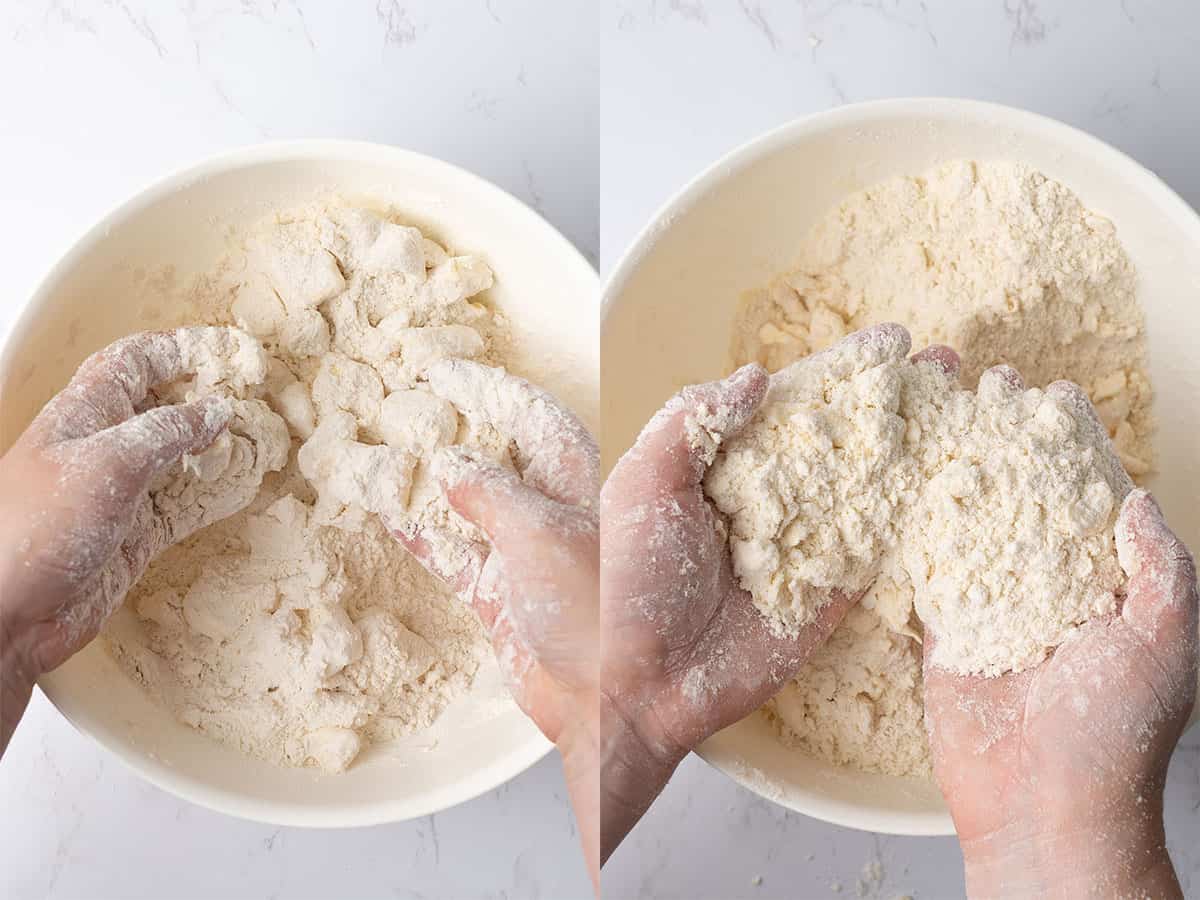
Add the cold butter chunks to the flour mixture, and rub them together with your fingertips for 2-3 minutes until they resemble coarse sand. But if a few larger bits of butter remain, don't worry. The important thing is that the butter stays cold and doesn't start to melt, so work quickly.
Slowly add the cold water and ACV, mixing with a wooden spoon. When approximately 75% of the liquid has been added, and you have a central lump of dough, remove that and continue adding liquid to the remainder. You may not need all the liquid!
Knead the dough briefly on a lightly floured surface or silicone baking mat. It just needs to come together, so don't overwork it. Wrap it in plastic food wrap and refrigerate for two hours. This step is essential to allow the flour to hydrate evenly and the gluten to relax, as it will be too hard to roll out otherwise.
You can also make apple hand pies with the same dough.
Laminate for perfect flaky layers - optional
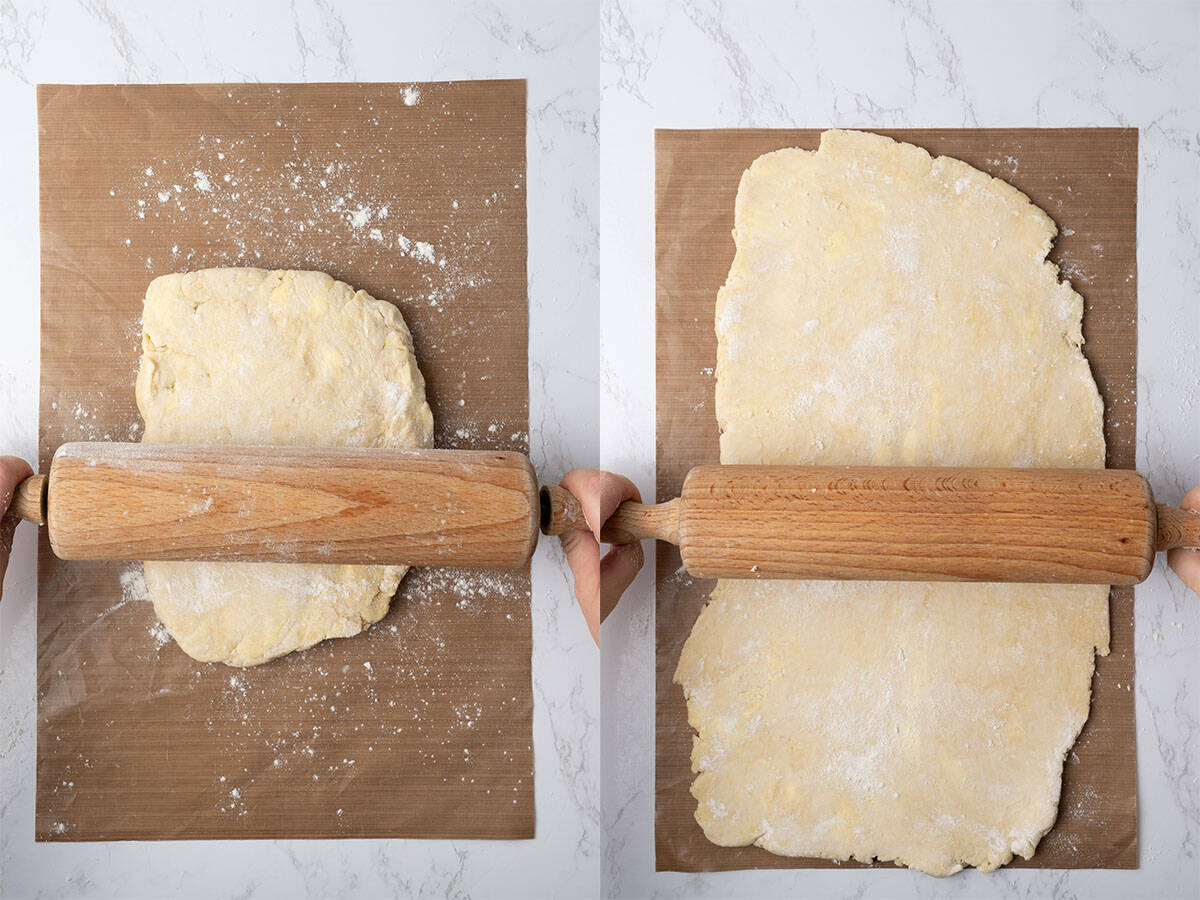
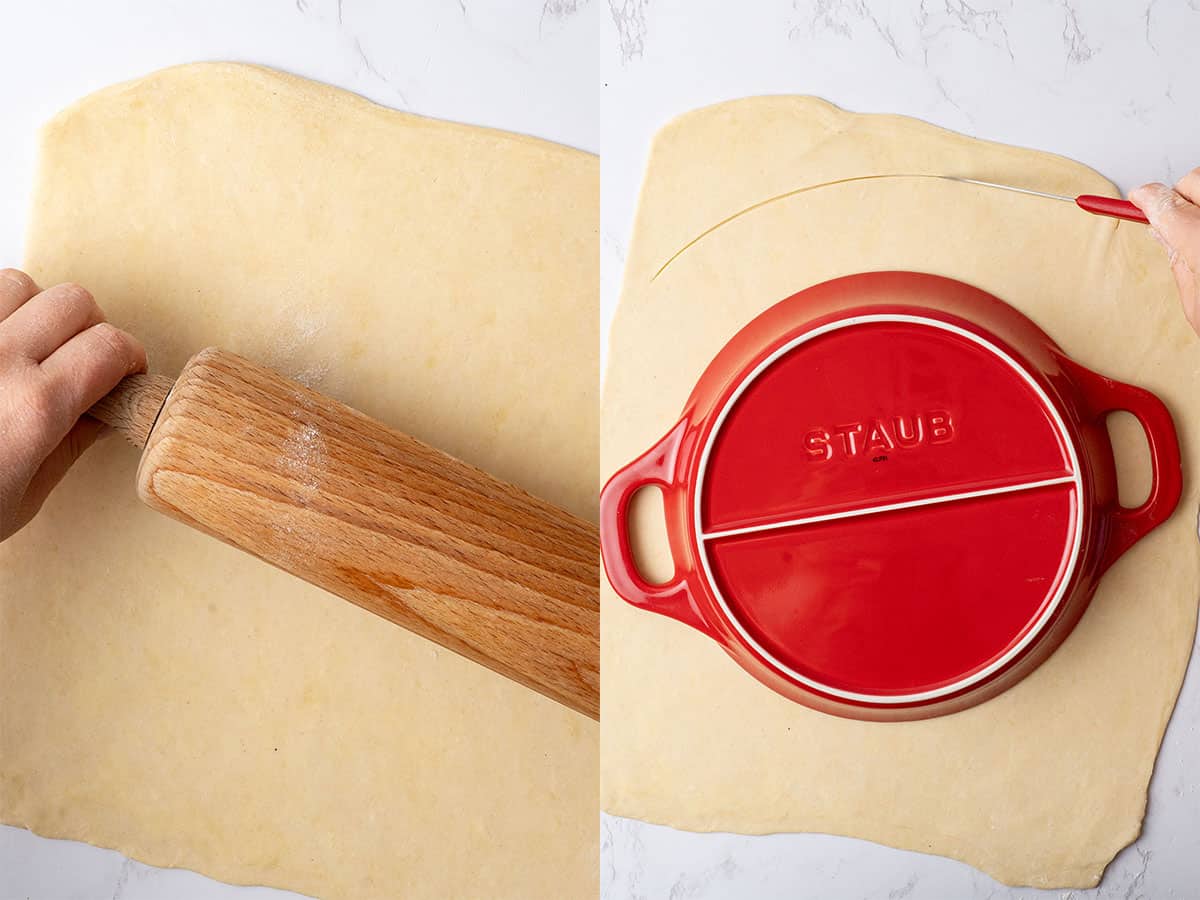
Now we laminate. Remove the chilled, rested dough from the fridge. You will need to let it sit on the counter for a few minutes first, but it must remain cold. Then, roll it out into a rectangle roughly 11 inches x 17 inches / 28 cm x 43 cm. You may or may not need to use a small amount of flour underneath.
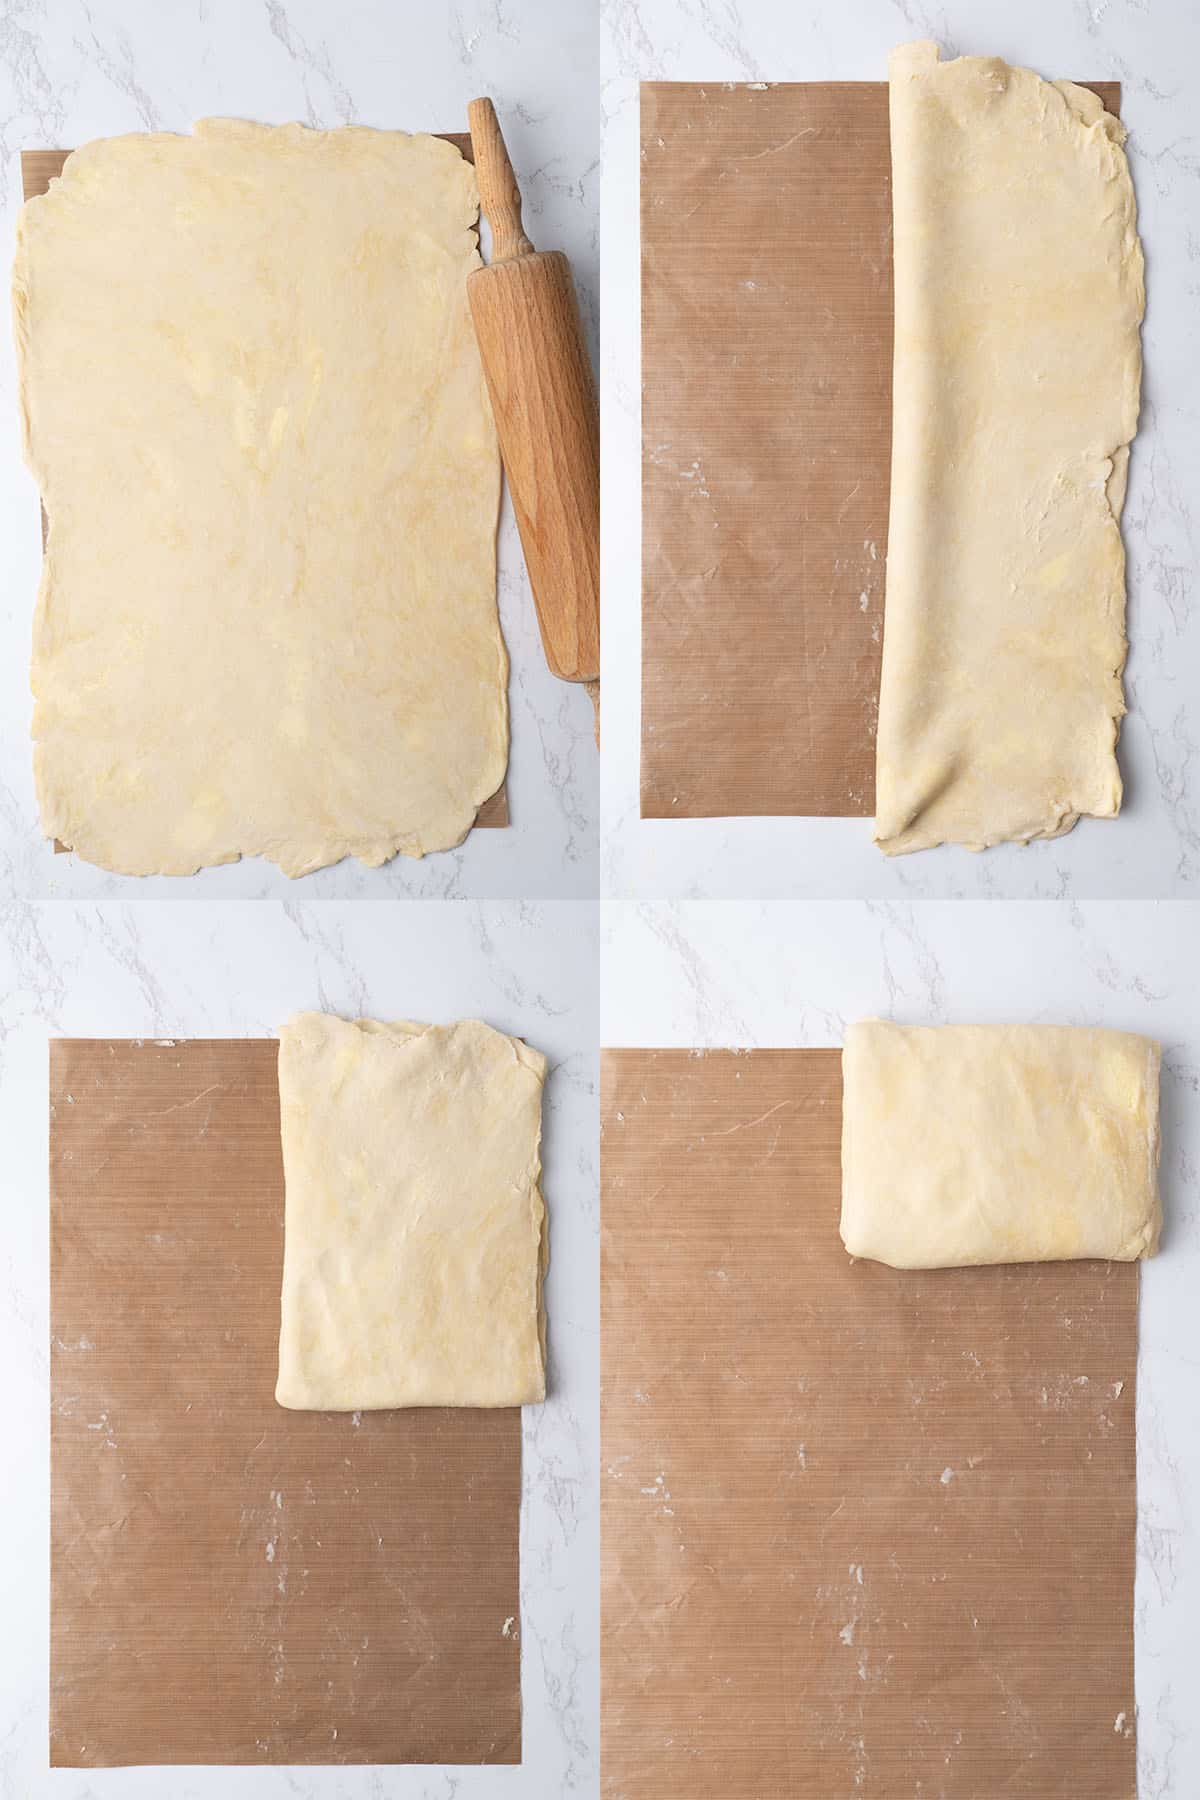
Fold the left half of the rectangle over the right half like a book. Then fold the bottom half up over the top. Fold the bottom half up again, and you will end up with a block of dough measuring 5.5 x 4 inches (14 x 11 cm). Wrap the dough up again and rest it for another 2 hours in the fridge. Don't worry if the edges are messy, it won't matter!
Pre-Cook the Apples to Avoid Soggy Bottom on Your Pie
Peel and core your apples, then slice them into equal-sized slices. Squeeze over some lemon juice to prevent them from browning. Alternatively, place them in a bowl of water with lemon juice added. Pat them dry with paper towels before proceeding.
Cook the apple slices in a large pan with the butter, sugar, and cinnamon. We want them to be slightly softened but not fully cooked. It will take 3-5 minutes. Then, use a slotted spoon to remove the apples and set them aside.
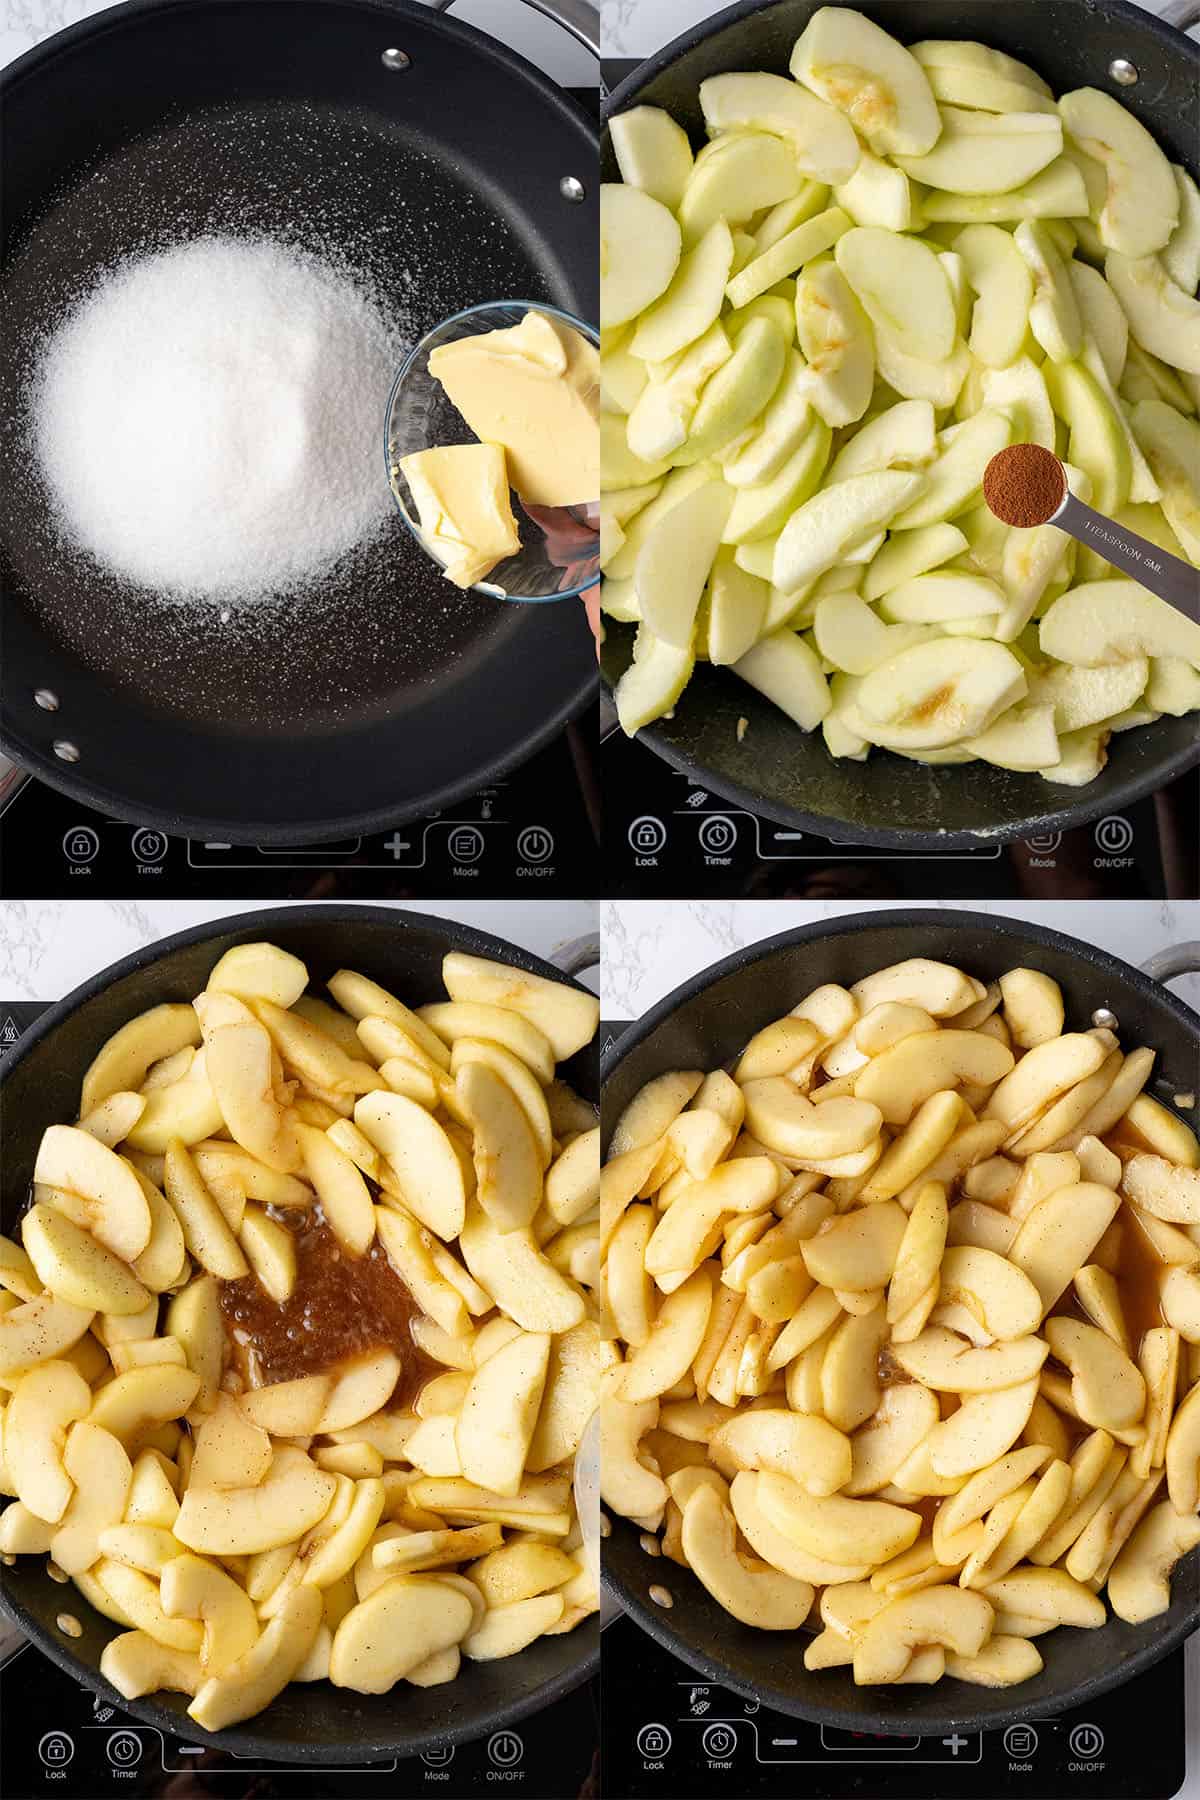
In a small heatproof bowl, mix a few tablespoons of the sauce with the cornstarch. If you put the cornstarch directly into the pan, chances are it will clump, so don't skip this step. Once it is smooth, stir this mixture into the rest of the sauce. By stirring constantly, cook for about a minute to allow the mixture to thicken, then stir the apples back in. Turn off the heat and let the mixture cool completely.

Now assemble the pie
Take your rested pie dough from the fridge and divide it into two equal-sized portions (one for the top and one for the bottom of the pie). Roll one piece out into a circle ⅛ inch (3 mm) thick, large enough to fit a 9-inch / 23 cm pie dish.
To ensure that the dough rolls out evenly, turn the dough 90 degrees clockwise with your hands after each rolling. If the dough feels tough or if it starts to spring back, those are signs it hasn't rested enough. Don't force it, put it back in the fridge for 30 minutes, and try again.
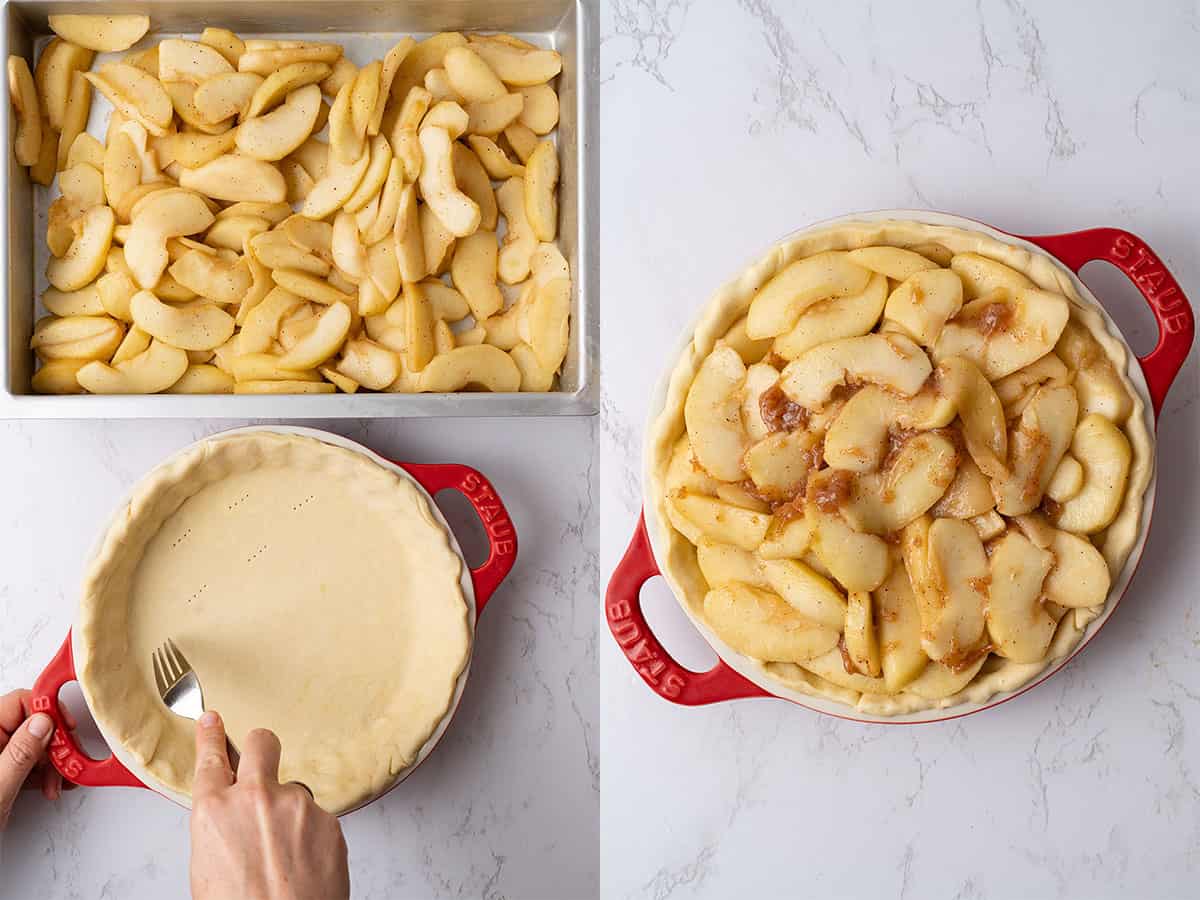
Place the dough into the pie dish and gently press it into the bottom and sides. You should apply gentle pressure down into the pie dish motion, rather than stretching.
Prick the bottom, then place it in the freezer for 15 minutes to chill, then spoon the cold apple filling into it, filling it to the brim. You should pile it up higher in the middle, as it will reduce a little further as it cooks, and we don't want a sunken pie!
Chill it while preparing the lattice crust.
How to Make Lattice Pie Crust
Roll the remaining piece of pie dough out to ⅛ inch (3 mm) thick, then cut it into even strips about ½ to ¾ inch (1 to 2 cm) wide. You can use a pastry wheel, a pizza slice, a sharp knife, or even a metal dough scraper to do this. Use a clean ruler to get a straight line and even thickness.
Transfer the strips to a parchment-lined baking sheet and chill for 5-10 minutes in the freezer. Cold strips won’t stretch or tear.
To construct your lattice, place half the strips parallel across the pie, evenly spaced. Leave the strip ends overhanging the rim by 1–2 cm (½"). Use your longest strips for the center.
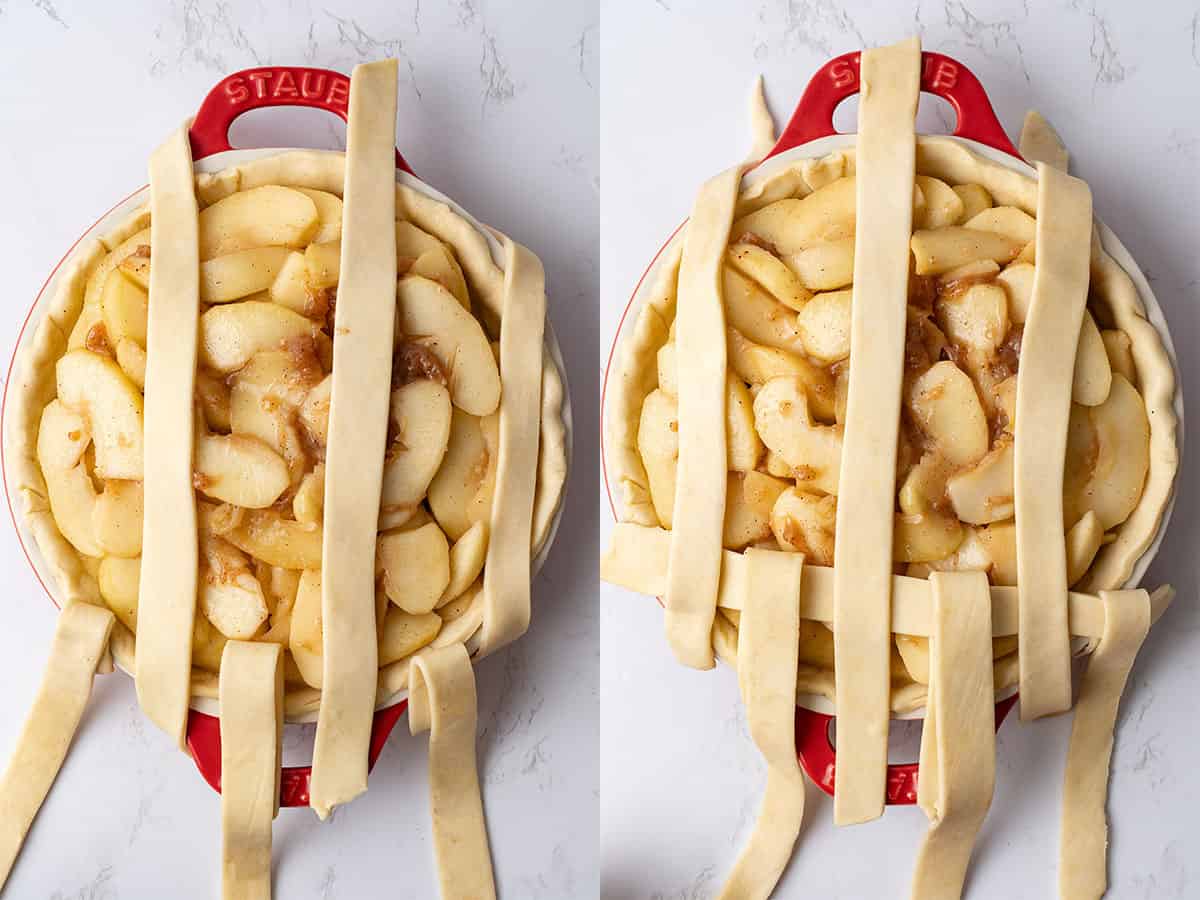
Fold back every other vertical strip halfway (so strips 1, 3, 5…) and lay one new strip horizontally across the center of the pie, perpendicular to the verticals. Unfold the lifted strips back over it. Now fold back strips 2,4,6...and repeat the process with a new piece of pastry laid perpendicular. Work upwards from the central strip, then downwards, until you have covered the entire surface.

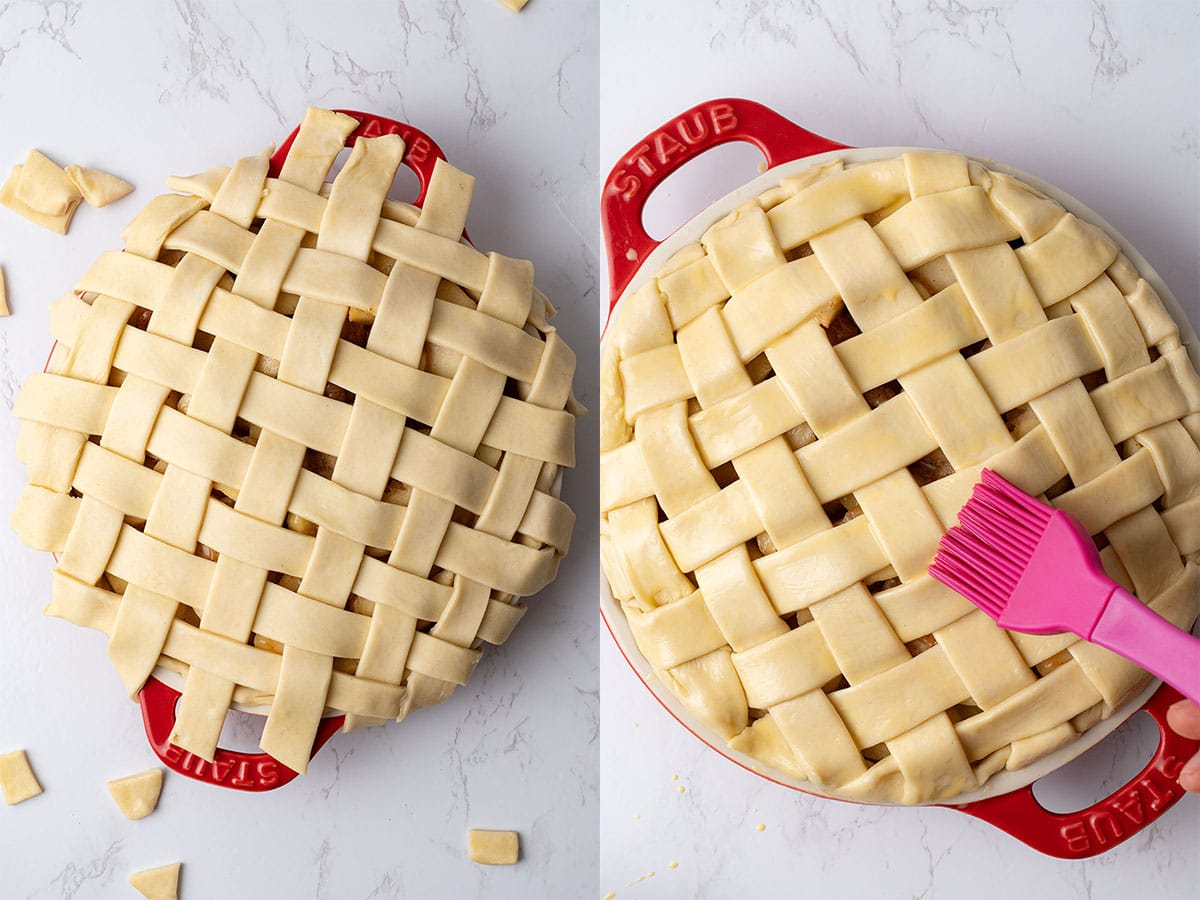
Trim the excess dough with scissors, and then use a fork to crimp the edges of the base dough and the lattice strips together.
Brush an egg wash over the lattice and edges of the crust. You can also scatter over a light, even layer of granulated sugar for extra crunch.
How Not to Overbake / Underbake Your Pie
Place the assembled pie in the freezer while preheating the oven to 390°F (200°C). Don't use the fan setting on your oven. It causes uneven heat distribution.
First, bake the apple pie at 390°F (200°C) for 35 minutes. Then reduce the oven temperature to 350°F (175°C) and continue baking for an additional 35 minutes.
Cover the rim with a pie crust shield partway through baking to stop it from overbrowning. This can be as simple as folding strips of foil over the edges of the pan. And if the lattice then seems to be browning too much, place a piece of foil over the whole surface of the pie. Don't cover it tightly, though, or it will trap too much steam underneath.
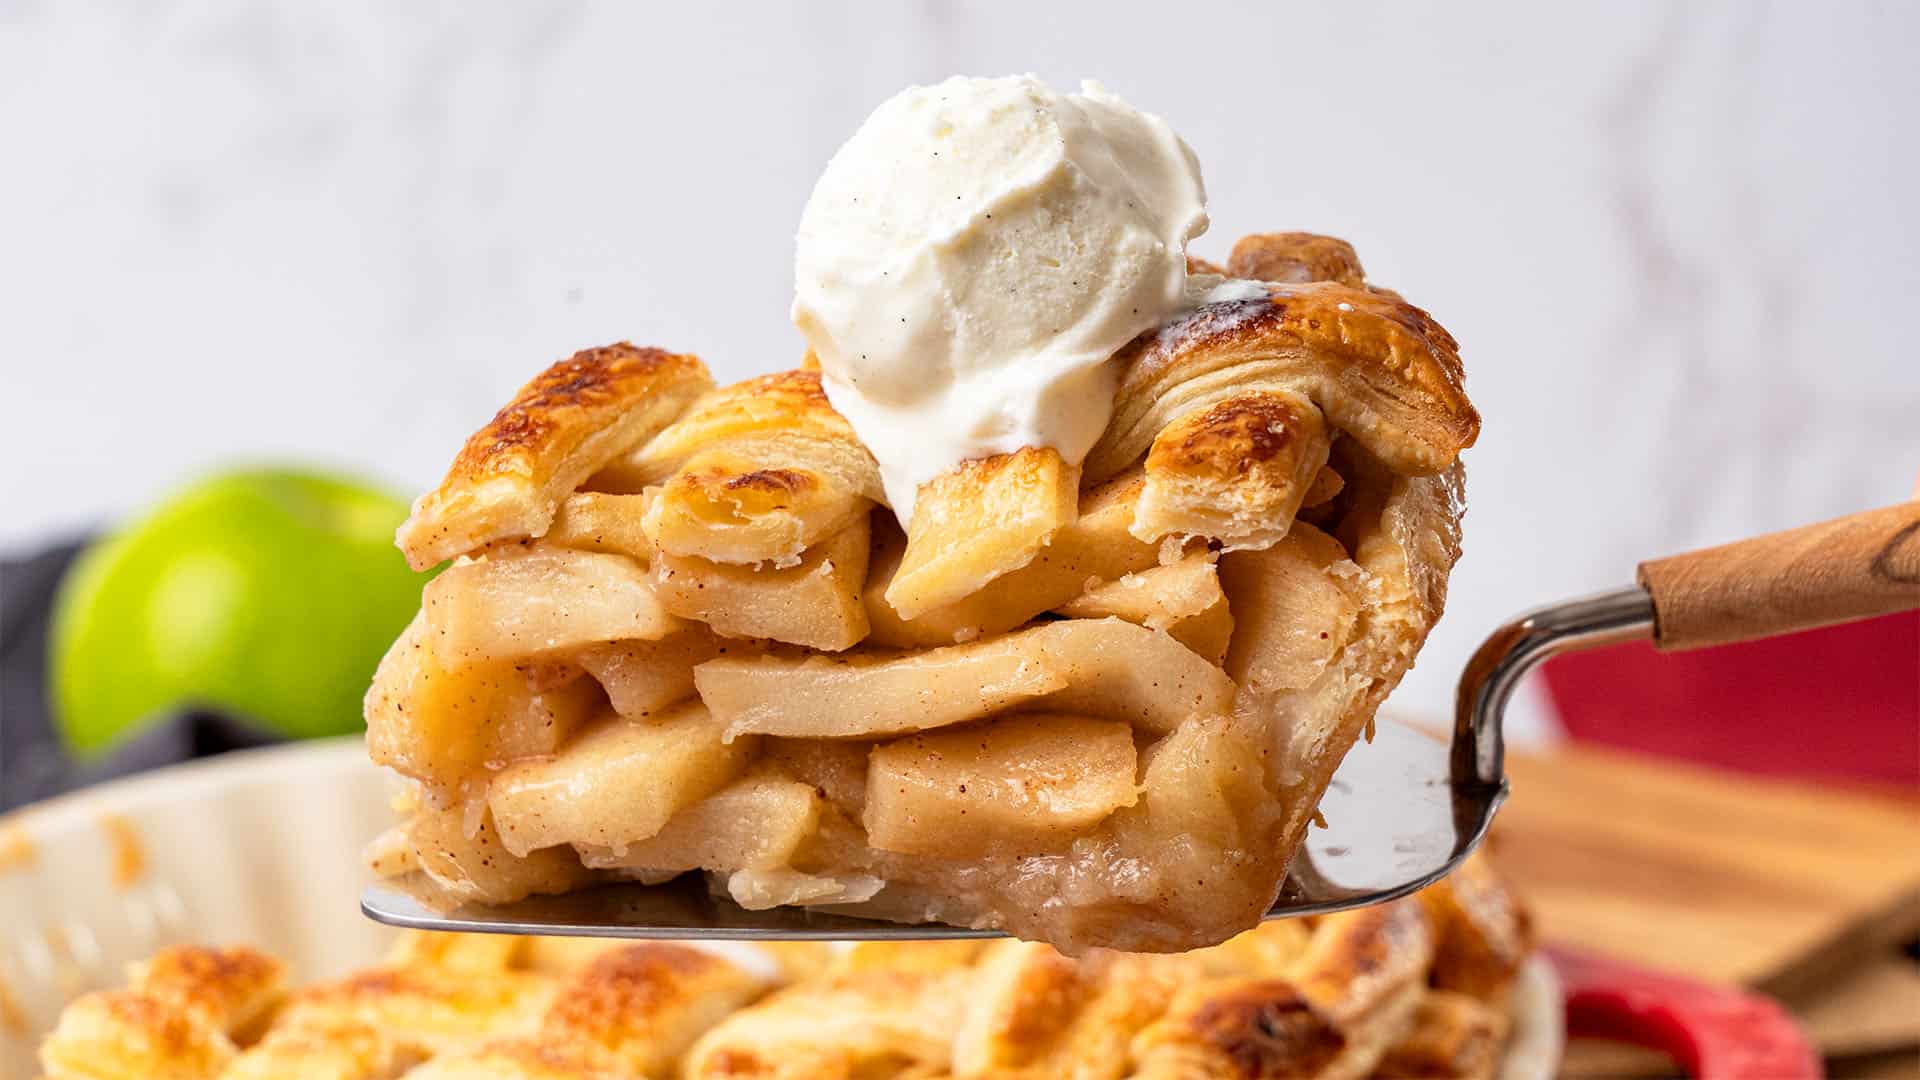
The pie is done when the apple filling is bubbling up around the lattice and the crust is fully baked and golden brown. Not just the top, but also around the sides as well.
Let it sit for 2-3 hours so that the filling can set, then slice it up and serve it with some Chantilly cream or vanilla ice cream.
Storing & Freezing
Leftover apple pie can be stored on the counter, loosely covered with foil or plastic wrap, for 2 days. If your leftovers last longer than this (which is unlikely, but...) keep the pie covered and refrigerated for up to 4 days.
You can also bake this apple pie ahead of time, freeze it, and reheat it! It's one of the things that makes it work so well for the busy holiday season, as it lasts for up to 3 months. Allow it to cool completely, and then wrap it tightly in food wrap and aluminum foil. When you're ready to enjoy it, let it thaw overnight in the refrigerator. Then, reheat it in the oven at 350°F (175°C) for 15–20 minutes. You can also freeze individual slices this way.
Flavor Variations
You can add some nutty flavor and texture to the pie crust by replacing some flour with almond, hazelnut, or pecan flour.
Try adding other fruits, such as blackberries, to the apple filling to add a bit of a different flavor. You can also make this pie with pears.
I love to add more spices to the filling for an extra warm flavor. A half teaspoon of ground cardamom is deliciously fragrant, or try some of my homemade apple pie spice mix.
Dial things up a notch with a splash of bourbon, Calvados, or spiced rum in the apple filling before baking!
Ingredient Substitutions

I have made this pie crust and pie filling with margarine and vegan butter because my mom is dairy intolerant, and it works well. Just make sure it is cold.
To make this apple pie gluten-free, you can use gluten-free flour in the crust, but it may not have the exact same taste and texture.
You can use flour instead of cornstarch to thicken the filling, but the result will be more rustic, and you won't get that nice glossy finish. Another option is tapioca starch (which is grain-free), but you'll need to double the quantity, and it is harder to find in stores.
You can, of course, use sugar substitutes; however, be careful with liquid ones, as we don't want to make the filling runny.
Expert Tips To Make Apple Pie
- Your pie crust dough might not need all the water specified in the recipe. Don't add it all at once and pay attention to the look and feel of the dough.
- If the dough is crumbly and doesn't come together, it needs a little more ice water. If the dough is too sticky and hard to roll out, it is likely overhydrated. Place it back in the fridge for a few hours to let the flour hydrate further and more evenly.
- For the best taste and texture, use unsalted butter with a high-fat content. I use European-style butter with 82% fat in this recipe.
- It can help to scatter some almond flour or other nut flour over the base of the pie dough. This will soak up excess moisture and prevent a soggy bottom.
- To give the base of the pie an extra blast of heat to cook it thoroughly, you can place the pie dish on a preheated baking sheet or pizza stone.
What Equipment To Use
When baking, it is really important to weigh your apple pie ingredients by the gram using a digital scale.
Avoid needing a lot of dusting flour by rolling pie crust dough on a silicone baking mat. Once you try it, you'll never go back!
You will need a 9-inch / 23 cm pie dish for this apple pie recipe.
All ovens vary, and baking apple pie at the wrong temperature will cause a number of problems! Avoid this by using a digital oven thermometer to check where you are.
Try Some Of My Other Fall Dessert Recipes
If you love the Fall baking season as much as I do, try some of my other Fall dessert recipes:
- Apple crumble pie
- Brownie pie
- Apple Tarte Tatin
- Pumpkin cream cheese pie
- Brown butter pecan chocolate chip cookies
And for even more impressive crowd-pleasing desserts to enjoy at this time of year, check out my roundup of the best Fall desserts.
Have You Tried This Recipe?
Please leave a 5-star ⭐️⭐️⭐️⭐️⭐️ rating on the recipe card and consider leaving a comment as well!
Apple Pie
Ingredients
All butter pie dough
- 375 g (3 cups) All purpose flour
- ½ teaspoon Salt
- 1 tablespoon Sugar
- 225 g (1 cups) Unsalted butter 82% fat, use it very cold
- 120 g (½ cups) Water use it very cold
- 30 g (2 tablespoons) Apple Cider vinegar
Apple filling
- 1400 g (50 oz) Apples e.g. Granny Smith. This quantity is about 7-10 apples depending on the size.
- 200 g (1 cups) Granulated sugar
- 50 g (¼ cups) Unsalted butter
- 1 teaspoon Cinnamon
- 2-3 tablespoon Lemon juice freshly squeezed
- 2 tablespoon Corn starch
Egg wash
- 1 egg
- splash of milk
US customary cup measurement is an indicative figure only. Measure the ingredients with a digital scale by weight (gram). Baking is art but also science which requires precision and accuracy.
Instructions
Prepare the dough
- Place the flour, sugar, and salt into a large bowl and mix until well combined. Transfer the bowl to the freezer for 5–10 minutes. Cut the cold butter into small chunks and freeze them for 5–10 minutes as well. Measure the water and vinegar separately, and place them too in the freezer for 5-10 minutes.
- Once all ingredients are nicely chilled, add very cold butter chunks into the bowl of flour and rub the mixture between your fingers until it becomes a sand-like consistency.
- Leave some bigger butter chunks in the mixture - this will encourage flaky pie texture on the pie crust - no need to fully incorporate the butter into the flour.
- Add very cold water and apple cider vinegar into the dough, a small amount at a time, and stir with a spatula or wooden spoon after each addition. Once about 75% of the liquid is used, take out the part of the dough from the bowl, that is already well hydrated, and only keep adding the water to the rest of the dry dough. You might need to use all the water, or slightly less, or very slightly more depending on the flour you are using and how neatly you hydrate the dough. What we want to achieve at the end is a dough that is evenly hydrated, but not too wet, neither too dry with loose flour in it.
- Now, on a lightly floured surface (or silicone baking mat), start working the dough with your hands. First, it will look crumbly, but it should come together in the next minute or so. Do not knead the dough as such; stop mixing as soon as the dough comes together. Remember, leave in some butter chunks, do not overwork the dough, and do not use a mixer.
- Form a disk, cover it with plastic wrap and let it rest in the fridge for a minimum of 2 hours.
Start the lamination - optional for flakier pie crust
- After 2 hours, take the pie dough disk out of the fridge and let it rest for a few minutes on the kitchen counter. The dough should stay cold but slightly warmed up to be able to roll it out without breaking it.
- Transfer the disk to a silicone baking mat or a lightly floured surface and start rolling it out, make sure you turn the dough with your hands after each rolling so it will become even. No need to add too much flour while rolling, the pie dough should be cold enough not to stick to the kitchen counter. If at any point the dough gets too warm, pop it back into the freezer for a minute to chill then continue
- The goal is to roll the dough out into a rectangle of 11x17 inches / 28x43 cm relatively quickly without warming it up.
- Then, apply the following fold: Fold the left half over the right half. Then, you will get a 5.5x17 inches / 14x43 cm rectangle. Then, fold this long rectangle in half by folding the bottom half over the top half. You now have a 5.5x8.5 inches / 14x21.5 cm rectangle. Lastly, fold the bottom half up over the top half again, so you will end up with a 5.5x4 inches / 14x11 cm rectangle. That's it, the folding is done, and you have 8 wonderful layers.
- Cover the dough with plastic wrap and let it rest in the fridge for a minimum of 2 hours.
- The dough makes two 9-inch / 23 cm. So, after the resting time, divide the dough into 2, one for the bottom and one for the lattice top.
Continue with the apple filling
- Peel, core, and slice the apples into even pieces. Toss them with lemon juice while cutting to prevent browning.
- In a large pan, cook the apples with butter, sugar, and cinnamon for 3–5 minutes until slightly softened but not fully cooked. Remove the apples and set aside.
- Mix a few tablespoons of the hot sauce with cornstarch until smooth, then stir it back into the pan. Cook for about 1 minute until thickened, then return the apples and coat them in the sauce.
- Let the apple mixture cool to room temperature before using it.
Assemble the Apple pie
- Roll out the bottom pie crust on a lightly floured surface to about ⅛ inch (3 mm) thick and large enough to fit a 9-inch (23 cm) pie dish with some overhang. Remember, do not force the dough, after rolling, it should stay smooth and cold, and easy to work with. The most common reason for pie crust shrinking is forcing and stretching it.
- Carefully transfer the dough into the dish, gently pressing it into the edges without stretching.
- Then, place the prepared pie crust in the freezer for 15 minutes to firm up.
- Spoon the apple pie filling into the chilled crust, piling the apples higher in the center to account for the slight shrinkage as they bake.
Make the lattice top
- Roll out the second pie crust to about ⅛ inch (3 mm) thick, then cut it into even strips about ½–¾ inch (1–2 cm) wide using a sharp knife or pastry wheel.
- Lay half of the strips across the filled pie, evenly spaced. Fold back every other strip halfway, then place a new strip perpendicular across the pie. Unfold the strips to cover. Repeat with the remaining strips, alternating the fold each time to create a woven lattice pattern.
- Trim any excess dough, then press and crimp the edges together with the bottom crust to seal.
- In a small bowl, whisk together 1 egg with 1 tablespoon of milk until smooth. Lightly brush the mixture over the lattice and edges of the crust to give the pie a golden, glossy finish.
- Optional: Sprinkle a thin, even layer of granulated sugar over the top for extra crunch and shine. Be careful not to let too much sugar collect in one spot, as it can burn during baking.
- Freeze the assembled pie for about 10-15 minutes while pre-heating the oven to 390°F (200°C), no fan.
Baking
- Bake the assembled pie at 390°F (200°C) for 35 minutes. Then reduce the oven temperature to 350°F (175°C) and continue baking for another 35 minutes, until the filling is bubbling and the crust is fully baked.
- Once the edges of the crust turn golden brown, cover them with a pie crust shield to prevent over-browning. A shield is simply a ring of foil (or a reusable metal/silicone ring) that covers the outer rim of the pie while leaving the center exposed, allowing the filling and lattice to continue baking evenly.
- Near the end of baking, if the lattice top browns too quickly, you can cover the entire pie loosely with foil to protect it while the filling finishes cooking.
- Allow the pie to cool at room temperature for at least 2–3 hours before slicing. This gives the filling time to set so the slices hold their shape. Serve plain, or with a scoop of vanilla ice cream or whipped cream.
- Storing: Cover leftovers lightly with foil or plastic wrap and store at room temperature for up to 2 days. For longer storage, keep the pie in the refrigerator for up to 4 days.Freezing: Apple pie freezes well. Once fully cooled, wrap the entire pie tightly in plastic wrap, then in foil, and freeze for up to 3 months. Thaw overnight in the refrigerator, then warm in a 350°F (175°C) oven for 15–20 minutes before serving. Individual slices can also be wrapped and frozen for quick treats.
Notes
- All ingredients, including butter, flour, and water, should be very cold when making the pie crust.
- Making this flaky pie crust will take less than 5 minutes. If you are assembling the dough for more than 5 minutes, you are overworking it and risking warming the ingredients up too much with your hands.
- Resting the dough in the fridge is a must - you won't be able to roll it out without appropriate resting time (minimum two hours).
- When it comes to rolling, again, it can be done when the dough is at the right temperature. If it's too cold, it can crumble. If it's too warm, it can tear and stick.
- You can use a mix of apples, such as Granny Smith for tartness and Honeycrisp or Golden Delicious for sweetness. Or, just use Granny Smith for the best texture.
- Cut the apples into evenly sized slices or chunks. Keeping the pieces uniform ensures that they cook at the same rate, so you won’t end up with some apples turning mushy while others stay too firm.
- Pre-cook the apples just until they begin to soften, around 3–5 minutes. The goal is not to cook them all the way through but to reduce excess liquid and prevent a soggy crust. They’ll continue baking in the oven, finishing with the perfect texture.
- Keep the pie crust cold at every stage. Cold butter creates steam pockets as it melts in the oven, which gives the crust its signature flakiness. Chill the dough before rolling it out, after lining the pie dish, and even before baking for the best results.
- Sprinkle a tablespoon of flour or ground nuts (like almonds or hazelnuts) to the bottom crust before pouring in the apple filling. This helps absorb excess juices and keeps the bottom crust crisp. I use this trick all the time in my galette recipe.
- Add a small splash of apple brandy, bourbon, or rum to the filling for an adult twist. The alcohol cooks off, but the flavor stays.
Lena
This is a really perfect apple pie with lots of tips useful for beginners like me. I will never buy store-bought again.
Jane
There are so many apple pie recipe out there and I noticed recently, many are AI. After reading a few recipes from real bloggers, I decided to try yours, and very happy with the result. I am not new to baking but your tips about the crust and filling are invaluable and finally found a recipe I am happy with! Thanks so much, Katalin.