Apple Pie
My classic Apple Pie with a buttery crust and juicy filling is a cozy Fall staple, designed to be enjoyed with family and friends.
Servings: 8
Calories: 628kcal
Ingredients
All butter pie dough
- 375 g All purpose flour
- ½ teaspoon Salt
- 1 tablespoon Sugar
- 225 g Unsalted butter 82% fat, use it very cold
- 120 g Water use it very cold
- 30 g Apple Cider vinegar
Apple filling
- 1400 g Apples e.g. Granny Smith. This quantity is about 7-10 apples depending on the size.
- 200 g Granulated sugar
- 50 g Unsalted butter
- 1 teaspoon Cinnamon
- 2-3 tablespoon Lemon juice freshly squeezed
- 2 tablespoon Corn starch
Egg wash
- 1 egg
- splash of milk
Instructions
Prepare the dough
- Place the flour, sugar, and salt into a large bowl and mix until well combined. Transfer the bowl to the freezer for 5–10 minutes. Cut the cold butter into small chunks and freeze them for 5–10 minutes as well. Measure the water and vinegar separately, and place them too in the freezer for 5-10 minutes.
- Once all ingredients are nicely chilled, add very cold butter chunks into the bowl of flour and rub the mixture between your fingers until it becomes a sand-like consistency.
- Leave some bigger butter chunks in the mixture - this will encourage flaky pie texture on the pie crust - no need to fully incorporate the butter into the flour.
- Add very cold water and apple cider vinegar into the dough, a small amount at a time, and stir with a spatula or wooden spoon after each addition. Once about 75% of the liquid is used, take out the part of the dough from the bowl, that is already well hydrated, and only keep adding the water to the rest of the dry dough. You might need to use all the water, or slightly less, or very slightly more depending on the flour you are using and how neatly you hydrate the dough. What we want to achieve at the end is a dough that is evenly hydrated, but not too wet, neither too dry with loose flour in it.
- Now, on a lightly floured surface (or silicone baking mat), start working the dough with your hands. First, it will look crumbly, but it should come together in the next minute or so. Do not knead the dough as such; stop mixing as soon as the dough comes together. Remember, leave in some butter chunks, do not overwork the dough, and do not use a mixer.
- Form a disk, cover it with plastic wrap and let it rest in the fridge for a minimum of 2 hours.
Start the lamination - optional for flakier pie crust
- After 2 hours, take the pie dough disk out of the fridge and let it rest for a few minutes on the kitchen counter. The dough should stay cold but slightly warmed up to be able to roll it out without breaking it.
- Transfer the disk to a silicone baking mat or a lightly floured surface and start rolling it out, make sure you turn the dough with your hands after each rolling so it will become even. No need to add too much flour while rolling, the pie dough should be cold enough not to stick to the kitchen counter. If at any point the dough gets too warm, pop it back into the freezer for a minute to chill then continue
- The goal is to roll the dough out into a rectangle of 11x17 inches / 28x43 cm relatively quickly without warming it up.
- Then, apply the following fold: Fold the left half over the right half. Then, you will get a 5.5x17 inches / 14x43 cm rectangle. Then, fold this long rectangle in half by folding the bottom half over the top half. You now have a 5.5x8.5 inches / 14x21.5 cm rectangle. Lastly, fold the bottom half up over the top half again, so you will end up with a 5.5x4 inches / 14x11 cm rectangle. That's it, the folding is done, and you have 8 wonderful layers.
- Cover the dough with plastic wrap and let it rest in the fridge for a minimum of 2 hours.
- The dough makes two 9-inch / 23 cm. So, after the resting time, divide the dough into 2, one for the bottom and one for the lattice top.
Continue with the apple filling
- Peel, core, and slice the apples into even pieces. Toss them with lemon juice while cutting to prevent browning.
- In a large pan, cook the apples with butter, sugar, and cinnamon for 3–5 minutes until slightly softened but not fully cooked. Remove the apples and set aside.
- Mix a few tablespoons of the hot sauce with cornstarch until smooth, then stir it back into the pan. Cook for about 1 minute until thickened, then return the apples and coat them in the sauce.
- Let the apple mixture cool to room temperature before using it.
Assemble the Apple pie
- Roll out the bottom pie crust on a lightly floured surface to about ⅛ inch (3 mm) thick and large enough to fit a 9-inch (23 cm) pie dish with some overhang. Remember, do not force the dough, after rolling, it should stay smooth and cold, and easy to work with. The most common reason for pie crust shrinking is forcing and stretching it.
- Carefully transfer the dough into the dish, gently pressing it into the edges without stretching.
- Then, place the prepared pie crust in the freezer for 15 minutes to firm up.
- Spoon the apple pie filling into the chilled crust, piling the apples higher in the center to account for the slight shrinkage as they bake.
Make the lattice top
- Roll out the second pie crust to about ⅛ inch (3 mm) thick, then cut it into even strips about ½–¾ inch (1–2 cm) wide using a sharp knife or pastry wheel.
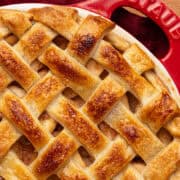
- Lay half of the strips across the filled pie, evenly spaced. Fold back every other strip halfway, then place a new strip perpendicular across the pie. Unfold the strips to cover. Repeat with the remaining strips, alternating the fold each time to create a woven lattice pattern.
- Trim any excess dough, then press and crimp the edges together with the bottom crust to seal.
- In a small bowl, whisk together 1 egg with 1 tablespoon of milk until smooth. Lightly brush the mixture over the lattice and edges of the crust to give the pie a golden, glossy finish.
- Optional: Sprinkle a thin, even layer of granulated sugar over the top for extra crunch and shine. Be careful not to let too much sugar collect in one spot, as it can burn during baking.
- Freeze the assembled pie for about 10-15 minutes while pre-heating the oven to 390°F (200°C), no fan.
Baking
- Bake the assembled pie at 390°F (200°C) for 35 minutes. Then reduce the oven temperature to 350°F (175°C) and continue baking for another 35 minutes, until the filling is bubbling and the crust is fully baked.
- Once the edges of the crust turn golden brown, cover them with a pie crust shield to prevent over-browning. A shield is simply a ring of foil (or a reusable metal/silicone ring) that covers the outer rim of the pie while leaving the center exposed, allowing the filling and lattice to continue baking evenly.
- Near the end of baking, if the lattice top browns too quickly, you can cover the entire pie loosely with foil to protect it while the filling finishes cooking.
- Allow the pie to cool at room temperature for at least 2–3 hours before slicing. This gives the filling time to set so the slices hold their shape. Serve plain, or with a scoop of vanilla ice cream or whipped cream.
- Storing: Cover leftovers lightly with foil or plastic wrap and store at room temperature for up to 2 days. For longer storage, keep the pie in the refrigerator for up to 4 days.Freezing: Apple pie freezes well. Once fully cooled, wrap the entire pie tightly in plastic wrap, then in foil, and freeze for up to 3 months. Thaw overnight in the refrigerator, then warm in a 350°F (175°C) oven for 15–20 minutes before serving. Individual slices can also be wrapped and frozen for quick treats.
Notes
- All ingredients, including butter, flour, and water, should be very cold when making the pie crust.
- Making this flaky pie crust will take less than 5 minutes. If you are assembling the dough for more than 5 minutes, you are overworking it and risking warming the ingredients up too much with your hands.
- Resting the dough in the fridge is a must - you won't be able to roll it out without appropriate resting time (minimum two hours).
- When it comes to rolling, again, it can be done when the dough is at the right temperature. If it's too cold, it can crumble. If it's too warm, it can tear and stick.
- You can use a mix of apples, such as Granny Smith for tartness and Honeycrisp or Golden Delicious for sweetness. Or, just use Granny Smith for the best texture.
- Cut the apples into evenly sized slices or chunks. Keeping the pieces uniform ensures that they cook at the same rate, so you won’t end up with some apples turning mushy while others stay too firm.
- Pre-cook the apples just until they begin to soften, around 3–5 minutes. The goal is not to cook them all the way through but to reduce excess liquid and prevent a soggy crust. They’ll continue baking in the oven, finishing with the perfect texture.
- Keep the pie crust cold at every stage. Cold butter creates steam pockets as it melts in the oven, which gives the crust its signature flakiness. Chill the dough before rolling it out, after lining the pie dish, and even before baking for the best results.
- Sprinkle a tablespoon of flour or ground nuts (like almonds or hazelnuts) to the bottom crust before pouring in the apple filling. This helps absorb excess juices and keeps the bottom crust crisp. I use this trick all the time in my galette recipe.
- Add a small splash of apple brandy, bourbon, or rum to the filling for an adult twist. The alcohol cooks off, but the flavor stays.
Nutrition
Calories: 628kcal | Carbohydrates: 89g | Protein: 6g | Fat: 29g | Saturated Fat: 18g | Polyunsaturated Fat: 1g | Monounsaturated Fat: 7g | Trans Fat: 1g | Cholesterol: 94mg | Sodium: 161mg | Potassium: 262mg | Fiber: 6g | Sugar: 45g | Vitamin A: 984IU | Vitamin C: 10mg | Calcium: 33mg | Iron: 3mg
