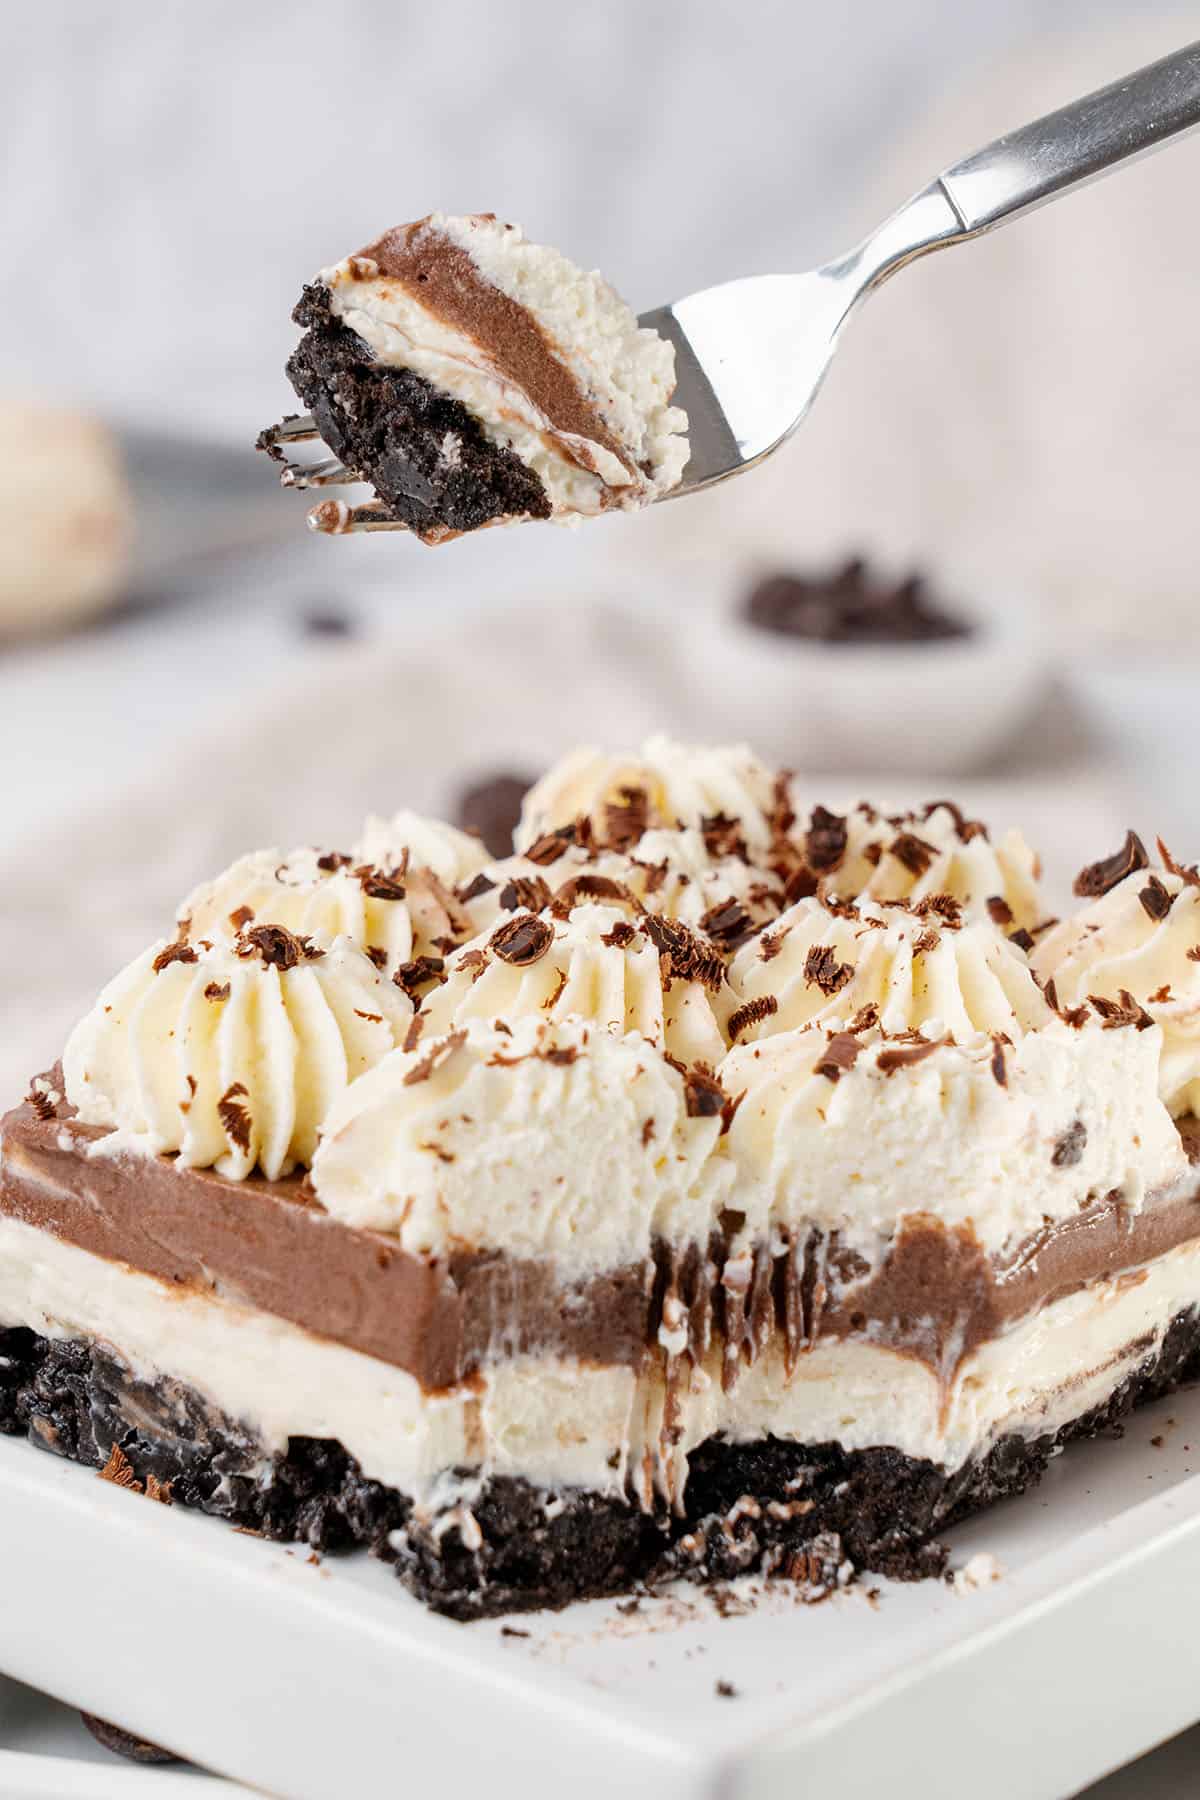
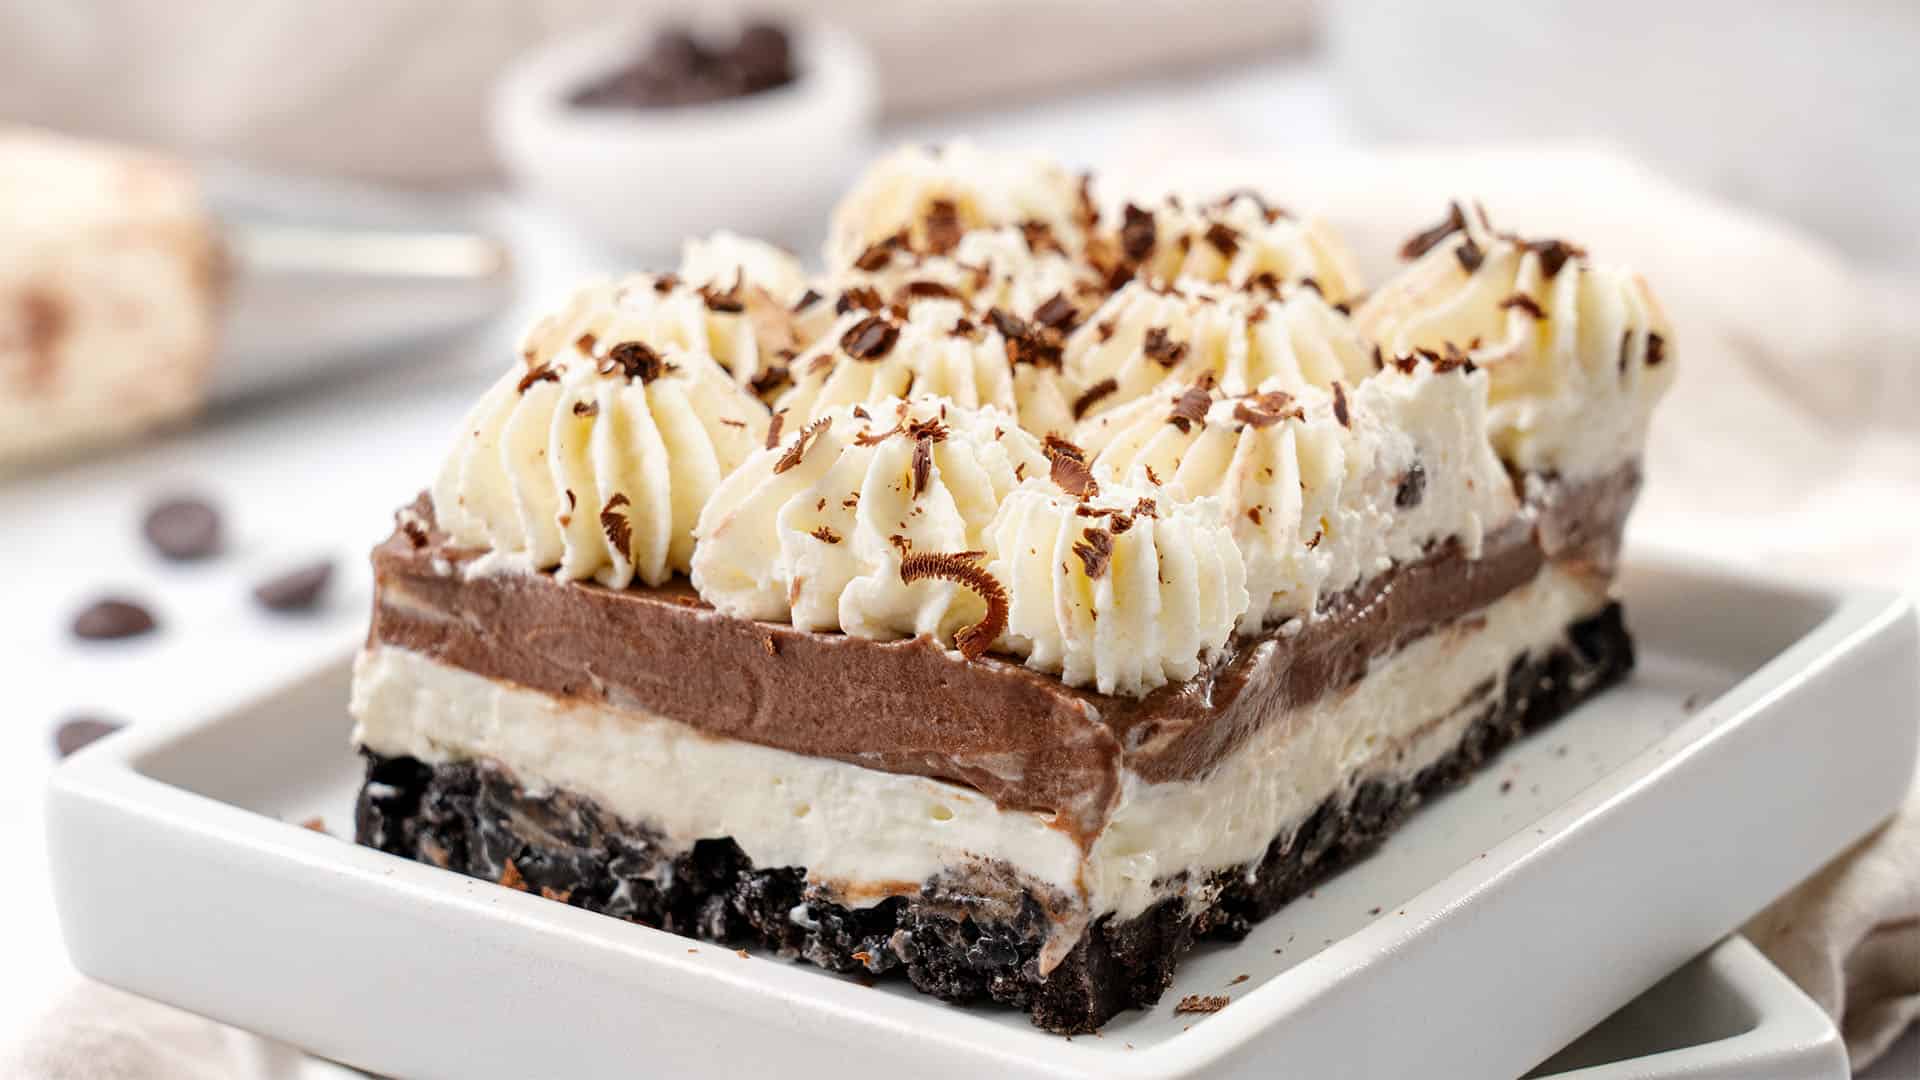
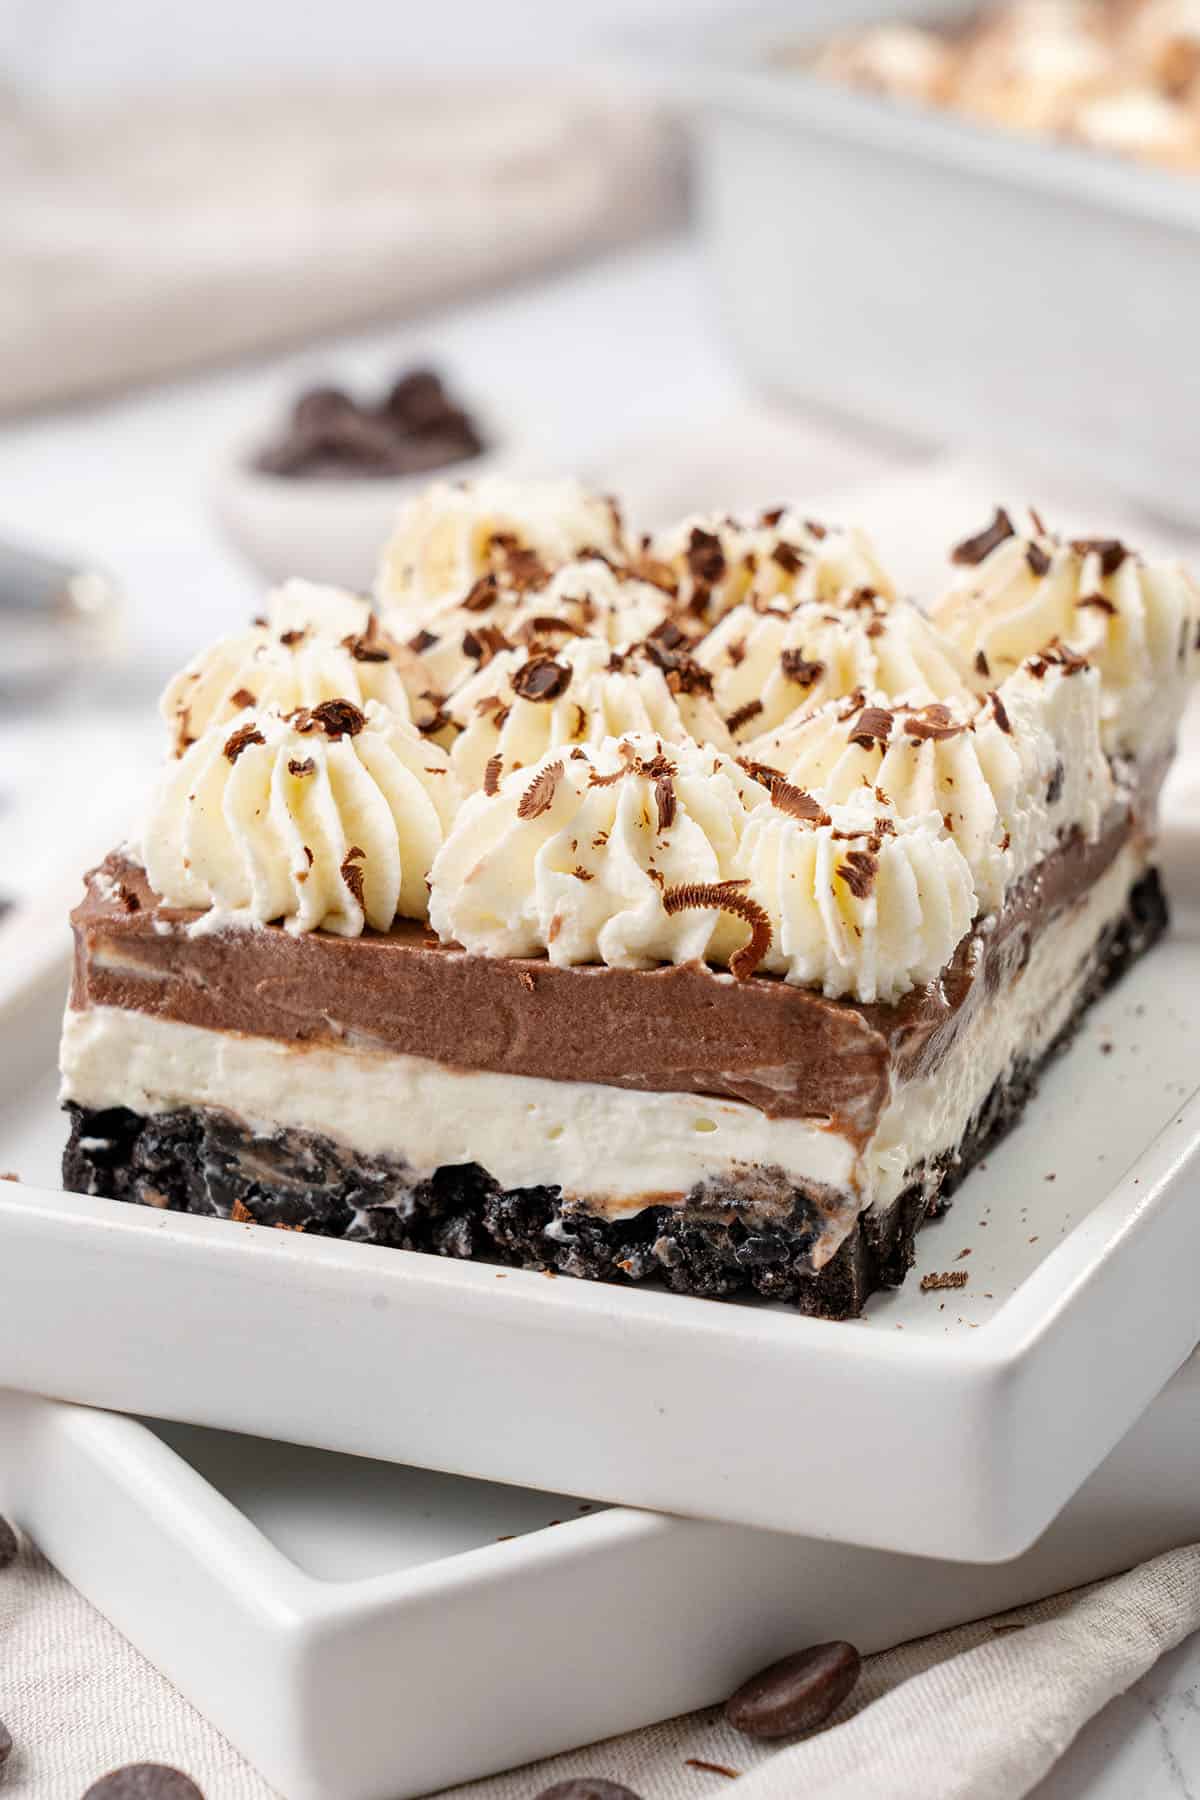
This easy chocolate lasagna recipe is a decadent no-bake dessert made entirely from scratch. Featuring an Oreo cookie crust with layers of creamy cheesecake, silky chocolate diplomat cream, and a light Chantilly whipped topping, it has the perfect balance between rich and airy. It’s easy to assemble, ideal for making ahead, and one of those desserts that looks as elegant as it tastes.
What you can expect making this Chocolate Lasagna recipe
This delicious no-bake chocolate lasagna may look difficult to make, but it is actually a super beginner-friendly dessert that comes together quickly with simple steps. The best part is that you won’t find any boxed pudding mix or artificial add-ins here!
This recipe starts with my simple 3-ingredient Oreo pie crust base, which adds a chocolatey crunch and gives the lasagna structure. The homemade cheesecake layer is light and slightly tangy, helping to balance the richness of the chocolate.
However, my signature 100% made-from-scratch chocolate pudding layer is what really sets this apart from other chocolate lasagna recipes. Here, the ‘pudding’ is actually a chocolate diplomat cream, creating a silky, light texture with a deep chocolate flavor that isn’t overly sweet.
The lasagna is topped with a layer of vanilla Chantilly cream, adding a soft, airy finish. Once chilled, the layers set into an irresistible dessert that slices cleanly and melts in your mouth with every bite.
Katalin's key take on why to make this cake from scratch
You can find plenty of chocolate lasagna recipes out there, but most rely on shortcuts like instant chocolate pudding and store-bought Cool Whip. While certainly convenient, those versions often overdo the sweetness and lack complexity.
If you’ve ever looked at the ingredient list on a box, you’ll notice it’s filled with things that are hard to recognize, let alone pronounce. Making this dessert from scratch completely changes the experience.
By using real chocolate in the pastry cream, you get a deeper, more complex flavor that you simply cannot get from a boxed mix. Folding it into homemade whipped cream makes it a light, mousse-like layer rather than a dense pudding. This homemade Chantilly cream replaces artificial toppings with a fresh, airy layer that has just the right amount of sweetness.
Another advantage is the control it offers, allowing you to easily adjust the sweetness and experiment with flavors. The extra effort is minimal, but the difference in taste and texture is definitely noticeable.
Start with the chocolate pastry cream
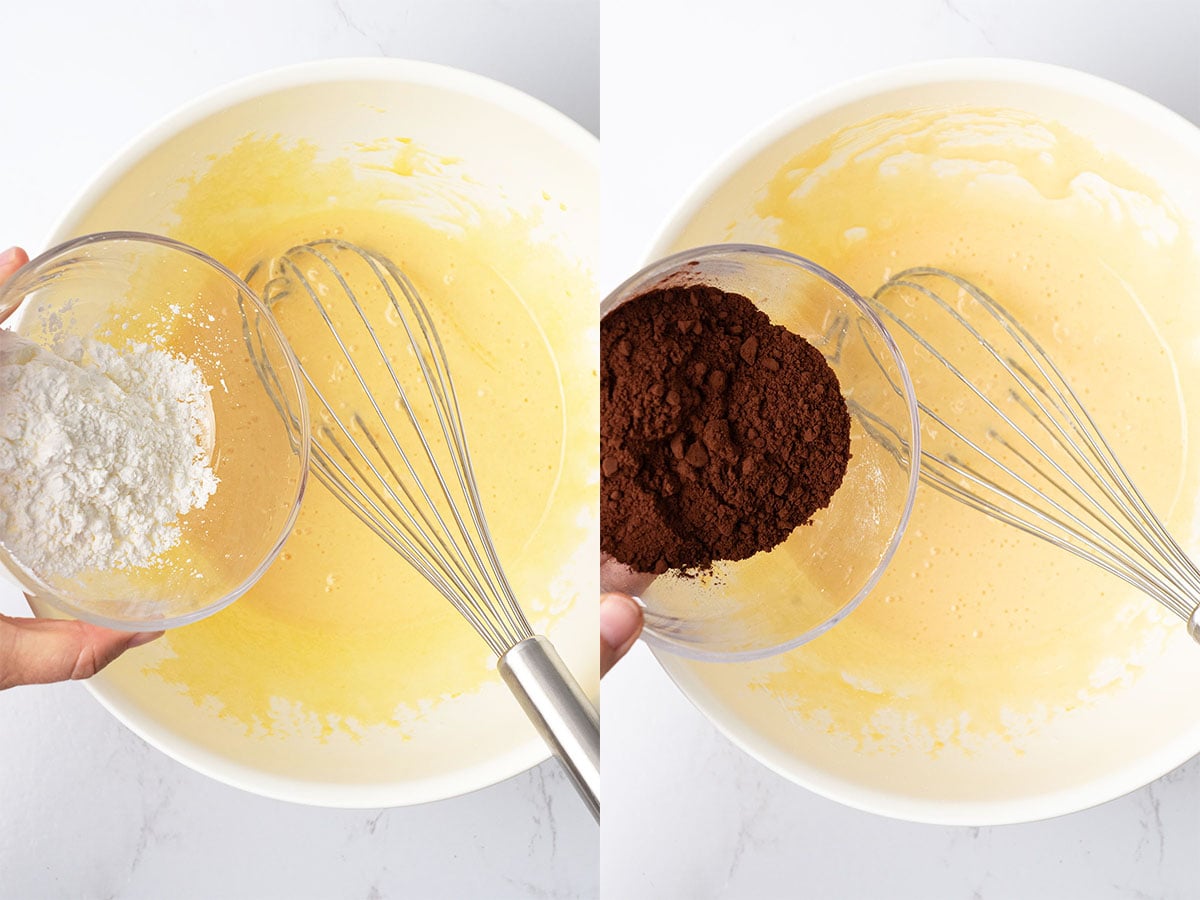
Begin by whisking the egg yolks and sugar in a large bowl until slightly pale and fluffy. Then sift in the cornstarch and cocoa powder, add the vanilla extract, and whisk until smooth.
Meanwhile, heat the milk just until it begins to simmer. It should be just starting to simmer, but not boiling (or the eggs will scramble). Then, slowly pour it into the egg mixture while whisking constantly. This gently tempers the eggs; do not skip this step.
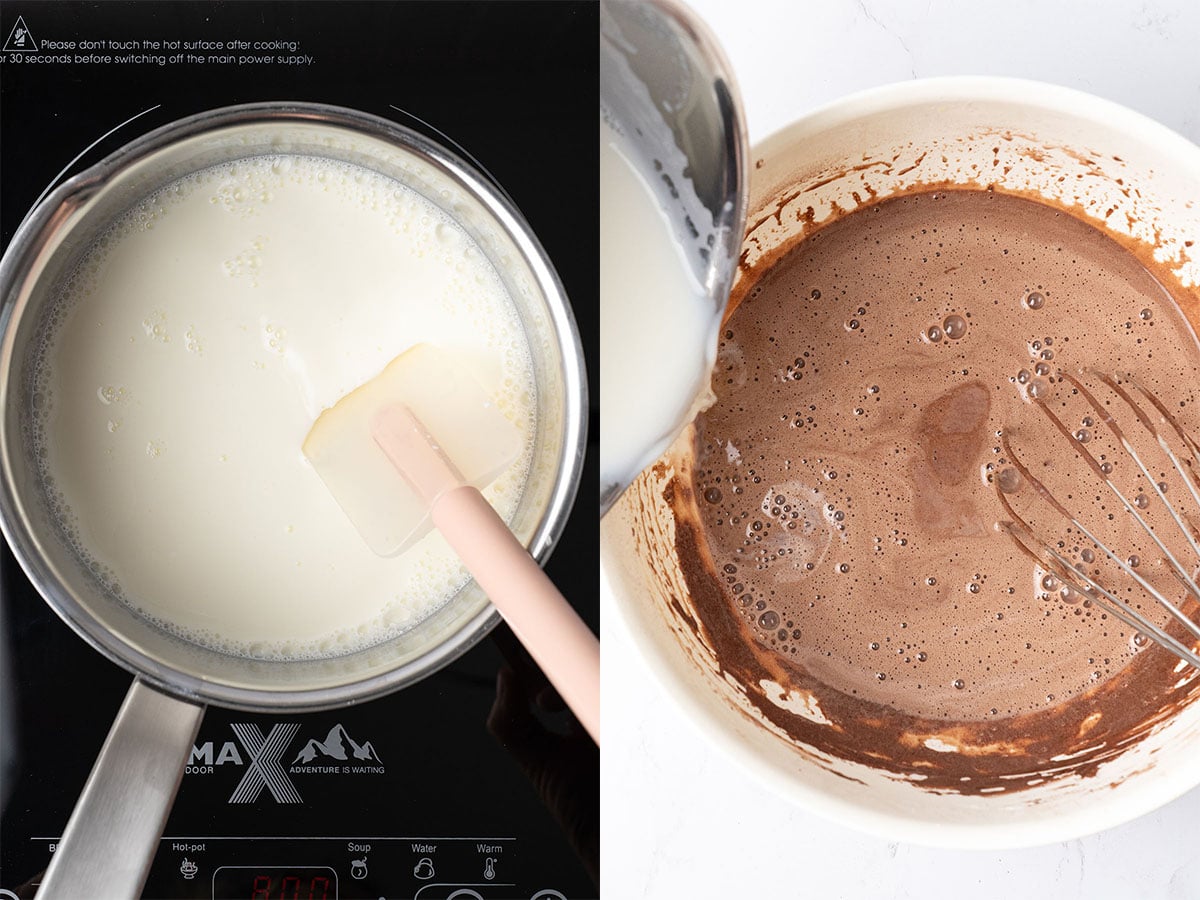
Return the mixture to the saucepan and cook over medium heat, whisking continuously. At first, it may look lumpy, but as it thickens, it will become smooth and glossy. Once it reaches a pudding-like consistency, remove it from the heat.
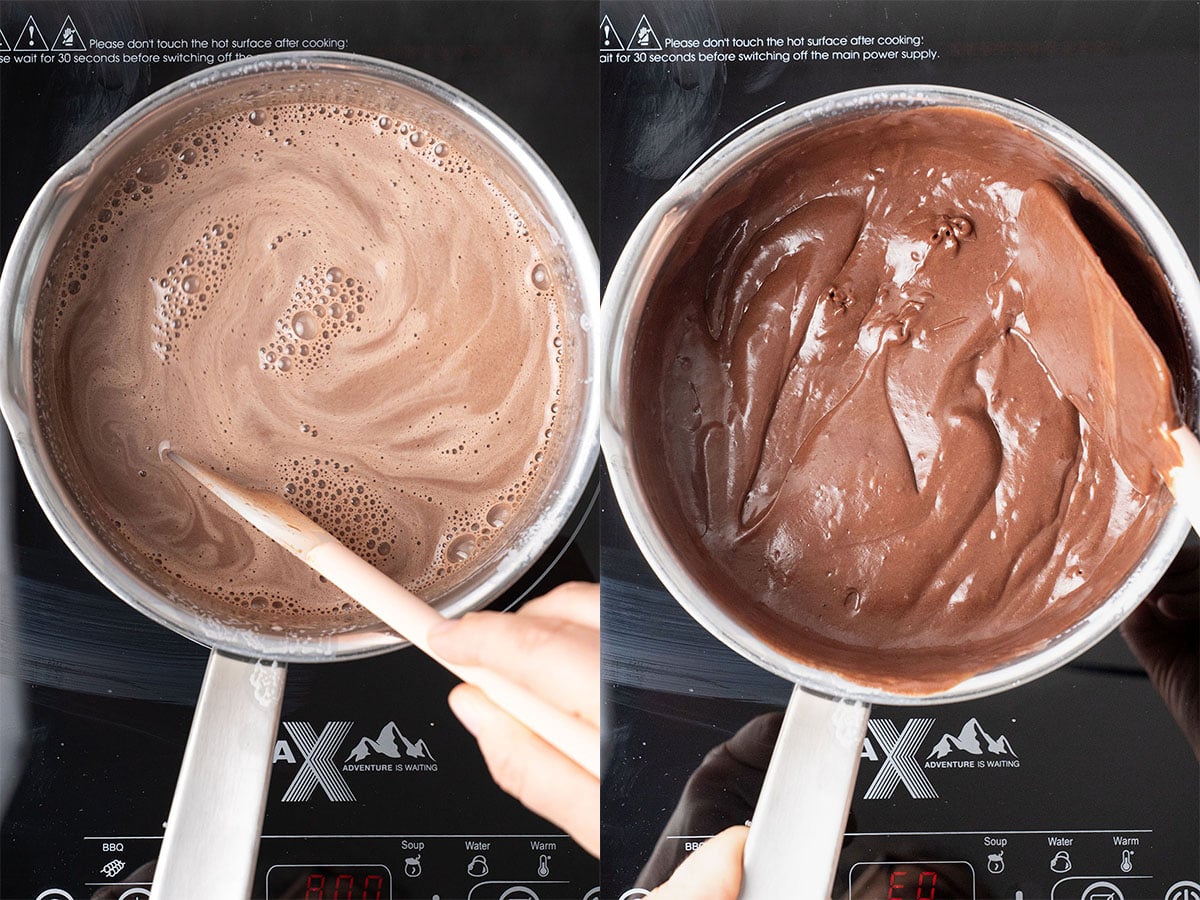
For the smoothest result, strain the cream through a fine sieve. Then add the softened butter (unsalted only) in stages, mixing well after each addition. Then, immediately pour the hot mixture over the chopped chocolate, letting the heat melt it, then use a rubber spatula to incorporate until fully combined.
Transfer the chocolate pastry cream to a shallow container, cover the surface with plastic wrap, and let it cool to room temperature.

Make the Oreo base layer
Start by melting the butter in the microwave, then let it cool slightly while you prepare the Oreos.
Crush the Oreo cookies into very fine crumbs using a food processor or a rolling pin. There should be no large chunks, as fine crumbs ensure the crust holds together properly.
Mix the crumbs with the cooled, melted butter and a pinch of salt. Using warm (not hot) butter helps coat the crumbs evenly without making the mixture greasy. If necessary, you can refrigerate the mixture for a few minutes.
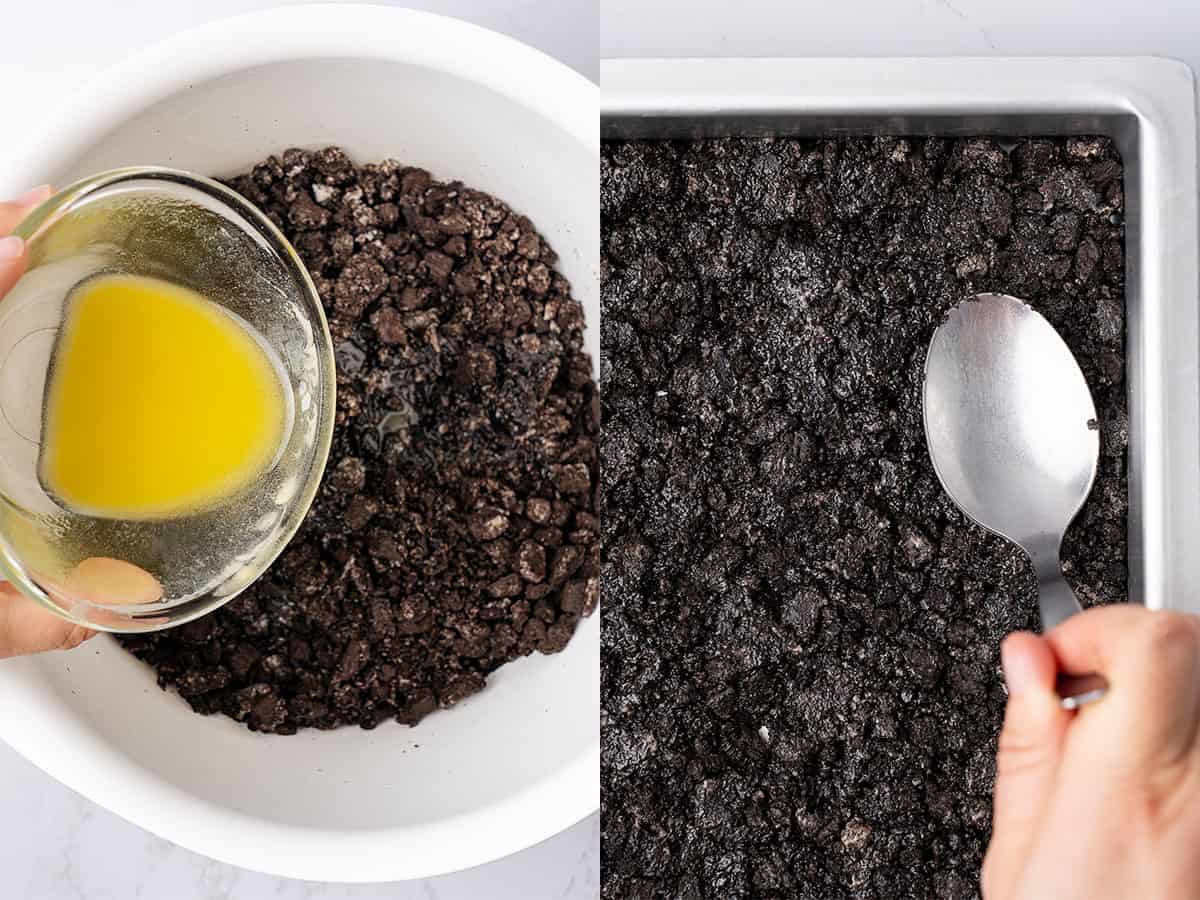
Press the mixture firmly into your pan to create an even, compact layer. While you can use your fingers, using the bottom of a glass or the back of a spoon helps achieve a smooth finish.
Refrigerate the crust while preparing the next layer so it firms up and holds its shape.
Whip up the cream cheese layer
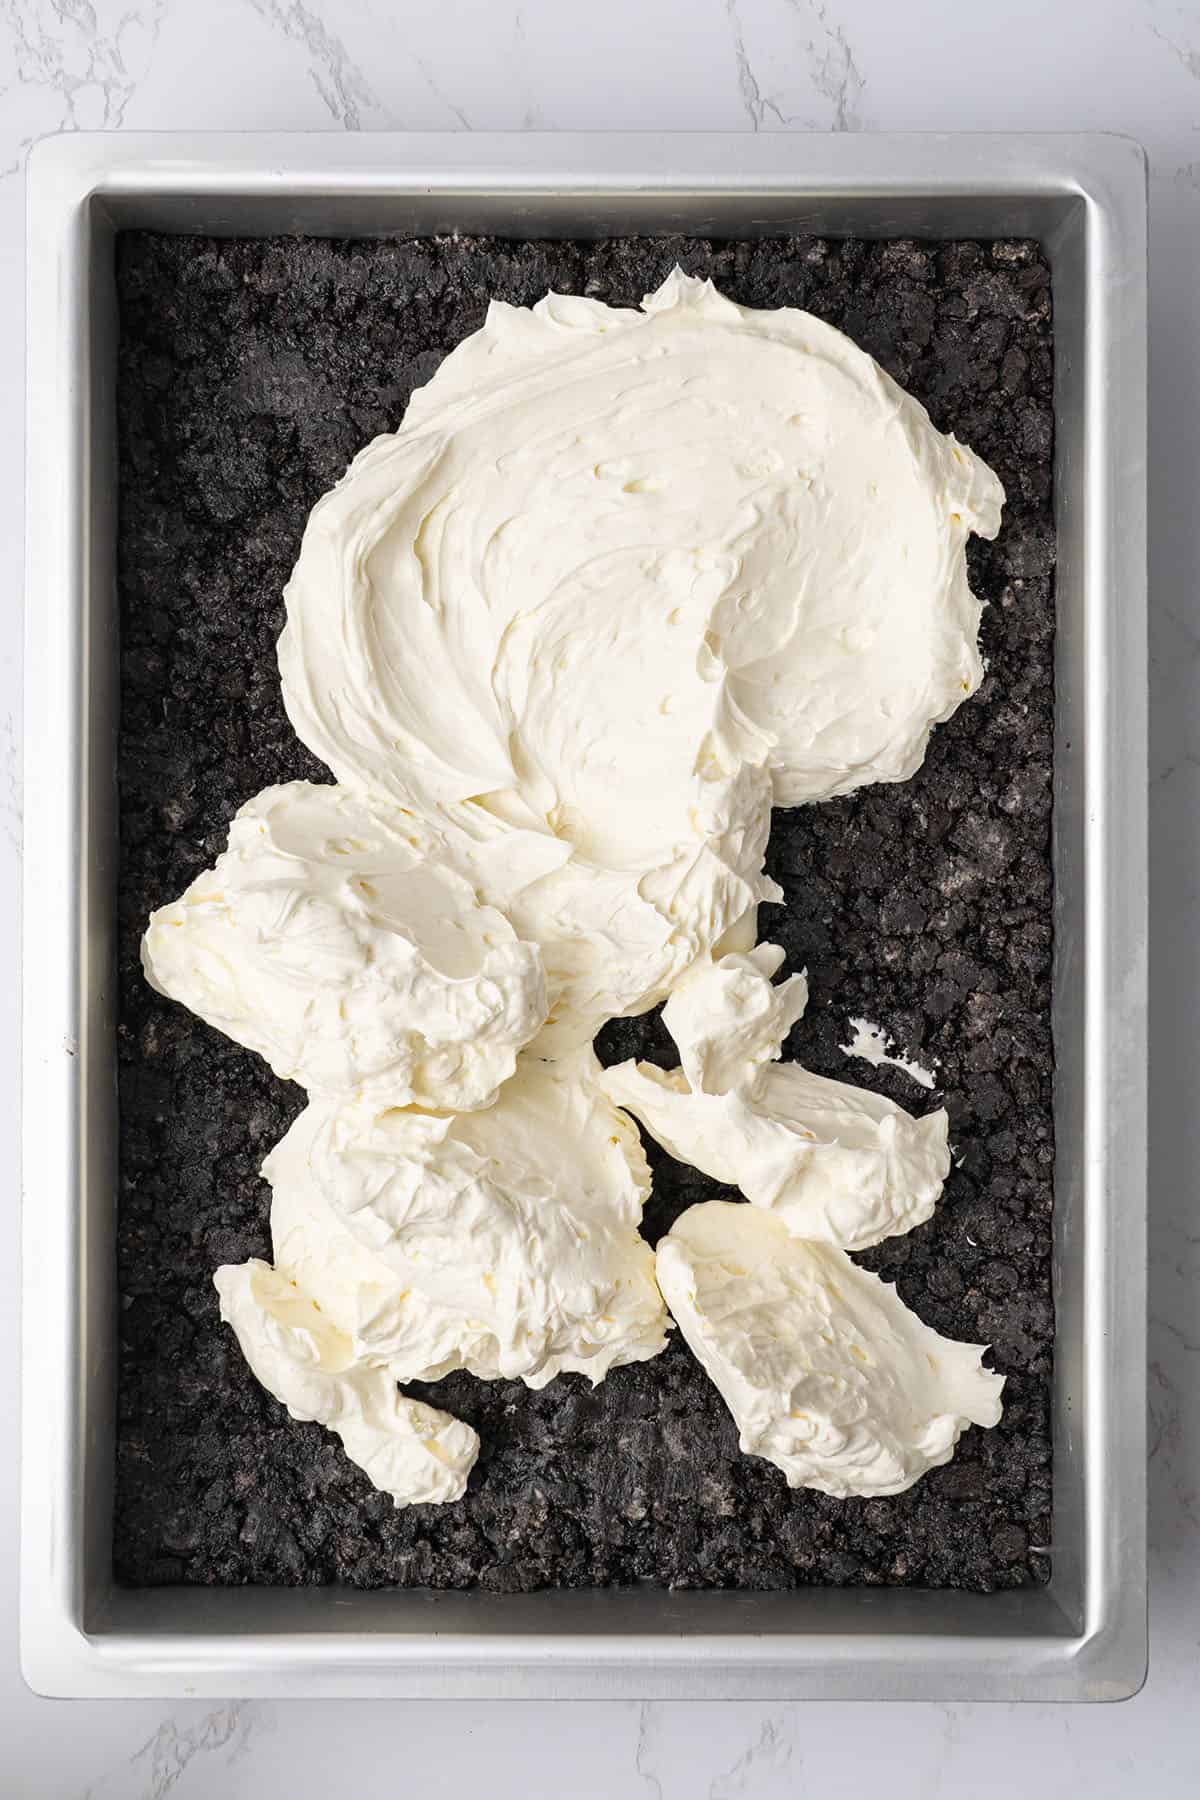
For the cheesecake layer, start with very cold cream cheese and heavy cream to help maintain structure.
Combine the cream cheese, heavy cream, sifted powdered sugar, and vanilla extract in a mixing bowl. Whip for a few minutes until the mixture becomes light, fluffy, and smooth. Avoid overmixing, as it can make the mixture too loose.

Spread the mixture evenly over the chilled crust, smoothing the surface with a spatula. Return it to the refrigerator to set slightly before adding the chocolate layer.
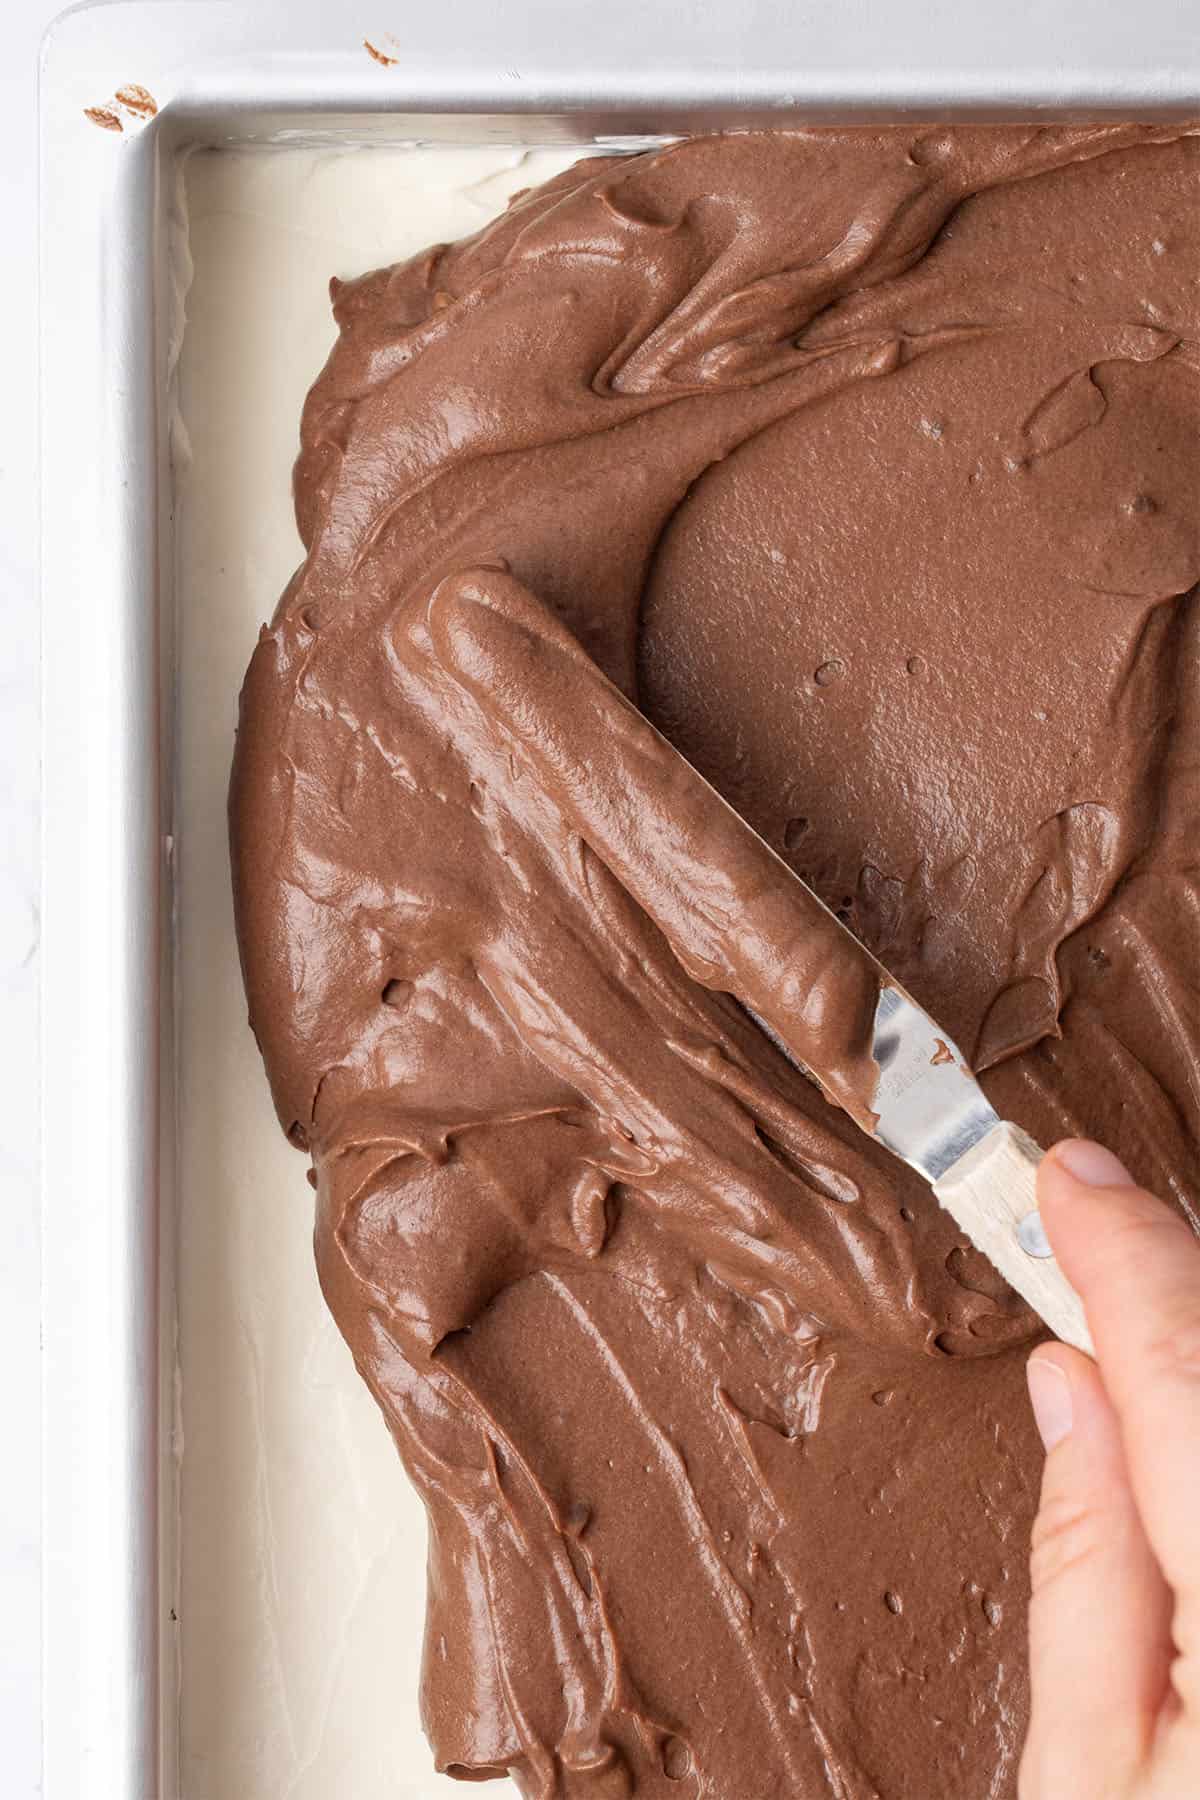
Now turn the Chocolate pastry cream into Chocolate diplomat cream, the best Chocolate Pudding you'll ever taste
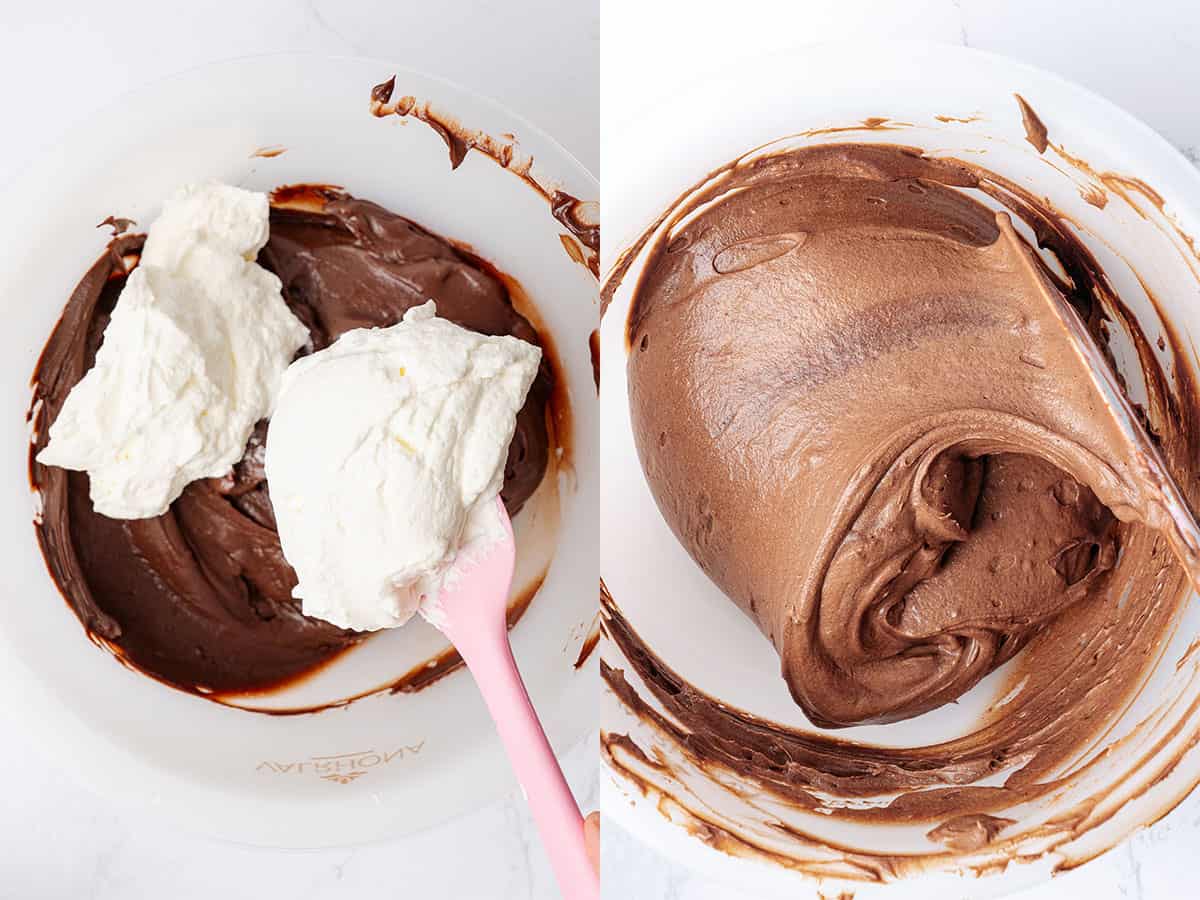
Once the chocolate pastry cream has cooled to room temperature, give it a few gentle whisks to loosen it. In a separate bowl, whip very cold heavy cream until it reaches soft- to medium peaks. It should be airy and light, not stiff.
Using a rubber spatula, carefully fold the whipped cream into the pastry cream, only until fully combined and smooth. Overmixing can deflate the cream and make it dense.
Spread your homemade chocolate pudding layer evenly over the cream cheese layer and smooth the top. Chill once again before adding the final layer.
Finish with the whipped cream layer
As with the cheesecake layer, you will want to start with very cold heavy cream and mascarpone to help the whipped cream retain its structure.
Combine the very cold heavy cream, mascarpone, and sifted powdered sugar in a bowl. Whip for 2–3 minutes until fluffy and pipeable. The mascarpone helps stabilize the cream, allowing it to hold its shape longer without becoming heavy.
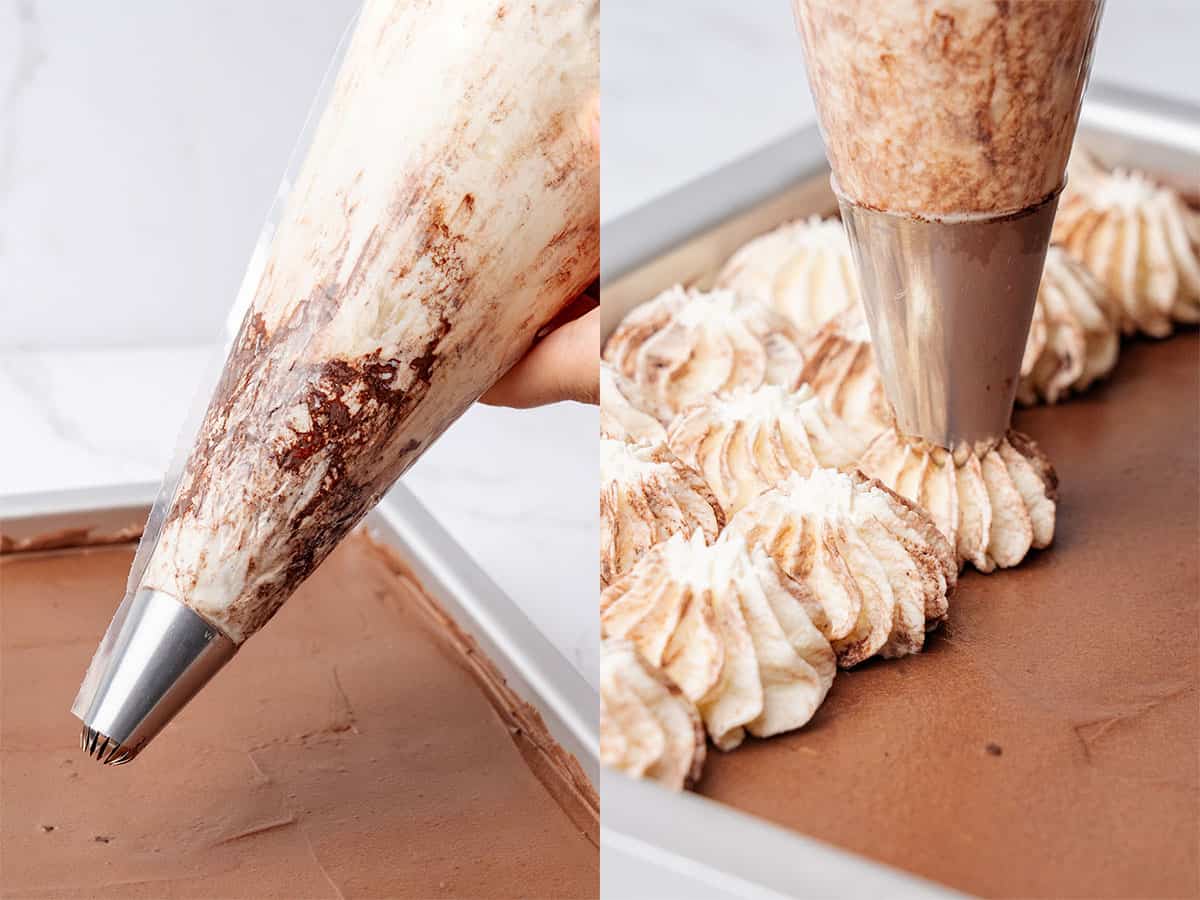
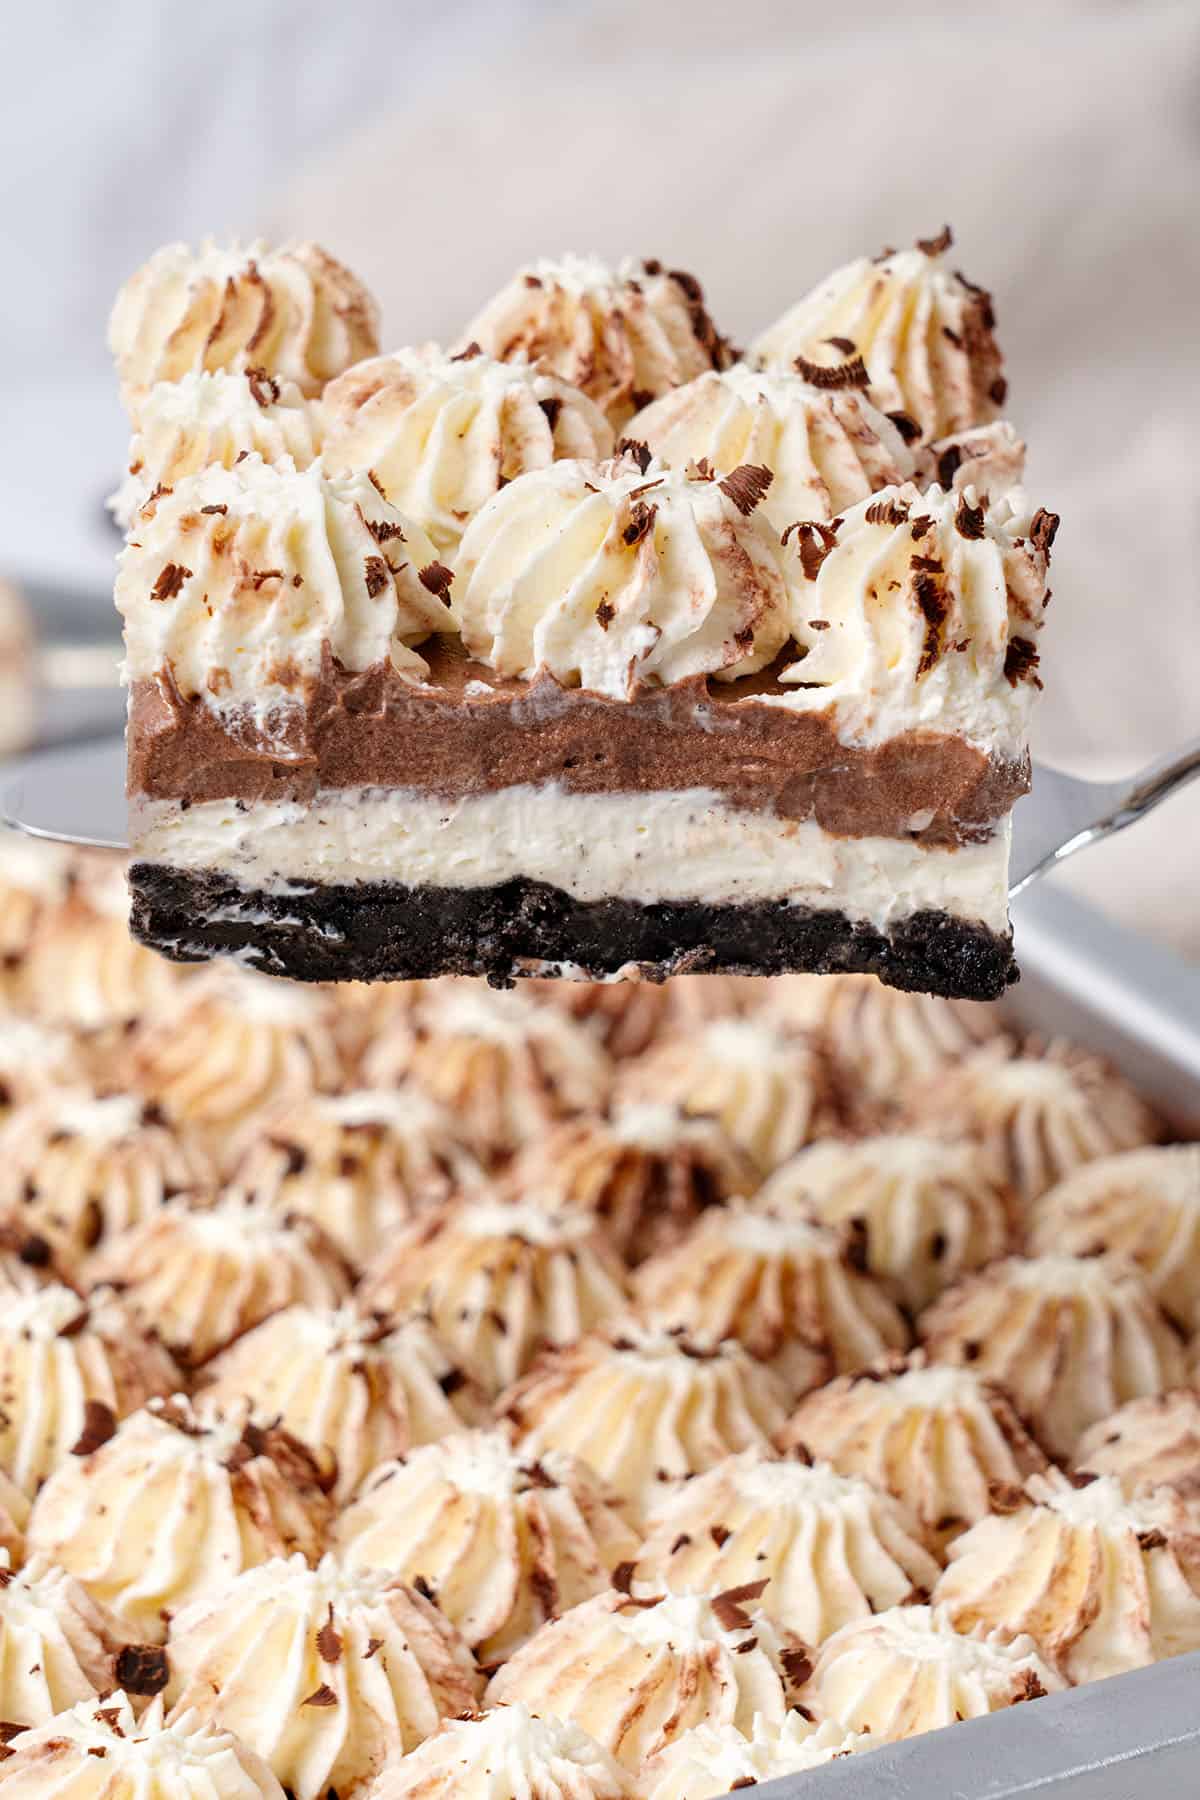
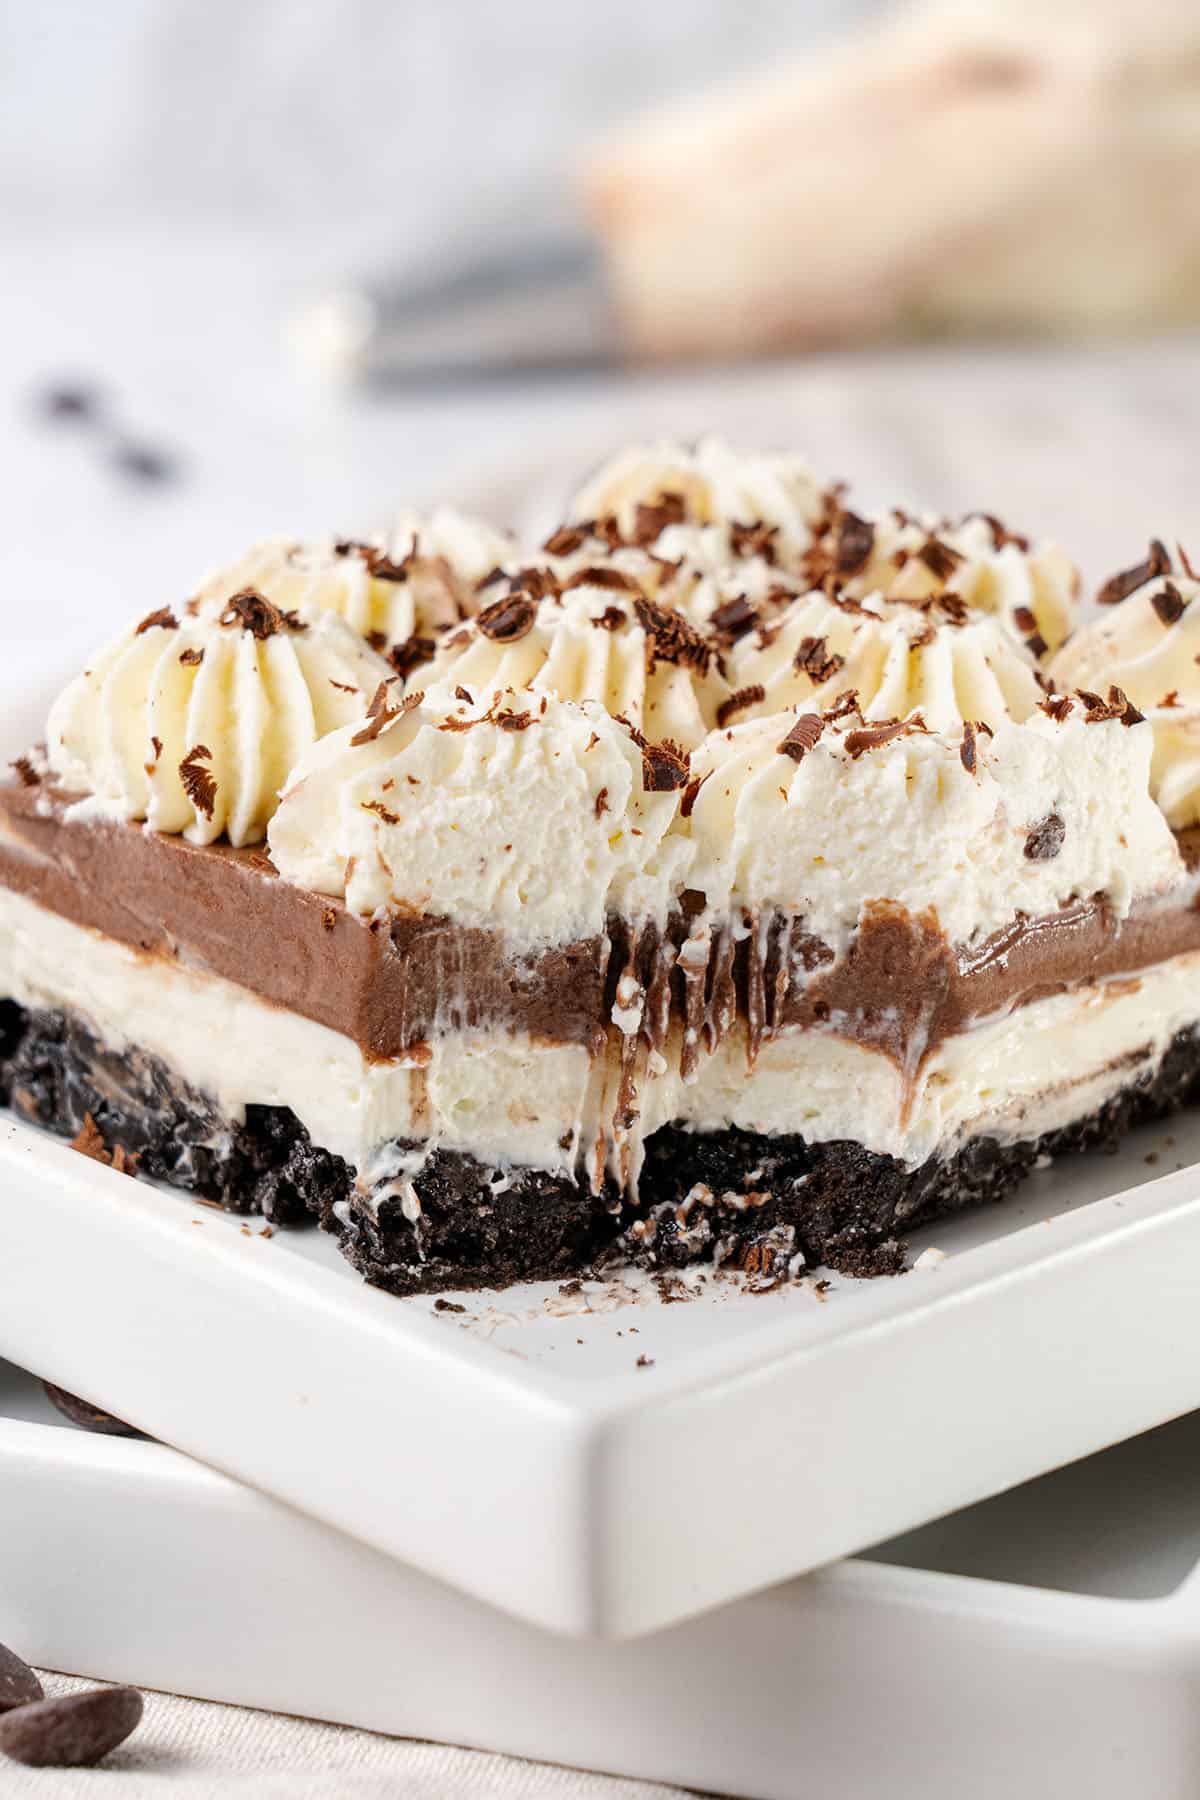
Spread or pipe the whipped cream over the chocolate layer of the lasagna, then refrigerate for at least four hours, or overnight for the best results.
Tip: If you want to achieve a similar marble pattern on the topping, place about a teaspoon of cocoa powder into the piping bag first, then add the topping. As you pipe, the cocoa will naturally create a marbled effect throughout the topping.
Finish with chocolate shavings for decoration. For clean slices, freeze for 15 minutes before cutting; however, serve it chilled, not frozen.
How to store leftovers
This chocolate lasagna is best enjoyed fresh after chilling, when the layers are fully set.
However, if you have leftovers, store them in an airtight container in the refrigerator for up to two days. Because of the cream-based layers, I do not recommend freezing it. The texture can become grainy and lose its smooth consistency once thawed.
Flavor variation ideas
One of the best things about this dessert is how easy it is to customize.
For a peanut butter version, add a layer of peanut butter to the cream cheese mixture or swirl it into the chocolate layer. You can also enhance the chocolate flavor by adding a small amount of espresso powder to the pastry cream.
For a richer, more indulgent version, add layers of homemade caramel sauce, Nutella, or Biscoff spread. For a citrusy twist that pairs well with chocolate, try adding a hint of orange zest to the chocolate layer.
Experiment with different-flavored Oreos, such as mint, peanut butter, or golden Oreos.
For a fruity variation, swap the chocolate layers for a strawberry-based cream and use golden Oreos for the crust, as I do in my strawberry lasagna recipe.
You can also use different toppings, such as mini chocolate chips, cocoa powder, chopped nuts, or even a drizzle of caramel or chocolate sauce.
Some potential ingredient substitutes
Because this dessert relies on a few key components, making substitutions can be tricky and may change the final result.
For a gluten-free version, use gluten-free chocolate sandwich cookies for the base. Vegan alternatives can be used for the cream cheese, heavy cream, and mascarpone, but will not yield the same result as dairy products.
If powdered sugar is unavailable, use a suitable powdered sugar substitute, but ensure it dissolves smoothly to maintain the layers' creamy consistency.
My expert tips
- Use high-fat, high-quality ingredients for the best results, i.e., 3% fat whole milk, 82% fat butter, full-fat cream cheese, 36% fat heavy cream, and 41% fat mascarpone.
- For the richest chocolate flavor, use the highest quality chocolate ingredients you can find. Use unsweetened, Dutch-processed cocoa powder with 100% cacao and high-quality semi-sweet chocolate chips or chunks, such as Callebaut or Lindt.
- Make sure all temperature-sensitive ingredients are used correctly. The pastry cream should be room temperature before folding it, and the heavy cream, cream cheese, and mascarpone should always be very cold before using.
- Chill each layer briefly before adding the next. This helps keep the layers distinct and prevents them from mixing together.
- Always allow enough time for the dessert to fully chill before serving. This is a must for clean slices and an ideal texture.
Helpful equipment
Always use a digital scale to measure ingredients accurately. Precision is key in baking for consistent results.
An electric hand mixer is ideal for whipping the cream cheese and Chantilly cream layers, while a rubber spatula is necessary for gently folding the diplomat cream without deflating it.
This recipe uses a 9x13-inch sheet pan, but you can use my cake pan size conversion guide to adjust the size depending on how thick you want the layers.
Try some of my other easy no-bake recipes
If you enjoyed making this delicious no bake chocolate lasagna, be sure to check out my other recipes that don't require an oven.
- Lemon icebox cake
- Eclair cake
- No-Bake Cheesecake Bites
- No-Bake Apple Pie with Graham Cracker Crust
- No-Bake Strawberry Cheesecake
For more simple make-ahead desserts that don’t require an oven, check out my full roundup of the top no-bake desserts.
Have you tried this recipe?
Please leave a 5-star ⭐️⭐️⭐️⭐️⭐️ rating on the recipe card and consider leaving a comment as well!

Chocolate Lasagna
Equipment
- 9x13 inch sheet pan
Ingredients
Oreo Crust Base
- 400 g (14 oz) Oreo cookies crushed
- 114 g (½ cups) Unsalted butter melted but not hot
- Pinch of salt
Cheesecake Layer
- 460 g (2 cups) Cream Cheese full fat (33%+) eg. Philadelphia, use it cold
- 150 g (⅔ cups) Heavy cream min 36% fat, use it cold
- 60 g (½ cups) Powdered sugar sifted
- 1 teaspoon Vanilla extract
Chocolate Diplomat Cream
- 480 g (2 cups) Whole milk 3% fat
- 100 g (½ cup) Granulated sugar
- 80 g Egg yolk approx. yolk of 4-5 eggs at room temperature
- 25 g (3 tablespoons) Corn starch
- 25 g (3 tablespoons) Cocoa powder unsweetened, dutch processed
- 1 teaspoon Vanilla extract
- 55 g (¼ cup) Unsalted butter 82% fat, room temperature soft butter
- 125 g (¾ cup) Semi-sweet chocolate high quality chocolate chips or chocolate bar cut into smaller chunks
- 115 g (½ cup) Heavy cream 36% fat, use it very cold
Whipped Chantilly Cream
- 460 g (2 cups) Heavy cream min 36% fat, use it cold
- 150 g (⅔ cups) Mascarpone 41% fat, use it cold
- 60 g (½ cups) Powdered sugar sifted
US customary cup measurement is an indicative figure only. Measure the ingredients with a digital scale by weight (gram). Baking is art but also science which requires precision and accuracy.
Instructions
Chocolate Diplomat Cream
- Start by making a chocolate pastry cream. In a large bowl, whisk together the sugar and egg yolks for 1–2 minutes, until the mixture is slightly fluffy. Add the cornstarch, cocoa powder, and vanilla. Whisk until completely smooth and lump-free.
- Heat the milk in a medium saucepan over medium heat. Remove it just as it begins to simmer; do not let it boil.
- Slowly pour the warm milk into the egg yolk mixture, whisking constantly as you pour.
- Pour the mixture back into the saucepan. Cook over medium heat, whisking constantly and scraping the bottom and sides of the pan. Continue until the mixture thickens, usually about 1 minute after the first boil. The cream may look lumpy at first—keep whisking, and it will become smooth and glossy.
- For an extra-smooth texture, strain the cream through a fine-mesh sieve into a clean bowl to remove any lumps or cooked egg bits.
- Add softened butter in 2–3 stages, mixing well after each addition until fully incorporated. Then, pour the hot cream over the chopped chocolate. Let it sit 1–2 minutes to melt the chocolate, then fold gently with a rubber spatula until fully combined.
- Transfer the cream to a shallow bowl or container. Cover the surface directly with plastic wrap to prevent skin from forming. Let it cool to room temperature.
Oreo Crust Base
- Melt the butter in the microwave on low heat, then let it cool slightly while you make the crumbs.
- Make the Oreo crumbs by either pulsing the cookies in a food processor or by putting them in a zip bag and beating them with a rolling pin. Make sure that the crumbs are fine and that there are no visible big chunks left.
- Mix the crumbs with the warm butter and a pinch of salt until the mixture comes together and the crumbs are evenly coated in butter. If the mixture is too runny, place it into the fridge for a few minutes.
- Spread the cookie mixture evenly and tightly in your pan. You can use your fingers for this step, or a flat-bottom glass or the back of a spoon.
- Refrigerate while preparing the cheesecake layer.
Cheesecake layer
- Place the very cold cream cheese and heavy cream into a bowl along with the sifted powdered sugar and vanilla extract. Use an electric hand mixer to whip the mixture for about 2-3 minutes until fluffy.
- Spread the cheesecake layer over the crust, smooth the top, then refrigerate while preparing the next layer.
Chocolate Diplomat Cream continue
- Start with your cooled chocolate pastry cream at room temperature.
- In a separate bowl, whip very cold heavy cream for a few minutes until it reaches soft to medium peaks. Avoid whipping until stiff peaks form.
- Give the chocolate pastry cream a few gentle whisks to loosen it and make it easier to fold. Then, using a rubber spatula, gently fold the whipped cream into the chocolate pastry cream. Do this carefully, just until the mixture is smooth and evenly combined, do not overmix.
- Spread the chocolate diplomat cream over the cheesecake layer, smooth the top, then refrigerate while preparing the next layer.
Whipped Chantilly Cream
- Place very cold heavy cream and mascarpone into a mixing bowl, along with the sifted powdered sugar. Use an electric hand mixer to whip the mixture for about 2-3 minutes until fluffy.
- To finish, pipe or spread this whipped cream layer on top of the chocolate diplomat cream layer.
- Refrigerate for at least four hours or overnight. For the cleanest cut, freeze it for 30 minutes before cutting. However, the dessert is best served chilled, not frozen. Decorate with chocolate shavings.
- Any leftovers can be stored refrigerated in an airtight container for 2 days. This chocolate lasagna does not freeze well because of its creamy layers.
Notes
- Measure your ingredients with a digital scale for accuracy.
- It is very important that the dairy products (mascarpone, heavy cream, cream cheese) are high in fat. The low-fat versions won't whip up correctly because they contain more water.
- Unsweetened, Dutch-processed cocoa powder and high-quality semi-sweet chocolate are the heart of making this pastry cream.
- For the crust, the butter acts as a binding agent in this recipe. Once it is cooled in the fridge, it will set. You may have had a bad experience with Oreo crust in the past, where it was too crumbly and didn't hold its shape. This was likely due to not using enough butter in the recipe.
- All these layers, using real dairy products as opposed to Cool Whip, can be easily overwhipped. When whipping, stop as soon as the mixture has reached a fluffy consistency (this will take 2-3 minutes) and form early stiff peaks. It won't get stiffer after this point. In fact, if you overbeat it, it will only get runnier and then break.
- You will need to chill the dessert in between building up the layers. While placing layers one by one, do so carefully so they don't mix.
- Make sure to chill the dessert at the end as well! Let it sit in the fridge for a minimum of 4 hours for the layers to set.
- For a clean cut, cut with a knife that has been run under hot water.
- Don’t let the dessert sit out too long (more than 30 minutes), or it might start to get too soft.
Linda Wagaman
Awesome