This is seriously the BEST classic chocolate eclair recipe that will take you through how to make eclairs at home step by step. It's a foolproof recipe designed for home bakers in their kitchen environment, but delivers professional results. Mastering homemade eclairs is one of the most rewarding skills to learn!

This classic chocolate eclair recipe was one of my first on the blog in 2020. So many readers have made it since then (with brilliant results), and I have not changed the recipe, but I've updated the post with new photos and added a troubleshooting guide and helpful baking tips based on your questions, as well as more filling options.
Read what others said about my classic chocolate eclair recipe
"After many trials of different recipes and attending online courses, I never was satisfied with the results. This recipe worked perfectly from the first attempt. Thank you 🙏" Natalya
"'Perfect' and 'Foolproof' is exactly what this recipe is. It is so good, I made it three times and threw all of my other recipes away!" Sally

Best foolproof chocolate eclair recipe
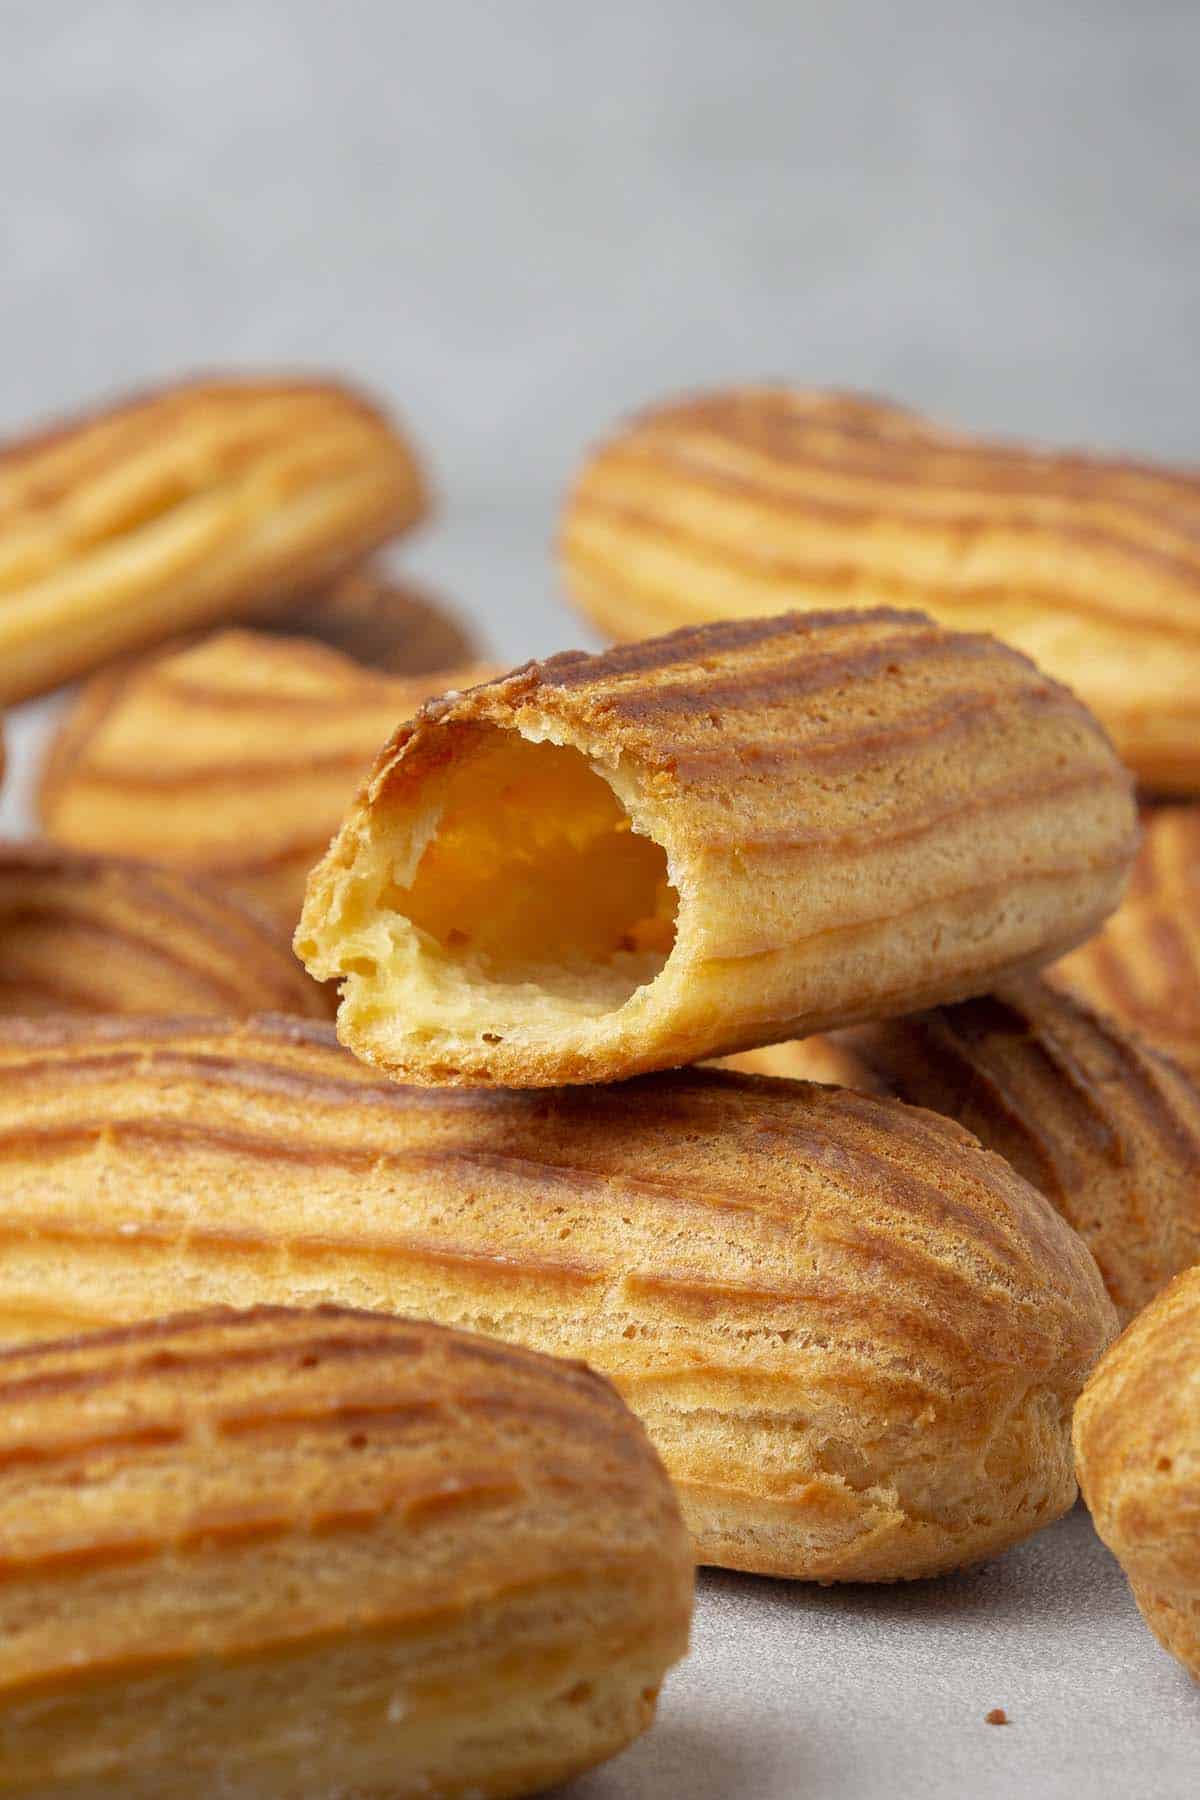
Nothing beats delicious crispy and creamy eclairs filled with vanilla bean pastry cream and covered with a chocolate glaze.
In my opinion, the best recipe is not just one that I succeed with but one that helps the reader recreate it easily on their own.
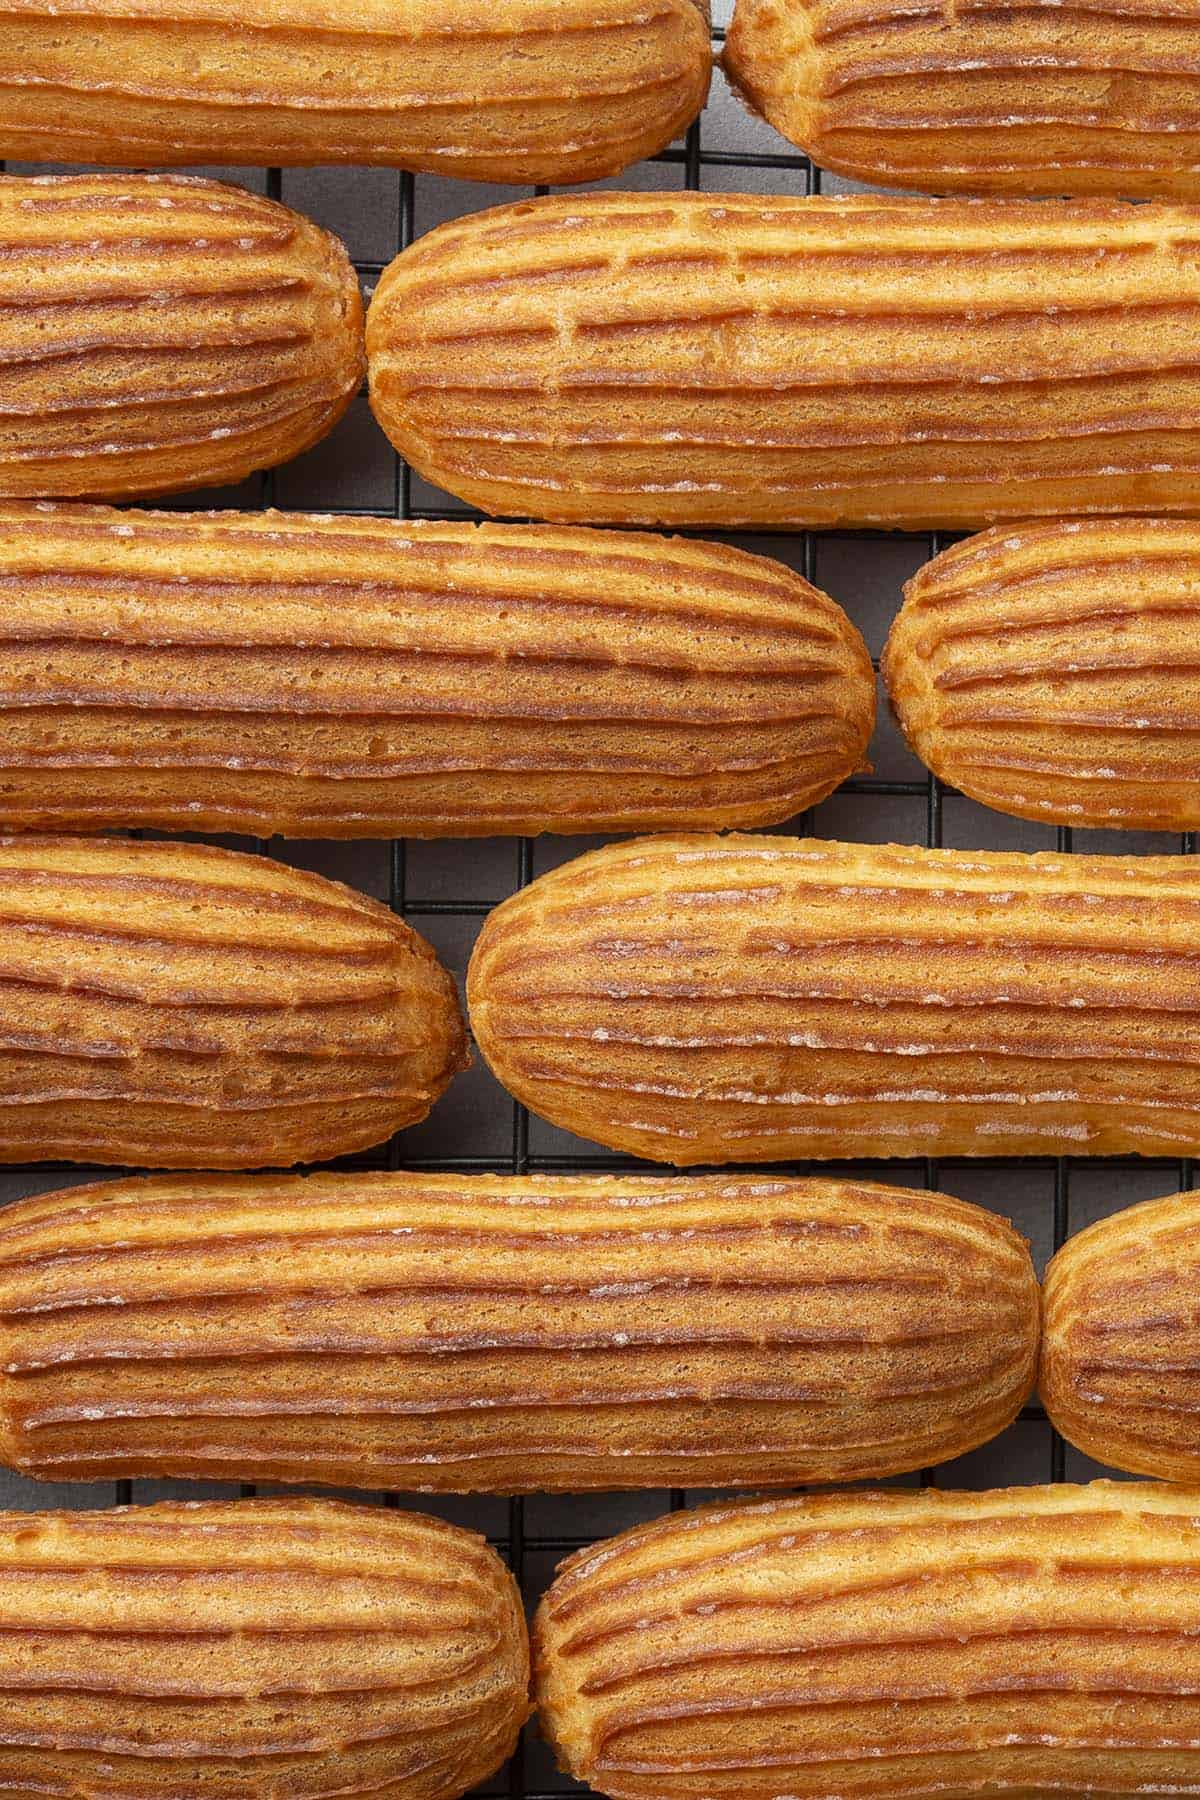
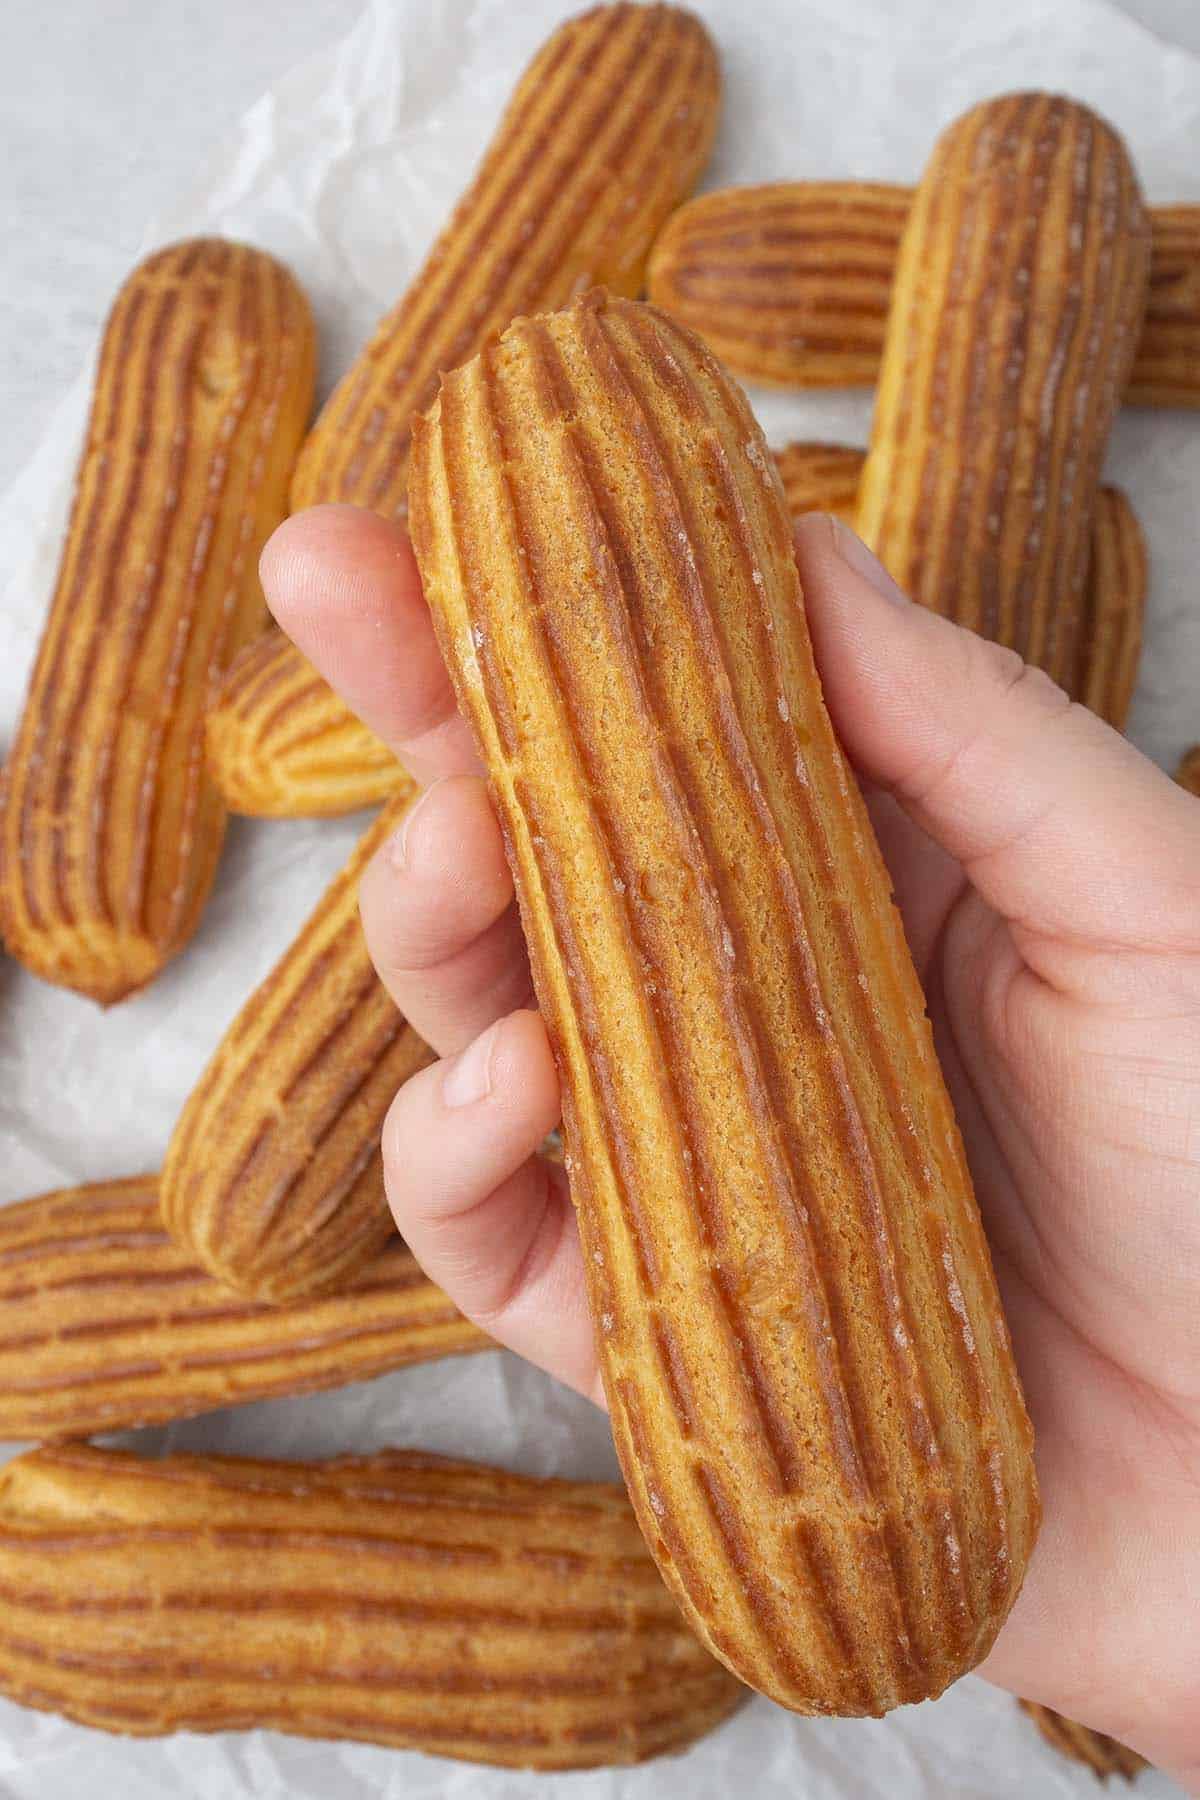
In this eclair recipe, I will walk you through the ingredients, the best equipment to use, how to use it, and all the techniques that will achieve the perfect oblong shape choux pastry eclairs with no cracks, an even rise, and a lovely colossal air pocket inside the choux that can be filled with your favorite eclair filling.
Choux pastry is so versatile and used in many classic French desserts, from profiteroles to cream puffs. I love making choux so much that I even have a course on it (check out my Ferrero Rocher Paris Brest course).
You will learn how to avoid typical eclair mistakes such as 1. cracked surface on eclair shells, 2. soggy inside, 3. flat and deflated eclair 4. no air pocket to fill… just to name a few. Consider this recipe as a full-on eclair and choux pastry crash course, the only eclair recipe that you will ever need to read!
Katalin's key take on how hard it is to make homemade eclairs in a kitchen environment
Choux pastry (pâte à choux) comes together really easily and quickly using a handful of ingredients. However, the trademark of an eclair is its long, uniform shape, and this can be the tricky part to achieve. An uneven rise and cracked surface make it hard to fill and glaze eclairs, and it won't have that professional look. So, it can be challenging to make a classic chocolate eclair recipe at home, and following a good tutorial with all the right tips and tricks is vital.
The most important factors for baking perfectly shaped, evenly risen eclairs are to use the right ingredients, the right equipment, the right technique, and the right baking temperature. But I would say that cooking the pastry, judging the amount of egg you need, and piping eclairs correctly are the most critical parts, and I'll give you my foolproof tips to get it right.
There is nothing as rewarding as serving a homemade classic chocolate eclair recipe. So don't be daunted!
My best advice on the ingredients
Whole milk is the best and unsalted, European-style butter with a fat content of at least 82%. For once, these ingredients can come straight from the fridge and do not need to be at room temperature, as we are heating them anyway. But the eggs must be at room temperature. Using both sugar and salt balances the sweetness, color and brings out the flavor of the choux. Don't skip the salt!
What most recipes on the internet won´t tell you is to use high protein content bread flour to achieve that lovely huge air pocket. This is vital. I am using a 12% protein content flour, and I get very poor results in this classic chocolate eclair recipe with low protein pastry flour. It might not be called bread flour in your country, so please search for the protein content on the bag and purchase the one recommended to make bread, pizza, etc. Read my flour guide for more information!
For the ingredient quantities and printable recipe card, visit the original chocolate eclair recipe.
Cook (yes, cook!) the pâte à choux
Sift the flour to remove any lumps, and set it aside. It needs to be ready for when you need it.
Break the butter into small chunks and place it in a saucepan with the water, milk, salt, and sugar. Don't add the butter in one big piece; or the liquid will boil before the butter melts into it. Heat the saucepan over medium until the mixture is incorporated and begins to simmer, but do not boil it.

Turn off the heat, and dump the flour into the saucepan in one go while vigorously whisking with a rubber spatula. Do not add it gradually. A smooth ball will form.

Turn the heat back on again and cook the dough in the saucepan over medium heat for 3-5 minutes, stirring constantly. A thin skin should form on the bottom of the saucepan; this is a good sign.

Now mix in the eggs wisely
Move the dough into the bowl of a stand mixer fitted with the paddle attachment. Whisk it on low speed for about a minute first to let it cool.
Mix the eggs together, then slowly pour them in with the mixer running. Do not add them all at once, as you may not need the full amount. The mixture may look separated at first, but it will come together, so just let it mix before each new addition. This stage will take about 2-3 minutes.

We are looking for a smooth texture, a glossy, silky finish, and a particular consistency. The dough is ready when it slowly falls from the paddle in a V shape when you lift it up. It should not be runny, or it will not be pipeable.

The exact quantity of eggs you need may vary, so use your judgment here. You may not need all the eggs, or you may need slightly more depending on the flour you are using, and the cooking process earlier.
Be extra careful when mixing the eggs in. If you do add too much, the choux is not salvageable; you cannot simply add more flour, but need to start again.
Today is the day you will need to learn how to use the piping bag
Move the dough into a pastry bag fitted with a French star nozzle tip (0.5 inch / 1.3cm in diameter). You must use a star tip. Do not use a round tip for piping eclairs like some other non-experienced bloggers tell you to do. Avoid mixing in air bubbles as you spoon or pour in the dough. Check for any air pockets by lying the pastry bag flat on a worktop and gently pressing it with your hands.
Chill the dough in the fridge for 1-2 hours to help avoid cracks when baking, then it's time to pipe eclairs!
Hold the bag at a 45° angle over a perforated “air” baking mat and pipe eclairs as evenly as you can, leaving enough space between them to puff up. This recipe makes 14 eclairs that are 0.5 inch / 1.3cm in diameter and about 10cm / 4 inches long - before baking. They expand as they bake, so don't worry if they look too skinny!
Gently press down any tips left from the piping with a lightly wet fingertip. Then, dust the eclairs with powdered sugar to help promote neat, even results.

Finally, freeze the piped dough. It ensures an even rise, and I find it is usually enough to freeze the dough for 30 minutes while you are heating up the oven, but the longer, the better. If you are making this classic chocolate eclair recipe for the first time, freeze it for 1-2 hours. Please do not skip this step.

What is the right baking temperature for making eclairs?
Some eclair recipes suggest starting with a high baking temperature and then decreasing it for the second half of the baking time. I find that an even baking temperature works better.
I suggest pre-heating the oven to a higher temperature of 200°C / 392°F and then turning it down to 170°C / 338°F once the eclairs are inside to compensate for the drop in temperature when you open the door. Do not use the fan setting under any circumstances (even if you have to cover it). This causes too much air circulation and cracks - unless you own a professional oven, but then I don´t think you would be looking for recipes online:)
Bake and pray
As you can guess based on the title of this section, baking is one of the most difficult parts of making eclairs.
So. Preheat your oven to 200°C / 392°F (no fan).
After the eclairs have been in the freezer for 1 hour, place the tray in the oven and reduce the temperature to 170°C / 338°F (no fan).
Bake the eclairs for 40 minutes at 170°C / 338°F until they are nicely puffed up and golden brown. Avoid opening the oven door for the first 30 minutes, or the choux will collapse.
It is a good idea to take one out at 40 minutes and wait a minute to see whether it collapses; if not, your eclairs are likely well-baked. Overall, I suggest starting with my baking suggestions; however, each oven is different - especially home ovens - so you must find what works best for your oven and dough.
Once the eclairs are well baked, let them cool on the tray/mat before removing them, and only fill them once they come to room temperature.

What fillings to use for eclairs
Eclairs are super versatile, and you can fill them with an endless variety of delicious fillings. The classic chocolate eclair recipe filling is a French crème pâtissière, and here is how you make it (also read my in-depth baking guide to pastry cream).
Mix sugar and egg yolk with a hand whisk for 1-2 minutes until slightly fluffy. Mix in the cornstarch, flour, and vanilla until thoroughly incorporated and have a smooth paste.

Bring milk to boil in a saucepan over medium heat, then remove it as soon as it starts simmering. Make sure it is steaming and simmering, but not boiling.
Pour the warm milk over the egg yolk mixture very slowly while whisking vigorously with a hand whisk to temper the egg yolks without scrambling them. The mixture will slightly thicken, and now you need to pour it back into the saucepan and cook over medium heat for a few minutes to thicken it even more.

Add the room-temperature softened butter in three stages while mixing with a rubber spatula until completely incorporated. Transfer the pastry cream to a bowl, and cover the surface with plastic food wrap to form a second skin. Place it in the fridge to chill before using it.

Other filling ideas
It is very easy to turn a classic chocolate eclair filling into a chocolate version. Cook vanilla pastry cream as explained above, but use only half of the corn starch and half of the flour. You might also want to consider adjusting the quantity of sugar slightly. In the meantime, melt 100g chocolate (about ⅔ cup). Pour warm pastry cream over the melted chocolate and fold them together.
Alternatively, you can use the following alternative fillings for eclairs, which are just as delicious!
- Diplomat cream
- Chantilly cream
- Chantilly cream and lemon curd (or even mango curd)
- Chantilly cream and strawberry compote
- Chocolate whipped cream frosting
- Chocolate cremeux
- Raspberry cream cheese frosting
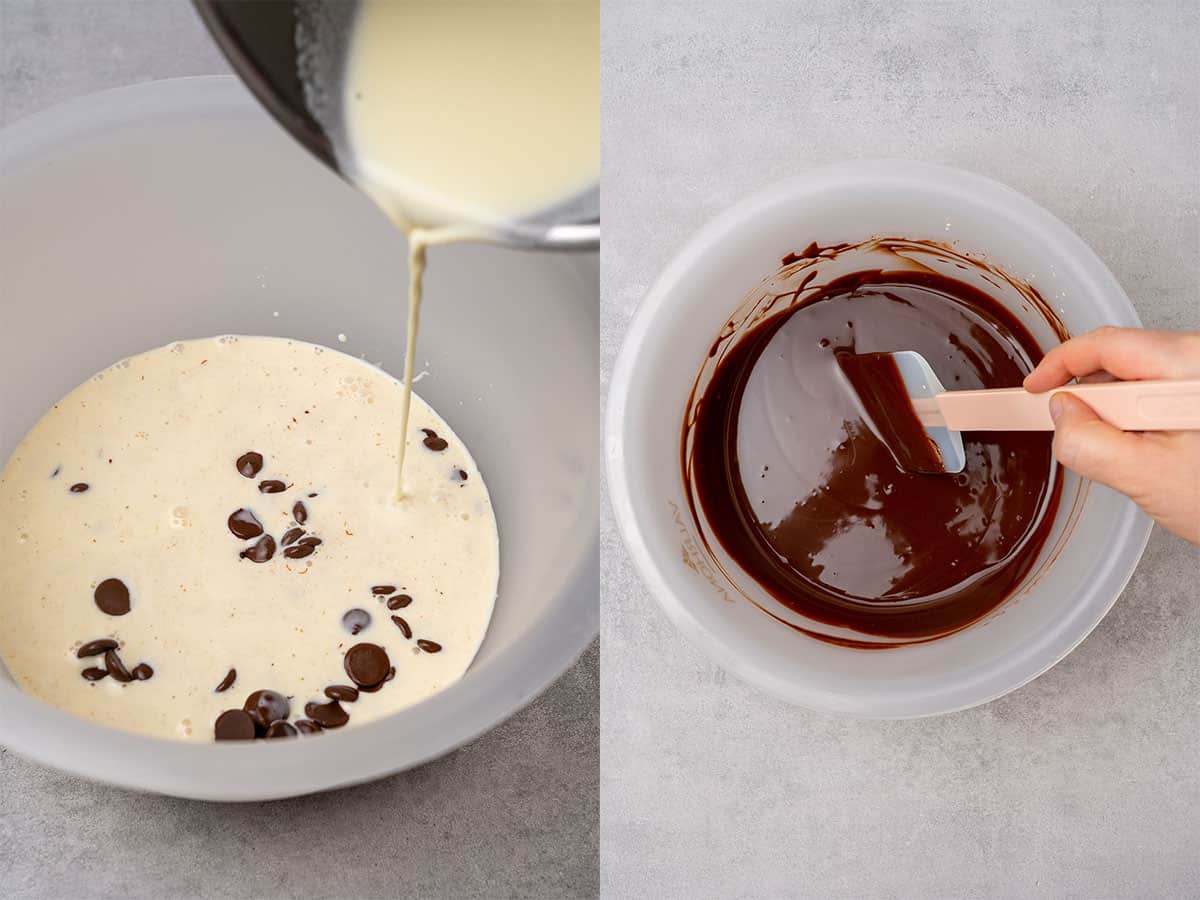
Try my three-ingredient chocolate ganache glaze
There are endless glazing options out there; however, for a classic chocolate eclair, I find you cannot beat a simple chocolate ganache.
Semi-melt the chocolate in the microwave; it can still have a few lumps. Meanwhile, heat the heavy cream in a saucepan until it just begins to steam and simmer, but do not boil it, or you can burn the chocolate.
Pour the hot cream over the melted chocolate and stir to melt any last bits. Once it is smooth, mix in the butter. Allow it to cool down (it needs to reach around 30°C (86°F) and be liquid but not too runny before you glaze the eclairs.
Fill and glaze eclairs like a pro
Now, you need to make piping holes in your cooled eclairs. Turn them over and poke three small holes along the bottom (one at each end and one in the middle so they fill evenly.
Insert the piping nozzle into the side of each eclair. Gently pipe the pastry cream into each eclair until filled. Alternatively, use a long piping nozzle and pipe the cream inside the eclair from the side as you can see on my picture below.
Dip the filled eclairs into the cooled chocolate glaze to coat the top, and gently tap on the side of the bowl to allow any excess to drip off. This is why it is important to cool the glaze first, or it will all run down the sides when you turn the eclairs the right way up again.
Place the eclairs in the fridge for 2-3 minutes to let the glaze firm up before serving.

How to store eclairs
You can store unfilled eclairs at room temperature in a ziplock bag for several days. They can still soften a bit, so I often put them back in the oven quickly to firm them up again before filling them. Wait for them to cool first, though!
Once you fill and glaze the eclairs, they should be served straight away as choux pastry tends to get soggy from the filling. Any leftovers can be stored in the fridge. Cover it, so it does not absorb any smell from the fridge.
You can freeze the eclairs before baking, and bake them fresh when needed. This is my preferred method for the best results. Technically, once they are baked, you can freeze them in ziplock bags. However, they might lose their crispiness upon defrosting, so again, you might need to pop them in the oven briefly. I do not recommend freezing filled eclairs.

My final expert tips
- Mixing the pâte à choux can be done using an electric hand mixer or by hand using a rubber spatula. However, using a stand mixer with the whisk attachment is more convenient.
- A french star nozzle tip is a cheap and easy investment that can make or break this eclair recipe. A ½ inch / 1.3cm diameter is a good one to use.
- You can bake larger, "American-size" eclairs, but you may need to bake them longer. If you do this, pay extra attention to the oven temperature and you might want to double the ingredients.
- I love using a perforated “air” baking mat for baking tarts, choux, and even cookies. Thanks to the holes in the mat, the heat spreads evenly throughout the mat’s surface, guaranteeing perfect and even baking.
- Alternatively, cover a baking sheet with parchment paper and pipe the choux dough onto the paper. I don't recommend using a silicone baking mat for making choux pastry, as my experience is that the eclairs get a soggy bottom.
- Oven temperature is vital. I personally do not bake without my digital oven thermometer. Even if your oven is over or under by 10C / 50F (which is very common), you will have trouble baking this perfect chocolate eclairs recipe.
Try some of my other choux pastry recipes
Now that you've mastered this classic chocolate eclair recipe, I highly recommend you put your new skills to good use and make these desserts next!
These are just some of the professional standard recipes I have on the blog; check out this round-up of the best French pastries to see even more.
Leave a Reply