This easy Rainbow cake recipe is one of the beautiful cakes with colorful layers and a super easy, light cream cheese frosting! Not only the most colorful cakes of all but also tastes really amazing with vanilla and cream cheese notes. A super delicious and fun cake to make from scratch, you will love it!
Jump to:
🌟 Why this is the best recipe
- It is super delicious – I never compromise on taste! Moist vanilla sponges with the best cream cheese frosting with just the right sweetness make this cake absolutely irresistible! No need to worry about making swiss meringue butter cream, my cream cheese frosting is way easier, quicker and more delicious
- It is rather easy – As fancy as it looks, making this Rainbow cake is extremely easy! Both the sponge cake, as well as the frosting together really easily using a handful of easily accessible ingredients
- It is an honest, detailed tutorial – While this Rainbow cake tutorial might look long, all the information I have written here, every tip and trick will help you achieve the perfect results without any issues on the way. Remember, baking is science, and every little detail written here is to help YOU!
- It is super pretty - Rainbow is the most colorful cake of all, every kid's favorite!
- No special equipment is needed – All you need is a round cake tin to bake the cake and a perhaps a nozzle tip for the decoration
🌈 What does the Rainbow cake taste like
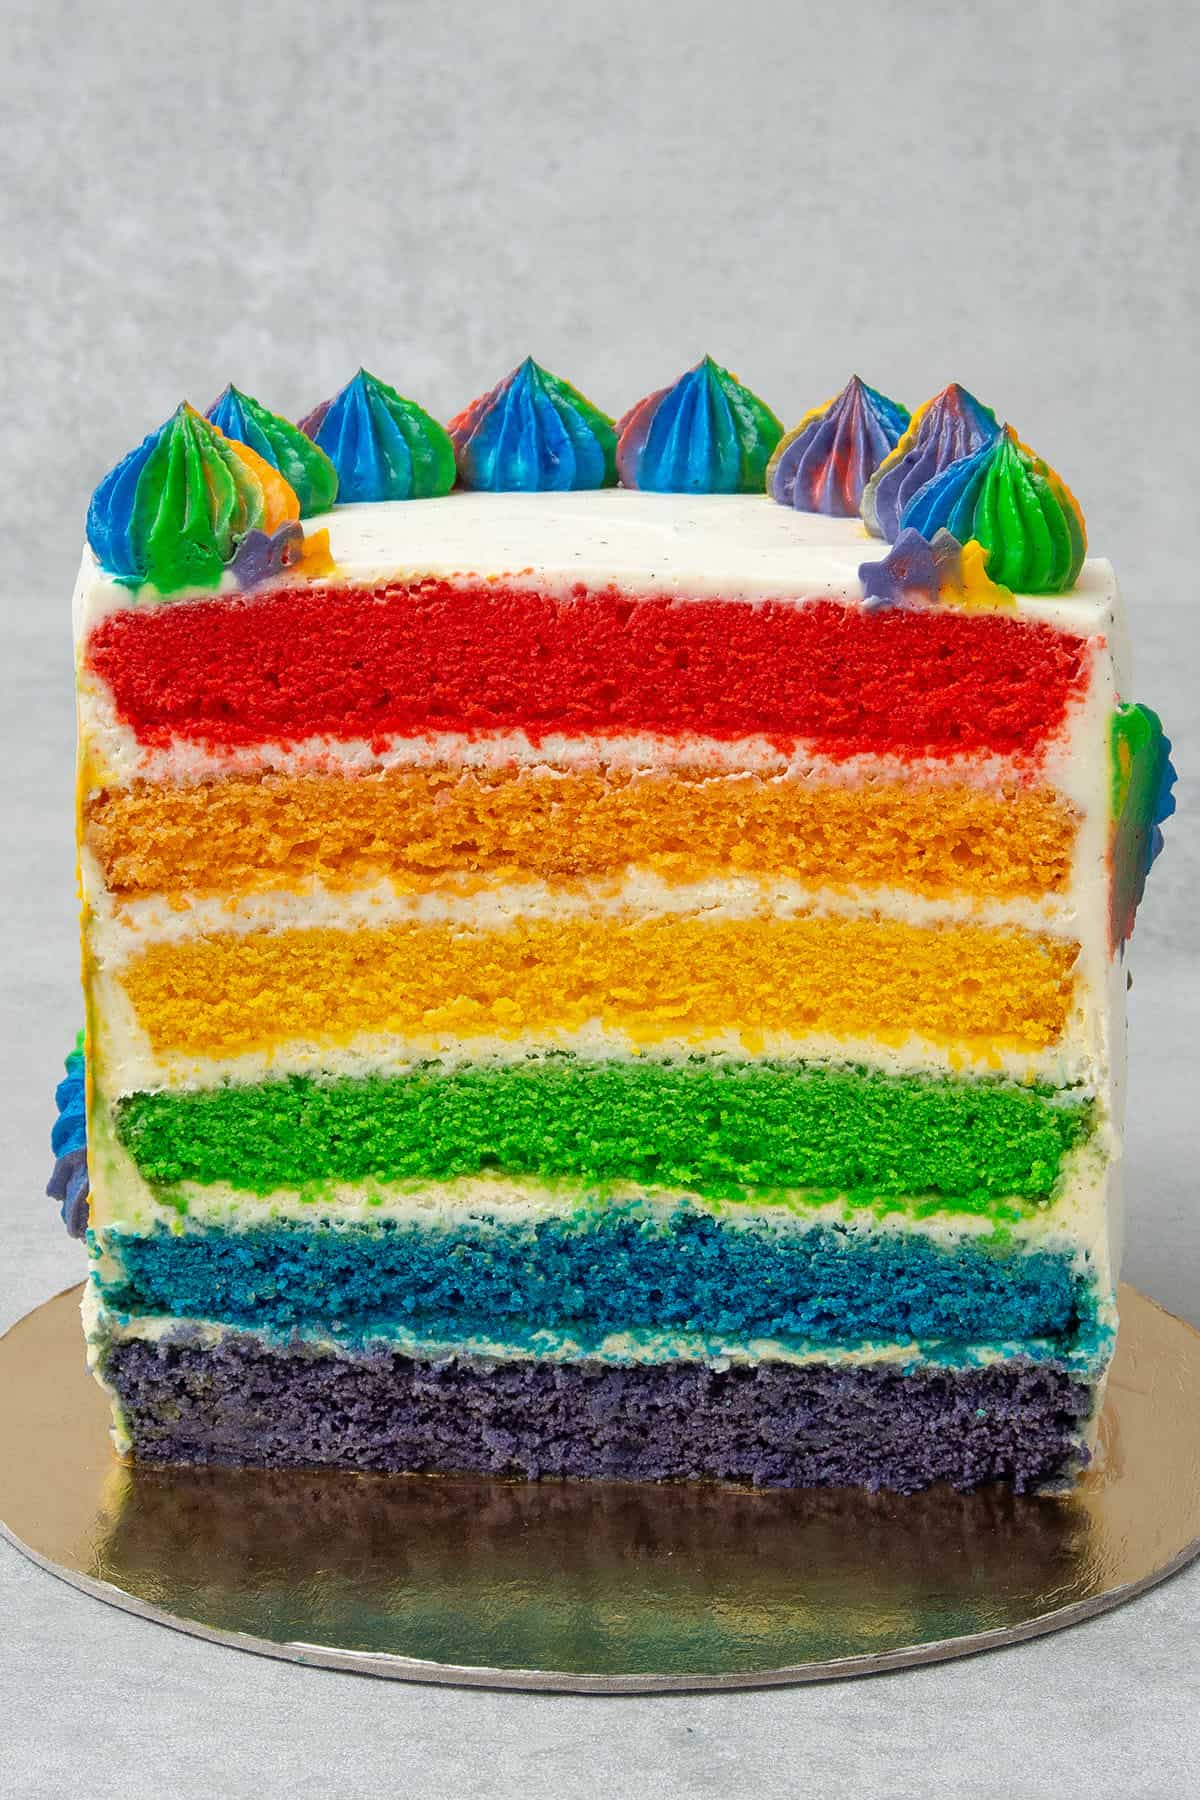
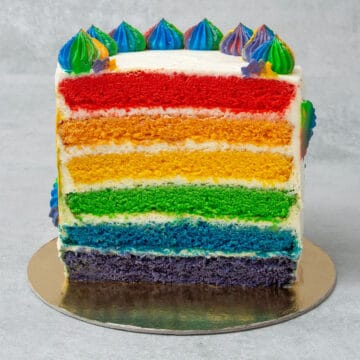
This Rainbow Cake has a mild vanilla and cream cheese flavor due to the vanilla layers that are sandwiched together with cream cheese frosting. The star is obviously the rainbow pattern both in the cake layers as well as in the decoration, and a simple vanilla cream cheese frosting is balancing that. The cake is definitely not too sweet given no buttercream is used and my cream cheese frosting is made without using tons of sugar. It is a simple, but super delicious cake without making it overly complicated.
🍰 How many layers are in the Rainbow cake
Traditionally Rainbow cake is made of using 6 layers: purple, blue, green, yellow, orange, and red but you can make as many or few layers as you wish. If you want a smaller cake or shortage of time, feel free to make only 3 layers, it will be still delicious. Alternatively, you can even make it into an ombre cake using one color in 3 different intensities of shades!
📝 Ingredient notes
For the cake layers
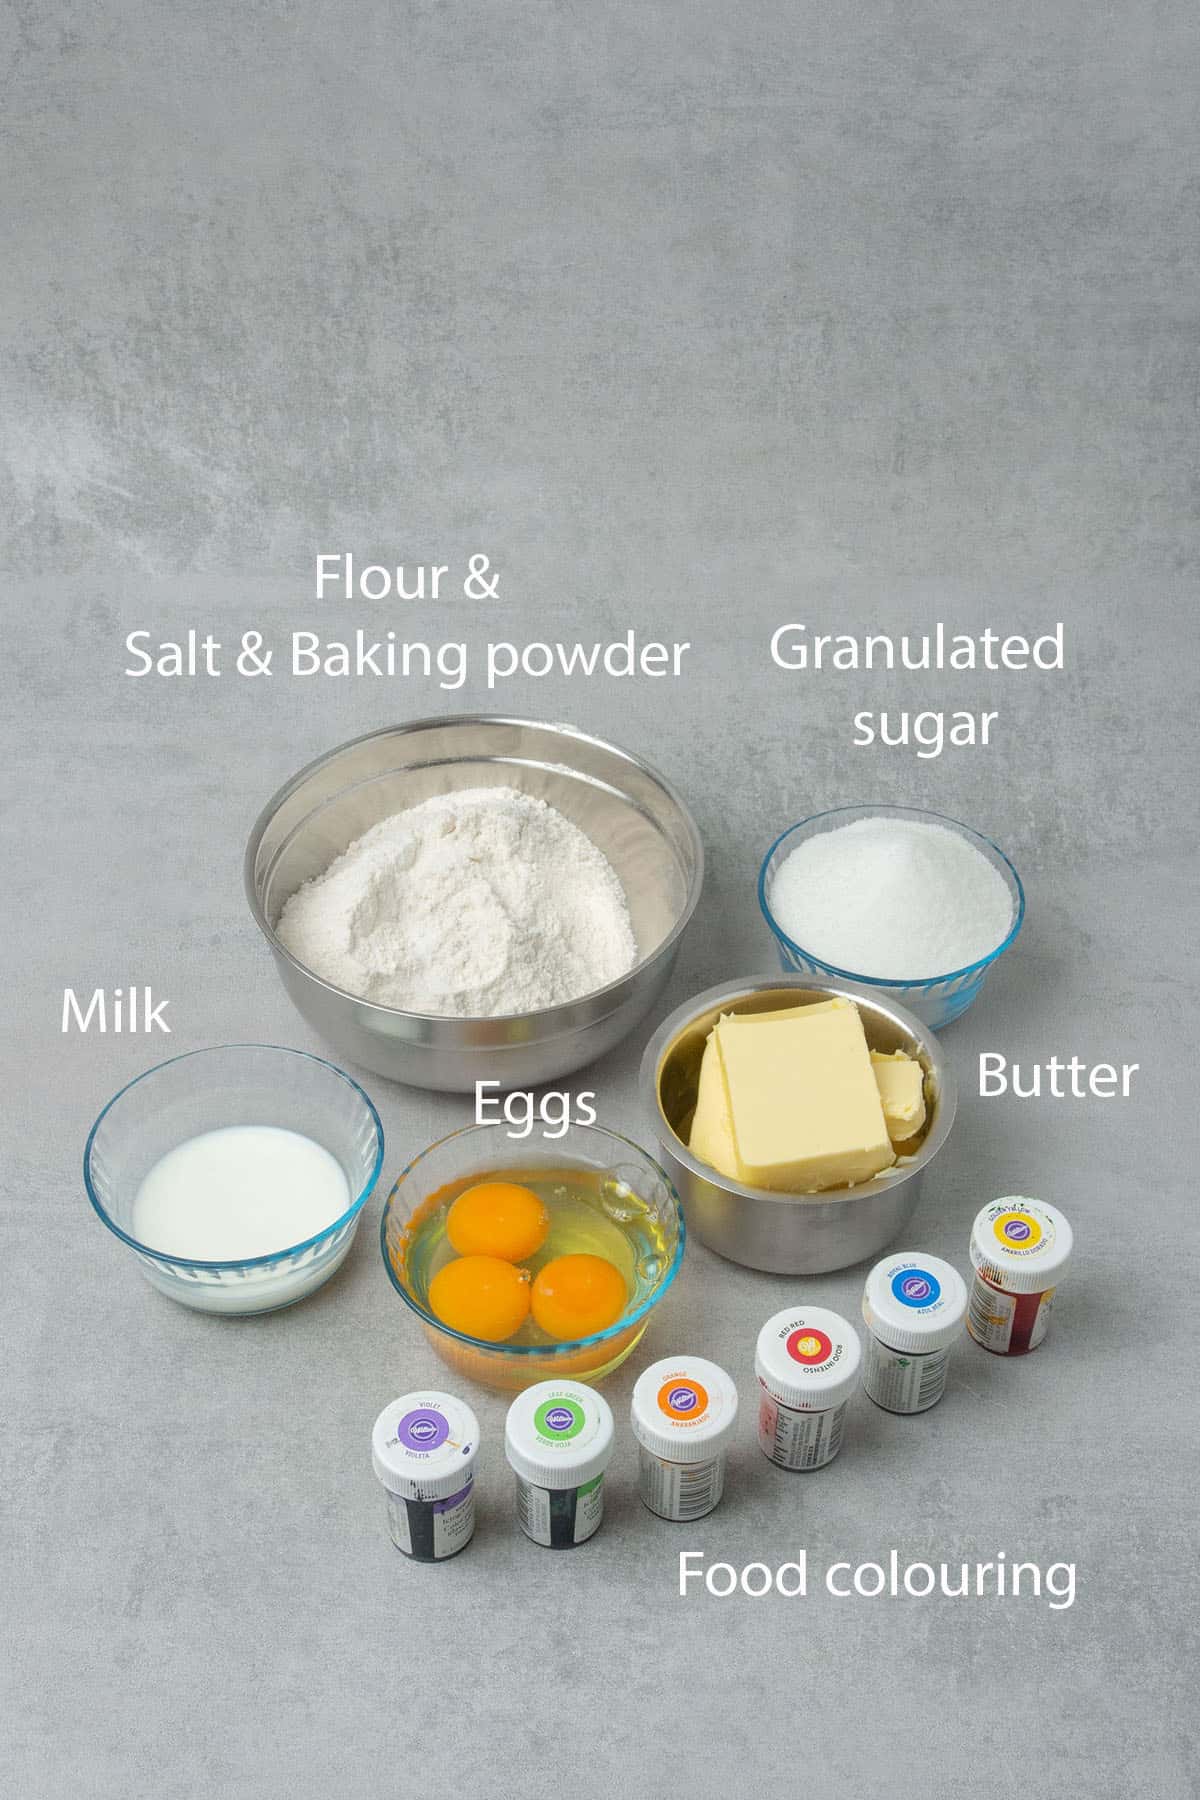
- Butter: Use always unsalted butter as you want to be in control of the quantity of the salt. I am using 82% fat content butter in all my recipes. In this recipe, the butter needs to be at room temperature which technically means soft enough to be able to cream but not too soft or runny so avoid last-minute microwaving
- Sugar: Standard, granulated sugar is perfectly fine in this Rainbow cake recipe, nothing fancy. If you want to learn about the different types of sugar and how to use them in baking, please read my sugar guide
- Egg: Room temperature as always. Please don´t use cold egg as it won´t emulsify properly with the rest of the ingredients
- Vanilla bean paste: Avoid using artificial vanilla. There are several great brands for fine, pure vanilla, I use Nielsen massey which I love and really recommend
- Flour: All purpose flour or pastry flour makes the best cakes. They are so called “soft flour” which are low on protein resulting in delicate, tender texture. If you want to be a Pro when it comes to deciding what type of flour to use in your baking, please read my flour guide
- Salt: An essential ingredient in almost all baking recipes
- Baking powder: Has two functions: increase the volume and lighten the texture
- Milk: Use the milk at room temp, I prefer whole milk
- Colouring: You will need some sort of food coloring to make Rainbow cake. I am all in for natural food colorings like beetroot powder etc. however they would not provide bright enough colors, I am afraid. Choose a high-quality concentrated gel eg. Silikomart or Wilton for the brightest colors. In terms of quantity, it is hard to give measurements when it comes to food coloring since it largely depends on the brands available in your country. As a general rule start with a small amount using a toothpick, then increase it gradually.
🛒 You’ll find detailed measurements for all Ingredients in the printable version of the Recipe Card at the bottom of this post
For the cream cheese frosting
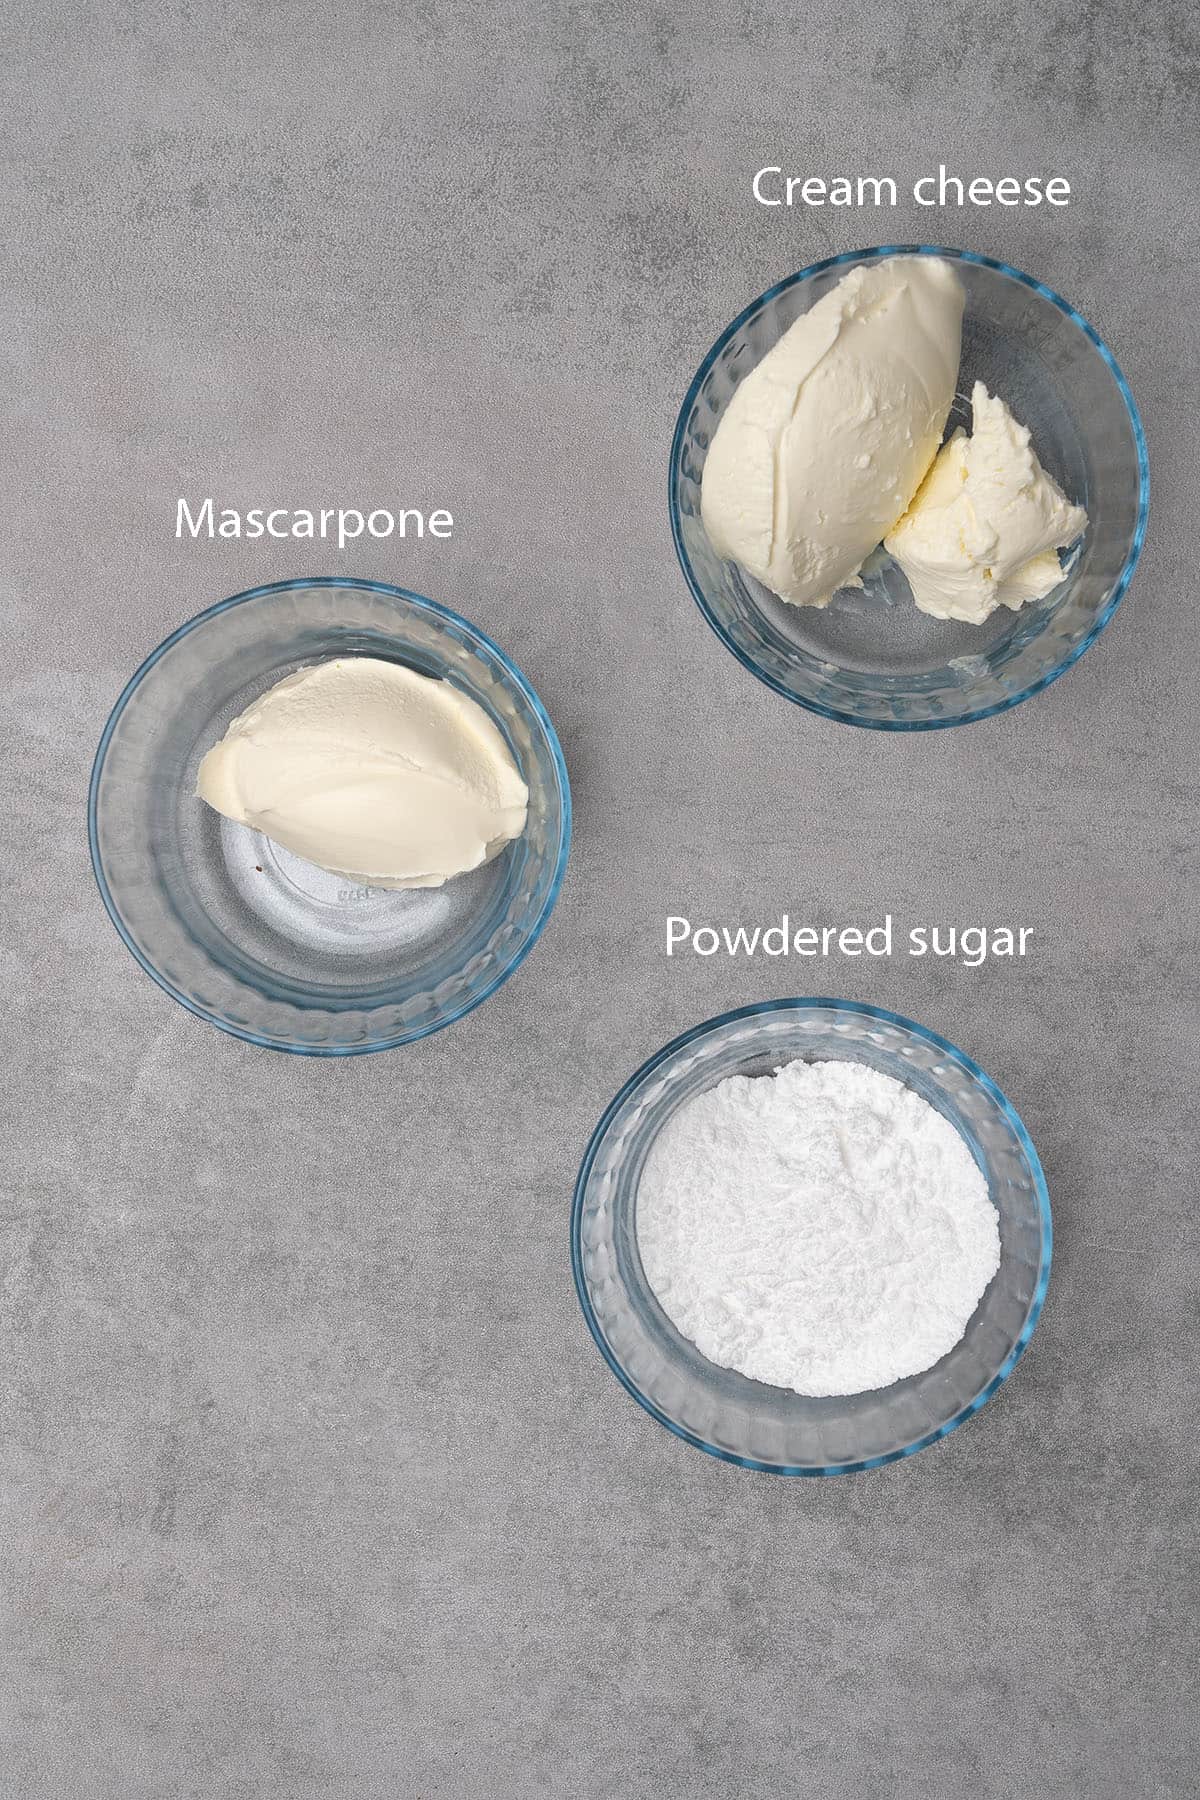
- Mascarpone: Very rich Italian cream cheese, exceptionally smooth and easy to spread, or whip. The flavor is milky and slightly sweet, use the full-fat version
- Cream cheese: I always use full-fat Philadelphia when I state cream cheese in my recipes. I find it easy to cream and very pleasant in taste.
- Icing sugar / Powdered sugar: Powdered sugar is the first choice when it comes to whipping up the frosting. The question I often get is whether the quantity is a typo. NO, it´s not! You do not actually need a lot of sugar when you are using mascarpone! Instead, let the mascarpone and cream cheese flavor shine. See my tips below for whipping up the perfect cupcake frosting without butter and without tons of sugar
- Vanilla: as per above
🛒 You’ll find detailed measurements for all Ingredients in the printable version of the Recipe Card at the bottom of this post
👩🍳 How to make this recipe
1. How to make Rainbow cake layers from scratch (6 layers)
Start by checking how many cake tins you own. Ideally, you want to make several layers at once to save time, but obviously, it all comes down to the no of cake tins you have in your kitchen.
I recommend 3 pans at least so you can bake this cake in 2 batches. The steps below assume 6 (all 6 colors) made at the same time. If you have 2 pans, make only ⅓ of the recipe using 2 colors then repeat the same process for another 2 colors then one last time with the last 2 colors. If you have 3 pans, make ½ of the recipe then repeat. The recipe quantity can be divided into either 3 or 2.
- Pre-heat oven to 170 C / 338 F no fan
- Ingredients must be all measured with a Digital scale
- Prepare baking pans (6x 15 cm (6 inch) round cake pan). See further tips below about how to correctly prepare baking pans
- Eggs, butter, and milk must be at room temperature so they will properly emulsify
- Besides the baking pans, prepare 6 small bowls and divide the milk between them using a Digital scale
- Mix gel food coloring into the milk one by one, there will be 6 colors: red, yellow, orange, blue, purple, and green. It's hard to give quantity here, use a toothpick and start with a small amount, the milk at this point should be very bright in color
- Cream room temperature butter and sugar together until pale and fluffy then beat the eggs in, one at a time, then mix in the vanilla bean paste
- Sift flour, salt, and baking powder together, this is the “dry ingredients”
- Fold dry ingredients with butter sugar mixture until combined
- Divide now the mixture into 6 equal portions using a Digital scale
- Mix each portion with one of the colored milk portions so at the end you will have 6 equal portions of cake batter. If you are unhappy with the color of your batter at this point, mix in some more food coloring until you are happy with the color.
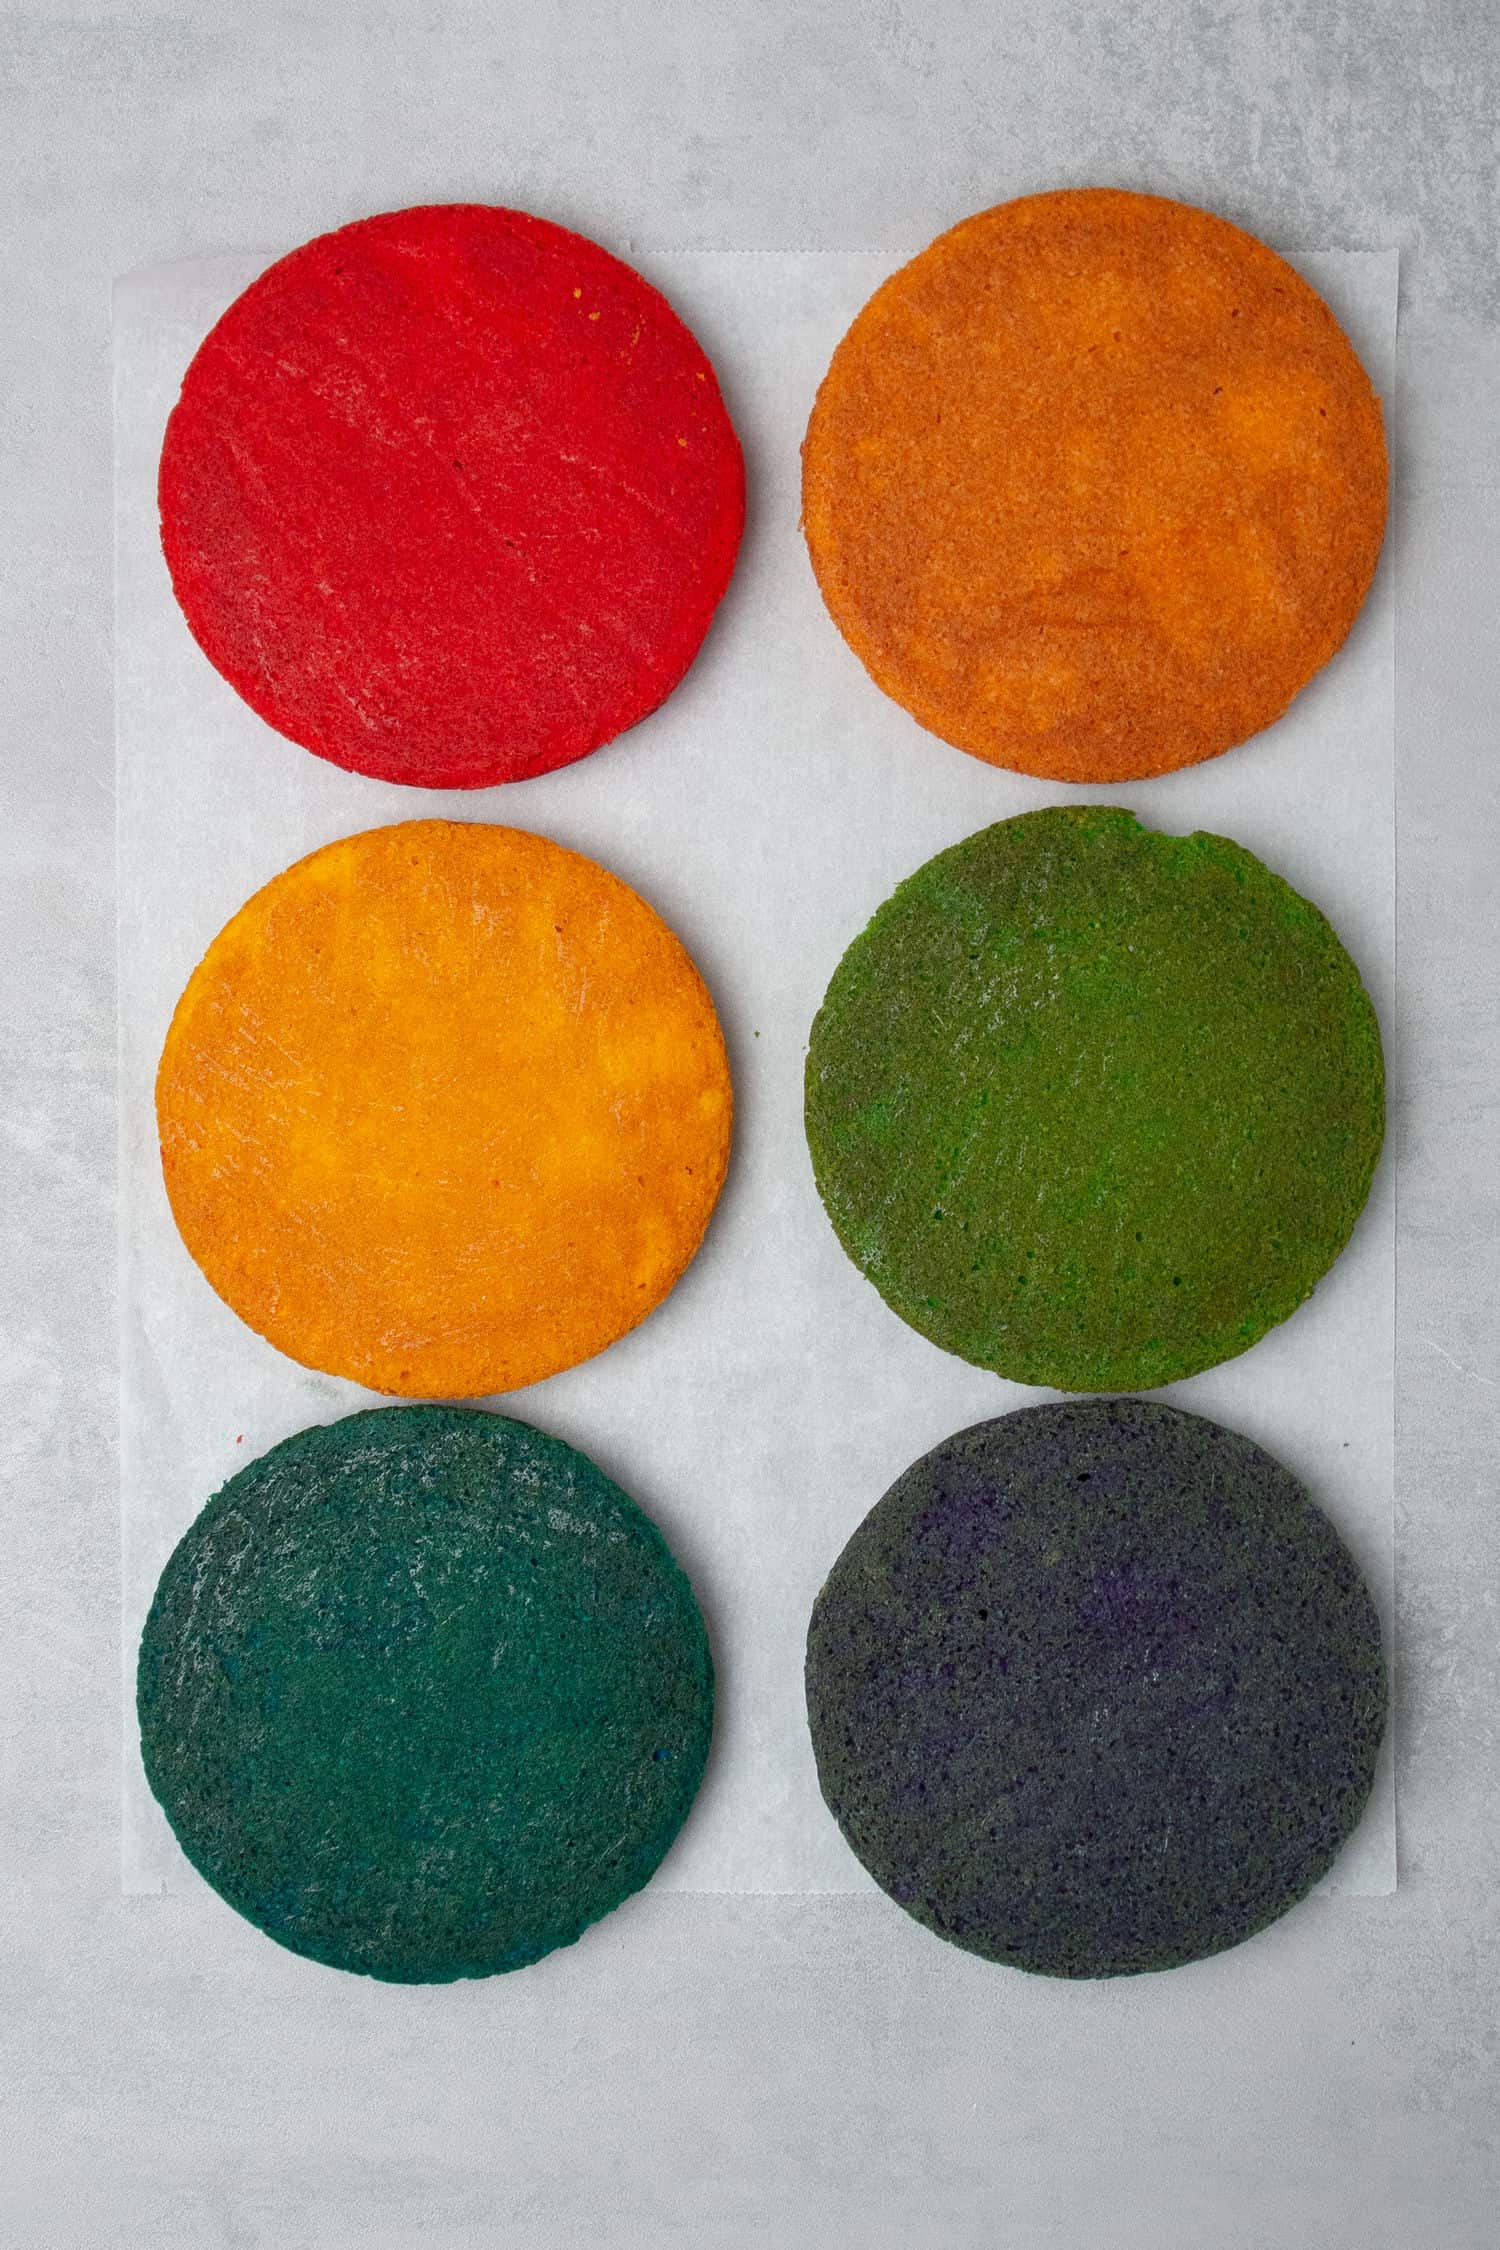
- Pour cake batter into prepared baking pans and bake for approx. 20 minutes. Do not open the oven door during baking
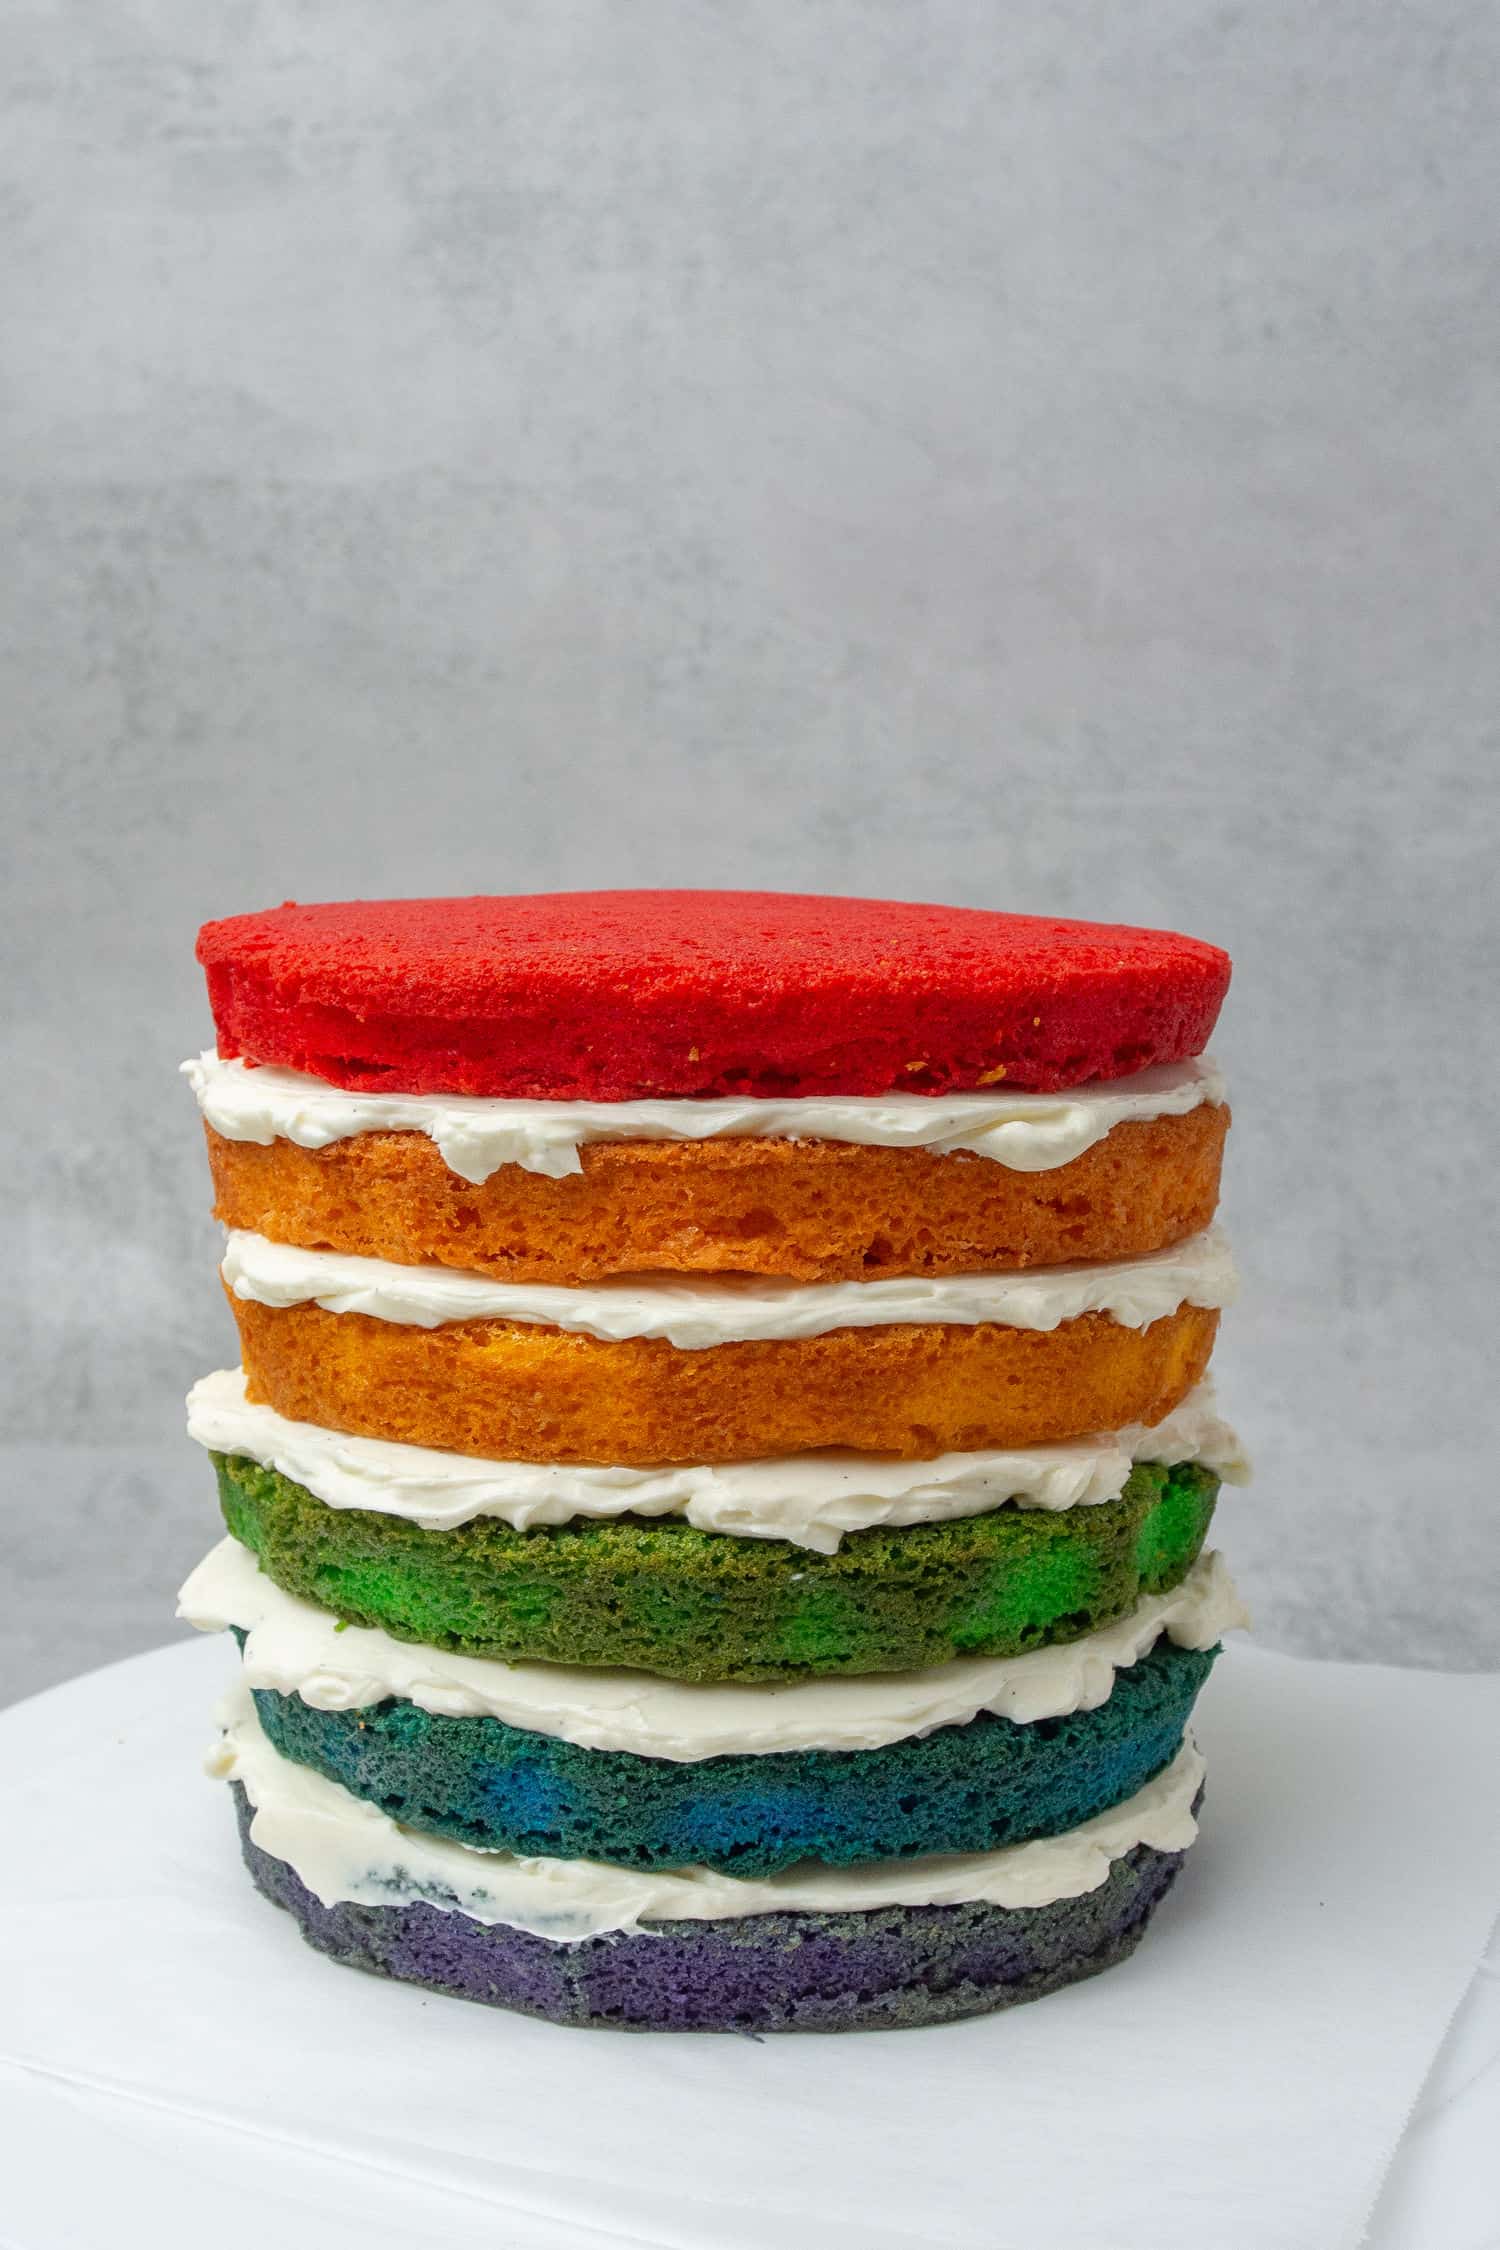
- Chill the sponges before assembling
Please note that the height of these sponge layers will be smaller than perhaps what you are used to in traditional American cake layers, however, it will be a tall cake overall since there will 6 layers overall.
💡 Top Tip: Do not over-bake the sponges as that would result in dry texture. After 20 minutes, check the middle of the cake with a toothpick. Bake until a toothpick inserted comes out clean, or, monitor the edge of the sponge as that should slightly separate from the side of the tin
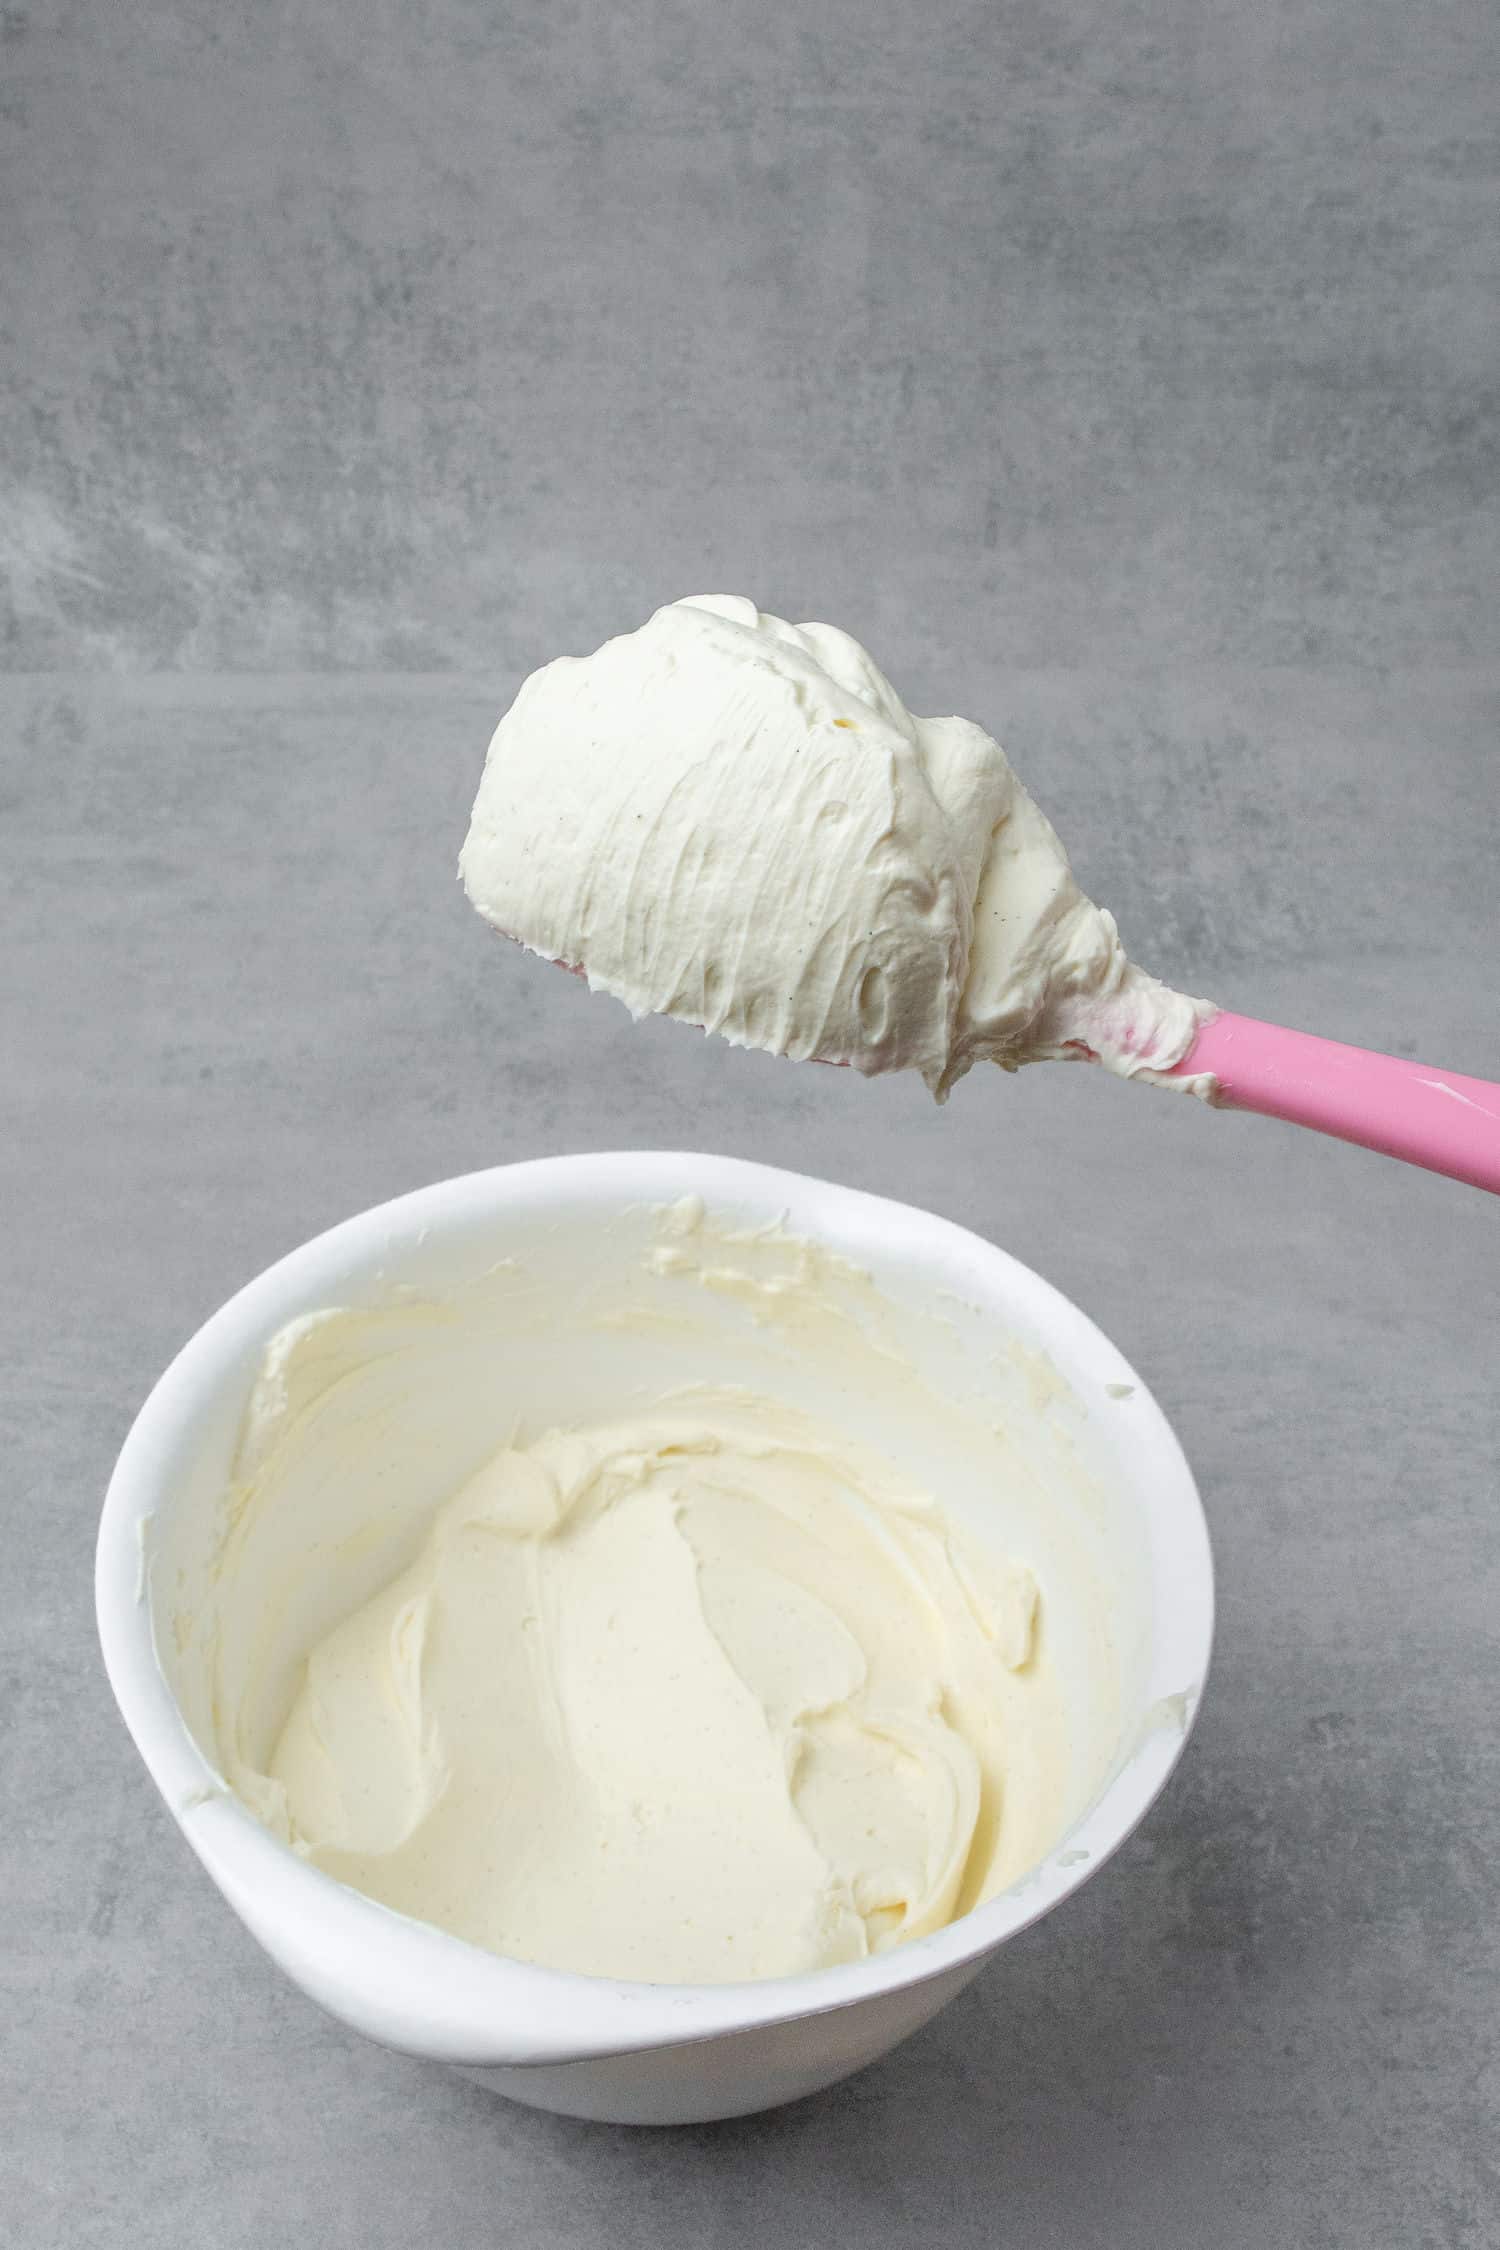
2. How to make cream cheese frosting without butter
This cream cheese frosting is super simple, however, if you want to learn more about it, check my ultimate cream cheese frosting without butter guide.
It consists of full-fat Philadephia cream cheese, mascarpone, and a small amount of icing sugar / powdered sugar whipped until fluffy, pipeable consistency. It is creamy, milky, a super stable frosting, and way more delicious and less sweet than buttercream!
Using the right ingredients at the right temperature is extremely important while making cream cheese frosting.1. Mascarpone should be cold, use the full-fat version (41%+) 2. Cream cheese should be also cold, use the full-fat version 3. Powdered sugar has to be sifted to avoid lumps
Whip the mixture with an electric hand mixer for a minute or two until it reaches a creamy, fluffy consistency, then stop. It won´t get stiffer after this point, in fact, if you overbeat it, it will get only runnier then it will break. I don´t use my stand mixer to whip this frosting since it is really easy to overwhip it.
💡 Top Tip: If you do not have mascarpone, the recipe works with high-fat content (36%) heavy cream as well, use it very! cold
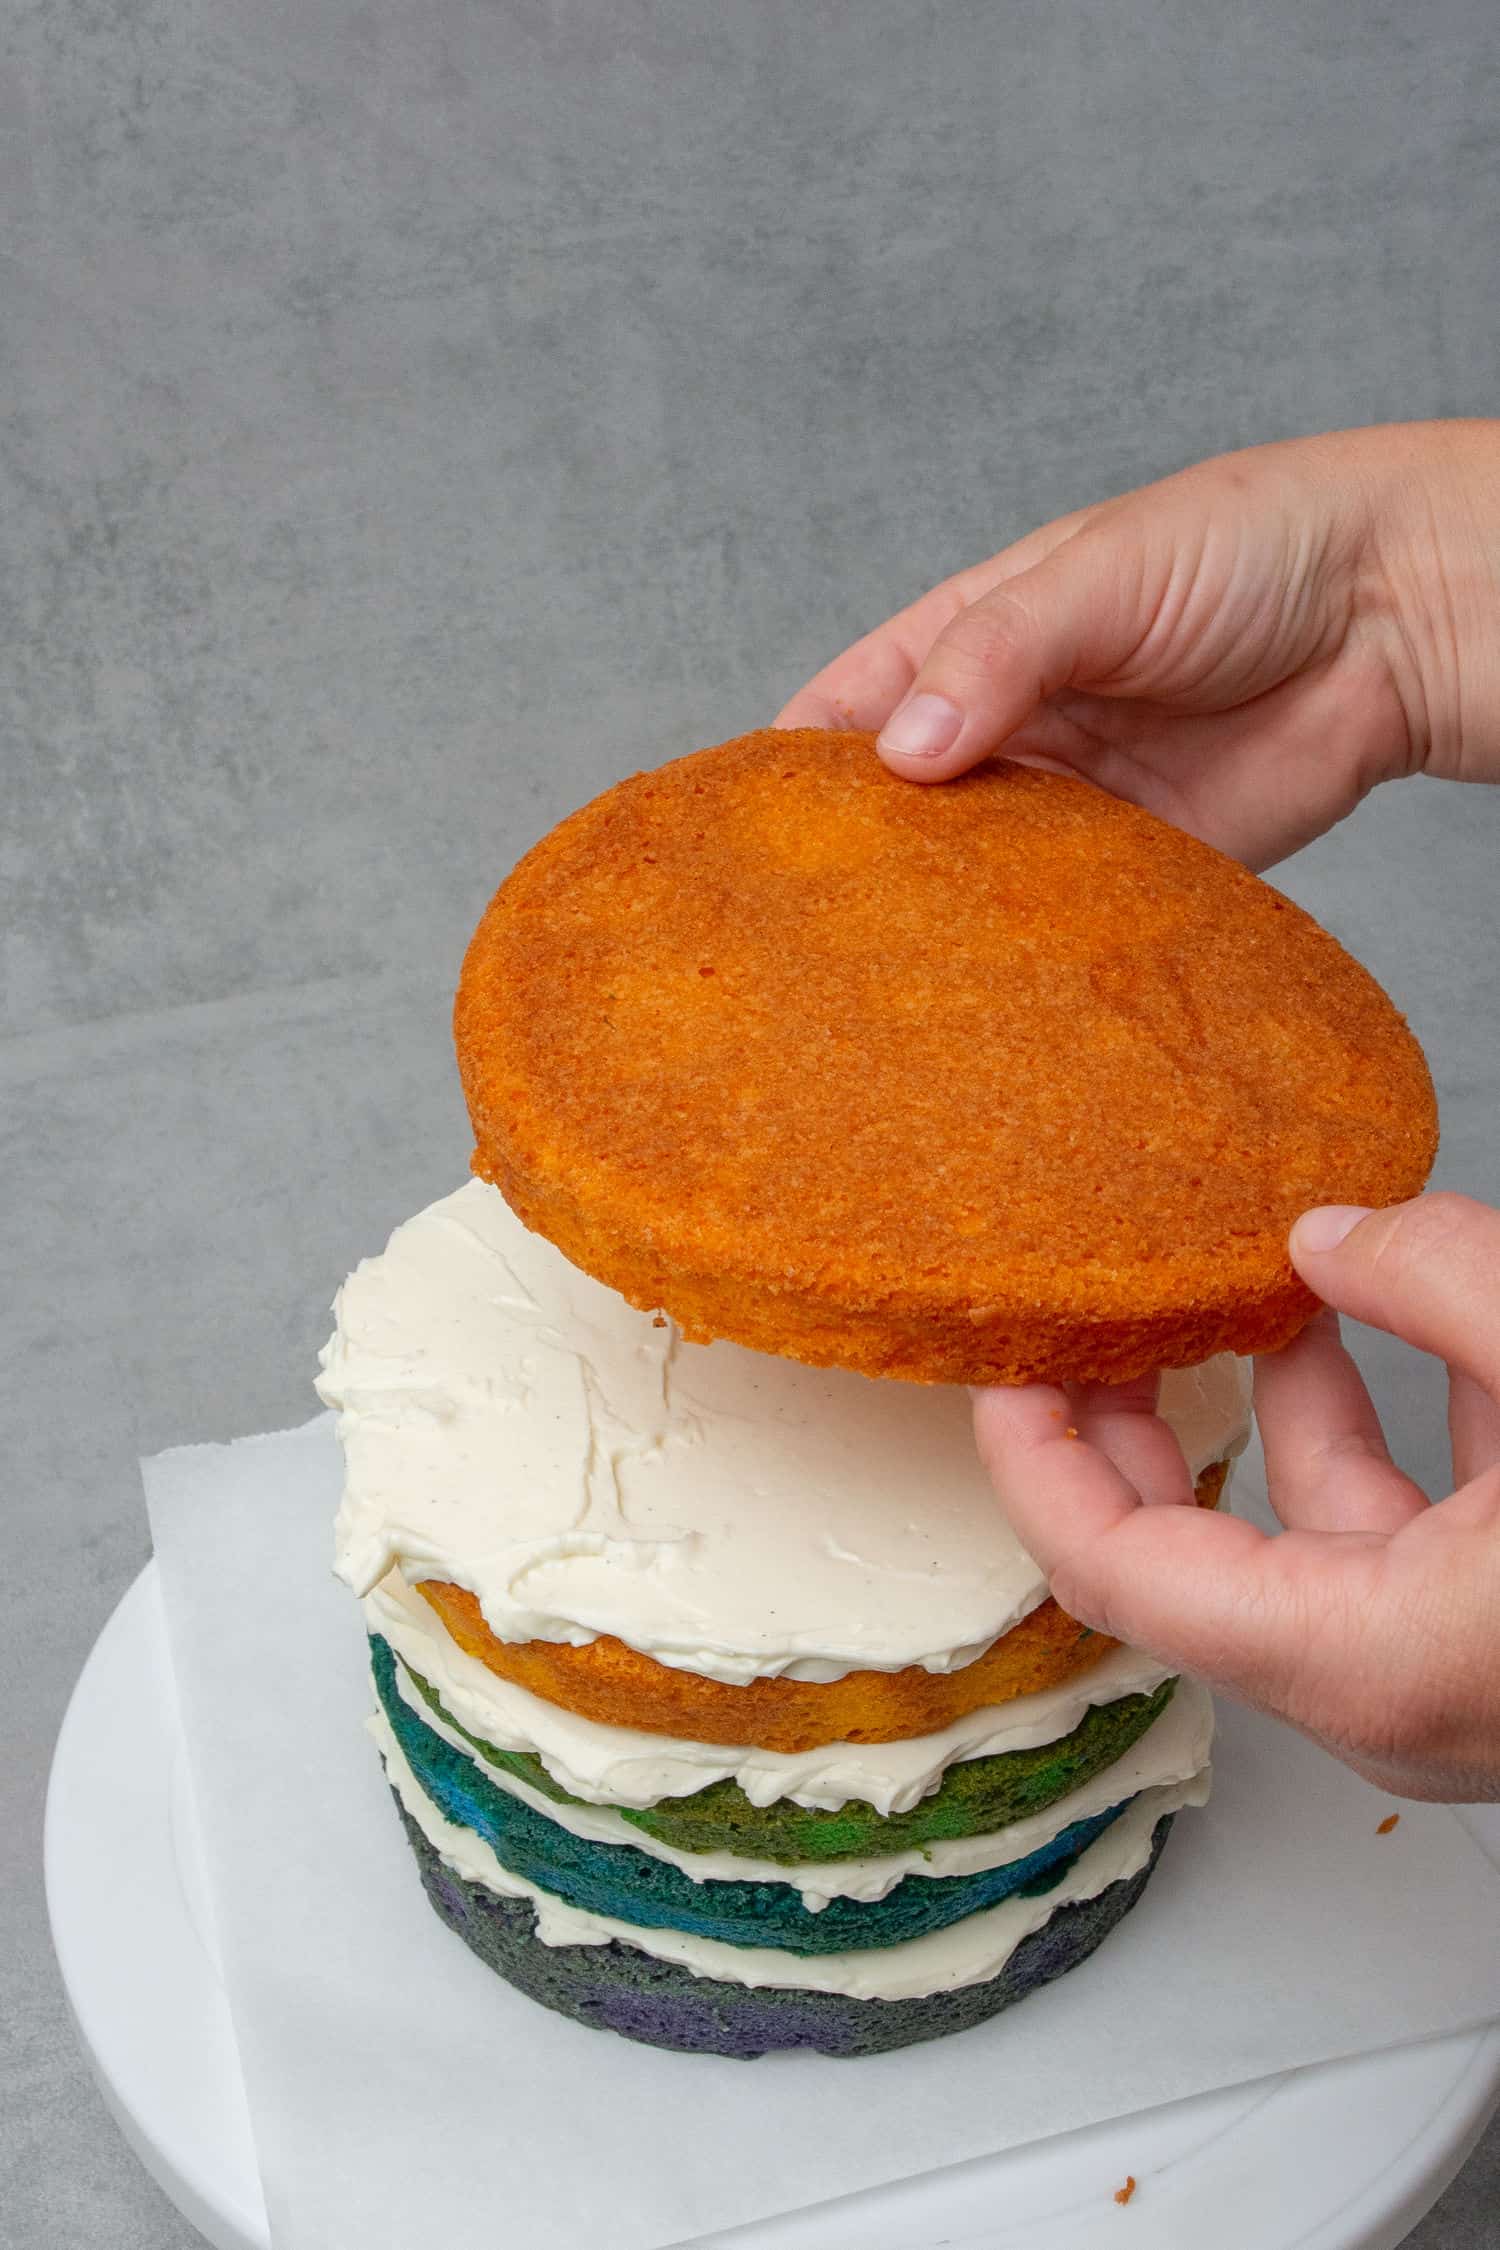
3. How to assemble the Cake
Assembling this Rainbow cake is rather simple, but a step-by-step process.
The cake consists of the following layers from bottom to top;
- Purple layer
- 100g Frosting
- Blue layer
- 100g Frosting
- Green layer
- 100g Frosting
- Orange layer
- 100g Frosting
- Yellow layer
- 100g Frosting
- Red layer
I suggest the following process:
- Grab your Digital scale and measure the frosting so the layers will look identical when you cut the cake
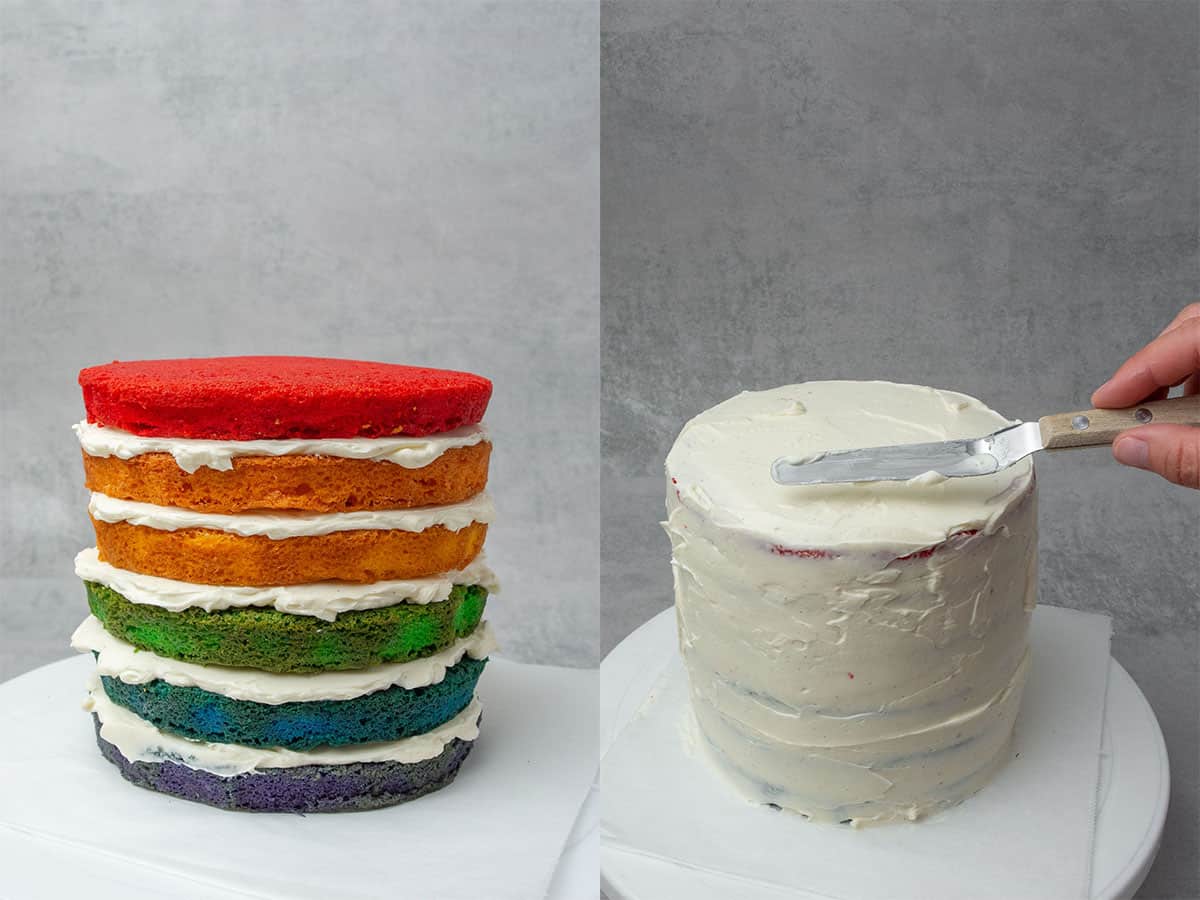
- Start to build up the layers from bottom to top starting with the purple layer and finishing with red
- Once the last layer is up (red), chill it for 1h
- Crumb coat the cake, then again chill it for 1h
- Apply the final coating, then again chill the cake in the fridge for 1h before decorating
Please note that after the final coating you should have enough frosting left for the decoration.
💡 Top Tip: If at any point the frosting feels soft, the cake feels unstable, place it into the fridge for 1h to chill then continue with the next layer
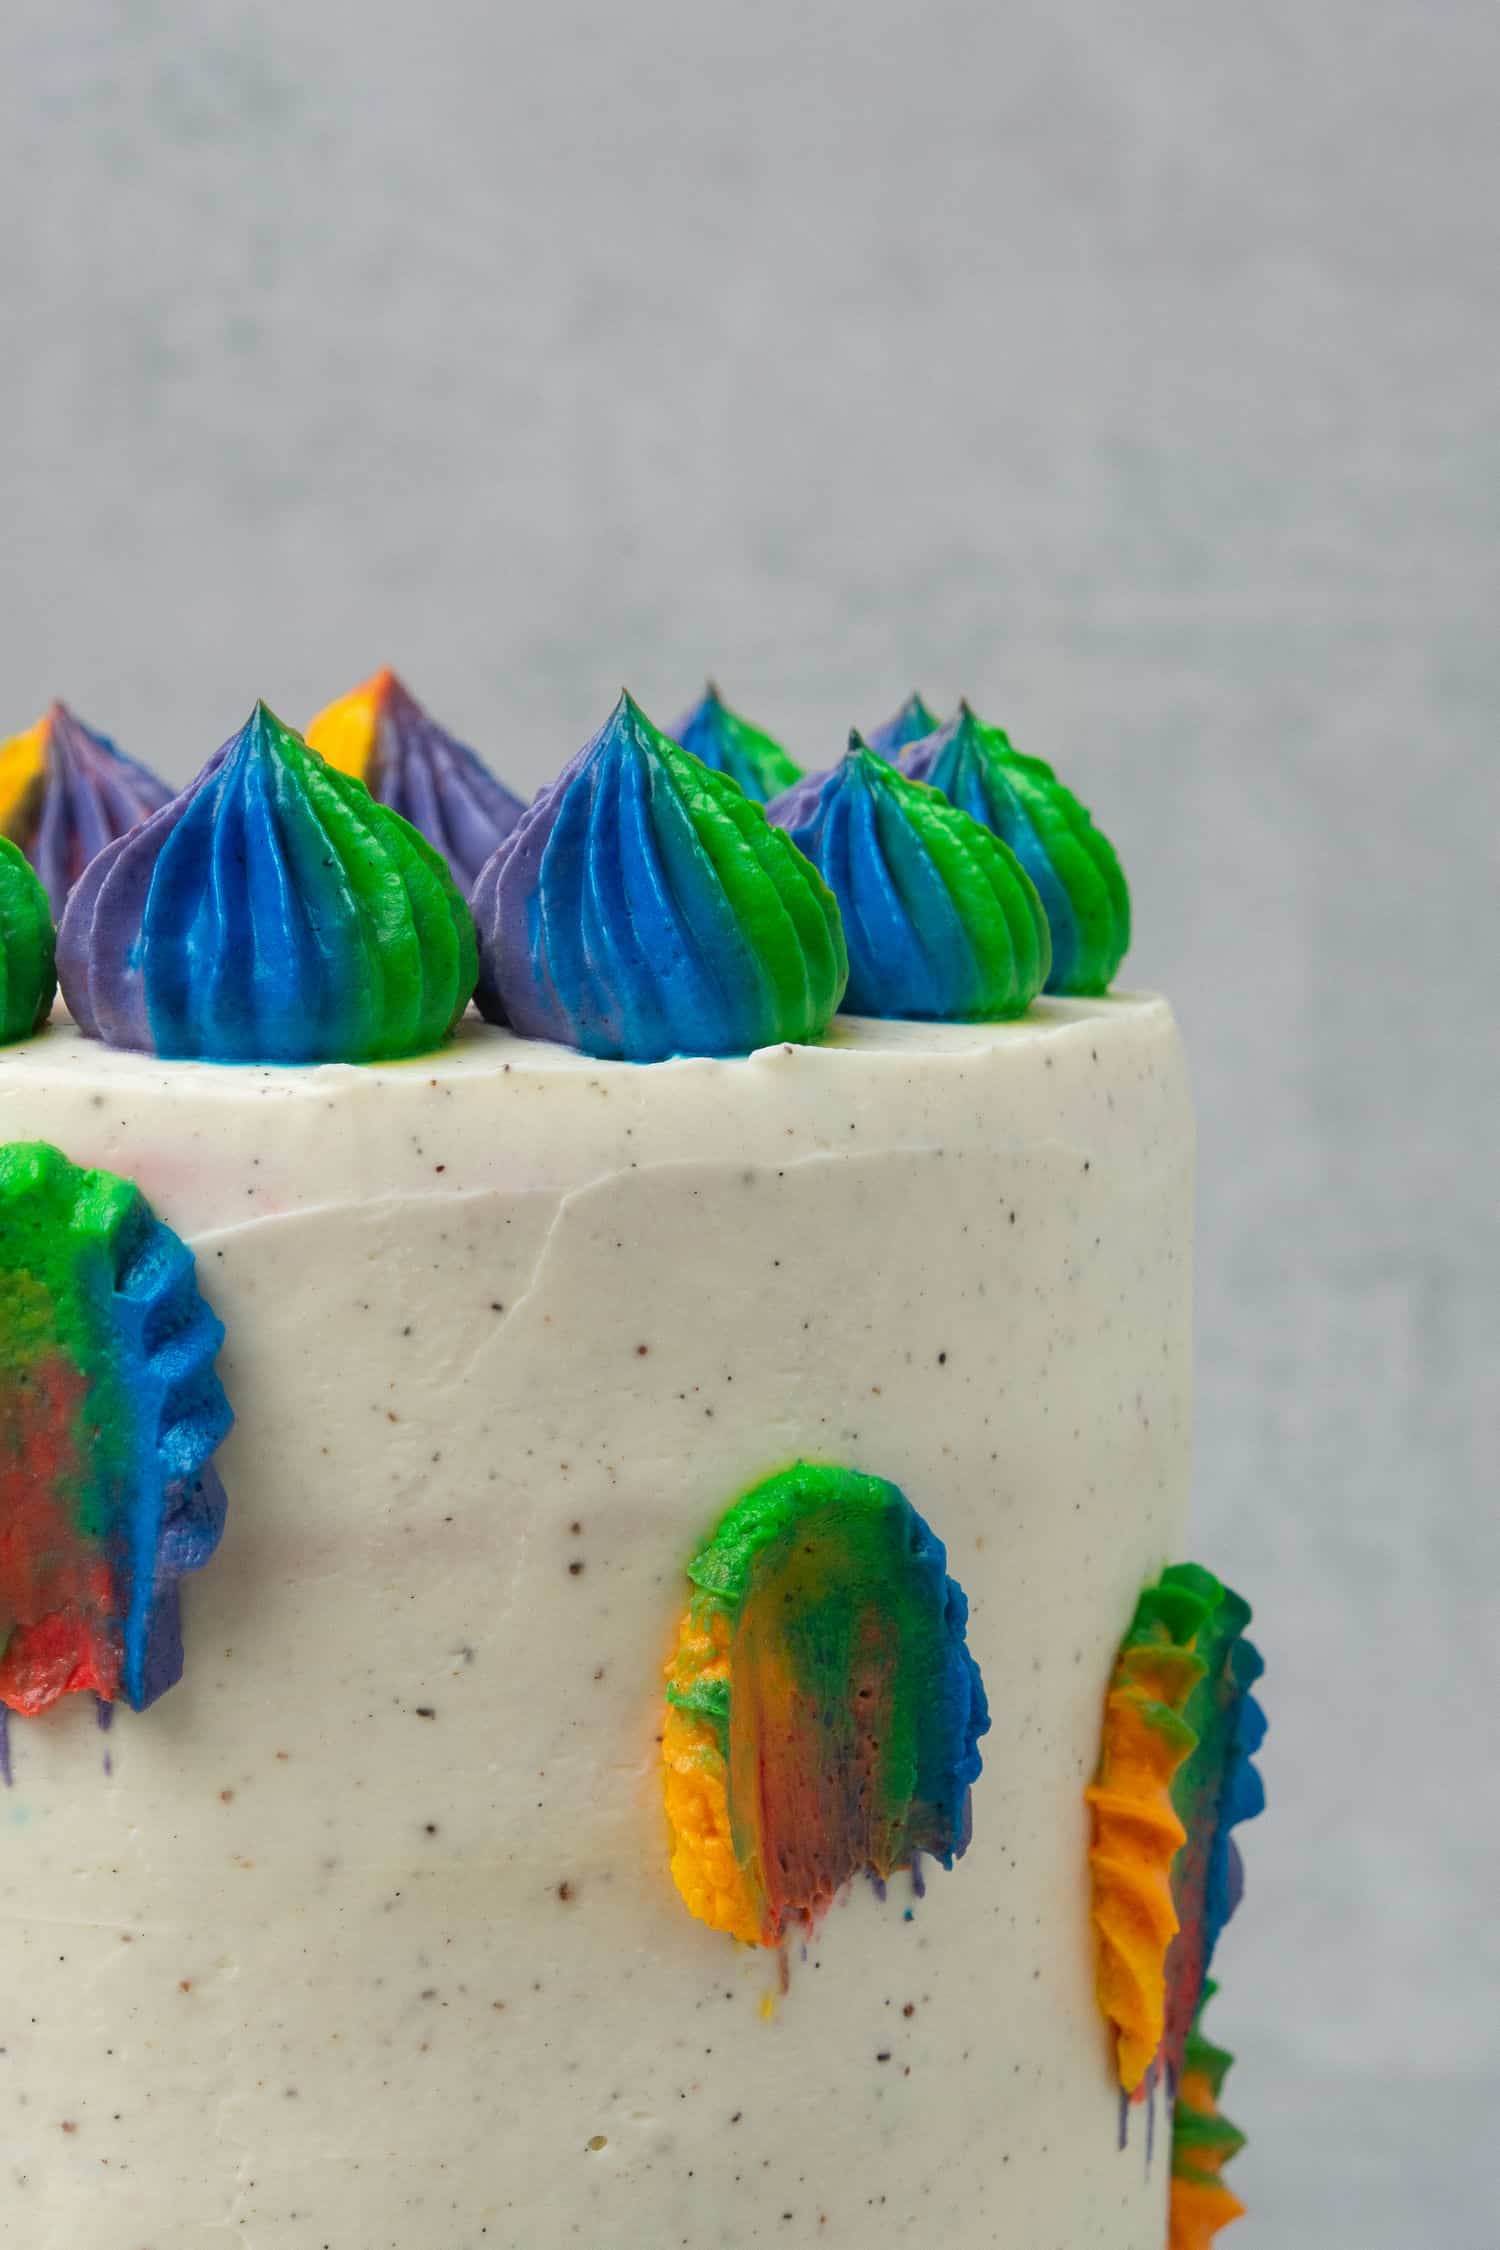
4. How to decorate
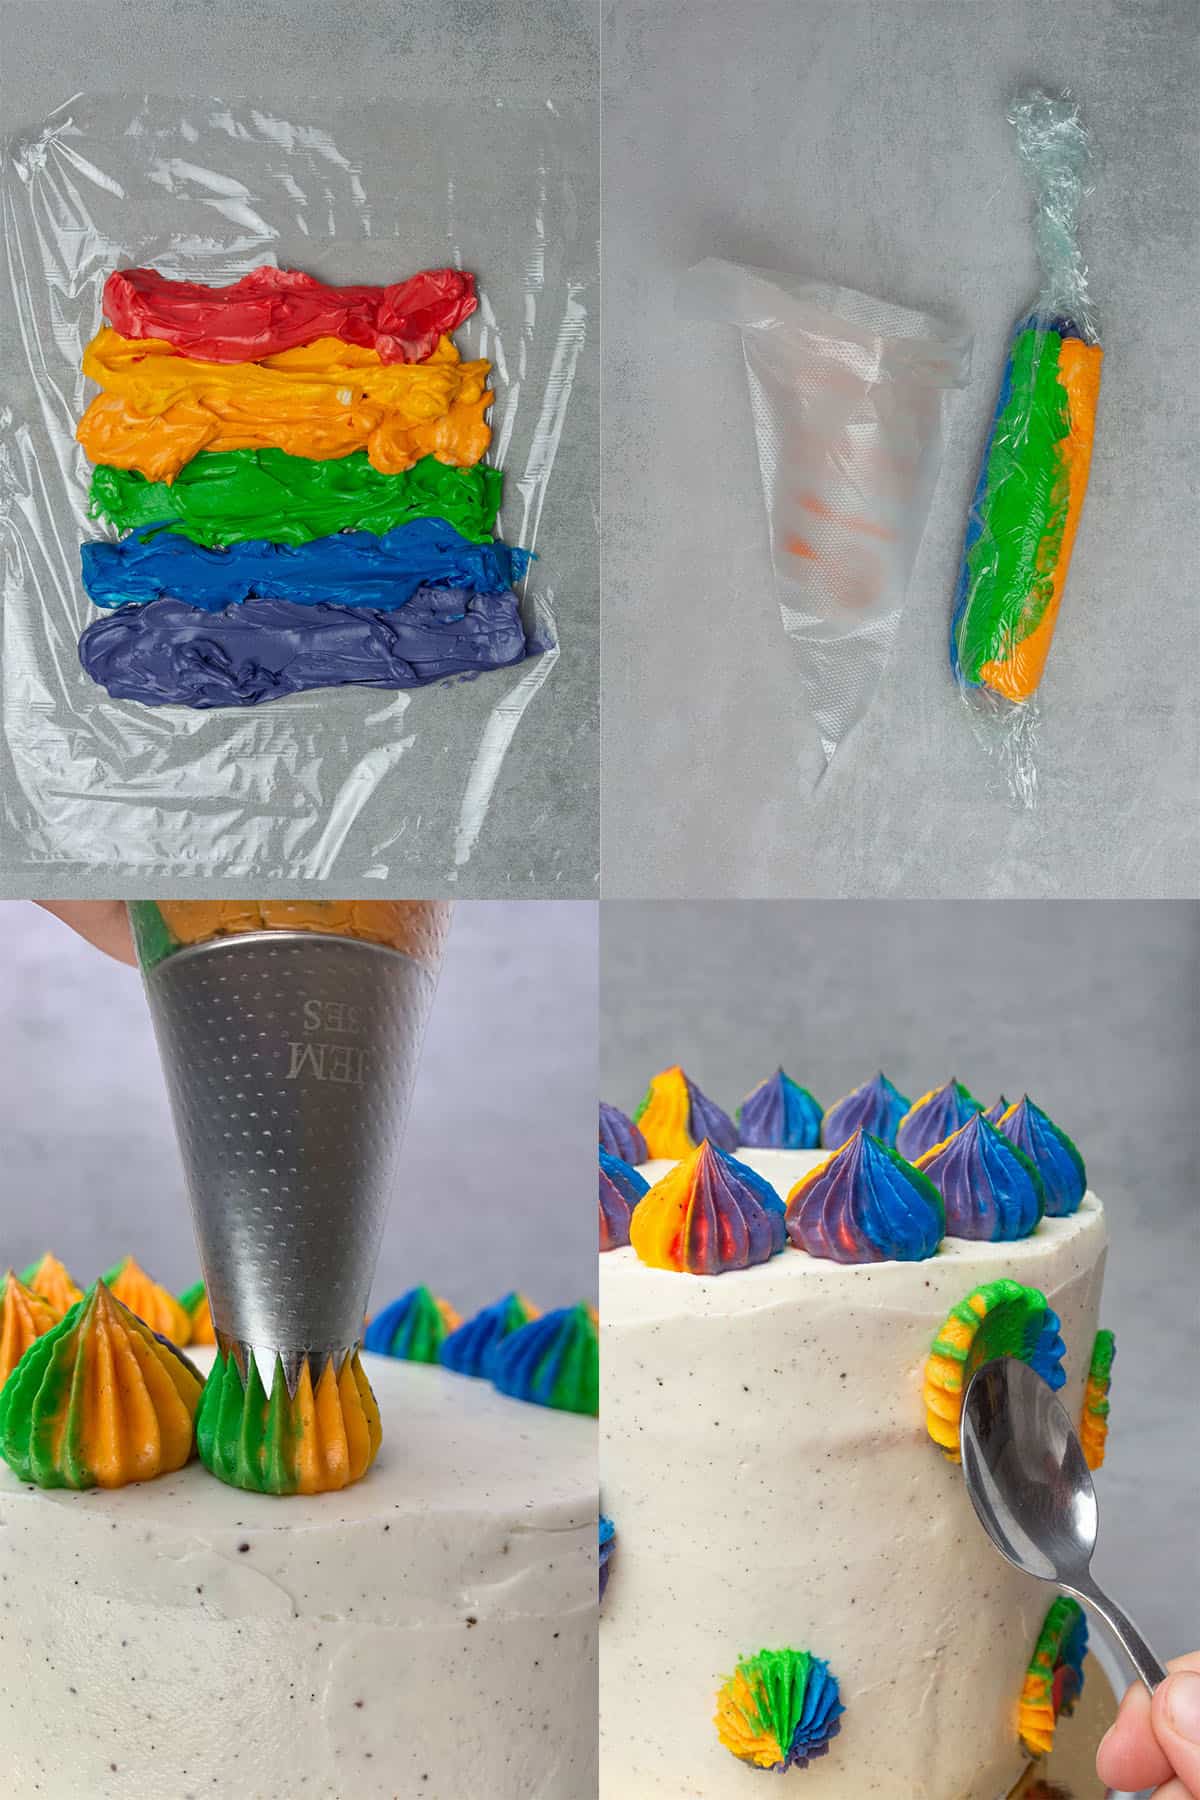
Divide the remaining cream cheese frosting into 6 equal quantities with the help of a Digital scale (it is the leftover frosting, the same that you used for filling and coating). Color each of them, then place them next to each other onto a kitchen foil as per the picture below. Roll kitchen foil and place it into a piping bag fitted with a star nozzle top. Then, the magic happens, as you pipe the frosting will automatically turn into this beautiful colorful rainbow pattern!
Now at this point, you might need to place frosting into the fridge to chill (try piping with it onto a plate to check consistency), or, if frosting is stable enough start piping on the top of the cake all around the side.
Now place the cake again into the fridge for 1h to chill then serve the same day.
Any leftovers can be stored in the fridge for 1-2 days.
💡 Top Tip: I find the cake has its best moist texture 30-60min after removing from the fridge (straight out of the fridge you might find that it is a bit hard - this is due to butter in the cake batter)
🥣 Equipment notes
Since this is a tall cake of 6 layers I am using relatively small, 15 cm / 6 inches round cake pans; 15 cm (6 inch) round cake pan. You can use a bigger or smaller cake pan too, according to your liking (adjust ingredients and baking time), what is important though that you divide batter evenly between the pans.
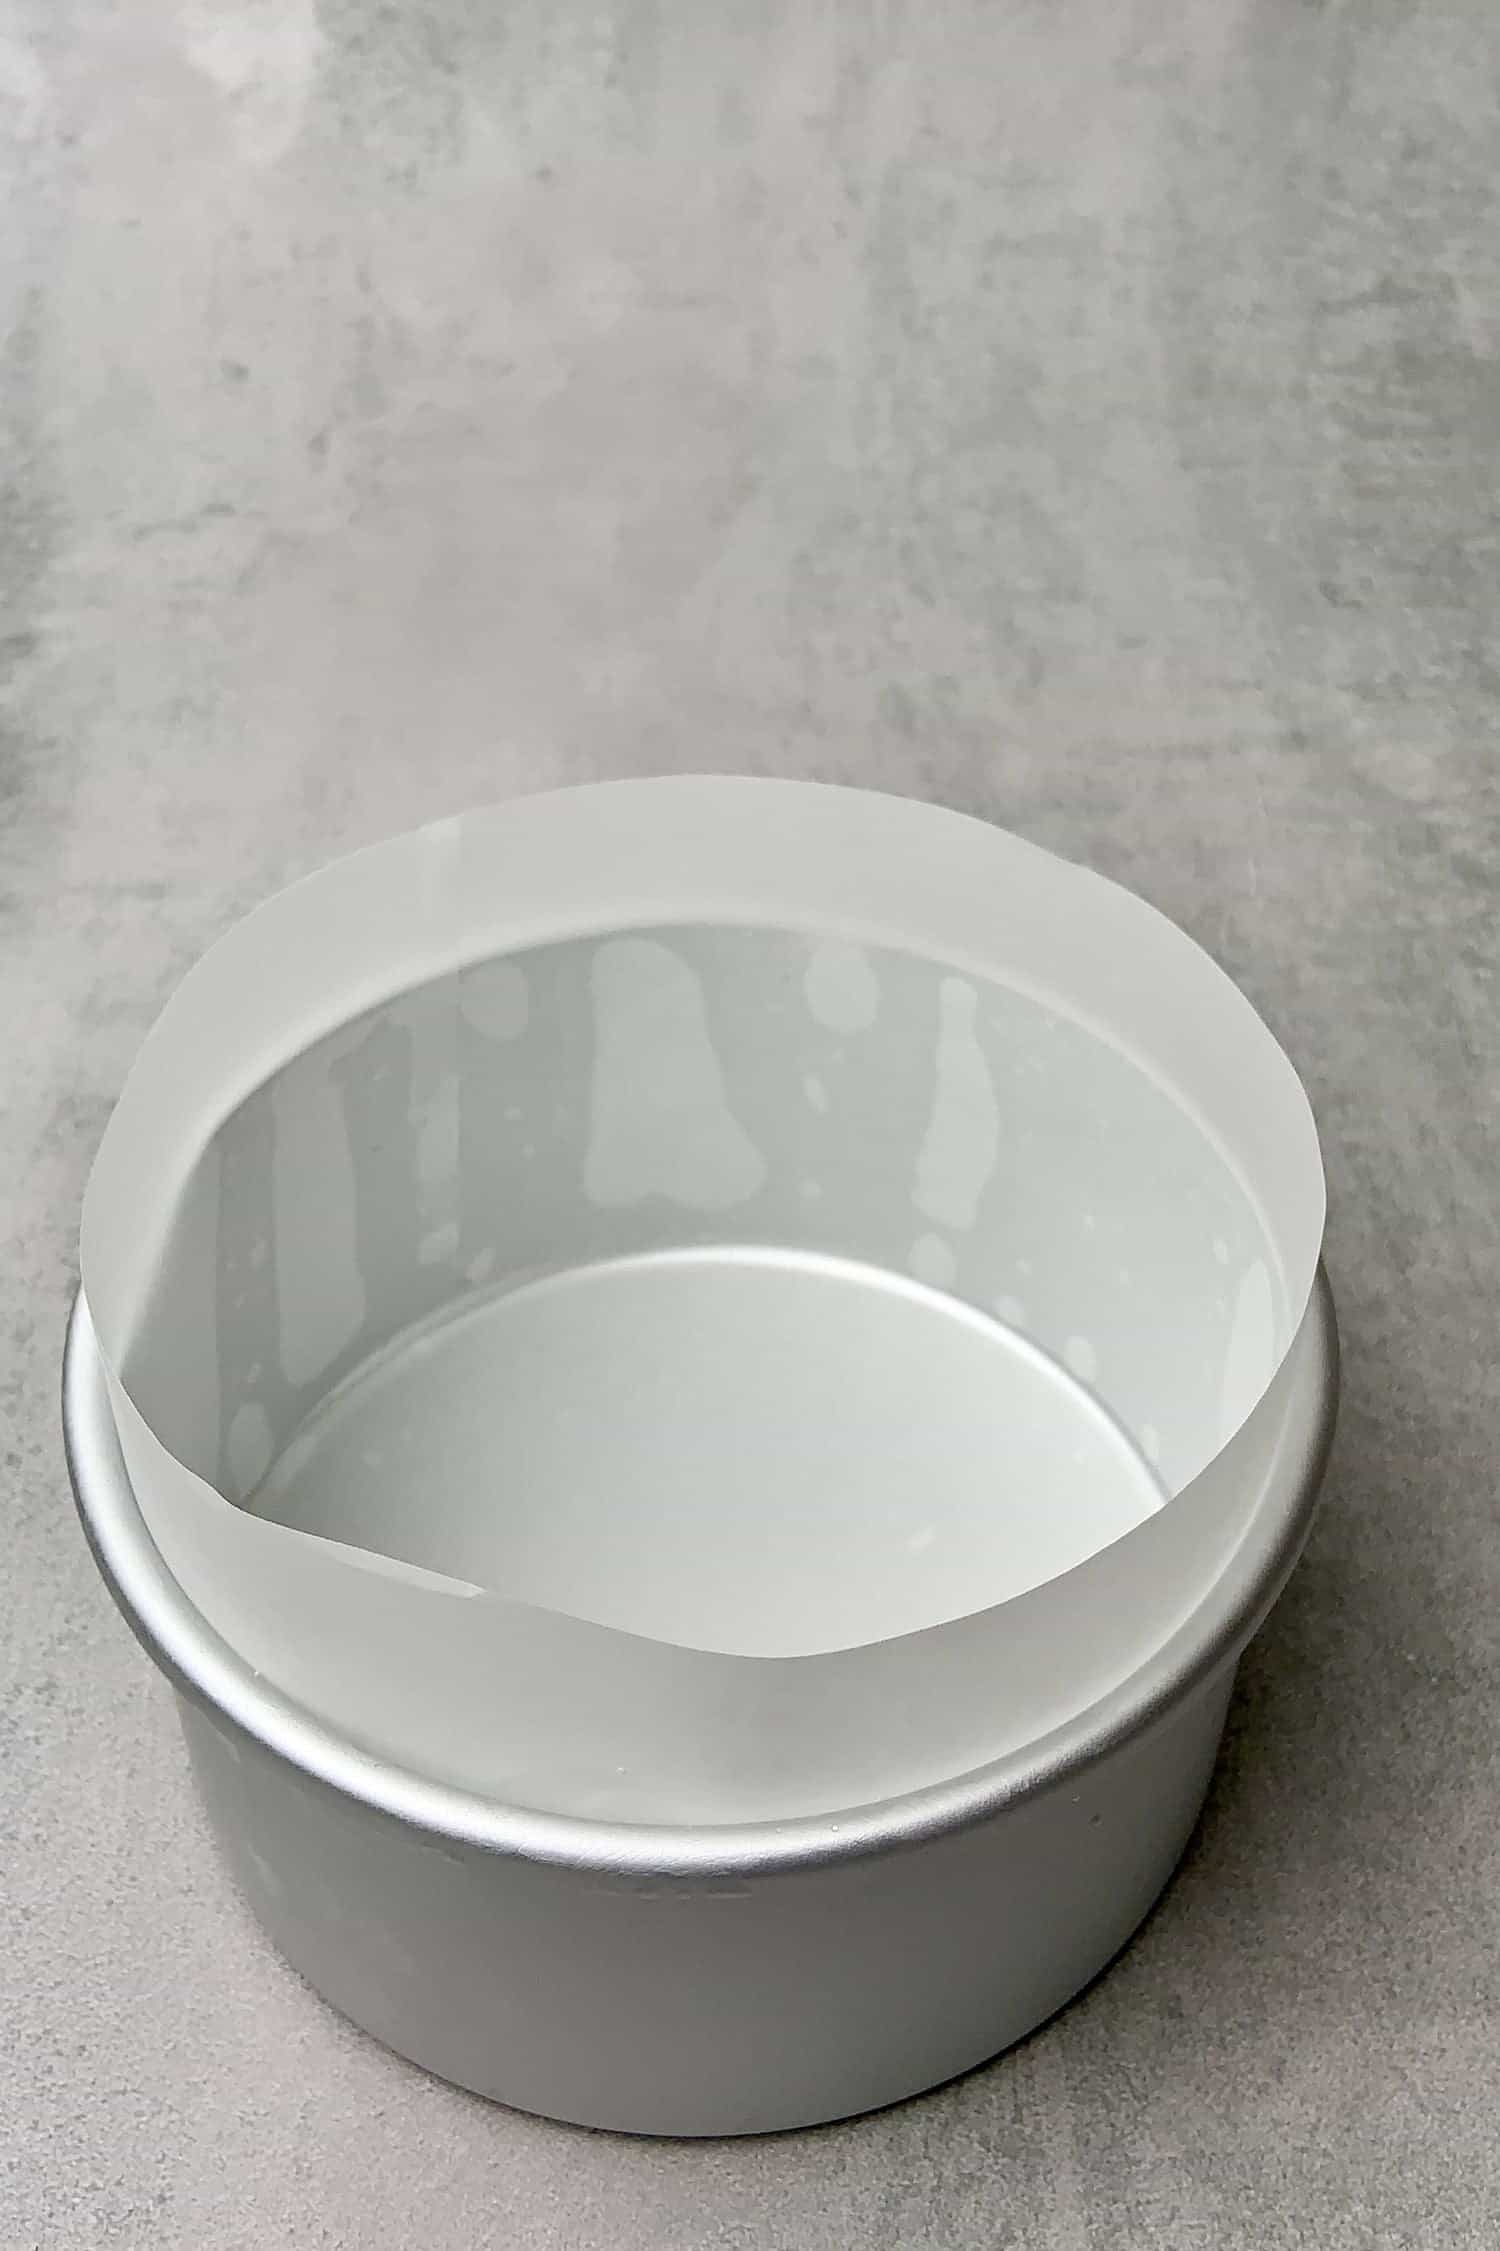
What is more important is how to correctly prepare the cake pan so that you can easily release the sponges from them: With the help of a pastry brush, brush the inside of the cake pan with a tiny bit of oil then use parchment paper on the bottom and side as well. The oil is only needed for the parchment to stick to the pan. Make sure you do the cake pan preparation before starting to mix the ingredients!
To assemble the cake a Cake turntable and an Offset spatula are super handy. For decorating the cake I suggest Piping bag with your favorite nozzle tip, the one I am using is a French star nozzle tip.
🎓 Expert tips
- While making the sponges, make sure that all ingredients are at room temperature for proper emulsification
- Do not over-bake your sponge as that would result in a dry texture
- Use concentrated gel food coloring (eg. Wilton) to achieve the rainbow colors
- An inexpensive Rubber spatula is super useful whenever "fold" is mentioned in the recipe. With the help of your spatula, you will be able to fold the cream gently without breaking it
- Cream cheese frosting is very easy to overwhip. When whipping the frosting stop as soon as the mixture reached a fluffy consistency (will take 1-2 minutes). It won´t get stiffer after this point, in fact, if you overbeat it, it will get only runner, then it will break
- Best if you chill the sponges before assembling
- If at any point the frosting feels soft, the cake feels unstable during assembling, place it into the fridge for 1h to chill then continue with the next layer
❓ Recipe FAQs
Yes of course you can, this recipe works no matter what size or shape of cake you want to bake, however, you will need to adjust the baking time and ingredients accordingly
Yes, most probably you can, however, you can´t just replace ingredients without reformulating the recipe. When one ingredient changes, some other ingredients need to be changed too in order to keep the balance in the texture and flavor. Sadly, I am not able to provide substitutes for all sorts of allergies and diets
You can only achieve bright rainbow colors by using high-quality gel food colorings eg. Wilton, Silikomart, etc. Avoid using cheap supermarket liquid food colorings and also, this time avoid using natural food colorings
You will want to follow my tips above about the ingredients and how to properly whip this kind of frosting. Cream cheese and mascarpone must be high-fat versions. Make sure that you stop whipping the cream as soon as the mixture is fluffy and pipeable, as a minute later it will break and become runny.
Once you assemble the Rainbow cake, it should be stored in the fridge. I suggest you cover the cake to make sure it does not absorb any smell from the fridge. Leftover cake - if there is any - should be stored in the fridge for 1-2 days in an air-tight container.
I do not recommend freezing the entire cake as the frosting does not freeze well but you can easily freeze the sponges before assembling the cake
🍰 More Cake recipes


Have you tried this recipe?
Please leave a 5-star ⭐️⭐️⭐️⭐️⭐️ rating on the recipe card and consider leaving a comment as well! I would love to hear about how your dessert turned out and your feedback also helps other Readers!
Rainbow Cake step-by-step tutorial
Equipment
Ingredients
For the 6 cake layers
- 250 g (1 cups) Unsalted butter room temp
- 225 g (1 cups) Granulated sugar
- 3 Eggs room temp
- 1 tablespoon Vanilla bean paste pure paste, eg. Nielsen Massey
- 250 g (2 cups) All purpose flour sifted
- Pinch of salt
- 2 teaspoon Baking powder sifted
- 50 g (⅕ cups) Whole milk room temp
- Rainbow colouring food gel in 6 different colours Rainbow Dust or Wilton
Frosting + Decoration
- 900 g (4 cups) Cream cheese full fat eg. Philadelphia
- 300 g (1⅓ cups) Mascarpone full fat
- 150 g (1¼ cups) Powdered sugar sifted
- 1 tablespoon Vanilla bean paste pure paste, eg. Nielsen Massey
US customary cup measurement is an indicative figure only. Measure the ingredients with a digital scale by weight (gram). Baking is art but also science which requires precision and accuracy.
Instructions
For the rainbow layers
- Decide how many cake layers you want to bake at once depending on how many baking pans you own, I recommend 3 pans at least so you can bake this cake in 2 batches. The steps below assume 6 pans (all 6 colours) made at the same time. If you have 2 pans, make only ⅓ of the recipe using 2 colours then repeat the same process for another 2 colours then one last time with the last 2 colours. If you have 3 pans, make ½ of the recipe then repeat. The recipe quantity can be easily divided into either 3 or 2.
- Heat the oven to 170 C / 338°F (no fan) and prepare your baking pans
- Start with preparing 6 small bowls and divide milk into 6 with the help of your Digital scale
- Mix gel food coloring into milk one by one, there will be 6 colors: red, yellow, orange, blue, purple, and green. Use a toothpick and start with a small amount until bright color achieved
- Cream room temperature butter and sugar together in a stand mixer until pale and fluffy then beat the eggs in, one at a time
- Sift flour, salt, and baking powder together, this is the “dry ingredients”
- Fold dry ingredients with the butter-sugar mixture until combined
- Divide now the mixture into 6 equal portions using a digital scale
- Mix each portion with one of the colored milk so at the end you will have 6 equal portions of cake batter. If you are unhappy with the color of your batter at this point, mix in some more coloring
- Pour the cake batter into 6 different baking pans
- Bake them for 20 min or until a skewer inserted comes out clean. Let them cool on a cooling rack before frosting
Frosting
- For the frosting beat mascarpone, cream cheese, vanilla bean paste and powder sugar until smooth and fluffy, this will only take few minutes. Use an hand mixer and do not over beat as it can become runny
Assemble and Decoration
- Start building up the cake from the bottom (purple) to the top (red) and spread the frosting in between the layers equally. I suggest 100g per layer, use a digital scale to measure
- If at any point the frosting gets soft or the cake gets unstable, place it into the fridge to chill then only after continue
- Once all the layers are assembled, place the cake into the fridge for 1h to set then on a turntable apply your first crumb coat around the cake
- Let the cake rest again for 1h in the fridge before applying your final coating
- Divide the remaining frosting into 6 equal quantities and color them. Decorate the top and side of the cake according to your liking
- Store cake in the fridge however let it come to room temp for 30-60min before serving for the softest, most moist texture
Notes
- Measure your ingredients with a Digital scale for accuracy
- While preparing the sponges, make sure all ingredients are at room temperature
- Good quality butter and pure vanilla are the heart of making this cake. Use high-quality 82% fat content European butter and the best quality vanilla for the frosting
- To achieve bright color on your sponge, you will have to use high-quality gel or powder food coloring eg. Wilton
- Make sure you read my Expert tips section above to maximize your success. A short recipe alone is not able to cover all the necessary details, and science behind baking.
- While baking the sponge layer, remember not to overbake it. Over-baked sponge cake can become too dry
- Cream cheese frosting is very easy to overwhip. When whipping the frosting stop as soon as the mixture reached a fluffy consistency (will take 1-2 minutes). It won´t get stiffer after this point, in fact, if you overbeat it, it will get only runner, then it will break
- Chill the sponges before assembling
- During assembling, if at any point the frosting feels soft, the cake feels unstable during assembling, place it into the fridge for 1h to chill then continue with the next layer
Tracey
Absolutely delicious cake not too sweet either. Nice and easy to follow recipe. Will use this recipe again.
Anuja
I made the light cream cheese frosting from this cake and its amazing! Perfectly sweet, fluffy and keeps it shape well. I used it with a carrot cake and it was perfectly tart. Looking forward to trying the cake recipe from here soon too!
Tazkia
Best Rainbow Cake recipe ever. The instructions are clear and easy to follow and the cake tastes amazing. Definitely should be the only recipe you use for rainbow cakes.
Thaleia K.
Beautiful recipe! It ended up being very nice! Thank you very much for this! 😍
admin
Happy for you 🙂
Carrie Dwyer
After researching many rainbow cakes this was the one I settled on. It was absolute perfection.
Easy to follow, clear instructions and I achieved a perfect first bake. I was thrilled and recieved many lovely comments.
It tastes superb, isn't overly sweet and has a lovely vanilla taste of cheesecake coming through from the frosting. Loved it so much I made a half rainbow today with 3 layers and again got applause. If you pick one recipe for a show stopper it has to be this one! 10/10
admin
Thanks so much for your feedback I am grateful!
Adriana
The recipe is grate! So manny colors so much joy! The taste is also grate and the frosting... the best I ever made.
admin
Thank so much for your kind feedback I am so happy it turned out great for you too!