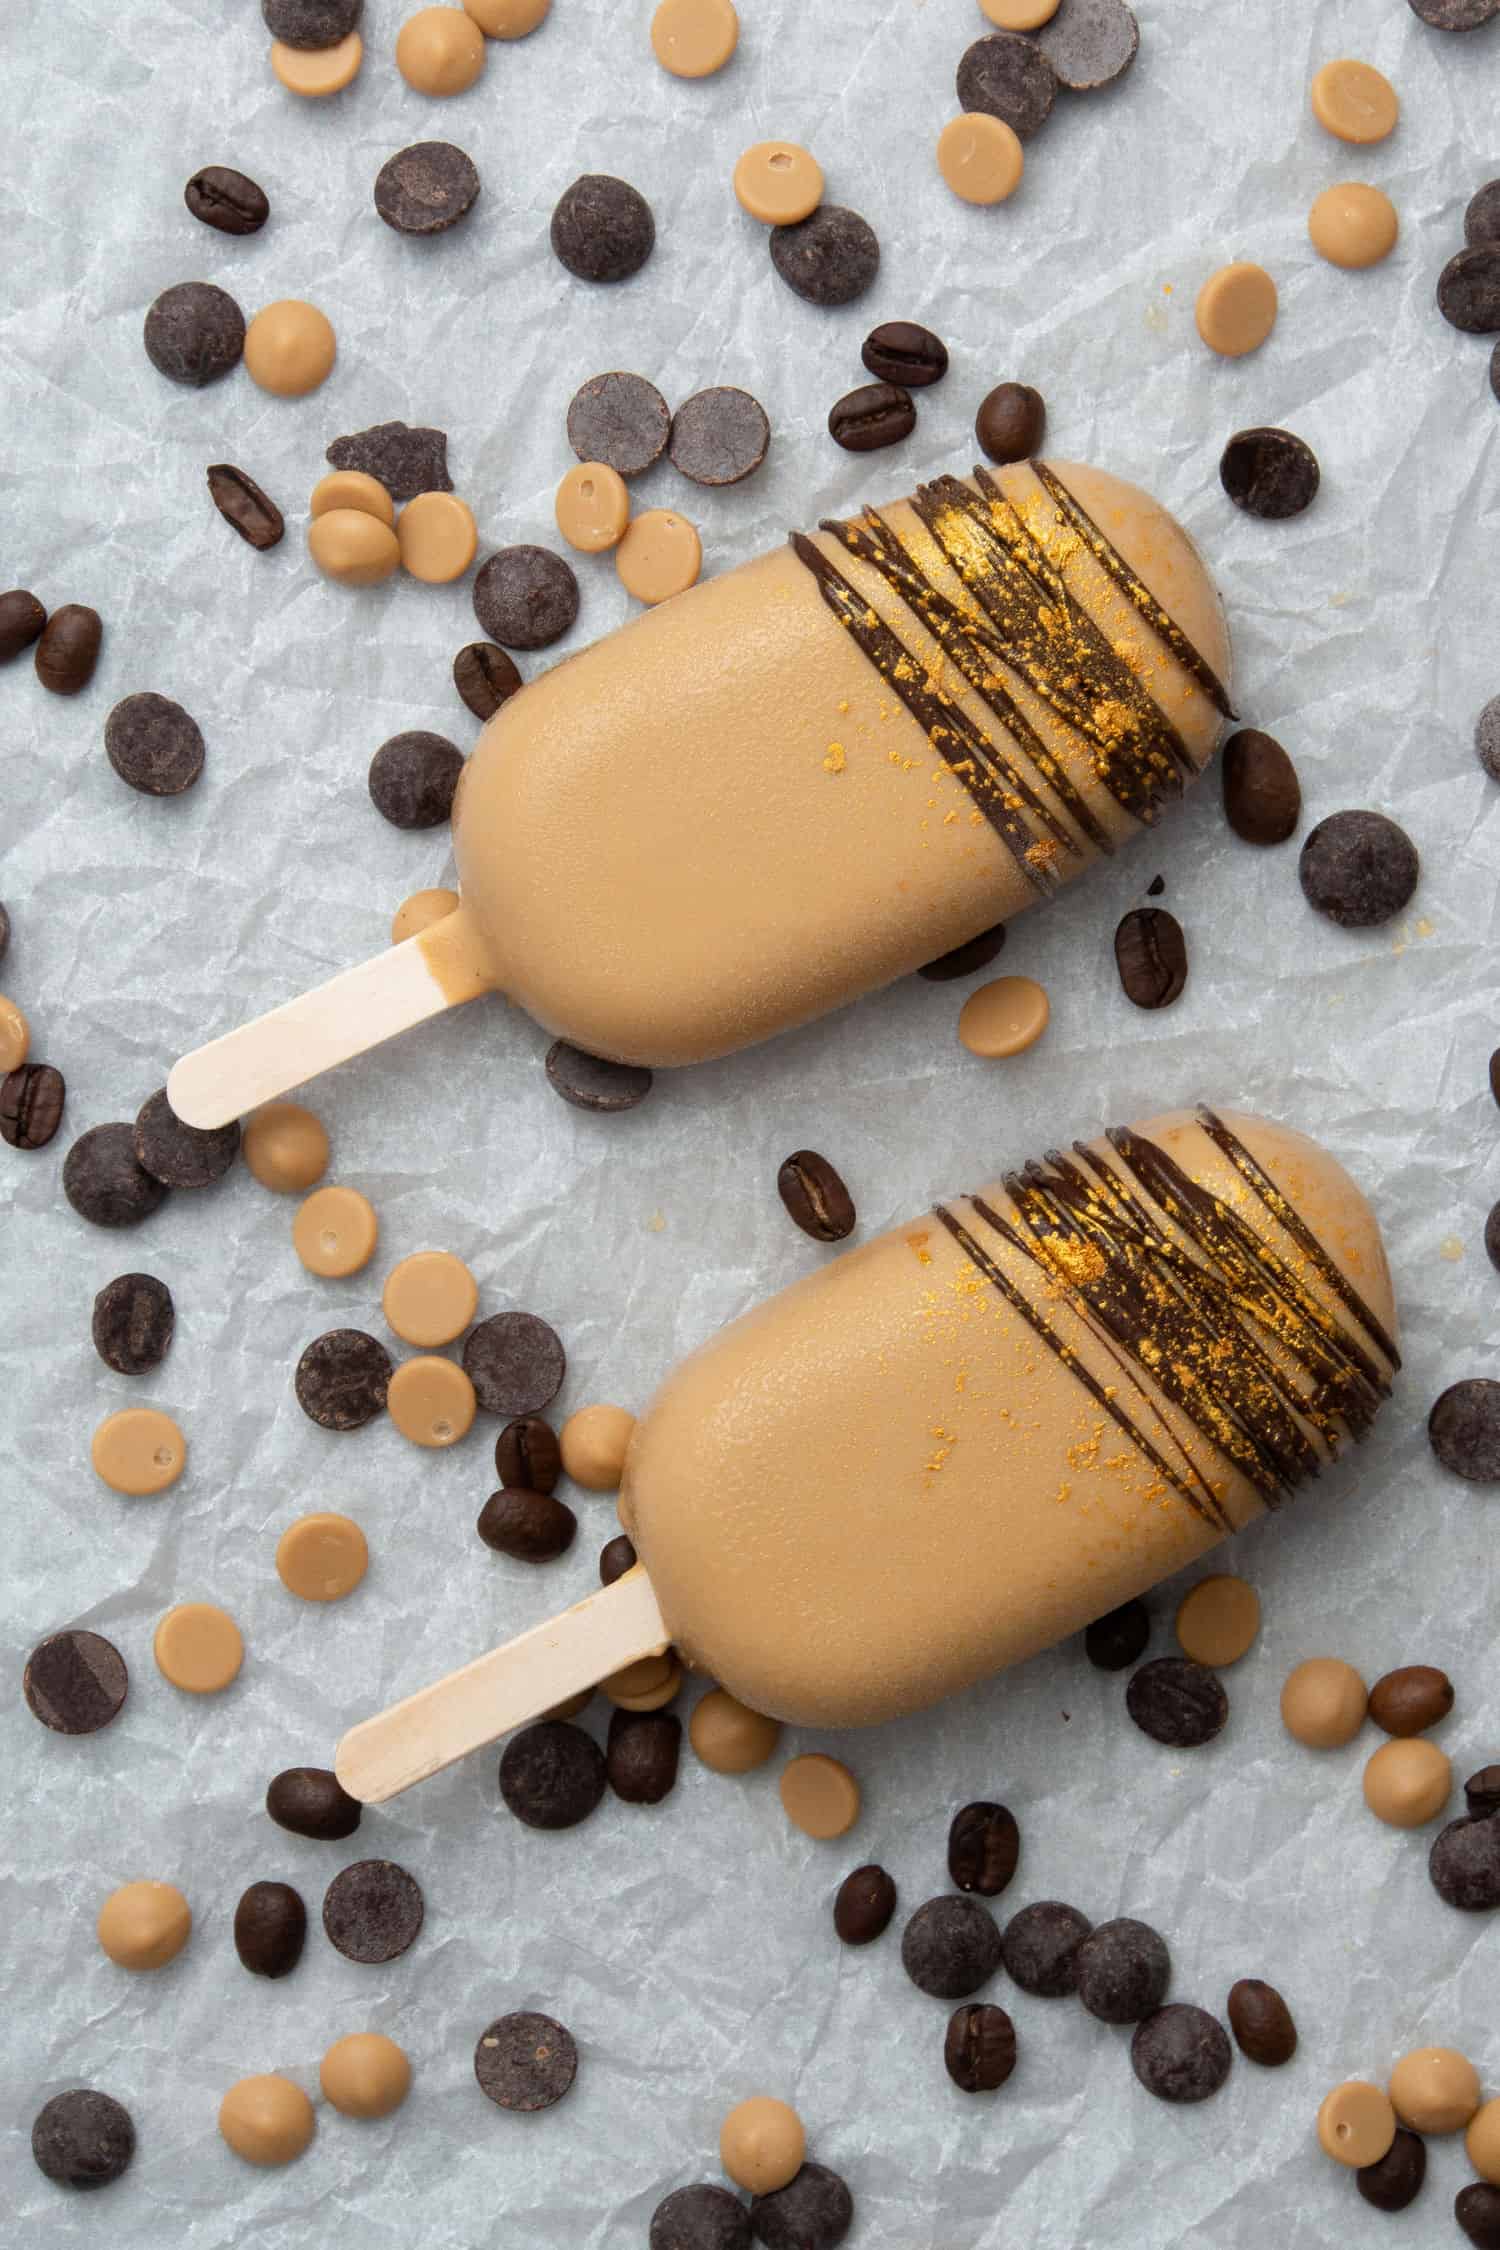
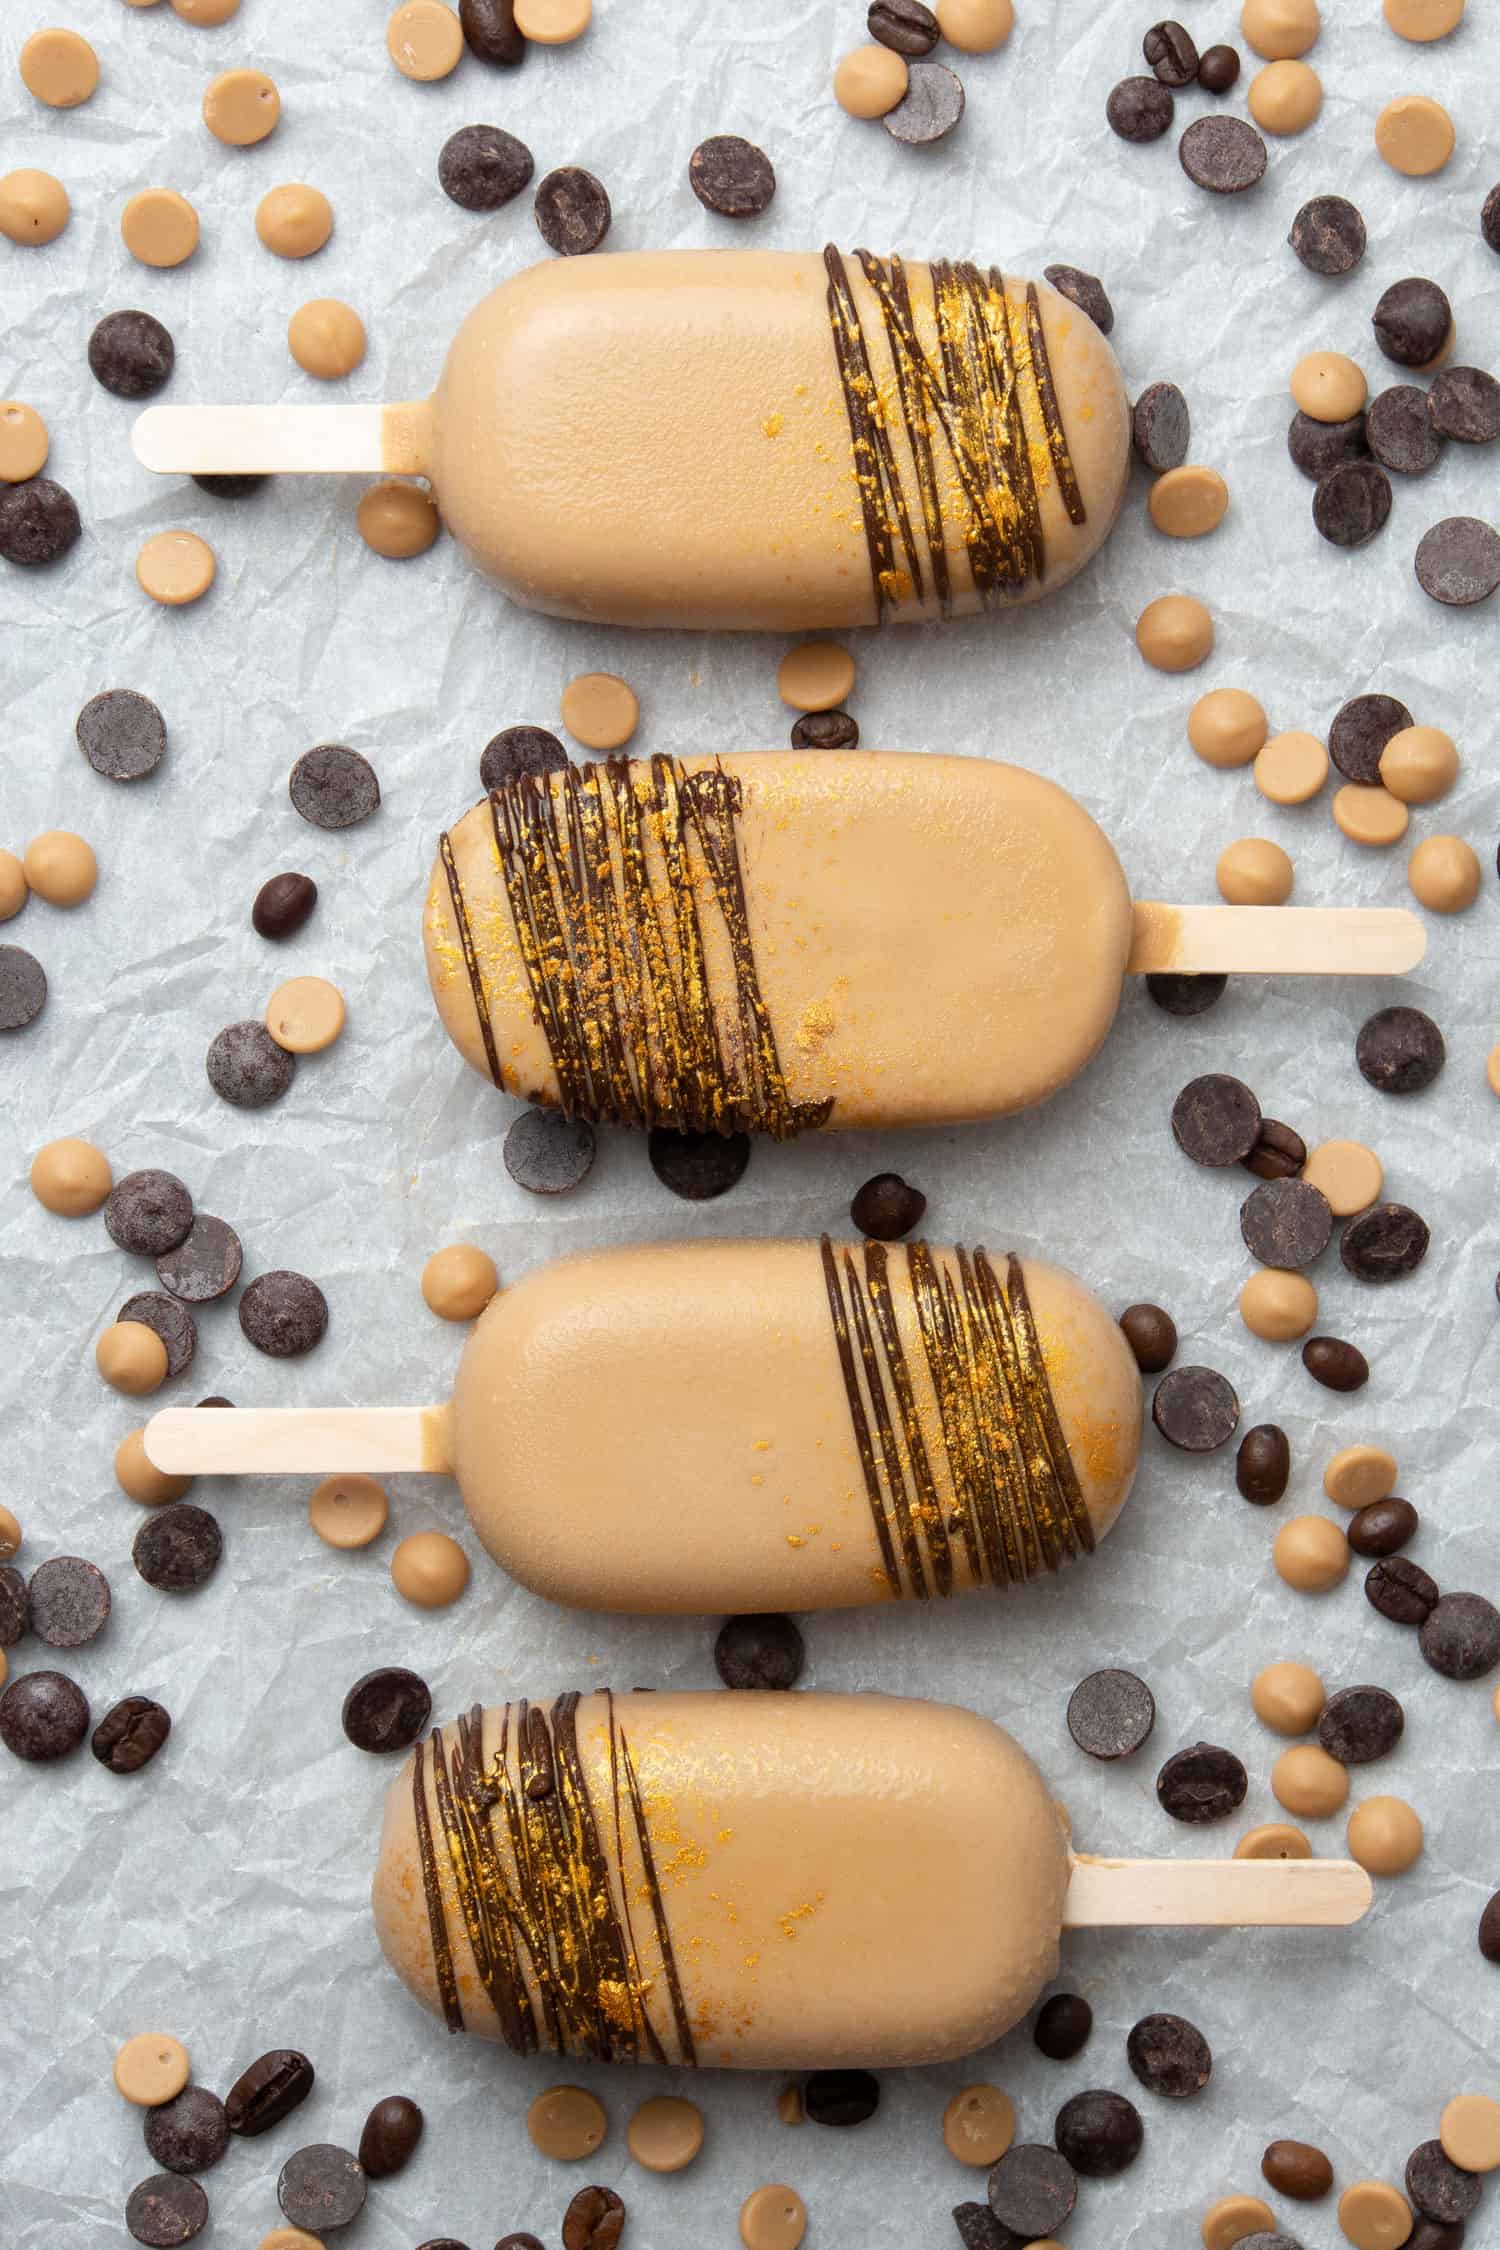
This Homemade No churn Coffee Caramel Ice cream bar recipe is the perfect choice if you want to make a Caramel Macchiato kind of ice cream without all the fuss! Made of 4 simple natural ingredients in 10 minutes without any ice cream machine! It is creamy and soft with delicious and deep coffee flavor inside the ice cream bar, while the crunchy caramelized white chocolate coating brings a super smooth and intense caramel flavor.
Jump to:
📖 What is No churn Ice cream
It means no fancy expensive ice cream maker is required to make homemade ice cream, all you need is 10 minutes and an electric mixer or hand whisk. No churn ice creams like this Coffee Caramel Ice cream bar is usually made of a few simple ingredients (cream, condensed milk plus the flavoring like coffee, fruit puree, etc) super quickly and easily. No Churn ice cream is the perfect ice cream recipe even if you are a beginner in the kitchen or perhaps a Pro but don´t want to purchase an ice cream machine.
How does No-Churn ice cream taste? I will be honest with you, I was skeptical and thought I can never make good, creamy ice cream without an ice cream machine. How wrong I was! Since I tried this easy 10 minutes no-churn ice cream base recipe, I can´t stop making a new flavor each week! See some of my other flavor recommendations at the end of this blog post!
📝 Ingredient notes
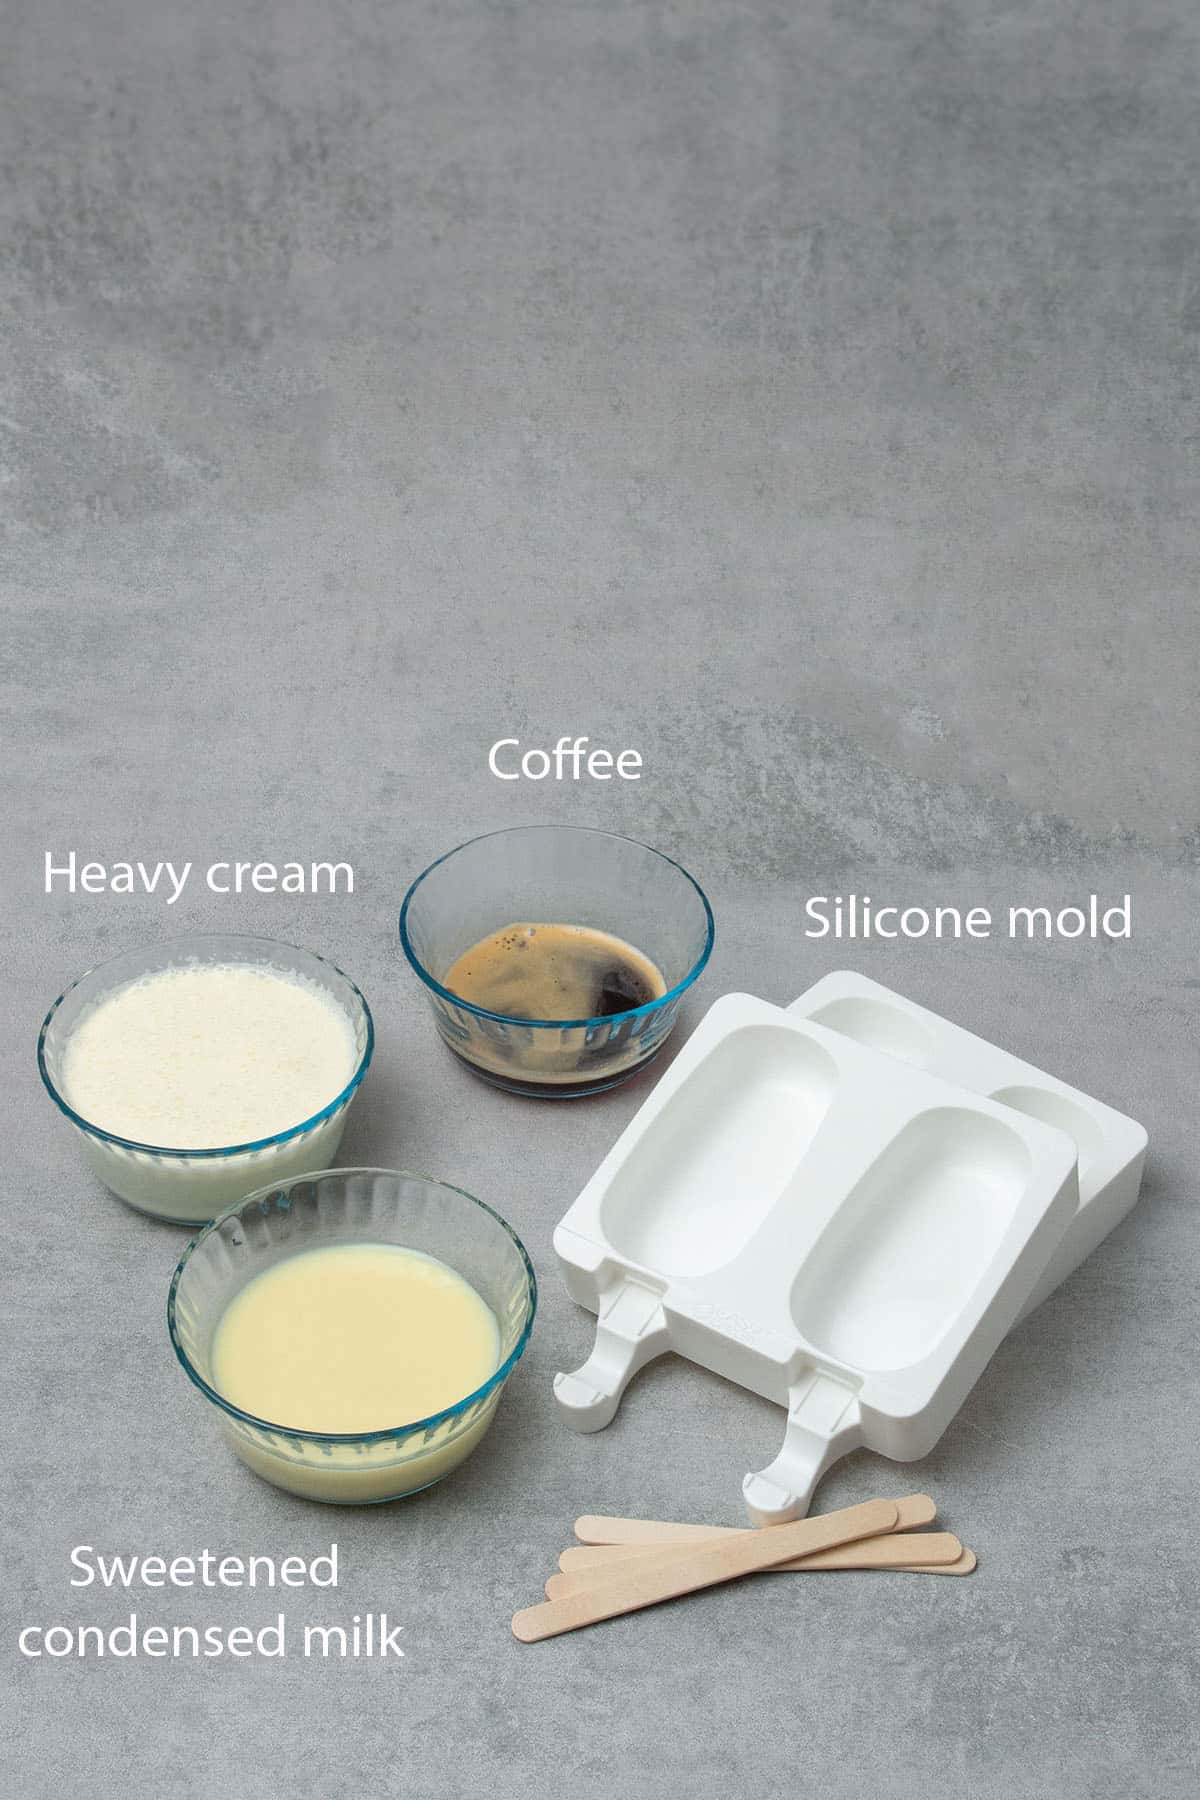
- Heavy cream: Heavy cream also known as whipping cream has a fat content of between 36% and 40%, the cream I am using is 36% to make this Coffee Caramel Icecream recipe that makes the ice cream super creamy and fluffy. Use it very cold. To substitute, check out my heavy cream substitute article.
- Sweetened condensed milk: Condensed milk is kind of an important ingredient if you want to make No churn Ice cream like this Mocha ice cream recipe without an expensive ice cream machine. Condensed milk is cow’s milk from which water has been removed (roughly 60% of it). It is most often found with sugar added, in the form of sweetened condensed milk. Sweetened condensed milk is a very thick, sweet product, which when canned can last for years without refrigeration, if not opened. Possibly you can substitute it with a product called evaporated milk, which has undergone a lengthier preservation process because it is not sweetened. Evaporated milk is known in some countries as unsweetened condensed milk. Both products have a similar amount of water removed however since evaporated milk does not contain sugar, you will need to add sugar into it (possibly glucose syrup that makes the ice cream softer vs granulated sugar)
- Coffee: This Coffee Caramel Ice cream bar is made using freshly brewed, strong espresso-like coffee. Make sure you make a strong coffee so your ice cream flavor will turn out deep. Check out some of my other coffee desserts as well!
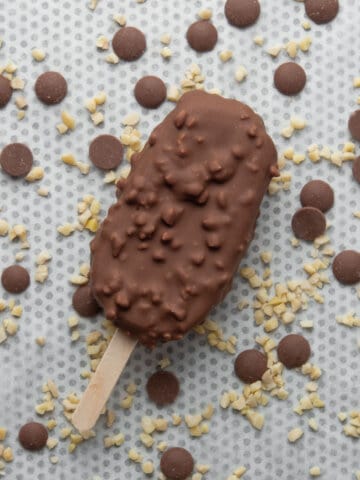
- Chocolate: The chocolate coat is quite an important part of this Coffee Caramel Ice cream bar both in terms of taste, also in terms of crunchy texture. Make sure you use high-quality chocolate that has a pleasant taste! This recipe I am using is a so-called Caramelized white chocolate, check it out here: Callebaut Gold chocolate is the best match to the lovely mocha flavor. This is high-quality chocolate (yet affordable) that has wonderful butterscotch and caramel notes. Please see further notes below regarding the chocolate itself
🛒 You’ll find detailed measurements for all Ingredients in the printable version of the Recipe Card at the bottom of this post
💡 What is Caramelised white chocolate
Caramelized white chocolate is a dream on its own and brings a flavor that makes your desserts super special! If I had to choose my favorite chocolate it would be probably this one! It goes super well with hazelnut, coffee, lemon, almost anything really.
White chocolate can be sweet for some (very much depends on the quality), but if you caramelize it in the oven for about 30 minutes (only try with high-quality chocolate that has a high content of cocoa butter), it becomes golden in color with a complex and nutty flavor. The taste of caramelized white chocolate reminds me of butterscotch, dulce de leche, or caramel, but with all the creaminess of white chocolate.
You can either make caramelized white chocolate at home (only try it if using high-quality white chocolate with high cocoa content otherwise the chocolate will dry out while caramelizing) or purchase eg. Callebaut Gold chocolate which I am using. Callebaut Gold is made of caramelized sugar and caramelized milk and the chocolate has rich notes of toffee, butter, cream, and an exciting dash of salt. It is brilliant when you want a caramel coating like on this Coffee Caramel ice cream, and really takes your chocolate experience and desserts to the next level!

👩🍳 How to make this recipe
1. What equipment is needed
By now you already know that this Coffee Caramel Icecream recipe does not require an ice cream machine! Hurray! You can totally use a paper cup or plastic container to make ice cream however if you want to make your ice cream in a bar format then you will need a mold and some ice cream sticks.
The product I am using is a rather affordable Ice cream mold from Silikomart that you can purchase from Amazon, it contains the sticks too and perfect for making ice creams, I am very pleased with it! It has a nice size, and super easy to release the frozen product.
💡 Top Tip: Silicone ice cream mold is the most perfect tool to make ice cream bars, however, please note that you can only remove the ice cream from the mold if it is completely frozen
 7")
2. Step-by-step process
Making this Coffee Caramel Ice cream could not be simpler, literally 10 minutes or so, the most difficult part is the waiting until it sets in the freezer. The recipe makes 4 Mocha ice cream bars, feel free to half or double the recipe if needed.
- Measure all your ingredients with a Digital scale
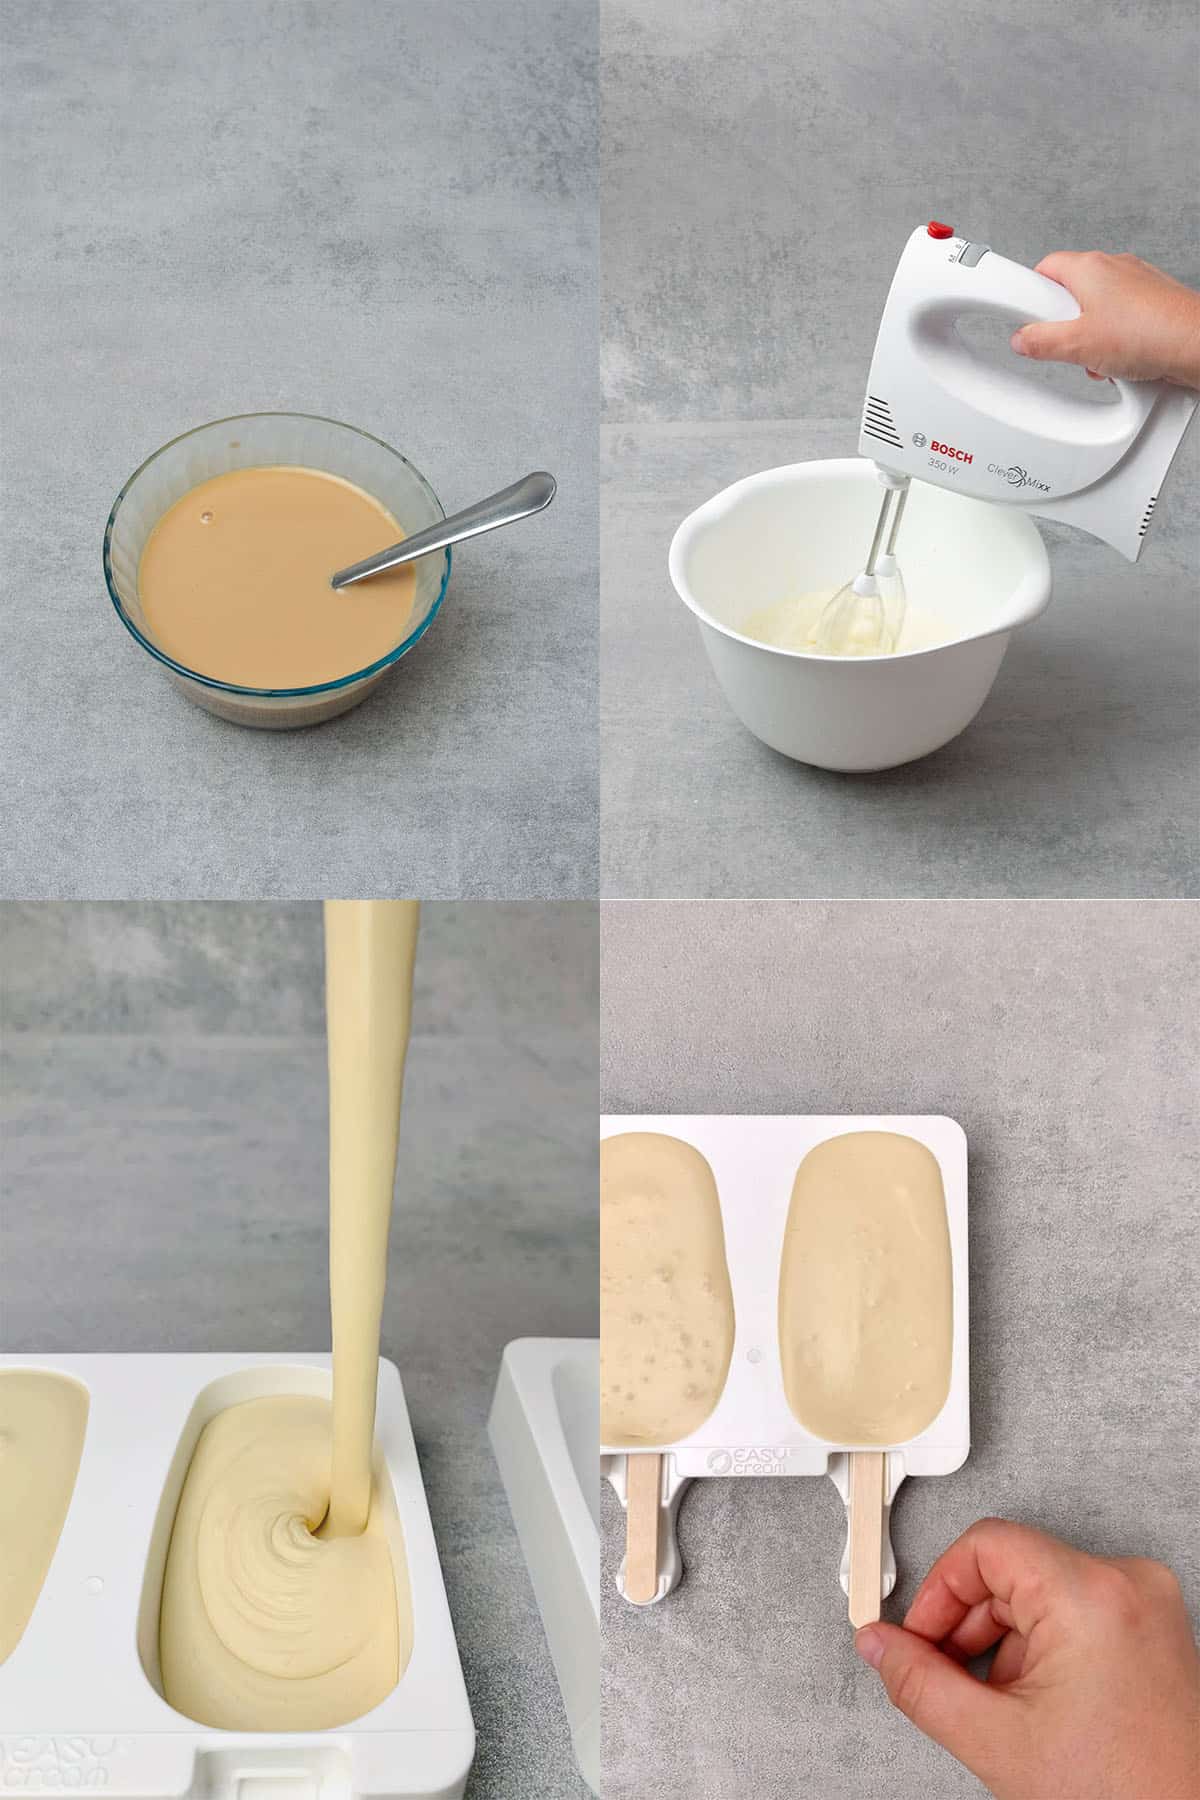
- Make a strong espresso-like coffee and mix it into sweetened condensed milk until fully incorporated - it will be very delicious, try not to eat it!
- Whip very cold heavy cream with the help of an electric hand mixer until early hard peaks
- Carefully, with the help of a rubber spatula, fold whipped cream into the condensed milk & coffee paste mixture
- With the help of a spoon fill 4 cavities of your Ice cream mould. Gently tap the mold onto the kitchen counter a few times so air bubbles will come to the surface then press one stick into each – the end of the stick should be where the mold indicates it, please see the picture below
- Smooth the top with an offset spatula. Make sure that the top is properly smooth and flat
- Place Ice cream mould into the freezer for 6 hours and now it is onto waiting. Please note that if you don´t wait long enough, the ice cream might be stuck into the mold and also won´t be too easy to coat later
💡 Top Tip: The consistency of the whipped cream is quite important for the perfect soft and fluffy ice cream texture so make sure that the cream is whipped up correctly and you stop as soon as early stiff peaks. If you happen to beat the cream longer, you might find that it will form lumps which then would make it impossible to fold it into the condensed milk mixture
3. How to chocolate coat Ice cream bars
Coating these Coffee Caramel Ice cream bars could not be easier! Basically, you will need to dip the frozen ice cream bars into melted chocolate however it is very important that both of these are on the right temp.
To be able to successfully and quickly coat your ice cream bars, make sure that ice cream is properly frozen (min 6h in the freezer). For coating, chose a tall but skinny glass that you will pour the melted chocolate in just before coating. Truth is, you won´t need all the chocolate stated in the recipe, but you have to melt enough chocolate to be able to dip the ice cream into it. Any leftover chocolate can be poured onto a parchment paper then it will set in a few hours and can be reused. Since chocolate won´t be tempered this time (no need), the leftover chocolate won´t set hard and snappy. But, you can always use it for making other desserts.
So the process of chocolate coating these Coffee Caramel Ice cream bars is the following
- Melt Callebaut Gold chocolate in the microwave stirring every 30 sec. Make sure you don´t burn the chocolate, use a plastic container (not glass)
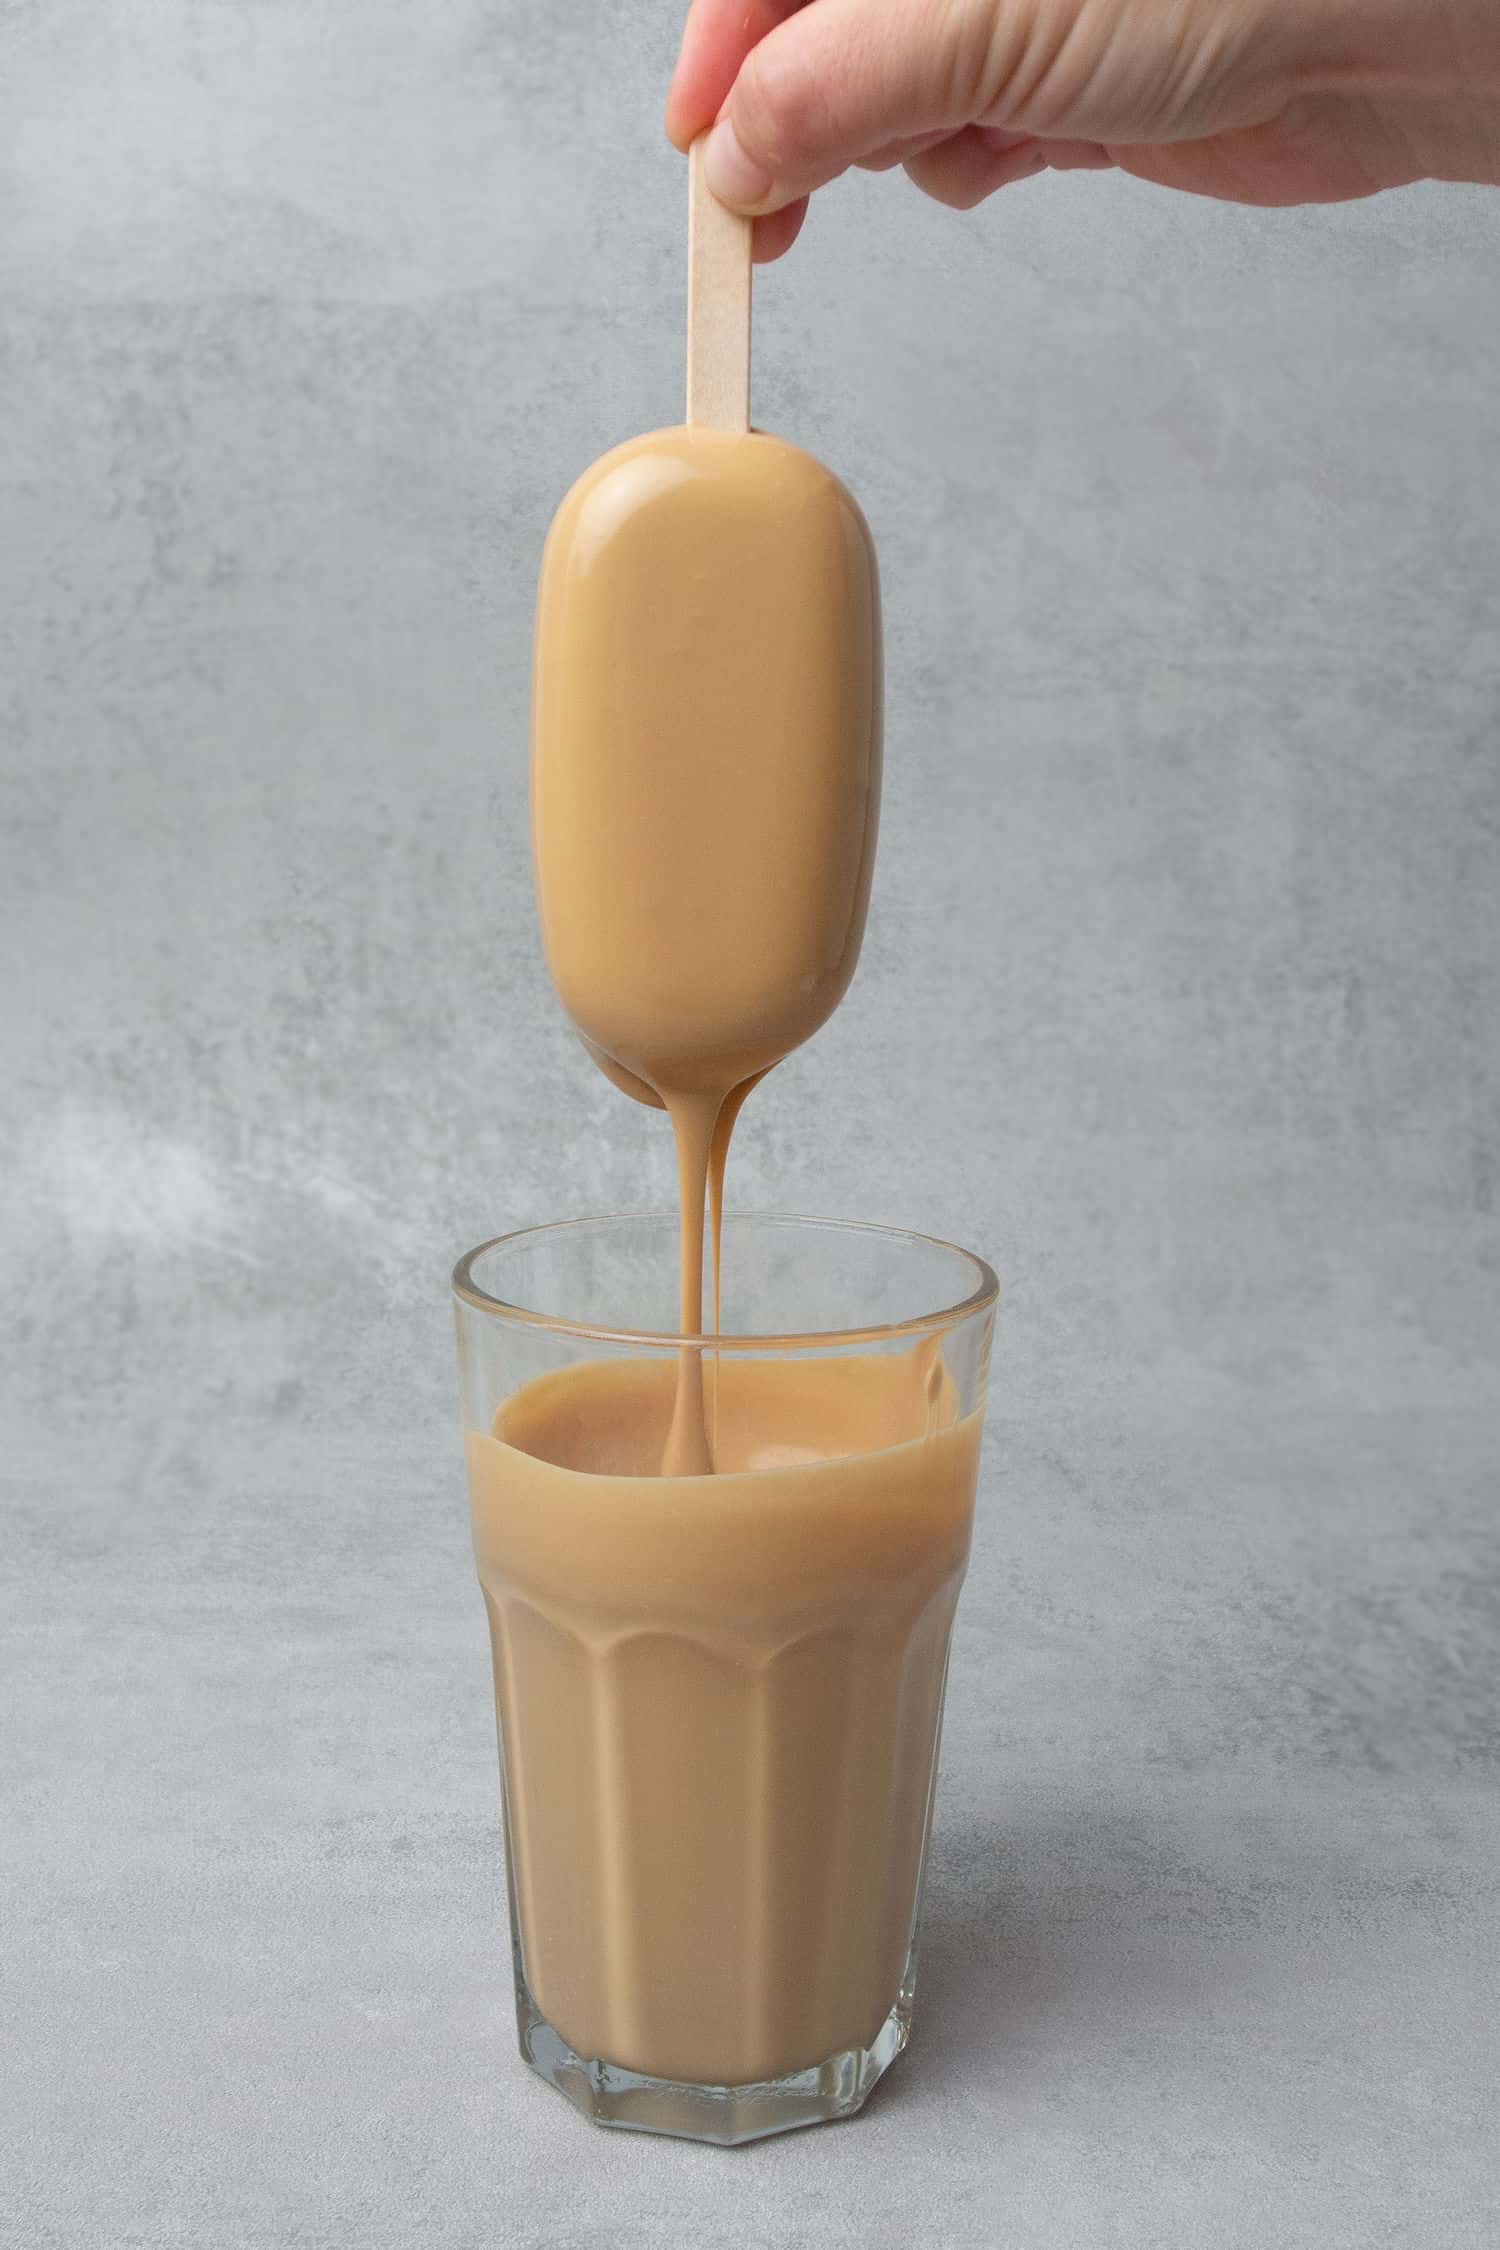
- Pour melted chocolate into a tall and skinny glass so that when you dip ice cream into it, the chocolate will reach it all the way
- Unmould one ice cream bar by gently releasing it from the Ice cream mould . The stick should come through the top. It should come out well, but a little bit of imperfection is fine since anyway they will be coated. If it seems stuck in the mold it means it is not properly frozen yet or your freezer is not cold enough
- Before ice cream is coated, don´t leave it outside the freezer, not even for one minute. Make sure that the 2nd ice cream is in the freezer in the mold while you are playing around with the 1st one and so on.
- While holding the stick, immediately dip ice cream into melted Callebaut Gold chocolate then very gently shake the ice cream a bit so that coating will run through it without getting too thick. Since ice cream is very cold, the chocolate coating should set on it fairly quickly, literally 30-60 seconds at room temp.
- If you have a warm kitchen and the coating does not seem to set, open the freezer door and hold the ice cream “into the freezer” with the help of the stick. The chocolate coat will set in this cold temp fairly quickly
- Continue with the next one as per the instructions above
- Store ice creams in the freezer until they are fully set then a few minutes later you can decorate them
- Needless to say, you have to work quick with ice cream, there is no time to wander around or they start to melt especially before they are coated
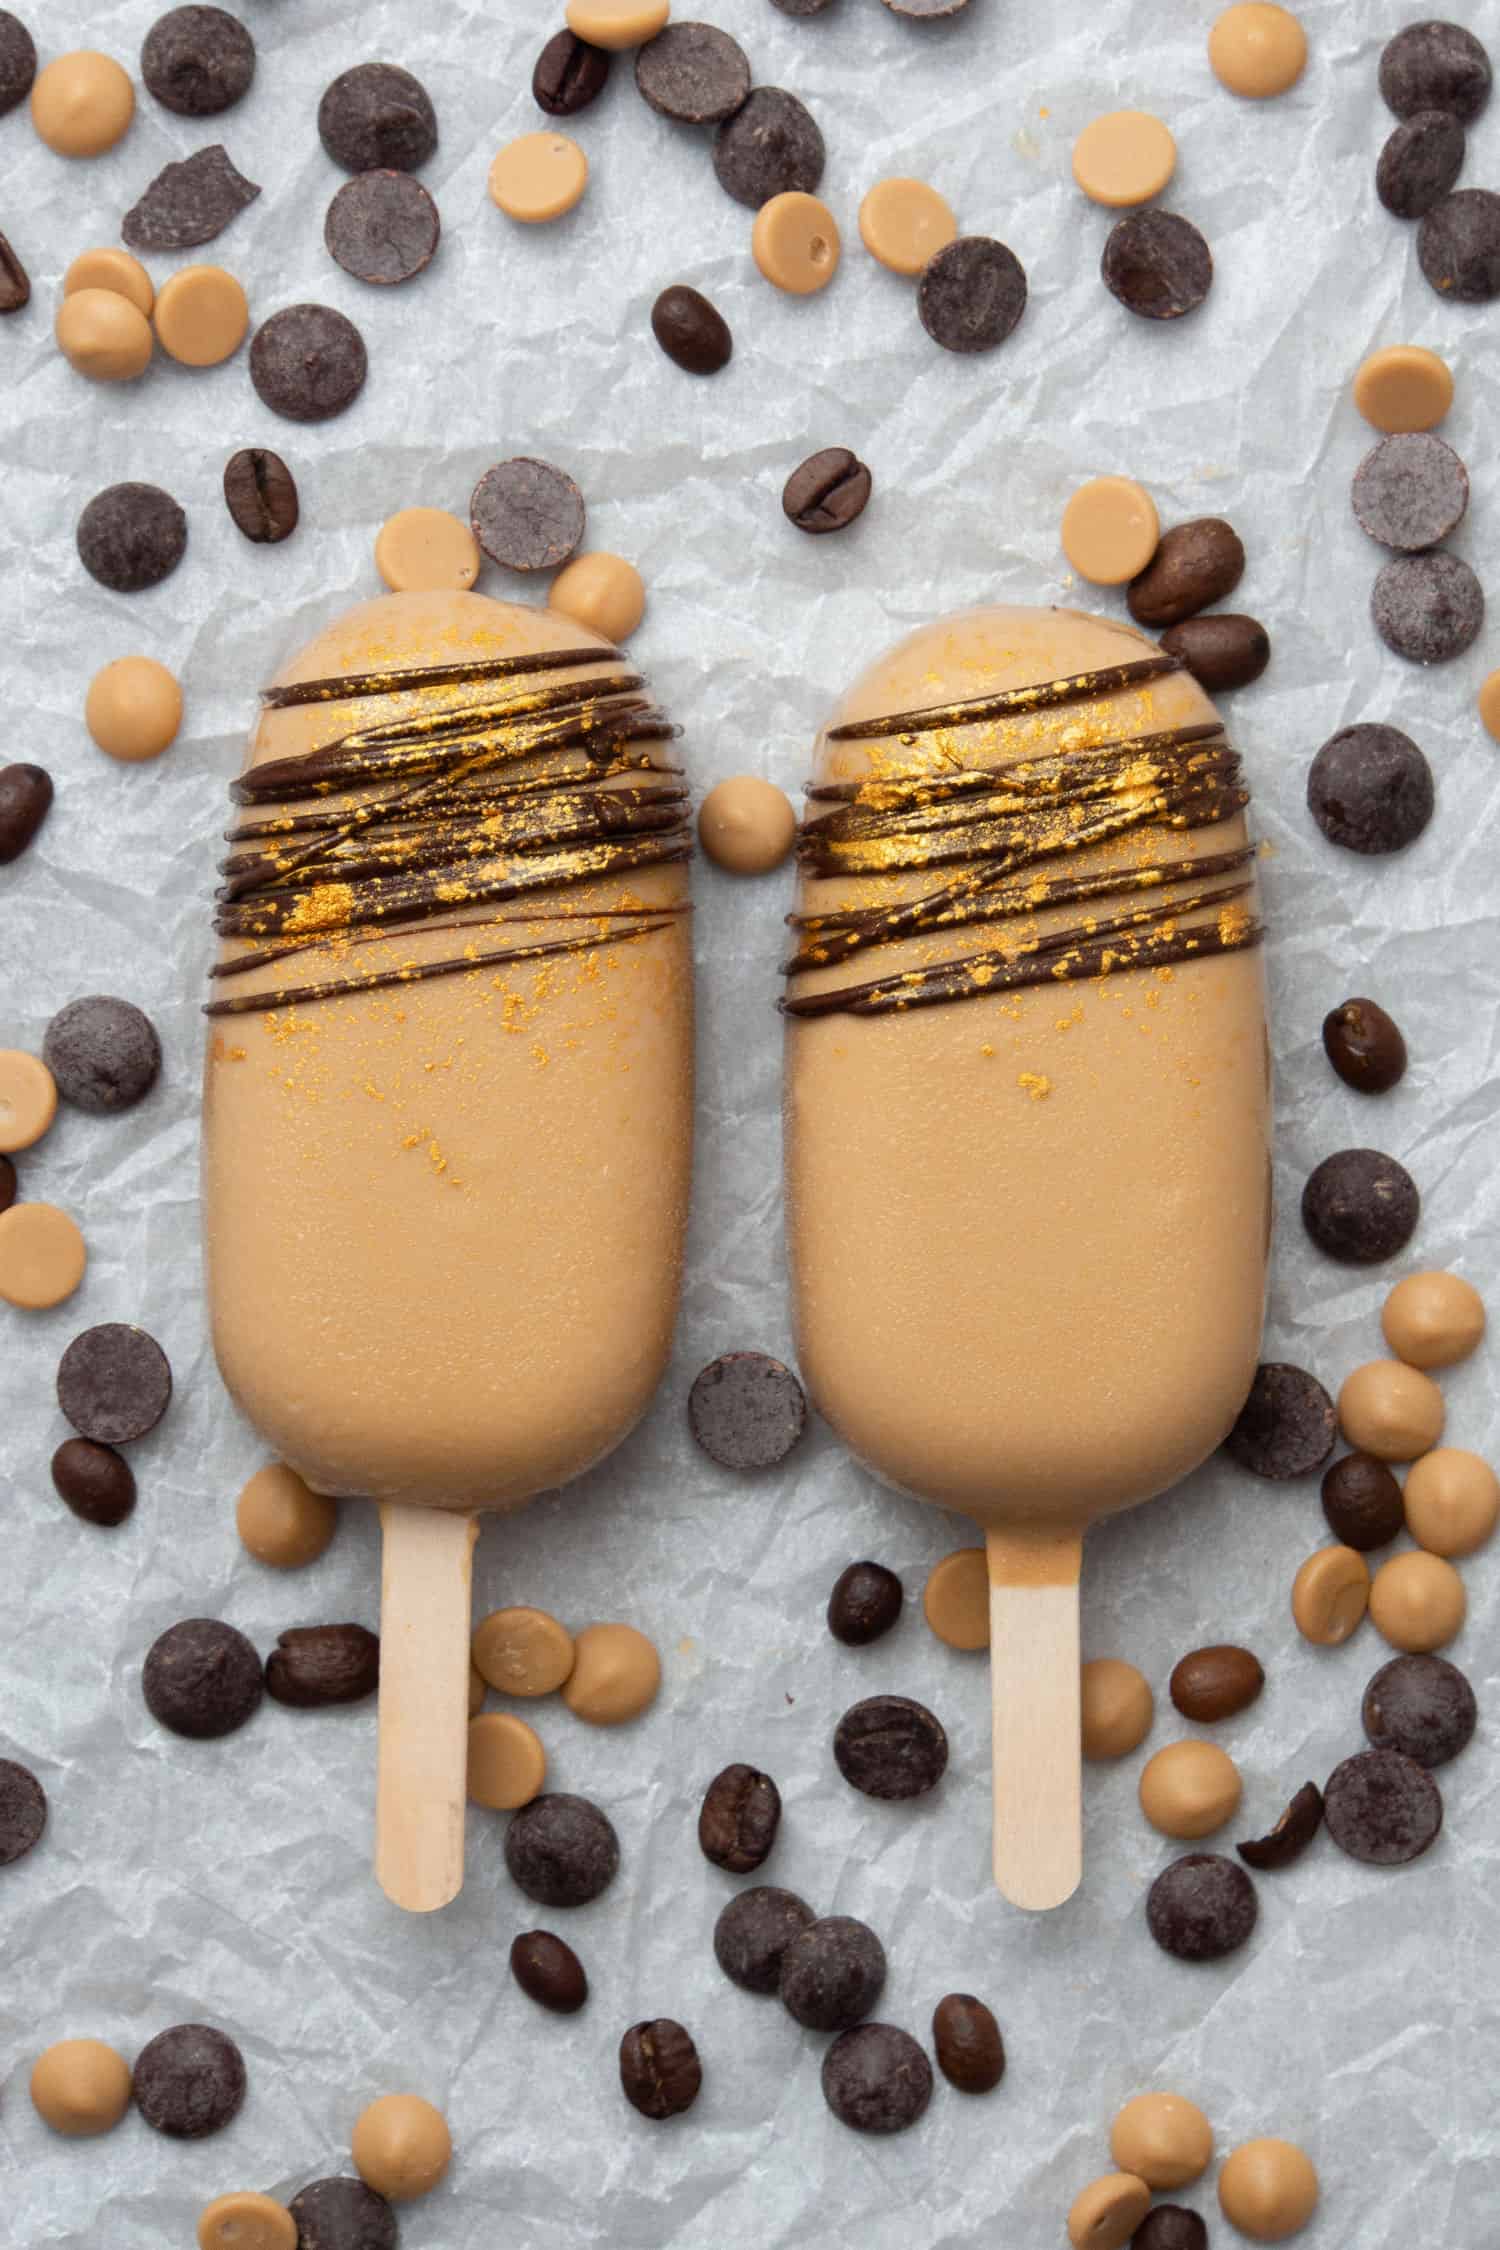
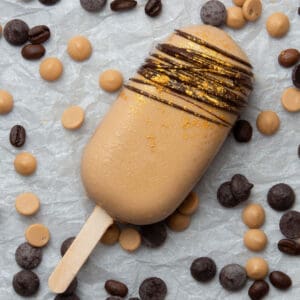
Regarding decoration, make it according to your liking. I made a very easy gold decoration on top of my Coffee Caramel Ice cream bars:
- Melt a little bit of dark chocolate
- Move it into a piping bag then make a very small hole in the piping bag
- Apply stripes with the melted chocolate
- Sprinkle some gold dust over the stripes
💡 Top Tip: Only dip the ice cream bar into the chocolate once. A second tip would risk 1. coating and ice cream melt together 2. chocolate set uneven “wrinkled”
4. How to store
Once caramel chocolate coating sets, you have to store these Mocha Ice cream bars in the freezer either in a plastic container or eg. wrapped in parchment paper. Make sure you do not wrap them before the chocolate coating is properly set as that would remove the chocolate coat.
Since this is a full natural ice cream using 4 real ingredients – unlike store-bought ice cream – I find they might be a bit hard straight out of the freezer and they need about 3 minutes at room temp before the inside starts to get soft and they get that lovely creamy texture. Obviously, it depends on where you live, in a warmer climate they might start to melt already after one minute, not an issue in Sweden!
💡 Top Tip:
🍦 More Ice cream recipes

Have you tried this recipe?
Please leave a 5-star ⭐️⭐️⭐️⭐️⭐️ rating on the recipe card and consider leaving a comment as well! I would love to hear about how your dessert turned out and your feedback also helps other Readers!
No Churn Coffee Caramel Ice cream bar
Ingredients
- 160 g (⅔ cups) Heavy Cream
- 130 g (½ cups) Sweetened Condensed milk
- 20 g (20 ml) Coffee strong espresso like coffee
- 250 g (2 cups) Caramelized white chocolate eg. Callebaut Gold
- Dark chocolate melted for decoration
- Edible Gold dust for decoration
US customary cup measurement is an indicative figure only. Measure the ingredients with a digital scale by weight (gram). Baking is art but also science which requires precision and accuracy.
Instructions
- Mix coffee with sweetened condensed milk just until combined
- Whip heavy cream with the help of an electric hand mixer until early hard peaks
- Carefully, with the help of a rubber spatula, fold whipped cream into the condensed milk & coffee mixture
- Smooth the top with an offset spatula
- After ice cream is properly frozen melt chocolate in the microwave stirring every 30 sec
- While holding the stick, immediately dip ice cream into melted chocolate then very gently shake the ice cream a bit so that coating will run through it without setting too thick
- The chocolate coating should set on it fairly quickly, in literally 30-60 seconds on room temp.
- Decorate with melted dark chocolate and edible gold dust
- Store in freezer
Leave a Reply