This is the best moist sponge cake recipe that every home baker needs. Trust me, this is hands down the most perfect sponge that you will ever make! Once you have mastered it, you can adapt the flavors and make so many delicious desserts - just look at the reviews!
This recipe was first shared on the blog back in 2021. Since then, I've updated it with new photos, added helpful baking tips and a troubleshooting guide, and included several flavor and ingredient substitution options based on your questions.
Read what others said about this recipe
"This moist sponge cake recipe is a game-changer for home bakers! It’s incredibly reliable and is a perfect base for many delicious desserts. I can't wait to experiment with different flavors! Highly recommend giving it a try!"" Nanajee

Best moist sponge cake recipe
This is a professional sponge cake recipe adapted for a home kitchen and explained in step-by-step directions.
A fluffy vanilla sponge cake recipe is an excellent base for all desserts, so having one in your back pocket is essential. But while it looks and tastes impressive, it is surprisingly easy to make! Even beginner bakers can master it.
You will not need any fancy pieces of kit to bake this super moist cake; all the ingredients are the basics from the pantry. You can then adapt it and use it in so many ways, like this Victoria sponge cake recipe.

Katalin's key take on how to make sponge cake super moist
There are several considerations when it comes to creating moist sponge cake.
Butter can harden over time and will firm up in the fridge, so using oil instead of butter in the cake helps to keep it really moist. Butter also contains water, which evaporates during baking, whereas oil is 100% fat. This means you don't lose any moisture during baking, which ensures a more tender texture.
Therefore, a moist sponge cake recipe with oil is your safest bet for a soft and tender cake. Use good quality vegetable oil that is neutral in taste. There is no baking powder or baking soda; instead, we use a specific mixing technique to combine the ingredients and whip air into the cake batter. The result is a super light and airy sponge cake.
It is also crucial not to overbake the sponge and to store it correctly so it won't dry out. I'll show you how to do everything below, so keep reading!

There is an easy, but particular way to mix the sponge cake batter
Preheat the oven to 170C /340 F (no fan) and make sure all the cake ingredients are at room temperature. In general, unless otherwise stated, room-temperature ingredients are required for baking cakes, cupcakes, muffins, etc., for proper emulsification.
Line a 20cm/8-inch cake pan with parchment paper on the bottom and sides. Prepare your cake strip and dip in water (see equipment notes below on how to make your own).
Whip the eggs, vanilla extract, and sugar in a large mixing bowl using an electric hand mixer. Mix on high speed for at least 5 minutes until the mixture reaches the stage where it is thick and pale and forms a "ribbon" when you lift the whisk and let the mixture fall back into the bowl. You can also use a stand mixer fitted with the whisk attachment.
Reduce the mixer to a low speed and whip for another 1-2 minutes to break down larger air bubbles. This will prevent large holes in your sponge cake.

Sift the flour (known as the dry ingredients), then gently fold it into the egg mixture with a rubber spatula until combined. Take care not to deflate the sponge cake batter.
Then, pour in the room temperature milk and oil and mix it with "cut and fold" movements; use a rubber spatula to "cut" down through the center of the batter, then gently scoop the mixture from the bottom, lift it, and fold it over the top. Rotate the bowl after each fold, and do not overmix.

Then comes the next critical part, bake it, but don´t overbake it
Pour the sponge cake batter into your prepared pan and bake at 170 C / 340 F (no fan) for approximately 40 minutes. Do not open the oven door during the first 30 minutes of baking, as this airy sponge cake can easily deflate.
The top of the cake will feel springy to the touch when it is fully baked, and the sides will start to pull away from the edges of the pan. An inserted toothpick will come out clean with no sticky batter.

Flip the sponge cake upside down and cool it upside down on a wire cooling rack to prevent it from sinking.
Wait until the sponge cake cools to room temperature, then cut it horizontally into 2 or 3 and/or frost it according to your recipe.

Storing and freezing
Once the sponge cake is baked, let it completely cool before frosting or making any layered cakes. If you do not need it immediately, cover it with foil and store it in the fridge for 2-3 days. It will not harden like cakes made with butter.
Sponge cake will last for up to 3 months in the freezer. To freeze sponge cake, wait until it cools to room temperature. Then, double wrap in plastic food wrap and aluminum foil to prevent freezer burn. Defrost in the fridge or at room temperature thoroughly before use.
Try some of my flavor variations
The best way to flavor this sponge is with citrus zest or a flavor extract. Always use extract rather than essence to avoid a synthetic flavor.
You can also experiment with replacing some parts of the flour with other flour. Try walnut flour, other nut flour, or even poppy seeds! Replace some of the flour with cocoa powder to make a chocolate sponge cake. Why not try loading the batter with fresh berries, too?
This fluffy, moist sponge cake recipe tastes delicious with just whipped cream and fresh fruit. It will be tall, about 7-8cm / 2-3-inches, so it can be used as a 2-tier or 3-tier cake.
This round-up of the best layer cake recipes will inspire you on how to use a sponge cake!

Do not substitute the ingredients
This recipe only contains a handful of essential baking ingredients, and I do not think any can be substituted without compromising taste and texture.
You can replace cake flour with all-purpose flour, but this recipe will be best with low-protein flour. Read more about the best flour to use in cakes and baking.
If you are baking around a dietary restriction or preference and need to use gluten-free flour, etc, check out my baking guides first to make the best swaps and check your conversions.
Expert tips to make moist sponge cake
- Use ingredients that are at room temperature before baking. This allows for proper emulsification of ingredients, so take everything out of the fridge before use.
- Whole milk is always the best when making sponge cakes, muffins, cupcakes, etc.
- Make all of the components in this cake batter fresh and bake it immediately; it can dry out otherwise.
- Sponge cake is very sensitive to temperature change, so do not open the oven door during the first 30 minutes of baking, as oven temperature fluctuation can cause issues with the cake.
- Every oven behaves differently, so you may need to adjust the baking time.
- The moist sponge cake texture will continue to set as it cools down, so do not attempt to cut while it is hot.
Troubleshooting
Your sponge is dry - it could be due to an incorrect ratio of ingredients, an inappropriate mixing technique, or over-baked. Weigh ingredients by the gram using a digital scale, and I highly recommend using an oven thermometer to check the temperature before baking.
Your sponge cake sunk - it is almost always due to underbaking the cake, which could be due to low oven temperature, too short baking time, or other issues. Check this guide to learn more about why your cake sank.
Your sponge cake is doming on the top - a cake with a dome or cracks can be caused by too much cake batter in a pan that isn't big enough. Besides not a big enough cake pan, a cake pan strip also ensures an even rise. Check my equipment notes to bake in the right size pan.
Your sponge cakes stick to your pan - you have to prepare the pan before baking. Brush the inside of the cake pan with a tiny bit of oil before lining it with parchment paper. This will help you to release the cake from the cake pan.

What equipment to use
Always weigh ingredients by the gram using a digital scale for precision. Baking is a science!
Combine ingredients using an electric hand mixer, a rubber spatula, and a stand mixer. But do not leave a stand mixer unattended, as we do not want to risk overmixing the batter.
A 20 cm / 8-inch cake pan with straight sides is essential to baking a uniform, moist vanilla cake recipe with oil. This is quite a runny cake batter, so avoid springform cake pans. Check my cake pan sizes conversion for larger or smaller cakes.
I highly recommend getting to know your own oven. Invest in a digital oven thermometer to check you are baking at the right temperature every time, as it is not uncommon for non-professional ovens to have a 16C / 60F difference between what the display says and what the actual temperature is.
Cool the cake to room temperature on a wire cooling rack.
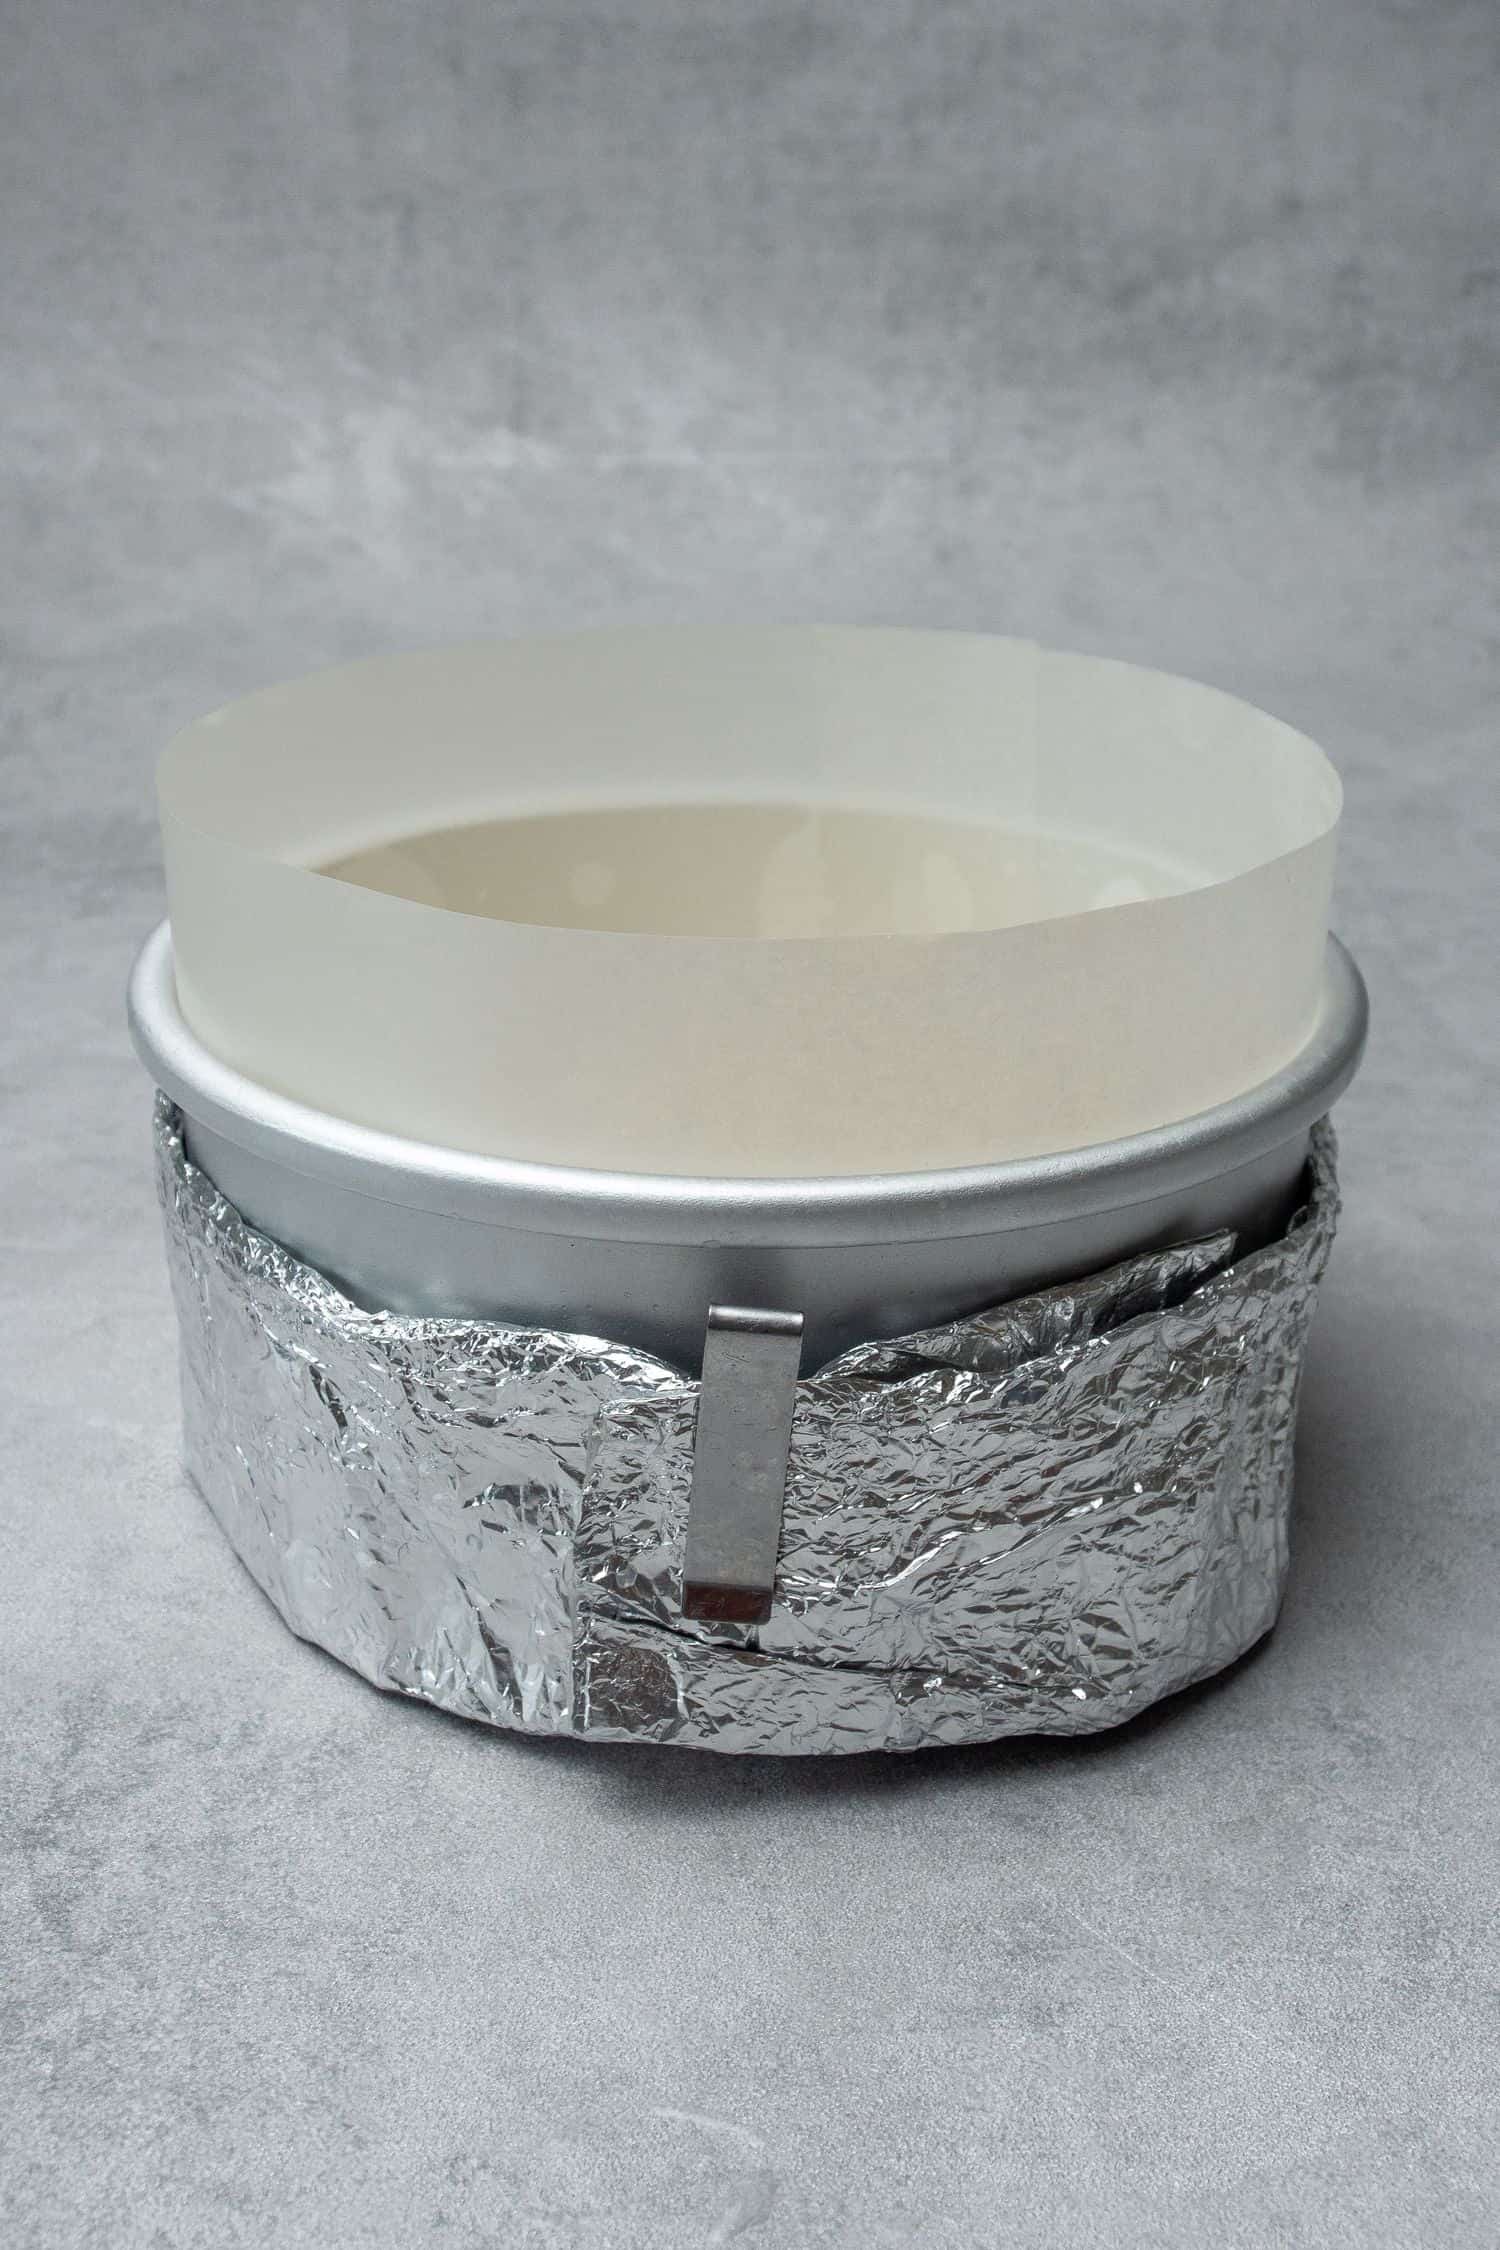
A cake pan strip cools the edges of the cake to avoid a dome. It prevents the outside of the cake from heating up too quickly, providing a cooling effect.
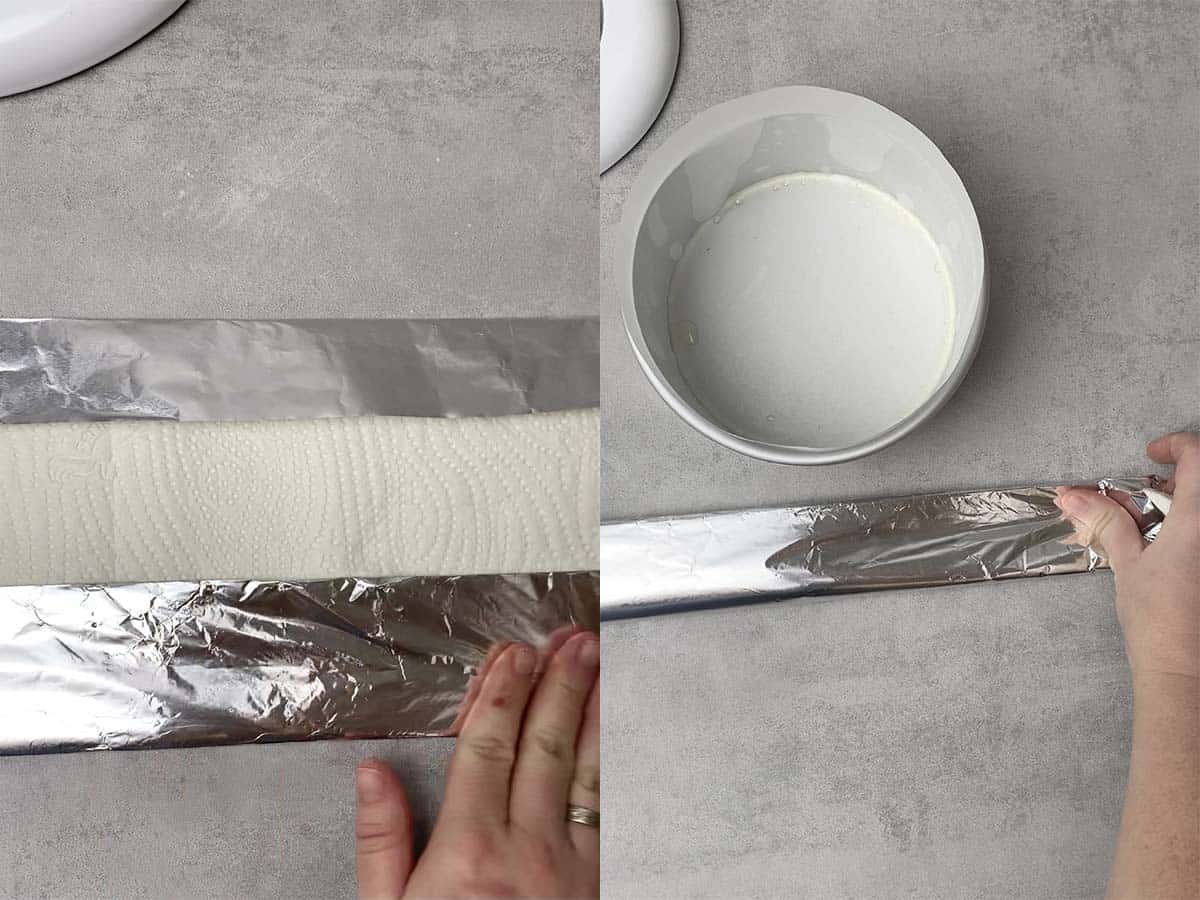
You can make your own cooling cake strip so easily! Fold a piece of kitchen paper into thirds and then dip it into water to dampen it. Wrap the wet kitchen paper in aluminum foil, and then wrap it around your cake pan.
How To Use This Sponge Cake
There are so many ways you can use this vanilla sponge recipe. I love spreading it with frostings like the following:
- Lemon curd
- Cream cheese frosting
- Swiss Meringue buttercream frosting
- Whipped chocolate ganache frosting
- Raspberry buttercream frosting
But try some of these different types of cake frosting to make the most amazing desserts from your tasty home-baked sponge.
Have you tried this recipe?
Please leave a 5-star ⭐️⭐️⭐️⭐️⭐️ rating on the recipe card and consider leaving a comment as well!

The Best Moist Sponge Cake Recipe
Equipment
- 20 cm / 8 inch cake pan
Ingredients
- 4 Eggs at room temperature
- 150 g (¾ cup) Granulated sugar
- 2 teaspoons Vanilla extract
- 30 g (2 tablespoons) Whole milk at room temperature
- 55 g (¼ cup) Vegetable oil
- 125 g (1 cup) Cake flour All purpose works too
US customary cup measurement is an indicative figure only. Measure the ingredients with a digital scale by weight (gram). Baking is art but also science which requires precision and accuracy.
Instructions
- Preheat oven to 170 C / 340 F (no fan) and bring all the cake ingredients to room temperature.
- Prepare a 20 cm / 8-inch cake pan with parchment paper on the bottom and side as well. Prepare your homemade or store-bought cake strip and dip in water.
- In a mixing bowl, whip together the eggs, vanilla extract, and sugar with an electric hand mixer for at least 5 minutes at high speed until very pale, creamy, and fluffy. You can also use a stand mixer. We are aiming to achieve a so-called ribbon stage, where the eggs and sugar mixture is whipped until it's thick and pale and forms a "ribbon" when you lift the whisk and let the mixture fall back into the bowl.
- Next, reduce the mixer to a lower speed and continue whipping for another 1-2 minutes. This helps break down larger air bubbles into smaller ones, preventing large holes in your sponge cake.
- Sift the flour, and then gently fold it into the egg mixture with a rubber spatula, just until combined, making sure not to deflate the sponge cake batter.
- Then, pour in the room temperature milk and oil and mix it with "cut and fold" movements just until combined. See expert tips on how to "cut and fold".
- Once the sponge cake cools to room temperature, cut and / or frost the sponge cake according to your recipe.
Notes
- Make sure your ingredients are at room temperature before you begin baking this moist sponge cake recipe.
- You can use all-purpose flour in place of cake flour. However, the lower the protein content, the softer and more moist the sponge cake will turn out.
- Baking powder is purposely omitted from the recipe; the sponge cake's texture will rely on the air you whip into the batter.
- Always weigh your ingredients by the gram using a digital scale for precision.
- Be sure to whip the eggs and sugar following the two steps mentioned above, as the air incorporated will help the cake rise without collapsing.
- Here is how to do the cut and fold method:
Cut: Use a spatula to "cut" down through the center of the batter. Fold: Gently scoop the mixture from the bottom, lift it up, and fold it over the top. Rotate: Turn the bowl slightly after each fold to ensure even mixing. Repeat: Continue the cutting and folding motion until the ingredients are just combined. Do not overmix. - Use a cake stripe for baking; with the help of a cak stripe, the side of the cake pan stays cooler for a longer period, and the whole cake rises at the same rate. This results in a level cake with a flat top, which is ideal for stacking layers or decorating.
- You can make your own cooling cake strip so easily! Fold a piece of kitchen paper into thirds and then dip it into water to dampen it. Wrap the wet kitchen paper in aluminum foil, and then wrap it around your cake pan.
- Ovens can vary, so use an oven thermometer to always bake at the right temperature.
- Each oven is different, so you might need to adjust the baking time slightly. In my oven, this cake takes 40 minutes. Use the toothpick test to ensure your cake is fully baked.
- The sponge cake texture will further set as it cools, do not attempt to cut while it is hot.
- This sponge will be tall, about 7-8cm / 2-3-inches, so it can be used either as a 2-tier or 3-tier cake.
Jenn
Hey, I really like this recipe, but could I add to the batter some sprinkles or it would ruin the cake??
Kata
Sorry hard to say I haven´t tried. Since it is a rather runny cake batter, it might all go down to the bottom.
Sue MALLINDER
Hi Kata, I did use the cooling strips (home made with foil and wet paper towels), so I tried it again with the oven temperature at 160 instead and it worked a treat !! I have a fan oven and I think the temperature is not completely accurate so thanks for the tip. Had lots of compliments on how light and moist the cake was. It will be my go to recipe from now on.
Kata
very happy to hear:)
Viviane
Hi Katalin,
I made your cake and it was divine! My husband and toddler almost ate the whole thing in one sitting 😅. Now I have a question, can I add chocolate to this to make a chocolate cake? If yes what kind? Thank you 😊
SueEvaM
Lovely cake, however it was quite domed when I took it out of the oven- I’m guessing it shouldn’t be? What did I do wrong?
Kata
Hey, did you use the "cooling the edge" method with the cake pan strip - as explained in the recipe? If yes, then I imagine temp was too high or tin too small.
ramesh
Thanks For Sharing this amazing recipe. My family loved it. I will be sharing this recipe with my friends. Hope the will like it.
Jacqui
Hi
I just got my new 6 inch pan, 4 inch deep Fat Daddios Andonized pans.
I was advised to bake them 25F lower. (Low and slow). Do you know if I should also bake them for an hour?
Would you have some experience with these pans?
Thanks
admin
Hey, I don´t have experience with that baking pan but 25F is not not much. I would not worry about it too much if you measure the ingredients, follow the technique explained in the recipe and make sure to use an oven thermometer, it should turn out well:)
Jacqui
Hi hi
I love sponge cakes.
I have a 6inch round pan that is 4inch deep.
Should I grease the sides or use a parchment paper like you did?
Thank you.
admin
I suggest you follow the recipe incl. the baking pan preparation 🙂
Penguine+(rumana)
Superb cake outta oven 🤩😘
Latifa
I tried to bake this cake today but failed. It came out a bit gummy. At first I thought it was underbaked but it wasn’t. How can I fix this? I measured everything by a digital scale and it was all room temperature. I folded everything in gently.
admin
Hey, sounds under baked to me, or perhaps your technique needs to be improved or the oven temp was fluctuating.
JD
I’ve made a few sponge cakes over the years and the one where you let it cool upside down is what I e always done, but it always specifies not greasing the bottom because it will most likely fall out. How could you line it with parchment and not expect it to fall out when turning it upside down?
admin
it is fine if it falls down, the important part that it should be upside down while set:)
Mama Mia
I agree with JD about not greasing the pans for sponge cake where you cool the cake inverted. I had baked sponges only using loose bottom pans without lining the pans .
Also I like to share this . I always bake sponges on the lowest rack of oven at 150 deg C on fan & it works fine.
Kata
Each cake pan and recipe (ratio) requires a different technique. The safest option for most people is always to use parchment paper, and that is why I recommend that.
Janet Smithers
Hi.. how would I adjust for a chocolate cake? Thank you
admin
You can replace some part of the flour with cocoa powder, I will make one chocolate version soon on the blog 🙂
Lena
This was the perfect recipe to make a tiramisu tiered cake. I doubled the recipe and did 2 pans of 10in square cake pans (i shouldve just did 1 pan and put it all together which would make it fluff up more) and i did a letter cake with it so it was perfect to cut out the letter and it tasted perfect as a tiramisu cake. I also did a 6in sponge cake (one recipe) so i put the batter in 2 pans - of 6in x 2in with the parchment paper going up and it was perfect! The fluff came up !! And i made that with regular whipped cream and strawberries. I will def keep using this sponge cake recipe from now one!
Manny
Just wanted to confirm is 3 eggs? In the picture I see 2 egg yolks. Are these about 59 grams eggs with shell? And bake the cake at the middle rack?
Sham A
Looks promising, I am looking forward to trying this, is there a recipe for the cream filling etc as in the picture pls?
admin
You can search for my Victoria sponge cake if want to make that recipe, also there is a link in the sponge cake recipe for that:)
Fatima
Fluffy sponge . Easy to make if you follow the instructions. Thank you for your work xx
Stephanie
Is the oven temperature for conventional oven or convection oven? thank you
admin
All my recipes are made without fan unless otherwise stated
Saja
The recipe was crisp n clear n too detailed in such a way that all sorts of basic errors while baking could be avoided.
The cake really came out well as i followed those instruction. Thanks for sharing the recipe at this detailed level.😊❣