Today I am sharing with you my very best Fig Frangipane Tart recipe! This delicate, delicious dessert includes almost everything I adore in a fall recipe! Pâte Sablée (sweet shortcrust) filled with a incredible delicious, easy almond cream (frangipane) and a slice of fig is what makes this tart a truly amazing autumn recipe! The Franginape tarts are sweet, fruity and nutty at the same time. They are easy to make, yet super decorative and you can impress everyone with them! This Fig frangipane tart can be made in a tart ring or in a larger, more traditional pie tin if you like.
What is a tart?
Tart is a freestanding shallow open-faced pastry, often baked in a tart ring with fluted or straight sides. Smaller tarts are referred to as tartlets. Making Pâte Sablée tart shell is one of the baking basics worth mastering for every home baker and let me tell you that this is the only tutorial you will ever need!
This Fig Frangipane tart recipe is one of those impressive recipes every home baker will be able to make at home following my step by step recipe. Pâte Sablée filled with delicious almond cream and fig is a beautiful and incredible delicious pastry to try this fall!
My Top 5 Baking Tips for home bakers
- Read the recipe carefully including my tips and recommendations on how to avoid and fix typical issues during baking
- Avoid using substitutes and changing the recipe unless you are aware of how to fully reformulate the recipe in order to keep the balance in texture as well as flavour. Reducing sugar, replacing egg, using milk instead of cream, using poor quality chocolate etc. will all have an impact on your baking
- For consistent, happy baking experience always measure your ingredients with the help of a Digital scale. Cup measurement is provided as an indicative figure only and might be used for less complex and large batch recipes however it is not an appropriate method for more delicate, complex pastries
- Did you know that most home ovens can significantly under or oven run? Also, oven temperature hugely drops when opening the oven door therefore it is recommended to always pre-heat the oven above the required baking temperature.
- Temperature is so important when it comes to baking and accurate oven temperature is key, can make or break any recipe. Make sure you invest into an inexpensive Digital oven thermometer to avoid under baked, burnt, sad looking desserts
First let’s start with some important notes regarding the ingredients of this Fig Frangipane Tart recipe
For the Pâte Sablée, sweet shortcrust pastry tart shell
- Flour: I am using pastry flour for this tart shell recipe, feel free to use AP if can’t find pastry flour in your local supermarket. If you want to be a Pro when it comes to deciding what type of flour to use in your baking, please read my article in here
- Almond: Some Pâte Sablée recipes contain almond, some don’t, I prefer mine with some almond flour in it from taste and texture point of view. It is worth to buy good quality ground almond, without skin. You can replace with equal amount of flour
- Sugar: This sweet pastry dough is made with icing sugar. If you want to learn about the different types of sugar and how to use them in baking, please read my article in here
- Salt: An essential ingredient in most of the dessert recipes. Balances flavour and enhances other ingredients especially chocolate desserts. This is a sweet tart dough and I just love that extra very mild salty kick at the end
- Butter: Use always unsalted as you want to be in control of the quantity of the salt. I am using 82% fat content butter in all my recipes. While in most of the recipes butter needs to be on room temperature, this is an exception and you have to take it very seriously. Butter needs to be chilled, which means take the butter out of the fridge, cut into cubes then place it into the freezer for 10-15 minutes before using it
- Egg: Room temperature as always

For the frangipane (almond) filling
- Sugar: Simple white granulated sugar is used to make this almond filling
- Butter: Since butter will need to be creamed with sugar, use it on room temperature. Unsalted, as always
- Egg: One egg will be used in this recipe, it needs to be on room temperature just like the rest of the ingredients
- Vanilla bean paste: We want some real vanilla flavour in this almond cream! Please please avoid using artificial vanilla. There are several great brands for fine, pure vanilla, I use Nielsen massey which I love and really recommend. I use vanilla bean paste instead of vanilla extract which has lovely vanilla bits in there too
- Almond: As per above, use good quality grind almond without skin
- Flour: You will need a very small amount of flour to make this almond cream, AP works totally fine
- Salt: You can't leave this out! Salt enhances the flavour and brings the taste of this almond cream to a whole new level
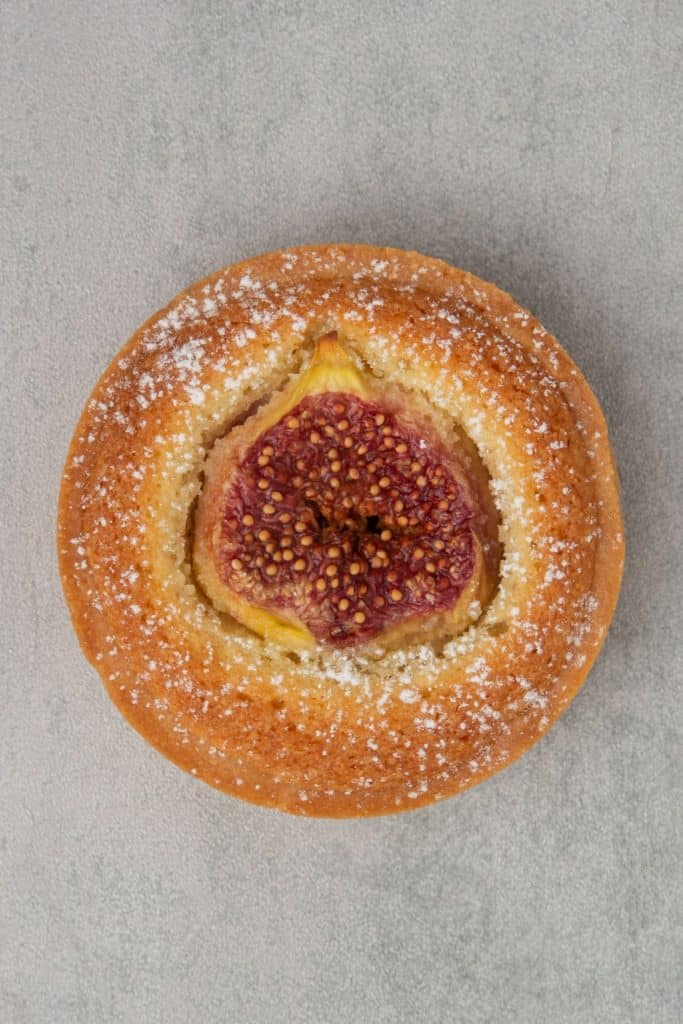
- Fig: I am using half figs, so overall 4 figs for the 8 tarts
Now let’s continue with my top 8 tips regarding the technique and equipment of making this Fig Frangipane Tart recipe
1. Crumbling method
There are 2 methods in the pastry chefs’ world making tart shell; one is creaming, the other is crumbling. With creaming method the butter is on room temperature and first needs to be creamed with icing sugar. In case of crumbling method, basically you need to rub the mixture incl. very cold butter between your hands until it becomes a sand like consistency. I am sharing the crumbling method with you in this recipe, which is my preference for one single reason; as the butter used while it’s very cold and that makes the dough itself also colder meaning easier to work with.
The dough will come together in literally few minutes. First rub the mixture between your hands until it becomes like a sand then add the egg in. Mix the dough for a minute or two until comes together then knead with your hands only for a minute and it should get shiny by now. Do not use a mixer.

2. Temperature
When I started experimenting with baking, I had several disastrous attempts making tart shell. Now I understand that the one and only reason I failed was me being inpatient and forcing the dough even when its temperature was inappropriate.
Baking is science and in general temperature is one of the most important factors to understand AND utilise for our benefit. When I say temperature I don’t purely mean baking temperature but also the environment we work e.g kitchen temperature as well as the dough temperature.
While making sweet tart crust, temperature is everything! If the dough is too hot, it’s sticky and can’t be rolled out or shaped. If too cold, it will easily break. The entire tart making process is a balancing exercise between keeping the dough cold enough but not too cold.
To give you a concrete example, in a home kitchen environment on a warmer day this practically means taking the dough in and out of the freezer about 15 times in between steps to ensure the dough is always on the right temperature to work with. Yes, not just to chill once or twice but to be in control of the dough temperature all the time! Obviously in professional kitchens temperature as well as humidity is under control and the rolling process is done by a machine, however in home environment this is something we have to be super careful with.

3. NO Blind baking
Do you know what blind baking is? Baking blind is the process of baking a pie crust without the filling. It’s done by lining the unbaked tart or pie shell with parchment paper then filling with baking bean. Frankly, it’s a half solution only and while it certainly prevents the crust from puffing up while it bakes, it does not provide even baking. Blind making makes the tart crust somewhat unappealing, full of wrinkles as I call it and baked uneven. My recipe DOES NOT involve blind baking and that brings us to the next important topic, the equipment.
Let me get this straight, I am not paid to say the below, I am only talking about my experience after trying a lot of different baking products. You can only achieve neat, visually appealing, even colour tart crust by using professional baking equipment. Luckily these are available to purchase on Amazon not just for professionals but also for home bakers. If you want to make beautiful, patisserie style looking tarts it’s worth to invest into a Perforated “air” baking mat, a couple of Perforated tart ring and 2 Silicone baking mat. They will change your tart game forever! Best investment ever.

4. Silicone baking mat
I recommend using 2 Silicone baking mat for rolling the dough out in between them. The recipe is designed in a way that you do not need to add extra flour while rolling the dough however it might stick to your kitchen counter so use silicone baking mat. It’s also possible to use 2 sheets parchment paper however the silicone mat provides a much neater, smooth surface. It can be washed and then used all the time so overall worth the investment. I am using the “Amazon basics” cheapest version so no need to buy anything expensive.
While rolling, start from the centre of the disc and work your way out in all directions. Again remember, temperature is very important. If the dough is too cold, you won´t be able to roll it out. If too warm, it will be difficult to handle and will even stick to the silicone baking mat. Use your fridge or freezer and pop the dough in and out until it is easy to work with.

5. Perforated baking “air” mat
I have been using Perforated “air” baking mat for more than a year now from a brand called Silikomart and loving it. The air mat is perfect for baking tart crust, éclairs or even cookies. Thanks to the holes in the mat, the heat spreads evenly throughout mats’ surface guaranteeing a perfect and even baking without blind baking. Use the Perforated “air” baking mat on top of the oven rack so that the air can circulate properly.
6. Perforated tart ring
Again, I have been using my Perforated tart ring for over a year and it’s the best investment I have ever made. I can not recommend it enough, it’s really one of those tools you have to invest in once and then will change your baking experience forever. Yes, I am loving it! The Perforated tart rings are non-stick and stainless, they allow homogeneous baking due to the even air circulation. It’s a a genius solution, isn’t it? Silikomart (and some other quality brands) offering the rings in various shapes and sizes, I am using a 8cm (3,14inch) diameter round version. As far as I can see there are several cheap copies of the initial Silikomart product, I am not sure though whether they are made of the same material and whether they work or not.

7. How to avoid tart dough shrinking while in the oven
Have you ever experienced shrinking, sad looking tart dough while baking? Again, 3 things to remember: temperature, technique and equipment. In terms of temperature, you have to freeze the dough before baking. In regards to technique, you must not force the dough while placing it into the tart rings. First cut the bottoms out then cut the side as long strip and carefully but firmly stick them together. Thirdly, use the right equipment. With Perforated tart ring the dough somewhat sticks to the side of the ring as opposed to shrinking like in case of non-perforated rings.
8. How to make frangipane filling
Frangipane tart sounds super fancy however frangipane is basically an almond based cream used in various pastries. Enhanced with just a hint of vanilla bean, frangipane is a velvety almond cream that adds delicious richness and texture to desserts. The cream, which has a nutty, sweet taste and usually paired with seasonal fruits like pear, peach or fig.
You will need to pre-bake your shortcrust pastry cases and can prepare the frangipane filling in the meantime super easily and quickly:
- Cream butter and sugar until fluffy - this will take about 5 minute with an eclectic hand mixer
- Mix in egg just until combined
- Mix in vanilla bean paste
- Mix in grind almond, flour and salt and fold until combined
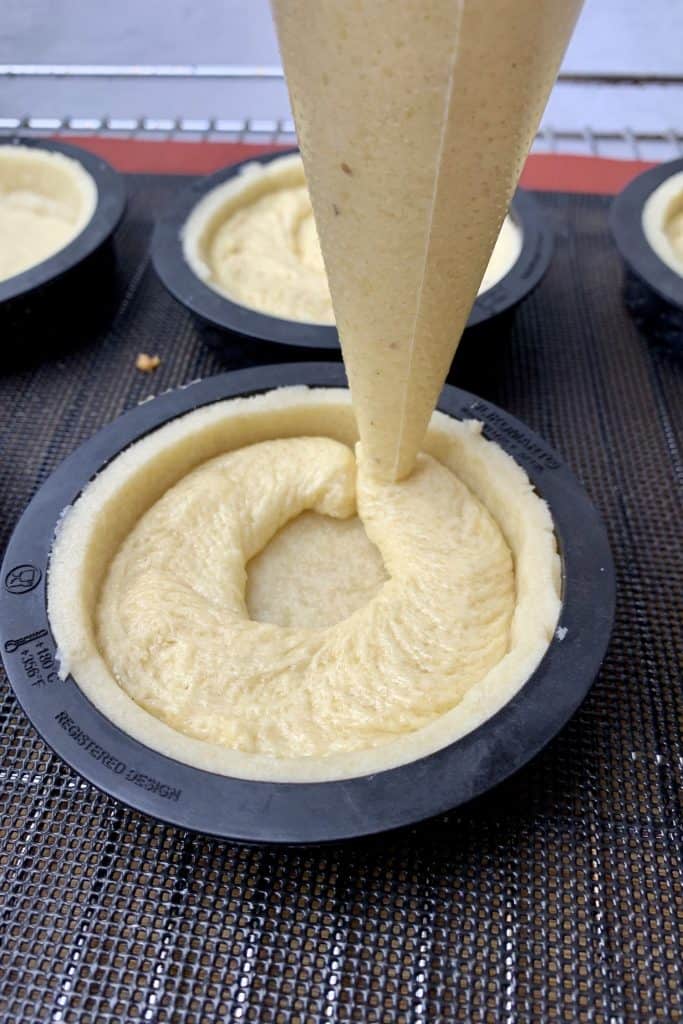
- It is a good idea to let this mixture sit for a few minutes in the fridge and then fill a piping bag with the mixture so that when the tart cases are half baked, you can easily pipe the almond filling into the tart shells
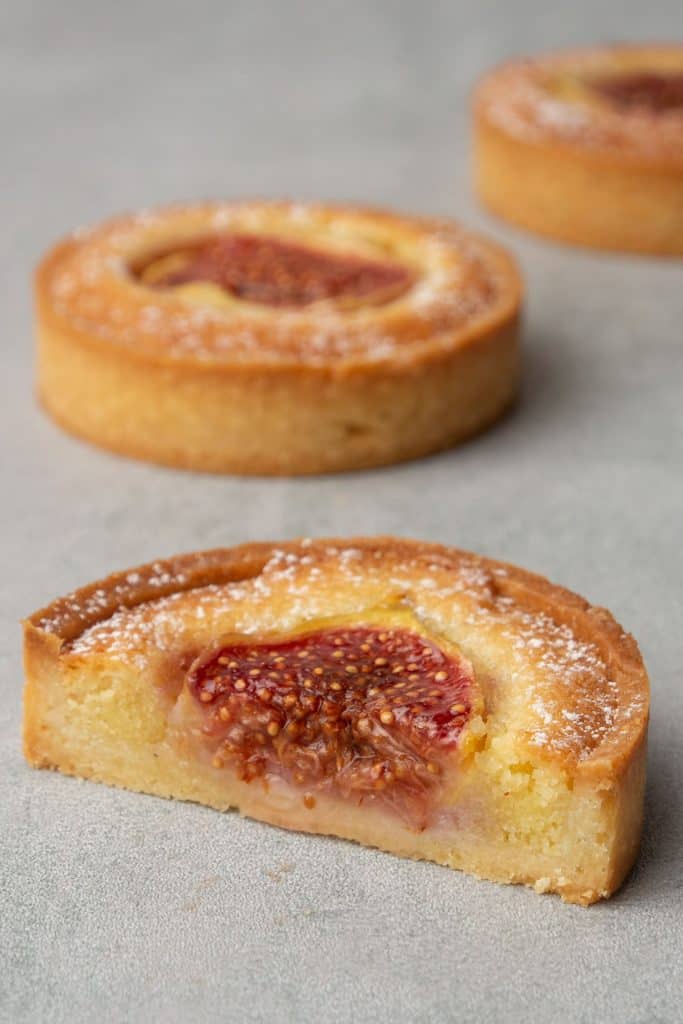
- Pipe frangipane filling into tart shells up until approx. ½. Place half a fig into each tart case. If figs are too big, feel free to trim them slightly so they will properly fit into your baking tin
- Make sure you do not pipe too much almond cream into the tart cases as the fig in the middle will take up some space and also the the frangipane cream will rise during baking
- Useful tip: Try to place the fig halves in the middle of the tarts while making sure that there is equal amount of almond cream on all sides of the fig. This will ensure that the top of the tart will turn out symmetric with a beautiful fig in the middle

Are you a tart lover as much as I am? Why not try some of my other tart recipes!
Check these recipes:
Salted caramel and chocolate tart
Caramel and caramelized banana tart
Now let's see the recipe of this Fig Frangipane Tart!
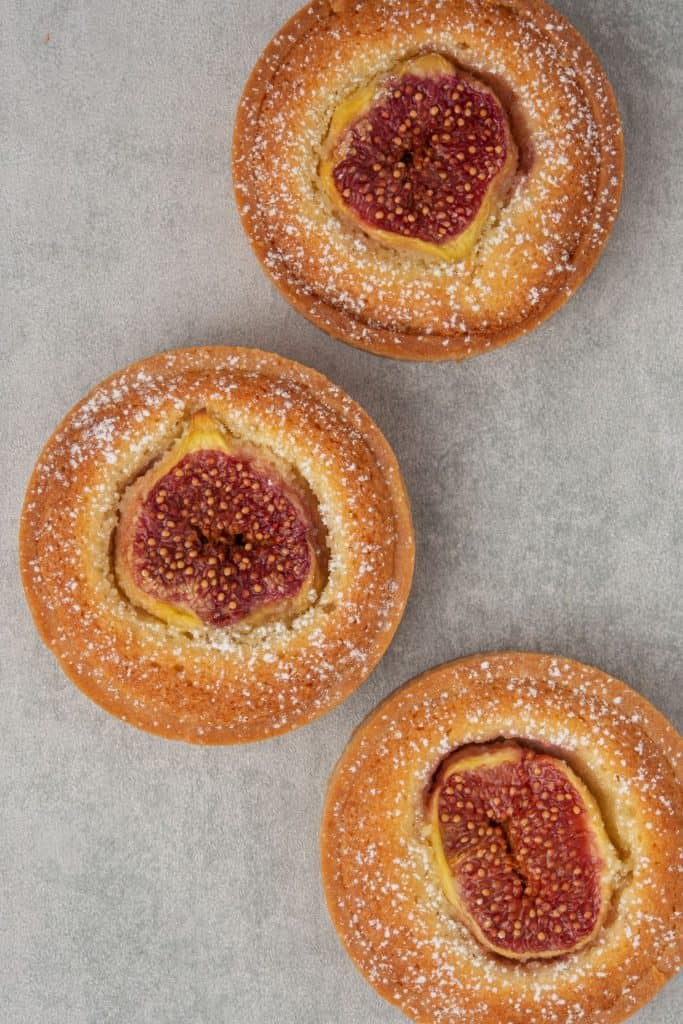

Fig frangipane tart
Equipment
Ingredients
For the Pâte Sablée
- 90 g (¾ cups) Icing sugar
- 230 g (2 cups) Pastry flour
- 30 g (⅓ cups) Almond flour
- Pinch of salt
- 110 g (½ cups) Unsalted butter very cold
- 50 g Egg approx. 1 egg
For the Frangipane filling
- 70 g (⅓ cups) Unsalted butter room temperature
- 70 g (⅓ cups) Granulated sugar
- 1 Egg
- 1 teaspoon Vanilla bean paste
- 70 g (⅔ cups) Almond flour
- 10 g (1 tablespoon) AP flour
- Pinch of salt
- 4 Figs cut into half
US customary cup measurement is an indicative figure only. Measure the ingredients with a digital scale by weight (gram). Baking is art but also science which requires precision and accuracy.
Instructions
For the Pâte Sablée
- Sift together dry ingredients; flour, icing sugar, almond, salt
- Add very cold butter cubes and rub the mixture between your hands until it becomes a sand like consistency. This will take around a minute or two
- Add egg into the mixture and mix with your hands just until the dough comes together, few seconds
- Knead with the palm of your hand for a minute or two (do not over knead and do not use mixer) just until the dough becomes smooth. Form a disk and cover the dough in plastic wrap. Let it rest in the fridge for min 2 hours. You can leave it resting in the fridge over night or you can freeze the dough and use it later
- After the dough rested, roll it out into 2mm thickness between two Silicone baking mat. Do not use extra flour for rolling
- Place the dough into the freezer for 15 min in between two Silicone baking mat.. Do not remove the mat at this point
- Prepare your oven rack with the Perforated "air" baking mat and Perforated tart rings on top
- Take the dough out from the freezer and using one of the Perforated tart rings, cut out 8 circles - this will be the bottom of your tart crust. Carefully move the dough circles with the help of an Offset spatula and place them into the rings one by one
- If at any point the dough gets too warm to work with, pop it back into the freezer for 5 minutes. You might need take the dough in and out of the freezer 10-15 times. It is extremely important to work with a dough that is cold enough to be able to handle (so not sticky) but not too cold which would result in breaking it easily
- Cut 8 long stripes out of the dough, this will be the side of the tart
- Carefully place the stripes into the ring one by one. Press each stripe onto the ring so it sticks to it
- Place the Perforated tart rings with the pastry dough in them into the freezer for 2 hours
- Pre-heat oven to 160C / 320F
- After 2 hours take the pastry dough with the rings on them out and trim the top to the level of the tart ring with a sharp knife then place the tarts into the oven
For the Frangipane cream
- Pop almond cream into the fridge for a few minutes then fill a piping bag with it
Assemble
- After baking the tart rings for 10 minutes, remove them from the oven and pipe almond cream on each to fill approx. ½ of the tarts
- Place half a fig into each tart. If figs are too big, trim them according to the size of the baking tin you use. Try to place the fig halves in the middle of the tarts while making sure that there is equal amount of almond cream on all sides of the fig. This will ensure that the top of the tart will turn out symmetric with a beautiful fig in the middle
- Pop the tarts back to the oven and bake for further 10 minutes
- Take tarts out of the oven and carefully remove the rings and bake for another 5 min without rings. Let them cool on the Perforated "air" baking mat
Lisa
I tried your method with the cut out circles and the stripes used for the sides of the tart shells, but it turned out that the sides broke off the minute I took them out of the tart rings. Ok, it does not happen when I bake them together with frangipane, because frangipane works like an extra "glue" to hold everything together.
But when I make tart shells to fill them with some kind of curd, either the sides break off or the curd is running out. Seems that I have to make the side stripes stick to the round bottom circles much more carefully, like using a bit of water or even egg wash, and slide my fingertips along the gap between the 2 dough parts to make everything really stick together. Unfortunately, it is not that easy as you describe the process of putting the tartshells together!
admin
I make all my tartlets with the method explained, I have 10-15 of these recipes on the blog. The side can break if you are taking off the ring too early, before it is properly baked. When the tart baked, it slightly contracts within the ring and the ring comes off easily. Of course, the technique in terms of sticking the side to the bottom comes with practise, you have to work with a dough that is not too warm, not too cold, just right temp and gently press the side to the bottom.