This delicious no bake strawberry icebox cake is the perfect dessert for those warm spring and summer days when you don't want to spend hours in the kitchen or even turning on the oven! Layered with fresh strawberries, graham cracker cookies, and a rich vanilla whipped cream, it's light, refreshing, and 100% made from scratch. Whether making it for yourself or sharing it with a crowd, it is guaranteed to become a favorite!

Best Strawberry Icebox Cake Recipe
If you're looking for a dessert that's easy, elegant, and made with real ingredients, you can stop your search now. One of the most common requests I get is for a simple, no-fuss treat that still looks and tastes like it's straight out of the bakery—and let me tell you, this strawberry icebox cake recipe delivers!
Not only is no baking involved, but everything comes together in just one pan, so you won't be left with a pile of dishes. Unlike many icebox cake recipes with Cool Whip (and all of the artificial add-ins that come with it), this one is 100% made from scratch with fresh strawberries, graham crackers, and homemade whipped cream. And don't worry—if you follow the recipe as written, your whipped cream won't deflate!
This easy strawberry icebox cake recipe is perfect when you're short on time but need an impressive dessert for a brunch or dinner party. It takes just 15 minutes to prep, and then the fridge does the rest of the work. But although it's simple, there's still room to get creative! I've also included plenty of tips and variations so you can customize it to your taste and expert advice to ensure the best results every time.

Katalin's Key Tips for Choosing the Best Ingredients and Layers for Your Icebox Cake
Let's talk about what makes an icebox cake so great and why the right ingredients matter. But first, what exactly is an icebox cake?
An icebox cake is the ultimate no-bake dessert. It's made by layering cookies (usually graham crackers), whipped cream, and fresh fruit, then chilling it for a few hours. The cookies absorb moisture from the whipped cream as it rests, softening into a cake-like texture. The result is a creamy, heavenly dessert that tastes like you spent hours on it yet only takes about 15 minutes to put together. You can make them in all kinds of flavors, including fruit-filled, chocolate, and containing layers of nuts.
There are several ways to layer the icebox cake. For example, you could include more than three layers, such as a fruit compote layer, a crunchy layer in the middle, or even a cream cheese layer. I opted for a simpler approach with just three layers: graham cracker, whipped cream, and fruit as part of the magic of this old fashioned strawberry icebox cake is how easy it is.
Sure, you could take this up a notch with other fillings and layers, but let's be honest: you can't beat the classic version, which comes together in minutes using just a handful of quality ingredients and a little time in the fridge!

Prepare the Ingredients and Your Tin
Start by rinsing and slicing the strawberries, ensuring they are evenly cut. I recommend using fresh strawberries. Not only are they much easier to slice, but frozen strawberries can become mushy when thawed. If frozen strawberries are all you have on hand, thaw and pat them dry before using them.
Next, prepare your loaf tin by lining the bottom and sides with aluminum foil or cling film. Doing so will make it much easier to remove your icebox cake when it's done!
Homemade Whipped Cream Frosting That Whips Up Perfectly and Will Not Deflate
Before starting on the whipped cream (a/k/a chantilly cream), make sure that the heavy cream and mascarpone are very cold; otherwise, they will not whip up properly or hold their shape.
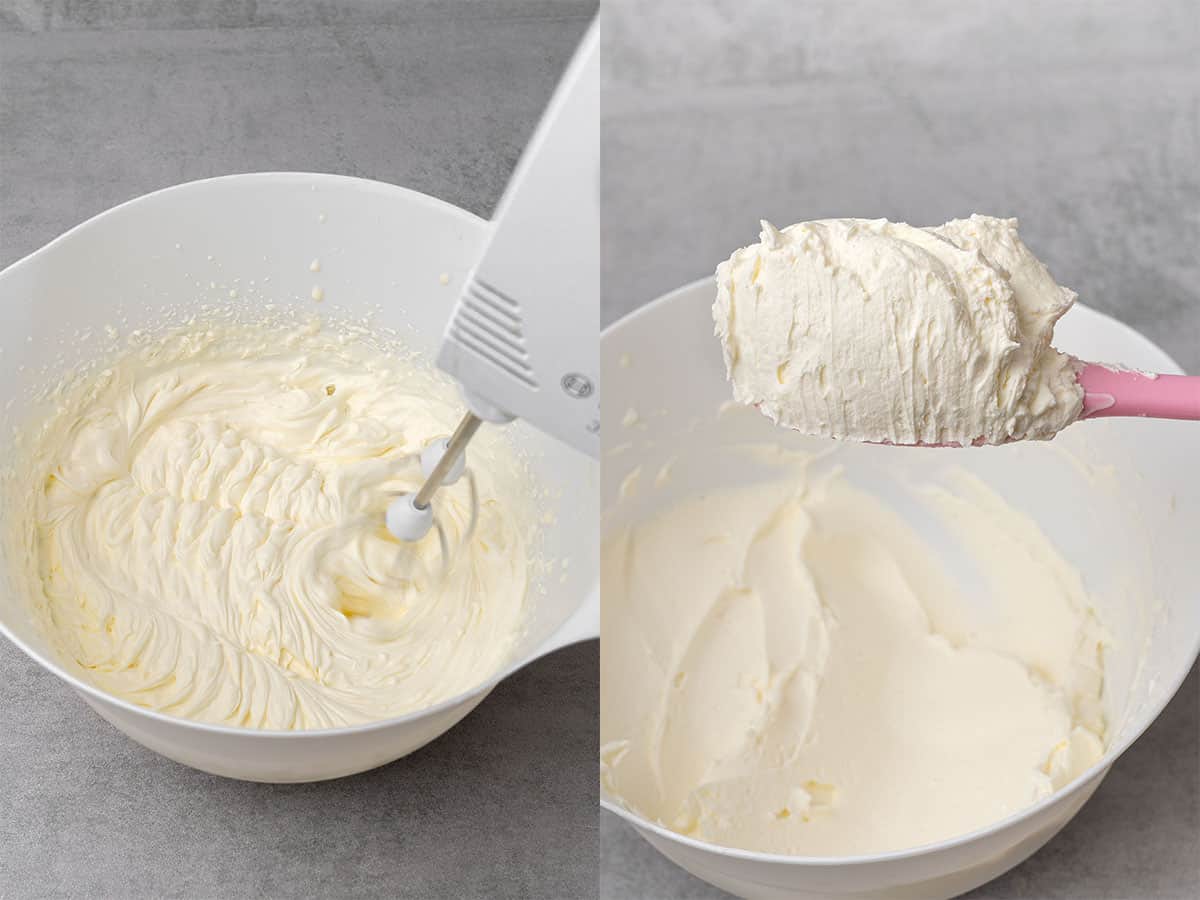
Place the very cold heavy cream and mascarpone into a large mixing bowl, then sift in the powdered sugar. Use an electric hand mixer to whip the mixture for 2-3 minutes until light and fluffy. Do not overwork as it can get runny after this stage.
3...2...1... Layering and Done!
Unlike most other cakes, this strawberry icebox cake is assembled upside down! When layering, you'll first add the whipped cream, then the graham crackers and strawberries. Then, repeat this process until you finish with a final layer of graham crackers on top.

Start by spreading ¼ of the whipped cream at the bottom of the pan. Then, add a single layer of graham crackers (approximately ¼ of the total), cutting some if needed to fit the gaps. Next, layer ⅓ of the sliced strawberries. Repeat the same layering order until you finish with graham crackers as the top layer.

Cover the pan with plastic wrap and refrigerate for at least four hours or overnight, allowing the crackers to soften into a cake-like texture. Don't skip or try to shorten this step! For easier removal and slicing, freeze the cake for about 30 minutes before flipping it out of the pan.
Put the finishing touch on with extra whipped cream, fresh strawberries, and a sprinkle of freeze-dried strawberries.
Have Leftovers? Here's How to Keep It Fresh...
Store any leftovers of your strawberry icebox cake in the fridge for 1-2 days. Please note that the Graham crackers will soften over time, so this cake is really best served fresh and eaten the same day if you ask me.
I don't recommend freezing icebox cake since the thawed strawberries can change texture once thawed. Plus, chantilly cream doesn't freeze well!

Experiment With Some Different Flavors & Layers
This strawberry icebox cake is delicious and super simple as is, but if you're feeling creative or have extra time, there are plenty of ways to customize it:
Instead of making your icebox cake strawberry flavored, you can use raspberries, blueberries, blackberries, or a mix of berries. Even peaches, mangos, and figs go great!
Try making it with my homemade ladyfingers, Oreos, Biscoff, shortbread cookies, amaretto cookies, or gingersnaps to add a new texture and taste.
Add cocoa powder to make a chocolate whipped cream, or fold in a fruit puree for a fruity twist.
Try your strawberry icebox cake with cream cheese filling in place of the whipped cream (yum, imagine a strawberry cream cheese icebox cake!). You can also try my diplomat cream, my chocolate or white chocolate mousse, or make your strawberry icebox cake with pudding!
Add a layer of my strawberry compote, mango curd, or lemon curd to enhance the fruitiness. You can also add a layer of my Biscoff spread, homemade Nutella, or pistachio butter!
Sprinkle crushed nuts like toasted almonds, pecans, or pistachios between the layers for added texture and flavor. My strawberry shortcake crumble also adds a nice touch!
Try Not To Substitute The Ingredients, However, Here Are Some Helpful Substitute Guides
I usually advise against substitutions whenever possible since ingredient changes may require other adjustments to keep the same texture and flavor.
However, if you need to make a gluten free cake, choose gluten free graham crackers. To make a vegan-friendly strawberry icebox cake, opt for a vegan heavy cream and mascarpone alternative. If you don't have powdered sugar at home, try one of these powdered sugar substitutes.
While I can't provide exact modifications for every dietary need, my baking guides and substitute guides can help you find the best alternatives!

Some More Expert Tips For Making Strawberry Icebox Cake
- For the best results, make sure to use high-fat ingredients. The mascarpone and heavy cream should be full-fat—I use 36% heavy cream and 41% fat mascarpone in this recipe. Low-fat versions contain more water and won't whip up properly.
- Chilling your mixing bowl in the freezer for 30 minutes before whipping will help the cream whip up faster and hold its shape better.
- Use the ripest, reddest strawberries you can find for the best flavor. Since they're the star of the dessert, their sweetness and freshness make all the difference!
- Be careful not to overwhip the whipped cream. Overwhipping can quickly turn it grainy, so stop as soon as you see stiff peaks starting to form.
- For the best texture, don't leave your strawberry icebox cake sitting out at room temperature for more than an hour or two. Keep it chilled until you're ready to serve.
Helpful Equipment
For the best results, always measure ingredients by the gram with a digital scale—precision is key in baking!
An electric hand mixer or stand mixer will help achieve a smooth whipped cream frosting, while a rubber spatula will help make spreading it in the pan a breeze.
I use a large 11x6-inch loaf pan in this recipe. You can also use other sizes and shapes, considering that the number of layers may change.
Try Some Of My Other Easy No-Bake Recipes
If you enjoyed how simple and delicious this strawberry icebox cake was, you won't want to miss my other no bake desserts:
- No-Bake Peanut Butter Pie
- Edible Cookie Dough Bites
- No-Bake Cookies Without Peanut Butter
- No-Bake Cheesecake Bites
- No-Bake Lotus Biscoff Cheesecake
- No Bake Apple Pie with Graham Cracker Crust
For more impressive no-bake recipes, check out my roundup of the Top 35 No-Bake Desserts.
Have You Tried This Recipe?
Please leave a 5-star ⭐️⭐️⭐️⭐️⭐️ rating on the recipe card and consider leaving a comment as well!

Strawberry Icebox Cake
Ingredients
Strawberry Icebox Cake
- 1½ sleeve (½ cups) Graham cracker 200g
- 450 g Strawberries fresh, sliced
Mascarpone Stabilized Whipped Cream
- 460 g (2 cups) Heavy cream 36% fat content, cold
- 150 g (⅔ cups) Mascarpone 41% fat content, cold
- 60 g (½ cups) Powdered sugar sifted
- ½ teaspoon Vanilla extract
Decoration
- Strawberries
- Freezed dried strawberries
US customary cup measurement is an indicative figure only. Measure the ingredients with a digital scale by weight (gram). Baking is art but also science which requires precision and accuracy.
Instructions
- Start with slicing the strawberries, making each slice even.
- Prepare your loaf tin by lining it with aluminum foil or cling film to make it easier to remove the icebox cake later.
- Place very cold 36% fat heavy cream and cold 41% fat mascarpone into a mixing bowl. Add sifted powdered sugar and whip with an electric hand mixer for 2-3 minutes, until fluffy.
Assembling
- Since you're assembling the layers upside down, in your tin, it should go: whipped cream, graham cracker, strawberry, whipped cream, graham cracker, strawberry, whipped cream, graham cracker, strawberry, whipped cream, and finally, graham cracker.
- Spread the first layer of whipped cream (¼ of the total cream) on the bottom of the pan. Then, add a single layer of graham crackers (¼ of the total graham crackers), cutting some to fit the gaps. Next, add a layer of sliced strawberries (⅓ of the total strawberries).
- Repeat the layers, finishing with a layer of graham crackers.
- Cover with plastic wrap and refrigerate for at least four hours or overnight. The crackers will become cake-like over this time.
- Freezing the cake for about 30 minutes before turning it upside down and removing it from the tin makes it easier to take out and slice.
- Decorate with more whipped cream, fresh strawberries and freezed-dried strawberries.
- Enjoy it fresh, store any leftovers refrigerated for 1-2 days.
Notes
- Measure your ingredients with a digital scale for accuracy.
- Mascarpone is used to add extra stability to the whipped cream frosting. If you're in a pinch, you can make it without the mascarpone as well.
- Both the mascarpone and the heavy cream need to be high in fat. The low-fat versions won't whip up correctly because they contain more water.
- Try to cut the strawberries into thin, identical sizes for the easiest assembly.
- Chantilly cream (whipped cream) is very easy to overwhip. When whipping, stop as soon as the mixture has reached a fluffy consistency (this will take 2-3 minutes) and early stiff peaks. It won't get stiffer after this point. In fact, if you overbeat it, it will only get runnier, and then it will break.
- Make sure to chill the cake! Letting it sit in the fridge for a minimum of 4 hours changes the texture from a crunchy graham cracker dessert to a smooth, creamy icebox cake.
Alice
I came across this icebox cake recipe on MSN and had never seen such a beautiful presentation of this cake before. It was very easy to make, and I am really glad I made it with your whipped cream instead of Cool Whip.