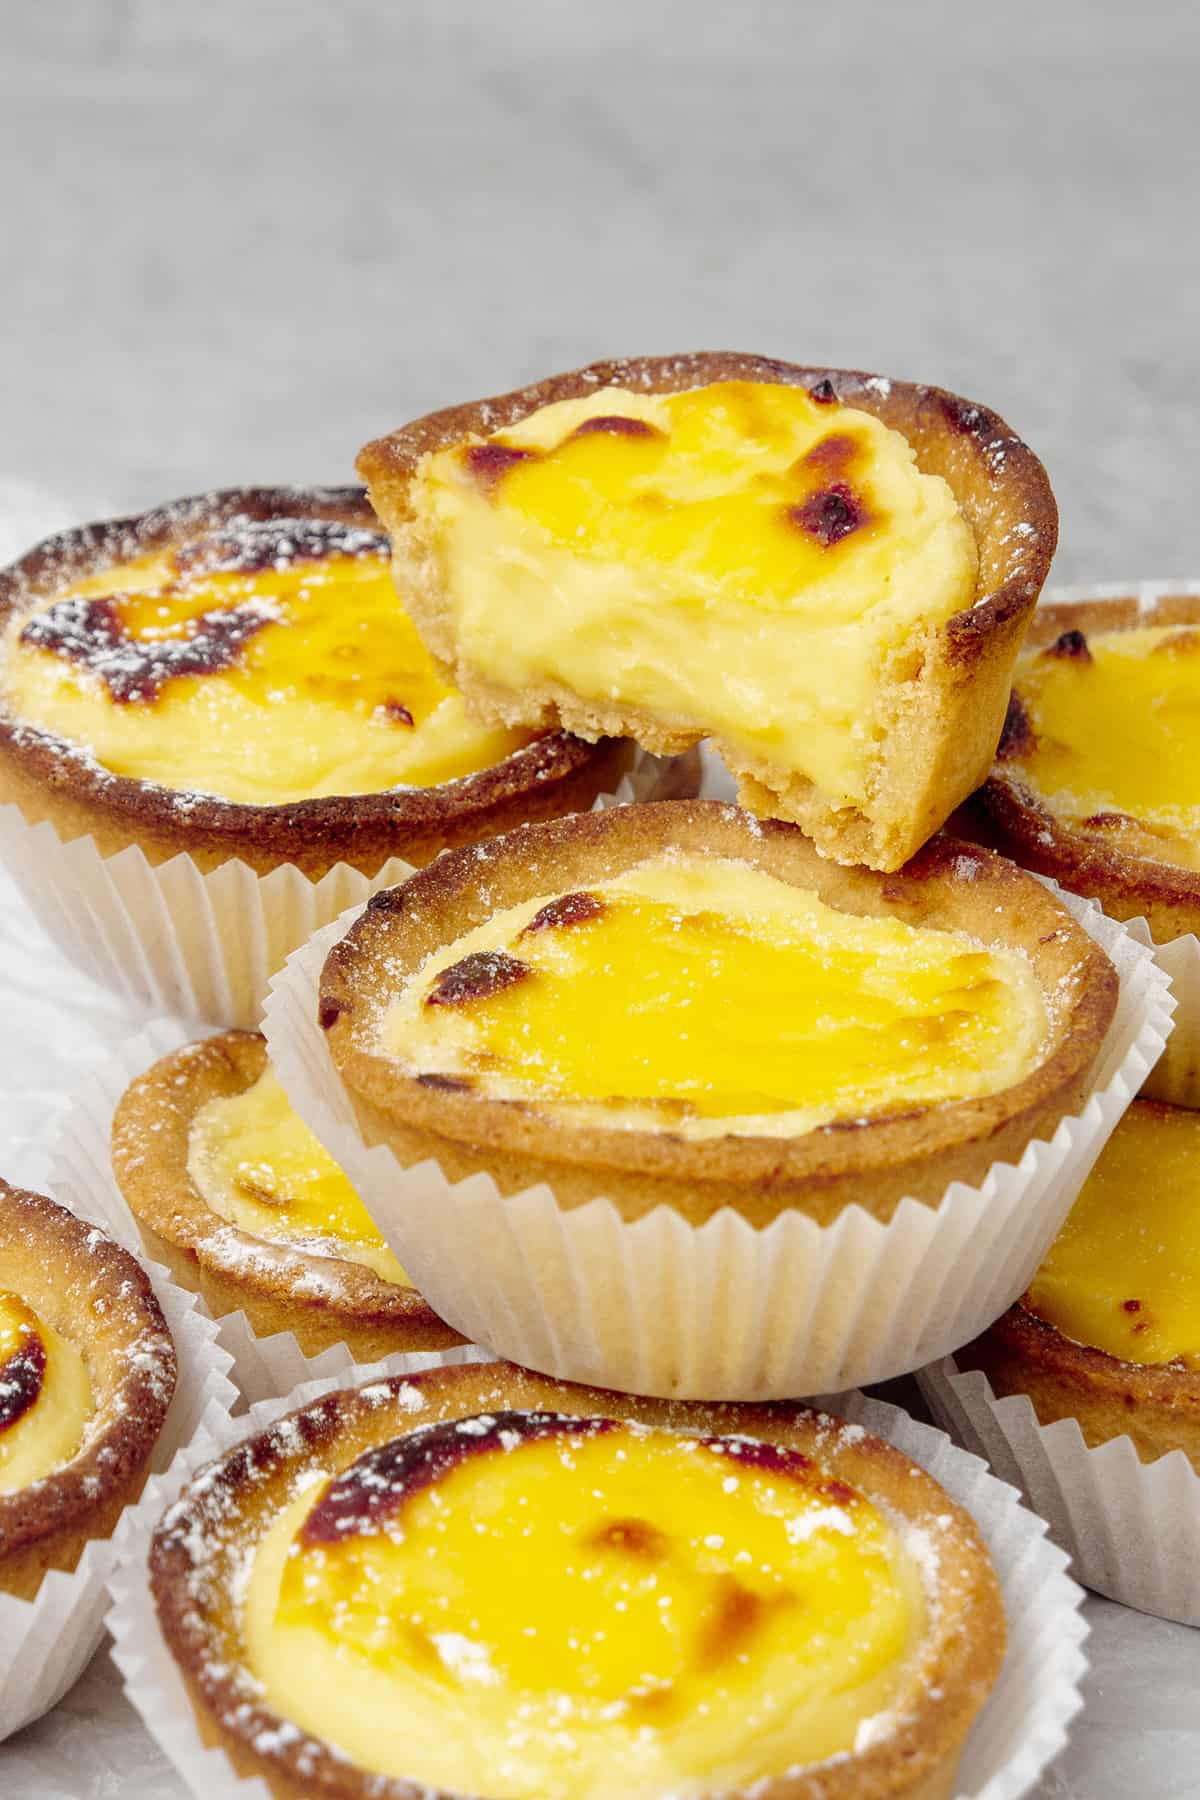
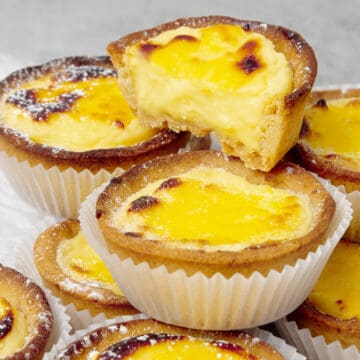
Hokkaido Baked Cheese Tarts are the ultimate rich and creamy Japanese desserts with crunchy shortcrust tart base and distinct sweet and savory cheesy filling. The Japanese Cheese tarts recipe is made using my popular Pâte Sablée aka Sweet shortcrust pastry tart that is filled with a combination of creamy, sweet, and savory dairy and cheese products such as heavy cream, Philadephia cream cheese, and parmesan cheese.
Jump to:
📖 What is Hokkaido Baked Cheese Tart
When I visited Japan in 2019 and I was waiting for ages in a mile-long queue to try the famous Baked Cheese Tart in Kyoto. At that moment, I knew I had to bring this recipe for you one day!
Named after the Japanese Hokkaido island, Baked Cheese tart is widely popular across Asia, Australia and pretty much available across the United States and major European cities like London. Its taste is an unforgettable combination of sweet & savory, and in my view, the best when it is right out from the oven. When it's chilled, it reminds me of special sweet & savory cheesecake and can be also enjoyed frozen, as creamy cheesy ice cream.
The exact recipe of the original Baked cheese tart is obviously secret, but I am sharing with you one that is using a combination of creamy and tasty dairy products such as full-fat Philadephia cream cheese, heavy cream, whole milk, and Parmesan as the secret ingredient that will bring a super delicious and exciting savory level to these Japanese Cheese tarts.
🌟 Why this is the best recipe
- Perfect creamy texture – This Baked Cheese tart has the most perfect custard-like creamy texture without being grainy. The secret behind the texture is 1. using a combination of full-fat dairy products such as heavy cream, Philadephia cream cheese, and parmesan cheese 2. using the yolk part of the egg only 3. there is also a small amount of corn starch in the cheese tart filling recipe that encourage the right texture development
- Most amazing crispy buttery crust – I think we can all agree that there is nothing worse than a soggy tart! I have tons of Pro tips for you in this recipe about how to achieve the best ever crispy tart crust texture
- Delicate sweet and savory taste – The combination of cream cheese and parmesan along with the buttery pie crust will blow your mind! It is mildly sweet, mildly savory, a flavor combination that is hard to describe by words. Try using the best quality ingredients, it will make a huge difference
- Easy to make – Last but not least, making the crust and the cheese cream filling are both super quick and easy, literally most part of the recipe is just waiting for eg. resting the dough, pre-baking the dough, etc. Even if you are a beginner in the kitchen, you can comfortably try this wonderful Hokkaido Baked Cheese Tart recipe
- No special equipment is needed - Japanese Cheese tarts are typically made in a fluted mini tart mold, however, for those of you who do not own these mold, I created this recipe in which the cheese tarts are made in a muffin tin. Of course, feel free to use your mini tart molds, if you own some
📝 Ingredient notes
For the shortcrust tart cases
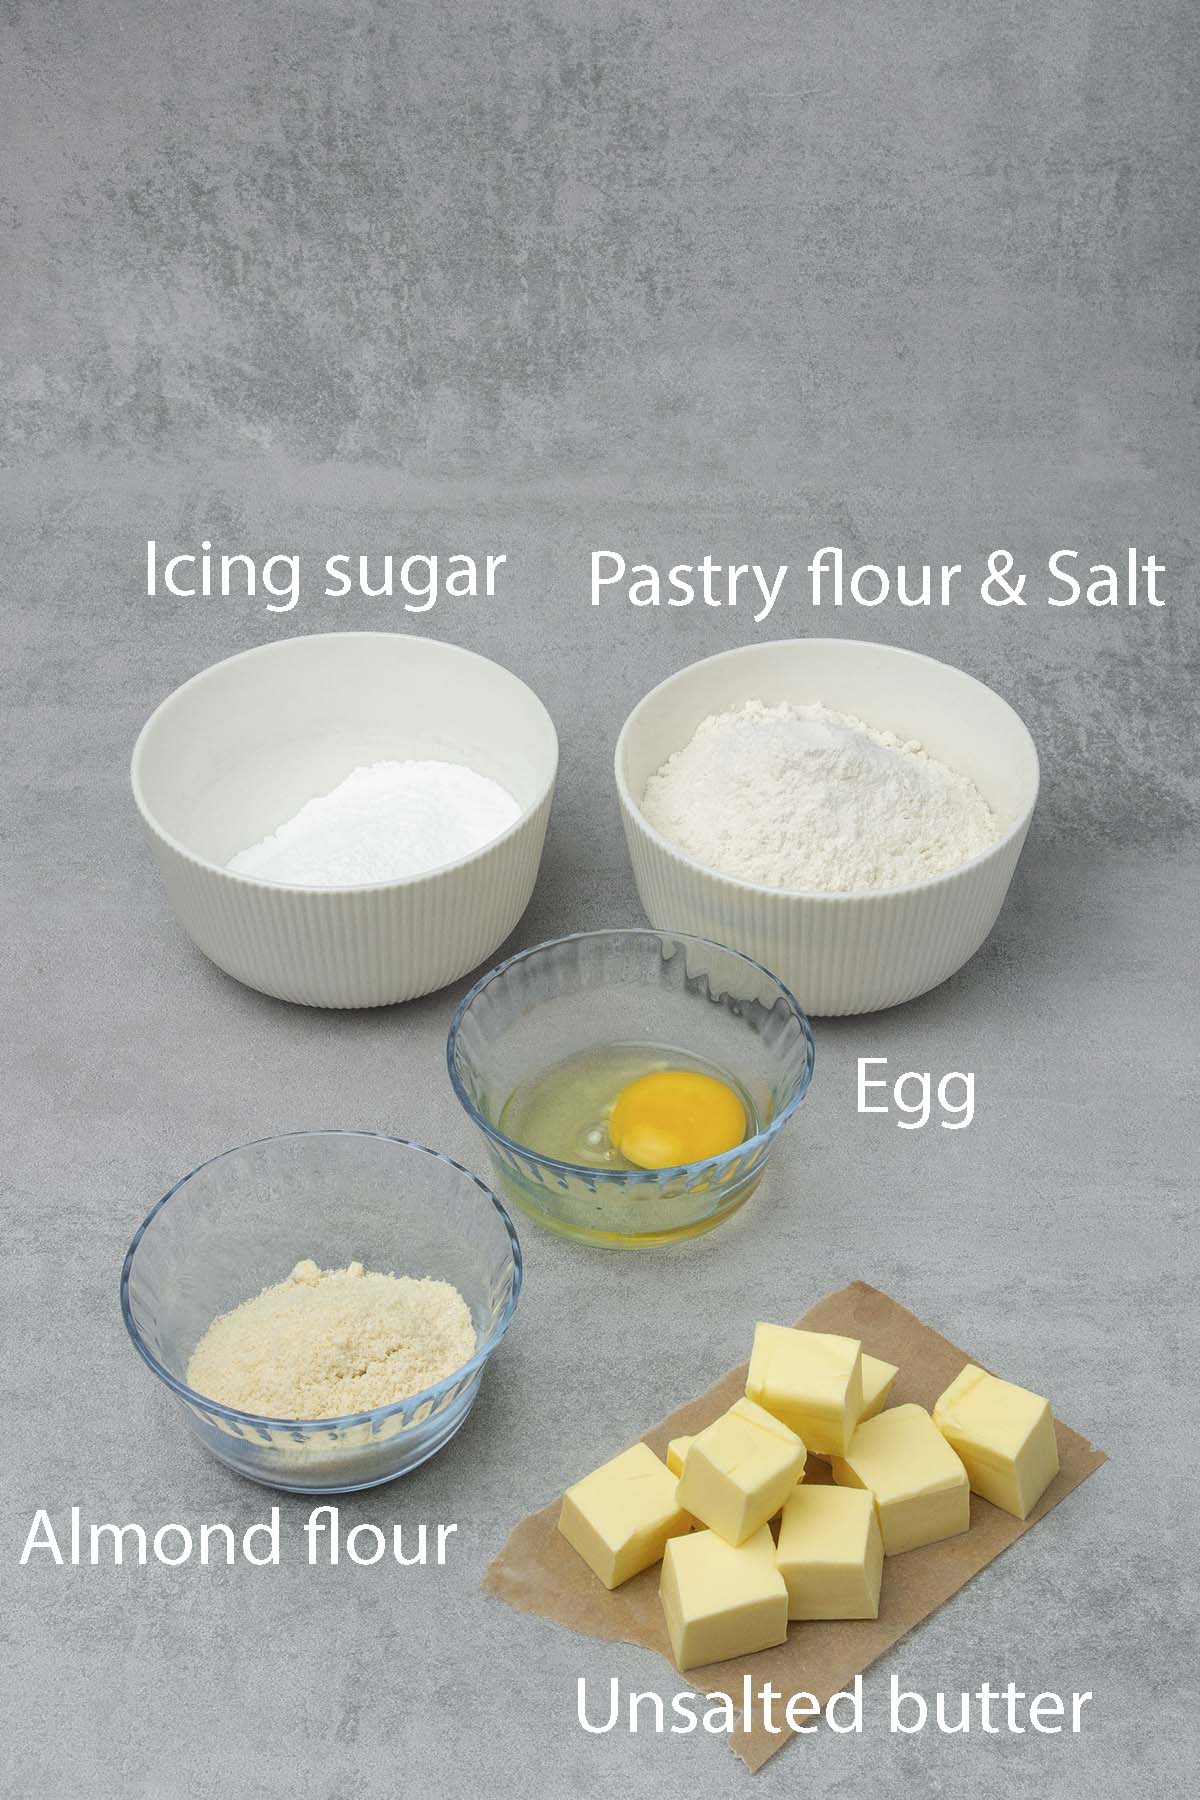
- Flour: I am using pastry flour (that is lower in protein content) for this egg tart shells recipe, feel free to use All-purpose flour, if can't find pastry flour in your local supermarket. If you want to be a Pro when it comes to deciding what type of flour to use in your baking, please read my flour guide
- Almond: Some Pâte Sablée recipes contain almond, some don't, I prefer mine with almond flour from a taste and texture point of view. Pâte Sablée with almond flour is slightly crispier with some marzipan taste. It is worth buying good quality ground almonds, without skin. Almond can be replaced with an equal amount of all-purpose flour
- Sugar: This sweet shortcrust pastry is made with a small amount of icing sugar that makes the tart case sweet but not overly sweet. If you want to learn about the different types of sugar and how to use them in baking, please read my sugar guide
- Salt: An essential ingredient in most dessert recipes. Balances flavor and enhances other ingredients. This is a sweet-tart dough and I just love that extra very mild salty kick at the end
- Butter: Use always unsalted as you want to be in control of the quantity of the salt. I am using high-quality 82% fat content European-style butter in all my recipes. While in most of the recipes butter needs to be at room temperature, this is an exception and you have to take it very seriously. The butter needs to be chilled, which means take the butter out of the fridge, cut it into chunks then place it into the freezer for 10-15 minutes before using it
- Egg: Room temperature as always. Please note that this is not a Vegan pâte sablée recipe and the egg can´t be left out or replaced unless you have the knowledge to totally reformulate the recipe
🛒 You’ll find detailed measurements for all Ingredients in the printable version of the Recipe Card at the bottom of this post
For the creamy cheese tart filling
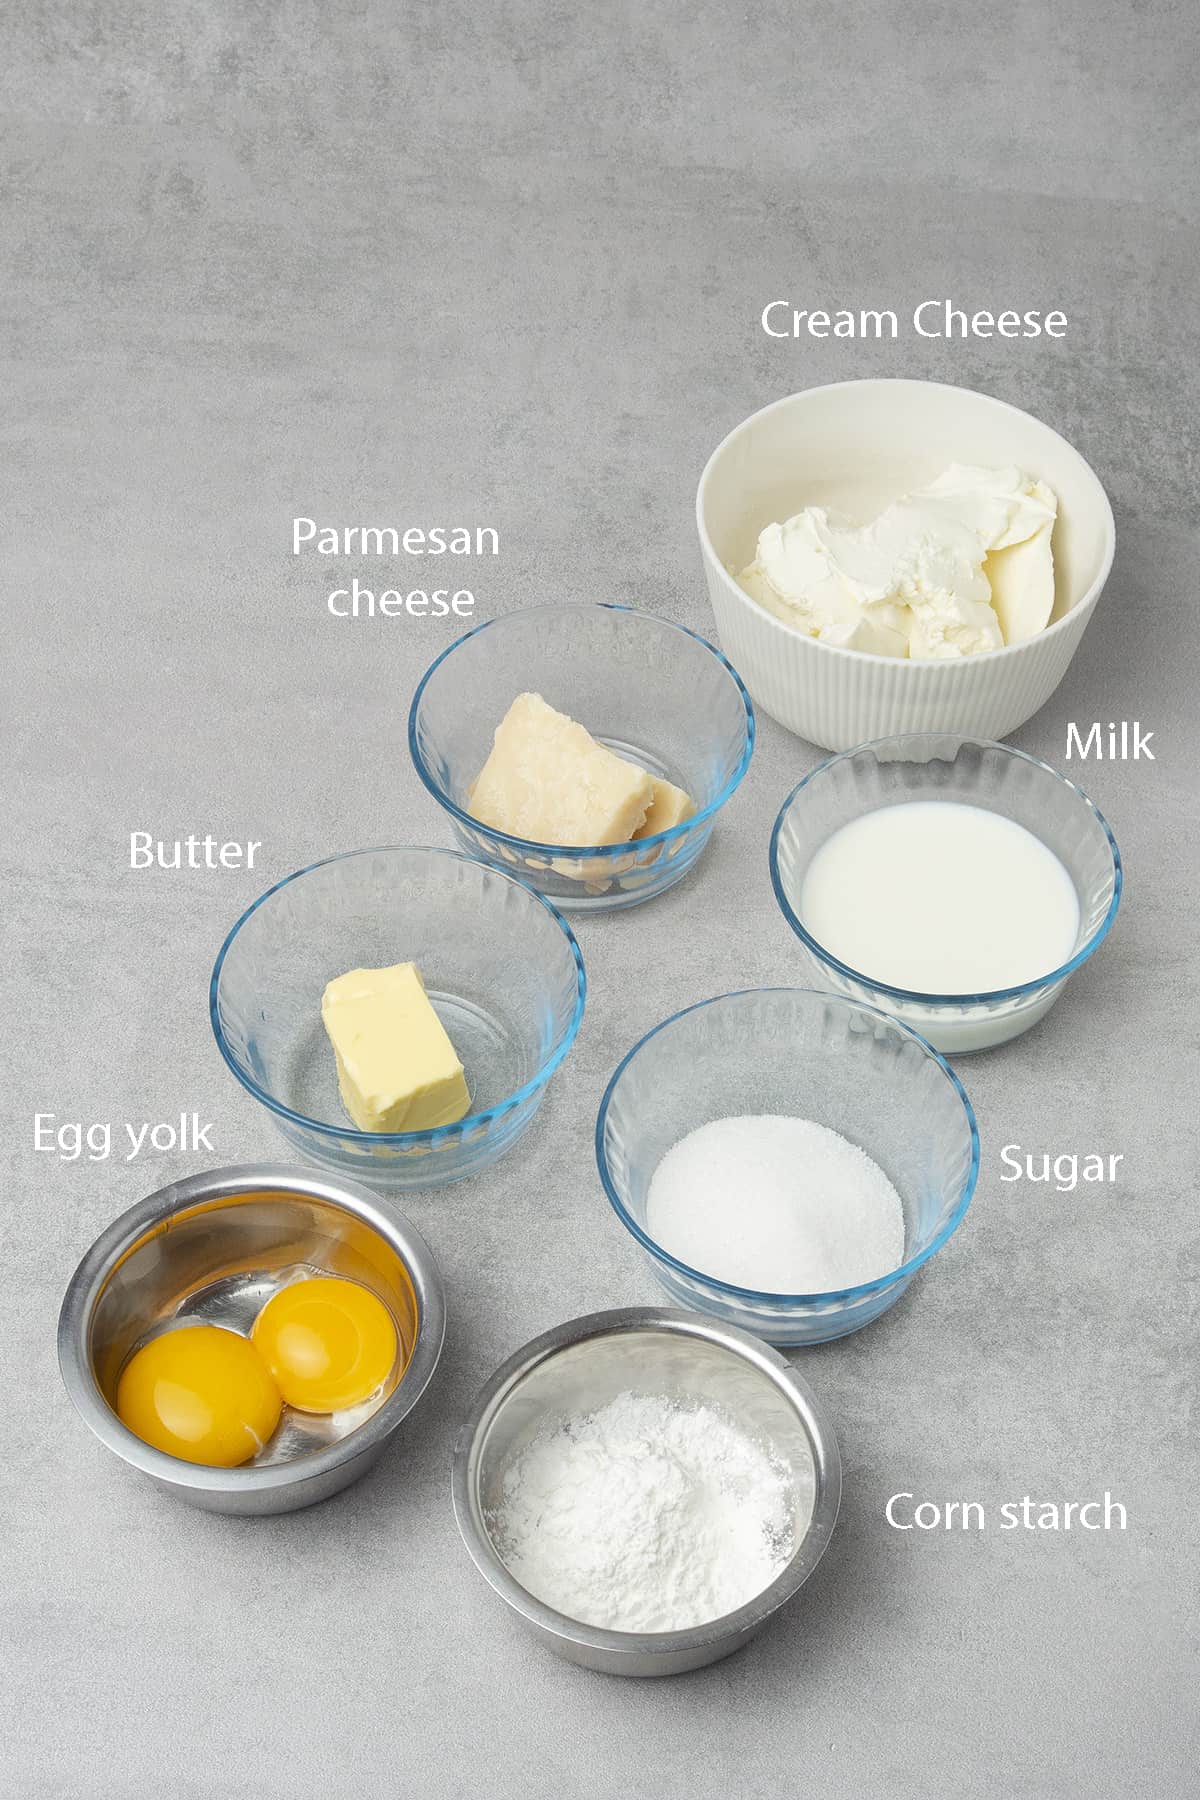
- Philadephia cream cheese: I always use a full-fat Philadelphia tub when I state cream cheese in my recipes. I find it easy to cream and very pleasant in taste. Check out some of my other cream cheese desserts as well!
- Parmesan cheese: Parmesan will bring the savory element to your Hokkaido Baked cheese tarts. Use it finely grated. Potentially can be substituted with another savory high-quality cheese
- Milk: Use whole milk for the best creamy results
- Unsalted butter: I am using 82% fat content European-style butter in the tart filling, just like for the tart shells
- Egg: For the creamiest result we will only use egg yolk, at room temperature as always. Try my macaron recipe perhaps with the leftover egg whites. The egg can´t be left out or replaced unless you have the knowledge to totally reformulate the recipe
- Sugar: There is a small amount of sugar in the cream cheese filling. Classic Hokkaido tart should not be super sweet, so if you like very sweet desserts, you might want to increase the sugar quantity
- Corn starch: Use corn starch as a thickening agent, just a small amount
- Heavy cream: Gives extra creaminess to the tart filling. Also known as whipping cream, has a fat content of between 36% and 40%, in my recipes, I use 36%. Avoid substitutes like vegetable-based “whipping cream”
As you can see I am not using any flavorings in the recipe eg. vanilla extract or lemon juice. I imagine you can use extra flavorings if you wish, however, the recipe I developed is crazy delicious without these extra flavorings and taste similar to the ones I tried in Japan.
🛒 You’ll find detailed measurements for all Ingredients in the printable version of the Recipe Card at the bottom of this post
👩🍳 How to make this recipe
1. The importance of temperature while baking shortcrust pastry
When I started experimenting with baking, I had several disastrous attempts making Pate sablee, shortcrust pastry. Now I understand that the one and only reason I failed was being impatient and forcing the dough even when its temperature was inappropriate.
Baking is science and in general, the temperature is one of the most important factors to understand and utilize for our benefit. When I say temperature I don't purely mean baking temperature, but also the environment we work e.g kitchen temperature as well as the dough temperature.
While making the shortcrust pastry recipe, the temperature is everything! If the dough is too warm, it's sticky and can't be rolled out or shaped. If too cold, it will easily break.
To give you a concrete example, in a home kitchen environment on a warmer day this practically means taking the dough in and out of the freezer about 10 times in between steps to ensure the dough is always on the right temperature to work with. If you are lucky and have a cold kitchen, you might be ok with 2-5 chilling breaks. Yes, not just to chill the dough once or twice but to be in control of the dough temperature at all times! Obviously in professional kitchens temperature as well as humidity is under control, and the rolling process is done by a laminator machine, however in a home environment remember, this is something we have to be super careful with.
💡 Top Tip: Remember, the entire pastry-making process is a balancing exercise between keeping the dough cold enough, but not too cold. Use your freezer wisely

2. Process of making shortcrust pastry tart shells
Now that we covered the important factor of the temperature, let´s see how exactly to make a sweet shortcrust pastry that will be the base for your mini cheese tarts!
- Measure all ingredients with a Digital scale and prepare all the equipment ahead
- Chill the measured butter chunks in the freezer for 5-10 minutes
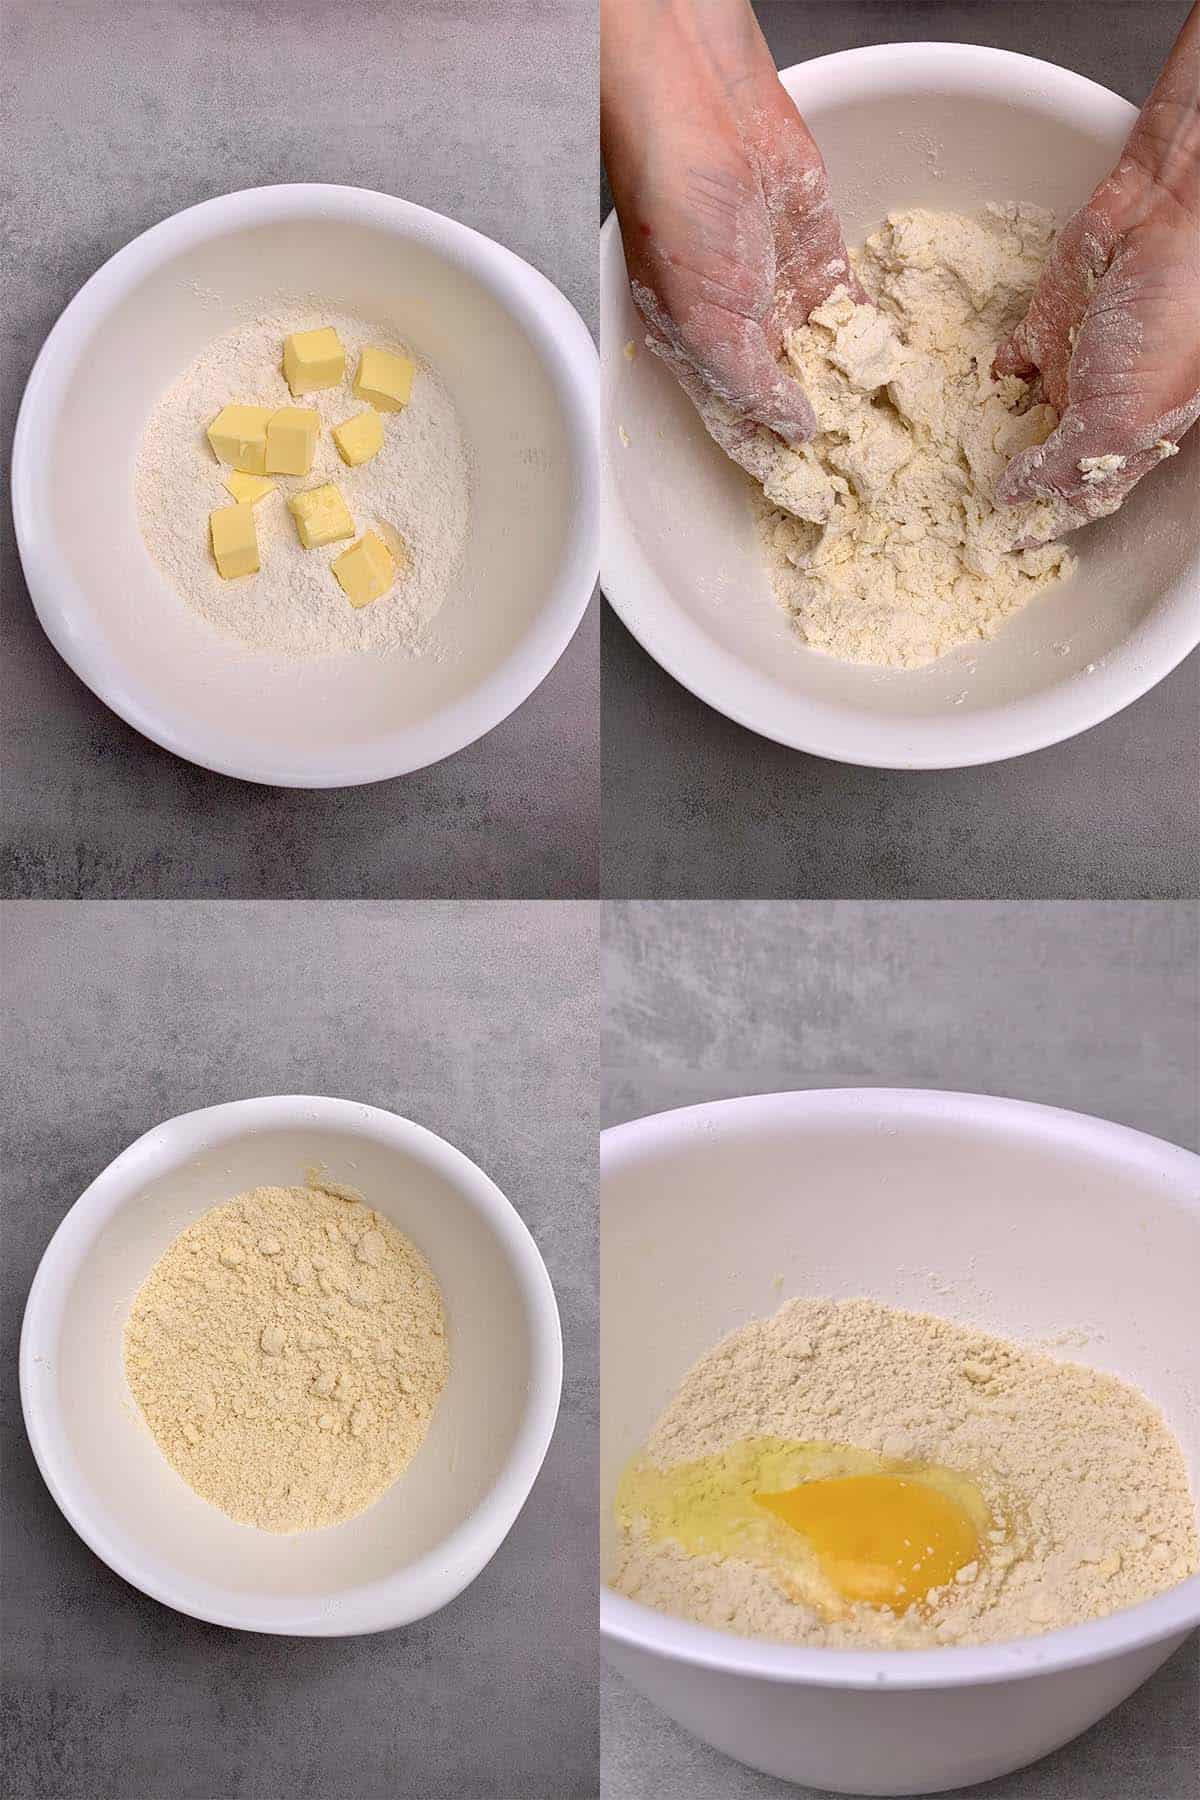
- Sift together the dry ingredients; flour, icing sugar, almond, salt, and mix so they are combined properly
- Add very cold butter chunks into dry ingredients and rub the mixture between your hands until it becomes a sand-like consistency. This will take about 2 minutes, make sure you do not spend too much time with this step as butter can easily warm up, and that is something we want to avoid. Please note that there is no need to use a food processor!
- Add egg into the mixture and mix with your hands just until the dough comes together. First, it might look crumbly but do not add more wet or dry ingredients to the recipe instead gently knead the dough with the palm of your hand for a minute or two (do not over-knead and do not use a mixer) just until the dough becomes smooth
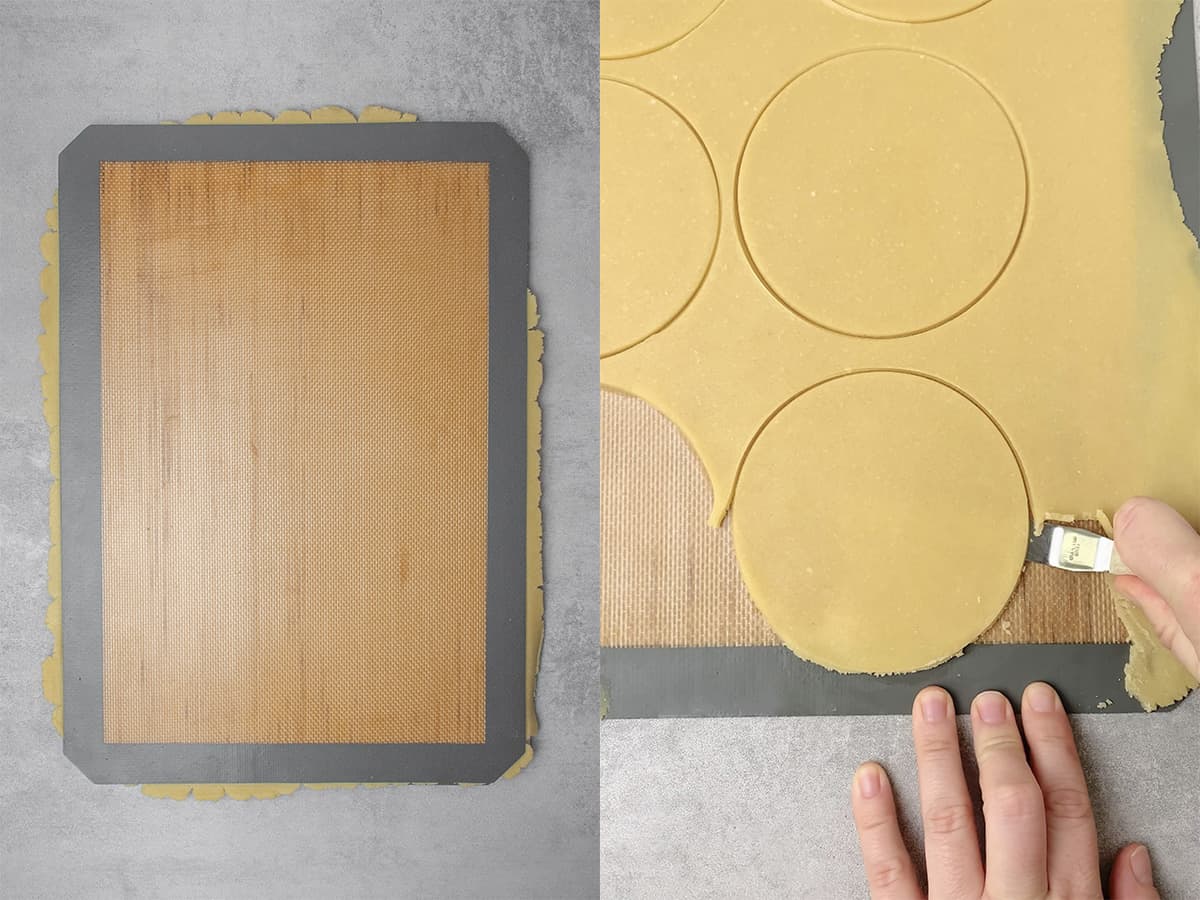
- If the dough is too warm and sticky, place it into the fridge for 10-15 minutes first. Otherwise, continue with rolling the dough out into 2mm thickness between two Silicone baking mat. The recipe quantity is designed in a way that once you roll the dough out, it will reach the silicone baking mat from edge to edge (11.6 inches / 30 cm x 16.5 inches / 42cm)
- Place the dough into the freezer for 10-15 min in between the two Silicone baking mat. Do not remove the mat at this point as the dough might stick to the mat while it is warm
- Prepare your muffin pan or 12 mini tart molds, no need to grease them, the pastry won´t stick to them due to its butter content
- Take the dough sheet out from the freezer, remove the top of the silicone mat, and cut out circles, using a cookie cutter. The size of the cookie cutter will depend on the size of your tin, the one I am using has a diameter of 11 cm / 4 inches. Any leftover dough can be re-rolled and re-used, overall you will have 12 tart cases of a standard muffin case
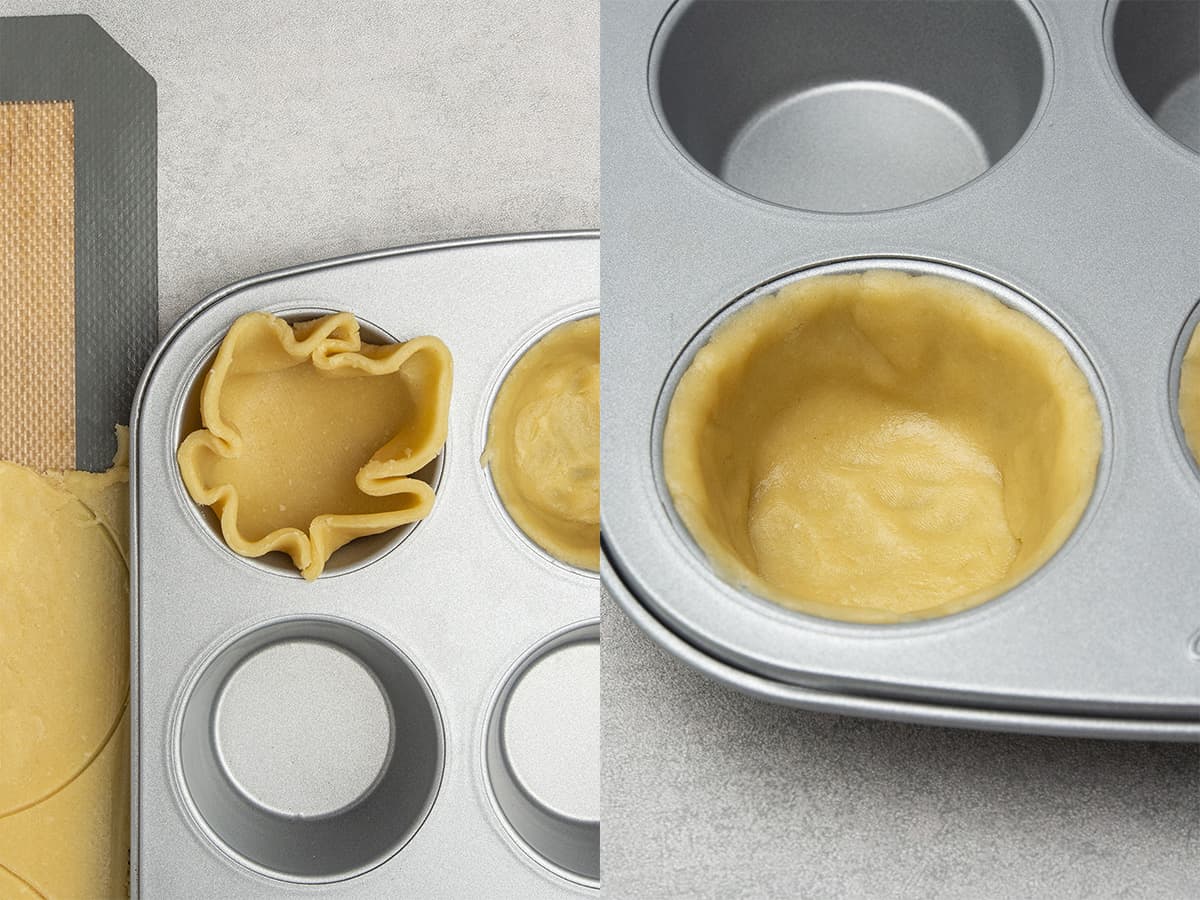
- With your fingers, press the dough circles into the tin one by one. Make sure that you work with a dough that is cold enough to be able to handle.
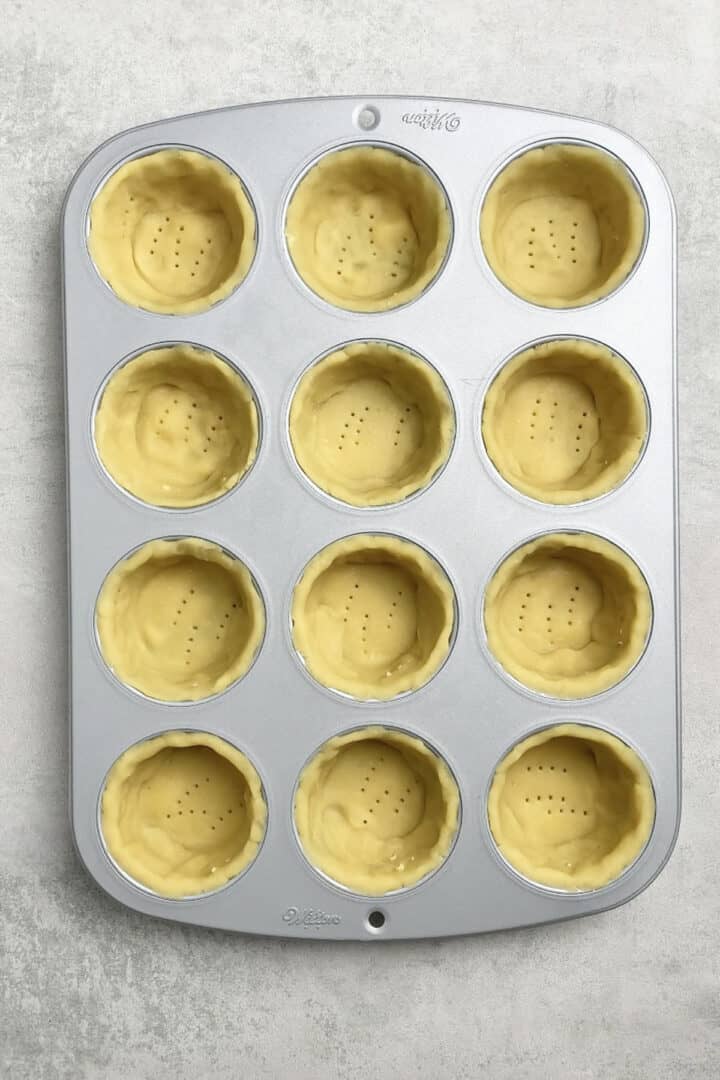
- Once you are ready with all the tart shells, poke them with a fork, then freeze the dough for 1 hour before baking. The freezing is necessary so the tart cases will shrink as little as possible during baking
💡 Top Tip: If at any point the dough gets too warm to work with, pop it back into the freezer for a few minutes. You might need to take the dough in and out of the freezer a lot of times but that is fine, don´t try to force the dough while it is warm.
3. What is blind baking
Baking blind is the process of baking a pie or tart crust without the filling. If it is a bigger Pie or tart, it’s done by lining the tin with parchment paper and filling it with eg. baking beans, however for small tartlets, like this Mini Baked Cheese tart, no need to use baking beans.
Blind baking is an important step to avoid soggy bottom on your Tarts, that is every bakers´ biggest nightmare!
💡 Top Tip: You will need to bake the tart crust all the way until it reaches a beautiful golden color, and the bottom, as well as the side, as the crust won’t bake further after the tart filling is in.
4. How to bake the Hokkaido tart crust
Pre-heat oven to 180C / 356F while the dough is in the freezer.
I suggest baking the pastry in 2 steps in the following way:
- Bake them for 15 min at 180C / 356F (no fan) in the muffin pan. After 15 minutes the pastry cases will somewhat contract within the pan so you will be able to easily remove them. If the pastry seems to be stuck onto the pan, it means probably you will need to bake it for a few more minutes. Do not force it as you can easily break it
- Once the tart cases are removed from the muffin pan to a baking sheet, you will need to place them back in the oven to bake for further 10-15 minutes at 160C / 320F (no fan). I suggest baking them in this second step upside down so the bottom of the tart case is up and can fully be baked until golden brown.
Why bake the tart cases in 2 steps?
As part of the pre-baking you will find that the bottom of the tart might puff up a bit and the side might shrink a little, that is normal since we are not using perforated baking rings as eg. I use in my Pate sablee tart case recipe. The reason we freeze the dough before baking and why we bake it at a relatively high temp is to avoid shrinking and/or puffing up too much.
Once the tart cases are pre-baked at a higher temperature, removing them from the muffin tin really helps to achieve even baking all around the tart case as the air can properly circulate around the pastry cases.
They are ready when they achieve an even golden color, in about 25-30 minutes, however, each oven is different, please focus on the texture and color, as opposed to time.
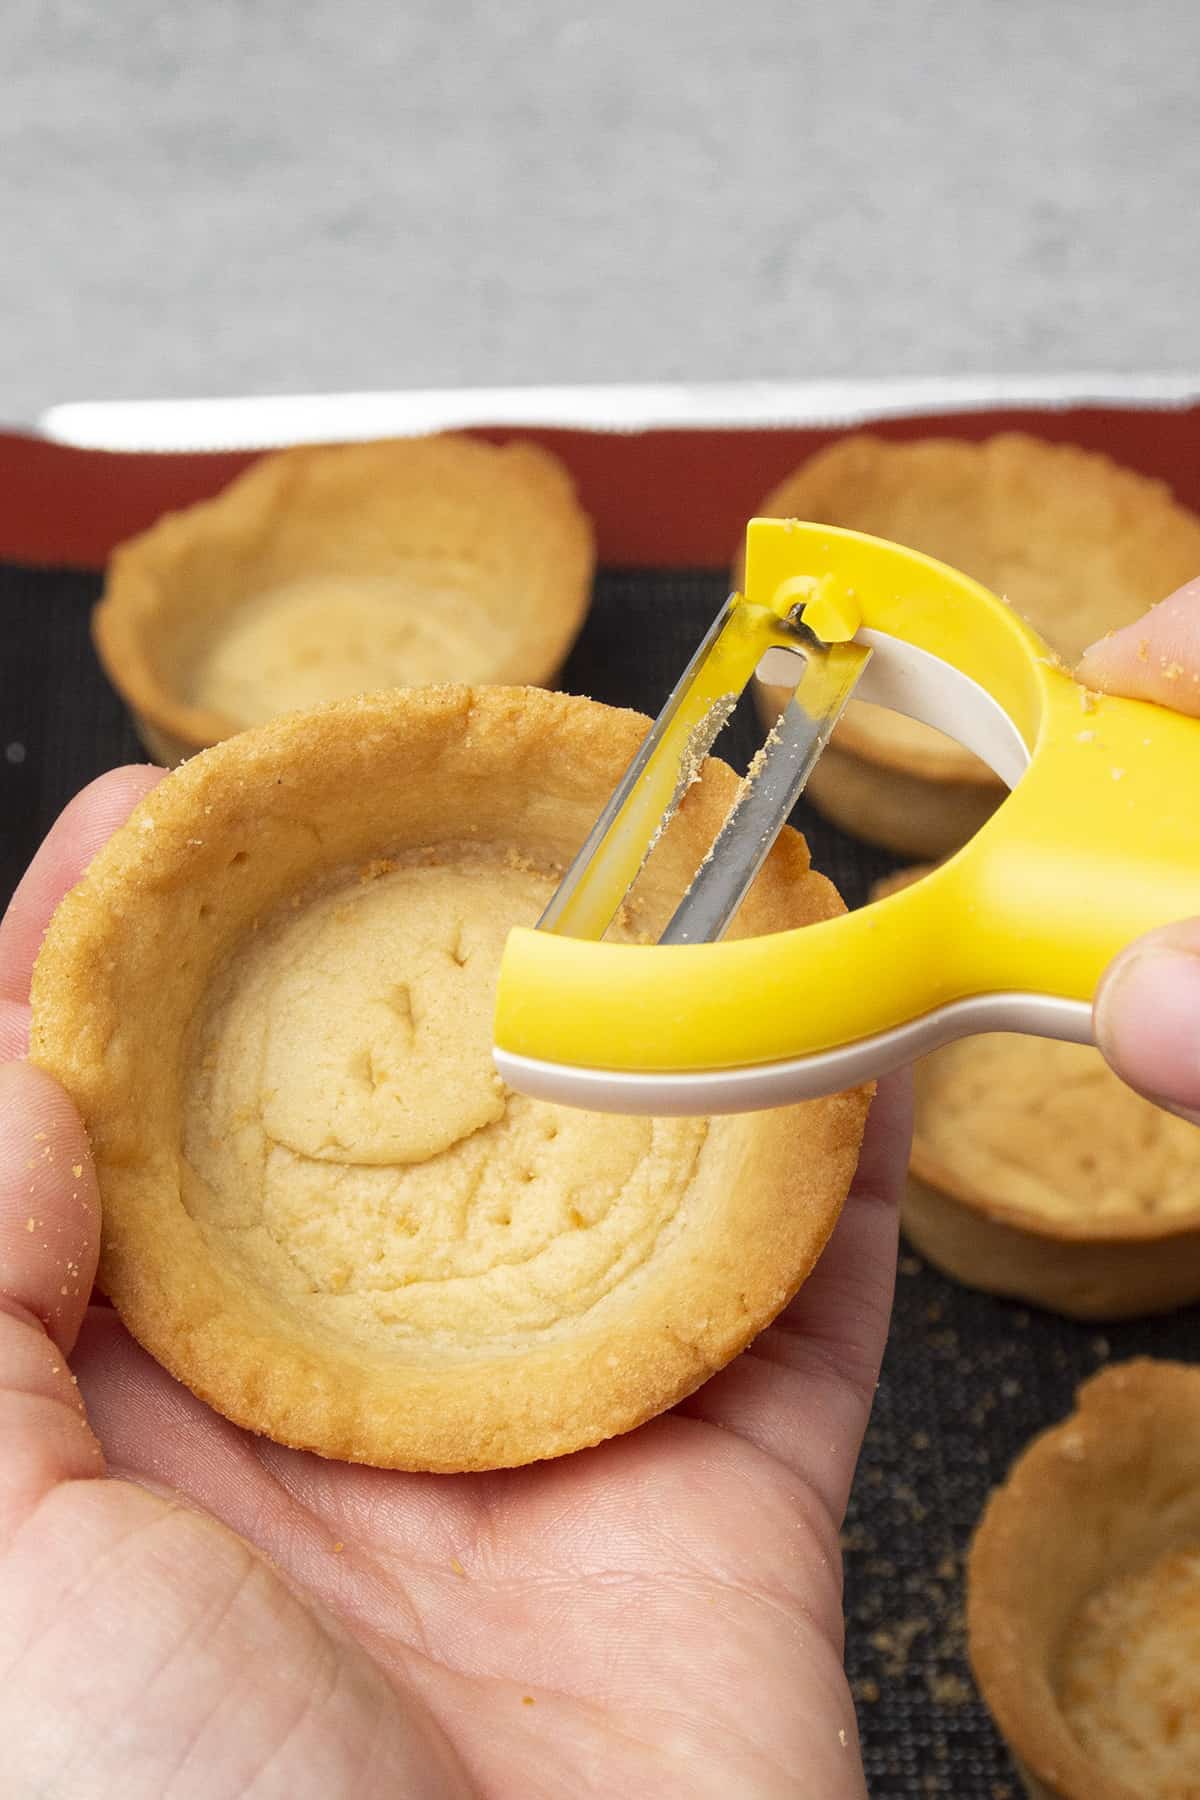
💡 Top Tip: Once the tart cases are baked, use a potato peeler to sharpen the edges of the tart and make them look super neat
5. How to prepare the cheesy filling
Preparing the filling of the Hokkaido Baked Cheese tarts is very similar to making pastry cream and as a result, the cheesy filling will get a custardy, super creamy, and silky texture, absolutely out of this world!
- In a large enough bowl with the help of a Hand whisk, whip together sugar and egg yolk until slightly fluffy for about 1-2 minutes
- Whisk in corn starch until thoroughly incorporated and have a smooth paste
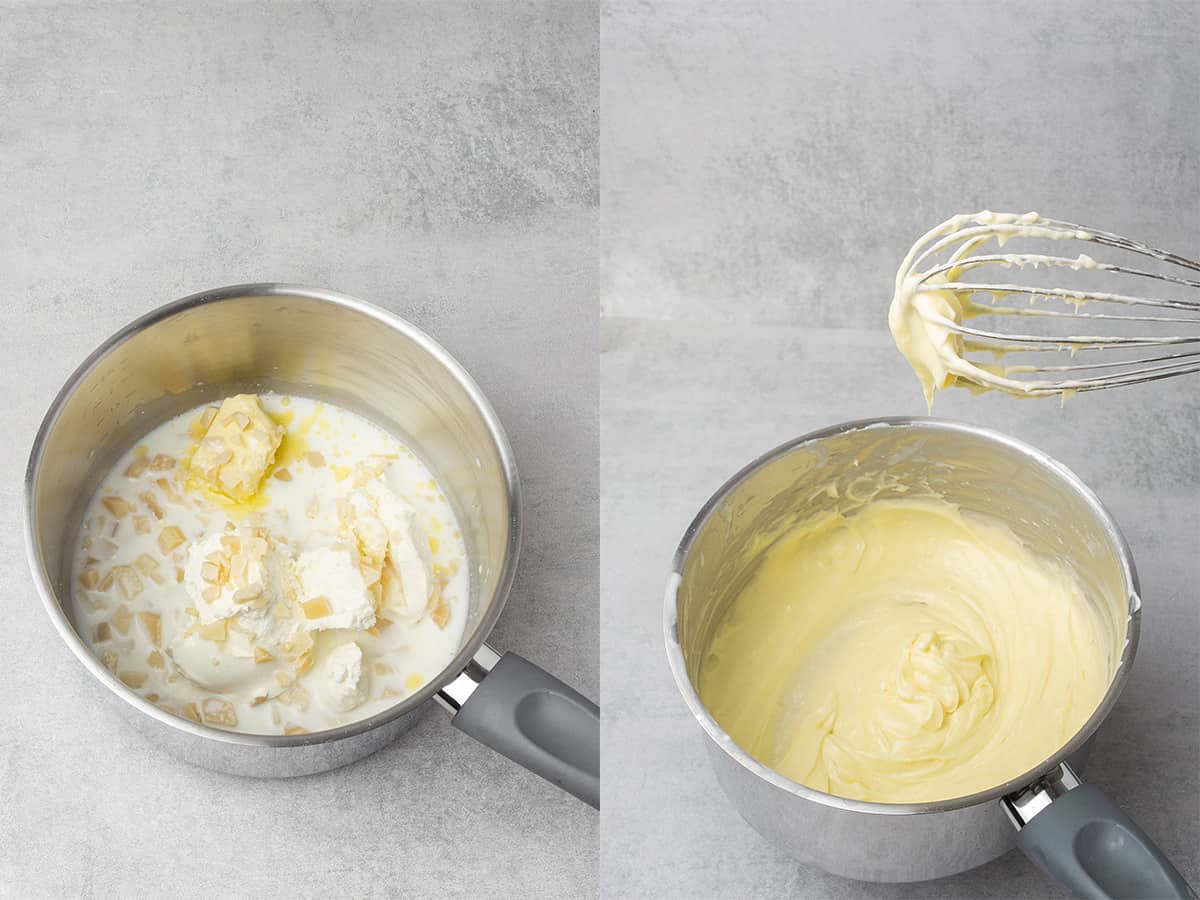
- Heat milk, cream, butter, Philadephia cheese, and grated parmesan in a saucepan on low-medium heat, then remove it as soon as the ingredients melt together. By this time, the mixture probably will be summering
- Pour the warm cheese mixture over the egg yolk mixture slowly while whisking vigorously with a Hand whisk. This stage is effectively tempering the egg yolks and the mixture should already start to slightly thicken
- Pour the mixture back into the saucepan and cook on medium heat for a few minutes until it thickens. Concretely it is approximately 1 min after the first boil. It might get lumpy first, don't worry just keep whisking and the cream will get smooth and glossy. It's worth keeping a good quality (so that the milk won't burn in it) small/medium-sized saucepan for making these kinds of creams
- If in doubt, strain the filling for a lump-free, creamy end result
💡 Top Tip: The creamy filling needs to completely cool before using it. Place it into a shallow bowl and cover the entire surface with plastic wrap to avoid skin forming on top. Store in fridge
6. Assemble
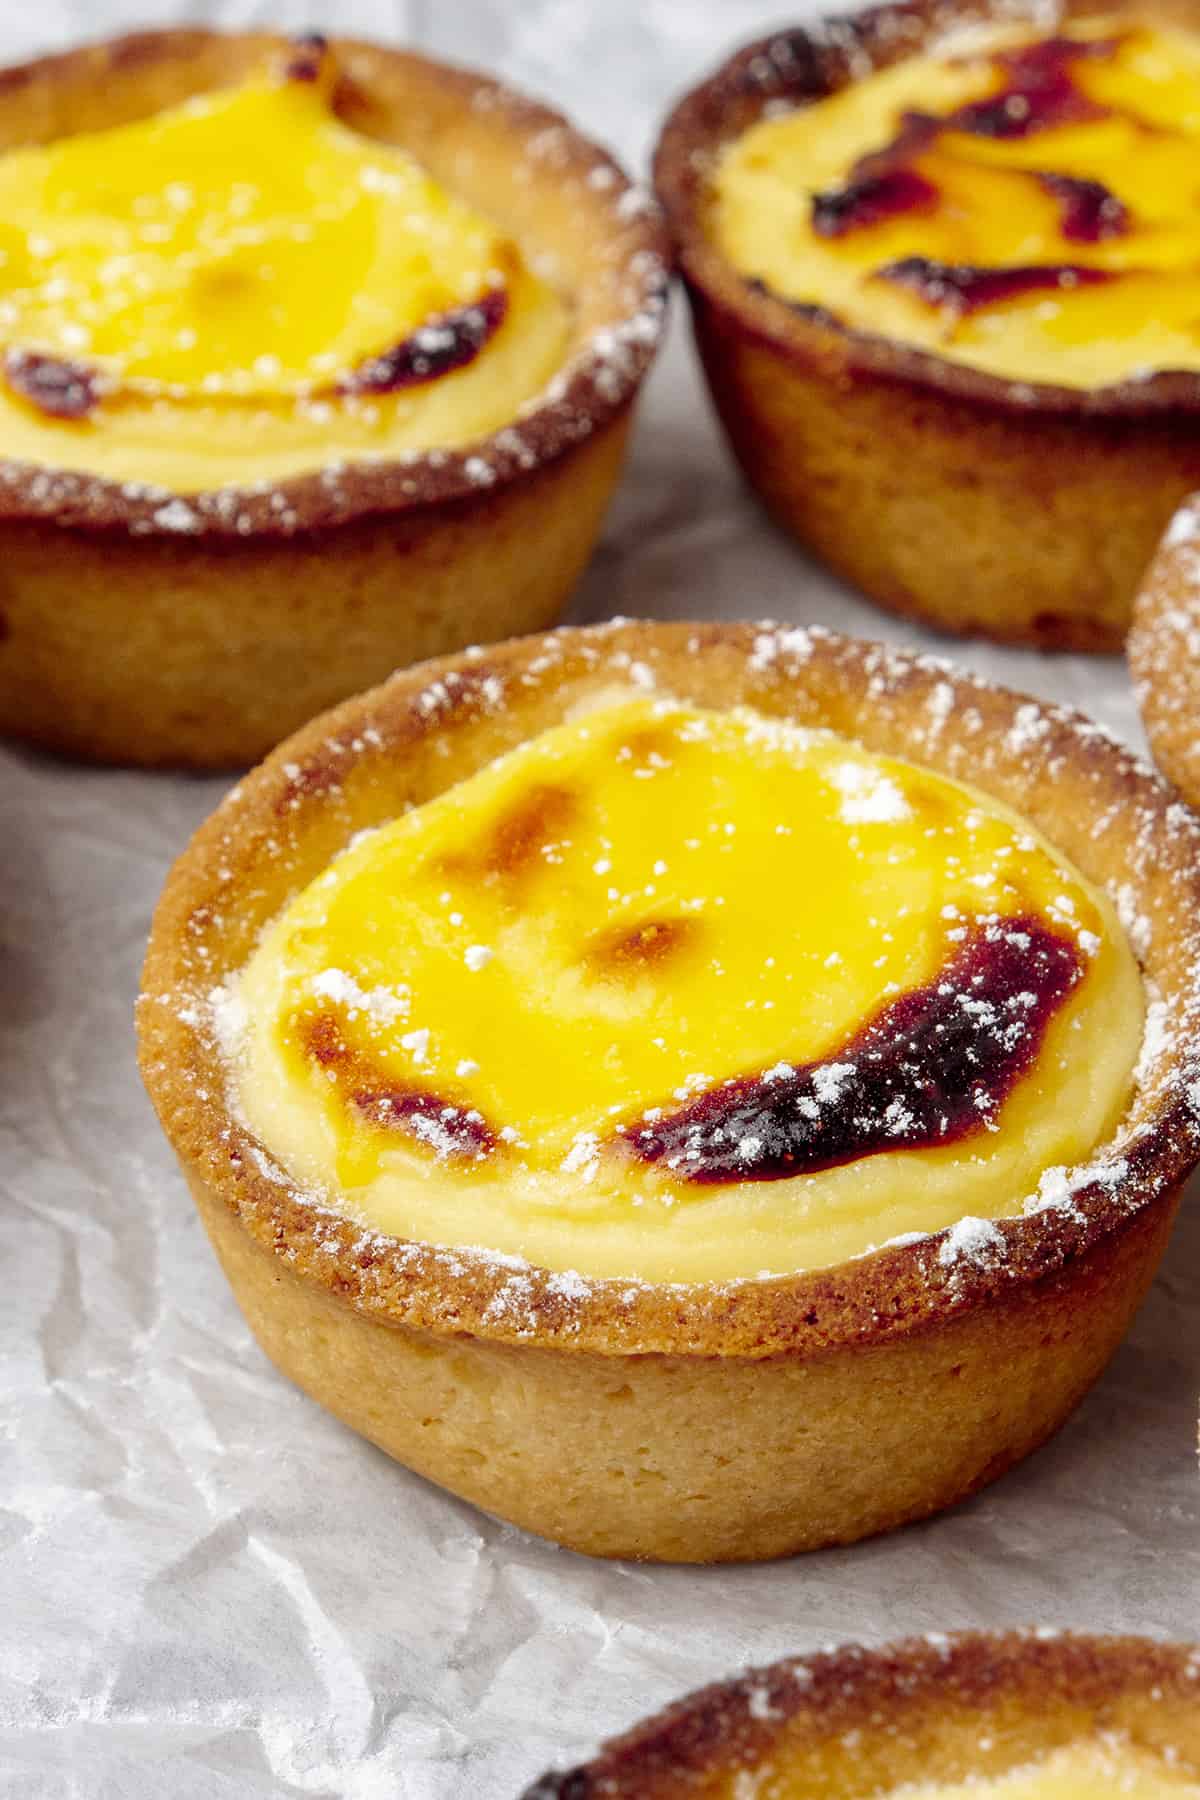
Now that you have your shortcrust tart cases ready as well as the cream cheese filling, the assembling could not be easier! The baking process is not really baking, as both the tart and the filling are already cooked, it is more like caramelizing the top.
- Pre-heat oven to 220C / 428F (no fan)
- Move the filling into a pastry bag
- Fill each tart shells with the cheese filling. The filling will be enough to fill 12 tart cases
- Whisk one egg with a splash of water and apply a light egg wash on top of the filling
- Pop the tarts bake to the oven and bake for 5-10 minutes or until the top slightly caramelizes
Voila, your Hokkaido Baked Cheese Tarts are ready! Serve them hot, room temperature, or even cold or frozen!

🎓 Expert tips
- The working temperature is the most important factor while making tart shells. If the dough is too warm, it's sticky and can't be rolled out or shaped. If too cold, it will easily break. Use your fridge and freezer to control the temperature
- High-quality full-fat dairy products will make the best cheesy filling
- You can experiment with adding lemon zest, vanilla or other add-ins to the cream cheese filling
- Once the tart cases are baked, use a potato peeler to sharpen the edges of the tart and make them look super neat
- Try these Hokkaido cheese tarts warm, chilled, and even frozen, and let me know below which one you like the best!
🥣 Equipment notes
I recommend using 2 Silicone baking mat for rolling the cheese tart pastry dough out in between them. The recipe is designed in a way that you do not need to add extra flour while rolling the dough however it might stick to your kitchen counter so use a silicone baking mat. It’s also possible to use 2 sheets of parchment paper however the silicone mat provides a much neater, smooth surface.
While rolling, start from the center of the disc and work your way out in all directions. Again remember, the temperature is very important.
For baking the Japanese cheese tarts, you can purchase some mini egg tart molds, however, the recipe works perfectly fine in a muffin tin as well. What is important is that you work the dough neatly into the tin so it will hold its shape while baking.
❓ Recipe FAQs
Yes, you can use traditional equipment eg. a muffin pan
Yes of course you can, this recipe works no matter what size or shape of cheese tarts you want to bake, however, you will need to adjust the ingredients as well as baking time accordingly
Yes, most probably you can, however, you can´t just replace flour with gluten-free flour 1:1 without reformulating the recipe. When one ingredient changes, some other ingredients need to be changed too in order to keep the balance in the texture and flavor
Probably you can, however just as making it gluten-free, you will need to adjust the ingredients somewhat if the egg is left out. Sadly, I am not able to provide substitutes for all sorts of allergies and diets
Yes, you can, however, I suggest using some sort of savory cheese that could bring the savory flavor profile to this tart
These Baked Cheese tarts are wonderful either hot, at room temperature, cold, or even frozen
Before you fill the tart cases, you can store them easily on top of each other in an air-tight container. Once you fill them, they can be stored in the fridge for 2-3 days. Cover it, so it does not absorb any smell from the fridge
You can easily freeze the tart cases before baking, and bake them fresh when needed. Once they are baked, you can still freeze them, however, they might lose the crispiness a bit. Once baked, you can again freeze them and serve the cheese tarts almost like ice cream tarts
🌟 More Tart recipes
Check out my ultimate collection of tart recipes! With a couple of base crust recipes, you can make mini tartlets or larger ones in any shape, form, or flavor.

🇯🇵 More Japanese dessert recipes
I have a true obsession with Japanese desserts, some of my favorites:


Have you tried this recipe?
Please leave a 5-star ⭐️⭐️⭐️⭐️⭐️ rating on the recipe card and consider leaving a comment as well! I would love to hear about how your dessert turned out and your feedback also helps other Readers!
The BEST Hokkaido Baked Cheese Tarts (VIDEO)
Equipment
Ingredients
For the mini tart shells
- 90 g (¾ cups) Icing sugar
- 230 g (2 cups) Pastry flour can be replaced with All purpose flour
- 30 g (⅓ cups) Almond flour
- Pinch of salt
- 110 g (½ cups) Unsalted butter 82% fat content, use it very cold, cut into chunks
- 50 g Egg approx. 1 egg
For the cheese filling
- 230 g (1 cups) Cream cheese use full-fat, eg. Philadephia
- 50 g (½ cups) Parmesan cheese finely grated
- 45 g (⅕ cups) Unsalted butter 82% fat
- 50 g (⅕ cups) Whole milk
- 50 g (⅕ cups) Heavy cream
- 45 g (⅓ cups) Icing sugar
- 2 Egg yolk
- 15 g (1 tablespoon) Corn starch
US customary cup measurement is an indicative figure only. Measure the ingredients with a digital scale by weight (gram). Baking is art but also science which requires precision and accuracy.
Instructions
For the tart shells
- Measure and cut butter into chunks and place it into the freezer for a few minutes
- Sift together dry ingredients; flour, icing sugar, almond, salt
- Add very cold butter chunks into the dry ingredients, and rub the mixture between your hands until it becomes a sand-like consistency
- Add egg into the mixture and mix with your hands just until the dough comes together
- Knead the dough with the palm of your hand for a minute or two, just until the dough becomes smooth. Do not over-knead the dough and do not use mixer, neither a food processor
- Prepare your muffin pan or 12 mini tart molds
- Take the dough sheet out from the freezer, remove the top of the silicone mat, and cut out circles, using a cookie cutter
- With your fingers, press the dough circles into the tin one by one. Make sure that you work with a dough that is cold enough to be able to handle.
- Once you are ready with all the tart shells, poke them with a fork, then freeze the dough for 1 hour before baking
- Pre-heat oven to 180C / 356F (no fan) while the dough is in the freezer.
- Bake for 15 min in the muffin pan. After 15 minutes the pastry cases will somewhat contract within the pan so you will be able to easily remove them
- Once the tart cases are removed from the muffin pan to a baking sheet, bake for further 10-15 minutes at 160C / 320F (no fan). I suggest baking them in this second step upside down so the bottom of the tart case is up and can fully be baked until golden brown.
- They are ready when they achieve an even golden color, in about 25-30 minutes overall
Filling
- Heat milk, cream, butter, Philadephia cheese, and grated parmesan in a saucepan on low-medium heat, then remove it as soon as the ingredients melt together. By this time, the mixture probably will be simmering
- Pour the mixture back into the saucepan and cook on medium heat for a few minutes until it thickens
- Place the filling into a shallow bowl and cover the entire surface with plastic wrap to avoid skin forming on top. Chill it for an hour before using it
Assemble
- Pre-heat oven to 220C / 428F (no fan)
- Fill each tart shells with the cheese filling using a piping bag
- Whisk one egg with a splash of water and apply a light egg wash on top of the filling
- Pop the tarts bake to the oven and bake for 5-10 minutes or until the top slightly caramelizes
- Serve the baked cheese tarts warm, room temperature or chilled
Notes
- Measure your ingredients with a Digital scale for accuracy
- Use high-quality 82% fat content European style very cold unsalted butter
- In case of nut allergy, almond can be replaced with an equal amount of flour
- Do not skip the salt in the tart shell
- In the filling use full-fat ingredients eg. cream, milk, cream cheese etc.
- If you prefer really sweet desserts, feel free to increase the quantity of the sugar, however, the Hokkaido Baked Cheese Tarts should not be sweet, like a cheesecake, more like sweet & savory
- Make sure you read my Expert tips section above to maximize your success. A short recipe alone is not able to cover all the necessary details, and science behind baking.
- While assembling and kneading the dough, work as quickly as possible without 1. overworking the dough 2. making the dough too warm. Kneading literally should not take more than a minute or two
- The temperature while working with this dough is super important. Too warm? The pastry dough will tear. Too cold? The pastry dough will break. Aim for the in-between, a cold enough dough that is comfortable to work with. Use your fridge or freezer to chill the dough if it gets too warm
- Do not worry if the inside of tart shells don't look perfect after baking, we will fill them anyway, no one will see it:)
- I strongly advise using a Digital oven thermometer to be able to measure your exact oven temperature
Peachystar
Absolutely amazing. I followed the recipe exactly (I always do for the 1st attempt) and the results were really great! As an amateur baker, I went into this thinking there was a chance for failure because the tart shells look difficult. The instructions were right, the key is the cold temperature for the dough.. I had to store mine in the freezer every 3-4min while rolling out the dough - it was a hot day in my city. I also used silicon mats. The results: the most delicious, and buttery tart crust I’ve ever made! The cheese filling was rich, sweet, and lava-like (hint: take your sweet time stirring the filling mixture on the stove. I did it until almost all the lumps were gone. I am definitely using this recipe again. Thank you!!! 😀
Aman Bajpai
nice recipe
Rakiah Tuah
Oh dear chef, I have try this recipe, its so yummy, delicious, the crush so crunchy, the filling is so good, thank you very much
Less
Would this work without the whole milk and if I just the more heavy cream?
Kata
Haven´t tried but I think it should work.
Kate
I want to serve these slightly warm. Can I prepare them up to the point of baking to caramelise and keep them in the fridge until I pop them in the oven?
Kata
Yes that should work very well! Let me know how it goes:)
Beth Mora
Can I use edam.cheese?
Kata
instead of the parmesan, yes probably you can:)
Mamamia
can i make it without the heavy cream?
Kata
Not really, it is needed for the texture. If you dont mind a different texture, maybe you can replace it with another fat-rich dairy product eg. mascarpone.
Tanu
The combination of sweet&savory cheese filling makes this tart super special, even more delicious than I imagined! Will definitely make it again, thank you Katalin 🙂
Gai
Sounds amazing! Would really love to make my own tarts using your recipe! However, I think the heavy cream is missing from the ingredient list. May I know the exact measurement for the heavy cream, please? That's the only info I would need to get started! Appreciate to hear from you soonest 🙂
Kata
Sorry just fixed it:) Let me know how it goes!
Victoria
Hello! Can I use dried grated parmesan cheese? The ones that you use to sprinkle your spaghetti at the restaurants? Thanks
Katalin Nagy
I would not use that, it might be to dry.