Classic French Madeleines are one of the easiest, most delicious little tea cakes you can make. I flavor them with vanilla and lemon for a classic taste, and the iconic shell shape makes them look so elegant. It's clear why this traditional French snack is so popular!

Read what others said about this recipe
"These are delicious, and they come together in no time. It took me about 30 minutes to complete the process, from assembling the ingredients to washing my dishes. The hardest part is the long wait for the batter to rest. This batter is a great foundation to play with flavors." Martina
Best French Madeleines Recipe
Classic Madeleines are small, shell-shaped sponge cakes baked in a special molded baking pan called a Madeleine tin. It's a genoise cake batter with a soft, light texture and a slightly crispy edge that rises during baking to form a so-called 'belly' or bump.
You can find them everywhere in France, but they're easy to bake at home! I love baking homemade madeleines, and I have truly tried to perfect this recipe to make it as good as the ones you get in France. I use browned butter to give a bit of nutty depth, and the batter is rested for a long time to really develop flavor and tenderness.
Getting the shape and texture right can be tricky, and my classic French madeleine recipe will guide you through the process of making this fancy yet easy French tea cake. I include all my pro tips for achieving the classic tender texture, perfect shell-like shape, and signature bump.

Katalin's Take On Why Chill The Madeleine Batter
I cannot stress enough how important it is to chill the madeleine batter! There are various reasons why, and I love getting into the science of baking.
Chilling the batter allows for proper hydration as the flour can absorb the liquid. And when you rest any dough or batter, it will enable the gluten to relax too, which further ensures soft and tender bakes. So, resting the batter in the fridge is what gives you that amazingly moist madeleine texture.
We also want to encourage the bump! The temperature contrast of the cold batter going into a hot oven helps the dough to dome and create the signature madeleine hump (sometimes called the belly!). Letting it thoroughly chill before baking is essential.

Chilling also helps develop the madeleine taste. Fat absorbs flavor, so the brown butter in the batter will have time to absorb the flavors of the vanilla extract and lemon zest, or any other flavors you include.
For practical reasons, chilling the batter also makes it easier to spoon it into the special madeline pan! The butter in the batter will harden as it cools, which thickens and firms up the batter.
So, in conclusion, don't skip the chilling time in this classic French-madeleines recipe, and now you see why!
Ingredients
- 110 g (½ cup) Brown butter. Start with approximately 140g unsalted butter, brown it, then measure.
- 100 g (½ cups) Granulated sugar
- Zest of 1 lemon
- 15 g (1 tablespoon) Whole milk
- ½ teaspoon Vanilla extract
- 2 Eggs at room temperature
- 125 g (1 cup) All-purpose flour
- 3 g (1 teaspoon) Baking powder
Make the brown butter
Every classic French madeleine recipe starts with melting butter. But browning the butter (known as a buerre noisette) gives them an extra dimension!
Cut the butter into even pieces and place them in a saucepan over medium heat. Ideally, use a saucepan that is pale in color so you can see when the butter starts to brown.
Stir the butter as it melts, and it will start to sizzle and then foam. After 5-6 minutes, the foam will subside, and the milk solids will separate and start to toast and brown. This is when you need to be careful not to burn the butter! As soon as the melted butter is golden brown and you have specks of browned milk solids in the pan, remove it from the heat.

Pour it into a heatproof bowl to prevent it from cooking, which will also help it cool down to room temperature faster, so you can continue making your madeleines.
The Madeleine batter comes together in 5 minutes
Once the brown butter is done, it is easy peasy!
Finely grate the lemon zest into a small mixing bowl, being careful not to include any of the white pith. The white layer of pith is bitter, and we do not want it in our madeleine batter.
Add the granulated sugar into the bowl and use your fingers to gently massage the lemon zest into it for a minute.
Now add the eggs to the bowl and whip the mixture together for around 3 minutes until it is pale and fluffy. Add the milk and vanilla extract. The milk and eggs should both be at room temperature to properly emulsify; don't use them straight out of the fridge.

Sift the flour, salt, and baking powder in a separate bowl. Then use a rubber spatula to gently mix the flour mixture into the egg mixture in thirds, not all at once. Don't overmix it, as we don't want to knock any air out (which will not help us achieve the bump!)
Finally, fold in the cooled brown butter. Make sure it is at room temperature, or the eggs can scramble! But it still needs to be liquid. Cover the bowl with plastic food wrap and place it in the fridge to rest. For best results, rest for at least 24 hours, or overnight.

Bake and Pray for the Bump
Preheat the oven to 200°C/390°F (no fan).
Brush the madeleine pan cavities with melted butter, making sure to brush it into all the grooves. Then, shake a sieve of flour over the top to create a fine coating. Tap out any excess and put the pan into the freezer for 5 minutes.

Take your chilled batter from the fridge and use a spoon or a piping bag to fill each cavity about ¾ of the way to the top. It will be roughly a tablespoon of batter in each. Don't overfill them, or the batter will spill over the top of the mold when it rises! But too little and they might be a bit flat.
Freeze the filled pan for another 5 minutes, then place it straight into the oven.

Bake the madeleines for 6 minutes, then reduce the oven temperature to 180°C (355°F) and continue baking for an additional 7 minutes. Starting at the higher temperature will help them to dome, but then the reduced heat stops them from drying out and gives them an even color.
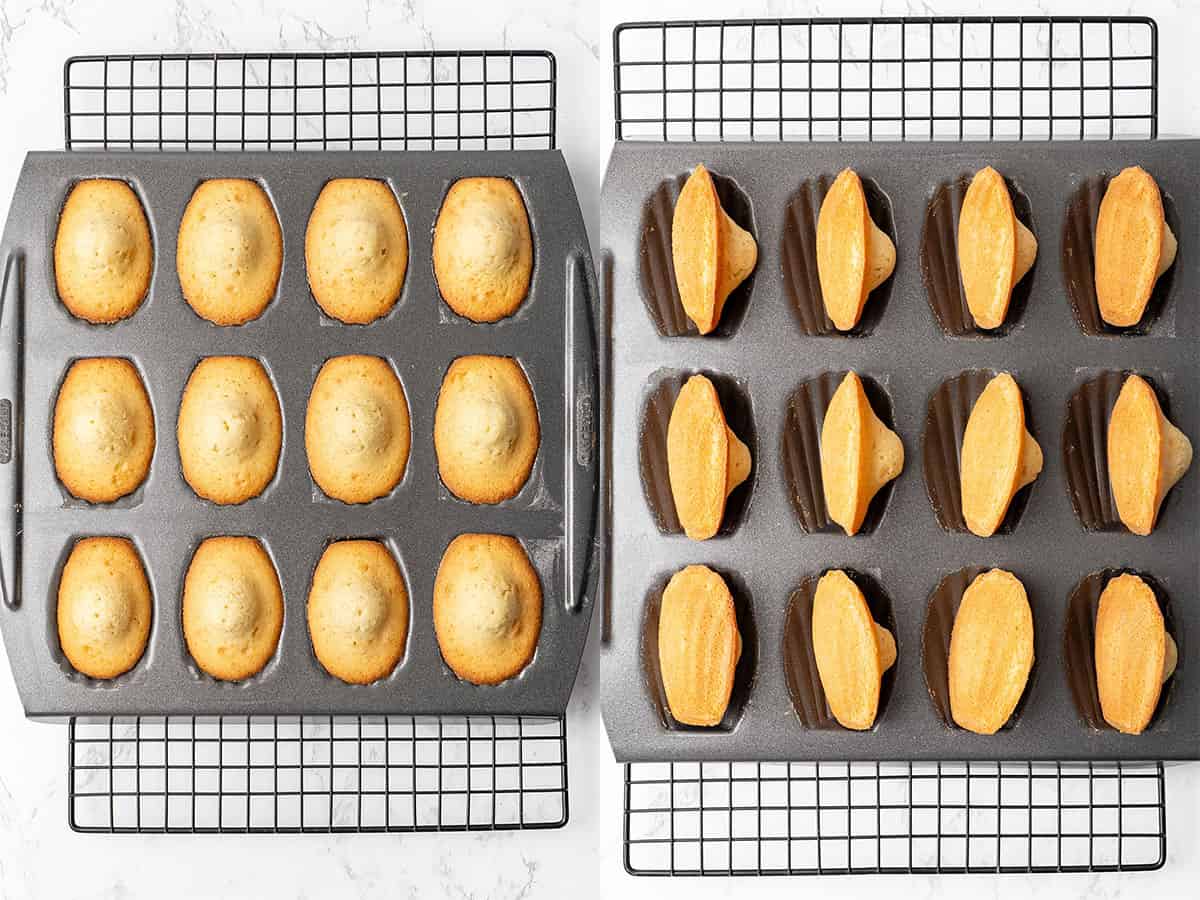
Take the madeleines out of the oven. Then I like to carefully turn them a bit and let them rest for a few minutes in the tray on their sides.
Dust with powdered sugar to serve.
Try Some Other Flavor Variations
Once you have mastered a basic madeleines recipe, you can adapt it in so many ways. Try grating some orange zest, or lime zest into the batter to give it a different citrus zing.
I also like using ground spices, like cinnamon, cardamom, or even pumpkin spice! Orange zest and cardamom are delicious together.
You can also add herbs like rosemary or thyme, which taste wonderful when added to the batter. Earl Grey tea is also a classic addition, giving a sophisticated flavor profile.
Dipping madeleines in chocolate is a great way to elevate them! If you want that snap, you'll need to temper the chocolate first, or simply dip them like my chocolate-dipped strawberries recipe.

Expert tips for making madeleines
- Use the best quality, unsalted European-style butter you can find. The quality of French pastries always comes down to the quality of butter!
- You will lose a bit of volume when browning the butter due to evaporation, so start with a bit more than you need and weigh it after you've finished.
- The eggs and milk both need to be at room temperature before you begin.
- All-purpose or pastry flour works best for traditional madeleines. Remember, this is a sponge cake, so you want to avoid high-gluten-content flour (so no strong bread flour). If you want to be a pro when it comes to deciding what type of flour to use in your baking, check out my flour guide.
- Baking powder alone is not what causes the bump, so adding more will not help! It's more about the technique, so follow my instructions closely.
- I find that setting the oven to a higher oven temperature and then turning it down helps to achieve the bump without any darker spots. Feel free to experiment with your oven to see what works best.
- Doubling the recipe is easy. Make a double batch, leave half in the fridge, and after baking the first set, wash and dry the pan. Then, grease it again and bake the rest as instructed.

Useful equipment
For consistent results, use a digital scale to weigh your ingredients by the gram.
Combine the batter using an electric hand mixer at first, then switch to a rubber spatula to avoid overmixing.
To get the classic French madeleine shape, you will need a proper madeleines tin!
I recommend everyone invest in an inexpensive digital oven thermometer to check that you are baking at the right temperature. Oven temperature is so important in baking.
Try Some Of My Other Tea Cakes
If you enjoyed baking these dainty French Madeleines, try some of these other recipes next:
And check out my round-up of the best mini desserts!
Get More Recipes

Secretly easy to make, beautiful desserts E-book is available now!
16 easy-to-follow spring dessert recipes with step-by-step instructions. Smart baking tips and expert techniques so you know what to do and why it works. 5 bonus baking guides answering the most common reader questions. Personal tips and tested variations that help you mix and match with confidence.
- No expensive tools required
- No special ingredients
- No advanced skills required
- All recipes include both American (cups and Fahrenheit) and European (grams and Celsius) measurements
Get the recipes now: Yes, I want to bake beautiful desserts!
Leave a Reply