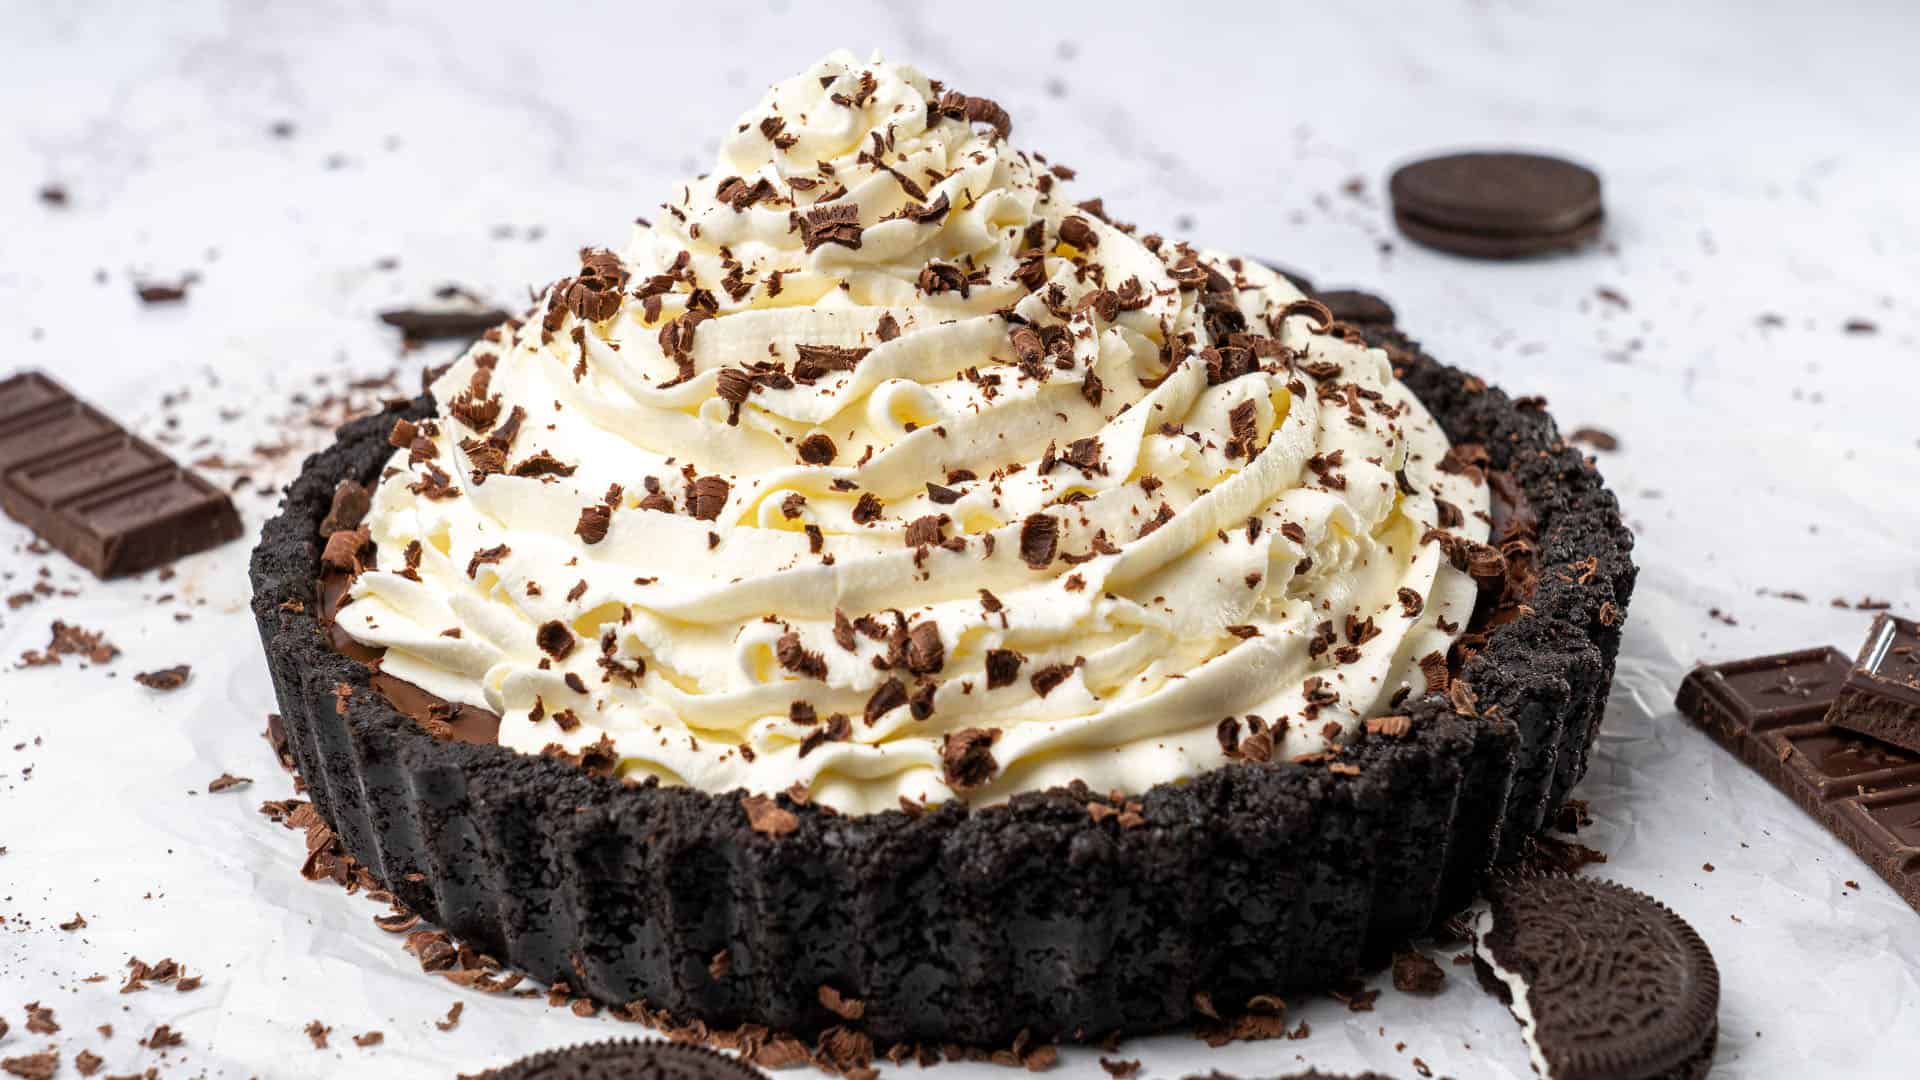
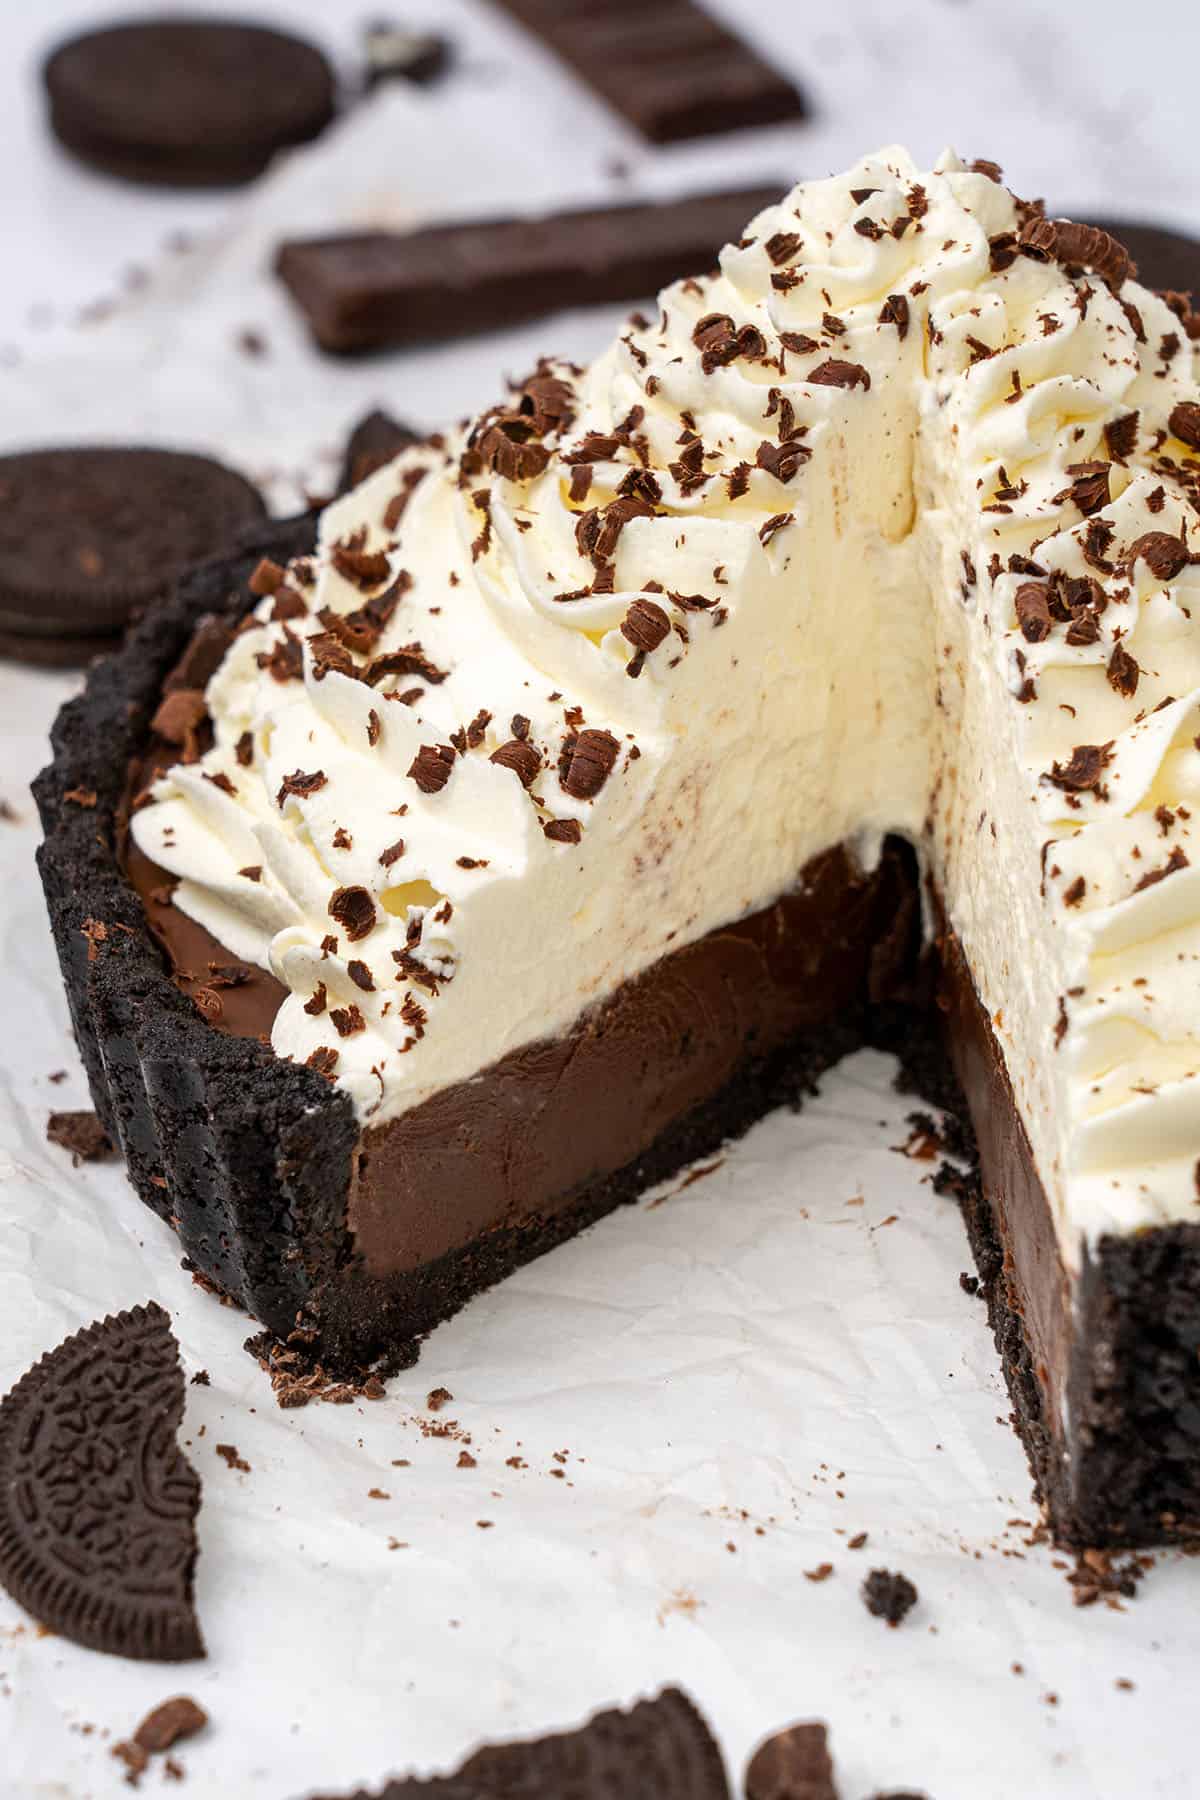
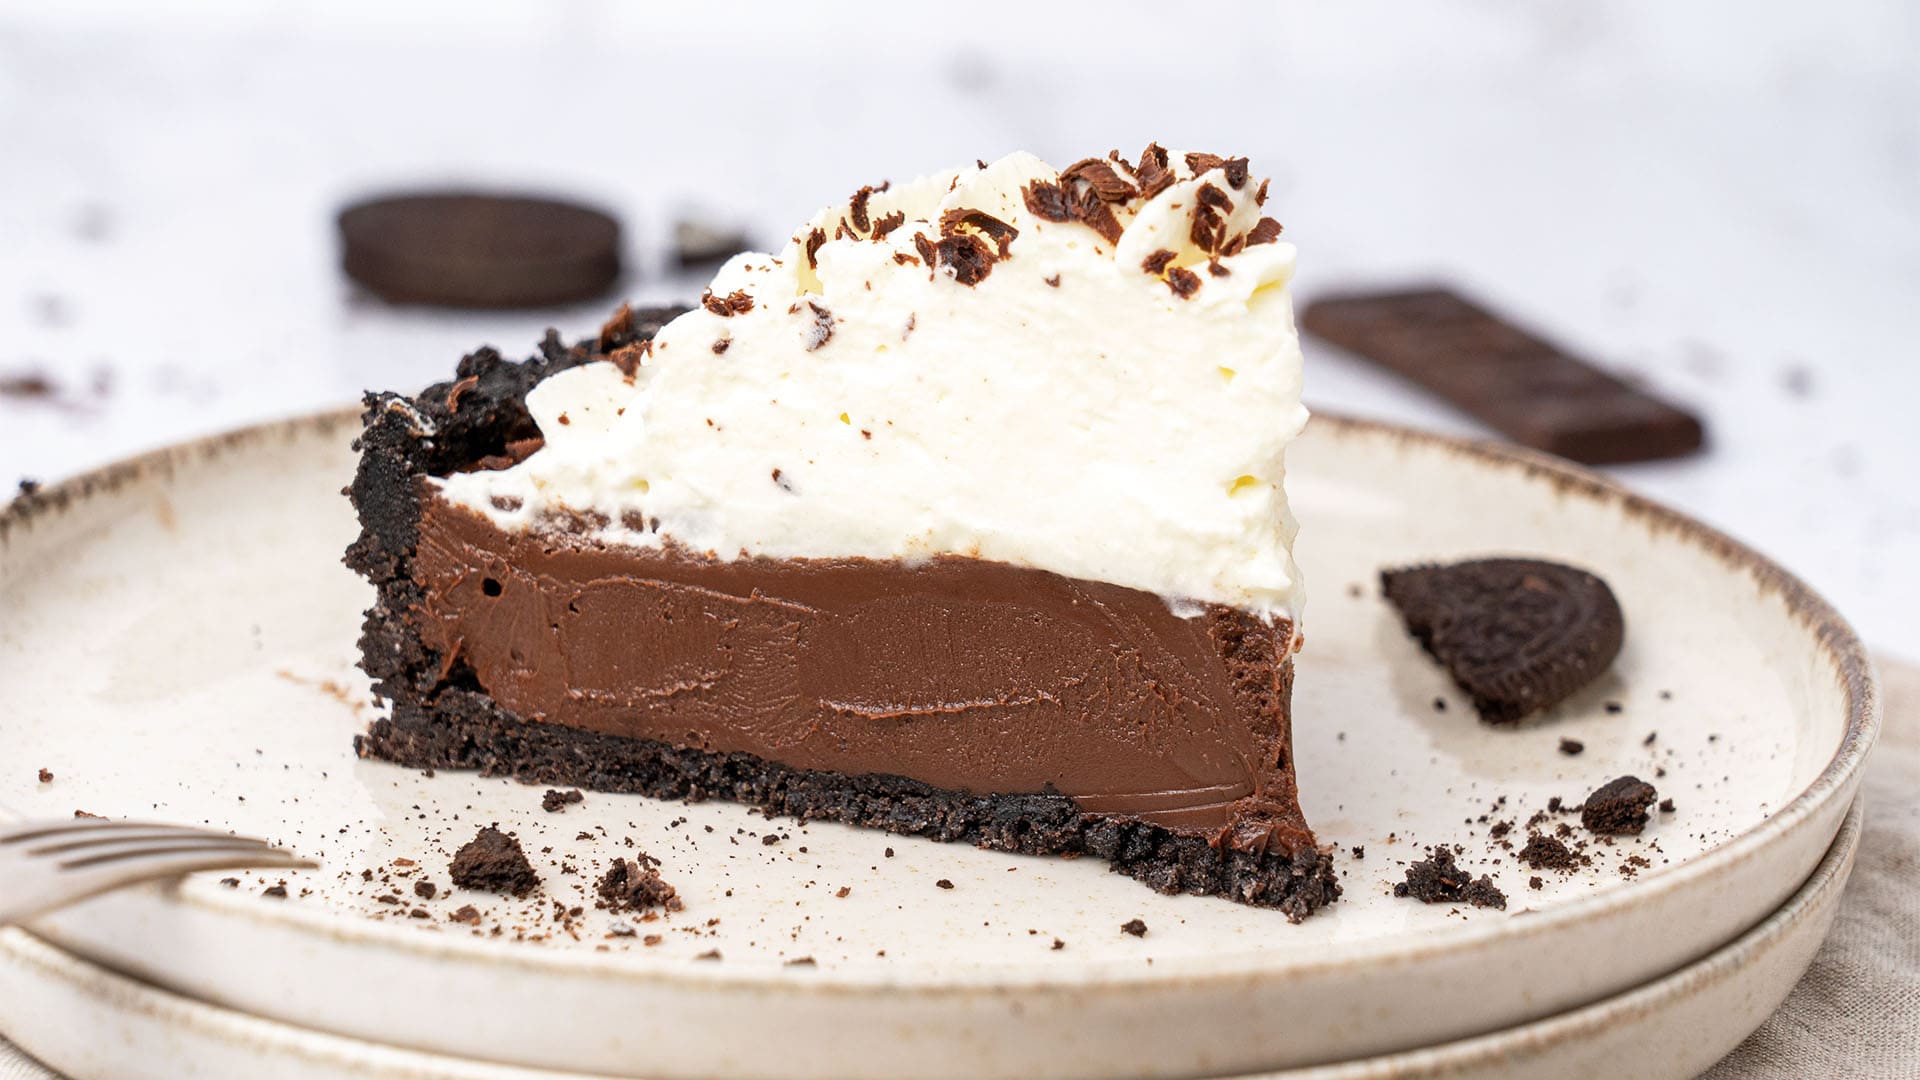
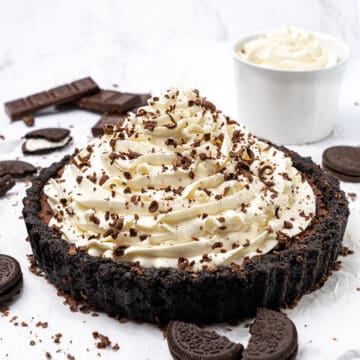
This no bake chocolate pie recipe is the ultimate combination of convenience and elegance! Featuring a rich and velvety chocolate ganache filling nestled within a heavenly Oreo cookie crust and crowned with fluffy Chantilly whipped cream, this delightful dessert is a true masterpiece perfect for any occasion and sure to impress any crowd!

Jump to:
🌟 Why this is the best recipe
- It’s the most delicious - Move over chocolate pudding pie! This no bake chocolate pie with rich ganache, a crunchy Oreo cookie crust, and light Chantilly whipped cream topping is simply irresistible.
- It’s easy and elegant - This easy chocolate cream pie recipe strikes a perfect balance between effortless and elegance. With clear step-by-step instructions and a short preparation time of just 30 minutes, even novice bakers can achieve impressive results.
- It’s a crowd pleaser - This decadent no-bake chocolate pie with Oreo crust is always a hit! Whether at laid back family gatherings or upscale celebrations, this dessert's widespread appeal makes it a good choice for any occasion.
📝 Ingredient notes
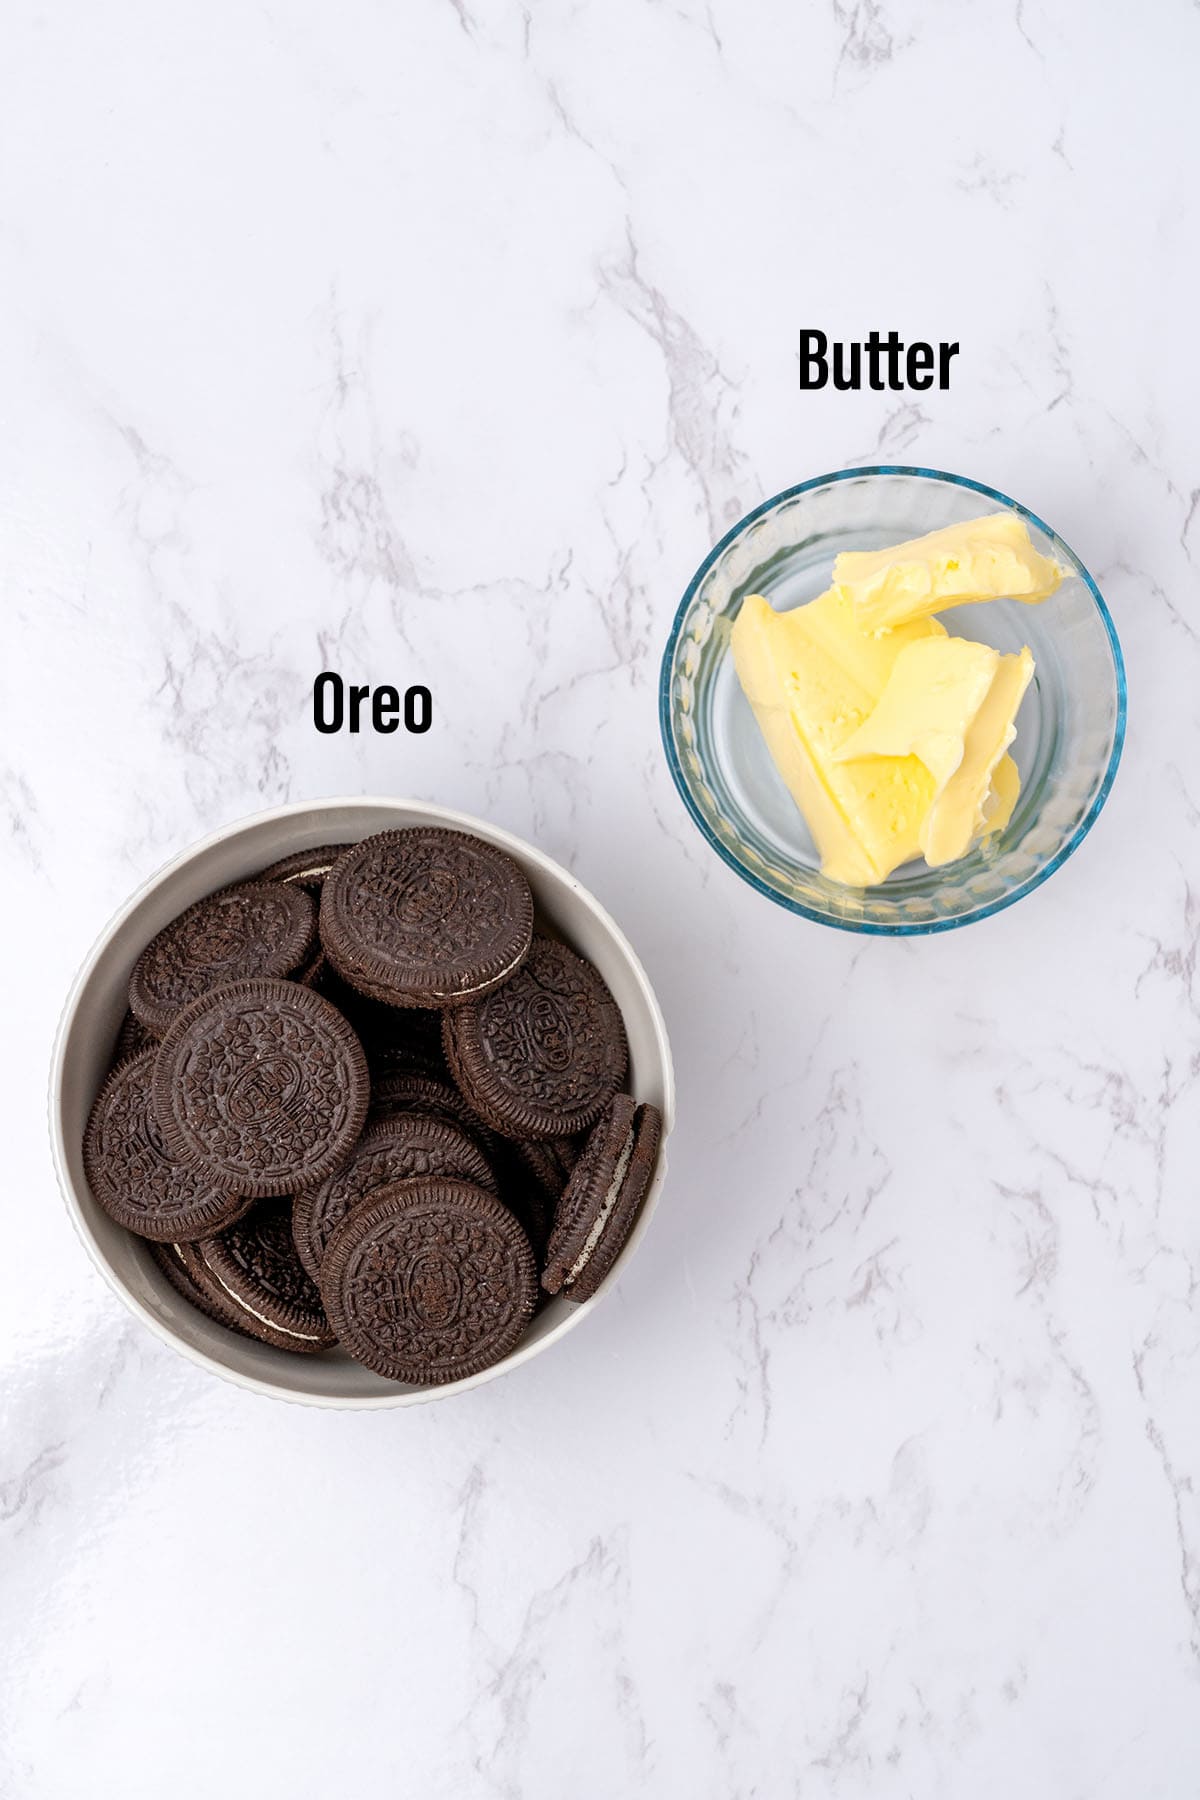
For the Oreo pie crust
- Butter - Melted butter helps to bind the crust. You should always use unsalted butter in baking.
- Oreo Crumbs - Made with crushed whole Oreo cookies, it gives the crust its signature flavor as well as a crunch!
- Salt - Balances the sweetness and enhances the chocolate flavor.
🛒 You’ll find detailed measurements for all ingredients in the printable version of the Recipe Card at the bottom of this post
For the Chocolate filling
- Dark Chocolate - It’s important to use high-quality chocolate when making no bake chocolate pie. I use Callebaut 811 Dark Chocolate with 54.5% cocoa butter content, which is a much higher percentage than average chocolate chips.
- Heavy Cream - Gives the no bake chocolate cream pie its creaminess. It’s crucial that you use high-fat heavy cream with at least 36% fat to achieve the proper texture.
🛒 You’ll find detailed measurements for all ingredients in the printable version of the Recipe Card at the bottom of this post
For the Whipped cream decoration
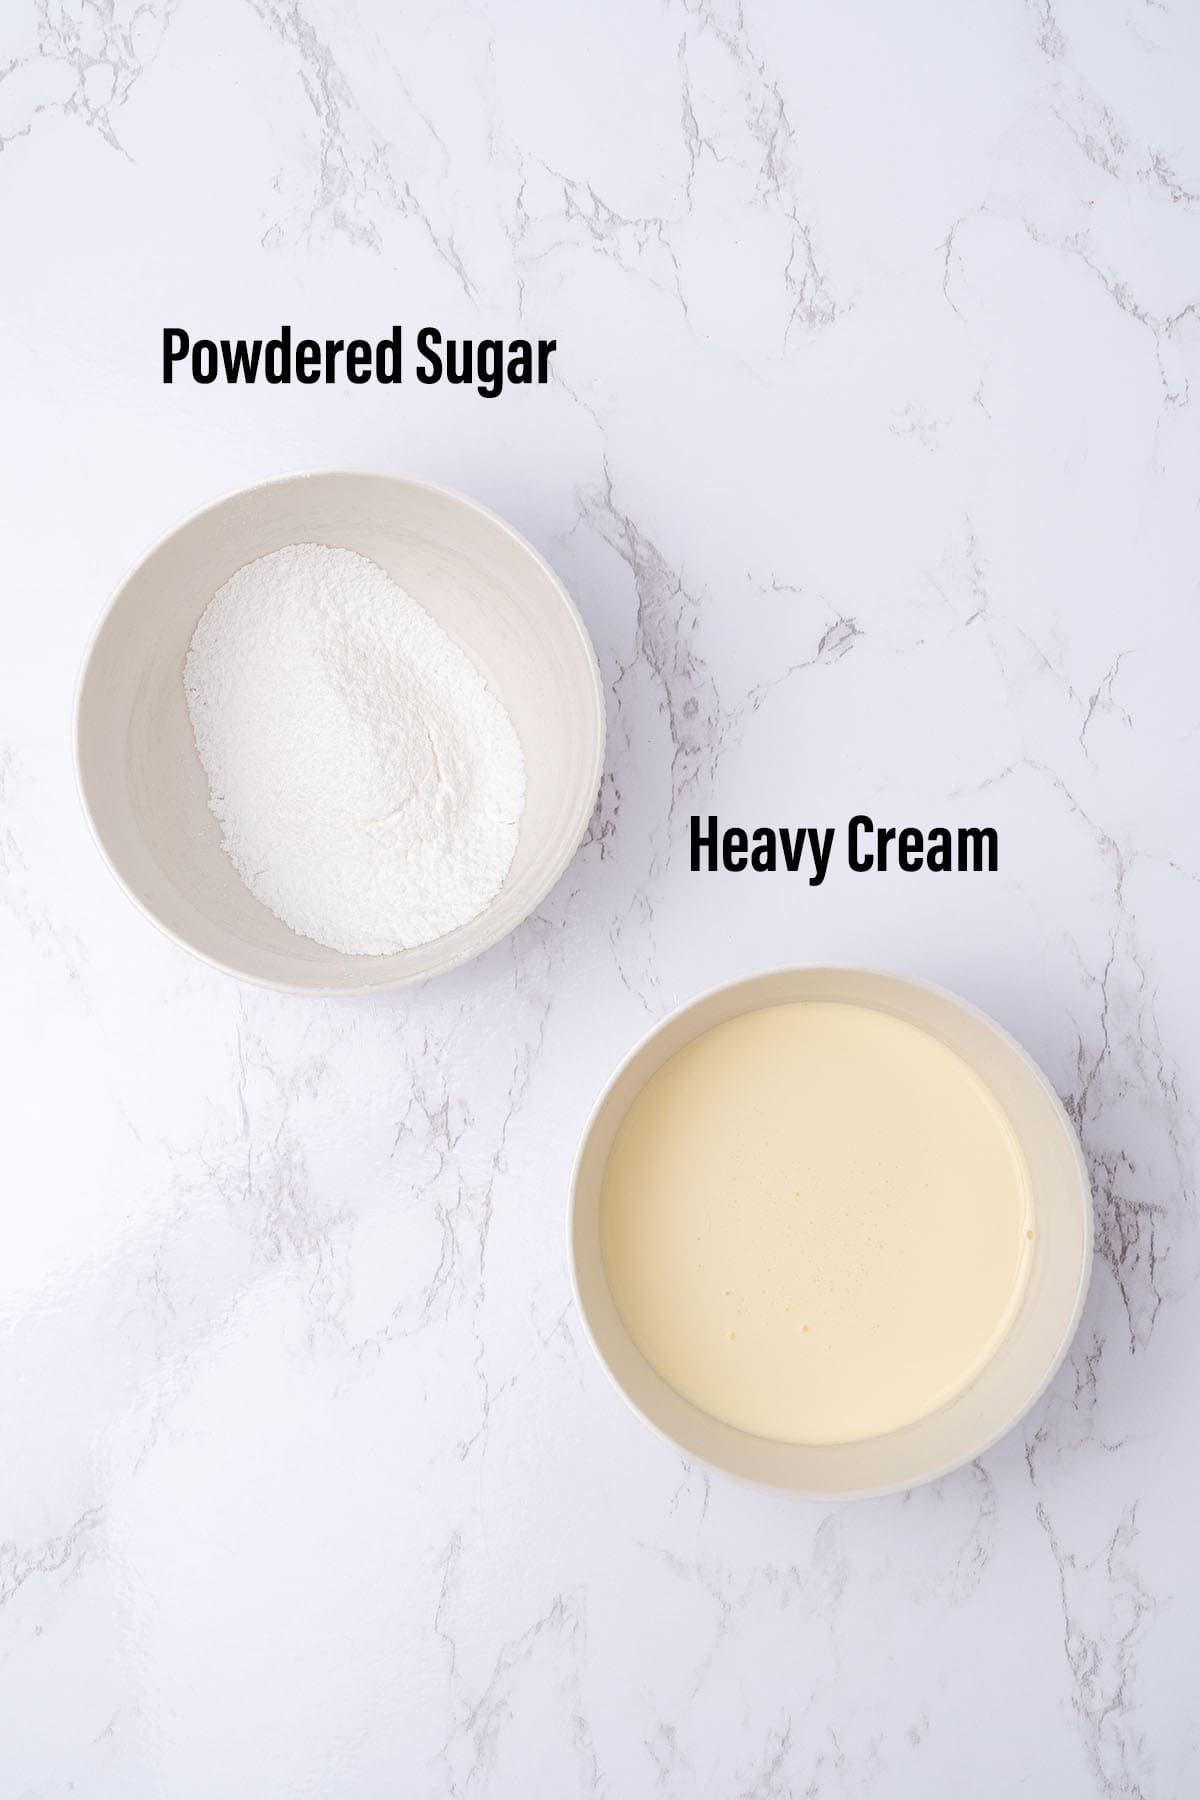
- Heavy Cream - You must use very cold, high-fat heavy whipping cream to make whipped cream. Cream with less than 36% fat content will not whip up properly.
- Powdered Sugar - Provides just a hint of sweetness. It’s important to always sift your powdered sugar to prevent any lumps.
🛒 You’ll find detailed measurements for all ingredients in the printable version of the Recipe Card at the bottom of this post
👩🍳 How to make this recipe
1. How to make Oreo pie crust
For more details, tips, and tricks, check my Oreo crust recipe.
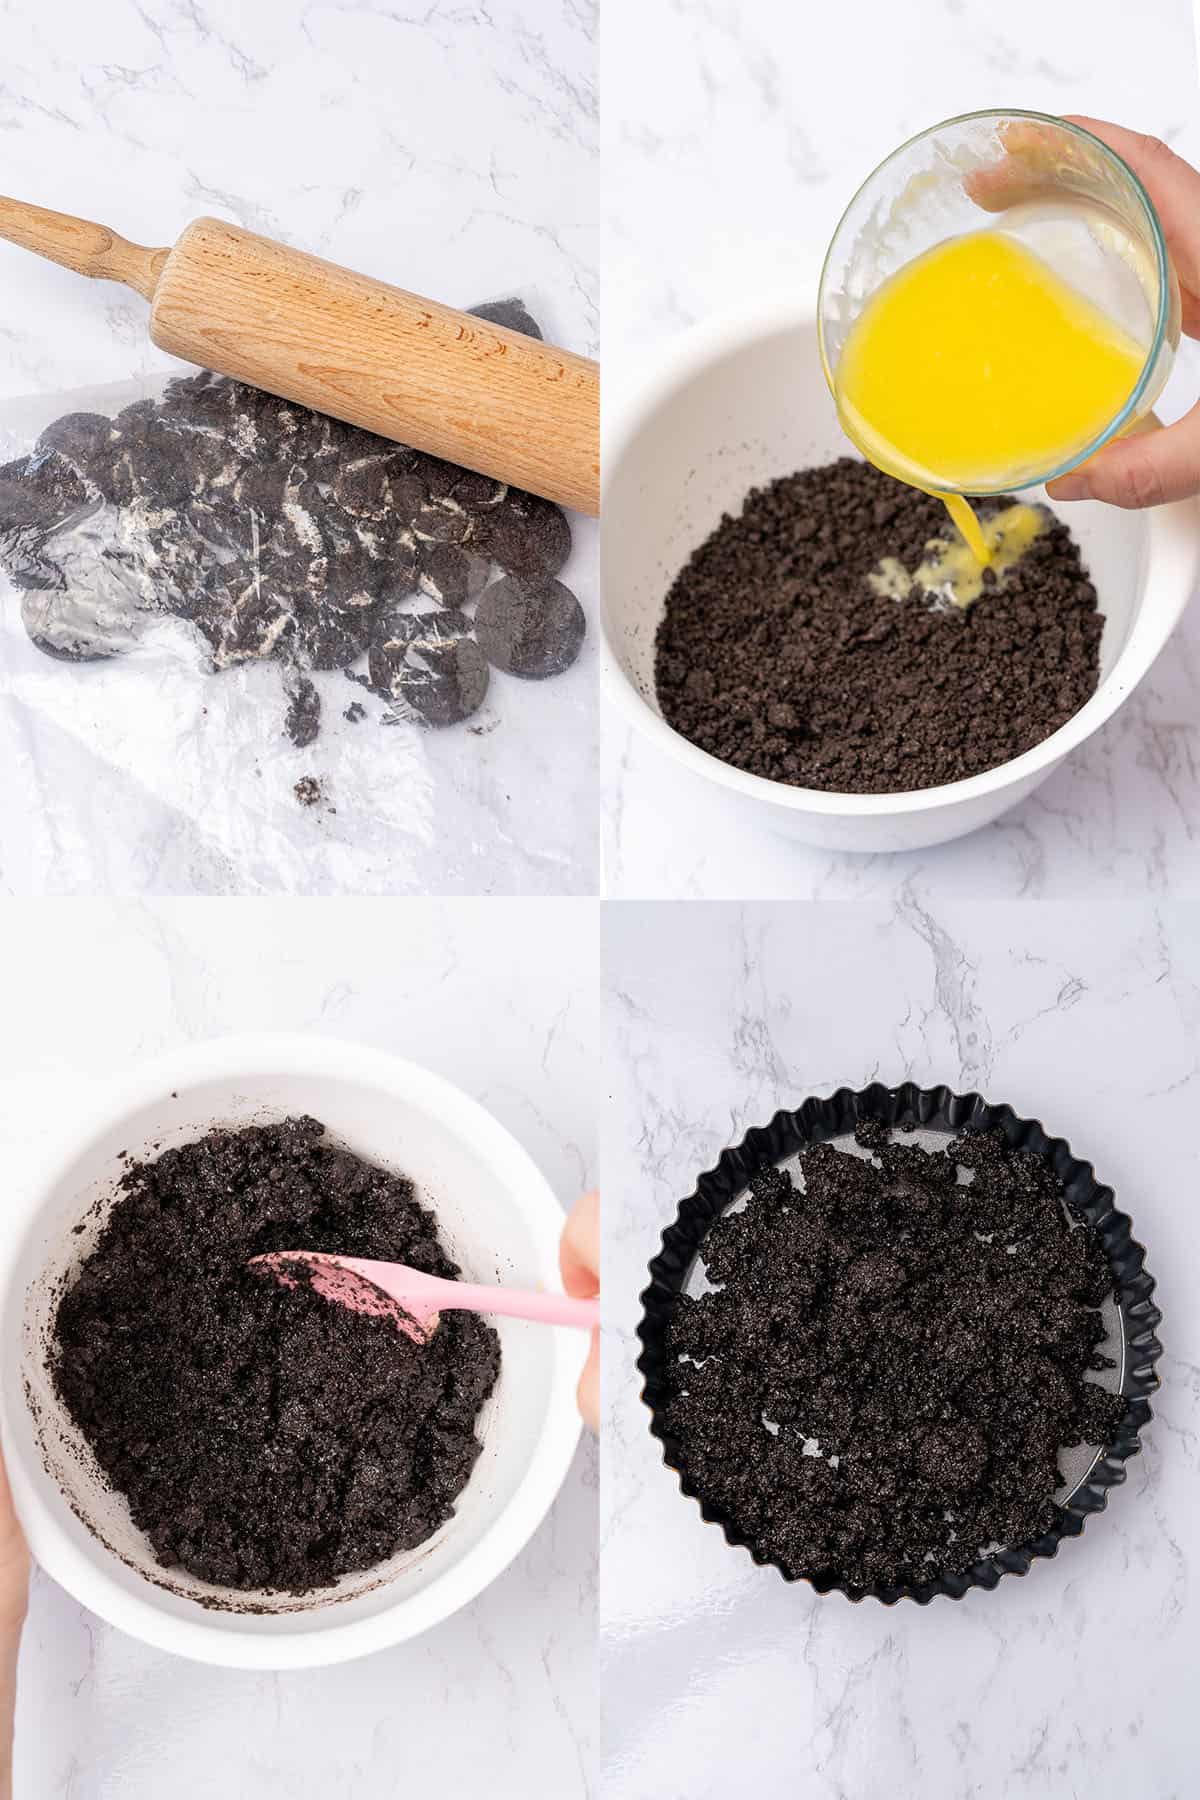
- Melt the unsalted butter on low power in the microwave. Then let it cool down a bit while you make the crumbs.
- Make your Oreo cookie crumbs by pulsing them in a food processor or putting them in a sealed bag and beating them with a rolling pin.
- Combine the crumbs together with the warm butter (not hot) and a pinch of salt until they are evenly coated in butter. If the mixture seems runny, put it in the fridge to chill for a few minutes.
- Put the cookie mixture into your pie pan and then firmly press it evenly into the pan starting at the sides and finishing with the bottom. I like to use a flat bottom glass or bent spoon, but you can also use your fingers.
- Put the formed Oreo cookie crust in the freezer for 15 minutes before adding the filling.
💡 Top Tip: The crumbs should be very fine and all about the same size. There should be no large chunks of cookies in your crumbs.
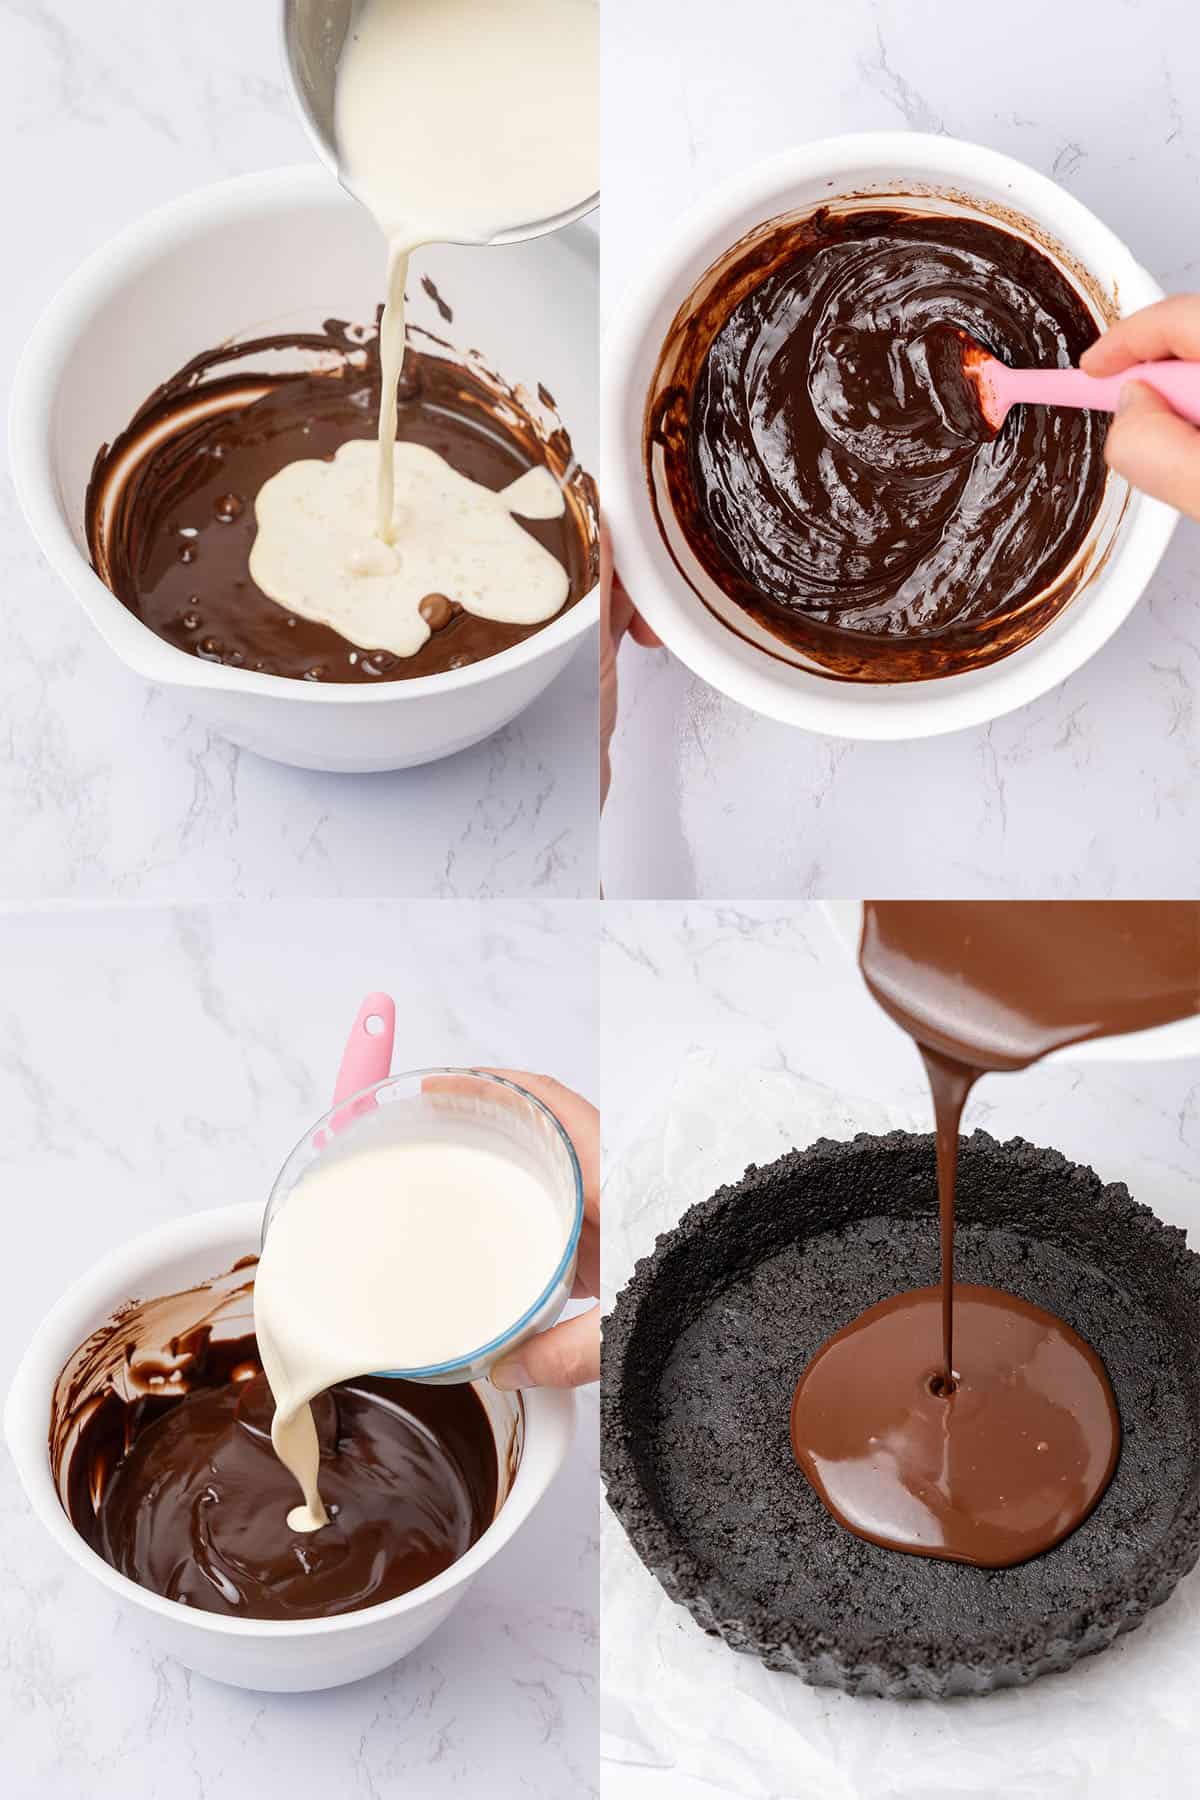
2. How to make the chocolate filling
- Put the finely chopped chocolate into a microwave-safe bowl and partially melt it in the microwave.
- Heat the first 190 grams of heavy cream just until it reaches a simmer. Then pour the warm cream over the partially melted chocolate. Now, allow the mixture to sit for a minute and then stir to combine.
- Add the remaining 190 grams of cold heavy cream to the chocolate mixture. Then stir until everything is smooth and fully combined. At this point, the ganache should be cool and rather liquid.
- Pour the chocolate ganache into the frozen pie crust. Now, put the no bake Oreo pie in the fridge to chill for at least 4 hours.
💡 Top Tip: Watch the chocolate closely in the microwave to avoid burning it. You can also check out this helpful baking guide to learn more about how to melt chocolate.
3. How to make chantilly cream
For more details and tips on how to make perfect chantilly cream frosting that is stiff enough but not too stiff, check my chantilly cream recipe.
- Don’t begin this step until the chocolate ganache has set in the pie crust.
- Put the cold heavy cream and sifted powdered sugar into a large mixing bowl.
- Use an electric hand mixer to whip the mixture for about 2 to 3 minutes until it’s a fluffy and pipeable consistency. Once hard peaks start to form, you need to stop whipping immediately or the whipped cream will break.
💡 Top Tip: Chill your mixing bowl and beaters before you begin making the whipped cream. This not only helps keep the heavy cream cold but also enhances aeration.

3. How to assemble this No bake Chocolate Pie with whipped cream
- Transfer the whipped cream into a piping bag and then pipe it on top of the pie. You can also spoon it on top if you prefer.
- Then garnish it with chocolate shavings.
- Store the pie in the fridge until you are ready to serve.
- The no bake chocolate pie will keep for 2 to 3 days in the refrigerator.
💡 Top Tip: Add gelatin or mascarpone to make a stabilized Chantilly cream, which will maintain its shape for a longer period of time even at room temperature.
📚 Flavor variations & Substitutions
While this chocolate ganache pie with Oreo crust is amazing just as it is! You can easily add other flavors or use substitutions to cater to different dietary restrictions.
- Fruity: Add some orange zest to the ganache. Better yet, sprinkle some crunchy strawberry shortcake crumble on top or serve it with a side of strawberry compote.
- Nutty: Mix chopped nuts like toasted almonds or pecans into the crust for added crunch or drizzle it with creamy peanut butter, hazelnut butter, or pistachio butter.
- Spices: Add a pinch of cinnamon, ginger, cardamom, or pumpkin pie spice to the crust or ganache for a bit of warm spice.
- Caramel: Drizzle the top with some homemade caramel before adding the whipped cream.
- Cream Cheese: Make a no-bake chocolate pie with cream cheese frosting by replacing the whipped cream with my delicious cream cheese frosting.
- Liqueur: For an adult twist, add a splash of coffee liqueur, Irish cream, or amaretto to the ganache.
- Cookie Swap: While chocolate Oreos are the classic choice, you can switch it up with other types of Oreos or even make no bake chocolate pie with graham cracker crust.
- Flavored Whipped Cream: Add a little cocoa powder to make chocolate whipped cream or a splash of vanilla extract to make classic French Chantilly cream.
- Dairy-Free: Swap the butter with vegan butter, use a heavy cream substitute like coconut cream, and a dairy-free whipped cream topping.
🥣 Equipment Notes
Learning how to make no bake chocolate pie is simple and only requires basic tools!
For this recipe, you’ll need a 20 cm / 8 inch loose base pie tin to form your chocolate cookie crust, as well as an electric hand mixer to make the light and fluffy whipped topping.
But most importantly, as with all recipes, you should use a digital scale to accurately measure your ingredients.
🎓 Expert tips
- Do not use hot melted butter. It must cool slightly before being combined with the cookie crumbs to achieve the proper texture.
- You must let the Oreo crust chill in the freezer for at least 15 minutes before adding the ganache.
- The trick to a no bake pie crust is to firmly press it into the sides and bottom of your pan.
- Butter begins to soften at room temperature, so don’t keep the cookie crust outside of the fridge for more than 20 minutes.
- Use high-quality chocolate. The richness and flavor of this no bake chocolate pie heavily relies on the chocolate you choose.
- When making the whipped cream, the heavy cream must be the high-fat version and super cold to become fluffy.
- Immediately stop whipping the cream when early stiff peaks form. You don't want to accidentally overwhip and have it break.
❓Recipe FAQs
It could be due to incorrectly measuring your chocolate-to-cream ratio or using low-fat content cream and low-quality chocolate. The ganache also might not have been given enough time in the fridge to set.
Yes, just like chocolate cream pie this no bake chocolate pie contains dairy and can spoil if left at room temperature for too long.
Cover it with plastic wrap or place it in an airtight container. Then put it in the refrigerator and consume it within 2 to 3 days.
Yes! The pie can be stored in the freezer for up to 2 months and thawed in the fridge overnight. However, freezing can alter the texture slightly, so it's best to consume it within a few weeks.
🥧 More No bake desserts

Have you tried this recipe?
Please leave a 5-star ⭐️⭐️⭐️⭐️⭐️ rating on the recipe card and consider leaving a comment as well! I would love to hear about how your dessert turned out and your feedback also helps other Readers!
No Bake Chocolate Pie
Ingredients
Oreo Crust
- 76 g (⅓ cups) Unsalted butter melted but not hot
- 250 g (22 pieces) Oreo cookies crumbs
- Pinch of salt
Chocolate ganache filling
- 310 g (1¾ cups) Chocolate good quality semi sweet chocolate eg. Callebaut 811 Dark chocolate callets
- 190 g (¾ cups) Heavy cream 36% fat, will be heated
- 190 g (0.8¾ cups) Heavy cream 36% fat, use it cold
Whipped Chantilly cream
- 230 g (1 cups) Heavy Cream 36% fat, use it cold
- 30 g (¼ cups) Powdered sugar sifted
Decoration
- Chocolate shavings
US customary cup measurement is an indicative figure only. Measure the ingredients with a digital scale by weight (gram). Baking is art but also science which requires precision and accuracy.
Instructions
Oreo pie crust
- Melt the butter in the microwave on low heat. Then let it cool down slightly while preparing the Oreo crumbs.
- Make the Oreo crumbs either in a food processor or by using a zip bag and rolling pin.
- Mix the cookie crumbs with the warm butter and a pinch of salt until it comes together and the crumbs are evenly covered with the butter. If the mixture is too runny, place it into the fridge for a few minutes.
- Line a pie tin with the cookie mixture and press it evenly into the pan using a bent spoon or a small flat-bottom cup. Alternatively, you can use your fingers. I recommend you start with the sides and then finish with the bottom. Make sure to pack the crumbs down into a flat and even layer.
- Put the crust in the freezer for 15 minutes before adding the chocolate filling.
Make the chocolate ganache filling
- Put the finely chopped high-quality semi-sweet chocolate into a microwave-safe bowl and then partially melt it in the microwave.
- Heat the first 190 grams of the heavy cream just until it's simmering. Then pour the warm cream over the partially melted chocolate. Now, let the mixture sit for a minute and then stir it together.
- Pour the remaining 190 grams of cold heavy cream into the bowl and stir until it's fully combined with the chocolate. The mixture should be cool at this point.
- Pour the chocolate ganache into the frozen Oreo crust. Then refrigerate it for a minimum of 4 hours so that the ganache can set.
Prepare the chantilly cream
- Once the chocolate ganache sets, whip the very cold heavy cream and powdered sugar together with an electric hand mixer until it's fluffy and pipeable. This will take about 2-3 minutes. Once the whipped cream reaches early stiff peaks, right after soft peaks, you need to stop whipping.
- Pipe or spoon the whipped cream over the chocolate layer and then garnish it with chocolate shavings.
- Chill the pie until ready to serve.
- Leftovers can be stored refrigerated for 2-3 days.
Notes
- When melting the butter, make sure that you do not overheat it. It also needs to slightly cool down before it's used.
- If the butter and Oreo crumb mixture is too wet, chill it for a few minutes before pouring it into the pie dish.
- For a different pie base, check this graham cracker crust recipe.
- The one and only secret to making a firm, neat crust is to press the crumbs firmly and evenly into the sides and the bottom of your pie tin. A bent spoon is probably the best equipment for this step.
- Because butter becomes soft again at room temperature, it is not recommended to keep this crust out of the fridge for longer than 20 minutes or it will start to melt.
- This chocolate ganache filling - due to the higher cream vs. chocolate ratio - is creamier and less hard than normal 1:1 chocolate ganache. It will be super silky even straight out of the fridge.
- Be careful not to overwhip the heavy cream topping or it will separate, get runny, and then it will turn into butter.
Leave a Reply