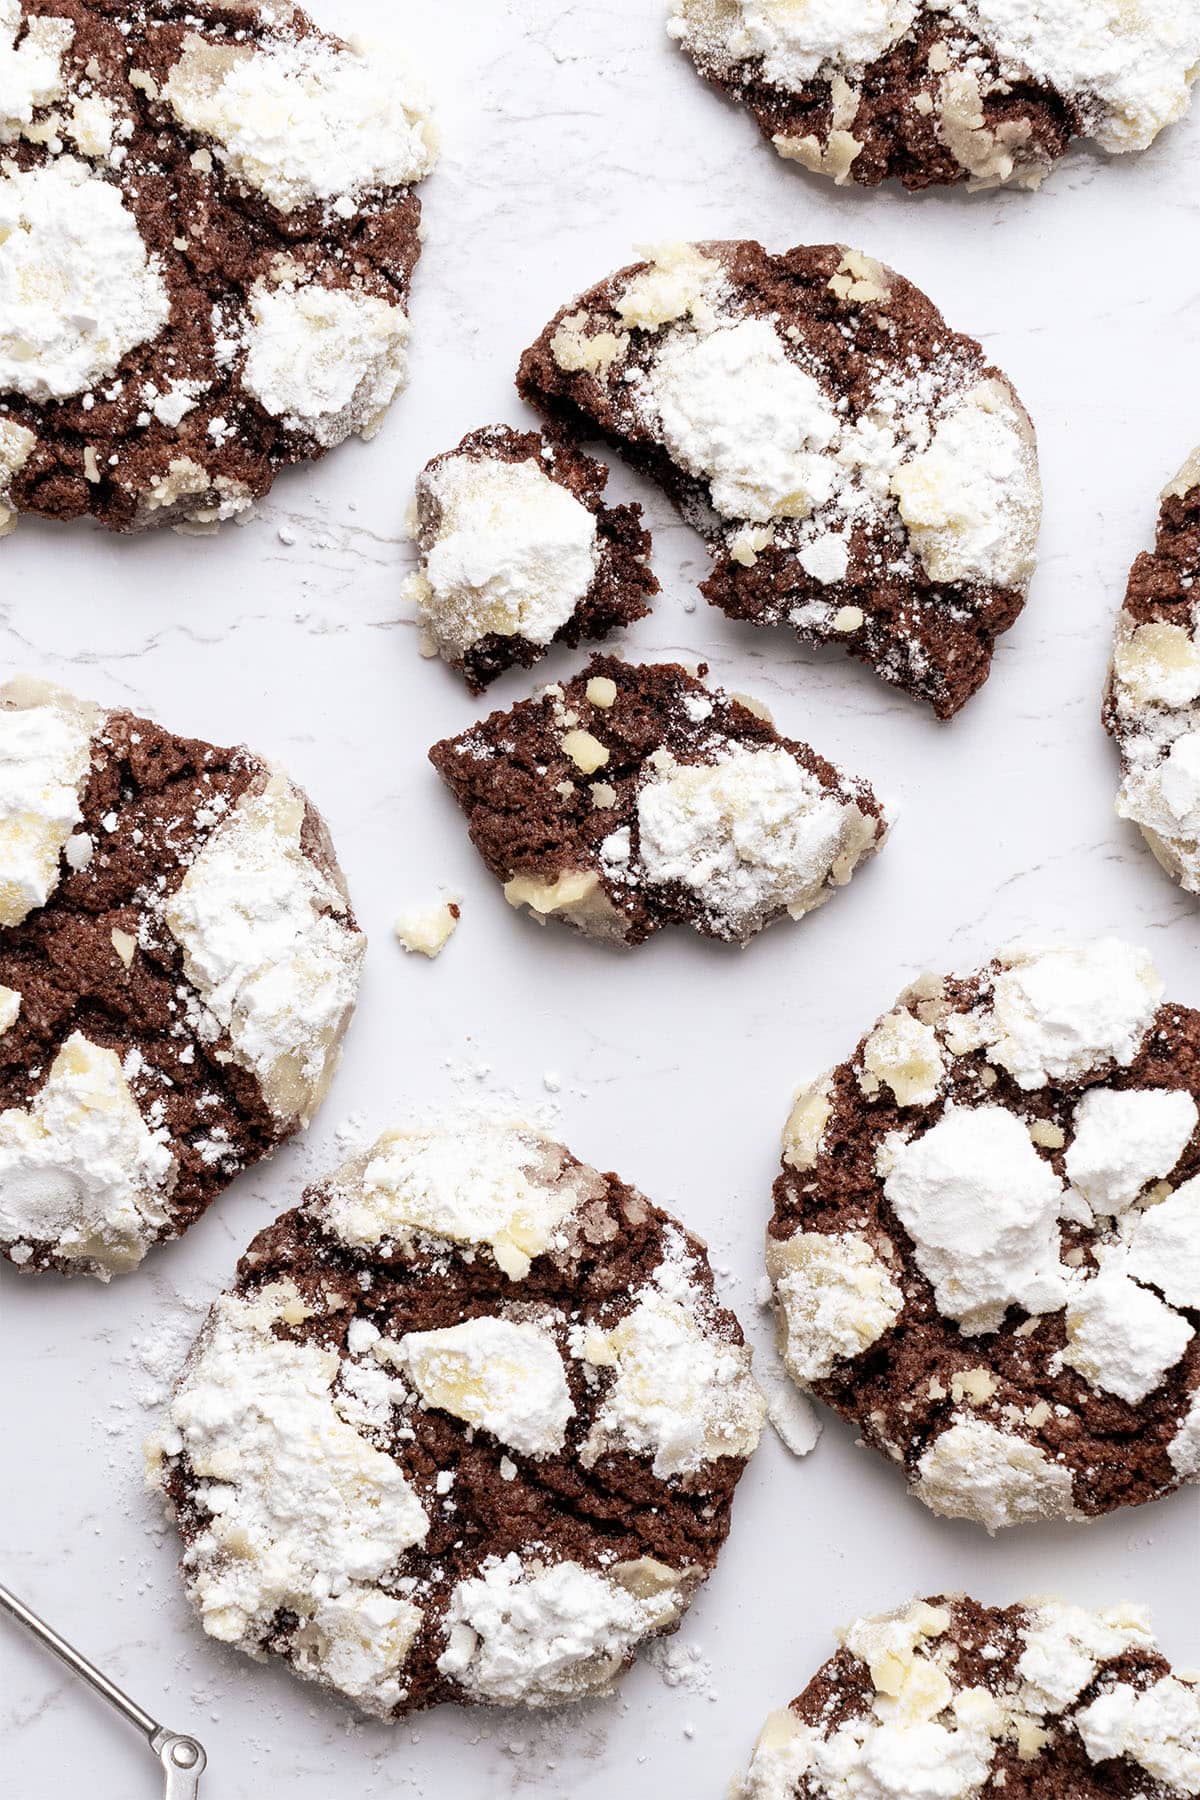
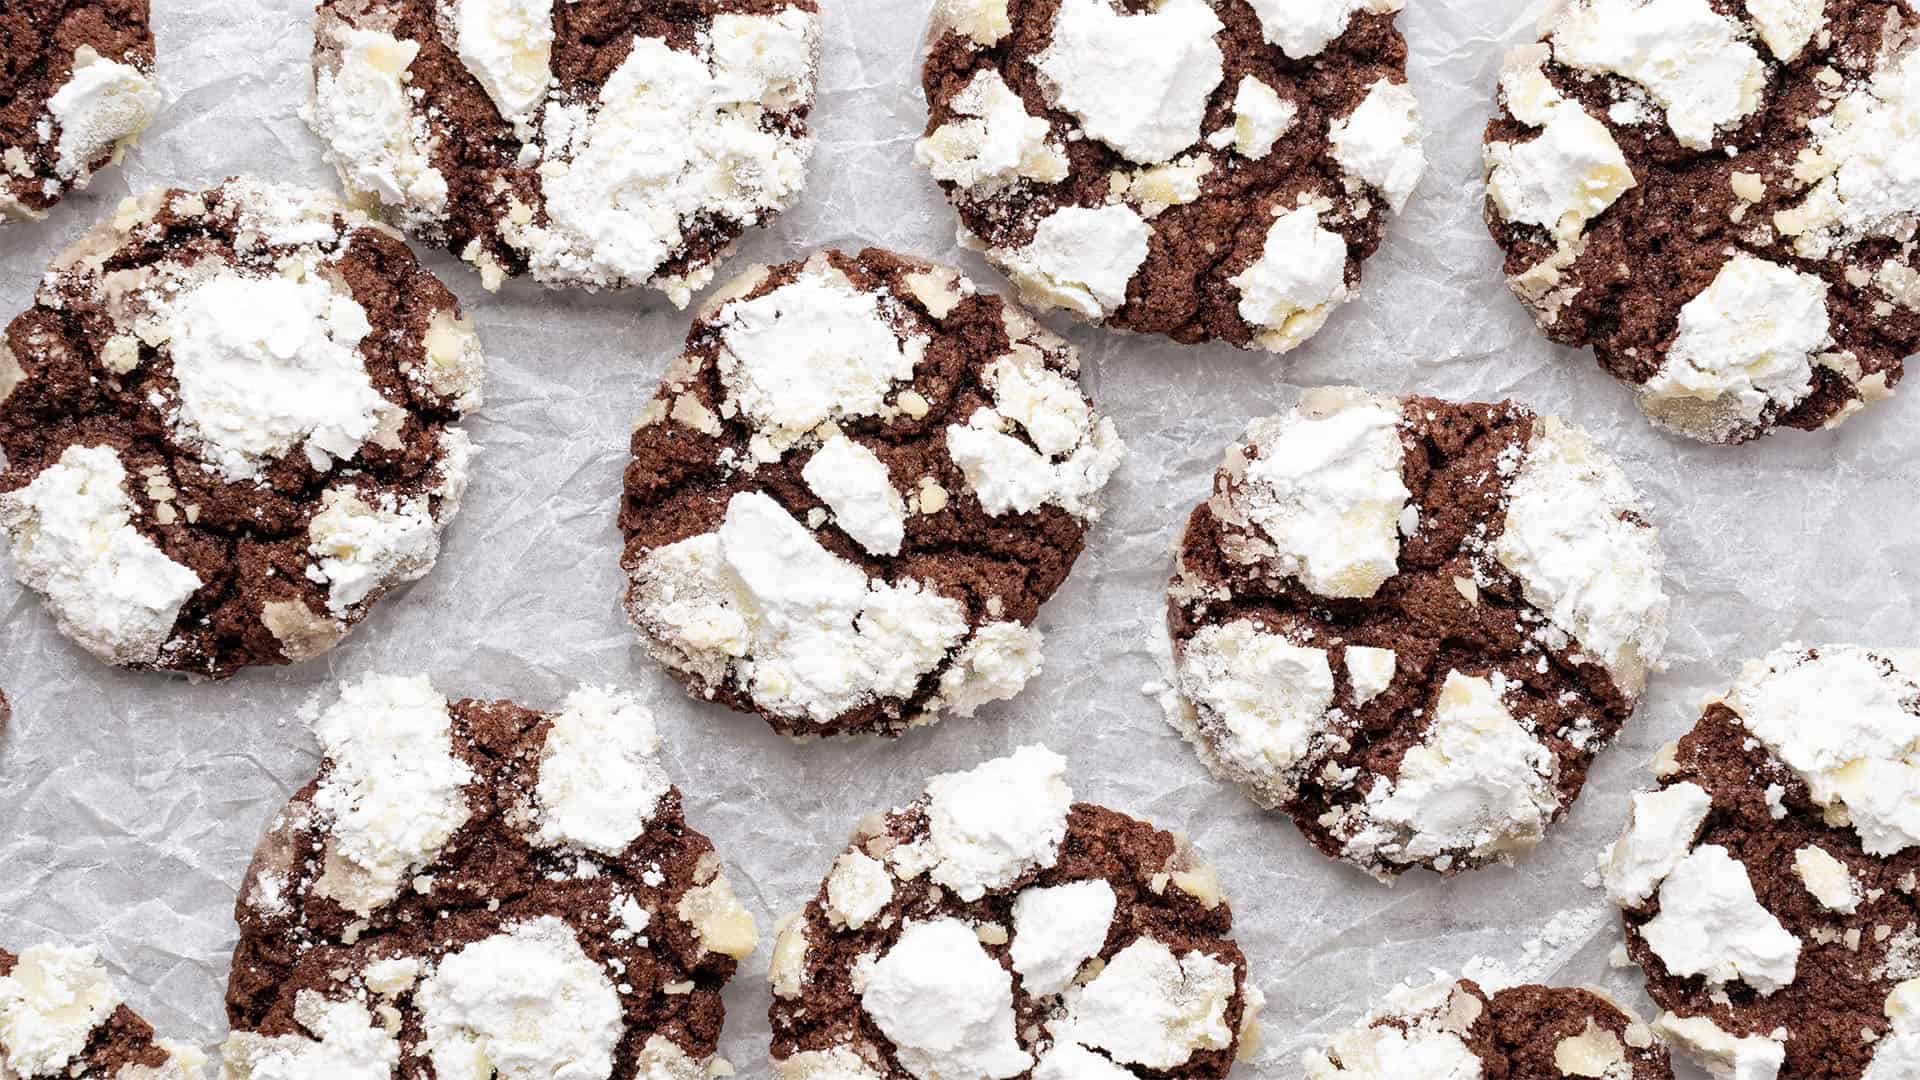
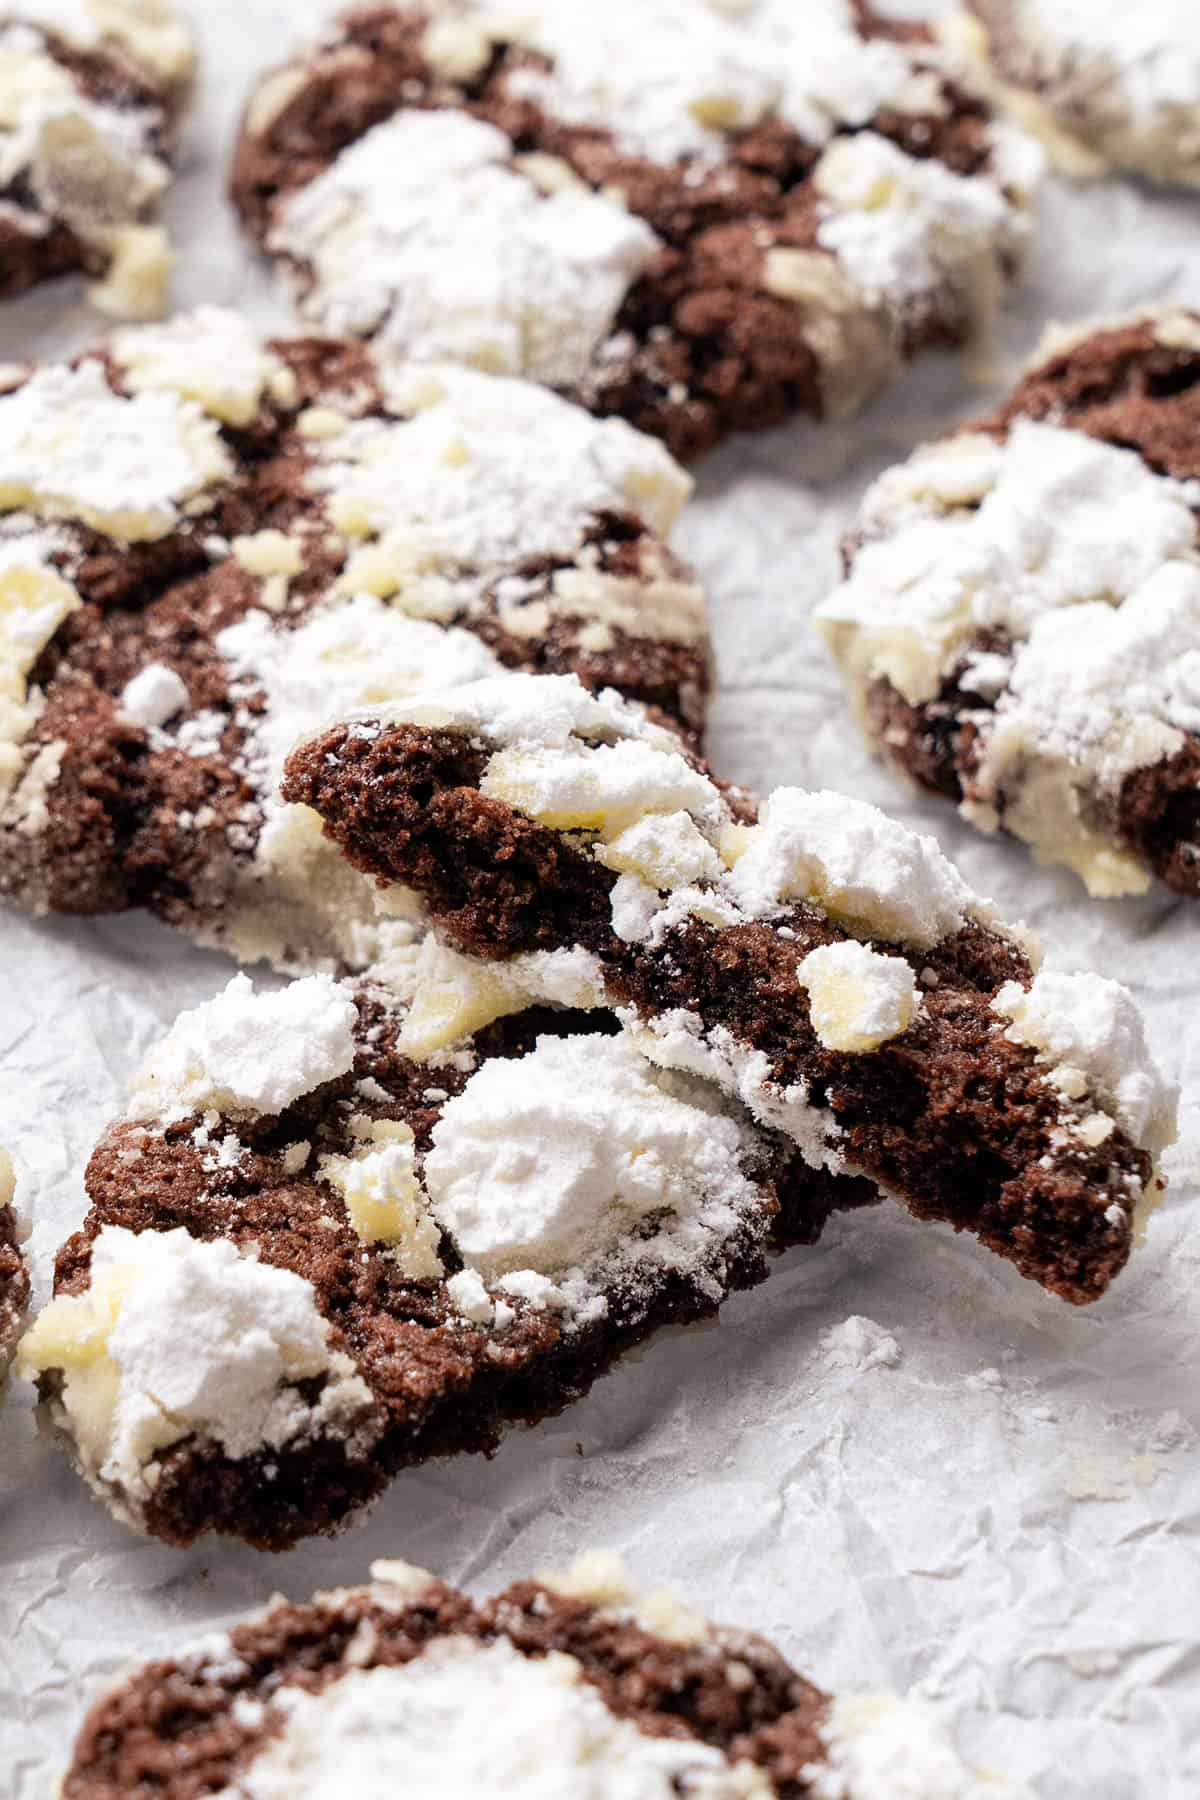
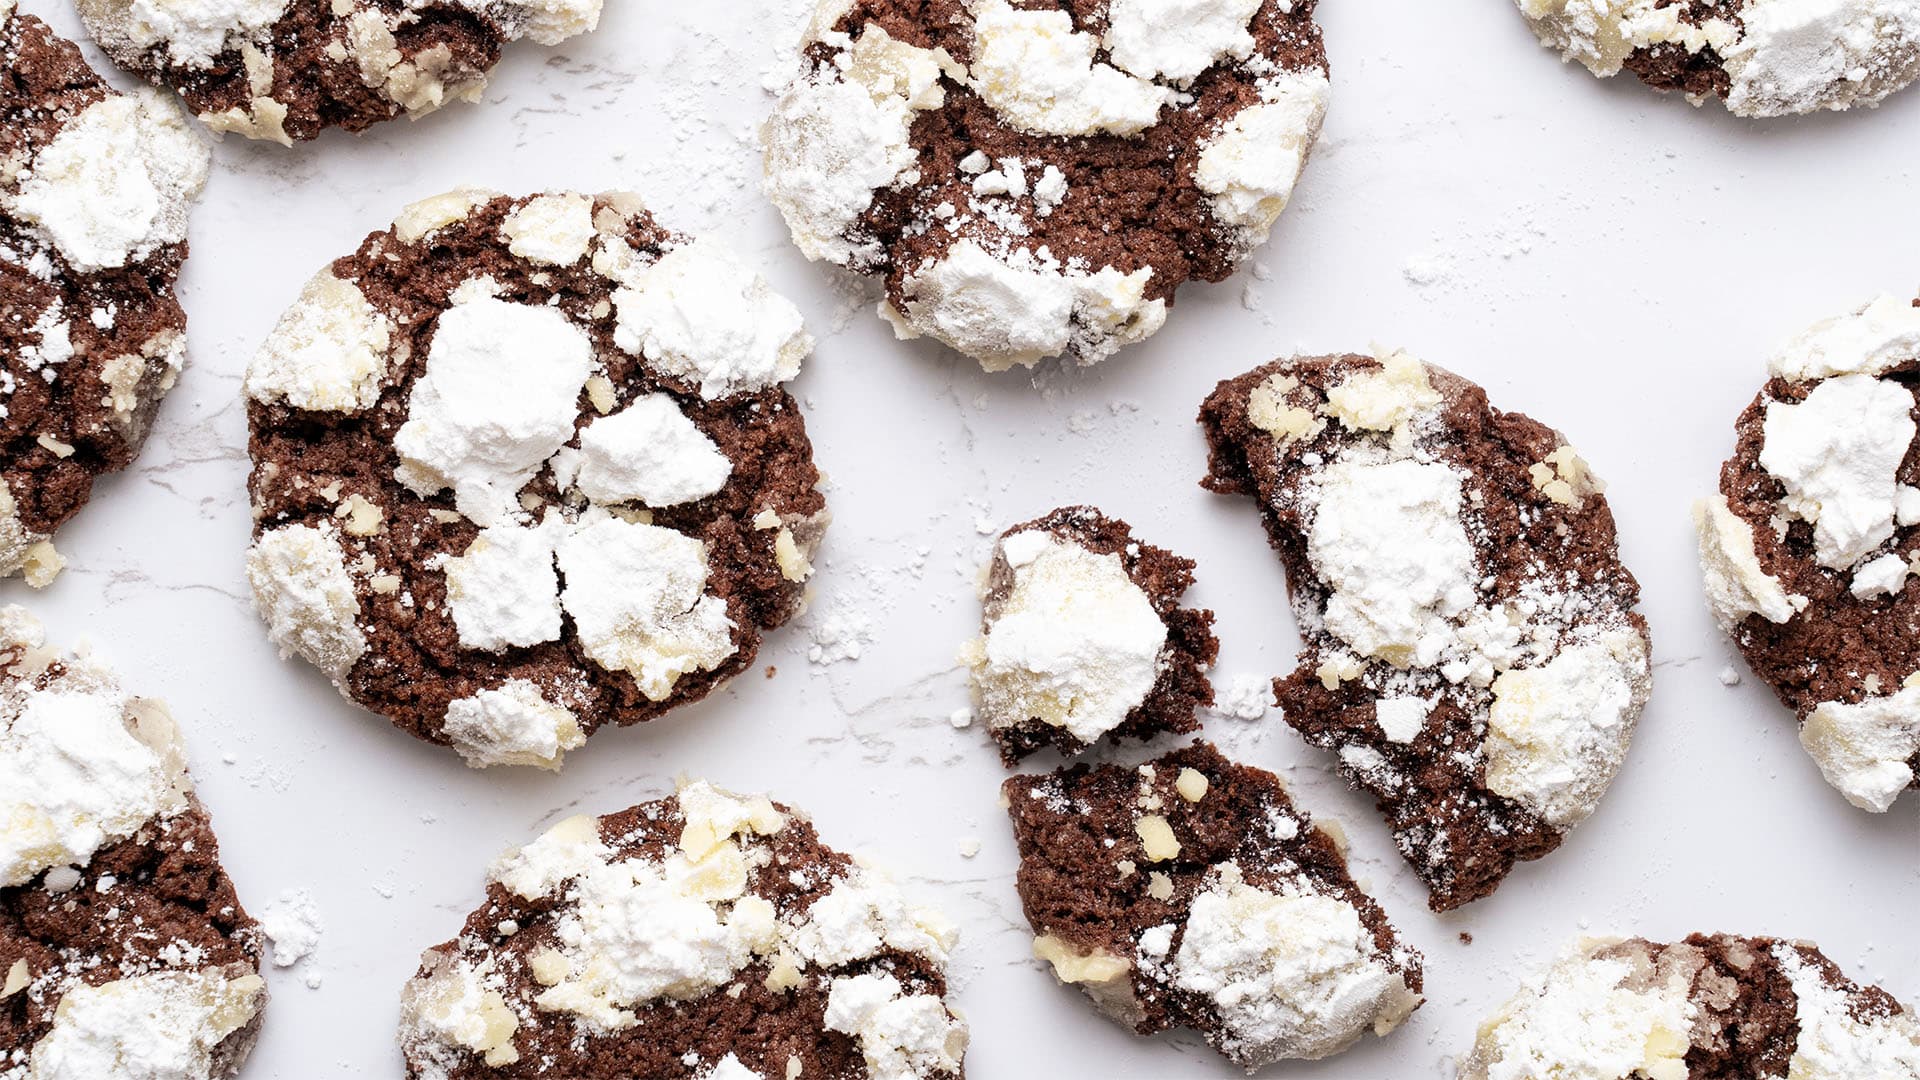
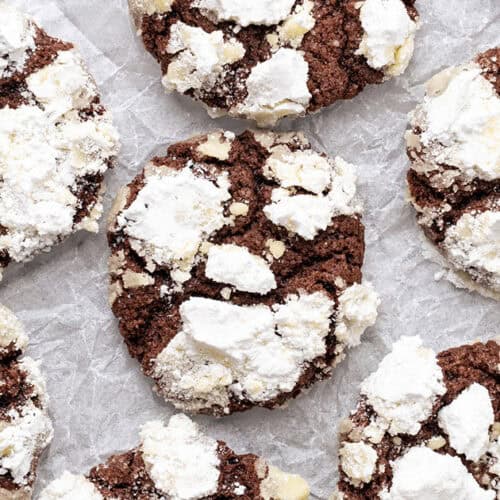
These chocolate crinkle cookies are fudgy and irresistibly soft with a crackled appearance that looks straight out of a bakery window. Made with deep cocoa flavor and rolled in two layers of sugar, they bake into soft cookies with a brownie-like center that everyone loves!
What you can expect making this Chocolate Crinkle Cookies recipe
This crinkle cookie recipe is beginner-friendly and designed to give you bakery-quality results at home. It was created so that every bite is loaded with chocolate flavor with a soft, crave-worthy center.
I tested multiple recipe variations before perfecting these cookies, saving you the hassle! My tests included butter-only and oil-only doughs, but this recipe uses both, which gives you the best of both worlds. The butter adds richness, and the oil keeps the cookies soft for days. They're the perfect combination of flavor and texture.
Another big difference is how important the sugar is in my recipe. Rolling the cookie dough balls in two layers of sugar is a step some recipes overlook, but it's super important because it is what makes that crackled top happen consistently every time.
Once the cookies are baked and cooled, you'll have a delicious dessert that is a stunner in both flavor and appearance.
Katalin's key take on how to achieve the signature crinkle top on the cookies
That iconic crackly top is not luck. It is the result of a few intentional steps working together. Crinkles form when the outside of the cookie sets faster than the inside while baking. As the dough continues to spread and rise in the oven, its surface cracks, creating the signature crinkled appearance.
Chilling the dough is one of the most important parts of this process. A properly chilled dough holds its shape just long enough for the exterior to set first, creating those defined cracks.
The double sugar coating is another key factor that should not be skipped. The granulated sugar creates a barrier, while the powdered sugar adds the pop of white that shows through the crinkled top. Be heavy-handed with the sugars.
Oven temperature and timing are also important. A properly preheated oven ensures the cookies start setting immediately on the outside. If the oven is too cool, the cookies will spread before the structure sets, flattening the crinkles.
Make the cookie dough
Before you begin, make sure your butter and egg are at room temperature. Stick with unsalted butter so you can control the salt level in the recipe. Using salted butter will make these too salty.
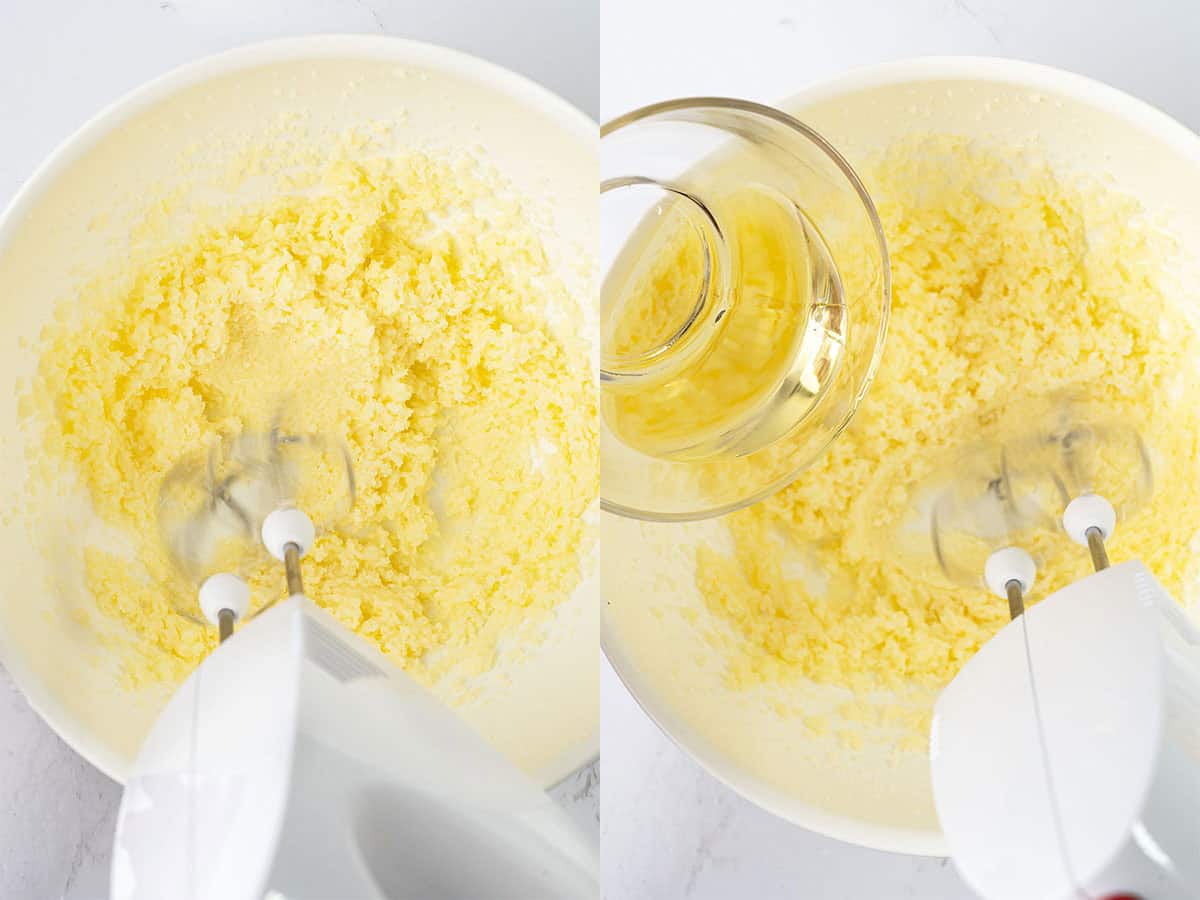
Cream the butter and granulated sugar together using an electric hand mixer. After a few minutes, the mixture should become light and fluffy. If it's not at that texture, don't stop. It will get there; it just takes a bit of time.
Next, add in the oil, egg, and vanilla extract. Mix until the ingredients are fully combined and smooth, but avoid overmixing at this stage. If you mix too much, the cookie dough will get dry and have the proper texture when baked.
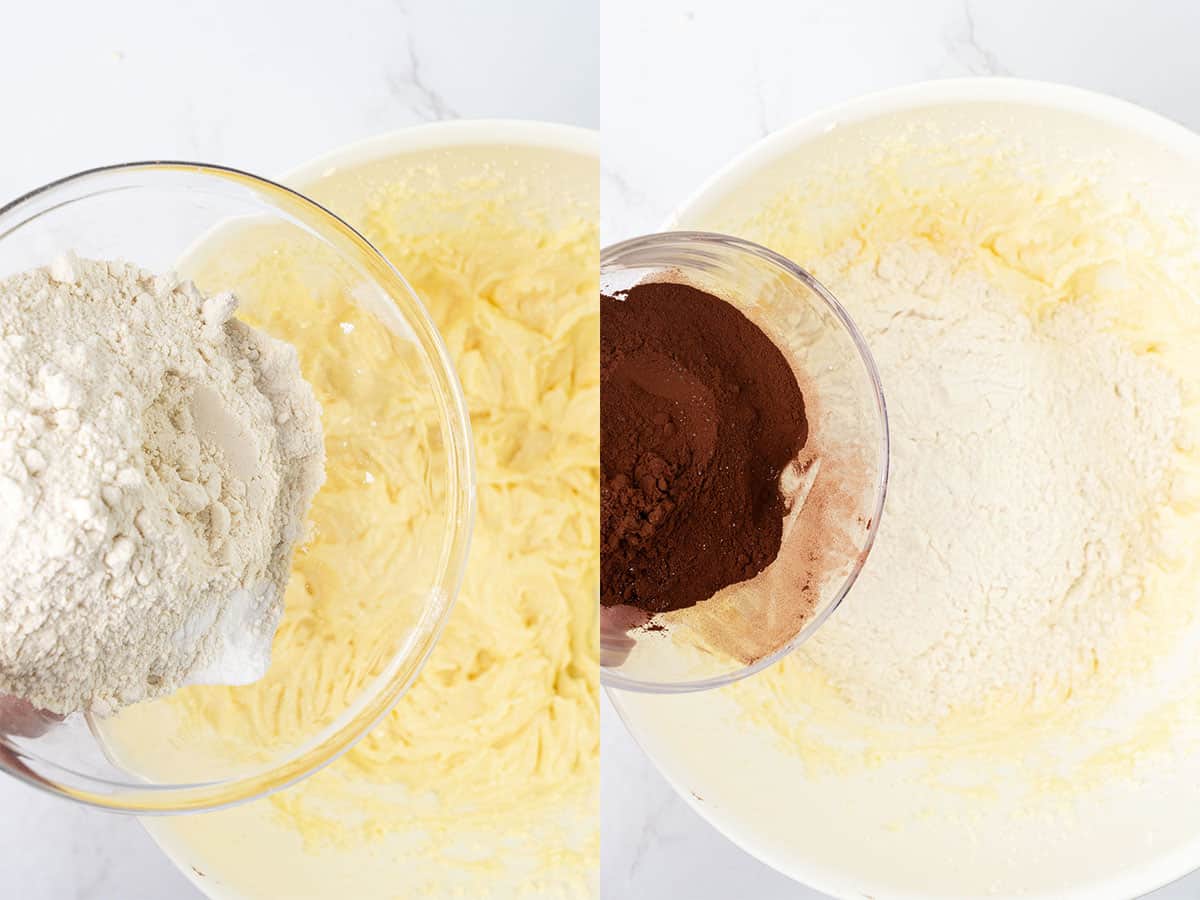
Grab a separate bowl, and whisk together the flour, cocoa powder, salt, and baking soda. Gradually add the dry ingredients into the wet mixture, folding gently with a rubber spatula until just combined. The dough should be thick and slightly sticky. Do not overwork it. If you do, it will lead to dense cookies rather than the brownie-like texture you want.
Add parchment paper to two baking sheets. Use a medium cookie scoop and scoop the dough onto the prepared pans. It's hard to estimate how many cookies you'll have, since scoop sizes vary, but I typically have around 16 cookie dough balls.
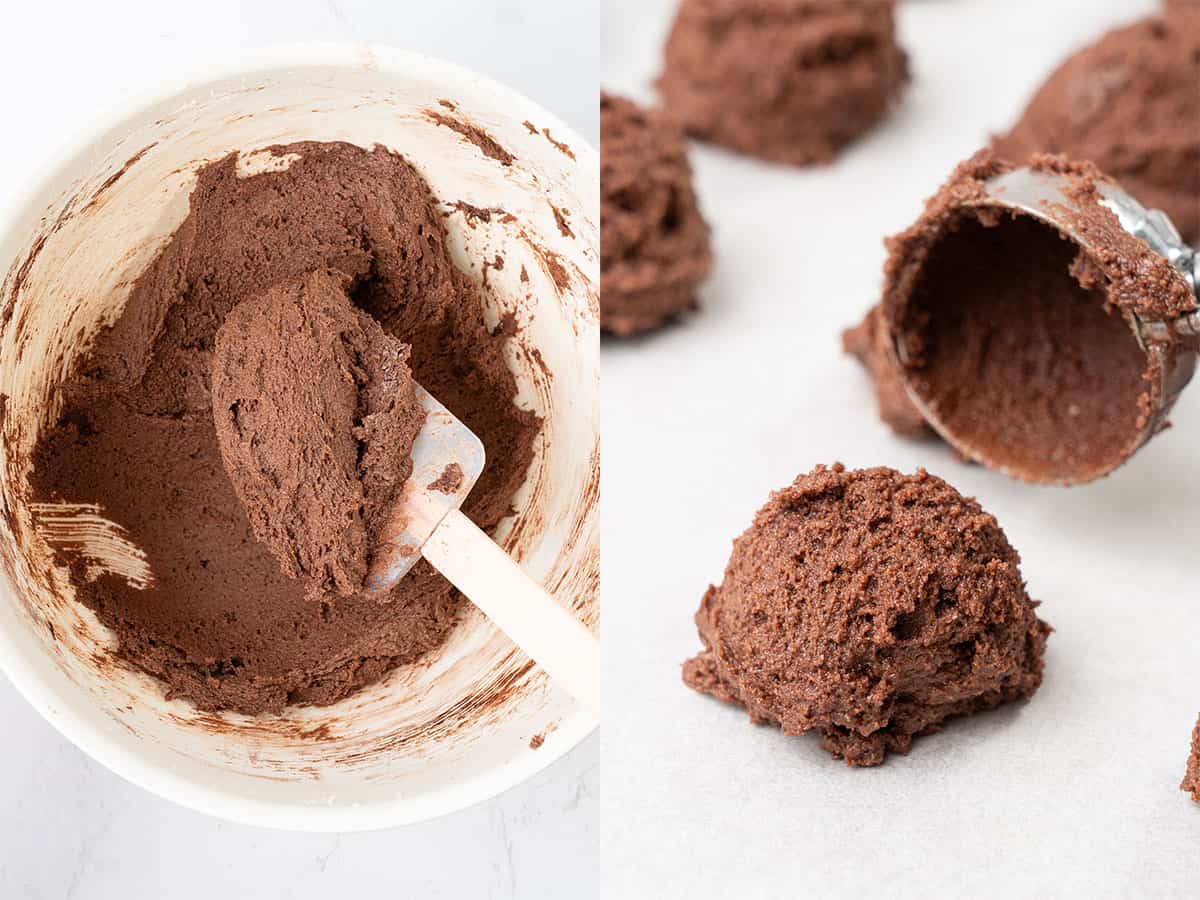
Put both baking sheets in the refrigerator and let the dough rest for at least 1 hour. If you skip this step, you will get flat cookies. The 1 hour of resting time in the fridge is a minimum, so be patient and let them chill!
Apply the sugar coating well; this is key!
As you get ready to coat the cookies, preheat your oven to 165°C / 330°F and don't use the fan setting. This lower temperature helps the cookies bake through evenly without over-browning.
The sugar coating is what creates the crinkled effect, and it only works if done properly. If you skip the first layer or go too light on the second, the powdered sugar will melt into the dough during baking and disappear.
Grab one chilled dough ball at a time and roll it first in granulated sugar, then immediately in powdered sugar. The dough ball should be completely covered in a thick layer, almost fully white on the outside.
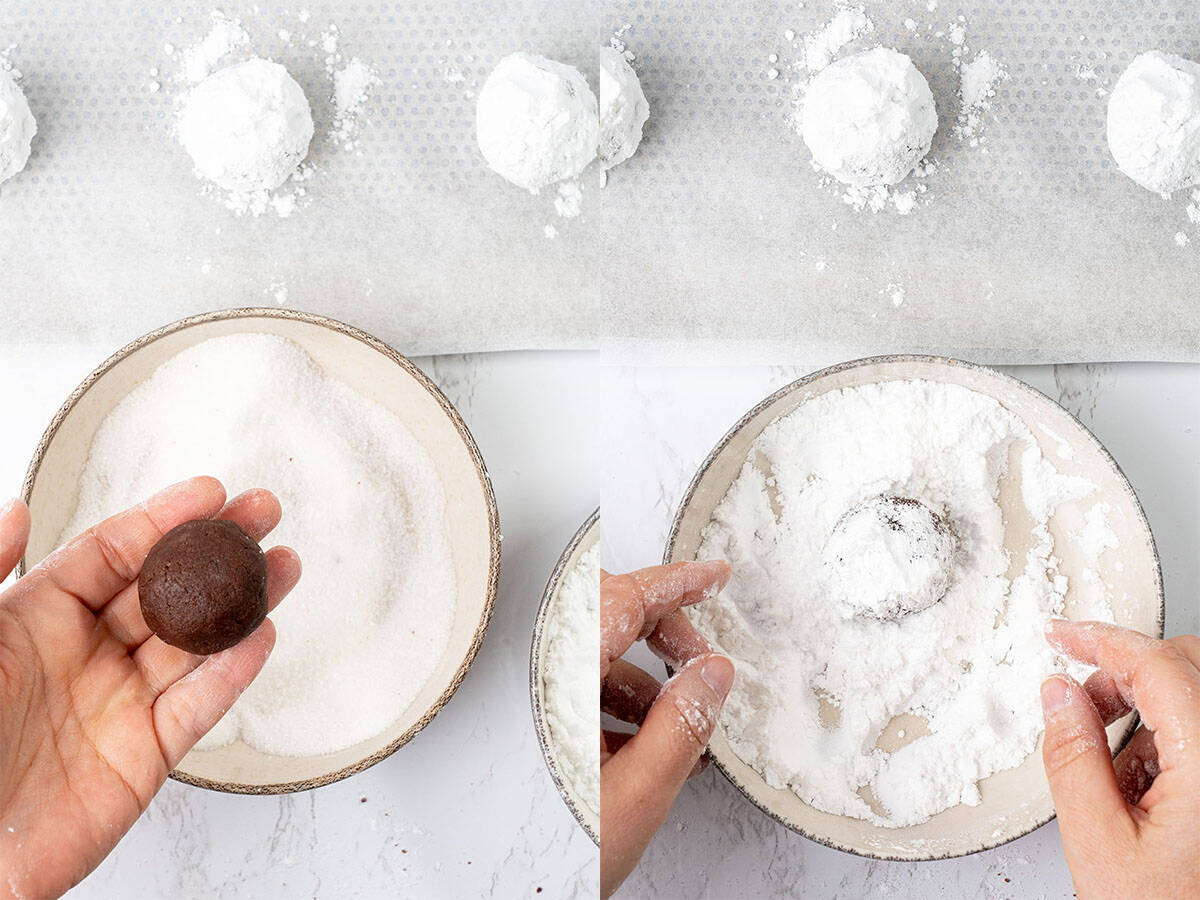
Avoid rolling multiple dough balls at once, as they will stick together and lose that even coating. Once coated, put each dough ball back onto the lined baking sheet. Leave a bit of space between them, as they will spread some.
Bake the cookies
Once your oven has preheated, place the tray of coated cookie dough balls on the middle rack. Bake for about 15 minutes, or until the edges are set and the tops have developed those signature cracks. The centers should still look slightly soft and underbaked when removed from the oven.
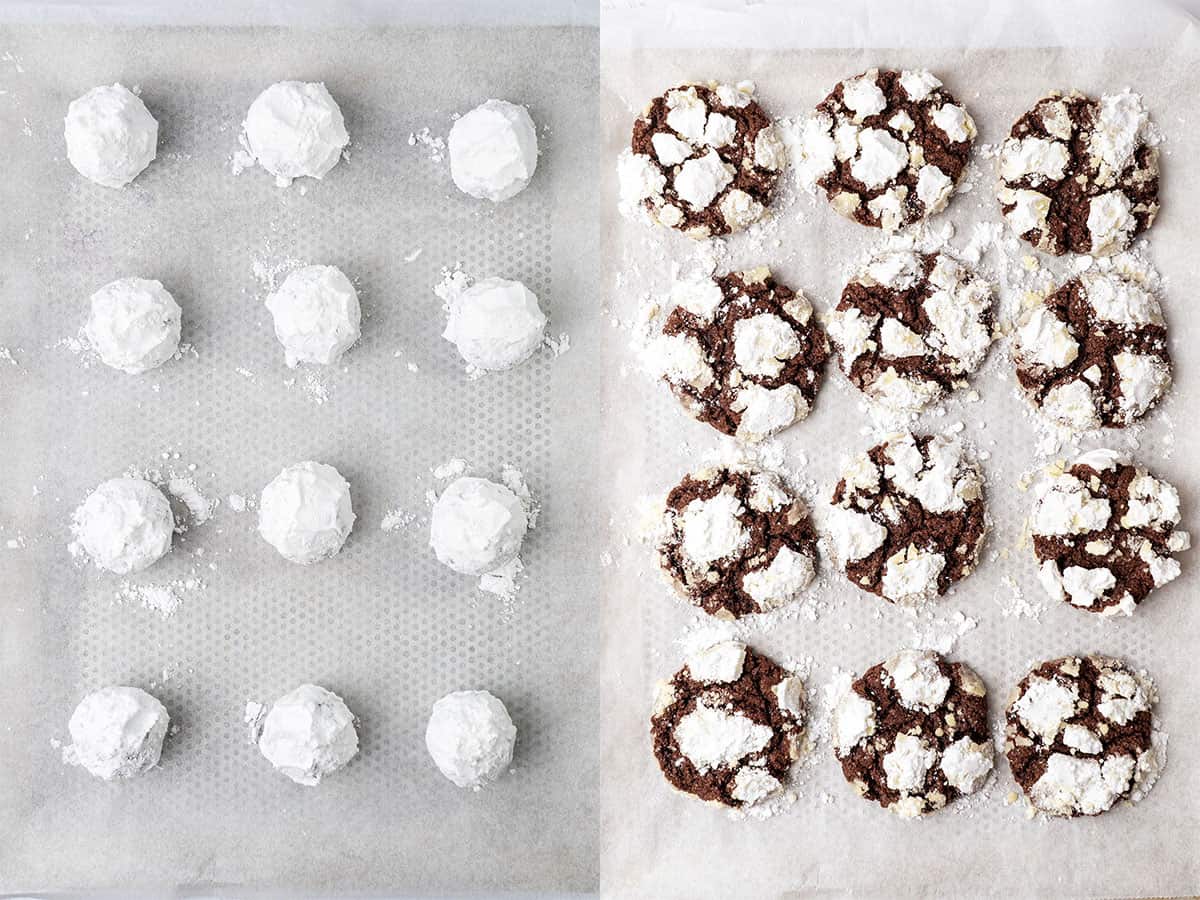
Be sure to keep a close eye on them as they bake, since every oven runs a bit differently. Some batches may be ready closer to 13 minutes, while others may need up to 16 minutes. The key indicator is the texture, not the time.
Let the baked cookies rest for a few minutes on the pan, then transfer them to a cooling rack to cool.
Troubleshooting
Even a well-tested recipe can run into small issues if a step is slightly off. Here are the most common chocolate crinkle cookie problems and how to fix them:
The cookies look dull and lack that bright white contrast: The powdered sugar may have absorbed moisture before baking. This can happen if the dough sits too long after coating or if your kitchen is humid. To fix this, roll and coat the cookies right before they go into the oven, and do not let them sit on the tray for extended periods.
The crinkles are faint or barely visible: The powdered sugar layer was likely not thick enough. A light dusting will not hold up during baking. You need a heavy coating so that when the cookie expands, the cracks clearly break through that white layer.
The bottoms brown too quickly: Your baking sheet or oven rack position may be the issue. Dark-colored pans or placing the tray too low in the oven can cause excess heat on the bottom. Use a light-colored baking sheet and bake on the middle rack for more even heat distribution.
The cookies stick to the pan: This is usually due to missing or poorly placed parchment paper. Always line your trays properly and make sure the paper lies flat.
The cookie texture feels greasy: This can be from too much oil or insufficient mixing of the fat into the dough. Make sure the butter and sugar are properly creamed before adding the oil.

Storing: fridge vs freezer
Leftover cookies can be stored at room temperature in an airtight container for up to 4–5 days. Keep them in a cool, dry place. If the cookies are stacked, place a sheet of parchment paper between layers to prevent sticking and protect the sugar coating.
You can also store the cookies in an airtight container in the fridge for 5–7 days. Let the cookies return to room temperature before serving.
For longer storage, freezing works well. Baked cookies can be frozen in an airtight container for up to 2 months. Let them thaw at room temperature, and they will return to their soft, fudgy texture.
You can also freeze the dough. Scoop and roll the dough into balls, but do not coat them in sugar yet. Freeze the dough balls for up to 2 months. When ready to bake, let the dough balls thaw slightly until they are rollable, then coat them in granulated and powdered sugar and bake as directed.
Make-ahead instructions
You can prepare the dough and refrigerate it for up to 2–3 days before baking. Keep it covered so it does not dry out. When ready to bake, scoop the dough, then proceed with the sugar coating and baking as directed.
You can also portion the dough ahead of time and keep it chilled, then coat and bake only what you need. This makes it easy to have fresh cookies on demand without making a full batch all at once.
Flavor variation ideas
Mocha: Add a small amount of espresso powder to the dry ingredients. This deepens the chocolate flavor without making the cookies taste like coffee.
Mint: Mix in a drop or two of peppermint extract along with the vanilla. Keep it subtle, as a little goes a long way.
Orange: Massage fresh orange zest into the sugar before creaming it with the butter. This releases the natural oils and infuses the dough with a light citrus aroma.
Cinnamon: Add a pinch to the dry ingredients. This spice will not overpower the cookies but will add warmth and complexity.
Some potential ingredient substitutes
If you need to substitute butter, you can use a high-quality plant-based butter. Avoid using fully melted butter substitutes, as that can affect the texture and spread.
For the oil, any neutral oil works well. If you prefer not to use oil at all, you can replace it with butter, though the cookies will be slightly less soft.
If you are out of granulated sugar, a fine caster sugar is the best alternative. Brown sugar can be used in place of some of the sugar, but it will add moisture and a slight caramel flavor, which will change the outcome.
All-purpose flour works best, but you can substitute it with a 1:1 gluten-free flour blend designed for baking.
Please note that ingredient substitutions will require adjusting the nutritional information. Read my substitute guides to learn more about other common substitutes in baking.
My expert tips
- It's important to use softened butter, not melted. The butter should feel soft to the touch but still hold its shape. You also want a room-temperature egg. A quick trick to bring it to room temperature is to place it in warm water for 5–10 minutes.
- Do not rush the creaming step. Creaming the butter and sugar until pale and fluffy incorporates air, which helps the cookies stay soft inside.
- Sifting the dry ingredients is worth the extra minute. Cocoa powder in particular tends to clump, and uneven distribution can lead to dry pockets in the dough or inconsistent texture in the final cookies.
- Chilling the dough is not optional. One hour is the minimum, but if you have time, a longer chill will make the dough easier to handle and help control its spread.
- When rolling the dough, work quickly and in small batches. Keep the remaining dough in the fridge while you coat a few pieces at a time. This prevents the dough from warming up too much.
Helpful equipment
A digital scale will give you the most accurate and consistent measurements. Baking by weight removes guesswork and helps you get the same results every time. A digital oven thermometer is also extremely useful, as many home ovens run hotter or cooler than expected.
An electric hand mixer is needed for creaming the butter and sugar until light and fluffy. A rubber spatula helps you to gently fold the dough without overworking it, which helps keep the cookies soft and tender.
A cookie scoop is a must for evenly portioning the dough. A cooling rack is a good piece of equipment to have on hand for the cookies to sit on and cool.
Try some of my other easy cookie recipes
If you enjoyed this chocolate crinkle cookies recipe, you have to try some of my other top cookie picks:
- Lemon Crinkle Cookies
- White Chocolate Raspberry Cookies
- Cream Cheese Chocolate Chip Cookies
- Chocolate Chip Cookies Without Butter
- Raspberry Pistachio Cookies
- Strawberry Cheesecake Cookies
For even more delicious handheld treats to fill your dessert table, check out my roundup of the best fun & unique cookie recipes!
Have you tried this recipe?
Please leave a 5-star ⭐️⭐️⭐️⭐️⭐️ rating on the recipe card and consider leaving a comment as well!
Chocolate Crinkle Cookies
Equipment
- Cookie scoop
Ingredients
For the Chocolate Crinkle cookies
- 55 g (¼ cups) Unsalted butter room temperature
- 55 g (¼ cups) Oil
- 150 g (¾ cups) Granulated sugar
- 1 Egg room temperature
- ½ teaspoon Vanilla extract
- 155 g (1¼ cups) All purpose flour
- 35 g (⅓ cup) Cocoa powder unsweetened, Dutch processed
- ½ Teaspoon Salt
- ¼ Teaspoon Baking soda
For the coating
- 100 g (½ cups) Granulated sugar
- 120 g (1 cups) Powdered sugar
US customary cup measurement is an indicative figure only. Measure the ingredients with a digital scale by weight (gram). Baking is art but also science which requires precision and accuracy.
Instructions
Make the cookie dough
- Line 2 baking pans with parchment paper, ensuring the paper lies flat and covers the base completely.
- With an electric hand mixer, cream the room temperature butter and granulated sugar for 2–3 minutes until pale, light, and fluffy, scraping down the sides of the bowl as needed.
- Mix in the oil, egg, and vanilla extract, whipping for about 1 minute until smooth and fully combined, scraping down the bowl if needed.
- Whisk together the flour, cocoa powder, salt, and baking soda, then add to the wet ingredients. Gently fold with a rubber spatula until just combined, without overmixing.
- Scoop the cookie dough into the baking sheets - it will be about 15-16 balls using a cookie or ice cream scooper that holds about one tablespoon. Let the dough rest in the refrigerator for about an hour.
Coat the cookies
- Preheat the oven to 330°F (165°C), no fan.
- Place the granulated sugar onto a plate and the powdered sugar onto a separate large plate. Roll the dough balls first in granulated sugar, then in powdered sugar. Make sure the powdered sugar is very generous; coat the entire cookie dough ball with a thick layer. Place the coated cookie balls on the baking sheets, leaving enough space between them to be able to spread
Bake
- Bake the cookies for at 165 C / 330°F (no fan) for about 15 minutes.
- After baking, let the cookies rest for a few minutes, then carefully transfer them to a cooling rack to cool. The cookies will further set as they cool.
Storage
- Room temperature: Store in an airtight container for up to 4-5 days.Fridge: Store in an airtight container for up to 5–7 days. Bring to room temperature before serving.Freezer (baked): Freeze in an airtight container for up to 2 months. Thaw at room temperature.Freezer (dough): Freeze dough balls (uncoated) up to 2 months. Thaw slightly, coat in powdered sugar, then bake.
Notes
- Make sure you read my Expert Tips section above to maximize your success. A short recipe alone cannot cover all the necessary details and science behind baking.
- Do not overmix the dough when adding the dry ingredients. Only fold it until thoroughly combined.
- Respect the chilling time in the cookie recipe; this is a very wet dough, and chilling allows the butter to firm up. Do not skip this step, or the cookies may spread too much and turn out very flat.
Leave a Reply