There's nothing quite like Apple Cinnamon Rolls during the Fall. With this easy-to-make recipe using brioche dough, apples, and cream cheese icing, you'll be able to whip up your own mouthwatering apple pie cinnamon rolls at home in no time.

Best Cinnamon Rolls With Apple Pie Filling Recipe
This apple cinnamon rolls recipe is so simple and beginner friendly. You won't need any fancy tools, and it uses simple, attainable ingredients that come together very easily. I provide step-by-step instructions for rolling the dough so that you end up with professional-looking results!
It doesn't take much time or effort - The hardest part is waiting for the dough to rest between steps. As the cinnamon roll is made with yeasted dough, you'll need to be patient during the proofing process. Other than that, the recipe is simple to make and doesn't require much time in the kitchen.
Between the sweet apple-cinnamon flavor and the soft, fluffy texture, you'll be craving these rolls for days.

Katalin's Key Take on why use bread flour (high protein flour) in this recipe
As with most sweet bread, you will want a light, fluffy bread that you can sink your teeth into. Therefore, bread flour with high protein content is the best choice to achieve the right texture.
Now, since the different types of flour have different protein content, the amount of gluten formed for each of them will also vary. Dough made using low-protein flour will have less, weaker gluten than dough made using high-protein flour. The higher the gluten, the better the structure. That's why bread requires high-protein flour while cake needs low-protein flour.
You can use all-purpose flour if high-protein content bread flour is not available. However, it will not provide the same texture or flavor as bread flour. Remember, bread flour is typically used for sweet bread and enhances the flavor of your apple cinnamon rolls.
My handy flour guide dives into the difference between the various types of flour used in recipes.

Make the dough
Heat the milk just until it is lukewarm (not too hot), and add half of the sugar and the fresh or dry yeast on top. The yeast should begin bubbling after around 10 minutes. If this doesn't happen, start again and make sure the kitchen is warm enough.
Place the foamy, "activated" yeast mixture into the stand mixer fitted with the kneading hook (dough hook). Add the room-temperature egg and egg yolk and mix for roughly one minute.

Slowly add all of your dry ingredients (bread flour, remaining sugar, and salt) and continue using the stand mixer to knead the dough. Don't worry if the mixture looks messy at first; it will come together.
Slowly add the room-temperature, softened butter to the dough piece-by-piece. Once it is incorporated, continue to knead in the stand mixer for a further 10 minutes at medium to high speed. It is ready when the dough becomes elastic and shiny (and not sticky).

Form the dough into a ball and place it into a glass or plastic bowl. Cover with plastic food wrap and place it in the fridge overnight (or for at least 12 hours) to proof.

Make the apple filling
Cut the apples into small, identical pieces; peeling is optional. You can cut into chunks or slices. Squeeze some lemon juice over them to prevent browning.
Cook the apple slices in a saucepan over medium heat for a few minutes with the brown sugar, cinnamon, and butter. You only need to cook the mixture long enough to soften the apples and thicken the juice. Do not overcook it!

Let the filling cool and chill in the refrigerator before using. Warm filling would quickly warm up your yeasted dough, which we want to avoid!
Check my caramelized apple recipe for more details on how to prepare such filling.
Assemble & Bake
After the dough has risen overnight, take it out of the fridge and punch the air out of it. Now roll the dough onto a silicone baking mat or lightly floured surface to a rectangle of approximately 30x60 cm / 12x24 inches.
Chill the rolled dough in the freezer for 2-3 minutes to keep it cold enough to work with, then spread the cold apple cinnamon filling smoothly and evenly on top of the dough rectangle with an offset spatula.

Place the dough with the spread back into the freezer for 3 minutes to help you roll it up, then starting from the longer end, roll the dough tightly and evenly. Once you reach the end, press it onto the roll to seal.

Place the roll back in the freezer for another 3 minutes to keep it chilled. Meanwhile, grease a baking pan of 23x33cm / 9x13, and place parchment paper inside.
Use a sharp knife to cut the dough roll into 12 evenly-sized pieces and place them into the pan with some spaces in between them to rise and spread. Cover lightly with greased plastic food wrap to prevent them from drying out.

Proof the apple cinnamon rolls a second time at room temperature. Depending on your kitchen temperature, this may take 1-2 hours. The key is for the dough to double in size before moving on to the next step.
Preheat your oven to 190C / 374F (no fan) while the cinnamon rolls have their second proof.
Bake the apple cinnamon rolls for about 40 minutes. Check its progress at around 30 minutes. If necessary, adjust the temperature or cover it with aluminum foil if it is browning too much on the top.
Your cinnamon rolls are done once the rolls are golden brown, and a skewer (or toothpick) comes out clean when inserted.

Make the cream cheese frosting
Whip the cream cheese and powdered sugar together for roughly 2-3 minutes until creamy. Make sure not to overwhip it, as it can over-soften the cream.

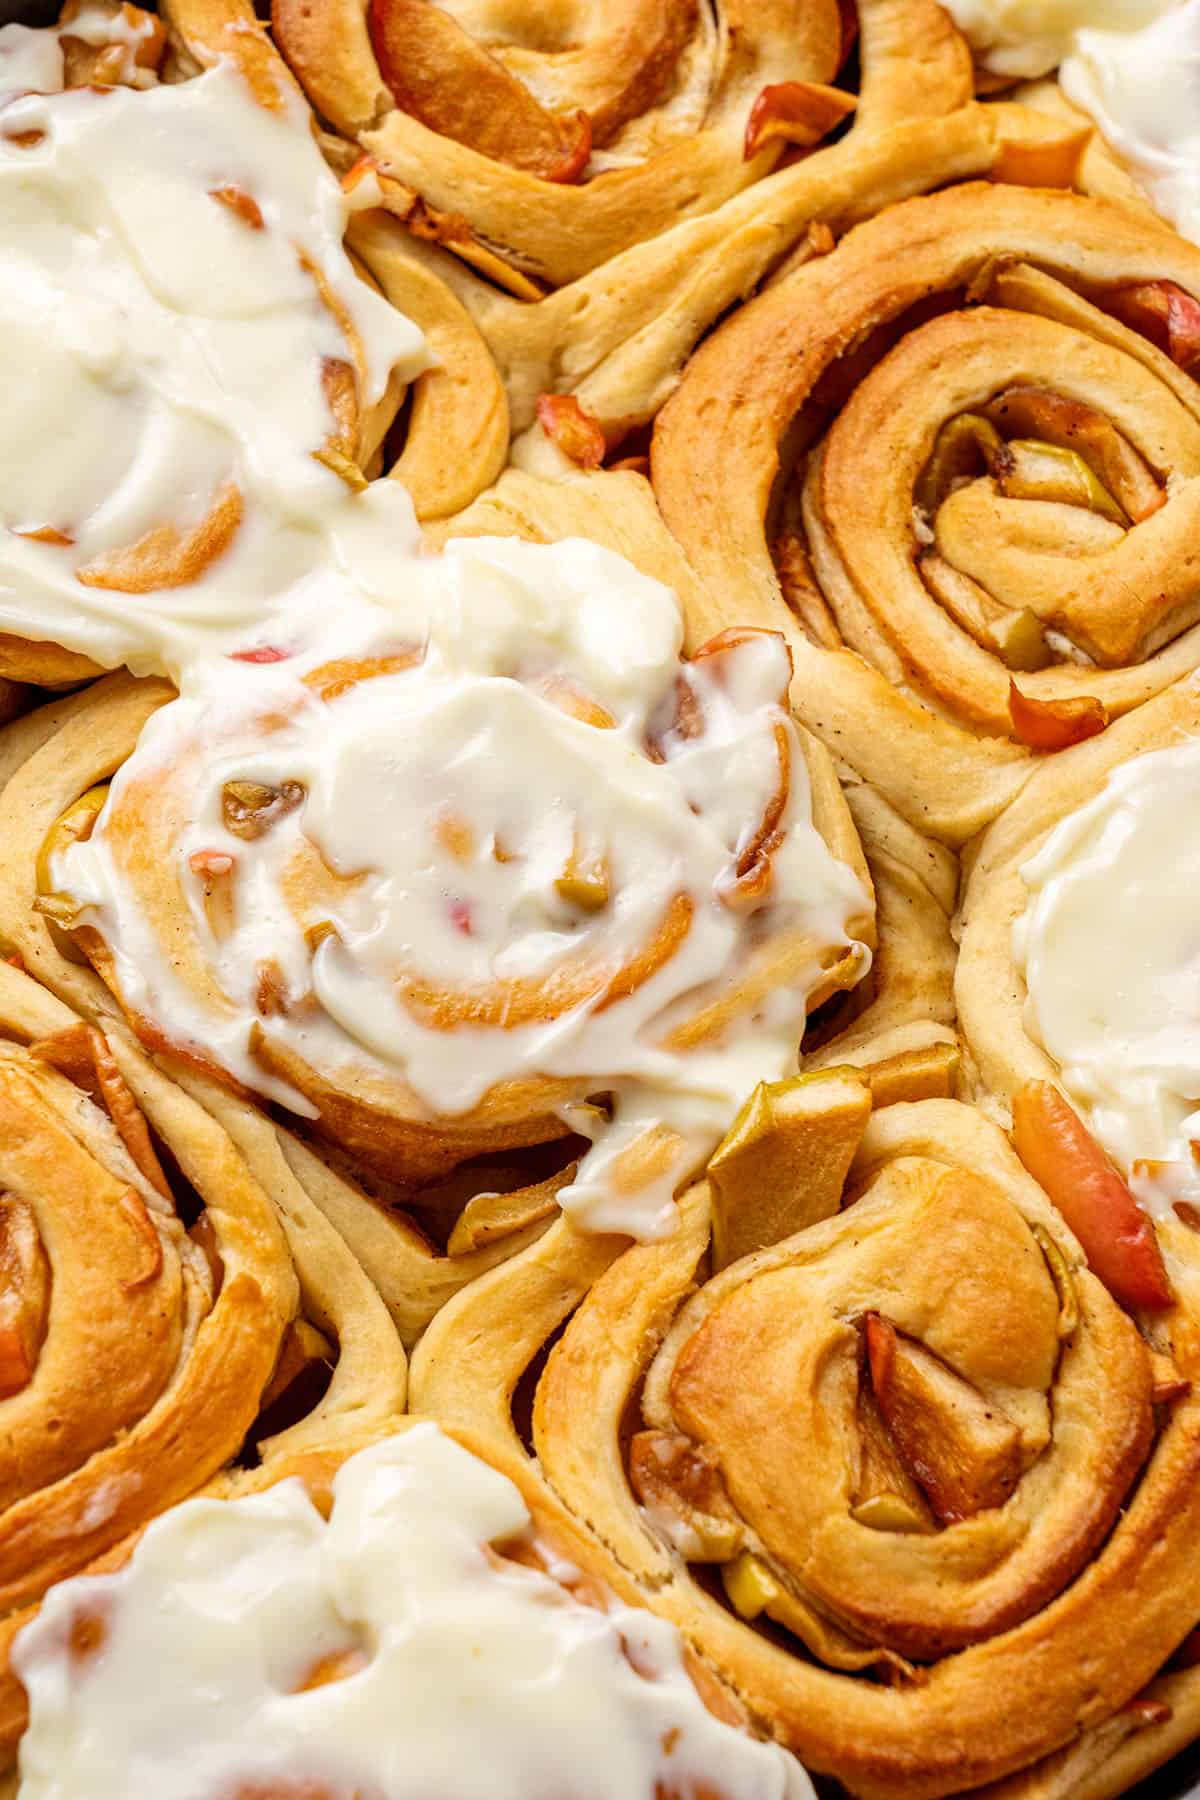
Once your apple cinnamon rolls have cooled to room temperature, apply the cream cheese icing to the top of each roll as desired.

Storing and freezing
Store the cinnamon rolls in an air-tight container at room temperature for 2-3 days, and stick them in the oven for a few minutes and serve warm!
Freeze your cinnamon rolls in an air-tight container, wrapped in plastic wrap or a Ziploc bag, and put them in the freezer until you're ready to enjoy them! I suggest freezing them without the icing.
Flavor variations
This recipe is very versatile, and once you have mastered it, you can adapt it to suit you. Perhaps choose to use different spices, skip the apples and use pears instead, add some crunch with chopped pecans, or use an alternative filling such as Nutella. I even love to use pumpkin puree to make pumpkin cinnamon rolls!
I sometimes use a lemon curd filling instead for a zingy citrus twist. It's all up to your taste buds! Or make it into a proper cinnamon roll casserole with apples and caramel sauce drizzled on top!
Ingredient substitutions
Yeasted doughs are always very precise recipes, which makes substitutions difficult. You could try one of these egg substitutes and use dairy-free butter or gluten-free flour. However, all substitutions will somewhat provide a different taste and texture.
If you substitute ingredients, you will also need to adjust the quantities and ratios of the other ingredients in the recipe. Unfortunately, I cannot provide instructions to accommodate every diet.
Check out my list of baking guides to learn more about the possible substitutions and how they may affect this cinnamon and apple rolls recipe.

What Equipment To Use
Always weigh ingredients by the gram using a digital scale to get exact ingredient quantities for your cinnamon roll bake. Baking is all about precision.
Unless you have the time (and the strength) to knead the dough by hand, your stand mixer will save you a lot of time and energy. I do not recommend using an electric hand mixer, as brioche needs a lot of mixing, and these can burn out quickly.
Use a rolling pin to roll out the dough on a silicone baking mat. This prevents the dough from sticking, saving the need to use extra flour. Your offset spatula will help ensure the filling is spread out nicely and evenly over the dough.
Use a digital oven thermometer to ensure that your oven is at the correct temperature.
Expert tips to make apple cinnamon rolls
- Make sure the eggs, unsalted butter, and milk are all at room temperature before you begin.
- Fresh yeast works best in these sweet rolls. However, dry yeast is an acceptable substitute if you don't have access to fresh yeast. Check the correct quantities with your chosen brand's instructions.
- If your yeast does not bubble, it might be outside of the expiration date, or the yeast was not at the right temperature to be activated. Remember, your milk should be lukewarm and not hot, and your kitchen needs to be nice and warm (above 20C / 68F).
- Read my ultimate yeast guide for more information about how to substitute and activate yeast.
- Always work with cold dough and filling to achieve easy-to-work-with perfectly rolled cinnamon rolls. It helps to put the dough and apple filling in the fridge or freezer between steps to keep it cool.
- An overnight rise in the fridge is recommended to achieve soft and fluffy apple and cinnamon rolls and will make the dough easier to work with. You can proof at room temperature for 1-2 hours instead but avoid direct heat or sunlight. Don't skip the second proofing; this is absolutely necessary to achieve a perfect, fluffy rise and dough texture.
- I sometimes spray non-stick cooking spray on my hands to help keep the apple cinnamon roll dough from sticking.
Try some of my other apple dessert recipes
If you loved these cinnamon apple rolls, try some of my other apple desserts.
- Apple crumble pie
- Apple Dutch baby
- Apple crumble muffins
- Apple crumb cake
- Apple roses with puff pastry
- Apple pie cookies
Have you tried this recipe?
Please leave a 5-star ⭐️⭐️⭐️⭐️⭐️ rating on the recipe card and consider leaving a comment as well!

Apple Cinnamon Rolls
Equipment
Ingredients
Cinnamon roll dough
- 240 g (1 cups) Whole milk lukewarm
- 60 g (⅓ cups) Granulated sugar
- 25 g Fresh Yeast check my yeast guide to convert it to dry yeast
- 3 Eggs room temperature
- 500 g (4 cups) Bread flour high protein content flour
- ½ teaspoon Salt
- 170 g (¾ cups) Unsalted butter room temperature, 82% fat content
Apple cinnamon filling
- 660 g (5 cups) Apple measure it after peeled, cut into small identical pieces
- 100 g (½ cups) Brown sugar can be 50% granulated sugar and 50% brown sugar or granulated sugar only
- 55 g (¼ cups) Unsalted butter
- 2 teaspoon Cinnamon or a mix of cinnamon, ginger, nutmeg
Cream cheese icing
- 226 g (1 cups) Cream cheese high fat, use is cold
- 60 g (½ cups) Powdered sugar sifted
US customary cup measurement is an indicative figure only. Measure the ingredients with a digital scale by weight (gram). Baking is art but also science which requires precision and accuracy.
Instructions
First day - first proofing of the dough
- Start with mixing half of the sugar with the lukewarm milk then sprinkle yeast on top. Make sure that the kitchen is nice and warm, and in 10 minutes, the yeast should start to foam.
- Pour in dry ingredients: bread flour, rest of the sugar, and salt, and start kneading it until the dough comes together. This will take about a minute or two.
- Then, slowly add the room-temperature (soft) butter chunks by piece to the dough. Once all the butter is in, knead the dough for another 10 minutes on medium-high speed until it becomes elastic and shiny and not sticky any longer.
- Move the dough into a bowl, cover it with plastic wrap and let it rest and rise in the fridge overnight for 12 hours. Alternatively, rise the dough for 1-2 hours at room temperature in a warm but not hot (avoid direct heat) spot in your kitchen.
Second day
Make the Apple Cinnamon filling
- Peel and cut apples into identical pieces, then, with the rest of the ingredients, cook it for about 10 minutes until the apples slightly soften and the mixture thickens.
- Let the filling completely cool before using it to fill the cinnamon rolls.
Second proofing
- Try to work quickly, and have everything you need - rolling pin, measuring tape, apple pie filling, a baking pan of 23x33cm / 9x13 inches with parchment paper prepared upfront. If the dough is warming up, pop it in and out of the freezer for a few minutes to chill between the steps, making sure the dough is always cold enough to work with and does not tear or stick. Refrain from using an excessive amount of flour, as that would make the cinnamon rolls hard.
- Spread apple cinnamon filling on top and roll the dough up evenly and tightly from the shorter end, and then press to seal the end onto the roll. So you will end up with a 30cm / 12 inches roll.
- Cut the sausage-shaped dough into 12. Make sure the dough is nice and chilled during the process, and pop it back into the freezer for a few minutes, if necessary, between the steps.
- Place the rolls into the pan by leaving some space in for the dough to rise.
- Cover the tray with a kitchen towel and proof the cinnamon rolls the second time now at room-temperature. Proofing might take 1-2 hours, depending on your kitchen temperature. Wait until the dough doubles in size.
Baking
- Pre-heat your oven to 190C / 375F (no fan) while the apple cinnamon rolls are proofing. Then, once the rolls are doubled in size, bake them at 190C / 375F for about 40 minutes. Bake until a skewer inserted comes out clean and the rolls are golden brown. If they were browning too much, place aluminum foil on top towards the end of the baking time.
Cream cheese icing
- Make the cream cheese icing by creaming cream cheese and powdered sugar for 2-3 minutes.
- Let the apple cinnamon rolls come to room temp, then apply the icing on top.
- Serve the cinnamon rolls fresh. Any leftovers can be stored in an air-tight container at room temperature (without the icing). Store refrigerated if the icing is already on the top.
Notes
- Always use unsalted butter in baking, in this recipe, the butter needs to be at room temperature so soft enough to be able to knead into the dough.
- Fresh or dried yeast can be used. My instant dried yeast pack says that 25g fresh yeast equals 7 g dried. Please check your local brand and calculate your yeast needs accordingly.
- Use the milk and egg at room temperature for the ingredients to properly emulsify.
- Since cinnamon roll is effectively a sweet bread, use high protein content bread flour to make it.
- For activating the yeast (whether it is dried or fresh), make sure that the milk is lukewarm and your kitchen is also nice and warm.
- You will knead the dough for about 10 minutes in a stand mixer. The dough is ready when it is shiny, elastic and does not stick to your fingers any longer. Do not add more flour to the dough. If it sticks too much, continue kneading. Having said that, each flour is different, and I cannot guarantee the quality of your flour, so if the dough is still sticky after 10-15 minutes of kneading, you might need to add a tiny bit more flour.
- The kneading process is most convenient with a stand mixer. I do not recommend using a handheld mixer as you can easily burn that machine down with this quantity. I must say that my Mom has been making yeasted dough with her hands for decades, so if you are strong enough like my Mom, it is not impossible. However, you will need strong hands and a proper hand-kneading technique, and it will take a minimum of 30 minutes.
- Overnight proofing is recommended for the best results. It is much easier to handle (roll, shape) a dough that is risen in a chilled environment. However, if you want apple cinnamon rolls the same day, you can try to make the first rise at room temperature and continue from there as per my recipe.
- While cooking the filling pay attention not to overcook the apple. Also, make sure the mixture is thick enough to be able to spread it on your dough.
- The filling must be chilled before use. A warm filling would melt the dough immediately.
- During the rolling, filling, and shaping process try to work with a chilled dough that does not stick or tear.
- Second proofing is necessary for the perfect rise = fluffy texture, do not skip it.
Edee McBride
Fantastic