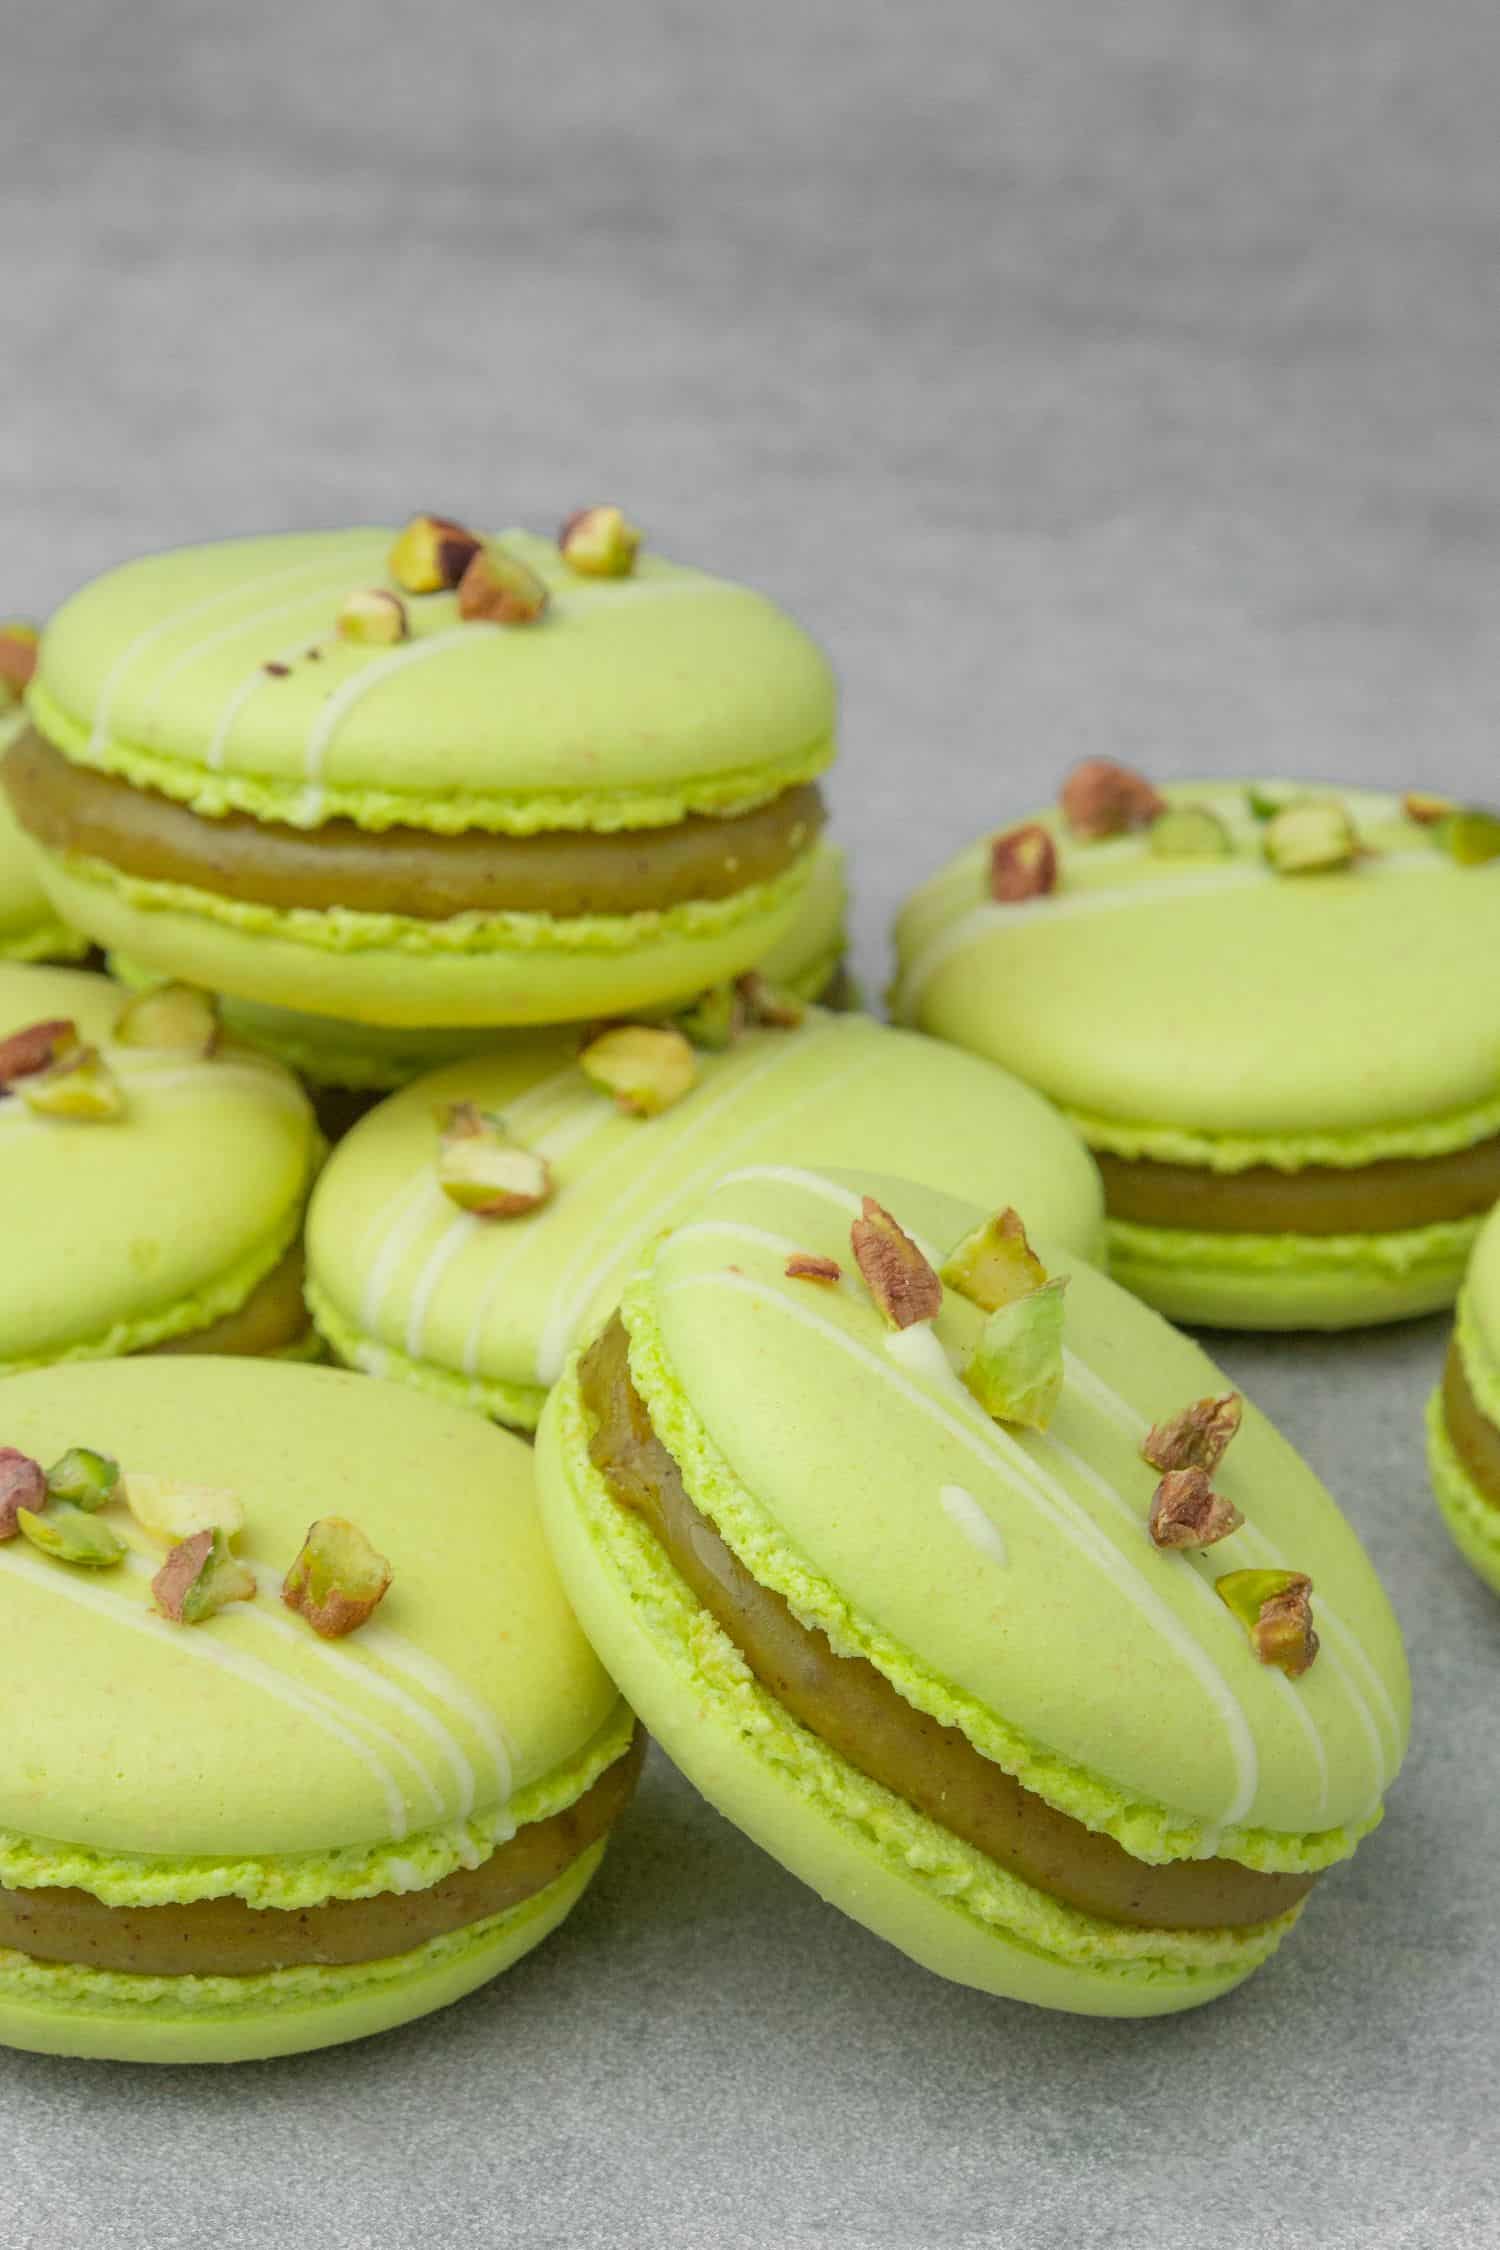
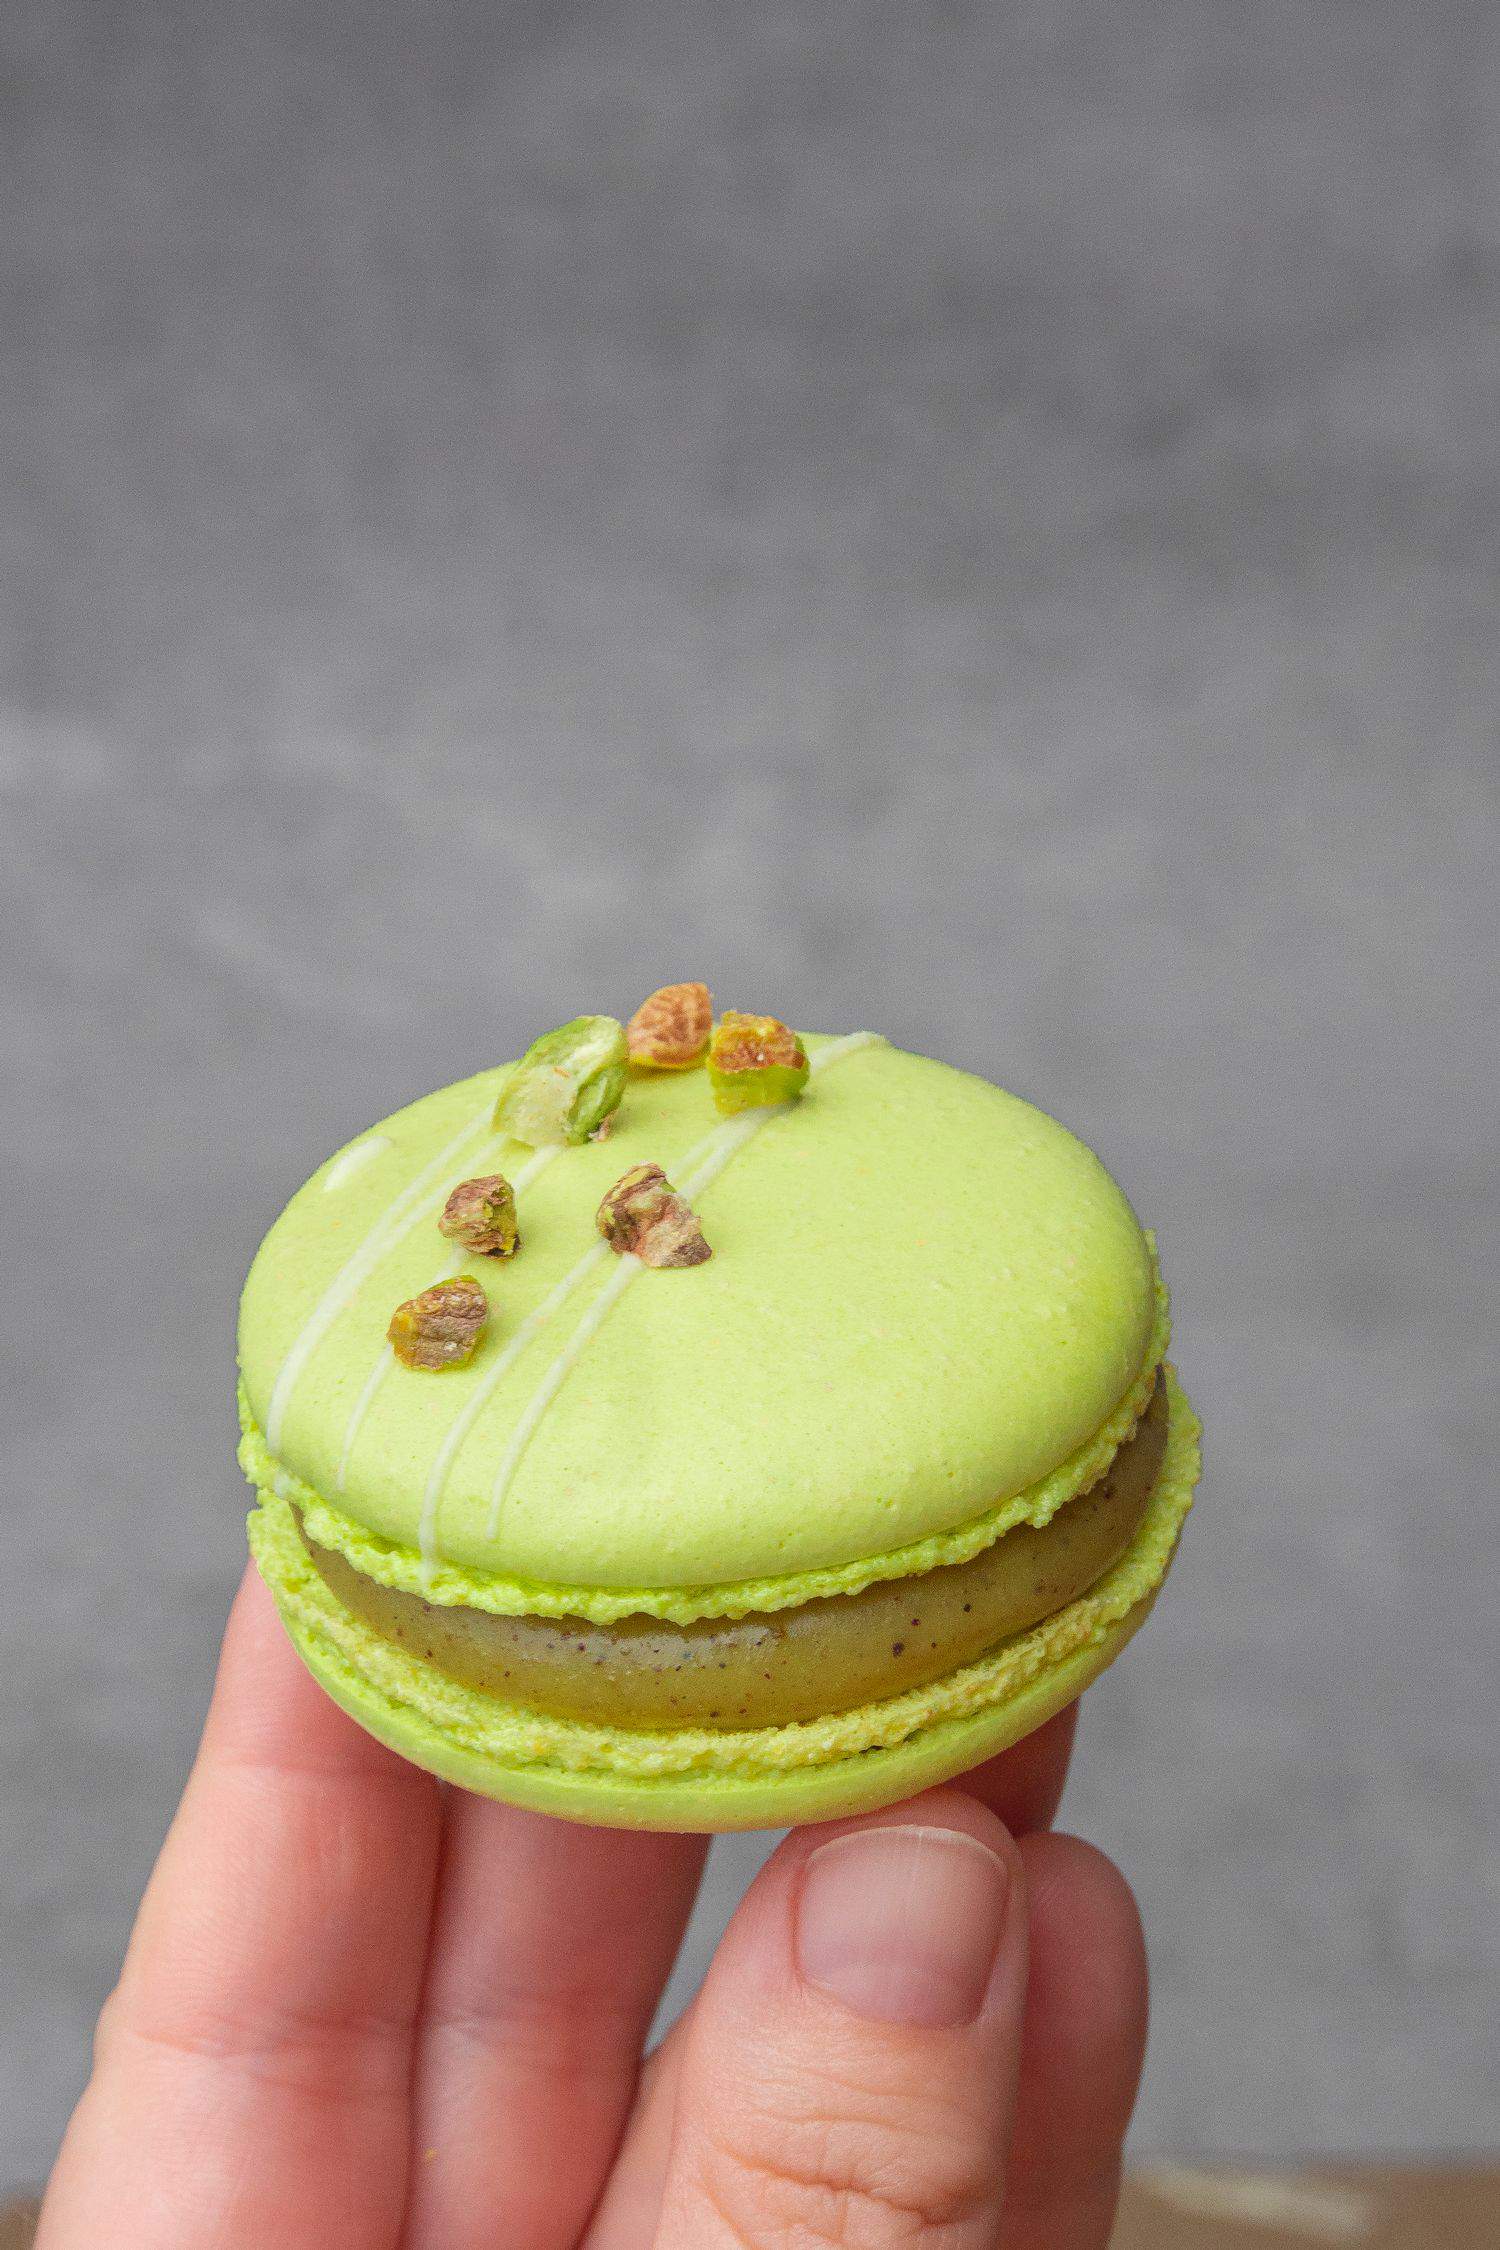
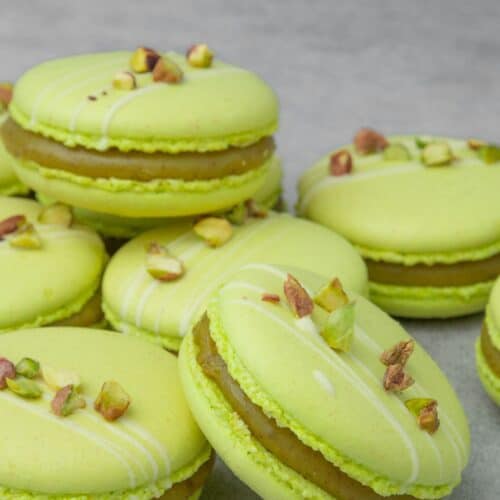
These are the ultimate Pistachio Macarons with Pistachio Ganache Filling that has the perfect color, and deep natural nutty pistachio flavor without being overly sweet. The macarons are decorated with an easy white chocolate & pistachio pattern, they can´t really get any more delicious and pretty!
You just can´t go wrong with pistachio flavor, it is widely popular! I had a flavor voting on my Instagram a few weeks ago and pistachio was by far the winner!
Jump to:
💪 Are macarons hard to make?
In summary, yes they are not the easiest to make!
Are they impossible to make at home? Absolutely not! Macaron making requires precision and patience, and I would also say passion that will keep you going to practice and run a few tests until you succeed.
Chefs and Bloggers love to claim that their macaron recipe is foolproof but if I want to be totally honest with you, there is no such thing as a foolproof macaron recipe or a recipe that works for all. Exactly the same recipe can turn out widely different just by changing something as little as a few more folds than necessary on the macaron batter – it will turn out too runny and that batch of macaron might end up like a pancake. So, instead of focusing on a recipe only, I will teach you the technique!
My ultimate macaron tutorial will certainly help you learn how to make macarons by explaining the process - therefore the long recipe! On the other hand, macarons are rather quick to make! This Pistachio macarons recipe might look long - to explain the theory part - but in practice, the macaron batter comes together in 15 minutes and the entire process is really not that long!
📝 Ingredient notes
For the macaron shells
- Almond: Look for almond flour or almond meal or finely ground almonds. Worth to buy good quality ground almond so-called blanched almond without skin. Blanched almond basically means that the brown skin has been removed. Please note that some parts of the almond meal can be replaced with pistachio flour to emphasize the taste however pistachio flour macarons do not have such a strong pistachio flavor as the pistachio ganache filling
- Egg white: Use room temperature egg whites that are absolutely free from any sort of fat (e.g. egg yolk)
- Green food coloring: Use a few drops gel coloring to achieve the desired color
- Sugar: For the best result I recommend using 3 types of sugar at 3 different stages of this French macaron recipe
- For the marzipan-like almond paste base, you will need icing sugar or confectioners’ sugar mixed with almond flour. Icing sugar is effectively granulated sugar grounded into a powder that typically also contains corn starch. Icing sugar contains 2% starch so you can mix 98g powdered sugar with 2g starch to get 100g icing sugar
- For whipping up the meringue I recommend using fine sugar, that is normal granulated sugar pulse blended into smaller bits (but not going that far that it would turn into powder sugar). Fine sugar is a common type to make meringue however if you are experienced in making meringue you might be ok using normal granulated sugar
- For the sugar syrup normal granulated sugar is totally fine
🛒 You’ll find detailed measurements for all Ingredients in the printable version of the Recipe Card at the bottom of this post
For the pistachio ganache filling
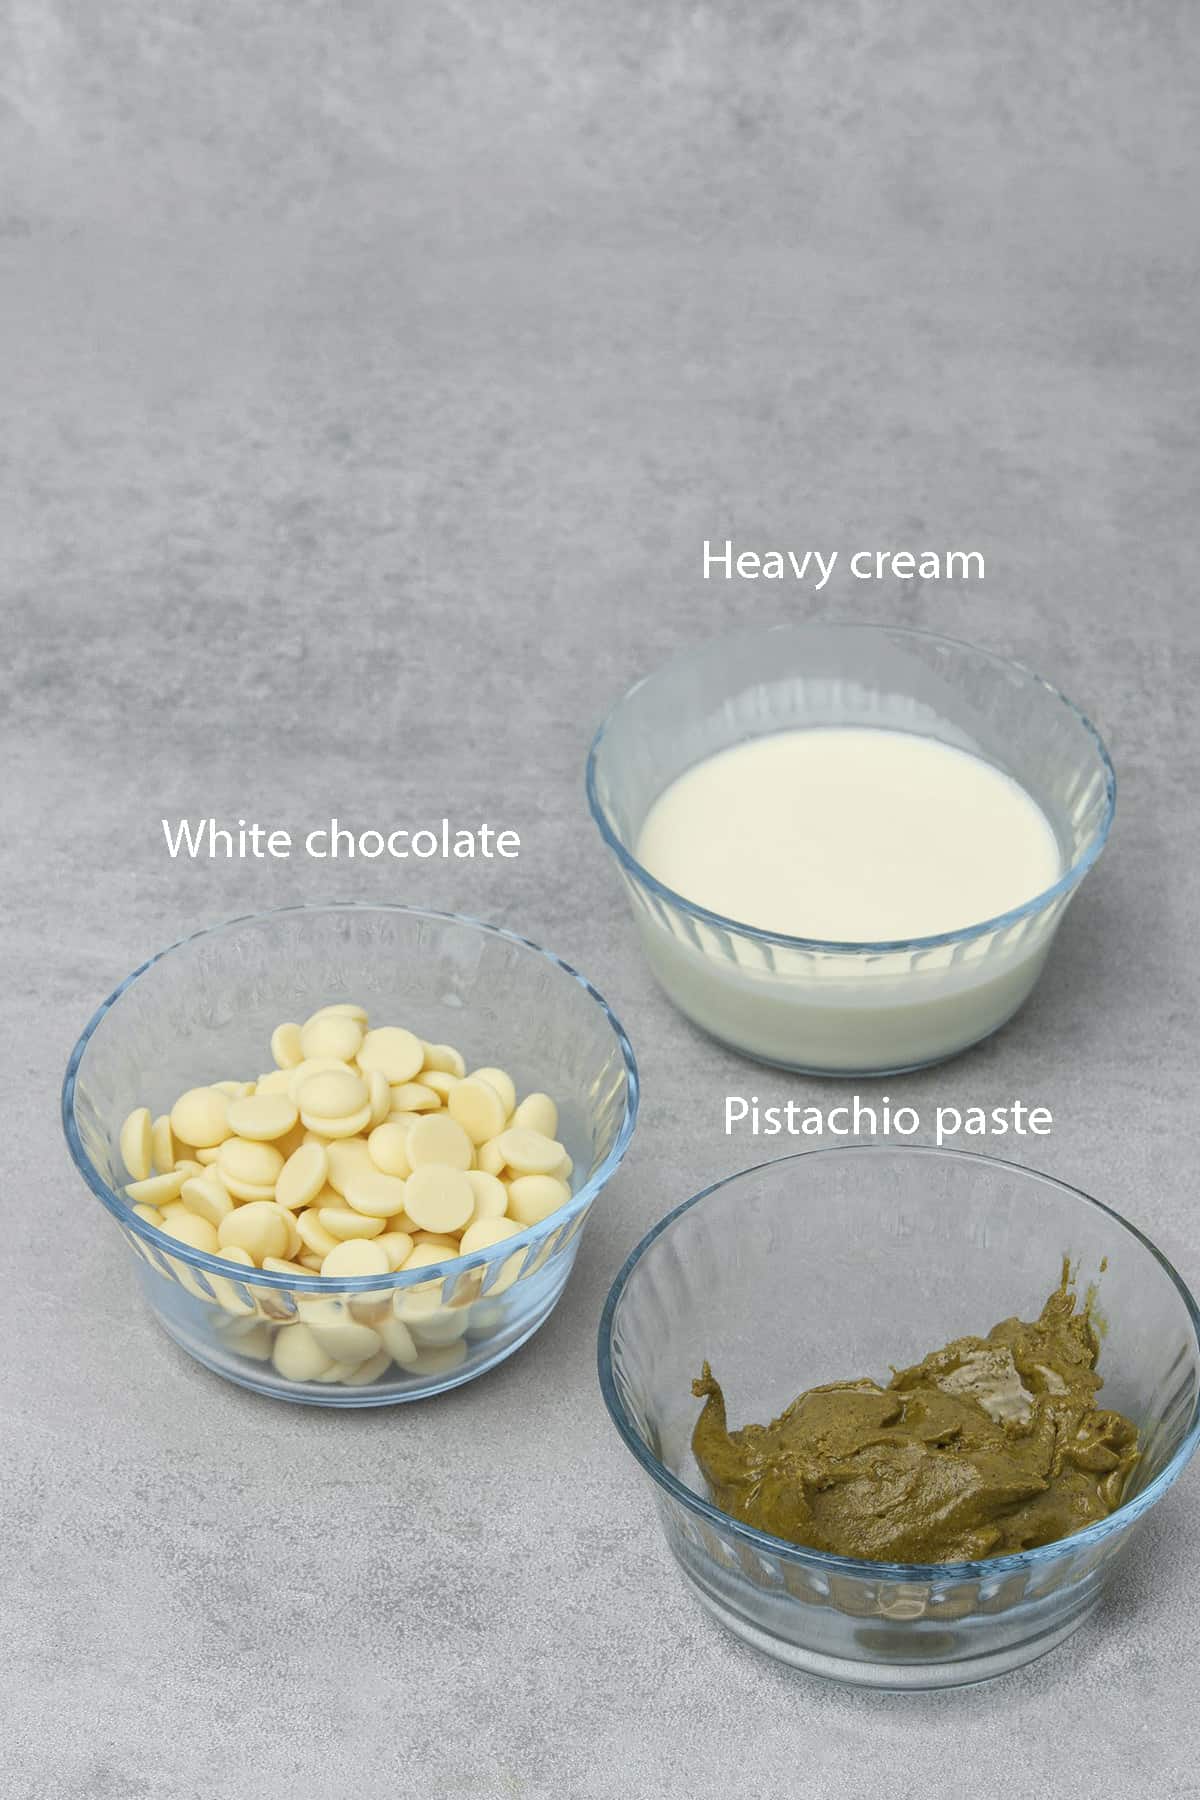
- Pistachio paste: The Pistachio macarons will be filled with a delicious and super easy pistachio cream that is a ganache and tastes 1000x better than pistachio buttercream for macarons (that is way too sweet). Check this homemade pistachio butter recipe or purchase 100% pistachio butter. It has a texture like a peanut butter, is slightly oily, and has a super deep nutty flavor without being sweet (no added sugar). Please note that the color of the ganache is very much depending on the quality of your pistachio paste, it can go anywhere between dark green, light green, or even a bit brownish.
- White chocolate: Pistachio ganache is a white chocolate-based ganache that does not taste white chocolate at all. However, the ganache will be as delicious as the quality of the chocolate you are using. Please use high-quality products when it comes to chocolate which you would anyway enjoy eating on its own and avoid using “baking chocolate”. I am using Callebaut WhiteChocolate (callets) that has high cocoa butter %, tastes amazing, and works wonderfully silky while making ganache
- Heavy cream: Also known as whipping cream, has a fat content between 36% and 40%, the one I use is usually 36%. Avoid substitutes like vegetable-based “whipping cream”. The cream is often used to make chocolate ganache and makes it wonderfully silky and creamy
If you love pistachios as much as I do, don´t forget to check out my pistachio desserts collection.
🛒 You’ll find detailed measurements for all Ingredients in the printable version of the Recipe Card at the bottom of this post
👩🍳 How to make this recipe
Make sure you carefully read my Ultimate macaron tutorial before jumping into making Pistachio macarons. In that tutorial, I share much more tips about how to succeed with macarons in general, also have a Troubleshooting Guide in there!
1. How to make Pistachio macarons – Italian meringue technique
The recipe makes about two trays of macaron shells depending on the size and how closely you pipe them next to each other which means about 22 macarons once the shells are sandwiched together.
- Measure all your ingredients with a Digital scale. This is non-negotiable, you absolutely can not make macarons using cups
- Make sure you arrange every tool you will need at hand, there is nothing more stressful than not finding the piping bag when you need it. You will need the following items: Rubber spatula, Stand mixer with a whisk attachment to beat egg white, Infrared thermometer gun or any other cheaper thermometer to measure the sugar syrup, Piping bag with a round nozzle tip eg. Wilton 2A Round nozzle tip, 2 Silicone baking mat or 2 trays with parchment paper, Digital oven thermometer to check your REAL oven temperature.
- Wipe down the mixing bowl and whisk attachment with vinegar to remove any potential residue
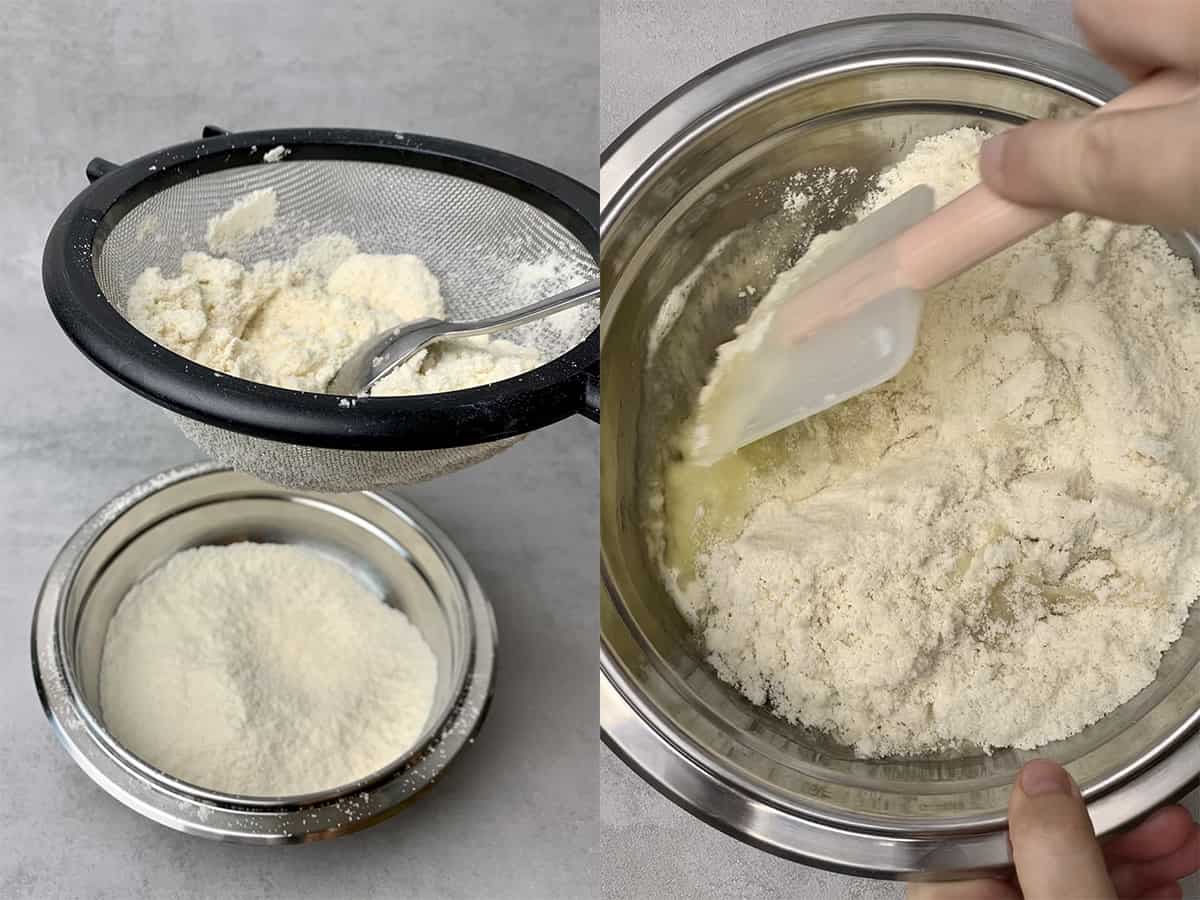
- Pulse blend almond flour with icing sugar for 5-10 seconds (no longer as the almond can get sticky / oily ), then sift them together and measure again with a Digital scale
- Make sure egg white is on room temp, you will need 2 x 55g. No need to age the egg white
- Move one of the 55g egg white into the mixing bowl of your Stand mixer fitted with whisk attachment
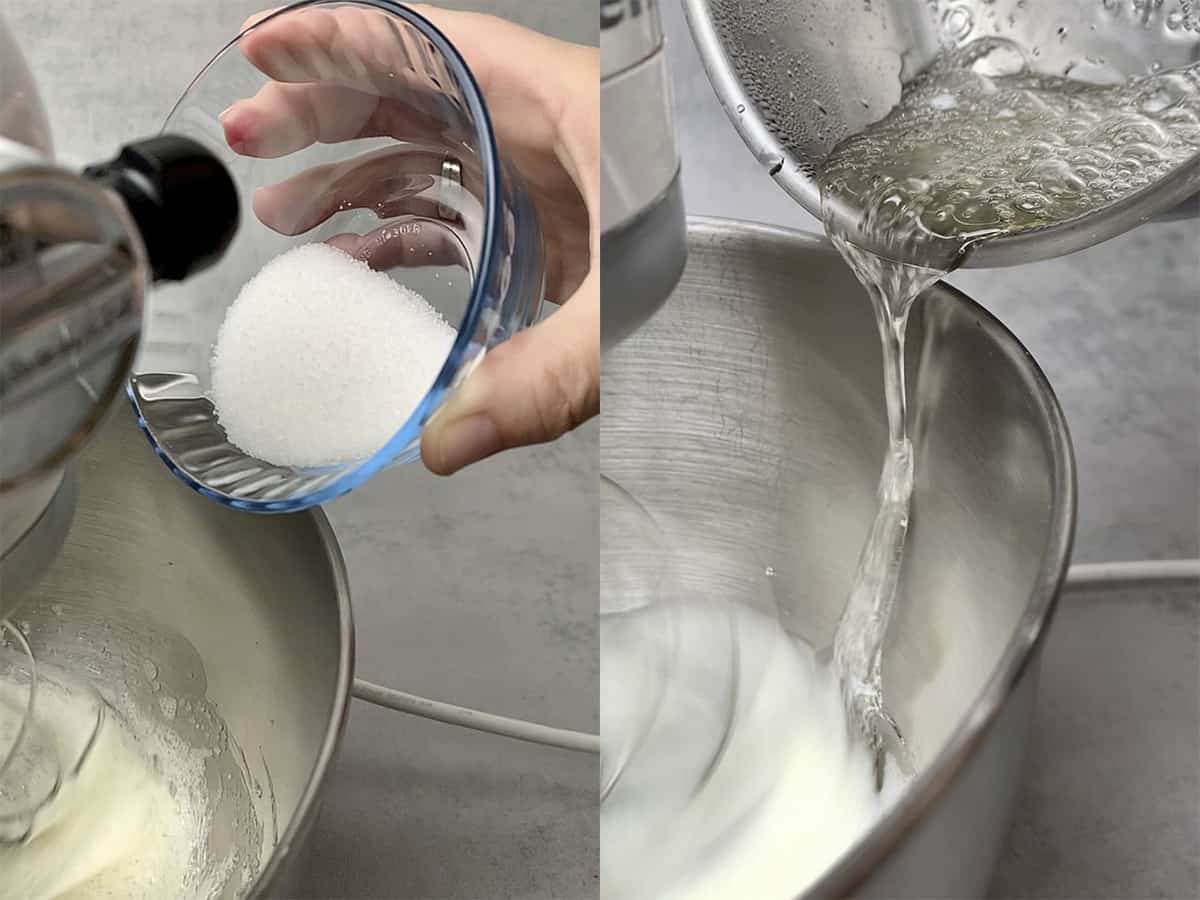
- Prepare and measure the superfine sugar and have it close by the Stand mixer
- Start making the sugar syrup by boiling granulated sugar with water in a small enough saucepan over medium heat. Please note that you will need a very small saucepan for the syrup otherwise it is very difficult to correctly measure its temp
- Start whisking egg white on low/medium, once foamy start adding the superfine sugar slowly, a small amount at a time
- Boil sugar & water together for a few minutes until reaches 118C-120C / 244-248F. On my stove, this takes about 3 minutes but I have a very powerful induction stove, it can take up to 5-6 minutes on a normal stove. You absolutely have to measure the correct temperature either with an Infrared thermometer gun or any cheap sugar thermometer can work. One tricky part is how to measure the syrup temp so make sure you use a small saucepan that actually can give some height to the syrup, that is easier to measure. If you use a large saucepan, the syrup “will get lost” in the saucepan making it impossible to measure the correct temp. Please note that even a small temp difference can make a huge difference. People often fail to make macarons because of incorrect syrup temp so this is one critical step
- By the time syrup reaches 118C-120C / 244-248F, the egg white & fine sugar mixture should be already reaching a consistency of somewhere between foamy and soft peak. If the egg white is at soft peaks before the syrup reaches the desired temp, turn the mixer down to low speed to keep the egg white moving but do not whip it up to stiff peaks form
- Once the syrup is on the right temp (118C-120C / 244-248), remove it from the heat, and wait 5-10 seconds for the bubbles to calm (be careful!!)
- Increase mixer speed to medium and begin slowly pouring the sugar syrup down the side of your mixing bowl into the meringue until thoroughly combined. Pour it slowly but constantly. This is one of the tricky parts of the process. What you want to make sure of is that you pour the syrup without touching the whisker as that would result in making a whole lot of mess within the mixing bowl including sugar syrup crystallizing into hard sugar shards. Make sure you pour the syrup on the side of your bowl and it will be fine. Please note that a small amount of sugar syrup might stay in your saucepan, do not worry about it
- Increase the mixer speed to medium/high and continue beating the egg white until it develops shiny, sticky, sort of stiff peaks and as you touch the bowl it is more or less cooled. In my experience, you do not need extra hard meringue as some other recipes state. I only beat the meringue for 3-4 minutes, by that time it is already stable and fluffy but check the consistency rather than the time
- While whipping up the meringue, mix the other 55g of egg white with the almond and icing sugar mixture. Use a flexible Rubber spatula. First, it might look crumbly but it should come together in a minute or two into a thick almond paste. This step can be done ahead if you wish however you have to cover it with a plastic wrap as it can get dry in a few minutes
- In the meantime keep an eye on the meringue and check its consistency every now and then
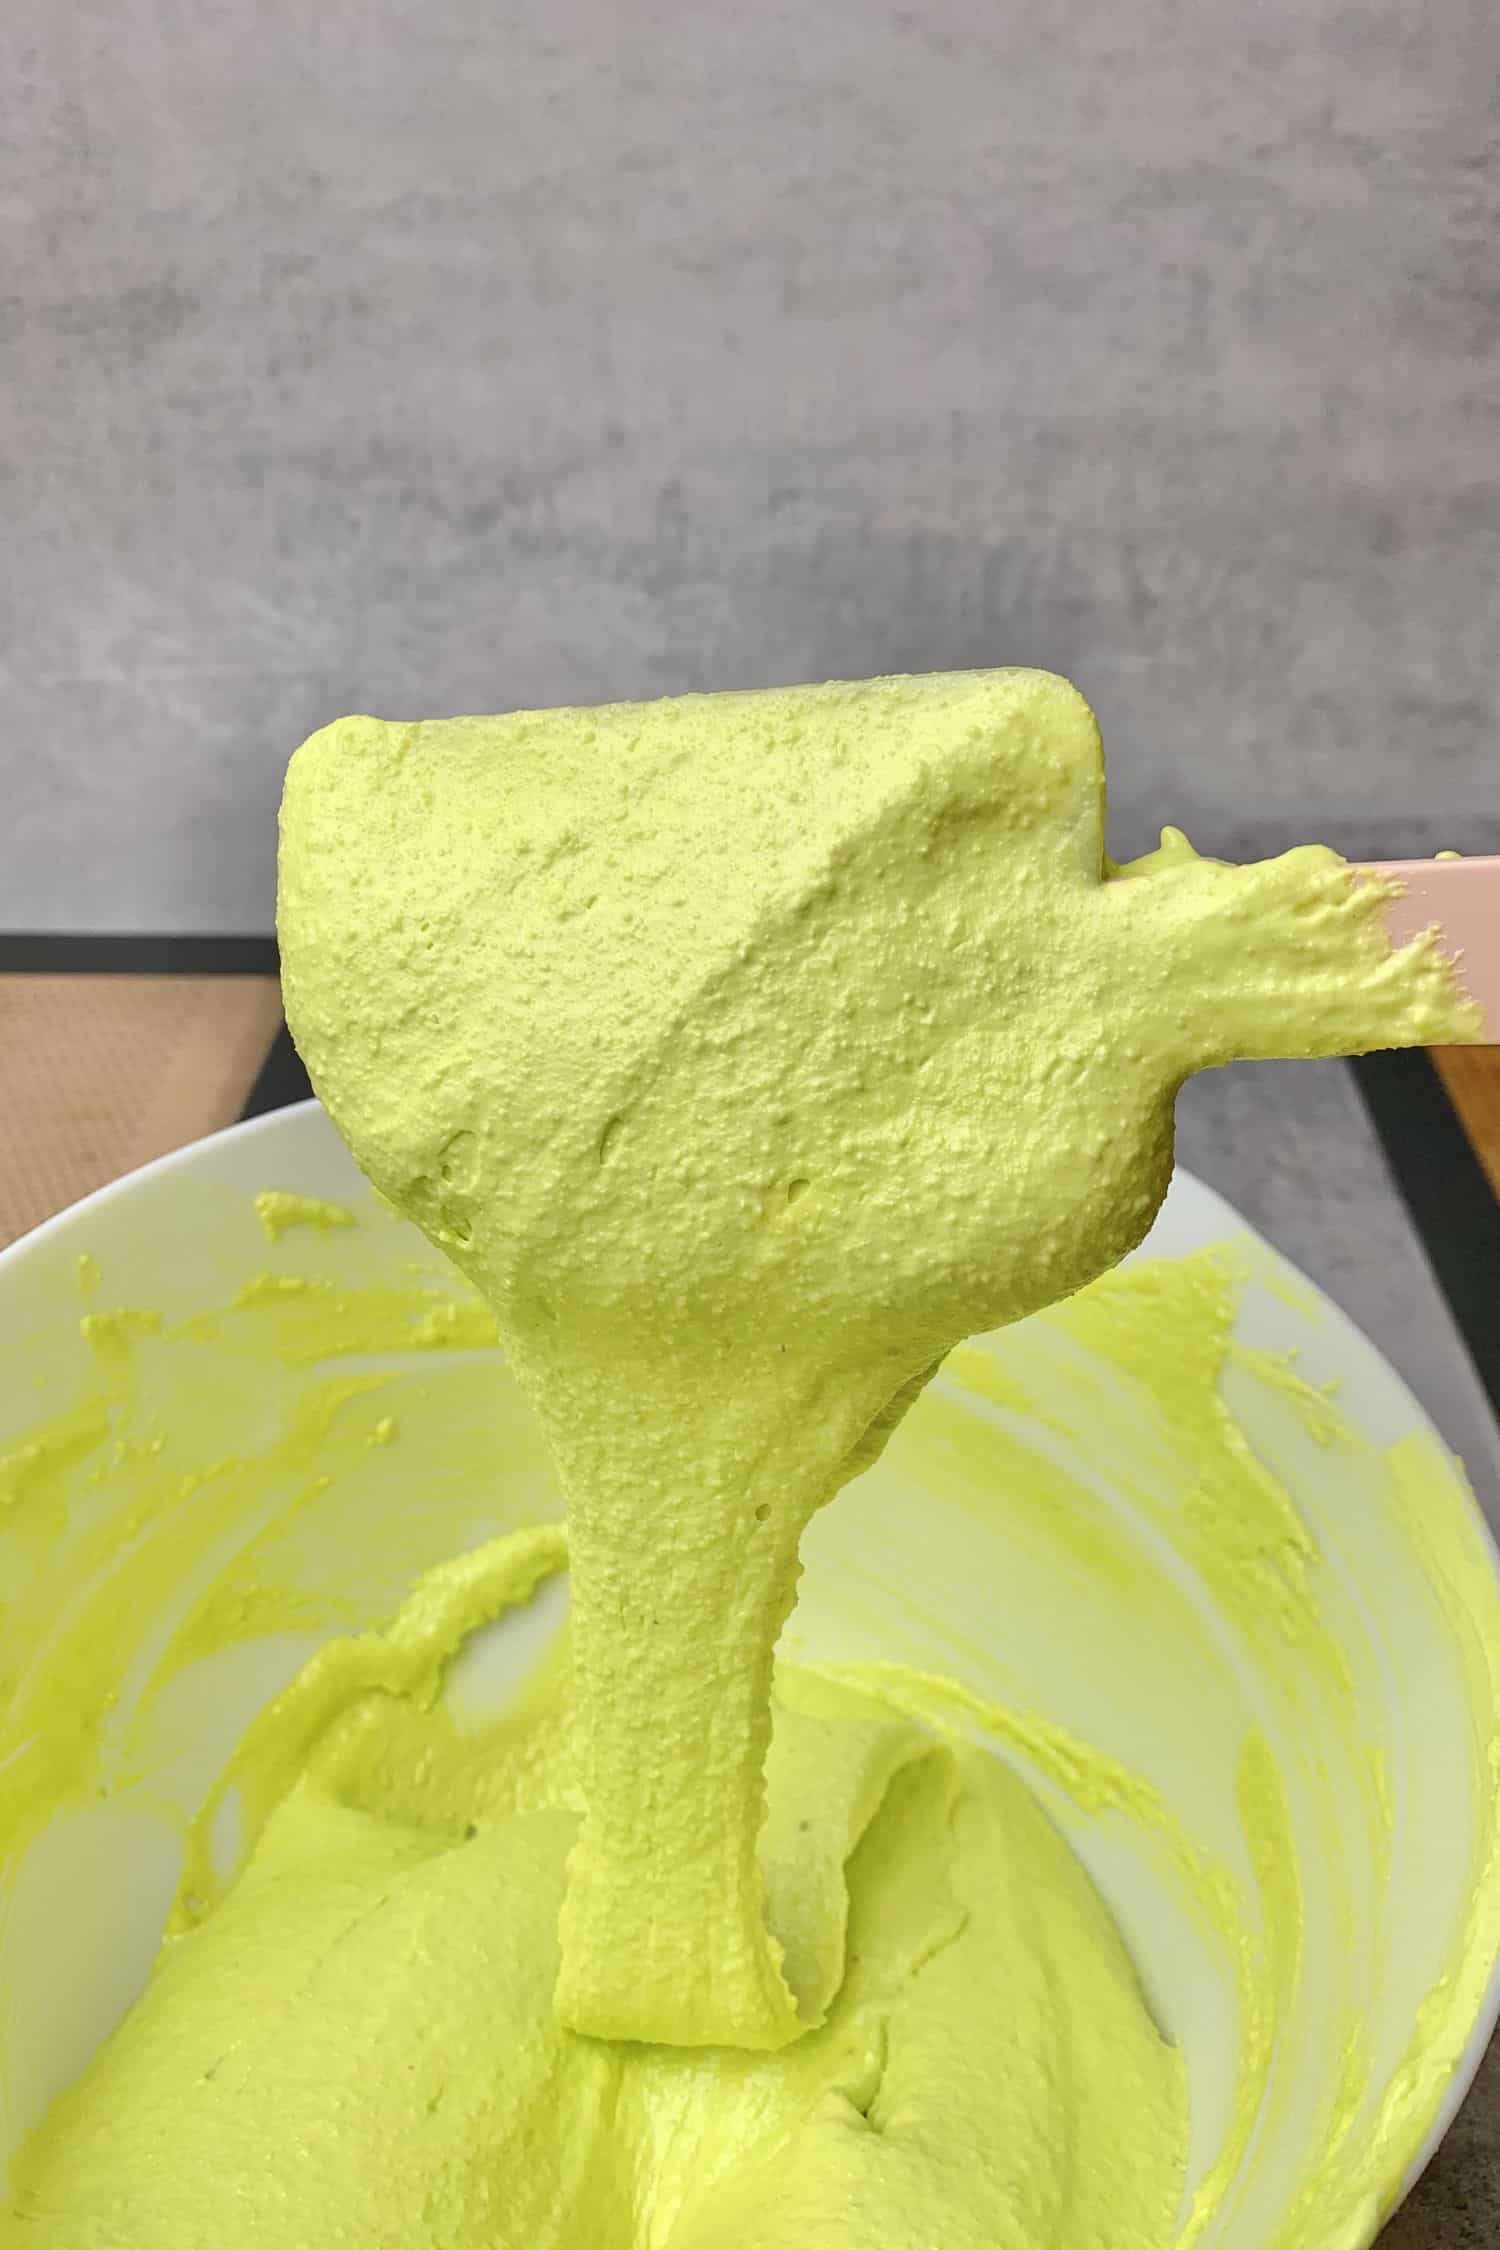
- Once you have your stable meringue ready as well as the marzipan paste, let´s move on to the macaronage stage of this macaron recipe
- Gently fold in meringue into the marzipan mixture in thirds, making sure that each third is fully incorporated before adding the next
- In terms of the folding process, it is quite a particular one: The first third is about loosening up the marzipan, the second third already working on the macaronage process and somewhat pressing the air out and the last third is fine-tuning the consistency to the stage that you need – that is not too runny, not too thick, but the ribbon stage
- After adding the last third of the meringue make sure you check the consistency of the macaron batter every few seconds. How to check when the macaron batter is ready? When you lift the spatula over the mixture the batter should fall slowly forming a ribbon. Try to write the number 8 with the ribbon, once the consistency allows you to write the number 8, it is very likely that your macaron batter is ready
- It is extremely important that you do not over-mix your macaron mixture. Too much folding would result in too runny macaron batter that makes it impossible to pipe or even if you can pipe, it would spread too much.
- On the other hand, not enough folding would result in too thick macaron batter which again makes piping difficult, leaving unappealing nipples on the macaron shells. It can also result in an unpleasant texture and unappealing look of the baked macarons
It might sound difficult and a long process but in practice this whole process I explain in 22 steps done in less than 15 minutes!
💡 Top Tip: So overall there are 3 crucial steps you need to get right during making macarons: 1. sugar syrup on the correct temp (118C-120C / 244-248F) 2. strong meringue that is stiff enough but not over-whipped and 3. appropriate macaronage = folding technique that will make the batter into a so called ribbon consistency
2. How to pipe macarons
Once you have your macaron batter ready in the right consistency (ribbon stage) the next task is piping.
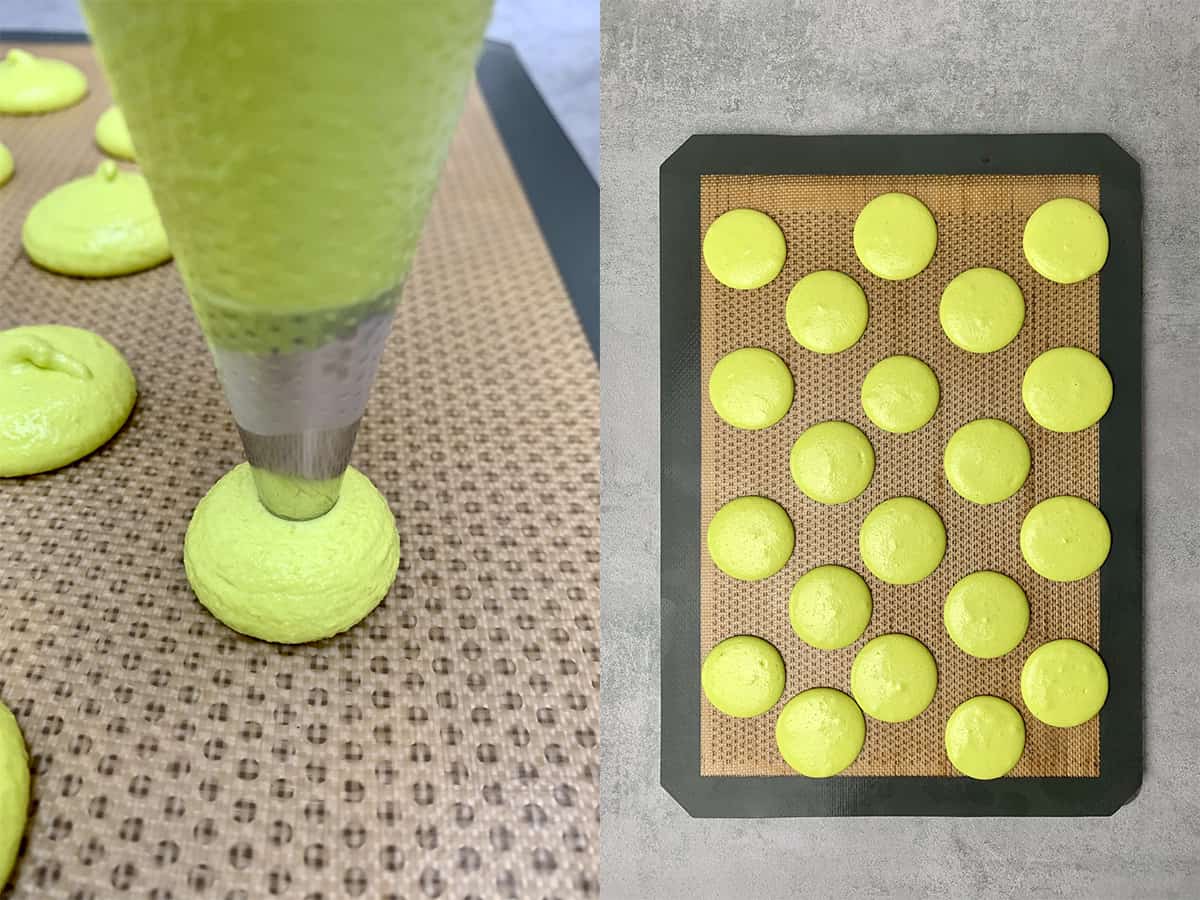
You will need a Piping bag with a round nozzle tip eg. Wilton 2A Round nozzle tip or alternatively you can cut the end of the piping bag but make sure you cut it straight otherwise the macarons might not turn out round. On this note, piping equal-sized, round macarons takes a lot of practice, don´t be hard on yourself if you are doing it the first time!
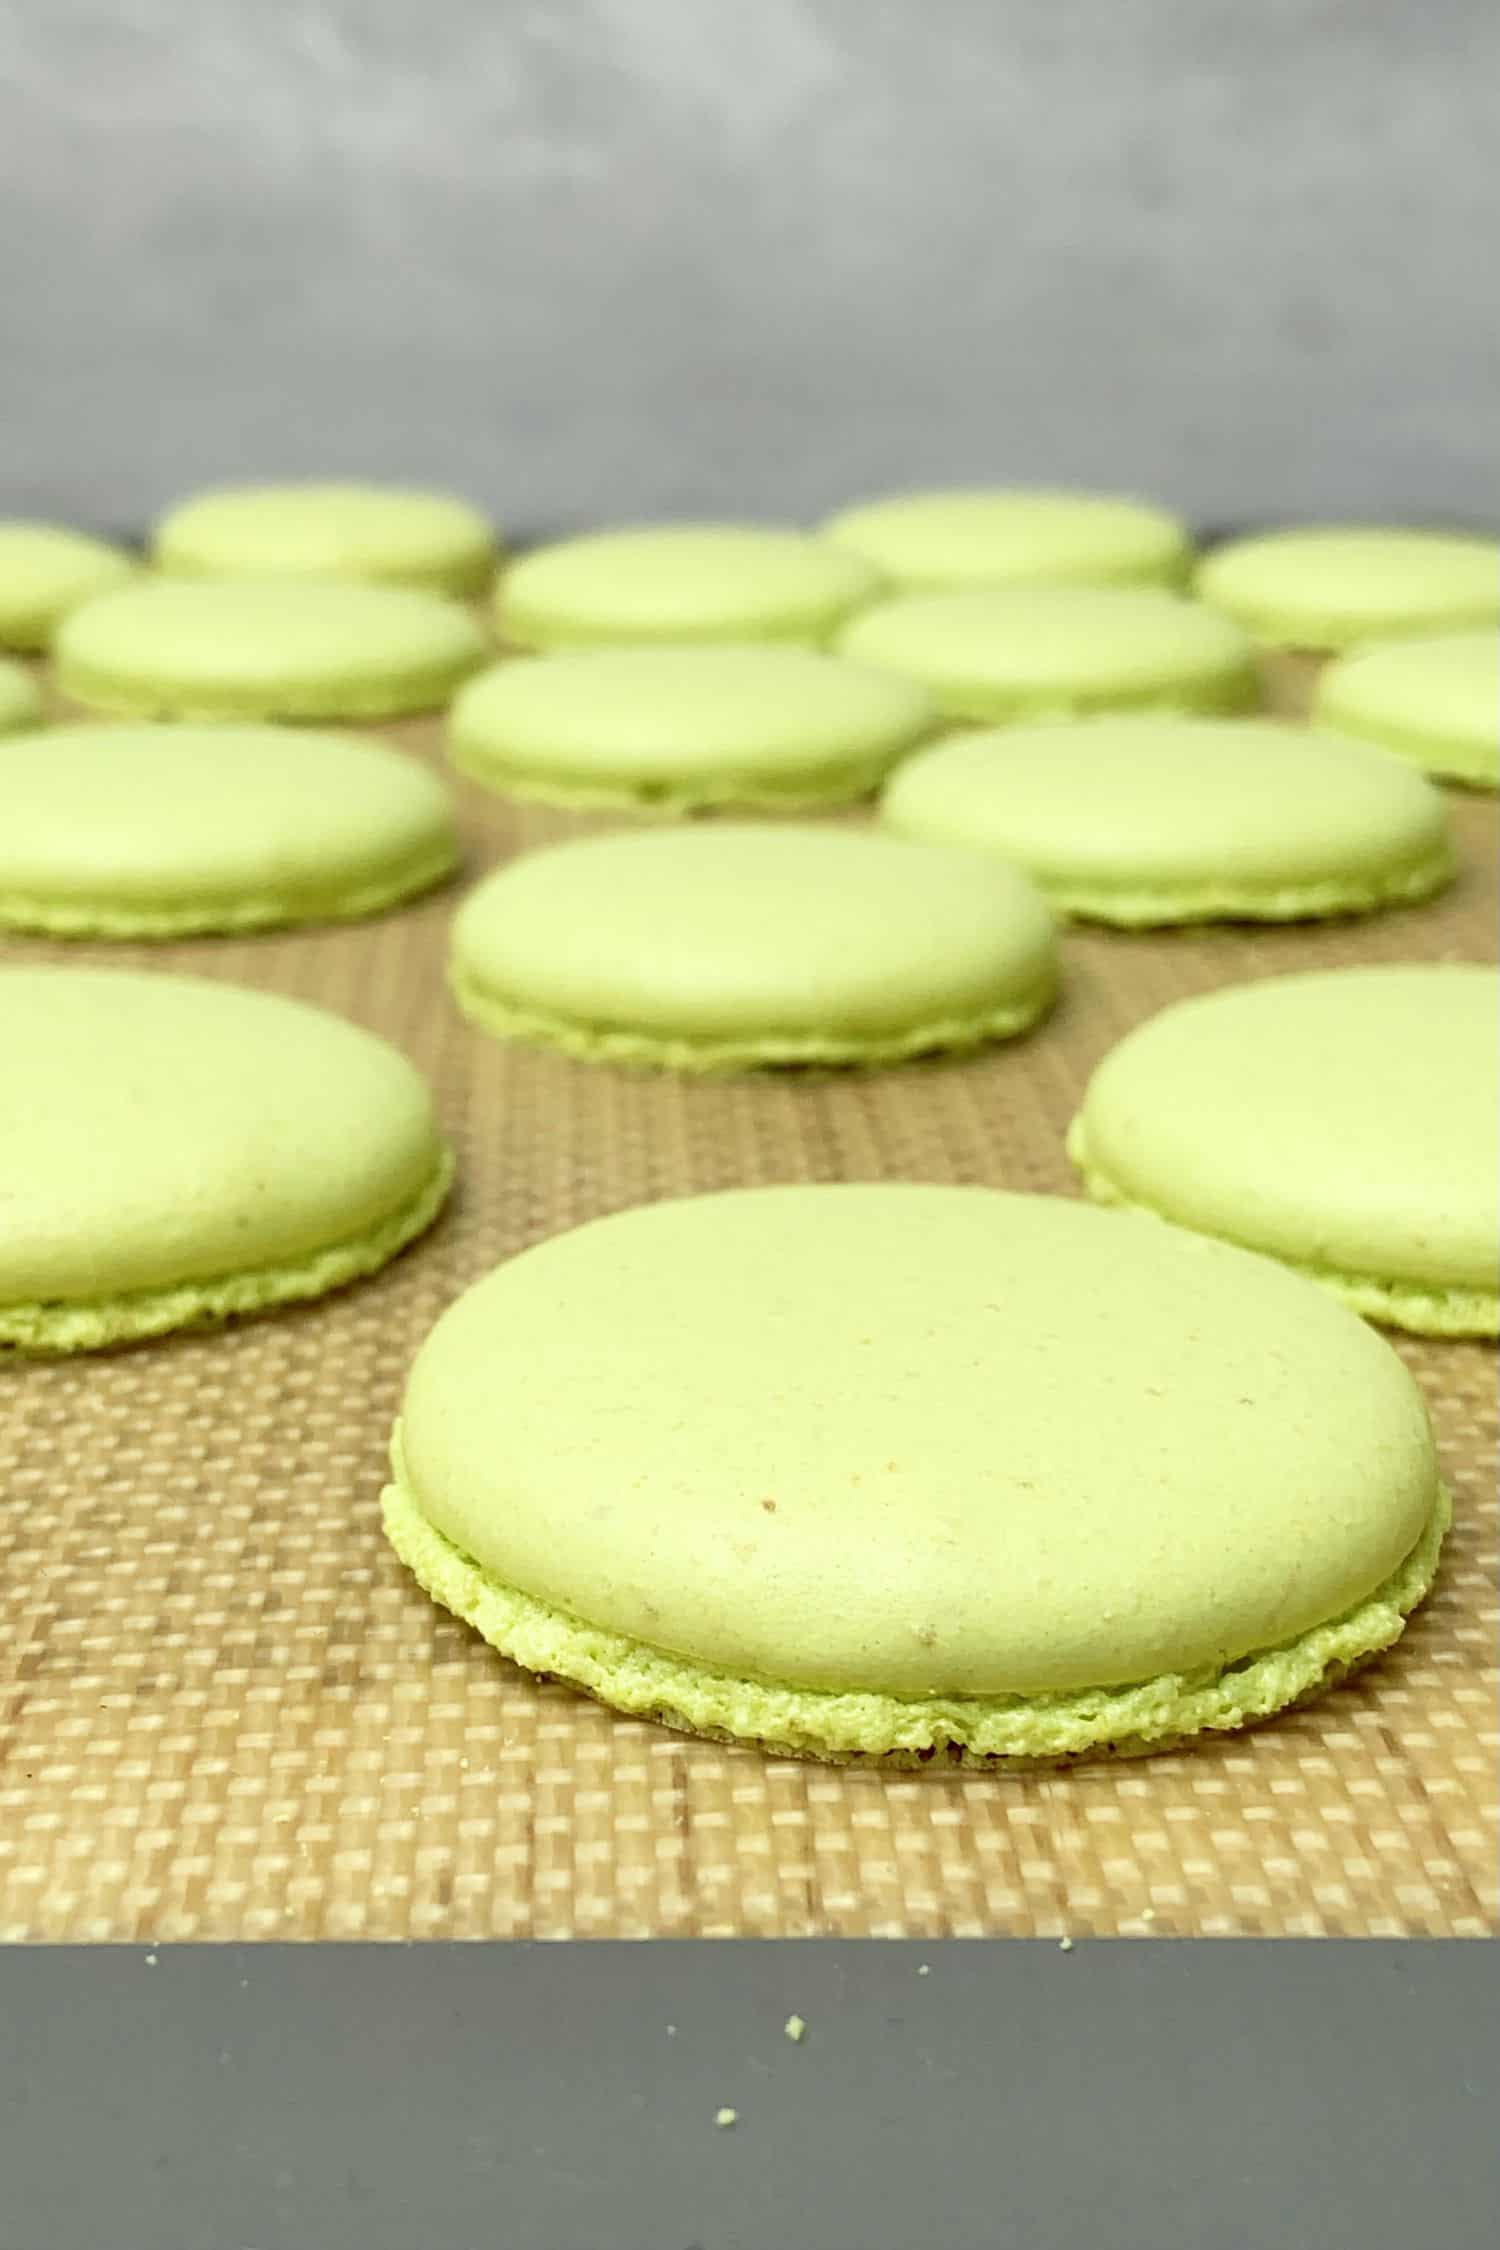
Ideally, the size of the macaron diatemer should be around 3-4 cm (1,5inch) but don´t stress about that too much. Try to pipe more or less equal-sized macarons so you can sandwich them together later when they are baked.
You will also need 2 Silicone baking mat or 2 trays with parchment paper. My personal preference is Silicone baking mat over parchment because it is more sturdy, less floppy and with parchment, there is always the risk of getting slight wrinkles on the paper which is not the best when you want flat macarons.
OK, now onto piping these Earl Grey macarons!
- Move the Earl Grey macaron batter into the piping bag in a careful manner, minimalizing any air bubbles. Fill the piping bag maximum half then try to remove any air bubbles before piping – by pressing onto the piping bag with your hands
- Hold the piping bag fully vertical and pipe with even pressure. Leave some space in between the macarons making sure they don´t touch each other, also the air can circulate in between them while baking
- As you pipe, the macarons should spread a little but not too much – if the macaron butter is in the right consistency. In case the macarons are spreading too much or the batter is too runny, try making another batch and fold it less
- If you are experiencing tiny nipples on top of the macarons after piping, you can get rid of them by tapping the tray onto the kitchen counter a few times (once you piped a whole tray). If that does not help, it means you need a few more folds on the macaron batter next time
- Whether there are nipples or not, tap the tray onto the kitchen counter about 5-6x to release air bubbles. Pop any air bubbles that might’ve come to the surface using a toothpick. Make sure that you do not destroy the macarons while doing the tapping process or they might end up lopsided
- Now onto waiting. You need to rest the macarons until a proper skin has formed on the outside of the shell. There are some other macaron recipes out there with different ratios and sugar syrup temp that require longer or no resting time at all. This particular Earl Grey macaron recipe requires a resting time of 25-40 minutes depending on temperature and humidity. Test by gently touching the macarons. I found sometimes they feel “dry” already after 10 minutes but when I baked them they still cracked so make sure they are super dry as you touch and there is a real thick skin on the surface.
💡 Top Tip: Not resting your macaron long enough is the most common reason for cracks on the surface while baking so it is probably a good idea to wait at least 25 minutes. On the other hand, do not rest them for too long (hours) neither as that can cause different issues.
💡 Top Tip:
3. How to bake the macarons
Make sure you invest in an inexpensive Digital oven thermometer. Most home ovens are under or oven heat and with macarons, that can make or break the outcome!
The bad news is that there is no such thing as one oven temp that fits all! The good news is that once you make your first 1-2 batches of this macaron recipe, you will see whether you need to increase or decrease the oven temp. I do not recommend using a fan, unless you have a professional oven. In home ovens, the air can circulates all over the place which can cause a lot of issues with the meringue.
So how to bake macarons?
- Bake only after appropriate resting time, there should be a proper skin formed on the surface of the macaron
- It is a good idea to properly pre-heat your oven while resting your macarons for 15-25 minutes
- I recommend baking the macarons at 155 C / 311 F but I pre-heat my oven +20C / 68F more as when I open the oven door, the temp drops
- I suggest baking only one tray at once then after 15 minutes bake the other tray
- I bake the macarons in the bottom third of my oven so they definitely do not get browned on the top, you know your oven the best, experiment
- I bake the macarons for 14-15 minutes but you have to test them in your own oven. They should not get browned in this temp but there should be a feet development already at around 5 minutes
- Once macarons are done, remove them from the oven and cool them on a cooling rack but leaving them on the parchment or silicone mat for 30 minutes. Please remember, they will stick to the mat while they are hot, they are not supposed to come off until they cool!
💡 Top Tip: If you have more than 2 trays of macaron shells I suggest placing the macaron batter into a piping bag and piping it later otherwise they might dry out too much
4. How to make pistachio filling for macarons
Making the pistachio ganache filling for the macarons is extremely easy and quick! It also tastes amazing…and you will need only 3 ingredients!
- Place 100% pistachio paste into the bowl with high-quality white chocolate (eg. Callebaut WhiteChocolate (callets)
- Semi-melt white chocolate & pistachio paste in the microwave stirring every 30 sec, make sure you do not burn it. No need to fully melt the mixture
- Heat cream until just simmering. If it’s boiling, the cream is too hot and could burn the chocolate. If the cream is not warm enough, it won´t melt the chocolate properly and won’t emulsify
- Pour warm cream over the chocolate & pistachio paste
- Let the mixture sit for a minute then stir together or use a blender to emulsify
- Place ganache into a shallow container, cover the surface with plastic wrap, and refrigerate for min 6 hours or overnight. The ganache will be set into a pipeable consistency that is appropriate to fill your Pistachio macarons
💡 Top Tip: The color of the pistachio ganache is highly dependent on the quality of the white chocolate and the pistachio paste, in can go anywhere from bright green to almost brownish
5. How to fill the macarons
Finally, you nailed this Pistachio recipe, your pistachio ganache has set, and it is time to fill your macarons!
For filling the macarons you will need Piping bag with Wilton 2A Round nozzle tip.
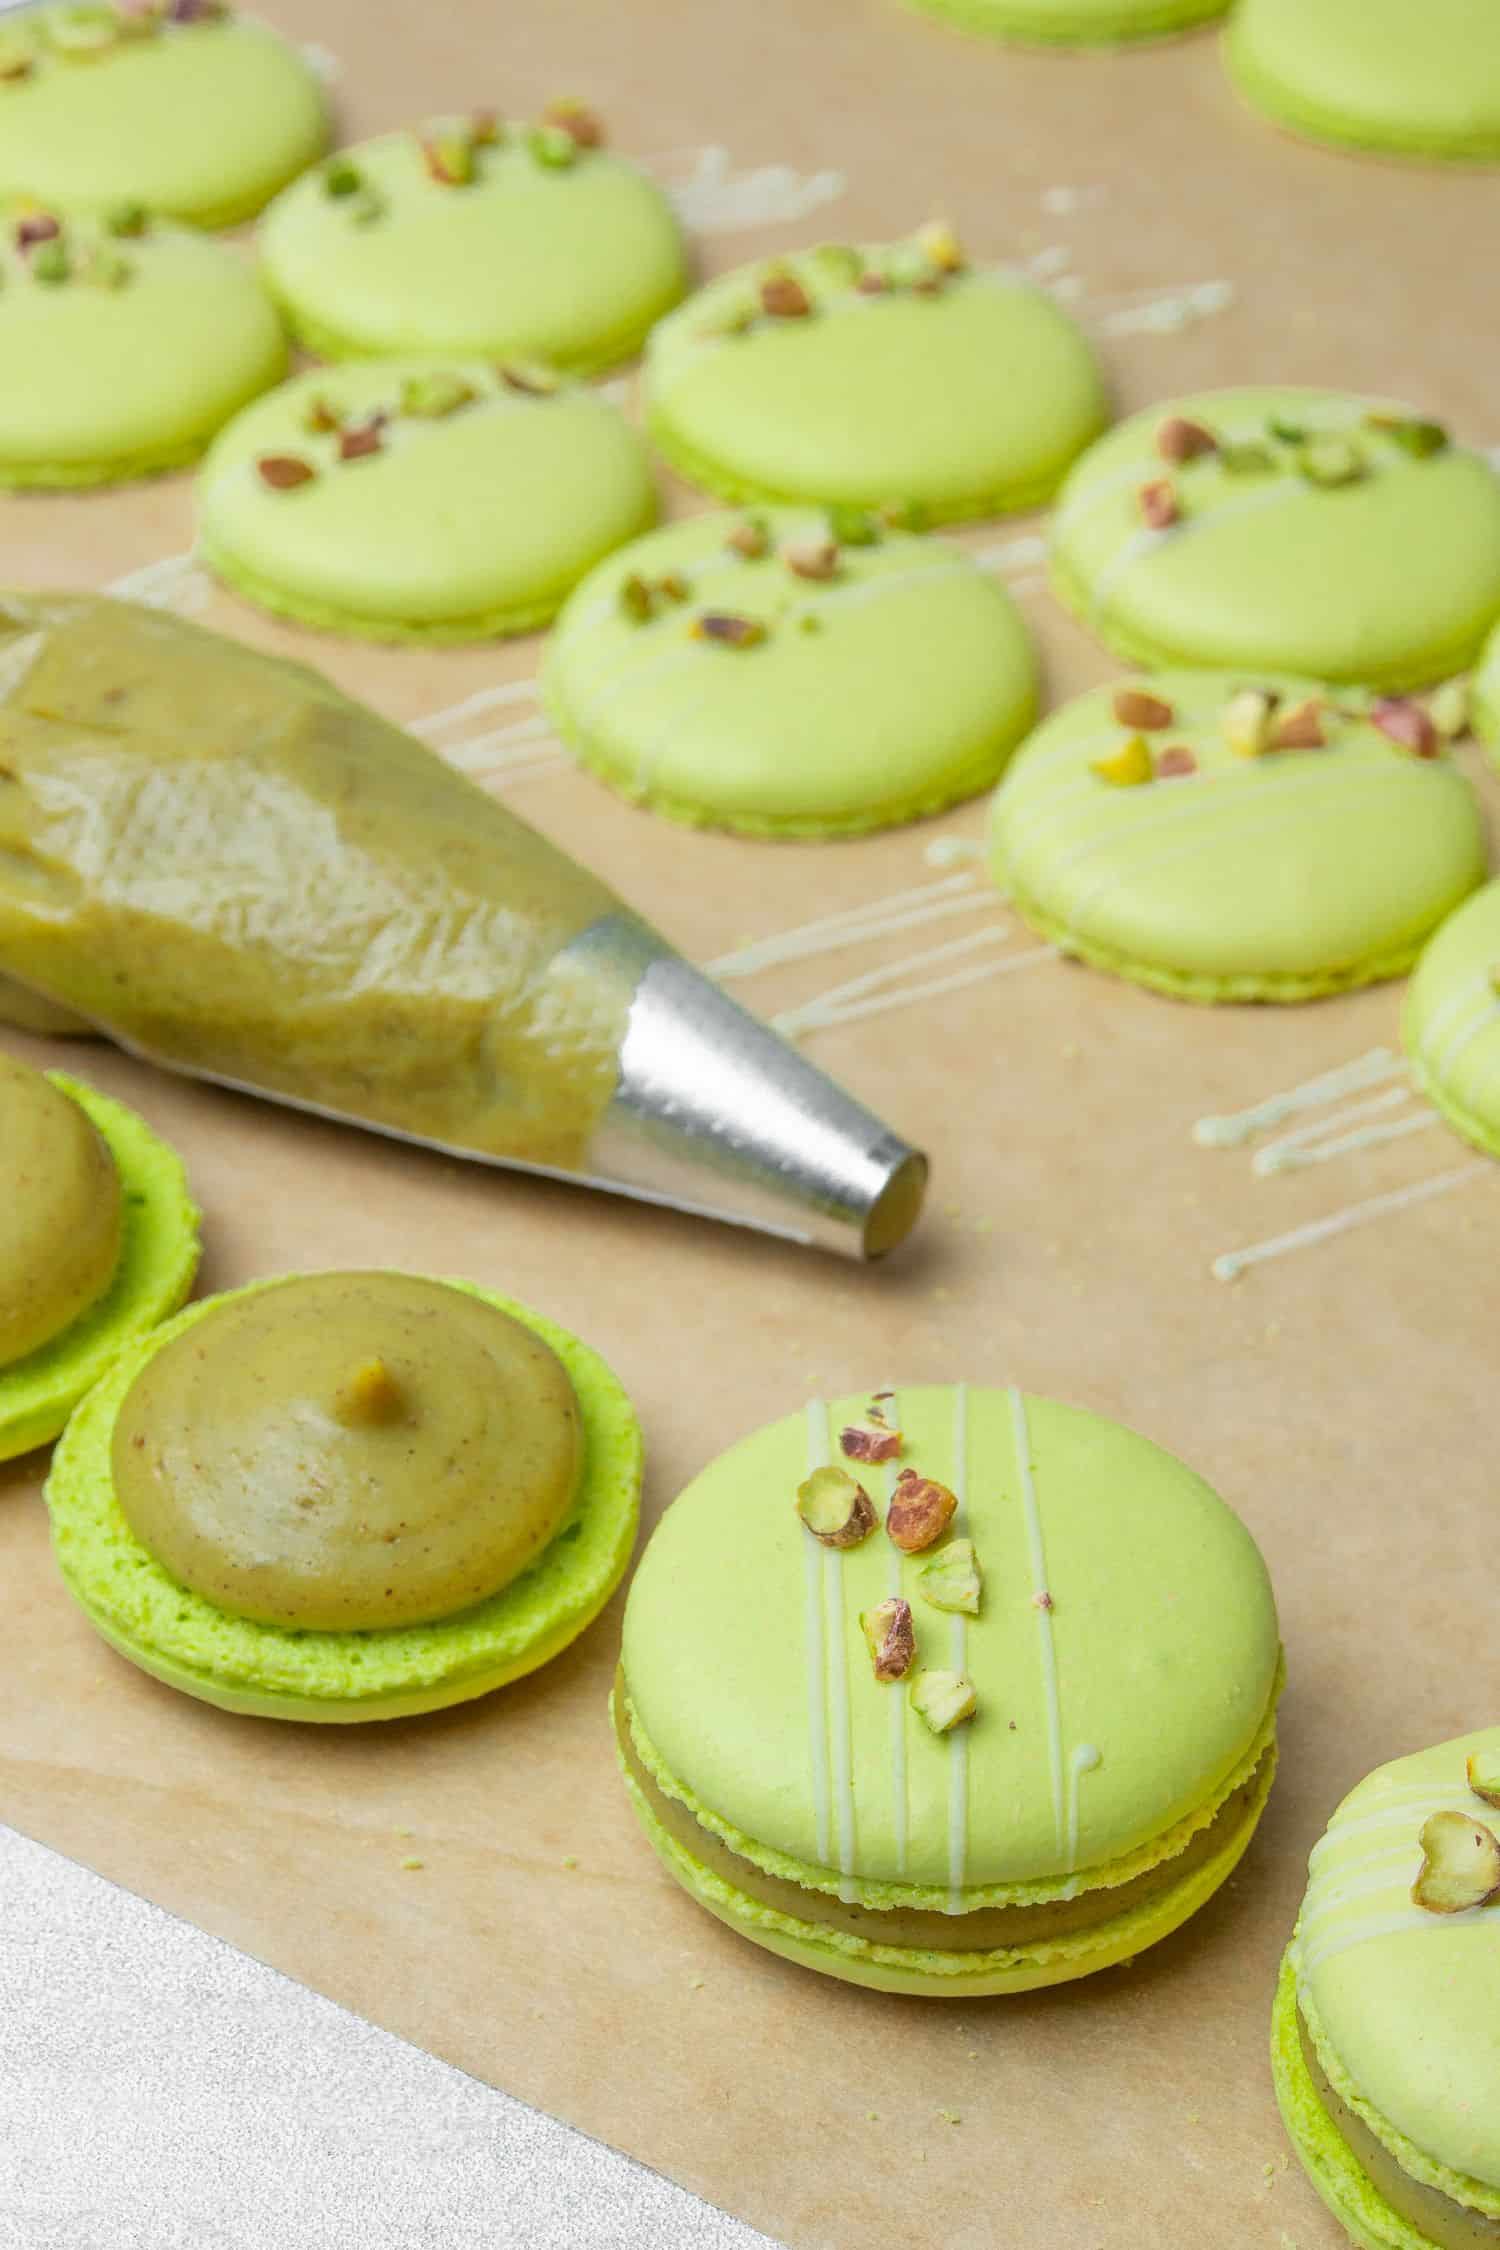
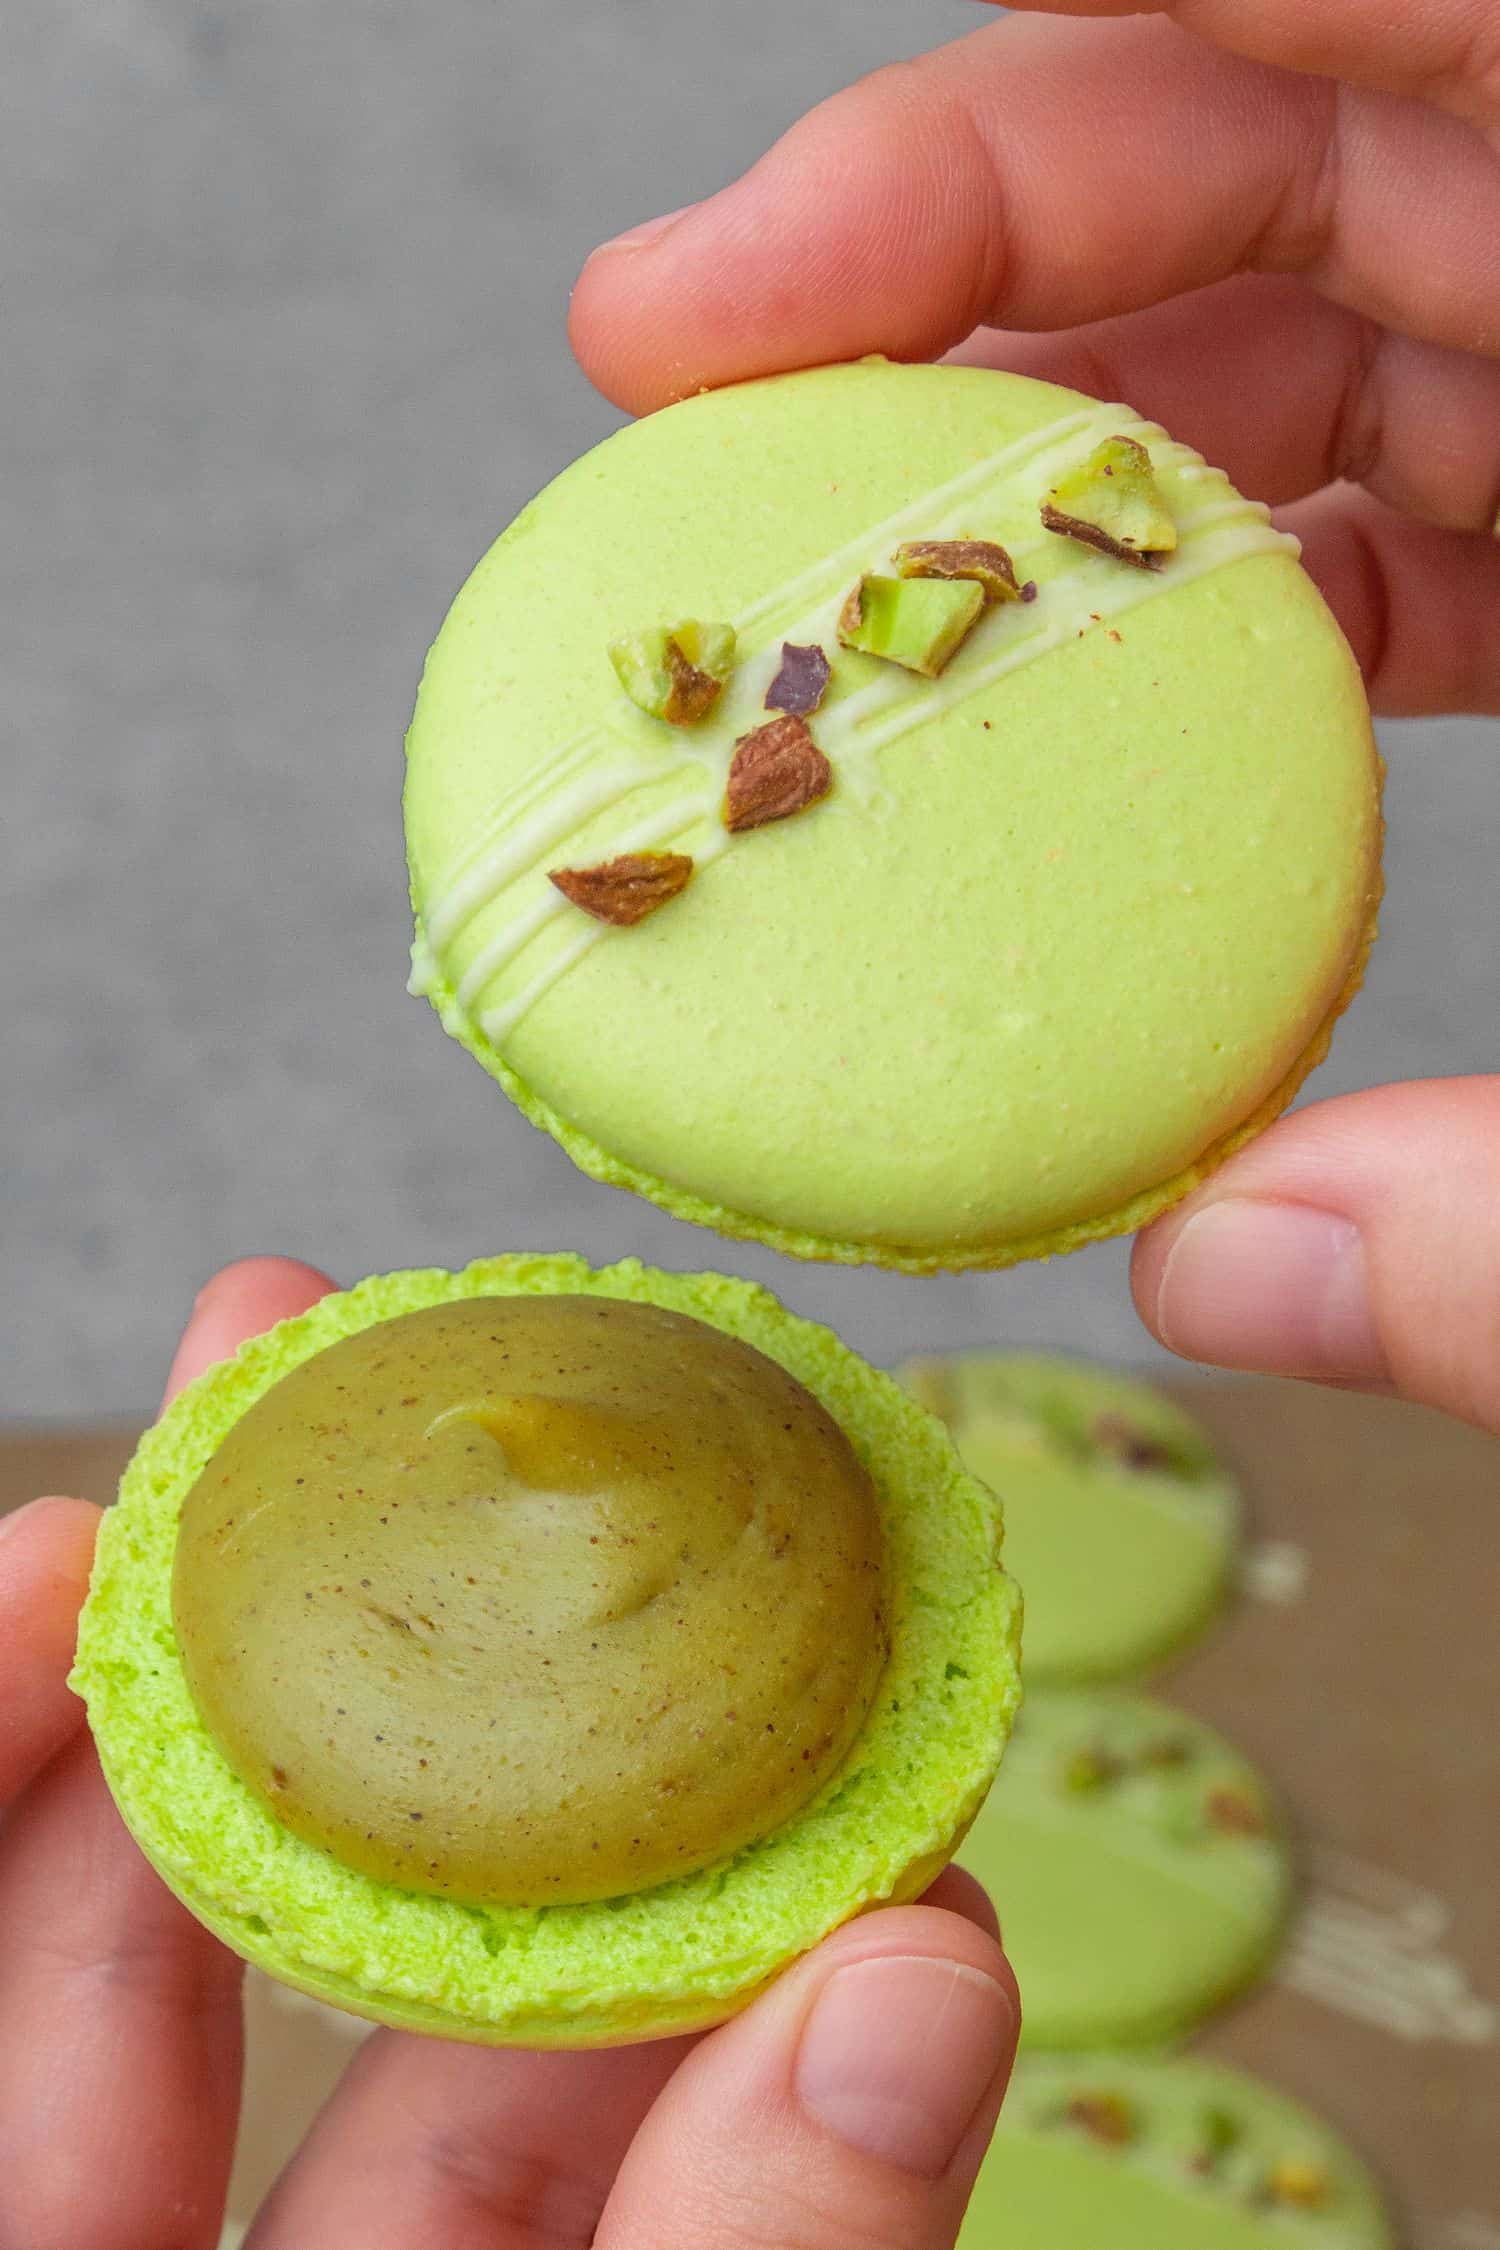
Filling macarons takes again some practice. The general rule is to pipe the filling onto one side of the macaron shell then press two shells together evenly so the filling will come out to the side but not more. How much filling do you need per macaron? It is impossible to give an exact amount here, you will see after filling one or two macarons whether you need more or less.
As a decoration, melt a small amount of white chocolate and make some stripes on top of the macaron shells using a piping bag, then place some crushed pistachios on top.
What happens after filling the macarons? The good news is that you are done with making macarons! The bad news is that you have to wait. Your Pistachio macarons require about 12h aging time in the fridge, within this time frame the lemon curd filling will soften the shells. They can be eaten of course straight away but the texture will be rather hard, nothing like the beloved soft and chewy macaron texture.
6. How to store
Macarons are normally stored in the fridge in an air-tight container and their shelf life is rather a delicate matter.
Once these Earl Grey macarons are filled with the lemon curd, they need about 12h in the fridge for the shells to soften however over time they will further soften and can become mushy. My recommendation is to make these Earl Grey macarons a day ahead so if you want to serve them on a Saturday afternoon tea, assemble them on Friday and they will have the perfect texture for Saturday.
Macarons can be also frozen, I don´t tend to do it but if you are making them in large batches, it might be a good idea.
🌟 More Macaron recipes

Have you tried this recipe?
Please leave a 5-star ⭐️⭐️⭐️⭐️⭐️ rating on the recipe card and consider leaving a comment as well! I would love to hear about how your dessert turned out and your feedback also helps other Readers!
Pistachio Macarons with Pistachio Ganache filling
Equipment
- Small enough saucepan to measure sugar syrup correctly
Ingredients
Macaron shells
Almond paste
- 150 g Almond flour finely grounded
- 150 g Powdered sugar
- 55 g Egg whites room temp
Sugar syrup
- 120 g Granulated sugar
- 50 g Water
Meringue
- 55 g Egg white room temp
- 30 g Superfine sugar
Pistachio filling
- 300 g Callebaut WhiteChocolate (callets)
- 100 g Pistachio paste 100% paste, homemade or store bought
- 100 g Heavy Cream 36% fat
- good pinch of salt
Decoration
- Melted white chocolate
- Pistachios
US customary cup measurement is an indicative figure only. Measure the ingredients with a digital scale by weight (gram). Baking is art but also science which requires precision and accuracy.
Instructions
Make the pistachio ganache filling
- Place finely chopped high-quality white chocolate (eg. Callebaut white chocolate) and 100% pistachio paste into a bowl
- Semi-melt white chocolate & pistachio paste in the microwave stirring every 30 seconds
- Heat cream until just simmering. Pour warm cream over the chocolate & pistachio paste. Add a good pinch of salt. Let the mixture sit for a minute then stir together or use a blender to emulsify.
- Place ganache into a shallow container, cover the surface with plastic wrap and refrigerate for min 6 hours or overnight. The ganache will set into a pipeable consistency that is appropiate to fill your Pistachio macarons
Macaron shells
- Measure all your ingredients with a Digital scale and prepare all the tools you need at hand. Properly clean your mixing bowl and whisk attachment by wiping them down with vinegar. Pulse blend icing sugar with almond flour for 5-10 seconds then shift them together. The mixture should be very fine powder like
- Move one of the 55g egg white into your Stand mixer
- Start making the sugar syrup by boiling granulated sugar with water in a saucepan over medium heat
- Star whisking the egg white on low / medium speed, then gradually add the superfine sugar into it
- Boil the sugar syrup until it reaches 118C-120C / 244-248F. Use a Infrared thermometer gun or any other thermometer to measure the correct temp
- By the time syrup reaches 118C-120C / 244-248F, the egg white & fine sugar mixture should be already reaching a consistency of somewhere between foamy and soft peak
- Once syrup at the right temp, remove it from the heat. Keep the Stand mixer speed on medium and begin slowly pouring the syrup down on the side of the mixing bowl making sure that the syrup flows on the side only and does not get onto the whisk
- Increase Stand mixer speed to medium / high and continue whisking the meringue until it forms early stiff peaks meaning it is strong enough to hold its shape but not over whipped
- In the meantime, mix the remaining 55g of egg white into the almond flour mixture (almond meal & powdered sugar) until it forms a paste, use a flexible Rubber spatula.
- When meringue is almost done, mix in food coloring (powder or gel) and continue beating for a few more seconds
- Once meringue as well as almond paste is ready, gently fold the meringue into the marzipan paste with the help of a Rubber spatula. Fold meringue in thirds, making sure that each third is fully incorporated before adding the next
- The first third is about loosening up the marzipan, the second third already working on the macaronage process and somewhat pressing the air out and the last third is fine tuning the consistency to the stage you need that is ribbon stage
- After adding the last third of the meringue make sure you check the consistency of the macaron batter every few seconds. When you lift the Rubber spatula over the mixture the batter should fall slowly forming
- Move macaron batter into a Piping bag fitted with round nozzle tip and while holding the piping bag fully vertical pipe equal sized round shapes, leaving enough space in between them to slightly spread. You can pipe on Silicone baking mat or parchment paper
- Tap the baking tray onto the kitchen counter a few times to release any air bubbles. You can also pop air bubbles out using a toothpick
- Rest the macarons at room temp for about 25-40 minutes depending on temperature and humidy. Test by gently touching the macarons, it should feel dry on the touch and proper skin should form on the surface of them
- Pre-heat the oven while the macarons are drying. I recommend baking the macarons at 155C / 311F (no fan) but pre-heat the oven 20C / 68F more as when you open the oven door, the temp drops. Make sure you use a Digital oven thermometer to check your real oven temp
- Bake the macarons for 14-15 minutes, adjust if necessary to your oven (use my Troubleshooting guide)
- Once macarons are done, remove them from the oven and leave them on the parchment or Silicone baking mat for 30 minutes. They are not supposed to come off the baking mat until they are properly cooled
- Once macaron shells are cooled, remove them from the baking sheet. In case they ended up slightly different in their sizes, pair the similar sizes next to each other
Filling & Decorating
- Pipe pistachio ganache filling onto one side of the macaron shells then press two shells together evenly so the filling will come out to the side
- Decorate with melted white chocolate and chopped pistachios
- Macarons require about 12h aging time in the fridge, within this time frame the filling will soften the shells.
- Store the macarons in fridge
Jan
I’ve been searching for a good macaron recipe for a while and so happy that I found your blog! This is the most delicious macaron that I’ve ever tried, especially the pistachio ganache filling is out of this world delicious!! Thanks a lot
Rita
I would like to know if you used any food coloring for the shells because it’s not mentioned in the ingredients
Thanks in advanced 🥰👍🏼
admin
I mention food coloring in the "important notes about the ingredients" section giving advice on what to use / not use:) Let me know how your macarons will turn out!
Noelle
Hi, can you store the filling for multiple days before using? Mostly due to time concern for the making of the macarons 🙂
Kata
You can store the ganache in the fridge for multiple days, no issue:)
Sadaf Rehman
Love it👍🏼
Ingrid
Need to try and do it!