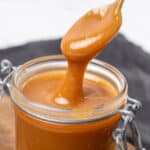
Homemade Caramel Filling for Cupcakes and Cakes
This is hands down the best homemade caramel filling for cupcakes, cakes, tartlets, brownies, pies, or any other desserts. It is sticky, buttery, silky without turning hard, and well-balanced in sweetness.
Servings: 6
Calories: 440kcal
Equipment
- Infrared thermometer gun optional
Ingredients
- 200 g Granulated sugar
- 160 g Glucose syrup
- 55 g Unsalted butter room temperature (soft)
- 230 g Heavy Cream
Instructions
- First and foremost, be careful throughout the process not to burn yourself!
- Melt the sugar and glucose syrup in a large saucepan over medium-high heat, in the meantime, heat the cream just until it is simmering.
- Once the sugar starts to turn golden brown in color, turn the stove down to medium heat.
- When the caramel reaches the right temperature (160-180C / 320-356F) or color (golden brown/amber), immediately pour over the hot cream and keep whisking with a hand whisk or rubber spatula. Cook the caramel for a further 1-2 minutes.
- Remove caramel from the stove and pour it into a large enough bowl so it can cool as quickly as possible.
- When the caramel has cooled to about 40C / 104F, mix in the butter in 3 stages whilst stirring vigorously between each addition.
- Store the caramel in an airtight container in the fridge for about a week. Please note that the caramel texture will become more solid in the fridge, but it won´t get rock-hard like most other caramel recipes. To use it as a filling, let it come back to room temperature first.
Video
Notes
Weigh all of the ingredients with a digital scale for precision.
Ensure that the butter is softened before adding it to the homemade caramel. I find this normally takes around an hour out of the fridge.
You can add 1-2 teaspoons of sea salt to the recipe to make salted caramel.
Nutrition
Calories: 440kcal | Carbohydrates: 63g | Protein: 1g | Fat: 21g | Saturated Fat: 14g | Polyunsaturated Fat: 1g | Monounsaturated Fat: 5g | Trans Fat: 0.3g | Cholesterol: 63mg | Sodium: 47mg | Potassium: 39mg | Sugar: 46g | Vitamin A: 793IU | Vitamin C: 0.2mg | Calcium: 28mg | Iron: 0.1mg
